Security is one of the top concerns for every WordPress site owner. With the growing number of brute-force attacks, comment spam, and unauthorized login attempts, leaving your website unprotected could be an open invitation to hackers. That is where the WP fail2ban plugin comes in, which is a powerful security plugin.
It detects and blocks malicious activity by logging login attempts and filtering them through fail2ban’s banning mechanism. And the most interesting thing is, combining this plugin with xCloud’s comprehensive security measures gives you an even stronger defense layer.
So, if you want to tighten up your WordPress security, read this guide to learn how to protect WordPress sites with fail2ban in xCloud. Let us get started.
Understanding WP Fail2Ban Plugin And How It Works
WP Fail2Ban is a WordPress plugin that logs all login attempts, both successful and failed, using the system’s syslog. This allows for powerful firewall-level banning of IPs showing suspicious behavior. Once this plugin is installed and enabled, it automatically protects your website by banning IPs that attempt too many incorrect logins or exhibit other abusive behavior. Some of the key protection WP fail2ban plugin provides are:
- Real-Time IP Banning: Instantly blocks IP addresses that attempt brute-force attacks on your login page.
- User Enumeration Protection: Prevents attackers from discovering valid usernames, a common precursor to hacking attempts.
- Spam Blocking for Comments: Filters out comment spam using behavioral and signature-based detection.
- Password Reset Monitoring: Blocks repeated or suspicious reset attempts to prevent unauthorized account access.
- Pingback Protection: Blocks malicious or fake pingbacks, often used in DDoS attacks.
Advantages to Protect WordPress Sites with Fail2ban
WP Fail2Ban for WordPress operates on a deeper level. This security plugin works by connecting WordPress login behavior to server-level security protocols. If you are managing a single blog or multiple client sites, this integration allows you to enforce a smart, proactive security structure that keeps attackers out and your server load down. Let us discuss some powerful features you unlock when using Fail2Ban with a WordPress site:
🔐 IP Banning Based on Failed Login Attempts
At the heart of Fail2Ban for WordPress is its ability to detect repeated failed login attempts and instantly ban the offending IP address. Rather than just limiting login attempts through cookies or JavaScript (which bots often bypass), Fail2Ban integrates with your server’s firewall to block access entirely at the network level.
👤 Common Username Detection and Blocking
Hackers frequently attempt logins using widely used usernames like:
- admin
- root
- test
- user
These names are the low-hanging fruit of automated attack scripts. Fail2Ban for WordPress allows you to define and block login attempts using known attack usernames, adding another wall of protection at the very start of the authentication process.
🔍 User Enumeration Protection
By default, WordPress exposes usernames through author archives and REST API calls. This information can be exploited by attackers to identify real login usernames and target those accounts with brute-force attacks.
With this, it blocks any attempt to perform enumeration via query strings or REST endpoint scans. These attempts are logged and the offending IPs are banned if the behavior continues.
💬 Spam Protection for Comments and Forms
Spam is not just annoying but can harm your SEO, reputation, and server performance. Fail2ban actively logs spam attempts in comment sections and form submissions.
This gives you a cleaner site and less moderation overhead, especially useful for content-heavy blogs and community-driven sites.
🔁 Password Reset Guard
Bots frequently trigger mass password reset requests in an effort to confuse users or find weaknesses in authentication. With Fail2Ban for WordPress, these attempts are detected and blocked.
📡 Pingback and Trackback Protection
Many DDoS and spam attacks are launched through fake pingbacks. These can flood your server or inject harmful links into your site. Fail2Ban for WordPress has built-in logic to monitor pingback behavior. Also, blocks suspicious or repetitive pingback requests and bans the IPs generating them.
📊 Syslog Integration for Advanced Logging
Unlike most plugins that log to the WordPress database (and risk clogging it), Fail2Ban for WordPress writes logs to the system’s syslog. This keeps your database lean and allows for integration with security suites and log monitors.
⚙️ 8. Easy Configuration and Automation
Once installed with xCloud, the features of Fail2Ban for WordPress are pre-configured and ready to go. You don’t need to touch a single line of code to:
- Toggle protections on or off
- Adjust thresholds for bans
- View or clear logs
- Manage IP access lists
And for advanced users, the wp-fail2ban-config.php file offers full customization right down to defining your own logging filters and behavior rules.
🔐 New: WP fail2ban Security Now Integrated with xCloud
Keeping your WordPress site safe is more important than ever. This integration of WP fail2ban with WordPress site security plugin – WP fail2ban straight to the dashboard that you can access with 1-click.
This built-in security plugin gives you real-time protection by automatically logging suspicious activity like failed login attempts, spam, or unauthorized access. It is an essential defense against brute-force attacks and other common threats that target WordPress sites every day.
With this setup, you get better security without any hassle. There is no need for complicated installations or steps. Plus, xCloud’s user-friendly dashboard makes it easy to manage these protections, allowing you to concentrate on growing your website and business without worrying about your safety.
Easy guide: How To Configure WP Fail2Ban on WordPress Sites (With xCloud)
WP Fail2Ban is a powerful WordPress plugin that enhances the security of your site by logging and helping to prevent malicious login attempts. When integrated with xCloud, it offers additional security features such as blocking failed logins, spam protection, and more.
Follow the steps below to integrate WP Fail2Ban with xCloud and get enhanced protection for your WordPress website.
Step 1: Access Your WordPress Site
To begin the integration, log into the WordPress dashboard of the site where you want to enable WP Fail2Ban. From the dashboard’s sidebar, navigate to the ‘Tools’ menu and select ‘NGINX & Security’.
Note: For OLS servers, go to the ‘Security’ option from the menu to access this feature.
Step 2: Install the WordPress Fail2ban Plugin
Within this section, you will find the option to enable WP Fail2Ban with xCloud. Once you toggle this feature on, the plugin will be automatically installed and activated on your site.
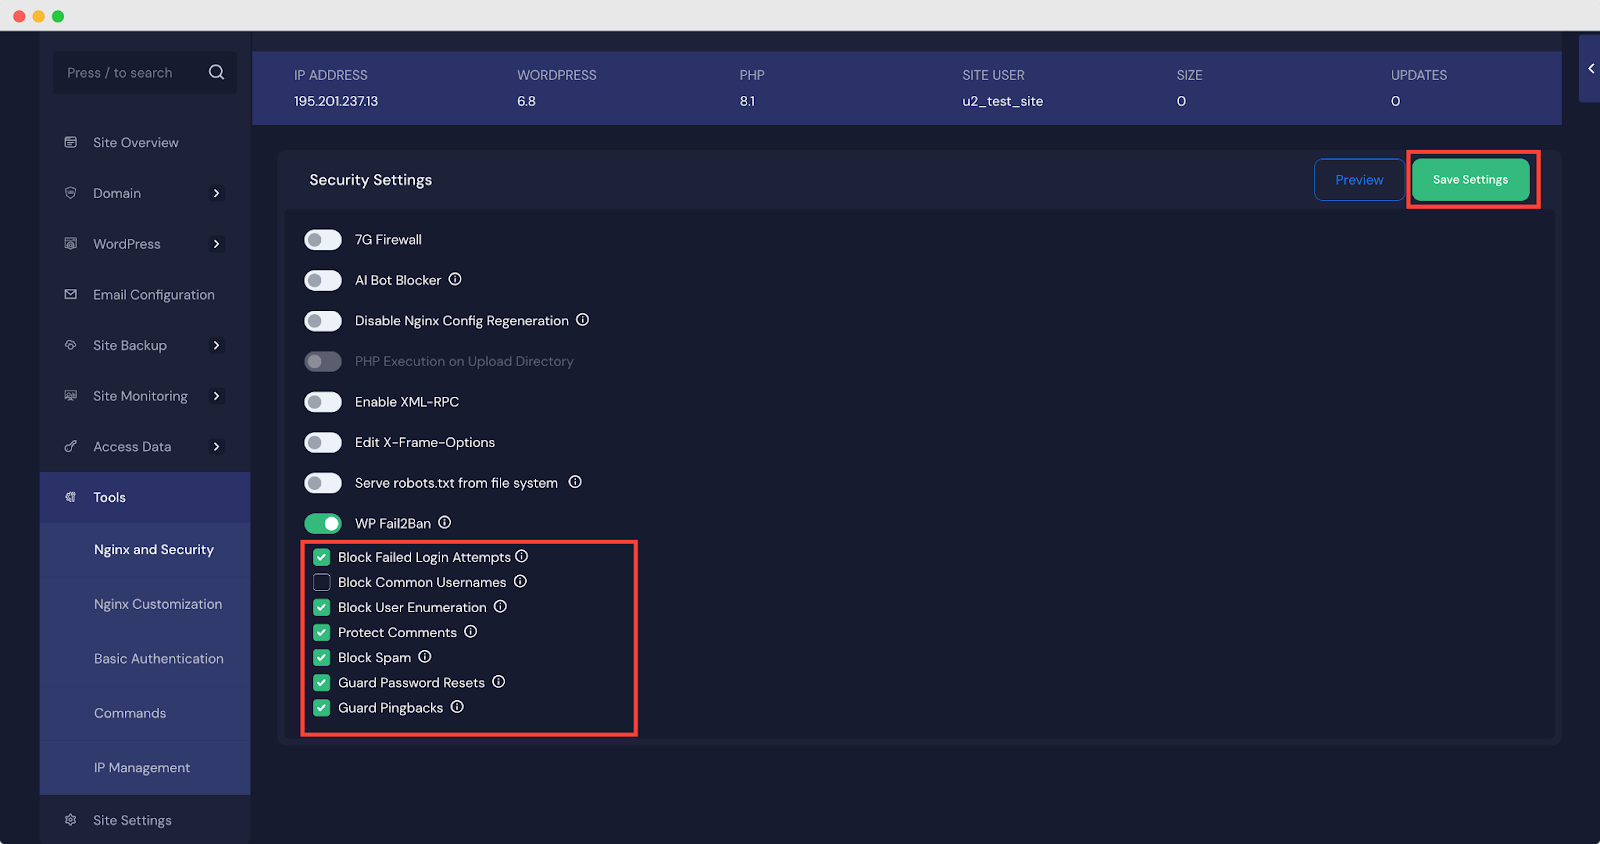
Step 3: Configure Security Settings in xCloud
After enabling the plugin, head over to the xCloud dashboard to configure your preferred security settings. Here, you will find options such as ‘Block Failed Login Attempts‘, ‘Block Common Usernames’, ‘Block User Enumeration’, ‘Protect Comments, ‘Block Spam‘, ‘Guard Password Resets‘, and ‘Guard Pingbacks’. Finally, click the ‘Save Settings‘ button to apply the changes.
For the full step-by-step process, visit our Fail2Ban setup guide for xCloud to learn how to enhance server security with ease.
Troubleshooting & IP Management
Even with a secure WordPress setup powered by WP fail2ban and xCloud, there may be times when you need to take manual action—whether that’s unblocking a mistakenly banned IP, managing access for specific users, or reviewing suspicious activity. Fortunately, xCloud offers intuitive tools that make IP and log management straightforward.
Unban IP Addresses
It is not uncommon for site administrators or legitimate users to find themselves blocked after multiple failed login attempts. When this happens, you can easily unban the affected IP address with xCloud right from the dashboard. This feature ensures you can quickly restore access without compromising your security setup.
Whitelist or Blacklist IP Addresses
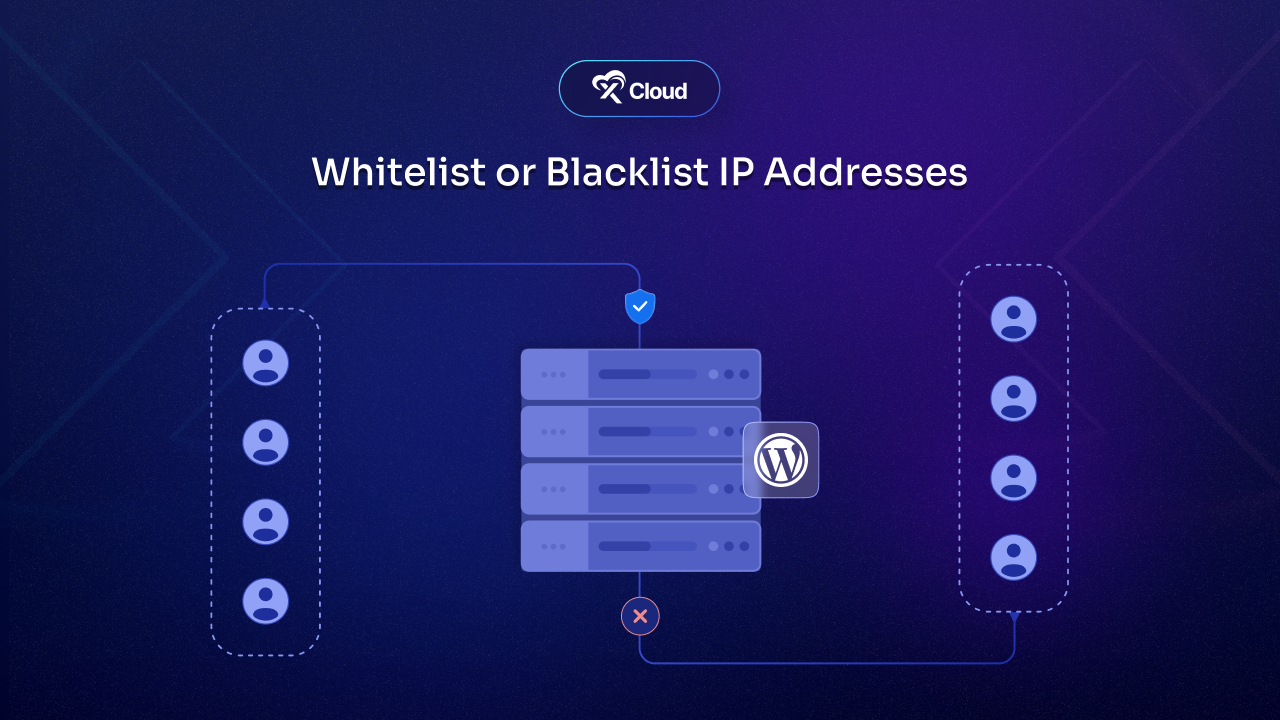
In some cases, you might want to proactively manage who can or cannot access your WordPress site. xCloud allows you to do this through the IP Management feature. Whitelisting an IP address means that fail2ban will never block that IP, regardless of its activity—perfect for trusted developers, internal staff, or remote team members. Conversely, blacklisting an IP ensures that any connection attempt from that address is permanently denied. This is an effective way to block known attackers or prevent repeated abuse from specific regions or devices.
Monitor Logs in Real-Time
For those who want to stay ahead of threats and keep a close eye on login activity, xCloud provides another two log types in the Server Log Viewer: the Fail2Ban Log and the Auth Log.
The Fail2Ban Log provides visibility into which IP addresses have been blocked and why, helping you detect patterns in brute-force or spam attacks.
Install WP Fail2Ban Plugin with xCloud &Supercharge WordPress Security
Keeping your WordPress site safe can actually be pretty simple, especially when you have the right tools. By using Fail2Ban for WordPress along with xCloud, you create a strong defense that helps stop brute-force login attempts, spam, and unauthorized access automatically.
This setup offers peace of mind, gives your site proactive, intelligent defense that works quietly in the background, around the clock. Whether you have a blog, a business site, or an online store, combining Fail2Ban for WordPress with xCloud is a smart way to protect your online space.
If you have found this blog helpful, feel free to subscribe to our blogs for valuable tutorials, guides, knowledge, and tips on web hosting and server management. You can also join our Facebook community to share insights and engage in discussions.