Adding HTTP headers and setting up redirects is one of those tasks every WordPress site needs at some point. You want to add a security header. Or redirect an old URL to a new one. Or send mobile users to a different page. These are everyday requirements for any site that takes performance and security seriously.
The traditional approach? Edit your nginx config file, run a syntax test, reload the server, and hope nothing breaks. Or install a plugin and accept the extra PHP overhead on every request.
Neither option is ideal, especially if you are managing multiple WordPress sites across different clients or projects.
That is where xCloud’s Site Rules feature comes in. It gives you full control over HTTP headers and redirects for your WordPress sites directly from your dashboard, with built-in safety checks and zero nginx knowledge required.
In this guide, you will learn how to use Site Rules, what you can do with it, and the real-world scenarios where it makes the biggest difference. Let us get started!
TL;DR
Every HTTP response from your WordPress site carries headers — metadata that controls security, caching, and browser behavior. Most WordPress sites either ignore them or handle them through plugins, which means PHP has to fully load before any rule fires. That is slow, fragile, and unnecessary.
Redirects have the same problem. Plugin-based redirects require the entire WordPress stack to boot up just to tell a browser, “go here instead.” If WordPress throws a fatal error, your redirects die with it — and your SEO takes the hit.
The fix: handle headers and redirects at the server level (nginx), where they fire in milliseconds before PHP even wakes up. xCloud’s Site Rules feature lets you do exactly this through a visual dashboard — no config files, no command line, no risk. It validates every rule before applying it and rolls back automatically if anything breaks.
What Are HTTP Headers in WordPress?
Every time someone visits your WordPress site, a conversation happens between their browser and your server. The browser sends a request. Your server sends back a response. That response includes two things: the actual content (HTML, CSS, images) and a set of HTTP headers.
Headers are lines of metadata attached to the response. The visitor never sees them, but the browser reads every single one. They carry instructions: how long to cache this page, whether the connection is secure, which scripts are allowed to run, and whether the page can be loaded inside an iframe on another site.
Think of headers as the rules printed on the envelope, not inside the letter. The letter is your page content. The envelope tells the postal system (the browser) how to handle it — where it came from, how to treat it, what to do if something looks wrong.
Here is a simplified example of what HTTP response headers look like:
HTTP/2 200 OK
Content-Type: text/html; charset=UTF-8
Strict-Transport-Security: max-age=31536000; includeSubDomains
X-Content-Type-Options: nosniff
X-Frame-Options: SAMEORIGIN
Cache-Control: public, max-age=3600
Each line is a header. Each one tells the browser something specific:
Content-Typesays “this is an HTML page.”Strict-Transport-Securitysays “always use HTTPS for this domain.”Cache-Controlsays “you can cache this for one hour.”
By default, most WordPress hosting setups ship with only the bare minimum headers. The security-critical ones — HSTS, CSP, X-Frame-Options — are usually missing entirely. That is a problem, because modern browsers rely on these headers to protect your visitors from attacks like clickjacking, XSS injection, and protocol downgrade attacks.
The good news: adding them is straightforward once you have the right tool. The bad news: doing it through a WordPress plugin means every response gets slowed down by the PHP overhead of processing those headers. That is why handling headers at the server level — where they get added before PHP even runs — is the approach that actually makes sense.
Why Redirects Matter for SEO
Redirects are not just a convenience feature. They are one of the most SEO-sensitive operations on your entire site.
When you change a URL — whether you are restructuring your blog, rebranding, merging domains, or just fixing a typo in a slug — every inbound link pointing to the old URL becomes a dead end. Backlinks, social shares, bookmarks, internal links from other posts — all of them now point to a page that does not exist.
Without a redirect, those visitors hit a 404. Google’s crawler hits a 404. And here is what happens next:
- You lose link equity. Every backlink to that old URL carried ranking power. A 404 throws that away. A properly configured 301 redirect passes the vast majority of that link equity to the new URL. Google has confirmed this — 301 redirects transfer PageRank.
- Your pages drop out of the index. When Googlebot encounters a 404 on a URL it previously indexed, it starts the process of removing that page from search results. If you had a page ranking on page one and you changed the URL without a redirect, you can watch it disappear within days.
- User experience takes a hit. A visitor clicking a link from an old article, an email campaign, or a social post lands on a “page not found” screen. They leave. Your bounce rate goes up. Your brand looks careless.
- Redirect chains kill crawl efficiency. If you set up a redirect from A → B, and later redirect B → C, you have created a redirect chain. Google will follow up to about 5 hops, but each hop slows down the crawl and dilutes the signal. Plugin-based redirects make it easy to accidentally create chains because there is no centralized view of how rules interact.
- The wrong redirect type sends the wrong signal. A 301 tells search engines “this move is permanent — update your index.” A 302 says “this is temporary — keep the old URL in the index.” Using a 302 when you meant a 301 means Google keeps trying to rank the old URL instead of the new one. It is a small mistake with outsized consequences.
Here is the part that makes server-level redirects non-negotiable for SEO: plugin-based redirects only work when WordPress is running. If your site throws a PHP fatal error, a database timeout, or a memory limit issue, your redirect rules stop firing. Every inbound link to an old URL now returns a 500 or 503 error instead of a clean redirect. Google sees server errors on URLs it expects to redirect, and your rankings take a compounding hit the longer the issue persists.
A redirect handled at nginx fires before WordPress loads. It does not care whether your database is down or your latest plugin update broke something. The redirect rule lives in the server config and runs regardless of PHP’s state. For SEO, that reliability is not optional — it is the baseline.
Why HTTP Headers and Redirects Belong at the Server Level, Not in WordPress
Why HTTP Headers and Redirects Belong at the Server Level, not in WordPress
Most WordPress sites handle headers and redirects through plugins, which means the entire PHP stack has to boot up just to add a response header or tell a browser to go somewhere else. There is a faster, more reliable way to do it, and it starts with understanding why the server level is the right place for these rules.
The Problem With Plugin-Based Solutions
When most WordPress users need to add a security header or set up a redirect, they reach for a plugin. And there are plenty of options out there: redirect manager plugins, security header plugins, SEO plugins with redirect features, and more.
But here is the catch. In most cases, redirects handled by plugins require WordPress and PHP to load. Every time a visitor hits your site, the entire WordPress stack has to load. PHP bootstraps. The database connects. Plugins initialize. And then your redirect or header rule fires. That is a lot of overhead for something that could have been handled in milliseconds at the server level.
Plugin-based headers and redirects come with real problems:
- Performance cost: Every rule requires WordPress to fully load before it can fire. On a site with multiple redirect rules, that adds up fast.
- Reliability issues: If WordPress throws a fatal error, your redirect rules stop working, too. The thing protecting your SEO is only as stable as your least reliable plugin.
- Maintenance burden: Plugins need updates, can conflict with other plugins, and add complexity to your stack. You are adding moving parts to solve what is fundamentally a server-level problem.
- Scope limitations: Some rules (like host-based redirects for domain consolidation) are difficult or impossible to implement correctly from inside WordPress.
Why Nginx Is The Right Place
When a redirect or header rule lives in nginx, it gets evaluated before PHP ever runs. The request comes in, the rule fires, and the response goes out without touching WordPress at all.
This is faster. It is more reliable. And it is how production web infrastructure is designed to work.
The only barrier has been the technical friction of editing nginx config files by hand. Site Rules removes that barrier entirely.
What Is Site Rules?
Site Rules is xCloud’s built-in system for managing nginx-level HTTP header and redirect rules for your WordPress sites through a visual UI, with zero server access required.
Here is how it works:
- You define rules through a clean interface
- xCloud generates the correct nginx config
- It validates the config against your live server
- It applies the config only if the validation passes
- If anything fails, it rolls back automatically
Your site stays up no matter what. Simple as that.
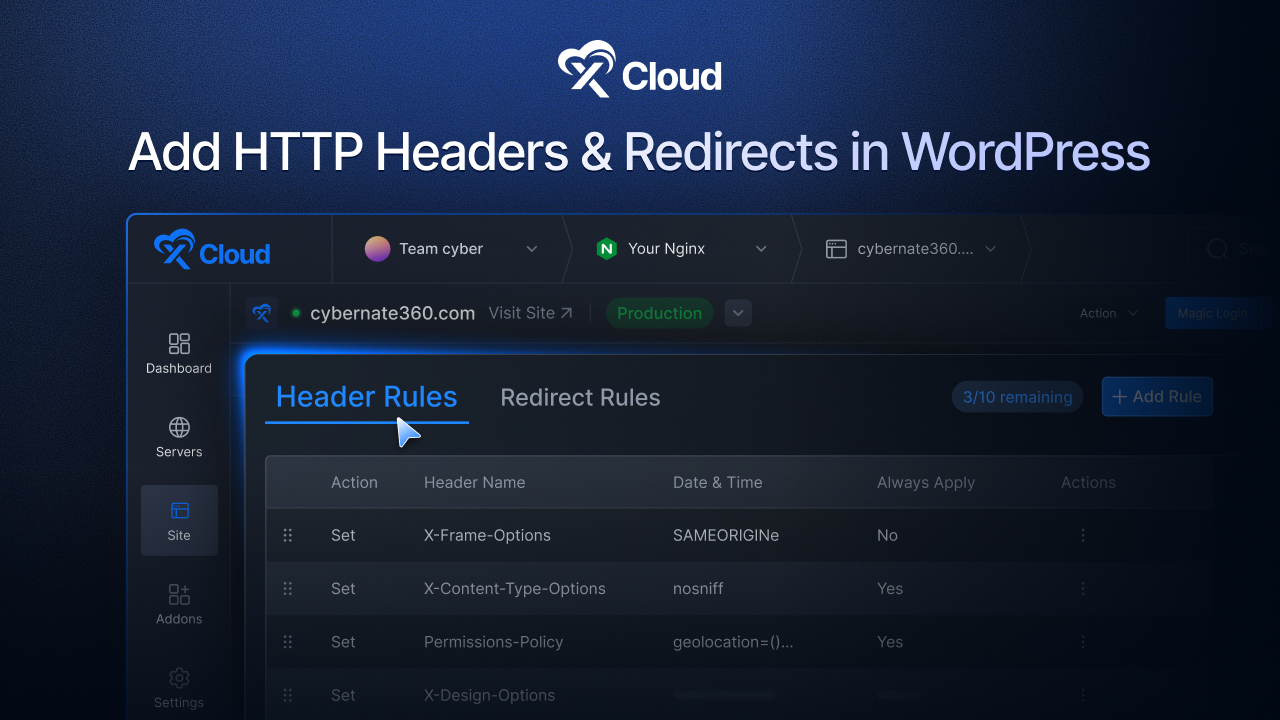
Site Rules supports two types of rules: Header Rules and Redirect Rules. Let us look at each in detail.
Best Security Headers for WordPress (With Examples)
Every HTTP response your server sends includes headers — metadata that tells the browser how to handle the content. Most default configurations leave a lot of these headers either missing or set to insecure defaults.
With Site Rules, you can add, modify, or remove any HTTP response header for your WordPress site. xCloud includes presets for the most commonly needed headers, so you can apply them in one click without remembering the syntax.
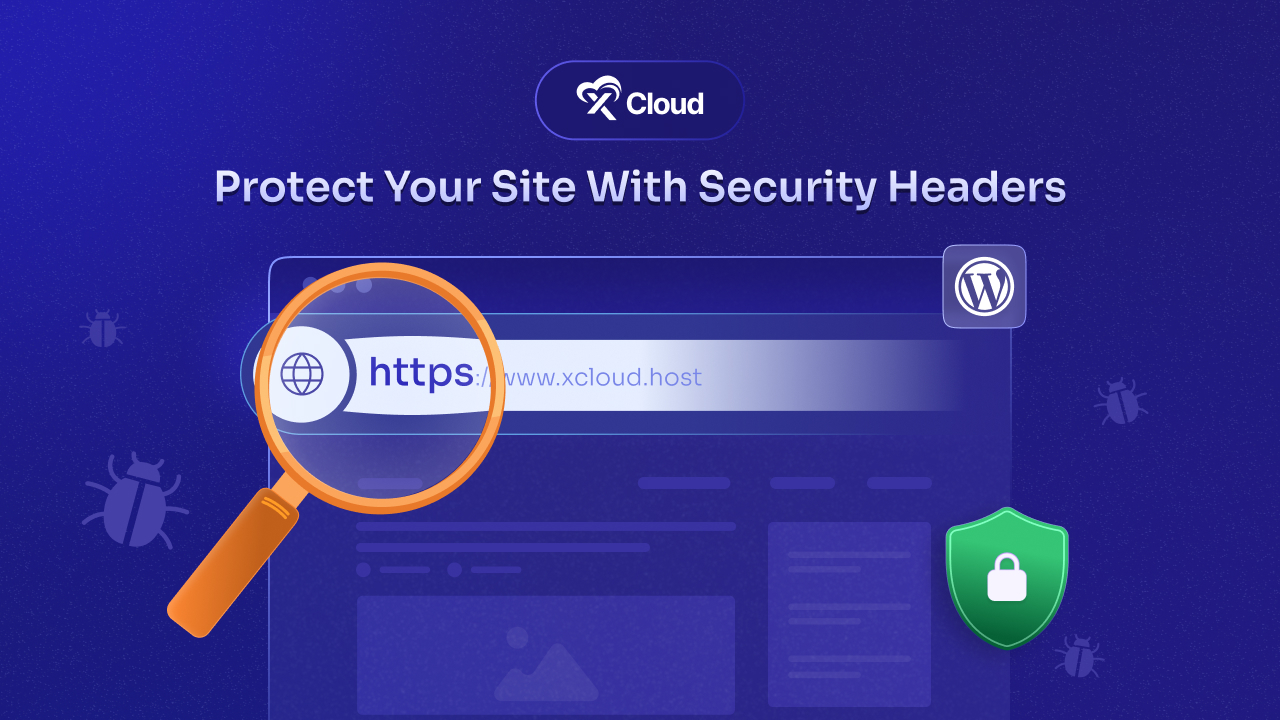
Security headers are one of the most impactful things you can add to a WordPress site. They are checked in security audits, flagged by tools like Mozilla Observatory and Google Lighthouse, and they protect your users from real attacks.
Here is what each major security header does, why it matters, and what a good configuration looks like:
Strict-Transport-Security (HSTS)
Tells browsers to always use HTTPS for your domain, even if a user types http:// manually. This prevents SSL stripping attacks where an attacker downgrades a connection to HTTP. Once a browser sees this header, it will refuse non-HTTPS connections for the duration you specify.
Example value:
Strict-Transport-Security: max-age=31536000; includeSubDomains; preloadThis tells the browser: “For the next year, never connect to this domain over plain HTTP. Apply the same rule to all subdomains.” The preload directive lets you submit your domain to browser preload lists, so even the first visit is HTTPS-only.
When to use it: On every WordPress site that has SSL configured. There is no good reason to skip this.
X-Content-Type-Options
Set to nosniff, this header tells browsers not to guess the content type of a response. Without it, browsers can be tricked into executing a file as JavaScript even when the server says it is plain text. That is a common vector for XSS attacks.
Example value:
X-Content-Type-Options: nosniff
One line. No configuration needed. Just add it.
X-Frame-Options
Prevents your site from being embedded in an iframe on another domain. This blocks clickjacking attacks, where an attacker overlays your site inside a hidden iframe and tricks users into clicking things they cannot see.
Example value:
X-Frame-Options: SAMEORIGIN
Use SAMEORIGIN if you embed your own content in iframes (some page builders do this). Use DENY if you never need iframe embedding at all.
Content-Security-Policy (CSP)
The most powerful security header available, and the most complex to configure. CSP lets you define exactly which sources of scripts, styles, images, and other resources are allowed to load on your page. A well-configured CSP can prevent XSS attacks even if an attacker finds an injection vulnerability in your site.
Example value (starter policy):
Content-Security-Policy: default-src 'self'; script-src 'self' https://cdn.example.com; style-src 'self' 'unsafe-inline'; img-src 'self' data: https:; font-src 'self' https://fonts.gstatic.com; frame-ancestors 'self'
This says: only load scripts from my domain and my CDN. Only load fonts from Google Fonts. Do not allow anyone to iframe my site except me. Everything else — default to my own domain only.
💡A word of caution: CSP is powerful but can break things if misconfigured. Start with Content-Security-Policy-Report-Only to monitor violations without blocking anything, then tighten the policy once you know what your site actually loads.
Referrer-Policy
Controls how much referrer information is included in requests made from your site. Setting this prevents leaking your internal URL structure to third-party sites.
Example value:
Referrer-Policy: strict-origin-when-cross-origin
This sends the full URL as a referrer for same-origin requests (useful for your own analytics) but only sends the origin (domain) for cross-origin requests. Your internal URL paths stay private.
Permissions-Policy
Formerly known as Feature-Policy, this header lets you control which browser features (camera, microphone, geolocation, etc.) your site is allowed to use — and blocks features your site does not need from being accessed by any injected third-party scripts.
Example value:
Permissions-Policy: camera=(), microphone=(), geolocation=(), payment=()The empty parentheses mean “disabled for everyone, including this site.” If your site genuinely needs geolocation (like a store locator), you would set geolocation=(self) it instead.
Putting It All Together
Here is what a well-configured set of security headers looks like for a typical WordPress site:
Strict-Transport-Security: max-age=31536000; includeSubDomains; preload
X-Content-Type-Options: nosniff
X-Frame-Options: SAMEORIGIN
Referrer-Policy: strict-origin-when-cross-origin
Permissions-Policy: camera=(), microphone=(), geolocation=(), payment=()
Content-Security-Policy: default-src 'self'; script-src 'self'; style-src 'self' 'unsafe-inline'; img-src 'self' data: https:;
With Site Rules, all of these are available as presets. Click the preset, review the value, hit save, and the header is live on your server in seconds.
👉 Want to learn more about WordPress security headers? Check out our complete guide: WordPress Security Headers – A Guide to Keep Your Website Safe
Cache Control Headers
Beyond security, header rules are also useful for fine-tuning how your content is cached by browsers and CDNs.
If you are using Cloudflare or another CDN in front of xCloud, your Cache-Control headers determine how long assets are cached at the edge. Getting these right means fewer origin requests, faster global load times, and lower bandwidth costs.
With Site Rules, you can set custom Cache-Control values for your site’s responses without editing any nginx config manually.
CORS Headers for Headless WordPress
Running WordPress as a headless CMS? Your frontend application (whether it is Next.js, Nuxt, or a mobile app) needs to make cross-origin requests to your WordPress REST API or GraphQL endpoint.
Without proper CORS headers, the browser will block those requests entirely.
With Site Rules, you can add a Access-Control-Allow-Origin header and configure any additional CORS headers your setup needs. Your headless frontend can then communicate with WordPress without any issues.
This is a use case where plugin-based CORS solutions often fall short, especially if you need fine-grained control over which origins are allowed or which HTTP methods are permitted.
How to Add Redirects Without Plugins (Step-by-Step)
Here is how to set up server-level redirects using xCloud’s Site Rules – no plugins, no config files, no SSH required.
Step 1: Open Site Rules and Start a New Redirect
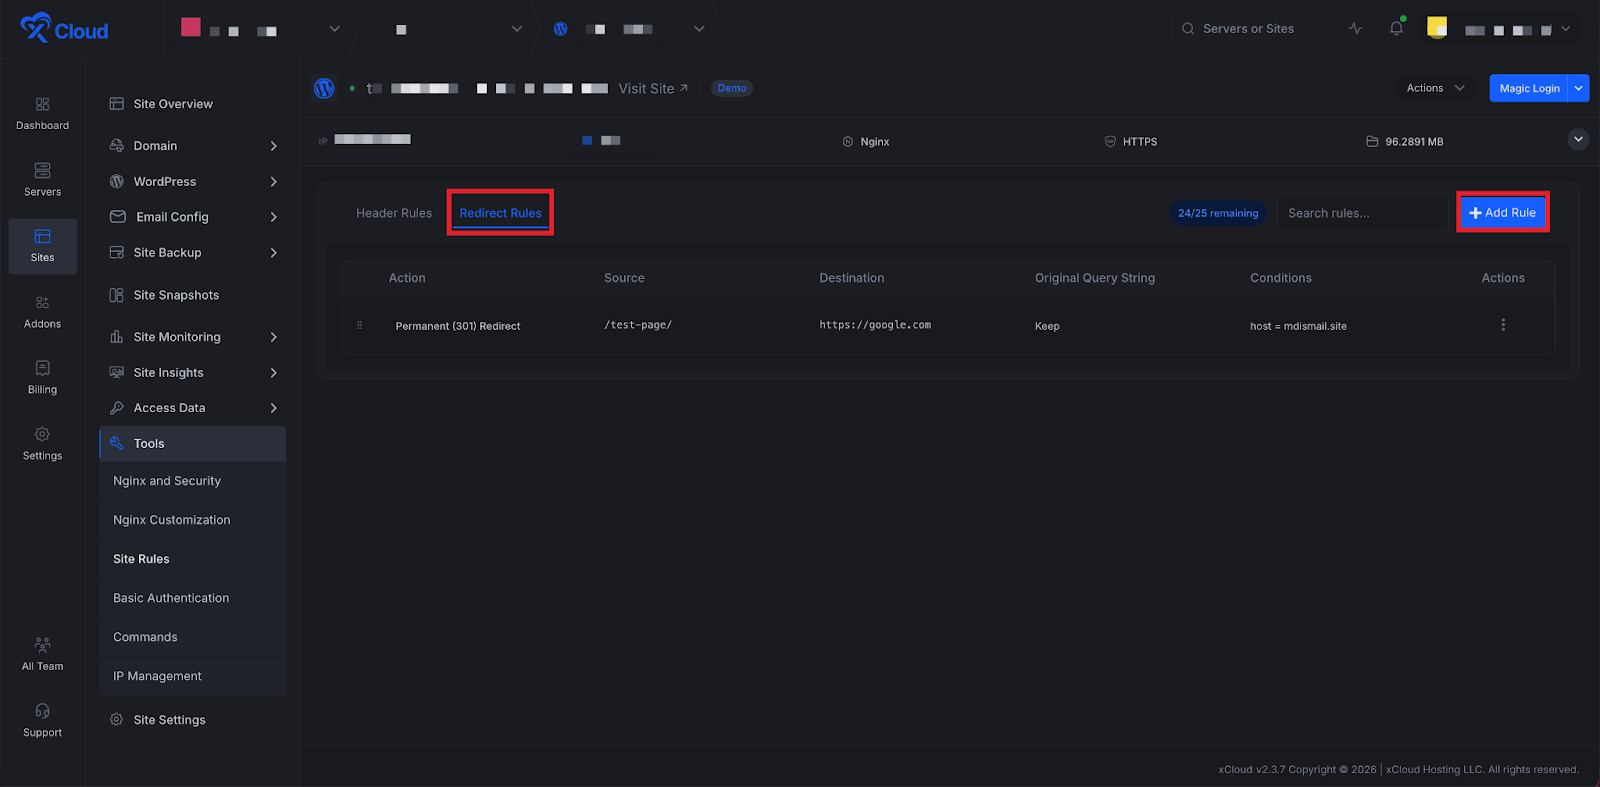
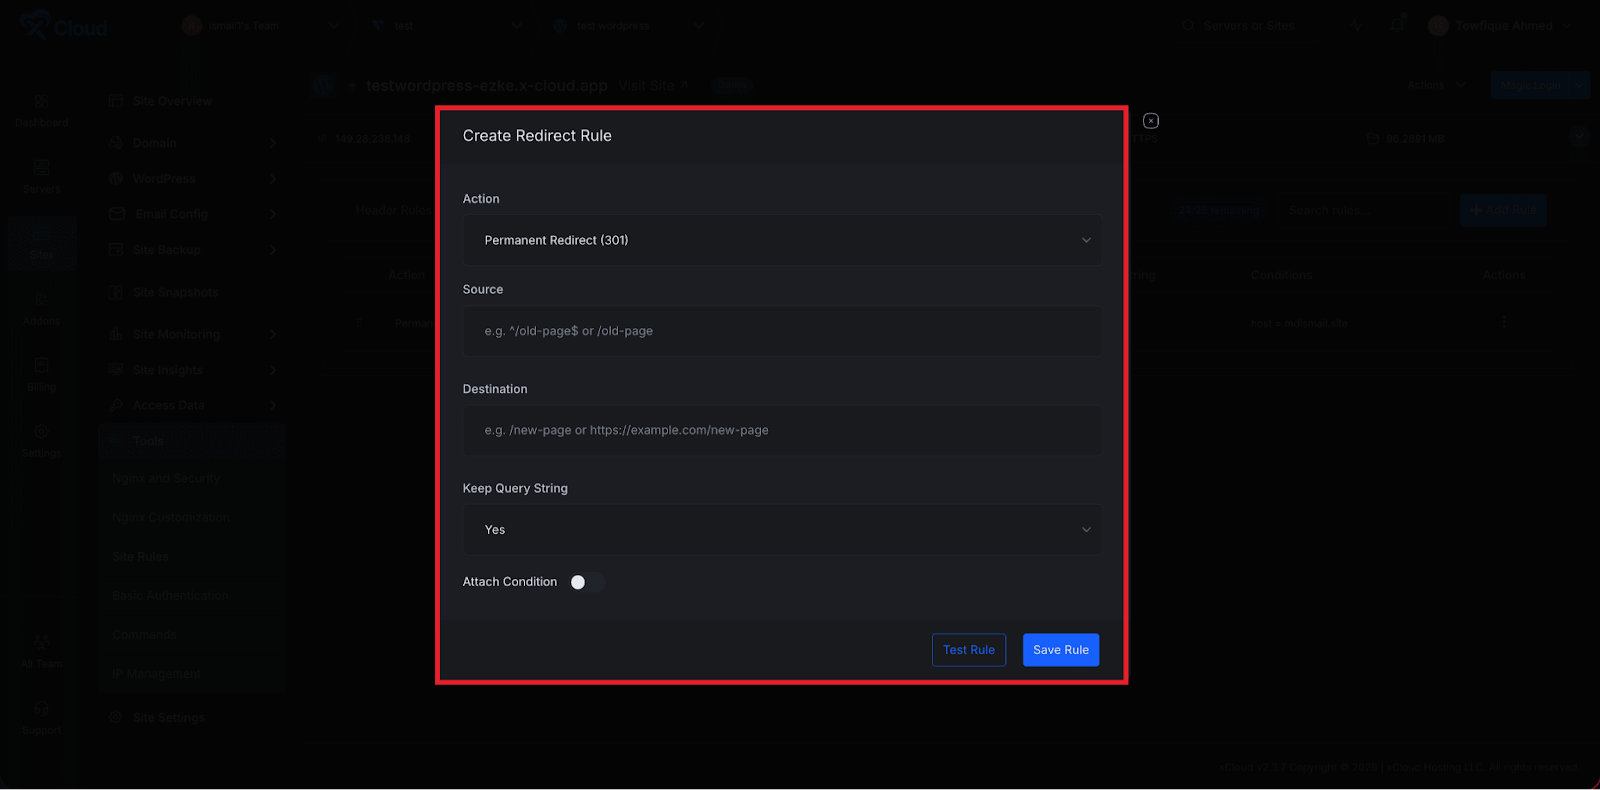
Log in to your xCloud dashboard, navigate to your site, and go to Tools → Site Rules in the left sidebar. Switch to the Redirect Rules tab, then click Add Redirect in the top right corner. A modal will open with the fields you need.
Step 2: Configure Your Redirect
Fill in the redirect details:
- From (Source URL): The old path you want to redirect, e.g.
/old-blog-post. No need to include the domain. - To (Destination URL): Where traffic should go — a path on the same site (
/new-blog-post) or a full URL on another domain (https://newdomain.com/page). - Redirect Type: Choose 301 (Permanent) for URL changes you do not plan to reverse — slug updates, migrations, restructures. Choose 302 (Temporary) for short-lived redirects like maintenance pages or campaign landing pages. When in doubt, go with 301.
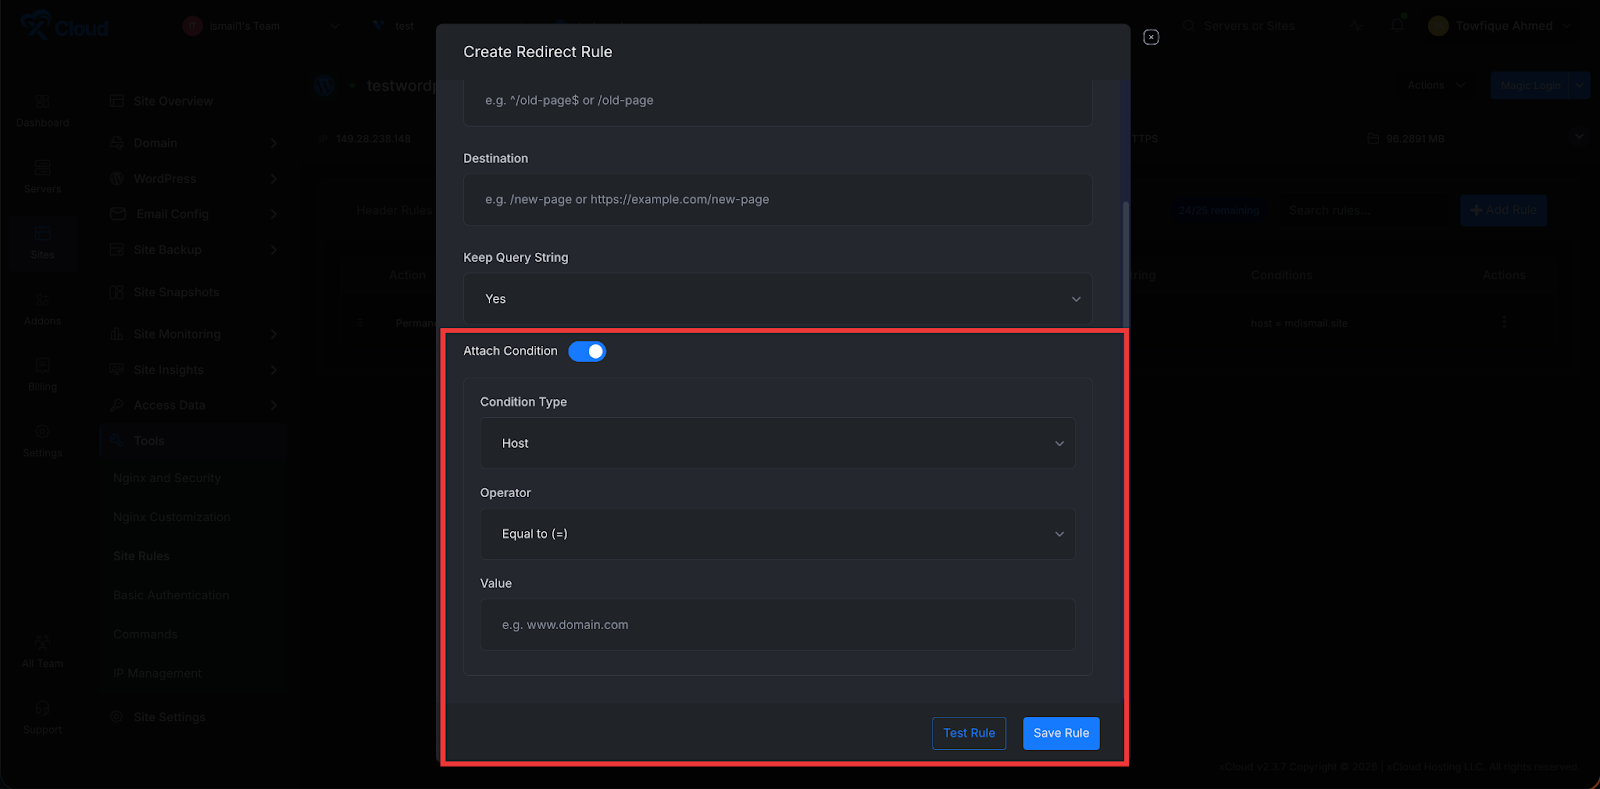
Step 3: Add Conditions (Optional)
Need the redirect to fire only in specific situations? Click Attach Condition to add conditional logic based on:
- Hostname: Only redirect requests from a specific domain. One rule can handle an entire domain migration while preserving paths.
- URI pattern: Match specific URL patterns for more targeted redirects.
- Query string: Only redirect when a specific parameter is present, like
?promo=summer2026. Great for campaign routing. - Device type: Redirect mobile users to
m.yoursite.comwhile desktop users stay on the main site.
Skip this step if the redirect should apply to all matching requests.
Step 4: Test, Save, and Apply
Before committing anything, click Test Rule. xCloud generates the nginx config and runs nginx -t against your live server without applying it. You will see whether the rule passes or fails — and if it fails, the exact error so you can fix it first.
Once the test passes, click Save Rule. xCloud validates one final time and applies the config. The redirect is now live at the server level, firing before WordPress or PHP even loads. If validation fails at any point, xCloud rolls back automatically. Your site stays up no matter what.
Redirect Rules: Handle Every Redirect Scenario Without a Plugin
Beyond the basic setup above, here are the specific scenarios where Site Rules handles redirects that plugins struggle with.
Simple Path Redirects
The most common use case: you have changed a URL and need to redirect the old path to the new one.
/old-blog-post-url→/new-blog-post-url(301)/services→/what-we-do(301)/contact-us→/contact(301)
With Site Rules, you enter the source path, the destination, choose 301 or 302, and save. xCloud writes the nginx rewrite rule, validates it, and applies it. No plugin. No PHP overhead. The redirect fires at the nginx level before WordPress even loads.
URL Structure Migration
You have relaunched your site with a completely new URL structure or migrated from a different CMS with different URL patterns. You have dozens or hundreds of old URLs that need to redirect to new ones, and getting this right matters for SEO.
Site Rules lets you create and manage all of these redirects in one place. Each rule is applied at the nginx level, which means Google and users get clean, reliable 301 redirects that do not depend on WordPress being healthy.
Domain Consolidation and Rebranding
You are consolidating multiple domains into one, or you have rebranded and have a new domain name. Every request to the old domain needs to redirect to the corresponding page on the new domain.
With Site Rules’ host-based conditions, you can create a redirect rule that only fires when the request comes from a specific domain. It then redirects to the equivalent URL on the new domain, preserving the path.
If host = old-domain.com → redirect to new-domain.com (same URI, 301)
One rule handles every page on the old domain. Clean, permanent, and handled entirely at the server level.
Trailing Slash Normalization
SEO best practice is to be consistent about whether your URLs include a trailing slash. If both versions of a URL return content, search engines may treat them as duplicate pages and split your link equity.
With a redirect rule in Site Rules, you can enforce your preference across your entire site. Redirect all trailing-slash URLs to their non-slash equivalents, or vice versa.
Conditional Redirects Based on Device Type
Some sites maintain separate mobile and desktop experiences. Rather than relying on JavaScript-based detection (which fires client-side, after the page has started loading), you can handle this at the nginx level.
Site Rules supports device-based redirect conditions. Create a rule that fires only for mobile devices, redirecting them to m.yoursite.com or a mobile-specific URL while desktop users continue to the main site. No JavaScript, no plugin, no PHP. Pure server-level logic.
Conditional Redirects Based on Query Parameters
Running a marketing campaign? Tracking UTM parameters? Need to redirect users who arrive with a specific query parameter to a custom landing page?
Site Rules supports query parameter conditions. Create a rule that only fires when a specific query parameter is present in the URL. This is the kind of conditional logic that is difficult to implement reliably in WordPress plugins but straightforward at the nginx level.
Temporary Redirects During Maintenance or Campaigns
Not all redirects should be permanent. During site maintenance, you might want to temporarily redirect traffic to a maintenance page. During a campaign, you might want to redirect a specific URL to a time-limited landing page.
Use a 302 (temporary) redirect in Site Rules for these scenarios. When the campaign ends or maintenance is done, delete the rule and the original URL returns to normal. Quickly, safely, and without leaving any permanent redirect baggage in your nginx config.
Common Mistakes to Avoid
Even with a tool that validates your rules automatically, there are mistakes that pass syntax checks but still hurt your site. Here are the ones that come up most often.
Using 302 When You Mean 301
This is the single most common redirect mistake in WordPress. You change a URL permanently, but you use a 302 (temporary) redirect instead of a 301. The redirect works — visitors get to the right page — so you assume everything is fine.
It is not. Google treats a 302 as a signal that the old URL should stay in the index. Your new URL does not get the ranking power from the old one. Months later, you are wondering why your rewritten content is not ranking, and the answer is a redirect type you set once and forgot about.
The fix: Default to 301 unless you have a specific, time-limited reason for 302 (maintenance page, short campaign).
Redirect Chains and Loops
Page A redirects to Page B. Later, you redirect Page B to Page C. Now you have a chain: A → B → C. Google will follow it (up to about 5 hops), but each hop adds latency and dilutes the SEO signal.
Worse: if Page C ever redirects back to A, you have a loop. The browser gives up, the user sees an error, and Googlebot flags the URL as broken.
The fix: When you create a new redirect, check whether the destination already has a redirect of its own. If it does, point the source directly to the final destination instead. A → C, not A → B → C.
Forgetting to Redirect Both Slash and Non-Slash Versions
You redirect /old-page to /new-page. But /old-page/ (with trailing slash) still returns a 404. Search engines may have indexed either version, and visitors might have bookmarked either one.
The fix: Set up trailing slash normalization as a site-wide rule first, so your site is consistent. Then your individual redirects only need to handle one version.
Redirecting Everything to the Homepage
When migrating a site, it is tempting to redirect all old URLs to the homepage rather than mapping each one to the correct new page. Google sees through this. A redirect from a specific blog post to a homepage is treated as a “soft 404” — Google understands the content is gone and does not transfer ranking power.
The fix: Map old URLs to their closest equivalent on the new site. If there is genuinely no equivalent page, it is better to let the URL return a proper 404 with a helpful “page not found” message than to redirect it somewhere irrelevant.
Adding Security Headers Without Testing Them
A misconfigured Content-Security-Policy header can break your entire site. Scripts stop loading, styles disappear, embedded content vanishes. The site looks like it was built in 1997.
The fix: Use Content-Security-Policy-Report-Only first. This header tells browsers to report violations without actually blocking anything. Review the reports, adjust your policy, and only switch to the enforcing Content-Security-Policy header when you are confident nothing will break.
With Site Rules, you can use the Test Rule button to validate the nginx syntax before applying. But keep in mind that a syntactically valid CSP can still break your frontend — the test checks server config, not browser behavior. Always test in a staging environment or with report-only mode first.
Ignoring Header Rules on Subdomains
You add security headers to your main domain. But your staging site at staging.example.com, your CDN subdomain, or your API endpoint at api.example.com gets nothing. Attackers target the weakest link.
The fix: Apply security headers consistently across every subdomain that serves content. With xCloud, you can manage Site Rules per site, so set up the same header rules on each one.
Not Setting an Expiry on HSTS
Adding Strict-Transport-Security without a reasonable max-age value is almost pointless. A max-age of 300 seconds (5 minutes) means the browser forgets about HSTS enforcement almost immediately.
The fix: Use max-age=31536000 (one year) as a minimum for production sites. If you are just starting with HSTS, begin with a shorter duration (like 86400 — one day), verify everything works over HTTPS, then increase to a year and add includeSubDomains.
The Safety System Behind Site Rules
One of the most important aspects of Site Rules is what happens when something goes wrong. Because sometimes it does, and xCloud has you covered.
Automatic Validation Before Every Apply
Every time you create, update, or delete a rule, xCloud does not just write the config and move on. It follows a strict process:
- Generate the new config: xCloud builds the complete nginx config from all your enabled rules
- Write to a temp location: The new config is written temporarily and is not applied yet
- Run nginx -t: xCloud tests the new config for syntax errors on your live server
- Apply if clean: Only if the test passes does xCloud apply the config and reload nginx
- Roll back if it fails: If the test fails, the previous config is restored immediately, and you see the exact nginx error in your dashboard
This means your site never goes down because of a bad rule. The worst that happens is you see an error message and the rule is not applied.
Test Rule Without Saving
Not sure how a complex rule will behave? The Test Rule button lets you run the nginx validation check without saving the rule. You will see whether the rule would pass or fail, and if it fails, you will see the exact error before committing anything to your server.
This is especially useful for redirect rules with multiple conditions, where the generated nginx rewrite syntax can be complex to predict.
Rule Limits
Site Rules enforces sensible limits to keep your nginx config manageable: up to 10 header rules and 25 redirect rules per site. This prevents config bloat and keeps your server performing well.
Drag-and-Drop Rule Priority
Rule order matters, especially for redirects. The first matching rule wins. Site Rules lets you drag and drop rules in the table to set their priority, then hit Save Order to apply the new ordering. You can discard changes before saving if you want to revert.
Site Rules vs. Plugin-Based Solutions: A Direct Comparison
| Site Rules | Plugin-based | |
|---|---|---|
| When the rule fires | At nginx, before PHP runs | After WordPress + PHP fully load |
| Performance | Zero PHP overhead | Adds to every request |
| Reliability | Always fires, independent of WordPress | Stops working if WordPress breaks |
| Maintenance | No updates needed | Plugin updates, conflict risk |
| Risk on misconfiguration | Auto-rollback, site stays up | Can cause white screens or errors |
| Conditional logic | Host, URI, query param, device type | Varies by plugin, often limited |
| CORS/custom headers | Any header, full control | Limited by the plugin’s supported headers |
| Cost | Included in xCloud paid plans | Often premium plugin features |
Who Should Use Site Rules?
WordPress developers managing client sites who want to add security headers and handle redirects properly without installing plugins for every site.
Agencies running large portfolios of WordPress sites who need a reliable, scalable way to manage redirects and headers across all their clients.
Site owners who have been putting off security hardening because it seemed too technical. Site Rules makes it approachable for anyone.
Developers building headless WordPress who need CORS headers configured correctly for their frontend applications.
SEO professionals managing URL migrations, domain consolidations, or ongoing redirect strategies who want server-level reliability.
Start Managing Headers and Redirects the Right Way
Security headers and redirects are foundational to how a professional WordPress site operates. They affect your security posture, your SEO, your user experience, and your site’s performance under load.
For too long, managing these things properly meant either accepting the overhead of plugins or learning nginx configuration by hand. Most sites ended up with an inconsistent setup that was hard to audit or maintain.
Site Rules changes that. It makes server-level header and redirect management accessible to every WordPress developer and team on xCloud, with built-in safety, a clean UI, and none of the risk that used to come with editing nginx configs manually.
If your sites are running without security headers or managing redirects through plugins, it is worth taking 10 minutes to explore what Site Rules can do.
👉 Ready to get started? Sign up for xCloud and start managing your WordPress headers and redirects the right way.
If you have found this blog helpful, feel free to subscribe to our blogs for valuable tutorials, guides, knowledge, and tips on web hosting and server management. You can also join our Facebook community to share insights and engage in discussions.