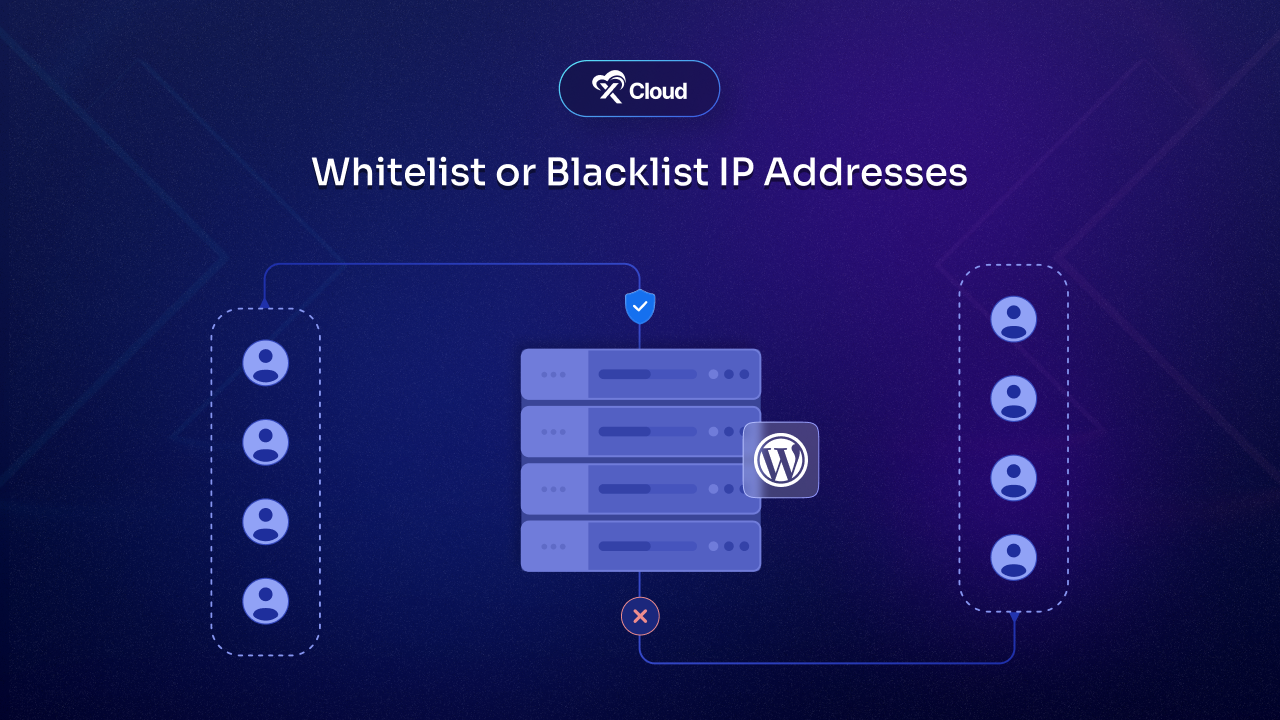
Securing your website from unauthorized access and malicious activity is crucial to safeguarding sensitive data, maintaining server health and ensuring consistent business growth. One effective way to achieve this is by using the IP Whitelist or Blacklist feature. With xCloud, managing IP access has never been easier. You can now seamlessly whitelist or blacklist IP addresses directly from your dashboard. This ensures that only trusted users can access your site while blocking harmful IPs.
The whitelist or blacklist IP addresses feature empowers website administrators to enforce stricter access control policies and respond swiftly to potential threats. Let us explore how this feature works and why it is an essential part of your security strategy.
🖥️ What Is IP Whitelisting And Blacklisting?
Before diving into the benefits of IP whitelisting, it is essential to understand its counterpart, IP blacklisting, to see how the two differ in approach.
What Is IP Whitelisting?
IP whitelisting is a security measure that ensures only trusted IP addresses can access a system or network. By maintaining a predefined list of approved IPs, it minimizes the risk of unauthorized access and enhances network security. For businesses, it provides the confidence that only vetted employees, systems, or third-party applications can interact with their tools and data.
What Is IP Blacklisting?
IP blacklisting, on the other hand, involves blocking known or suspicious IP addresses that may pose a threat to the system. While this approach works well for preventing attacks from known bad actors, it is inherently reactive, relying on up-to-date threat intelligence.
Key Difference: Proactive vs. Reactive Security
While IP whitelisting operates on a “default deny” model, where access is restricted by default and only explicitly approved addresses are allowed, blacklisting uses a “default allow” model, blocking only those explicitly flagged as threats. Both have their place in a comprehensive cybersecurity strategy, but whitelisting is often seen as a more robust, proactive approach.
💡 Why Use IP Whitelisting And Blacklisting?
The ability to whitelist or blacklist IP addresses offers website administrators significant control over who can access their network. Whitelisting or blacklisting IPs can help identify patterns in malicious activity by providing clear records of authorized and unauthorized access attempts. Repeated requests from blacklisted IPs or unexpected access attempts from non-whitelisted IPs can indicate potential threats.
Here is why this feature is essential:
- Enhanced Security: Prevent unauthorized access by blocking suspicious IPs.
- Controlled Access: Allow specific IPs uninterrupted access to your site using the whitelist.
- Prevent Cyber Threats: Reduce risks such as DDoS attacks or data breaches by filtering malicious IPs.
- Customizable Settings: Tailor access to suit your operational needs, whether for a team, clients, or specific regions.
✨ Benefits of Whitelisting Or Blacklisting IP Addresses in xCloud
xCloud provides a straightforward approach to managing IPs, ensuring a secure and efficient workflow:
- Ease of Use: The intuitive dashboard eliminates the need for complex configurations.
- Real-Time Management: Instantly add or remove IPs as circumstances change.
- Comprehensive Overview: View and manage all whitelisted or blacklisted IPs in one place.
📝 How to Whitelist Or Blacklist IP Addresses in xCloud
xCloud’s user-friendly dashboard makes it simple to manage IP access. Follow these steps to whitelist or blacklist IP addresses effectively:
Step 1: Log in to Your xCloud Dashboard
Start by logging into your xCloud dashboard using your credentials. By providing a centralized interface for all security-related configurations, the dashboard ensures that even non-technical users can manage IP addresses with ease. Now, navigate to your website’s overview to access advanced settings.
Step 2: Access the IP Management Settings
In your website’s settings, go to ‘Tools → IP Management’. This is where you will find the options to manage your IP whitelist or blacklist. With clear options for adding, editing, or removing IPs, you can implement changes in seconds.
Step 3: Add an IP Address to the Blacklist or Whitelist
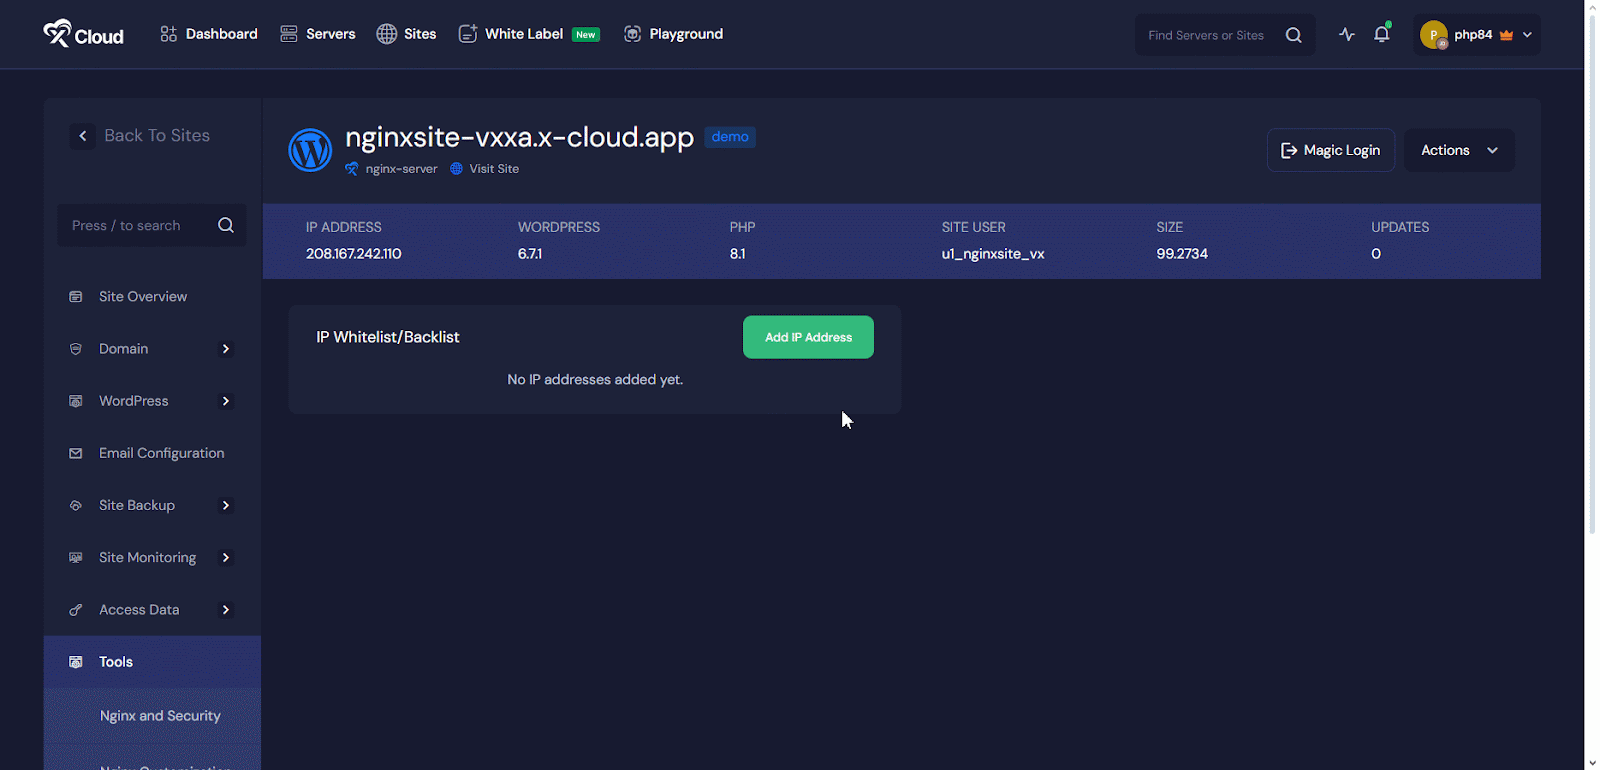
Now, click on the ‘Add IP Address’ button. A popup will appear. Enter the IP address you want to whitelist or blacklist. Then, select the ‘Whitelist’ or ‘Blacklist’ option by checking the corresponding box. Once done, click ‘Submit’ to save the changes.
[Pro tips: Adding an IP address is a straightforward process, but it is essential to ensure accuracy. A small error, such as mistyping an IP address, could lead to unintended access or blockage. To avoid such issues, double-check the IP before submission. Additionally, consider maintaining a backup of your whitelist and blacklist for future reference or restoration.]
xCloud continues to innovate, offering tools that are not only functional but also user-friendly. By leveraging the whitelist or blacklist IP addresses feature, you are taking a proactive step toward ensuring your website’s safety and reliability. For any further assistance, check out the documentation or reach out to our dedicated support team.
💻 Whitelist or Blacklist IP Addresses: Practical Use Cases
Whether you are safeguarding sensitive data, preventing unauthorized access, or managing compliance, whitelisting and blacklisting IP addresses provide powerful tools to achieve these goals. Below, we explore practical scenarios where these features can make a significant impact on your business operations and security strategy.
✅ Whitelist Trusted Users
For businesses, whitelisting can be used to grant secure access to internal teams or trusted external partners. For example, remote developers can access server environments safely without exposing the network to risks. On the other hand, whitelisting is particularly beneficial in scenarios where specific roles require exclusive access to sensitive areas of your website or server.
✅ Blacklist Malicious IPs
If your website faces repeated unauthorized login attempts or spam attacks, you can easily blacklist those IP addresses to prevent future threats. Blacklisting is a reactive yet highly effective measure against cyber threats. By analyzing server logs, administrators can identify suspicious activity and respond in real-time.
💸🔐 Cost vs. Security: Balancing the Trade-Offs
While IP whitelisting offers robust security benefits, it is not without challenges. Understanding the trade-offs can help businesses implement it more effectively.
Benefits
- Low Cost: No need to invest in complex infrastructure.
- Proactive Protection: Prevents unauthorized access by default.
- Enhanced Control: Administrators have precise oversight of who can access their systems.
Challenges
- Manual Configuration: Setting up and maintaining the whitelist can be time-intensive, especially for dynamic teams.
- Scalability Issues: As organizations grow, managing extensive whitelists across multiple platforms becomes challenging.
🛡️ Leverage xCloud’s IP Management & Secure Your Websites
The ability to whitelist or blacklist IP addresses is an indispensable feature for website security. With xCloud’s intuitive IP management system, you can protect your site from threats while maintaining seamless access for trusted users. Start managing your IPs today to safeguard your website against unauthorized access and enhance its overall security.
If you have found this blog helpful, feel free to subscribe to our blogs for valuable tutorials, guides, knowledge, and tips on web hosting and server management. You can also join our Facebook community to share insights and engage in discussions.