Want to safeguard your website from potential risks? A staging environment is like a safety net, letting you test new features without risking your live site. With xCloud, it is simple to create a staging environment, even if you are not a tech expert. Just follow this guide to easily set up and use your staging environment in xCloud.
What is a Staging Environment?
A staging environment allows you to test new features, plugins, themes, or updates without any risk to your live site. For web developers and site administrators, this is crucial because it means you can experiment freely, knowing that your changes will not accidentally break something that is already working perfectly.
In the world of website management, where one small mistake can lead to a major crisis, having a staging environment is not just extra work it is a smart and secure move. If you are using xCloud hosting, you are in for a treat. xCloud makes the process of creating and managing a staging environment seamless, even for those who might not be tech-savvy.
This guide will walk you through every step you need to take to create a staging environment in xCloud, deploy it, and manage your data efficiently between your staging and production sites.
Why a Staging Environment is Essential for Your Website
Before we dive into the technical details, it is important to understand why a staging environment is crucial. Imagine you are running an online store and decide to install a new plugin to enhance the user experience. Without a staging environment, you would need to install that plugin directly on your live site.
If the plugin causes a conflict or error, your customers could encounter a broken page, or worse, they might be unable to make purchases. The result? Lost sales and frustrated customers. A staging environment allows you to test such changes safely, ensuring your live site remains unaffected by potential issues.
A staging environment acts as a buffer zone, allowing you to catch potential problems before they affect your real-world users. But the benefits do not stop there:
- Risk-Free Experimentation: A staging environment lets you try out new features or changes without fear. Whether it is a new plugin, a theme, or a major update, you can see exactly how it will behave on your site without risking the live version.
- Performance Testing: Before rolling out changes, you can test how they affect your site’s performance. This is crucial for maintaining a fast and smooth user experience.
- Bug Fixing: Debugging on a live site can be a nightmare. A staging environment allows you to identify and fix bugs without any pressure, ensuring a smooth experience for your users once the changes go live.
- Security: Sometimes updates or changes can introduce security vulnerabilities. Testing in a staging environment helps you ensure that your site remains secure before the updates go live.
- Backup and Recovery: xCloud makes it easy to back up your site before making changes. This way, if something does go wrong, you can quickly revert to the previous version without any data loss.
Overall, a staging environment is essential for safely testing changes, ensuring your live site remains secure, bug-free, and performing at its best before going live.
How to Create a Staging Environment in xCloud?
Now that we understand the importance of a staging environment, let us get started on creating one in xCloud. Follow these step-by-step instructions below to create a staging environment in xCloud and manage data transfers between staging and production sites.
Step 1: Create a Staging Environment in xCloud
First, log into your xCloud account to access your dashboard. Select the server hosting of your live site. If you have not created a live site yet, do so first, as the staging environment requires an existing production site to clone.
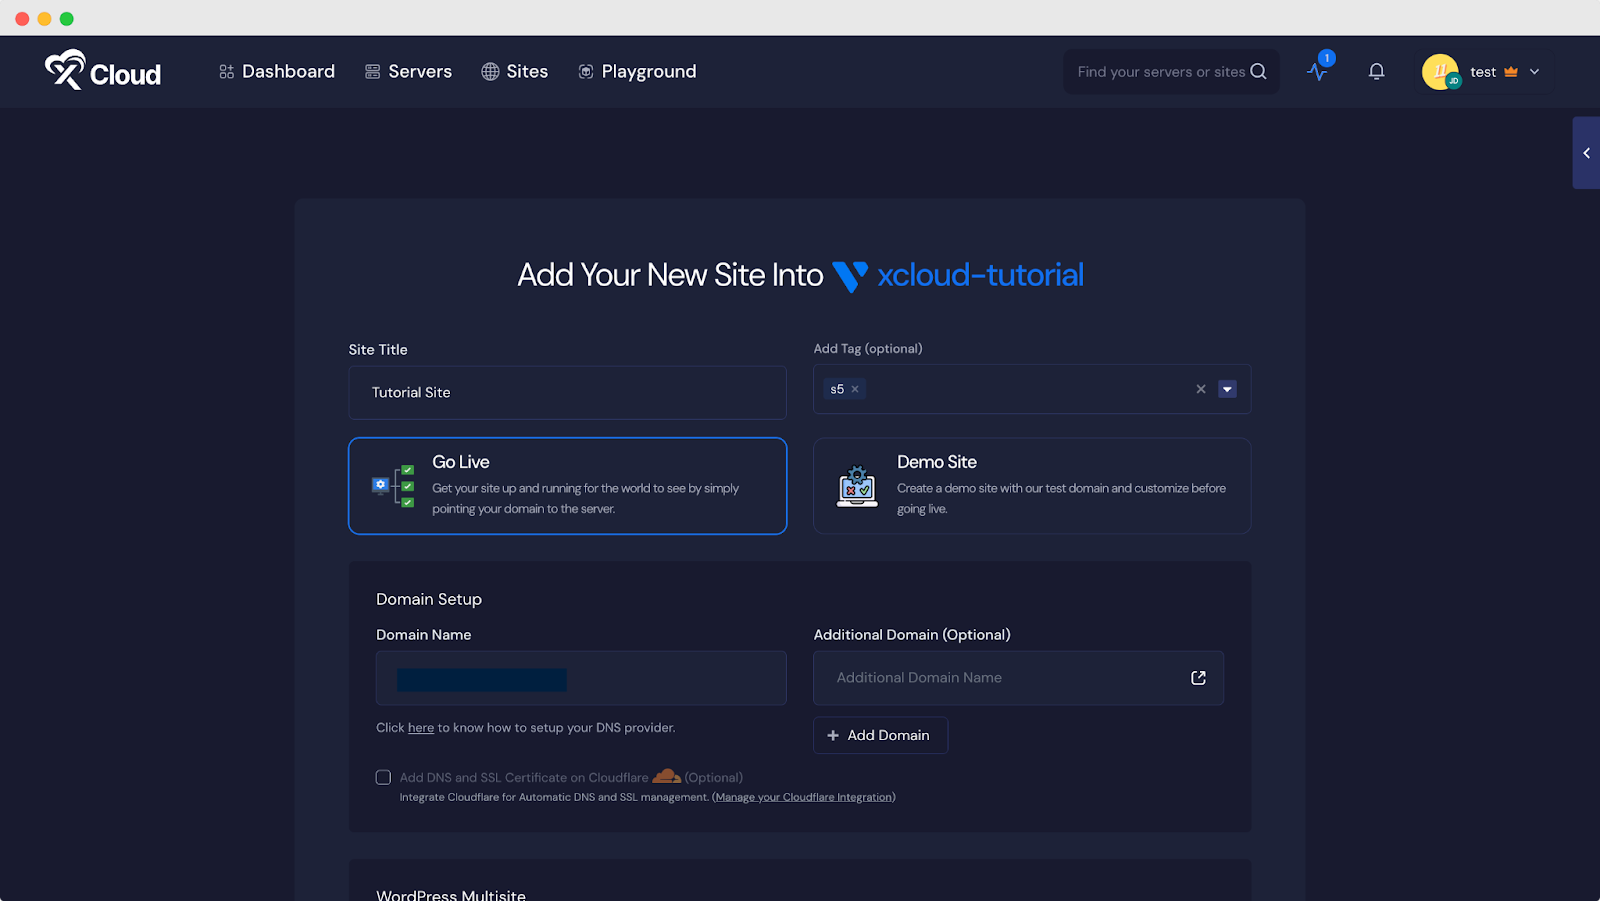
Note: Before creating your staging environment, name it clearly (e.g., ‘mystore-staging’), clone the latest live site data, and verify that permissions and access levels are correctly set to prevent unauthorized changes.
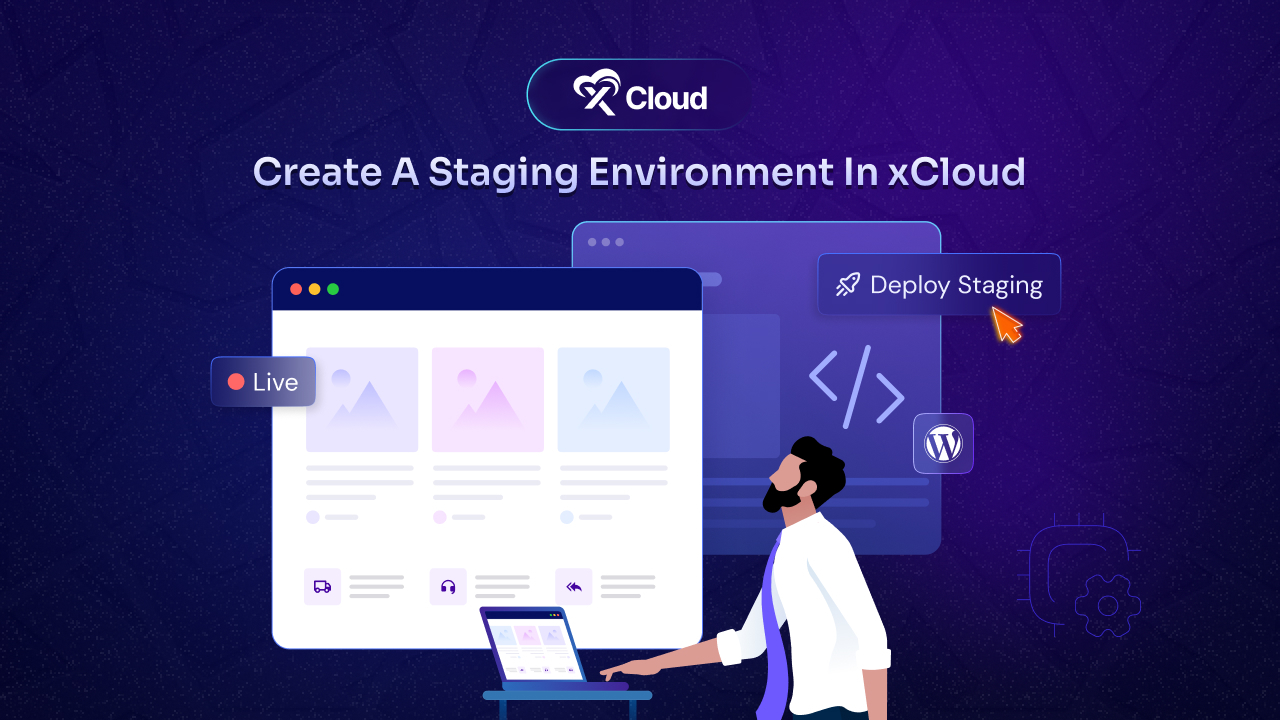
Step 2: Deploy Your Staging Environment
Now that you have created the staging environment, the next step is to deploy it. xCloud simplifies this process, so even if you are not particularly tech-savvy, you will find it easy to follow along.
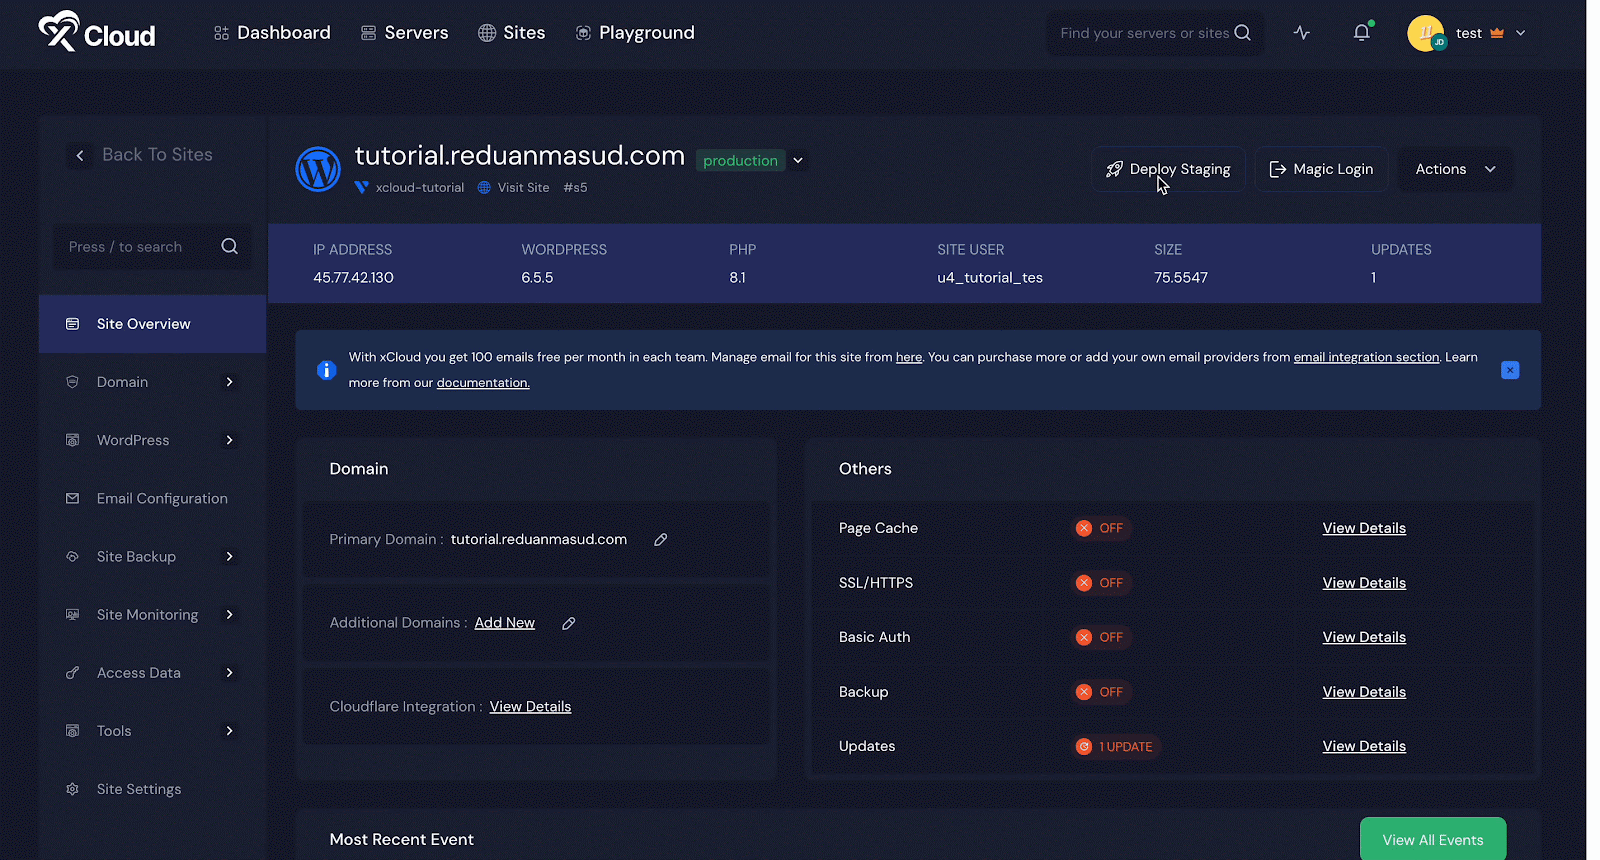
On your xCloud dashboard, you can quickly create a staging environment by expanding the drop-down found beside the site name and selecting ‘Add Staging Environment’ or clicking on the ‘Deploy Staging’ button.
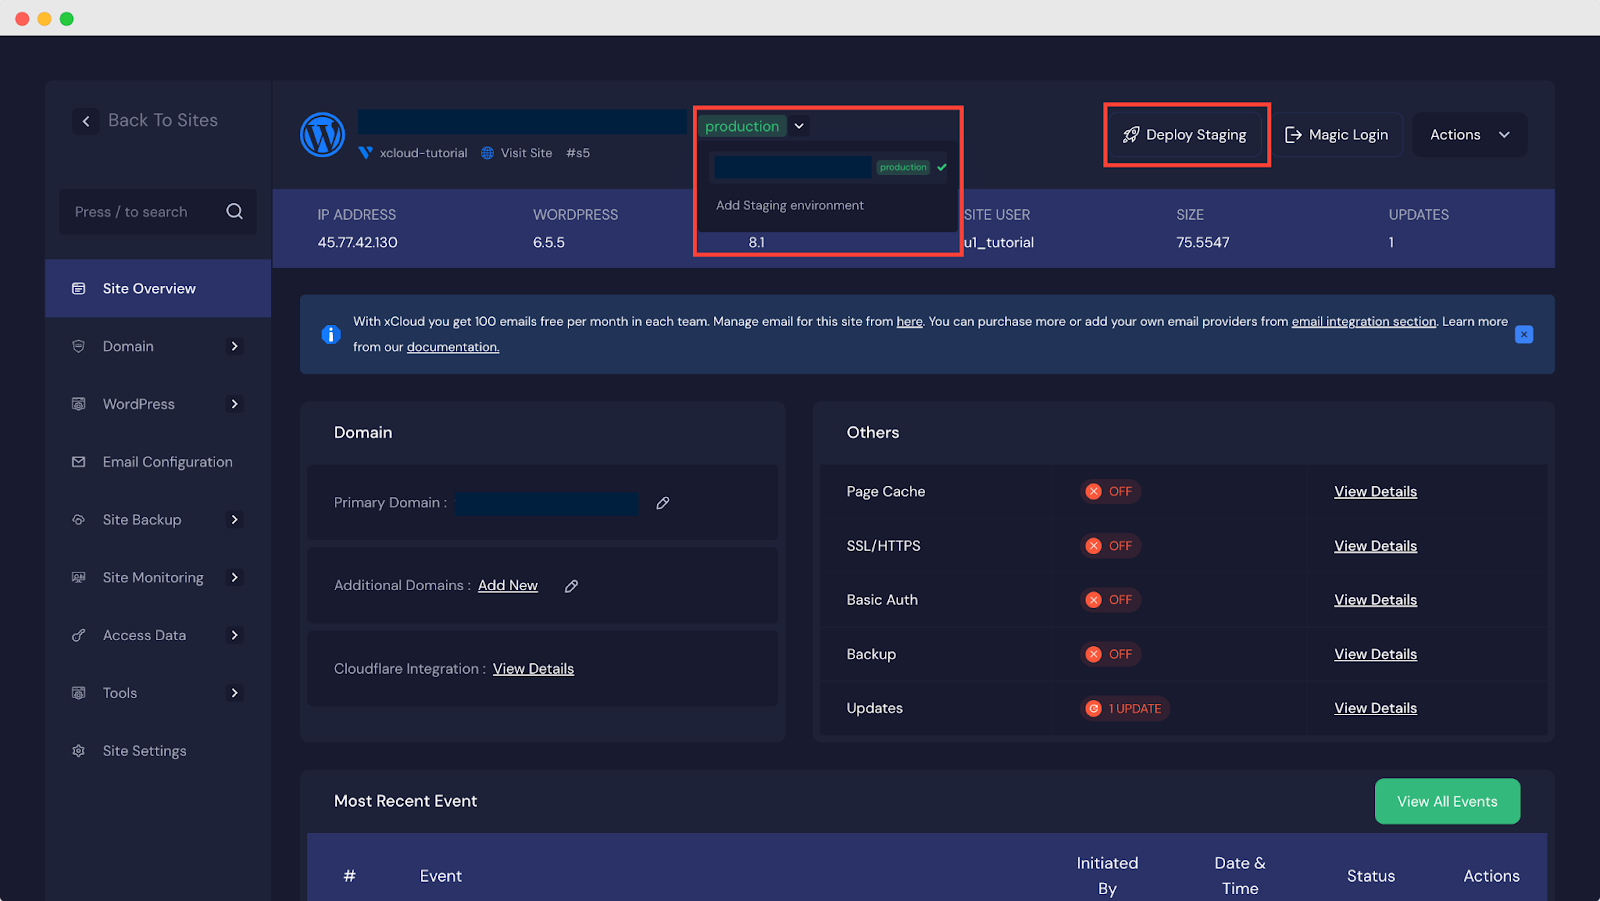
A confirmation window will appear, explaining how staging works in xCloud. Simply confirm by clicking on the ‘Deploy Staging’ button. Within moments, xCloud will deploy your staging environment, complete with a test domain.
Once deployed, you can begin customizing your staging environment. This could involve installing new plugins, updating themes, or making any other changes you need to test. With your staging environment deployed, you now have a safe space to make and test changes without any risk to your live site.
Step 3: Pull and Push Site Data
Once your staging environment is live and running, it is time to manage the data between your staging and production sites. This is where the real power of xCloud comes into play, allowing you to seamlessly transfer data between environments.
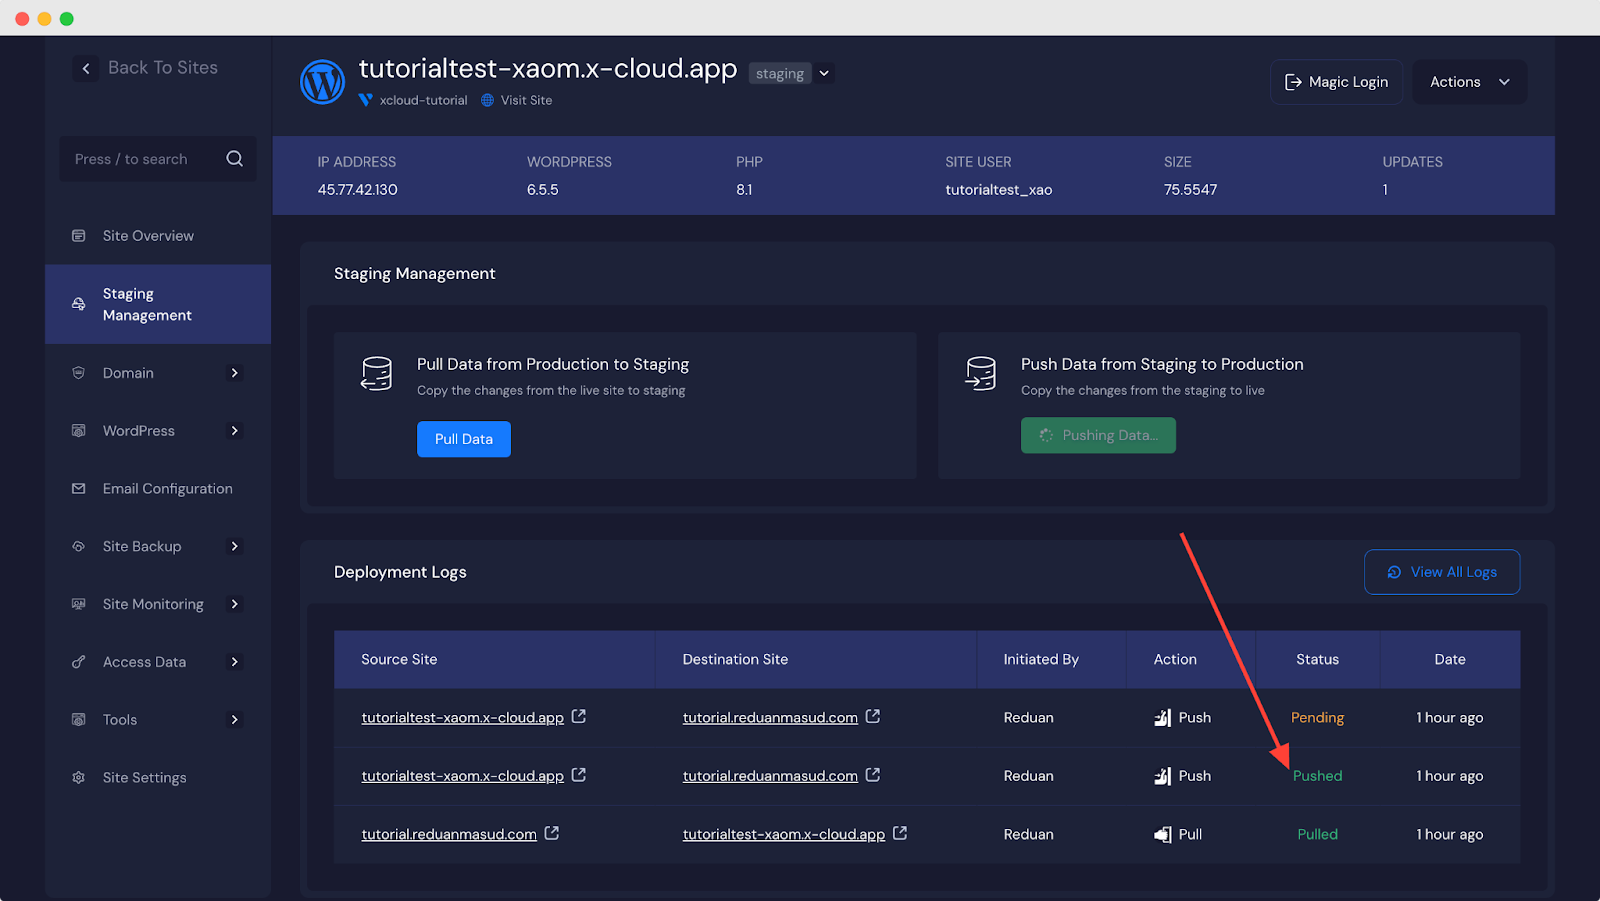
Navigate to the ‘Staging Management’ tab on your staging site page. Here, you will find options for pulling and pushing data, as well as access to deployment logs. These logs are incredibly useful for tracking changes and ensuring that everything is working as expected.
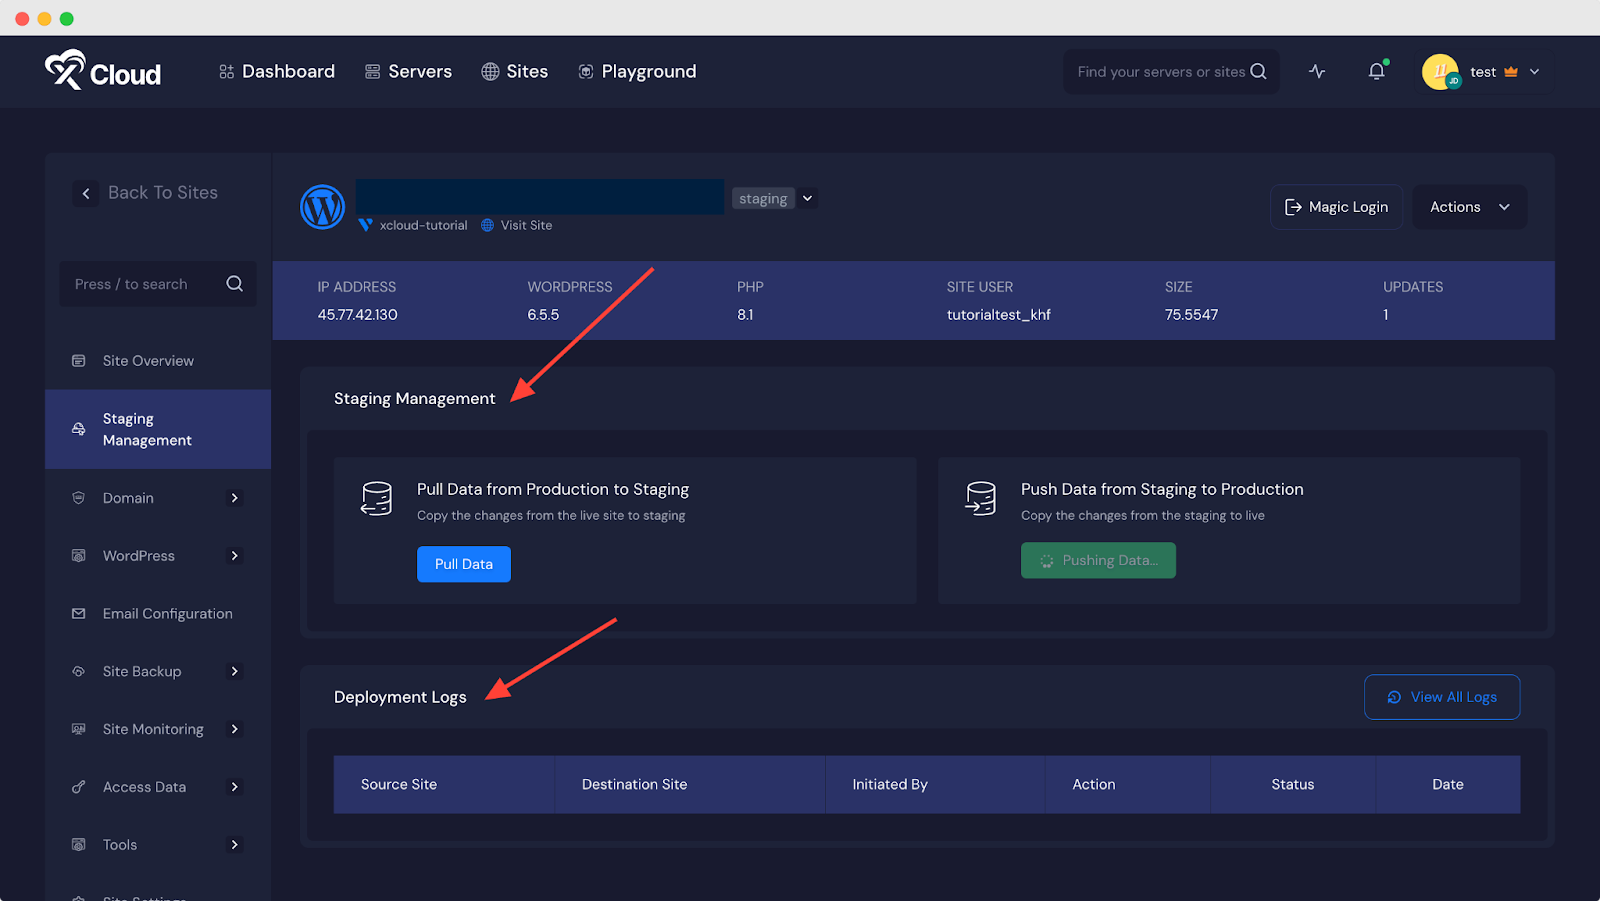
If you need to update your staging environment with the latest data from your live site, click on the ‘Pull Data’ button. You will have two options to pull: Files and Database. Plus, you can choose to overwrite all files or keep the most recent updates since the last pull with the ‘Incremental’ option.
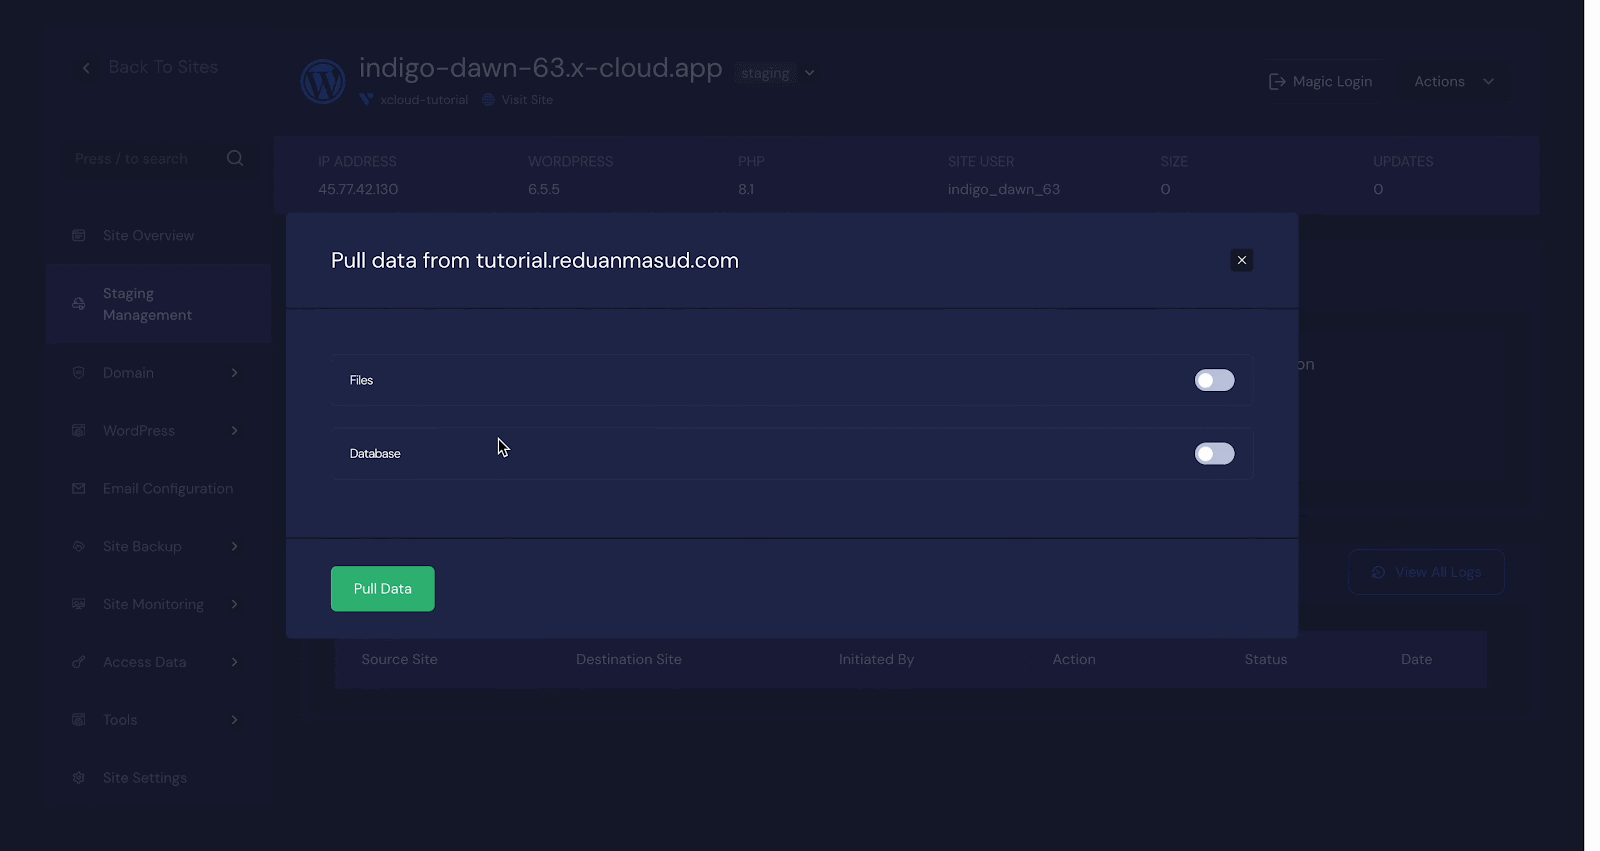
You can pull the full database or select specific tables to import only the data you need. Once you are done selecting, hit the ‘Pull Data’ button.
[Note] This is especially useful if you are only working on specific sections of your site.
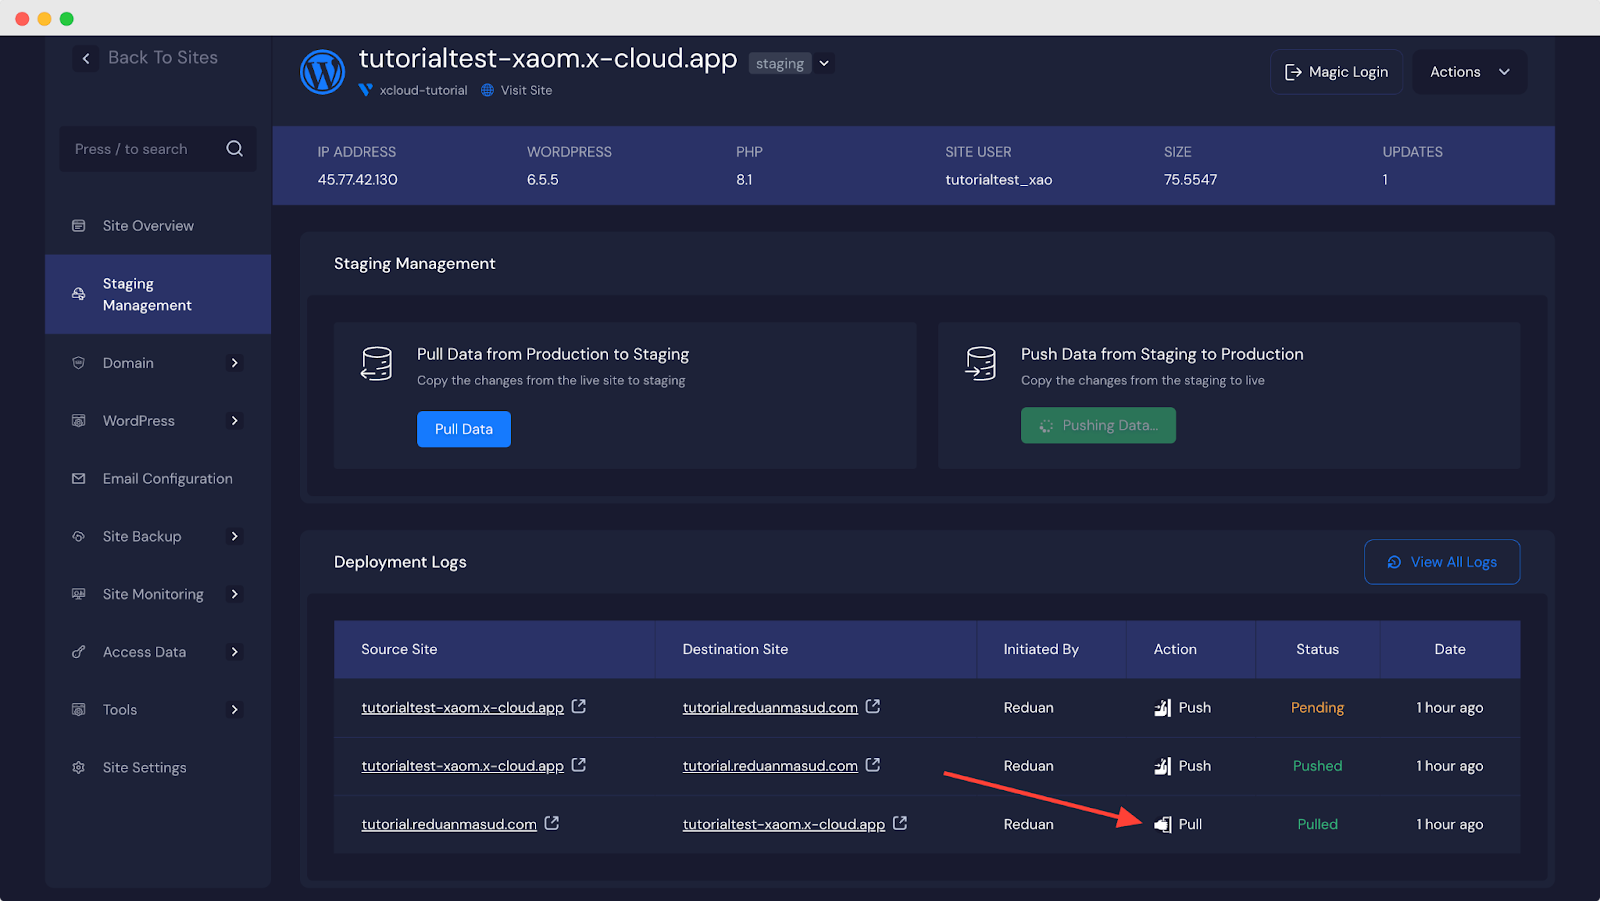
Your data pull will initiate and will be completed in a few seconds. You can see the pull status and record in the ‘Deployment Logs’.
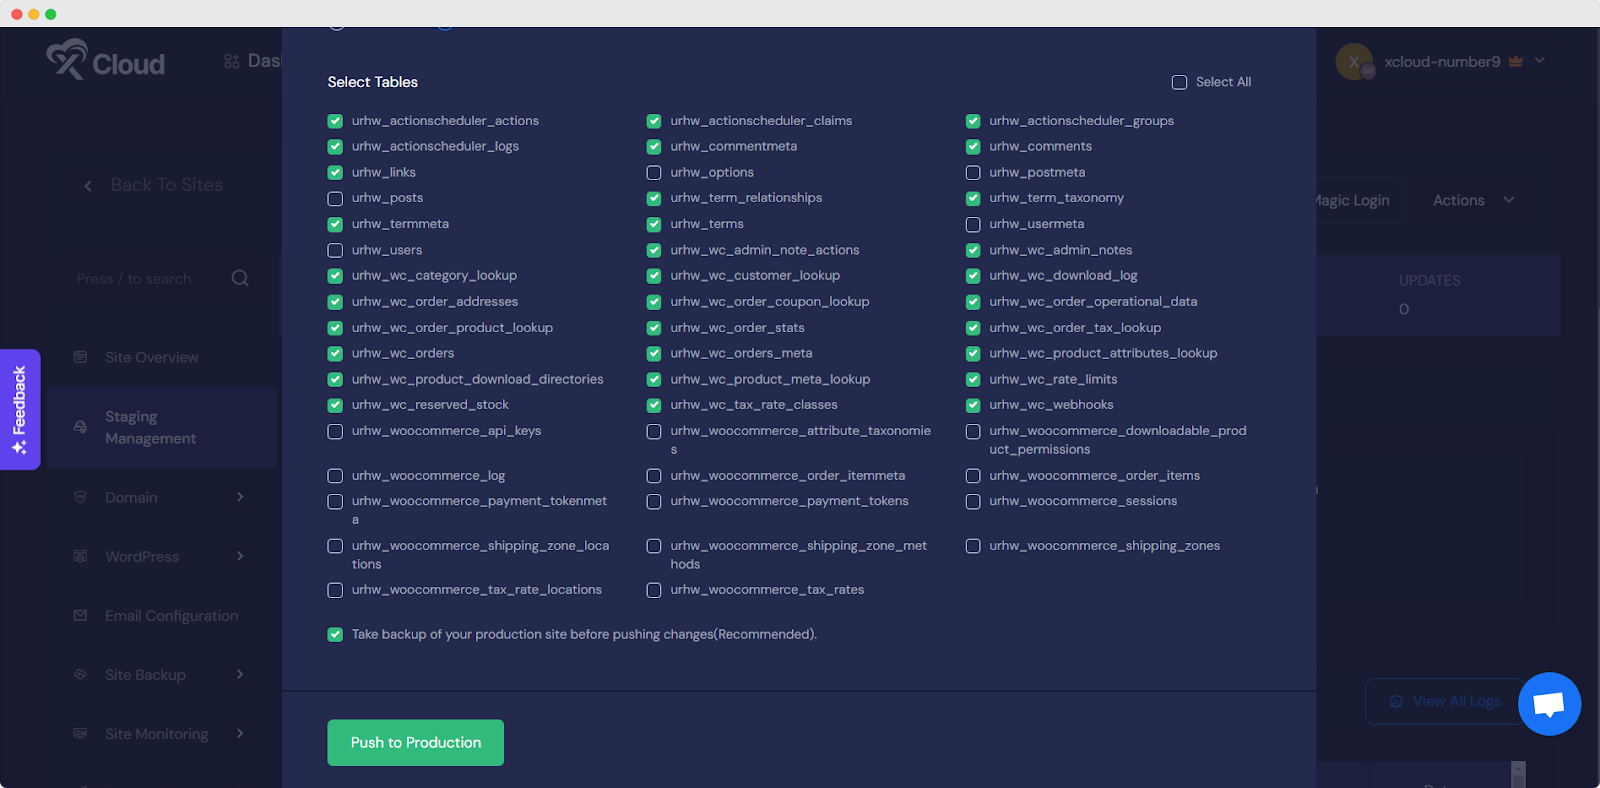
To push data from the staging environment to the production site, click the ‘Push Data’ button. A popup will appear, allowing you to select files and databases to push. You can choose to overwrite all files or apply the most recent updates using the ‘Incremental’ option.
Note: if you are a woocommerce user creating a staging site pushing data might conflict with your live site data for products, orders, or transactional values. Create a backup and use a secure method to data.
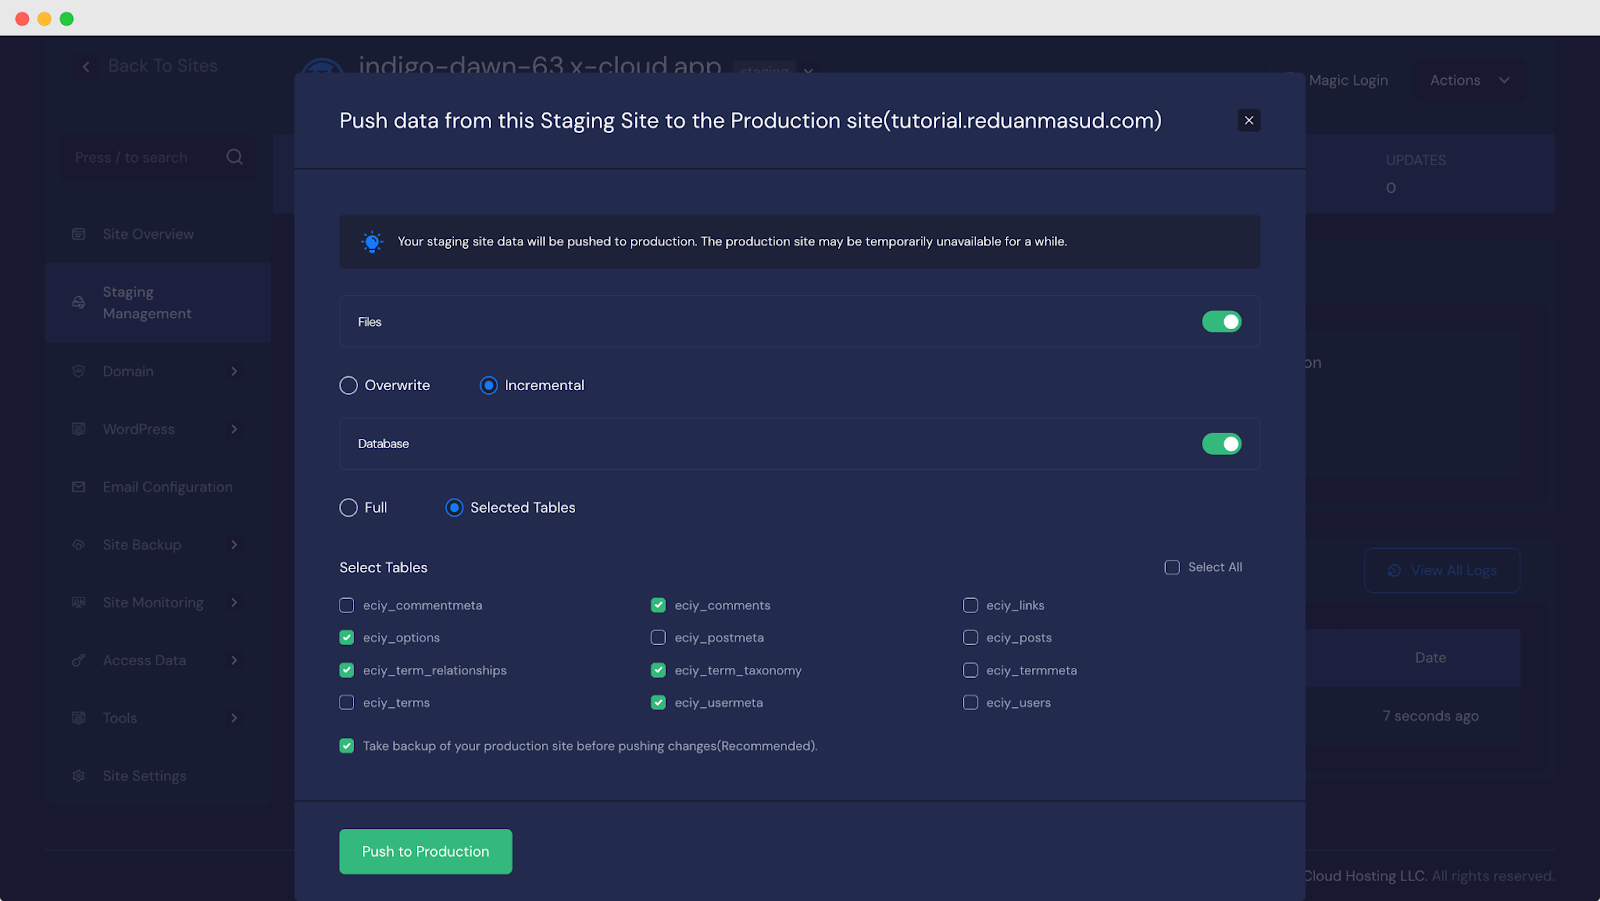
Alternatively, you can push the entire database or select specific tables from staging to live. However, xCloud strongly recommends backing up the production site before pushing data to prevent any potential data loss in case of errors.
After selecting your preferred options, click the ‘Push to Production’ button to initiate the data push. The process will be completed within seconds. During the push, xCloud backs up your environments, overwrites the destination, and clears the cache. You can view the push status and records in the ‘Deployment Logs’.
After pushing data from staging to production, it is essential to perform some final checks on your live site. Make sure that all functionality is working as expected, and that no critical features have been disrupted. It is also a good idea to have a few other people test the site from different devices and browsers to ensure everything is working smoothly.
This is how efficiently you can create a staging environment to pull and push site data in xCloud between your production site and staging.
How to Avoid Data Conflict in WooCommerce Push for Product And Order?
Whenever you push data from a staging site to a live website in xCloud, it is crucial to ensure that WooCommerce orders, customers, and products on the live site remain unaffected. Unfortunately, there is no automatic way to prevent these items from copying or merging between the staging and live sites. However, you can avoid losing your essential WooCommerce data with careful manual work.
While certain plugins promise seamless WooCommerce data merging between staging and live environments, their performance in practice often needs to improve. The potential for unintended data overwrites poses a serious threat to order and product integrity.
To safeguard your data, it is essential to adopt a manual approach when transferring WooCommerce data between staging and live sites.
Understanding How WooCommerce Stores Data
WooCommerce and WordPress store their data, including orders, products, and user information, in specific database tables.
Orders and products, for instance, are stored in the wp_posts and wp_postmeta tables under a custom post type labeled ‘orders‘. User information is stored in wp_users and wp_usermeta, while other WooCommerce-specific data like tax rates and order items are stored in custom tables, typically prefixed with ‘_woocommerce.’
Note: In xCloud Database table files are labeled differently on different sites
Three Methods to Prevent Data Overwrite
To migrate data from your staging site to your production site while ensuring WooCommerce data on the live site remains untouched, consider the following methods:
1. Selective Table Exclusion
In this method, you exclude all database tables except for the _options table and select only the necessary plugins and themes to push. This prevents the loss or overwriting of any data generated on the live site after the staging site was created. However, any missing data must be recreated manually on the live site after the push.
2. Export And Import WooCommerce Data
This method involves exporting orders, user data, and other transactional data from the live site and importing them into the staging site before pushing it live. This allows you to safely copy the entire staging site while preserving live WooCommerce data. For those unfamiliar with the database structure, this is the recommended approach.
3. Exclude Modified Tables
Here, you exclude modified database tables like _posts and _postmeta from the push process. While this prevents certain data from being overwritten, it may result in missing images or layout elements on the live site, particularly if you use visual editors like Gutenberg or Elementor. Use this method only when necessary, as it can disrupt your site’s design and functionality.
To ensure data integrity and prevent conflicts when transferring WooCommerce data between staging and live sites, it is crucial to avoid automatic merging. By following the recommended methods you can safely migrate data while preserving your live site’s WooCommerce information.
Advanced Tips for Managing Your Staging Environment
Creating and managing a staging environment in xCloud is straightforward, but there are a few advanced tips that can make your life even easier:
- Automated Backups: Set up automated backups of your staging and production environments. This ensures that you always have a recent version to revert to in case something goes wrong.
- Version Control: Use version control software like Git in conjunction with your staging environment. This allows you to track changes more effectively and collaborate with other developers.
- Regular Updates: Keep your staging environment updated with the latest data from your live site. This ensures that your tests are always conducted in an environment that closely mirrors your production site.
- Security Testing: Use your staging environment to test the security of your site. Run vulnerability scans and penetration tests to identify and fix potential security issues before they reach your live site.
- Stress Testing: If you are planning a major update or expecting a surge in traffic, use your staging environment to conduct stress tests. This will help you identify potential bottlenecks and optimize your site’s performance before the changes go live.
- User Testing: Before pushing changes live, consider running user tests in your staging environment. Gather feedback from real users to ensure that the changes improve the user experience.
- Documentation: Keep detailed documentation of all the changes you make in your staging environment. This can be invaluable if you need to troubleshoot issues or revert to a previous version.
- Collaboration: If you are working with a team, ensure that everyone has access to the staging environment and is on the same page regarding changes. Clear communication can prevent costly mistakes.
You can enhance the efficiency and security of your staging environment in xCloud, ensuring smooth updates and a seamless experience for both your team and users by implementing these advanced tips.
Securely Create & Manage Staging for a High-Performance Website
Creating a staging environment in xCloud is not just about protecting your live site. It is about empowering yourself to be confident that your site visitors will always have a smooth, uninterrupted experience.
xCloud’s staging environment tools are designed to be user-friendly while offering powerful features for more advanced users. Following the steps in this blog you can create a robust staging environment in xCloud that keeps your site safe, secure, and performing at its best. If you found this blog helpful, subscribe to our blog for more tutorials, guides, and tips on web hosting and server management. Join our Facebook Community to share insights and engage in discussions.