


A mailbox stores and manages your emails. It allows you to send, receive, and organize messages using an email address that includes your own domain. For example, instead of using a generic email like yourname@gmail.com, you can use yourname@yourbusiness.com.
Having a professional mailbox with your domain helps you build trust with customers. It gives your communication a branded, business-like look. It also helps you manage business emails more securely and efficiently, all in one place.
The xCloud MailBox Addon has been upgraded with a powerful new email infrastructure partner to bring you much more than just email. Your mailbox is now a complete business productivity suite with AI-powered features, a built-in calendar, task management, cloud drive, document editors, shared contacts, and enterprise-grade security.
Here’s what you can now do with xCloud MailBox: #
- AI-Powered Productivity – Auto-generate email replies and subject lines with AI, summarize long email threads in seconds, let smart classification sort your inbox automatically, hand off routine work to Smart Tasks, and have your emails read aloud with text-to-speech.
- Full Business Workspace – Manage your schedule with a built-in calendar that supports RSVP, smart scheduling, and resource booking. Track work with shared task lists, due dates, and comment threads. Store and share files with Cloud Drive, including version history, WebDAV, and sync clients for every platform. Edit documents, spreadsheets, and presentations right in your browser with real-time collaboration.
- Enterprise-Grade Security – Protect your inbox with two-factor authentication, WebAuthn hardware key support, end-to-end encryption, and premium antivirus, antispam, and antiphishing protection.
To learn more about all available features and plans, visit the xCloud Mailbox Addon.
Note: xCloud is offering a free 100 MB Mailbox plan that is available exclusively for xCloud Managed Servers and xCloud Provider Servers. To get this offer, you need to create a new mailbox on an xCloud Managed Server or on an xCloud Provider. Existing mailboxes are not eligible for the free plan.
If you already have a mailbox, you can move it to our new mailbox provider and enjoy the upgraded features while keeping your current price.
To create professional email addresses with your own domain, use the Mailbox Addon. With the xCloud MailBox Addon, you can create and manage professional email addresses using your own domain name.
You can send and receive emails securely from your email addresses. It helps you manage business emails with ease and gives you full control over your mailbox setup. Follow the steps below to set up your Mailbox easily.
Note: This Addon is not available on our Reseller Hosting Program. To learn about the features that are available on the Reseller Hosting Program, please visit here.
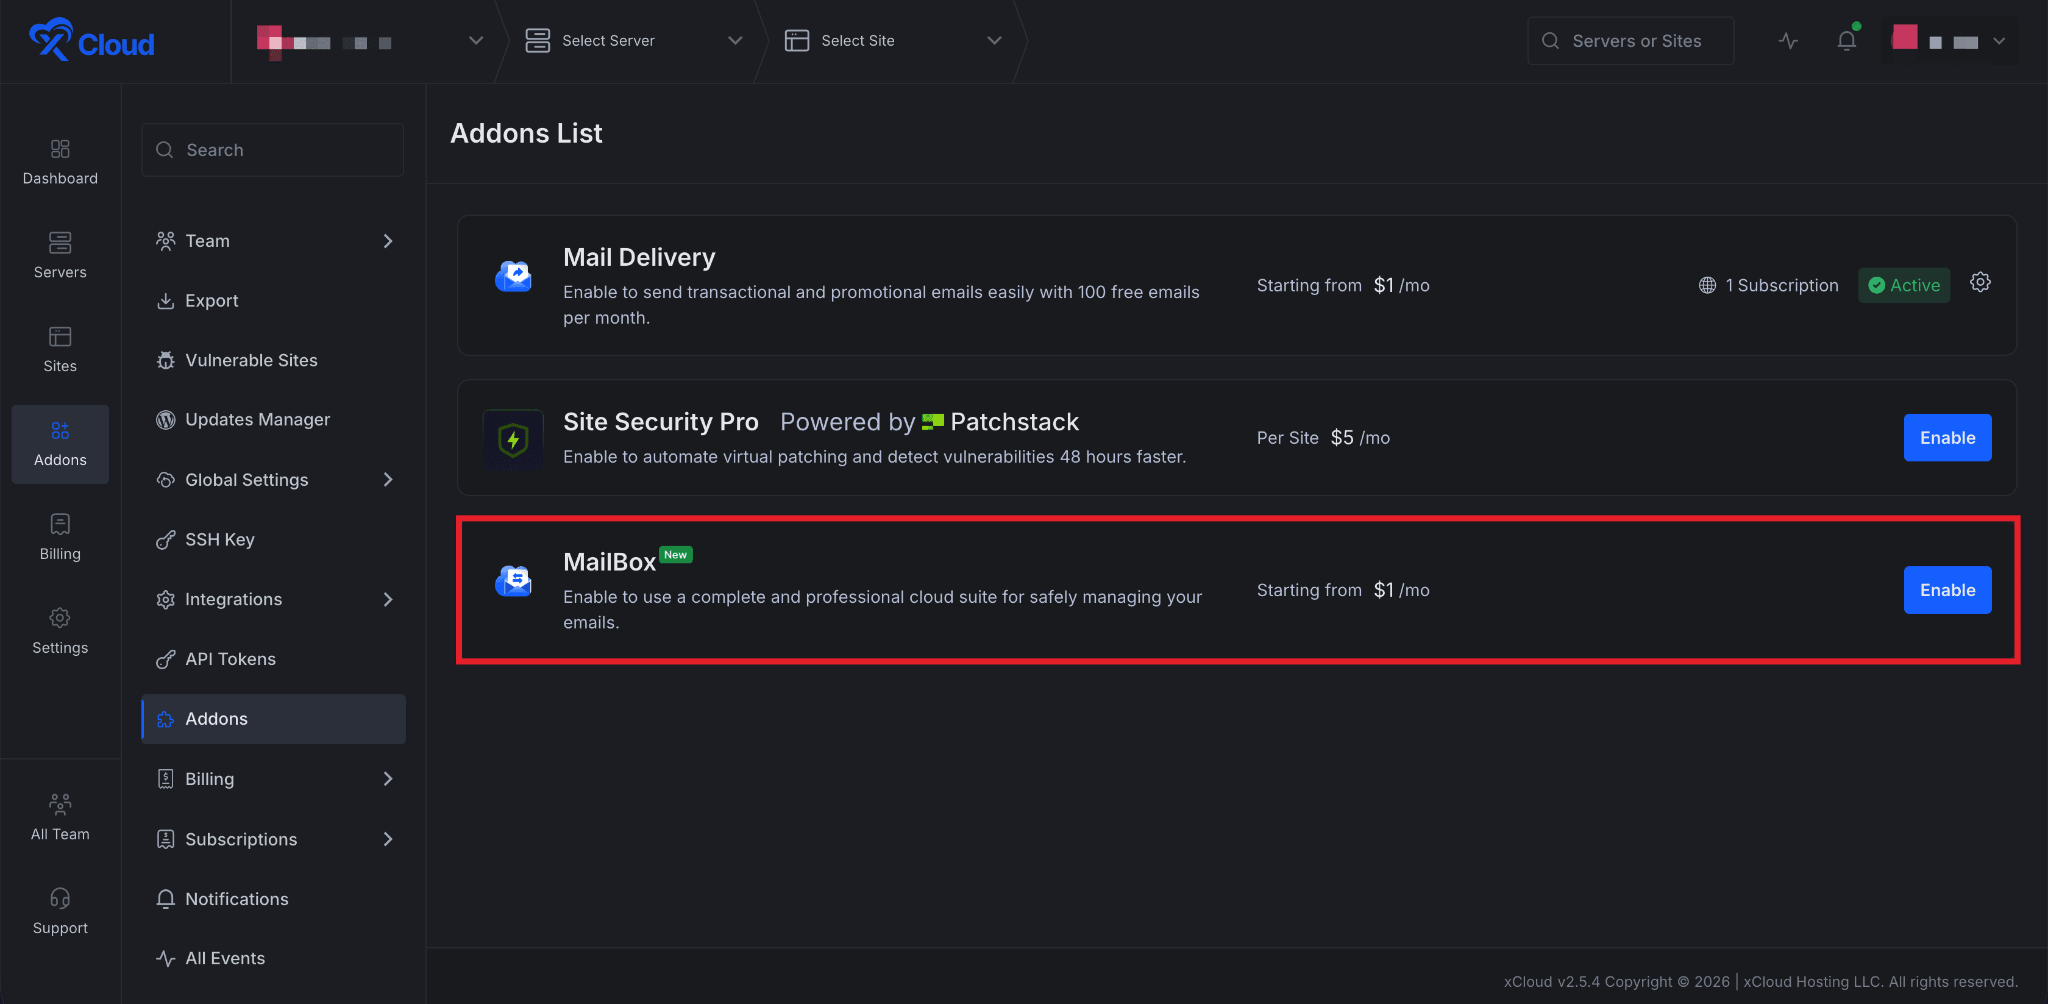
Step 1: Go to Addons #
Log in to your xCloud dashboard, then head over to the left navigation menu and click on the‘Addons’ option from the dashboard. Here you will find all the addons available in xCloud.
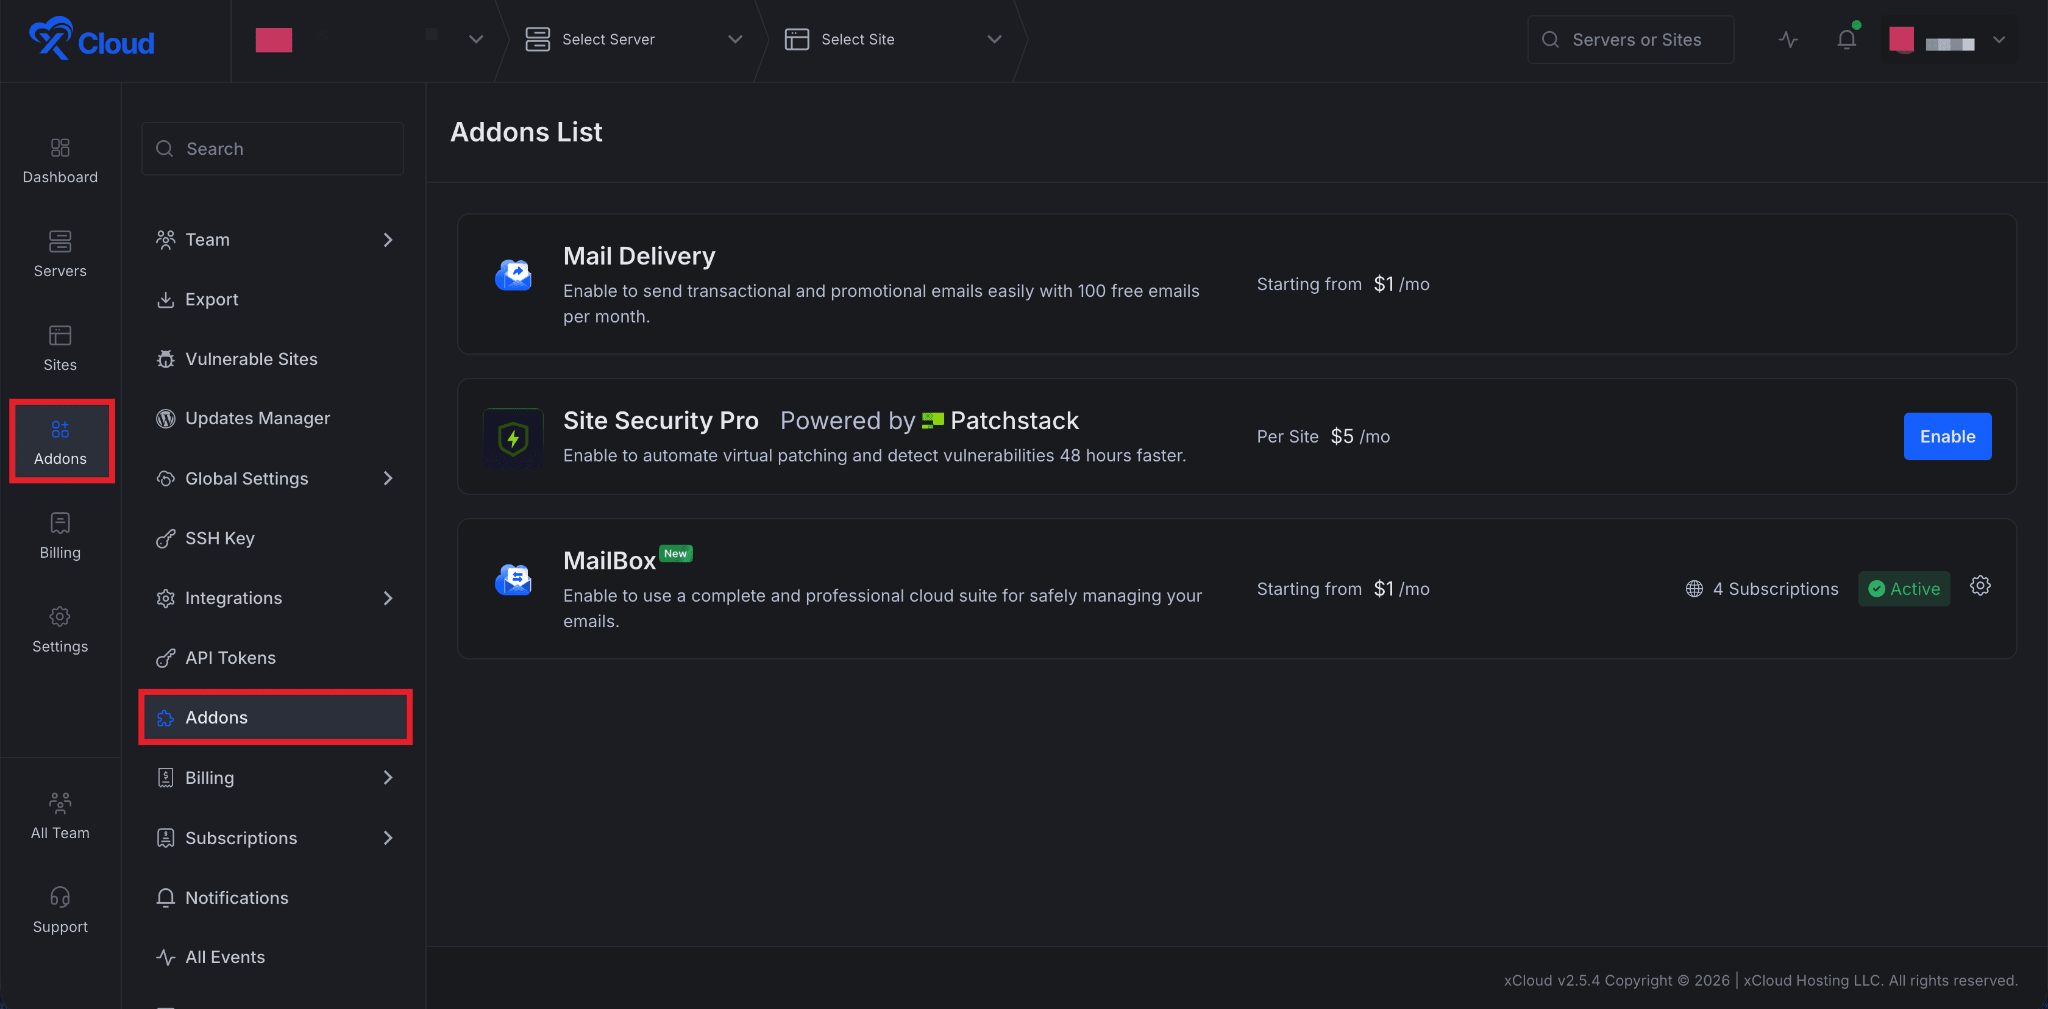
Step 2: Enable xCloud Mailbox Addon #
Look for the ‘MailBox’ addon from the list of available addons. If you have not purchased it yet, click the ‘Enable’ button to purchase it.
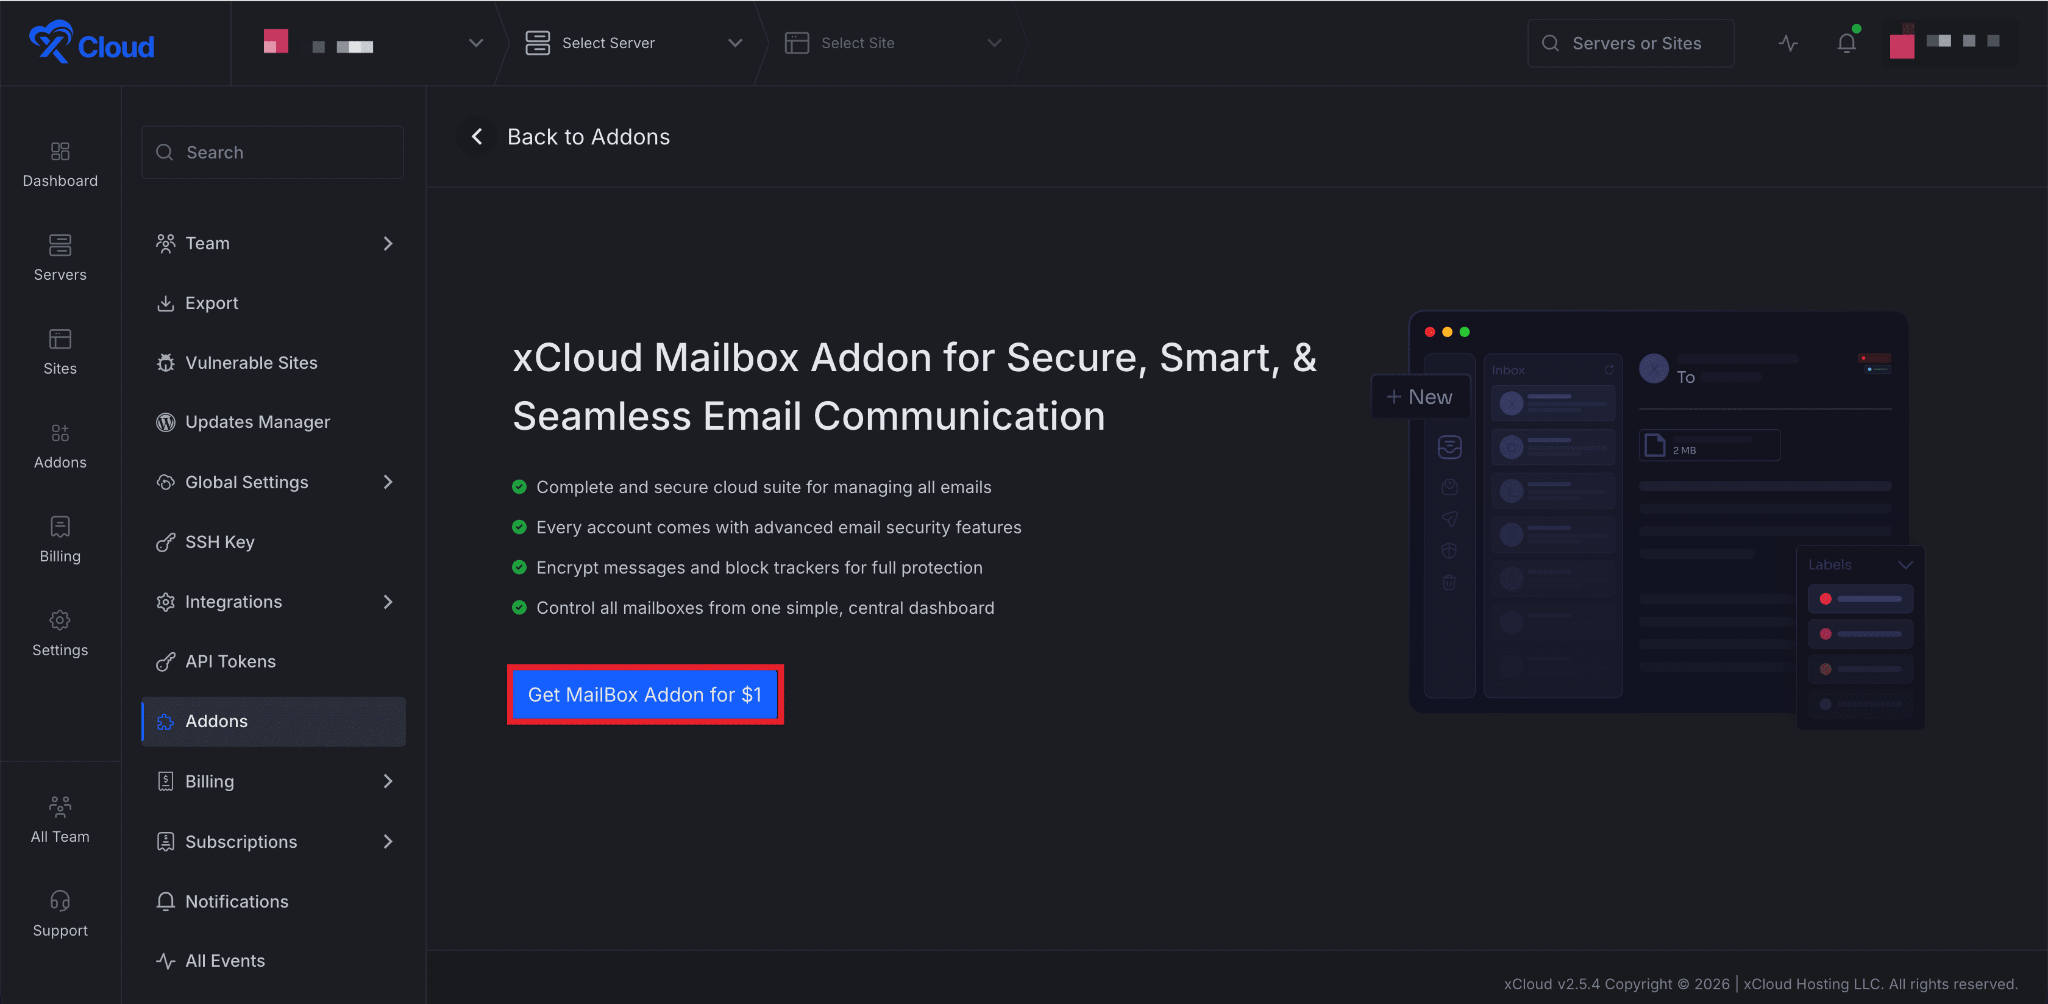
Next, click on the ‘Get Mailbox For $1” button to proceed.
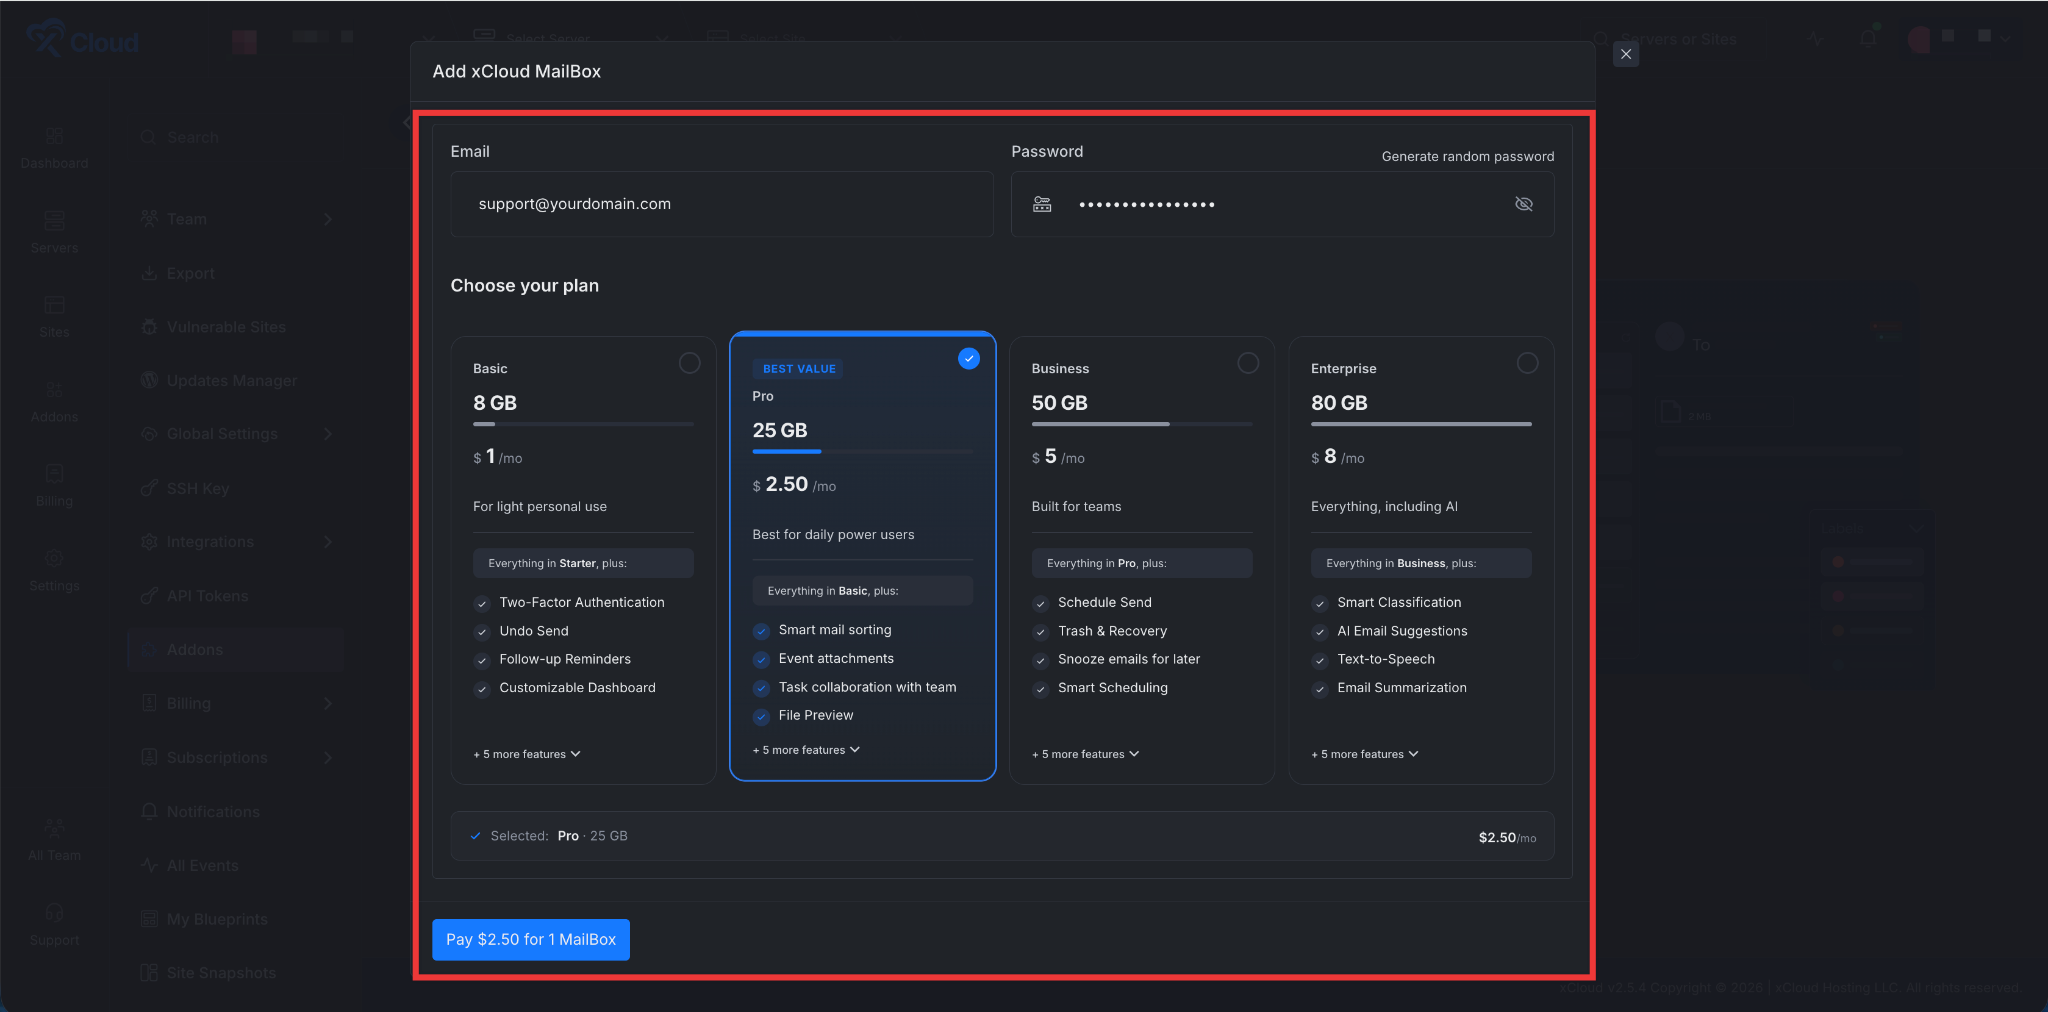
Step 3: Subscribe to a Mailbox Subscription Plan #
Next, a pop-up will appear. Enter the credentials ‘Email’ and ‘Password’ in the dedicated fields. Then choose a plan according to your needs. And finally, click on the ‘Pay’ button.
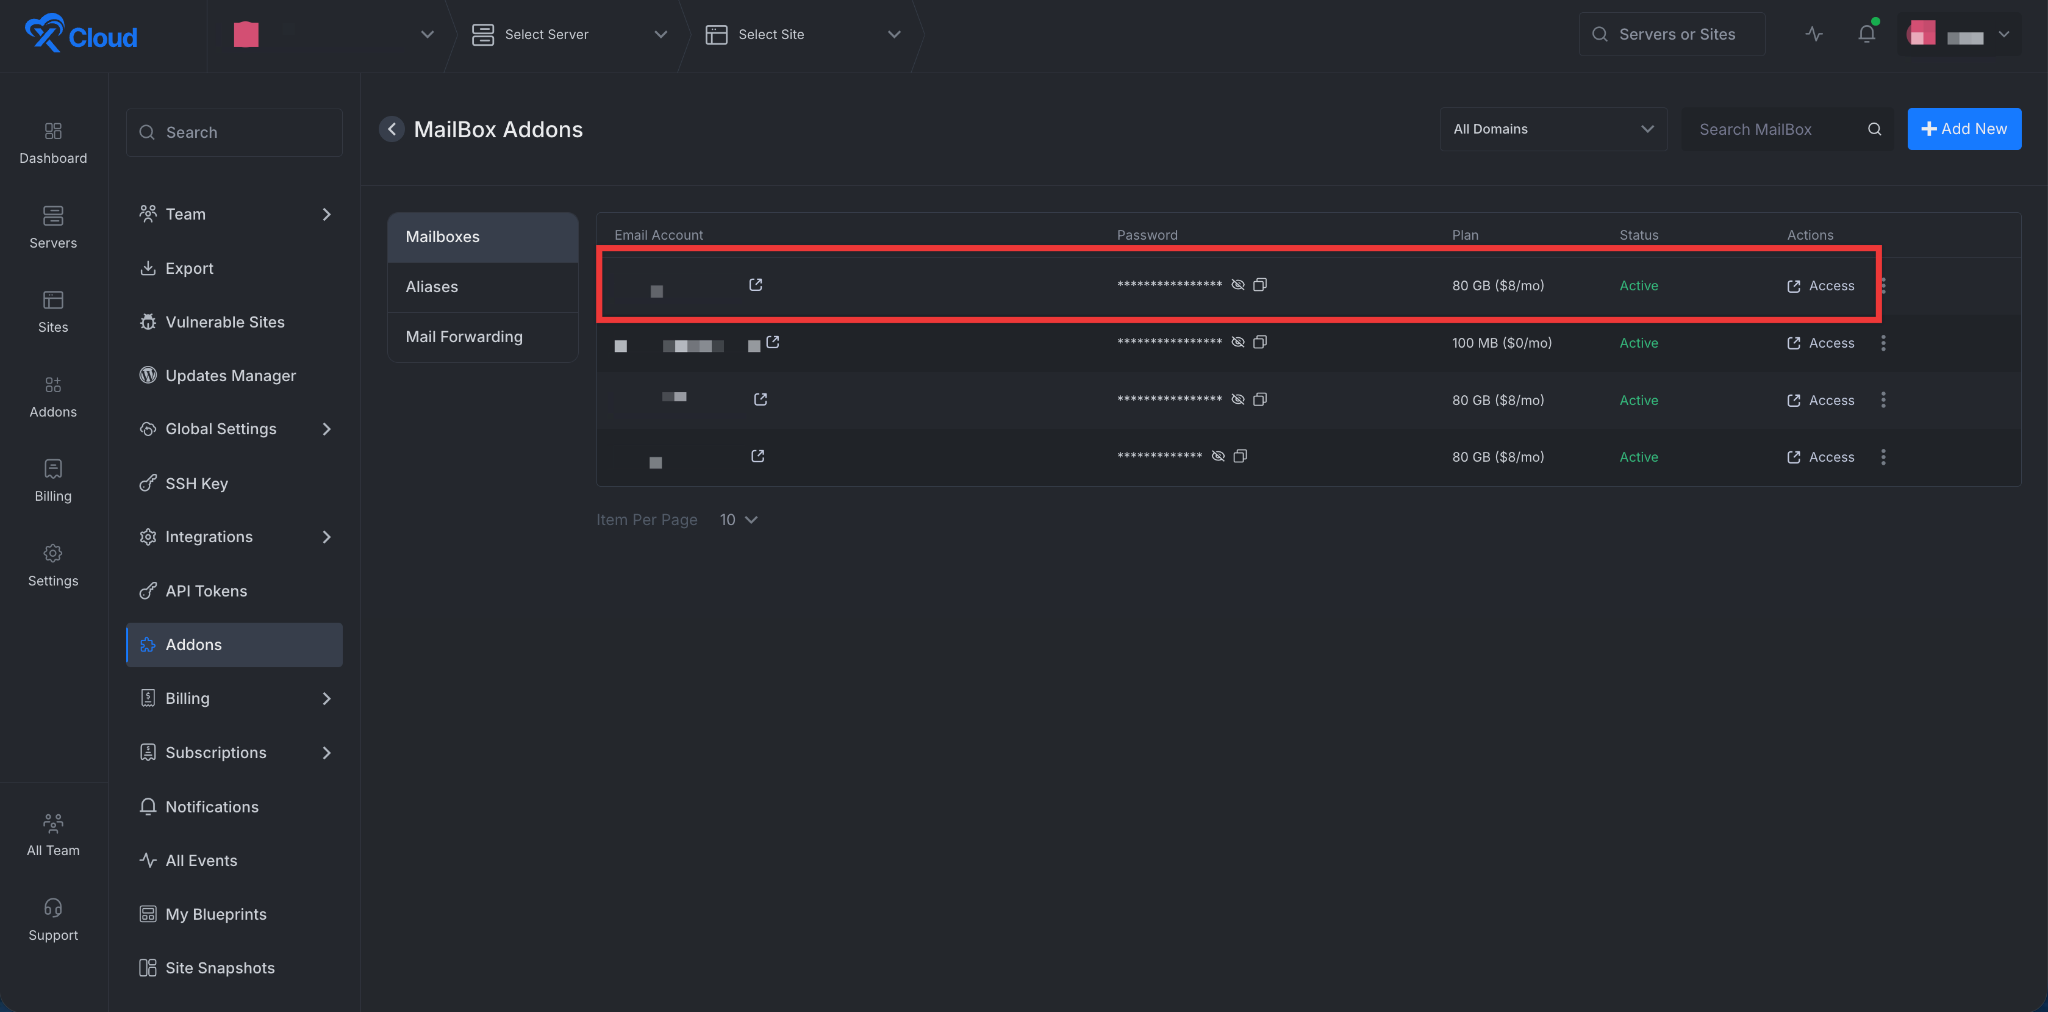
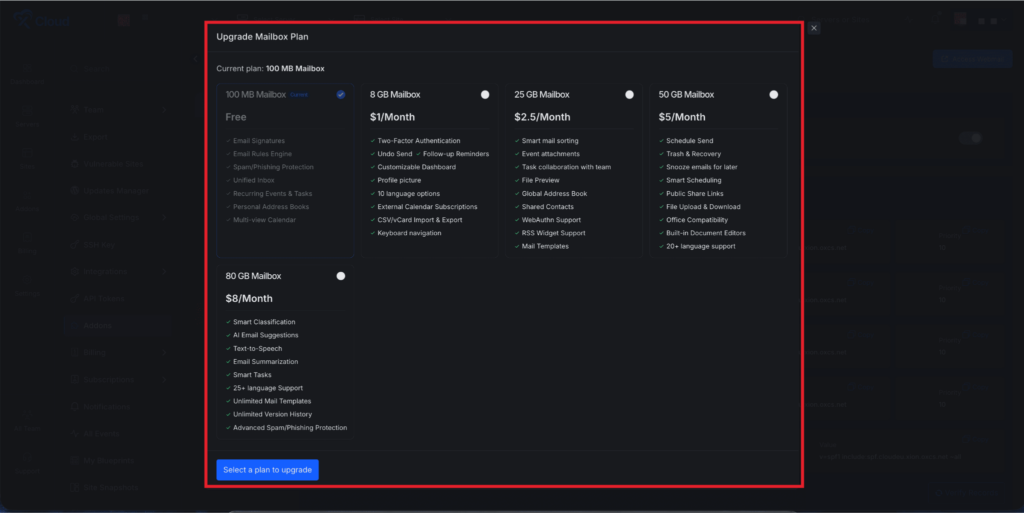
Right now, xCloud Mailbox offers 5 plans:
| Free 100MB | 8GB MailBox | 25GB MailBox | 50GB MailBox | 80GB MailBox |
|---|---|---|---|---|
| Available on all plans: | Everything in the 8GB Plan, and: | Everything in the 50GB plan | Everything is free, and: | Everything in 50GB plan |
| Email Signatures | Two-Factor Authentication | Smart mail sorting | Schedule Send | Smart Classification |
| Email Rules Engine | Undo Send | Event attachments | Trash & Recovery | AI Email Suggestions |
| Spam/Phishing Protection | Follow-up Reminders | Task collaboration with team | Snooze emails for later | Text-to-Speech |
| Unified Inbox | Customizable Dashboard | File Preview | Smart Scheduling | Email Summarization |
| Recurring Events | Profile picture | Global Address Book | Public Share Links | Smart Tasks |
| Recurring Tasks | 10 language options | Shared Contacts | File Upload & Download | 25+ language Support |
| Personal Address Books | External Calendar Subscriptions | WebAuthn Support | Office Compatibility | Task collaboration with the team |
| Recurring Events | CSV/vCard Import & Export | RSS Widget Support | Built-in Document Editors | Unlimited Version History |
| Multi-view Calendar + More | Keyboard navigation + More | Mail Templates + More | 20+ language support + More | Advanced Spam/Phishing Protection + More |
| Get Started For Free | Get Started For $1/mo | Get Started For $2.5/mo | Get Started For $5/mo | Get Started For $8/mo |
Note: xCloud is offering a free 100 MB Mailbox plan that is available exclusively for xCloud Managed Servers and xCloud Provider Servers. To get this offer, you need to create a new mailbox on an xCloud Managed Server or on an xCloud Provider. Existing mailboxes are not eligible for the free plan.
However, existing mailboxes can be migrated to our new mailbox provider. This allows you to benefit from all the upgraded features while continuing to pay your current rate.
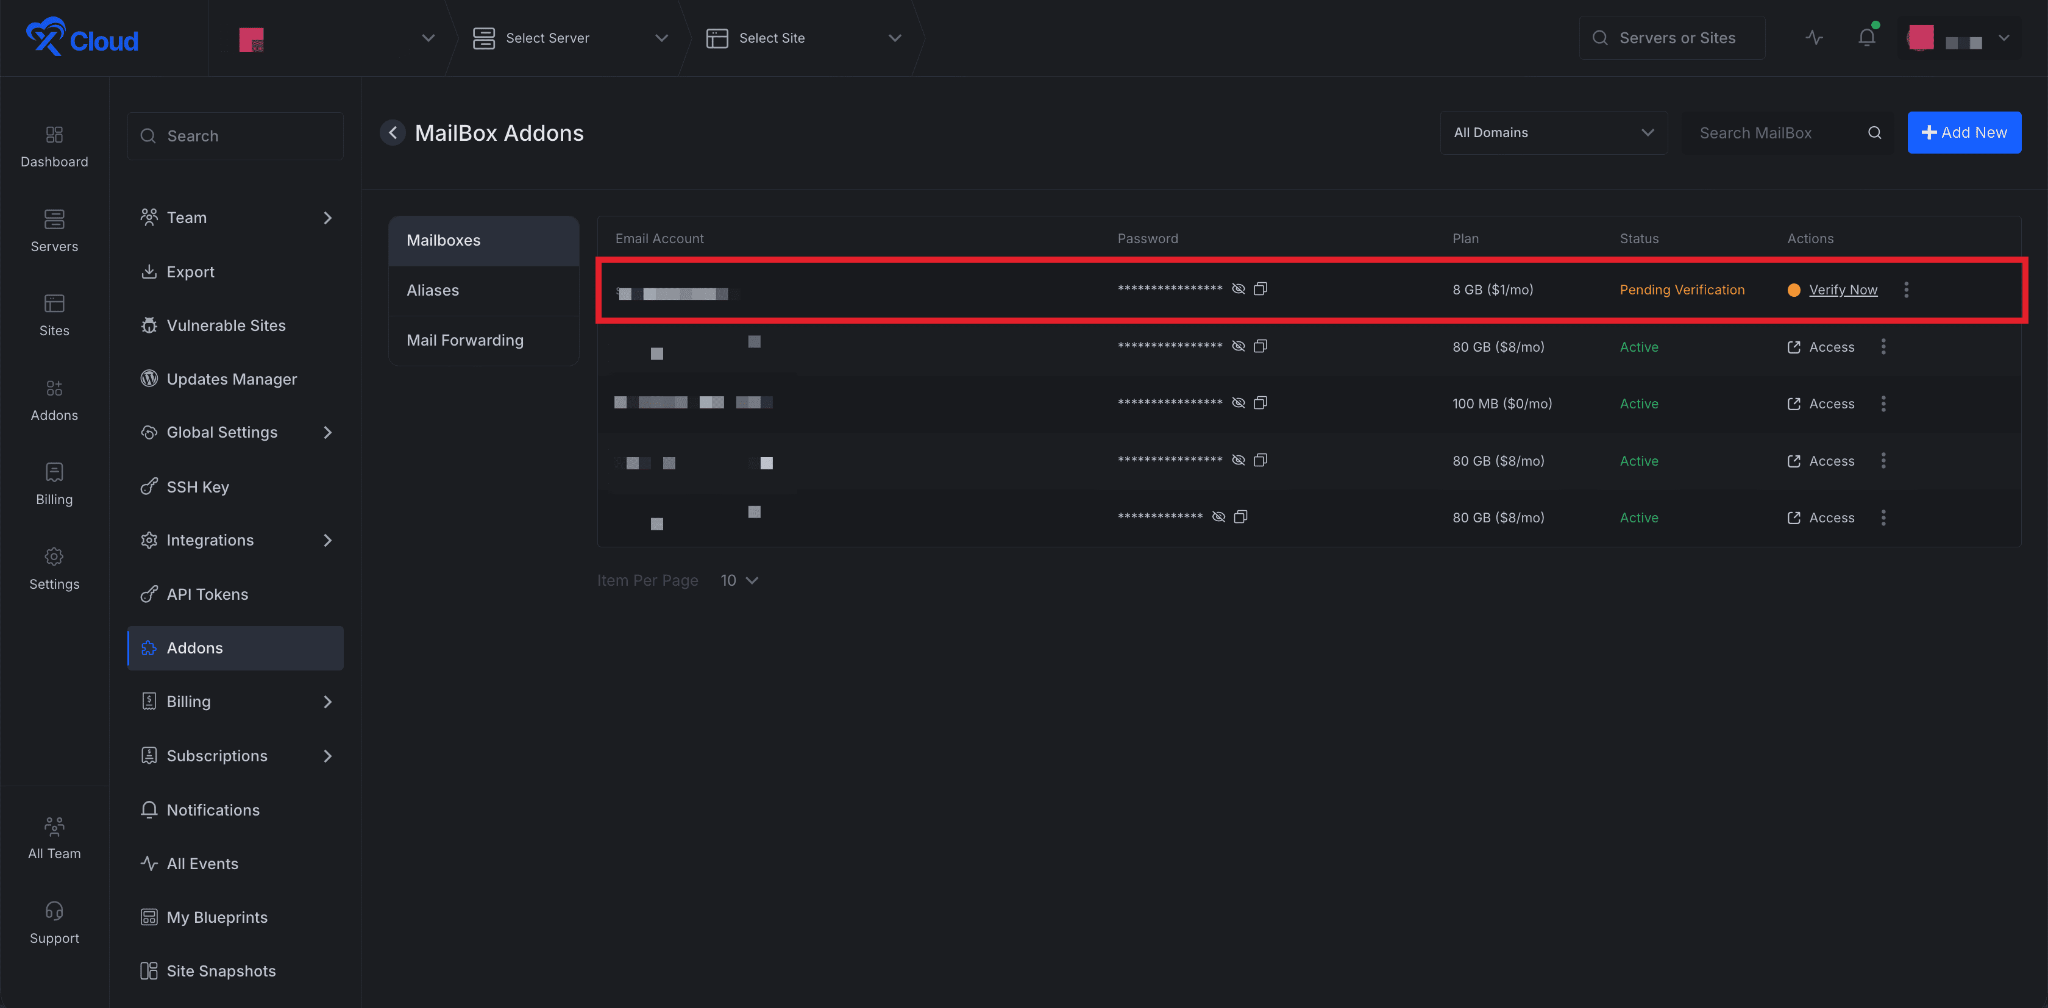
Step 4: Verify Mailbox #
Once the purchase is done, your subscription plan for the xCloud Mailbox will be shown in the dashboard. Here you can see the ‘Pending Verification’ status. Click on the ‘Verify Now’ button to start the DNS setup process.
You can do this in two ways. If you have already connected your domain with Cloudflare, the easiest method is to toggle the “Auto Manage DNS Records” switch. This will automatically add all the required DNS records like MX and SPF to your Cloudflare account and verify them.
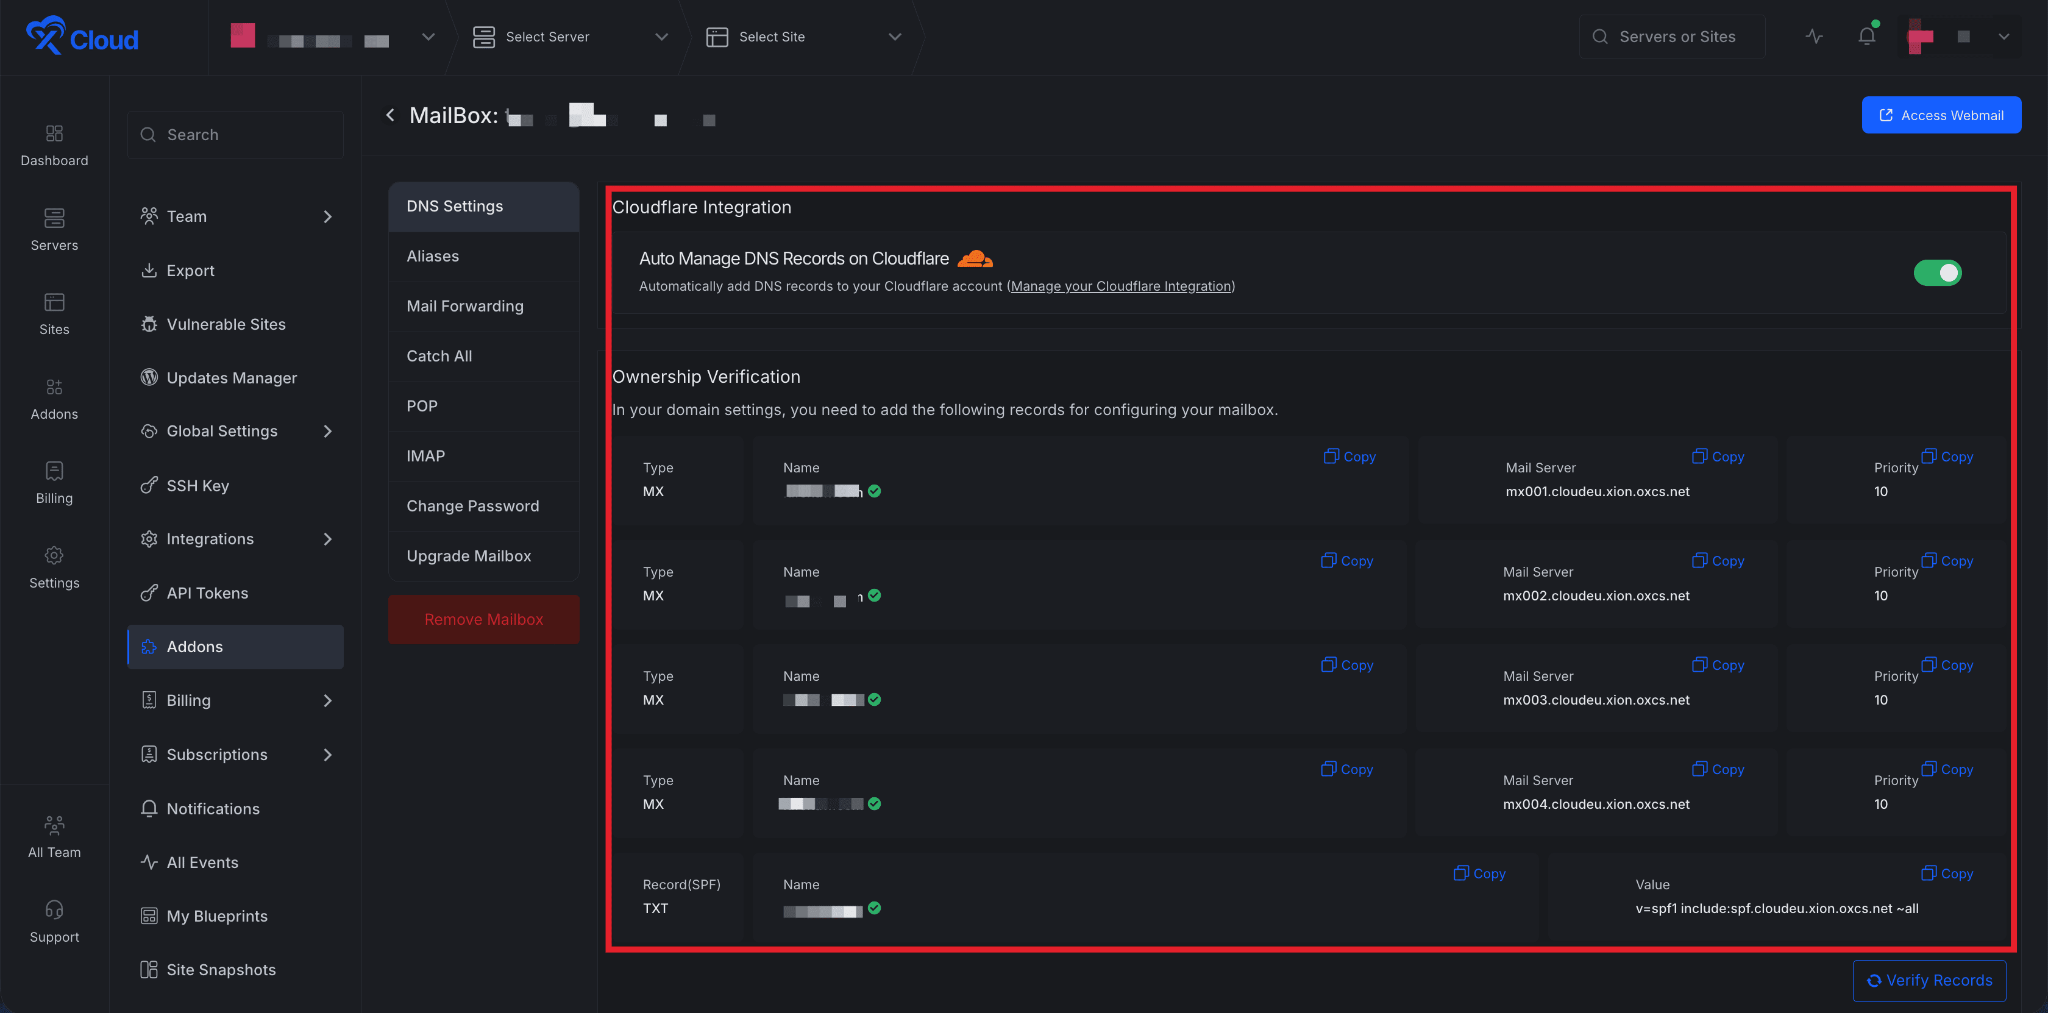
If you manage your domain’s DNS settings with a different domain provider, you will need to copy the required records provided and paste them into your domain provider’s DNS panel. These include various types of DNS records like MX and SPF. After adding records on your DNS provider, click on the ‘Verify Records’ button

Step 5: Launch Your Mailbox #
After configuring everything, let’s go back to the Mailbox dashboard and click on the Access option to log in to your Mailbox dashboard.
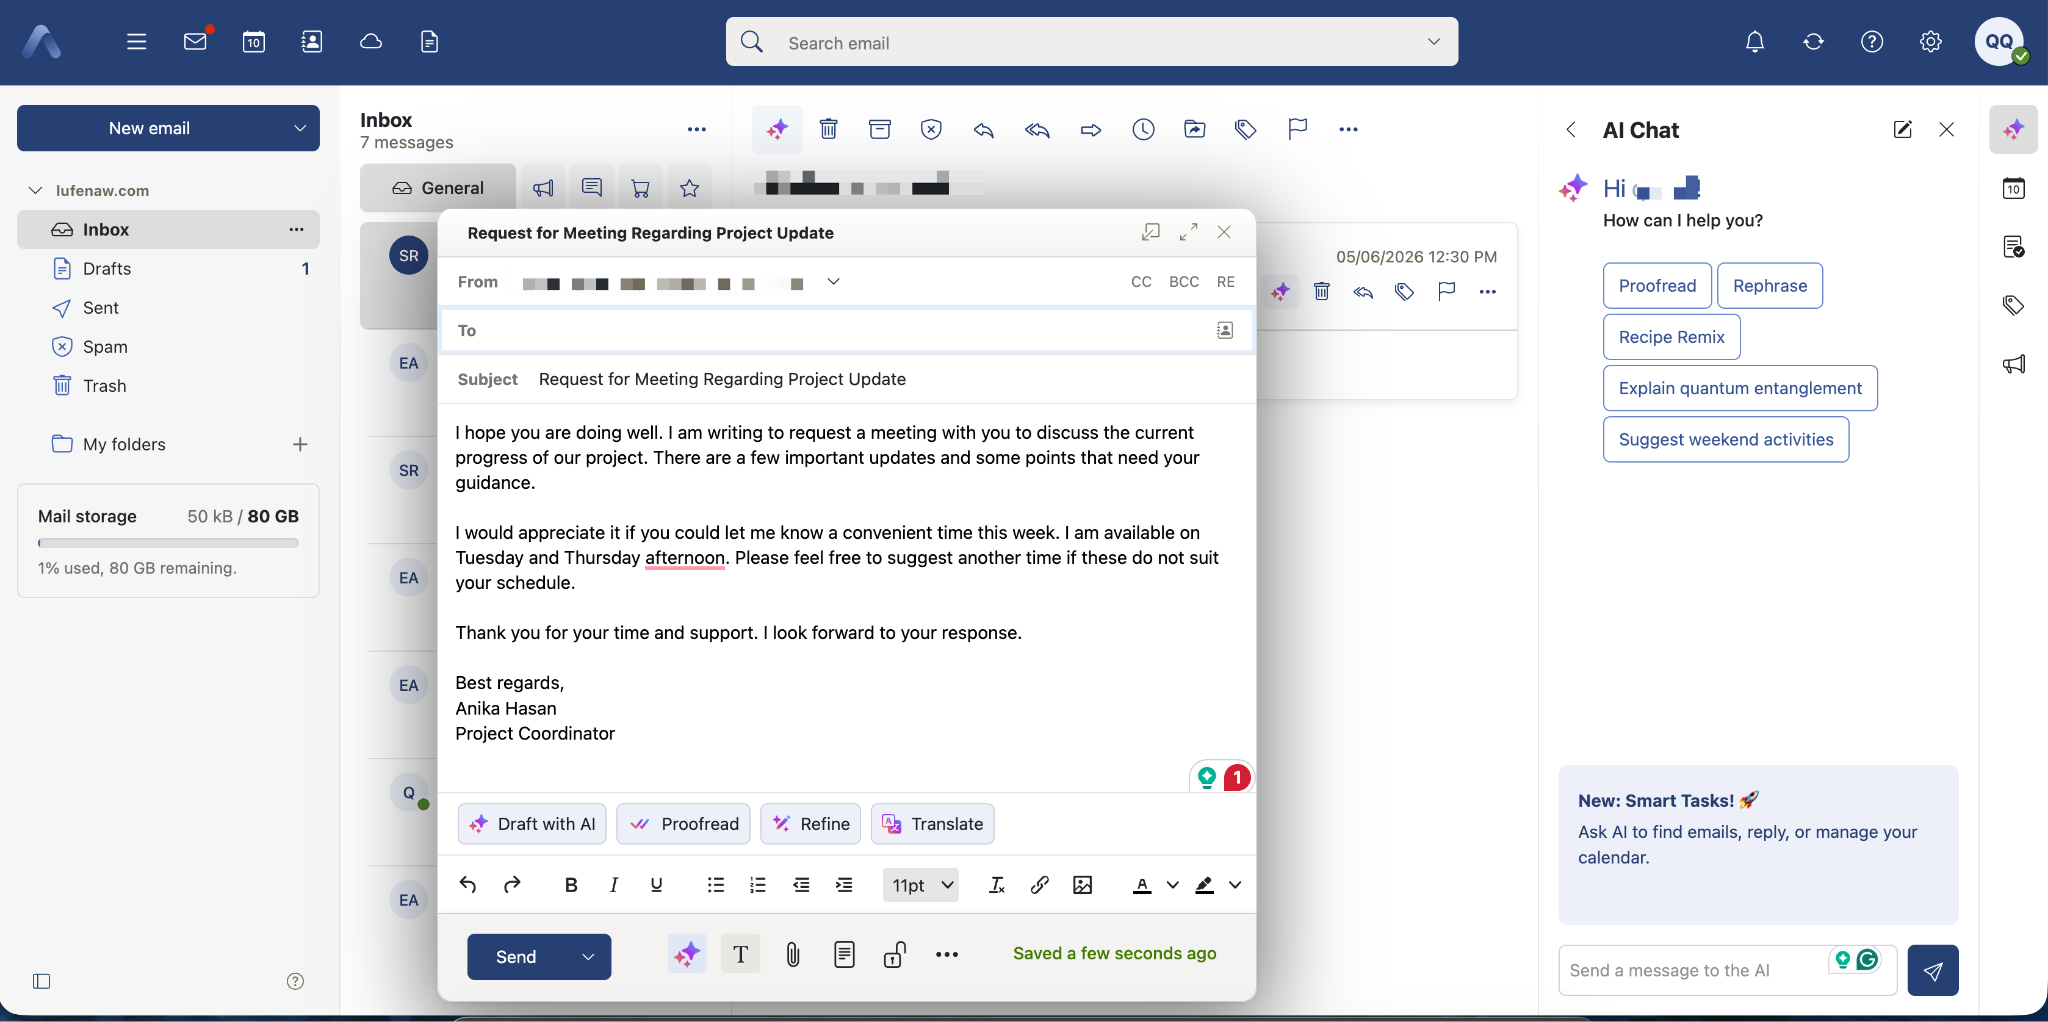
Once logged in, you can check out the ‘Inbox’, ‘Draft’, and more from the dashboard. Even send the new message to your preferred email address as well. Moreover, access, Calendar, Drive, AI-powered replies, summarize, and more features to increase your productivity.
And that’s it, this is how easily you can set up your xCloud Mailbox for your site in just a few clicks.
👉 Want to migrate your emails from legacy Mailbox to the new xCloud MailBox? Follow the steps in this documentation.
Advanced Configuration Settings Of Mailbox #
With the xCloud Mailbox Addon, you get a lot of advanced options to tailor your email communication more easily and hassle-free. Let’s setup few more advanced configurations:
Set up Aliases #
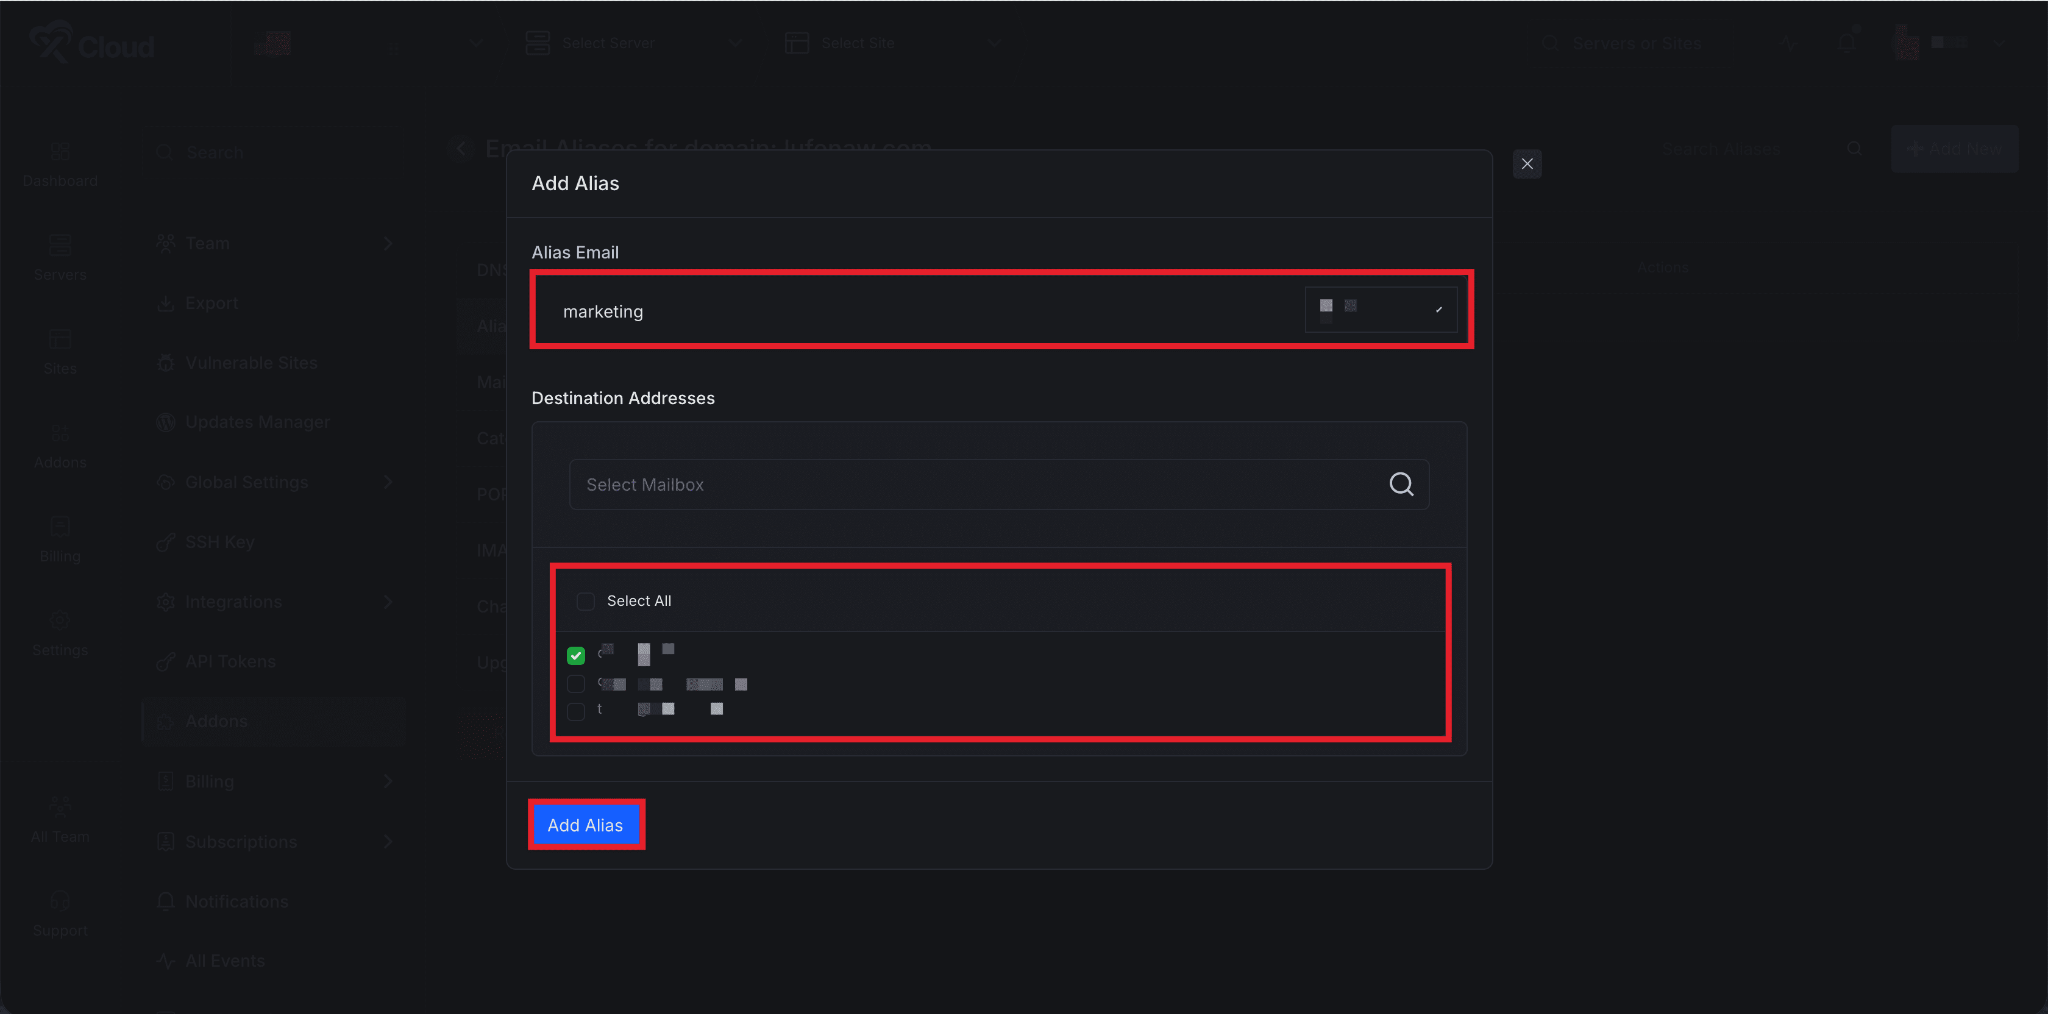
Aliases allow you to create extra email addresses that redirect to existing mailboxes without needing to set up new ones.
For instance, if you own a mailbox, user@example.com, and wish to receive emails at another address, user2@example.com, without having a separate mailbox, you can establish user2@example.com as an alias that directs to user@example.com. Now, you only need to log in to user@example.com to check the emails received at both addresses.
Navigate to Aliases from the left side menu and click ‘Add Alias’. Enter the alias and select the domain from the dropdown menu. Next, select the email address you wish to be a member of that alias. Finally, click on the ‘Add Alias’ button.
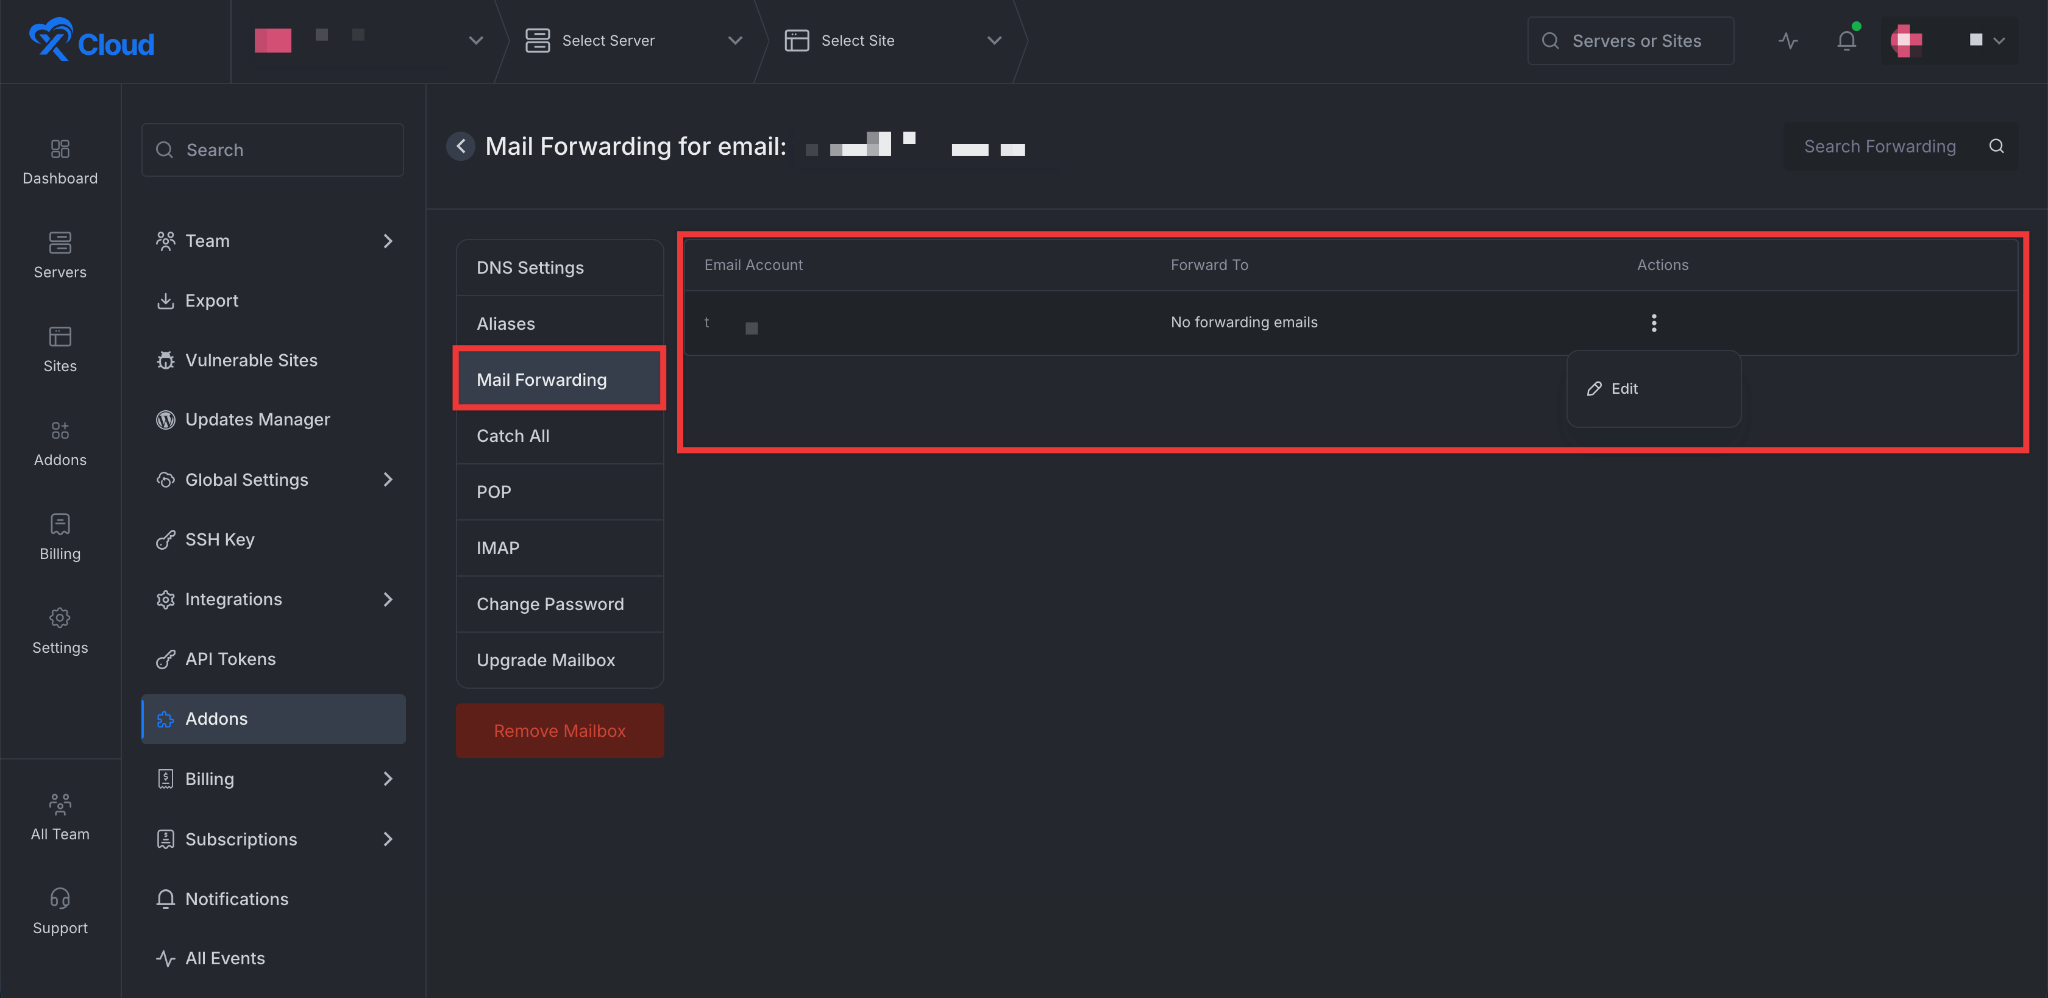
Set up Mail Forwarding #
Mail forwarding lets you send a copy of incoming emails from one mailbox to another address. This is useful if you want to manage multiple email addresses from a single inbox.
For example, if you own info@yourdomain.com and want to receive those emails at your main address, you@yourdomain.com, you can set up forwarding. All emails sent to info@yourdomain.com will automatically be sent to you@yourdomain.com.
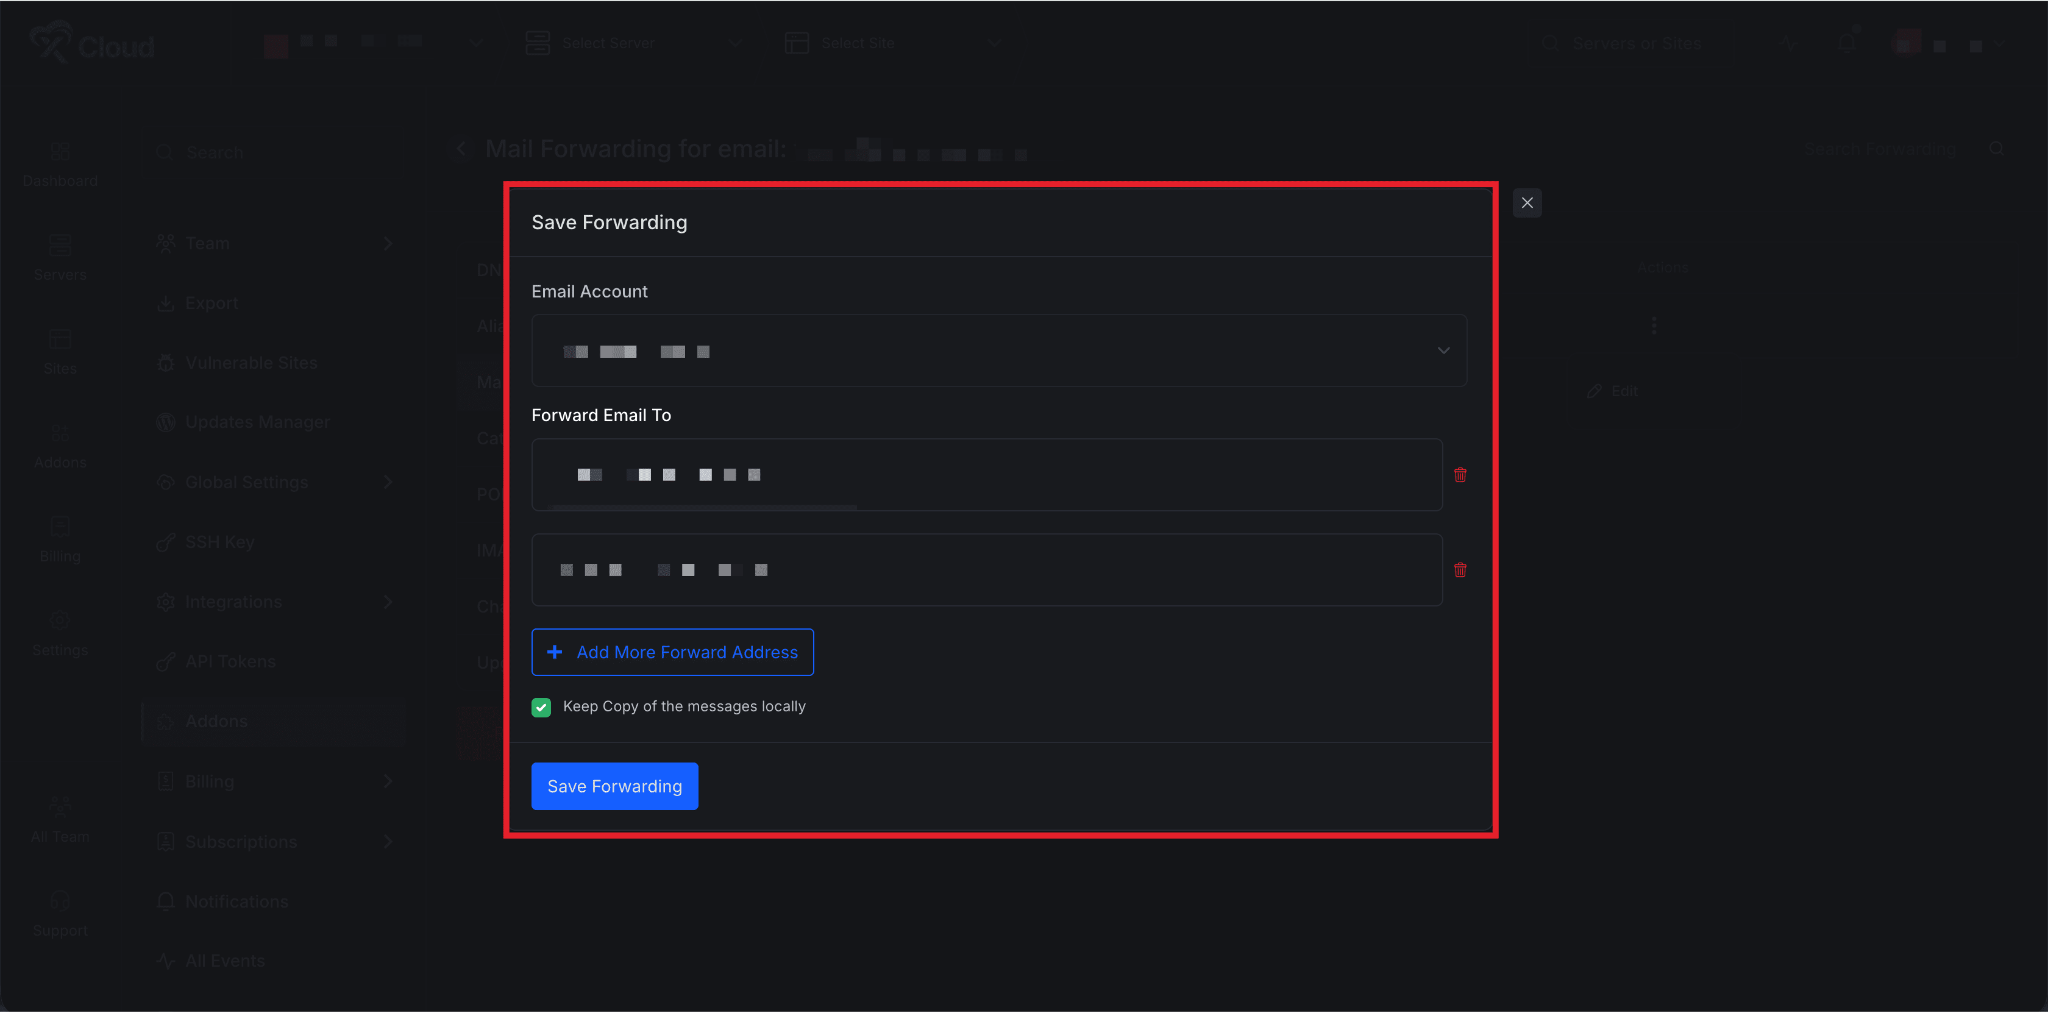
You can also forward the emails in your mailboxes. Navigate to the ‘Forwarding Mail’ option from the dashboard. Click on the three-dot icon and click on the ‘Edit’ option.
A pop-up will appear; you need to enter your email account in the dedicated field. Next, add the forwarding email addresses where you want to forward the emails. Finally, click on the ‘Save forwarding’ button
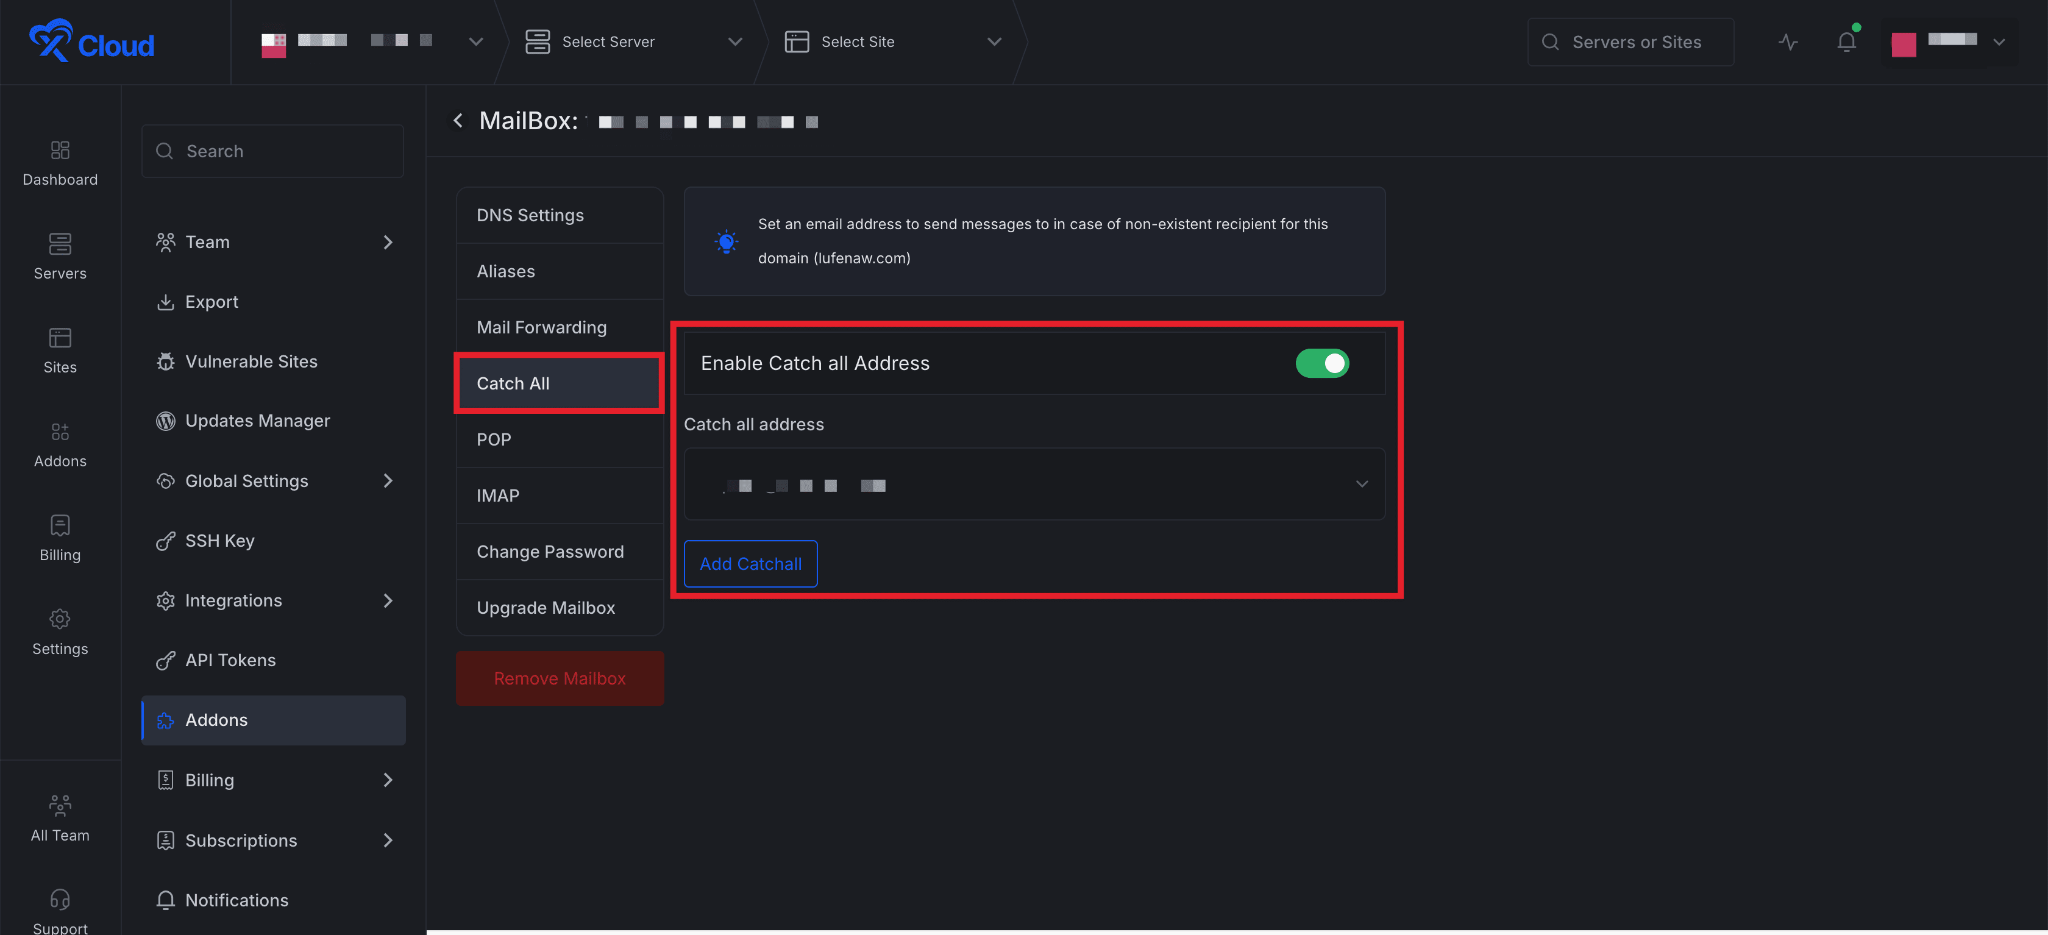
Enable Catch All For Your Email Account #
Next, go to the ‘Catch All’ option from the left side menu. Next, toggle on to enable and set an email address to send messages to in case of a non-existent recipient for this domain. Then, under the Catch All Address dropdown, select the email address where you want to catch the email addresses and click on the ‘Add Catch All’ button.
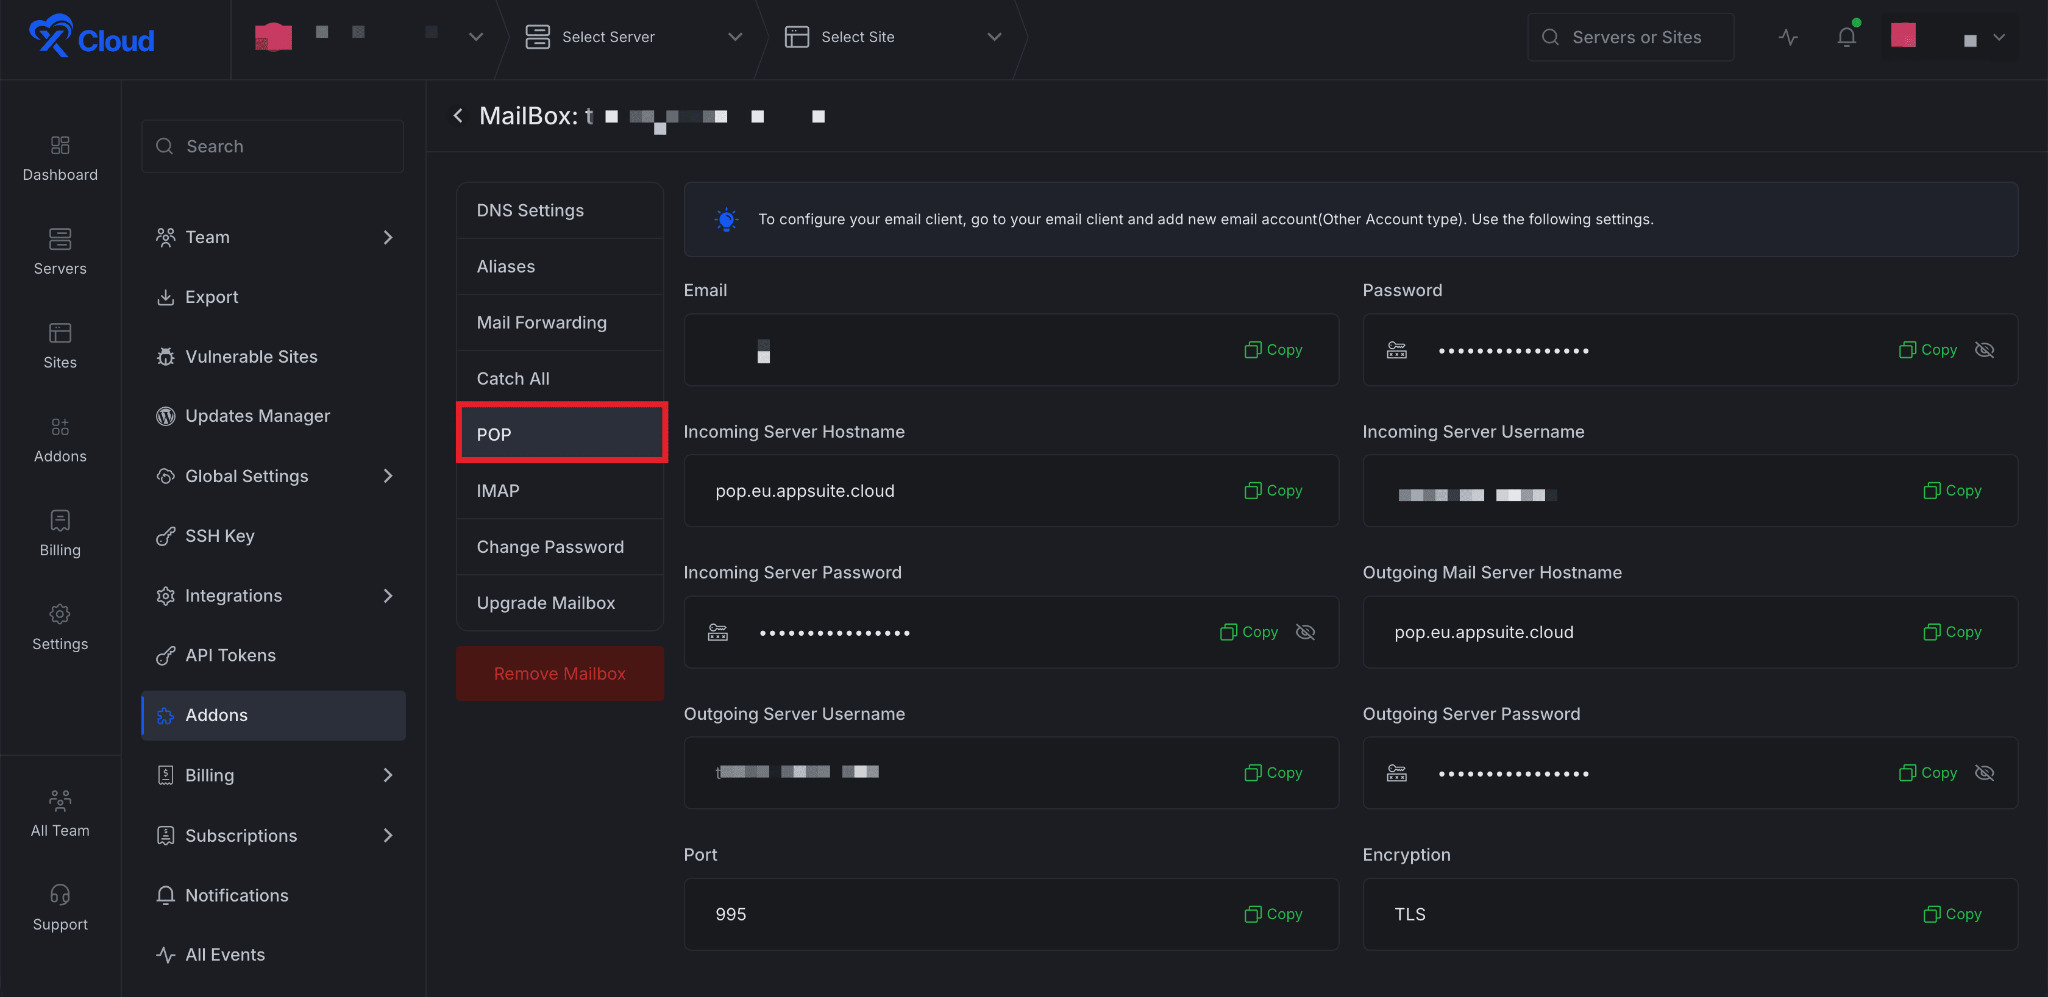
Setup Your Email Clients With IMAP & POP #
On the other hand, POP3 (Post Office Protocol v3) is designed for downloading emails to a single device. Once downloaded, emails are typically removed from the server, and any changes made on one device won’t sync to others. POP3 is best suited for users who only check their email on one device and prefer to store their emails locally.
Next, go to the POP option on the left side. Here you will get the credentials to set up your email client using POP.
IMAP (Internet Message Access Protocol) is the recommended option for most users. It allows for two-way synchronization between your email client and the server, meaning any changes you make—such as reading, deleting, or moving messages—will reflect across all your devices. This makes IMAP ideal if you plan to access your email from multiple devices, like your smartphone, tablet, or computer.
Next, go to the IMAP option on the left side. Here you will get the credentials to set up your email client using IMAP.
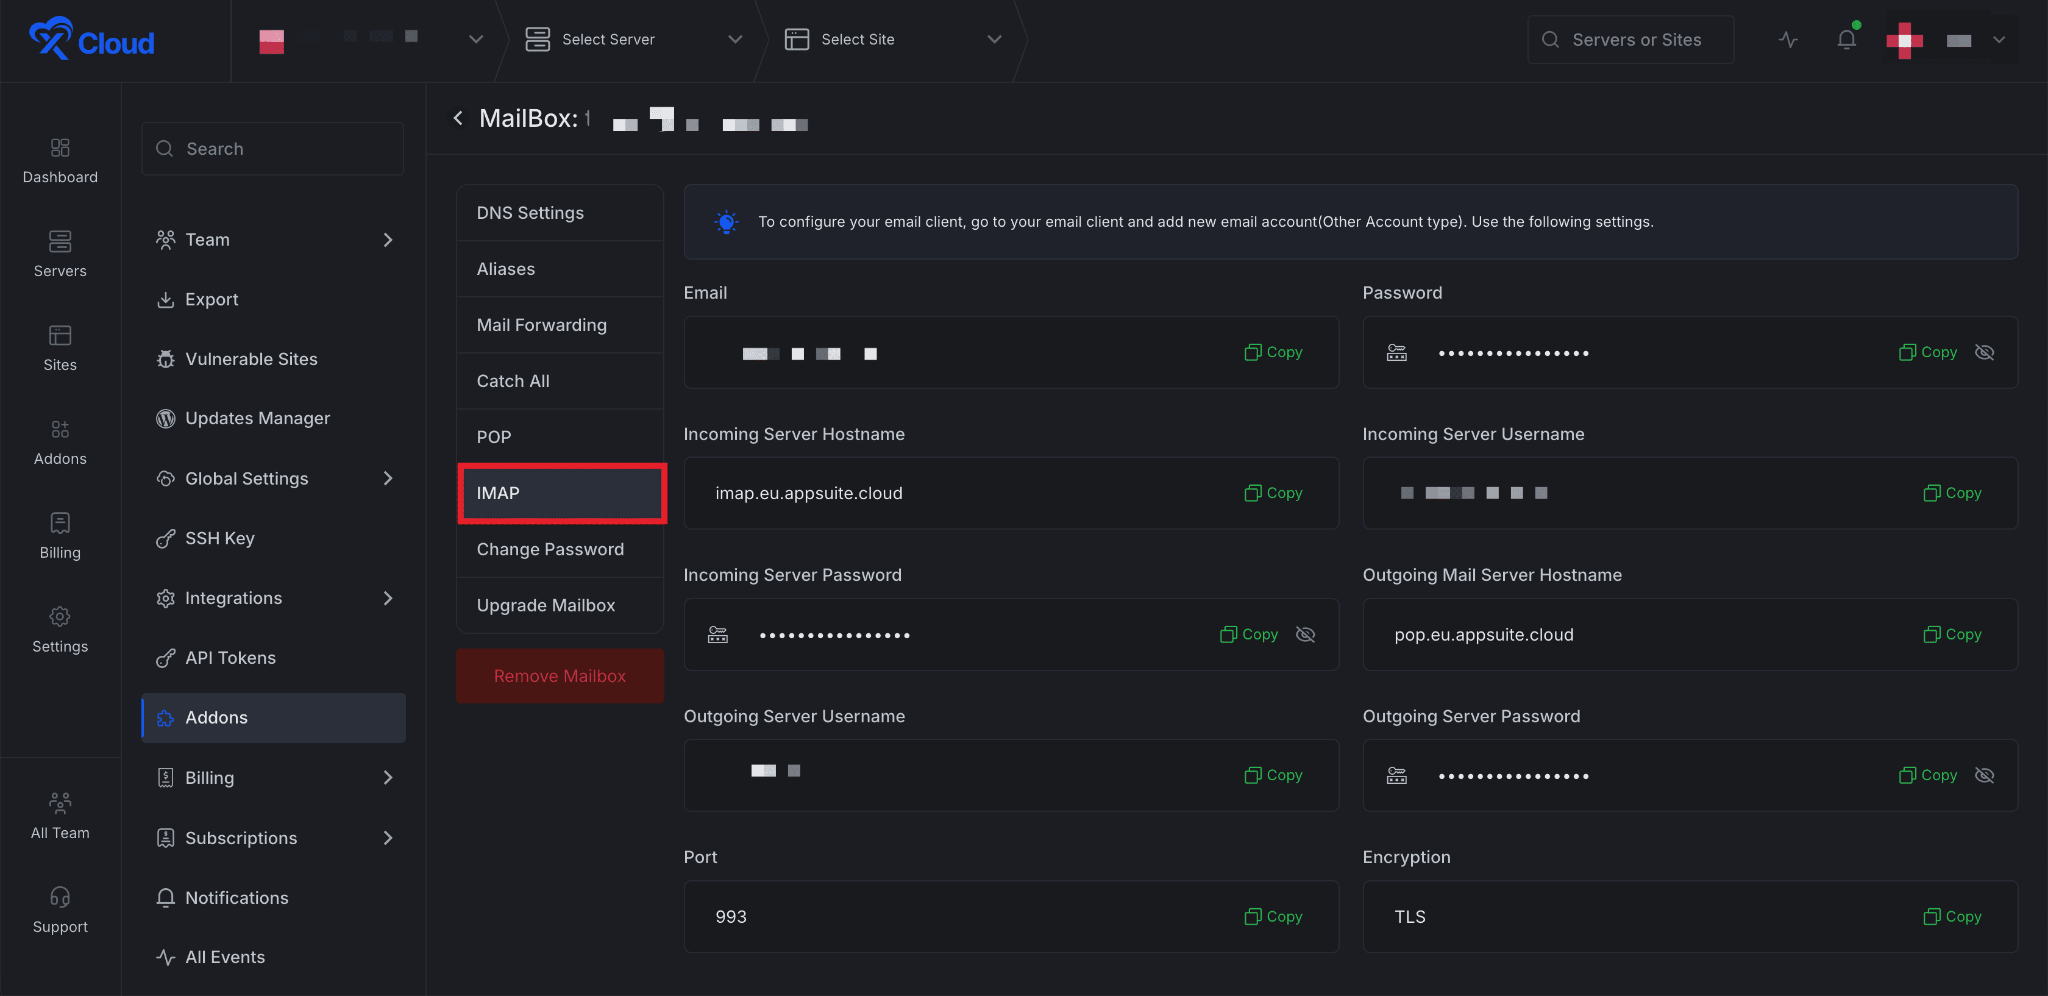
👉 To learn more about IMAP and POP, read this documentation
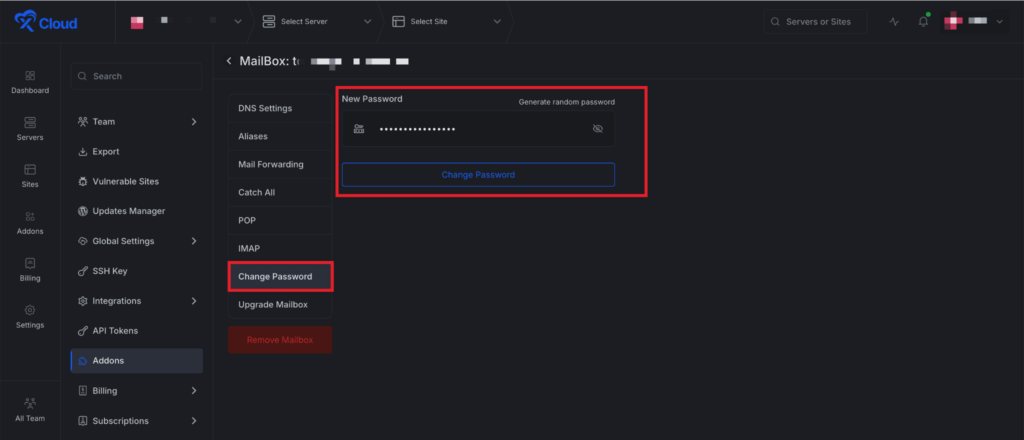
Reset Password #
If you want to change your Mailbox password, go to the ‘Change Password’ option, and head over to the ‘New Password’ field. Here, enter your new password and click on the ‘Change Password’ button.
Upgrade Your Mailbox #
If you want to upgrade your existing Mailbox plan, just click on the ‘Upgrade Mailbox’ option and choose your preferred plan, and click on the ‘Upgrade’ button. It will instantly upgrade the plan.
⚠️ Important Considerations #
1. MX Record Conflicts:
If your domain already has existing MX records, verification will fail. Make sure to remove all existing MX records before connecting your mailbox.
2. Failed Verification Fix: If clicking ‘Verify Records’ does not work, Double-check that all DNS records have been correctly added. If you’re using Cloudflare, try toggling the ‘Auto Manage DNS Records’ setting OFF and then ON again. Wait a few seconds and it will start working again.
Also, keep in mind that DNS records may take some time to publish globally. Depending on your DNS provider, it can take up to a few hours for the records to fully propagate. Cloudflare usually updates DNS records the fastest, often within minutes.
📌 Limitations #
To ensure fair and stable service, here are some limitations and notes users should keep in mind:
1. There are some rules and limitations you need to be aware of. You are allowed to create multiple mailboxes under the same domain as long as they are in the same team. However, you cannot create mailboxes or aliases using the same domain in different teams. For instance, if demo@domain.com is part of Team A, then test@domain.com cannot be created under Team B.
2. You cannot have aliases with the same name as the mailboxes or the alias of aliases.
2. It is also important to avoid using POP email clients. These clients only download emails to your device and do not sync changes like read status or sent emails. To ensure full syncing across all your devices, you should use IMAP-supported email clients.
4. If you are using Cloudflare and face verification issues even after automatic integration, try toggling the DNS integration off and on again. This often helps reset the settings and successfully verifies your domain.
xCloud Mailbox Add-on – Frequently Asked Questions (FAQs) #
How is xCloud Mailbox Addon billed? #
The billing is monthly, based on your chosen plan. You only pay for the plan you subscribe to. There are no hidden charges for aliases or forwarding.
Can I create multiple mailboxes under one domain? #
Yes, you can create multiple mailboxes as long as they’re within the same xCloud team.
You cannot use the same domain across different teams.
Example: If user@domain.com is in Team A, then admin@domain.com can’t be in Team B.
Are aliases free to use? #
Yes. Creating and using email aliases is completely free and included with your Mailbox plan.
Is there a limit on how many aliases I can have? #
No, there is no limit to how many aliases you can create under a domain. An alias cannot have the same name as an existing mailbox, and aliases cannot forward to other aliases.
What is email forwarding, and is it free? #
Email forwarding automatically sends a copy of incoming mail from one address to another. Email forwarding is included for free. Each mailbox supports an unlimited number of email forwarding addresses.
What if my domain verification fails? #
Try the following:
- Double-check all DNS records
- If using Cloudflare, toggle ‘Auto Manage DNS’ OFF and then ON again
- Wait a few minutes and try verifying again.
After logging in, if you see the white page, what do you do? #
Once you log in to your webmail page, if you encounter a blank white screen, it may be due to your ad blocker. Please ensure that you turn off your ad blocker, clear your cache, and then refresh the page.
Can I use xCloud Mailbox for transactional emails? #
Yes, it is possible. SMTP is included with the mailbox and comes with a sending limit of 250 emails per day. However, for SMTP or transactional emails such as subscriber notifications, order confirmations, and marketing messages, we recommend using the Email Delivery Addon for better reliability and performance.
What is a business email? #
A business email uses your own domain name as the address, like you@yourdomain.com. You use it for professional communication, and it makes your brand look more credible. You get your business name in the address, more control over security, and the ability to add more accounts as your team grows.
How is business email different from personal email? #
You use personal email to talk with friends and family, sign up for services, and manage social media. Business email handles professional communication and contacts. It comes with email aliases, group aliases, more storage, and features like migration support, an admin control panel, and team-level integrations.
What is email hosting? #
Email hosting lets you send and receive emails using your own domain name. You get a professional address, more storage, and strong security and privacy controls. If you want full control over your business email without relying on free providers, email hosting gives you that.
How do I create a business email address with xCloud Mailbox? #
If you own a domain, connect it to xCloud Mailbox and set up your email in minutes. If you don’t have a domain, you can buy one, and create a Mailbox using that domain.
How much storage do I get with xCloud Mailbox? #
xCloud Mailbox has 5 plans, including a free tier. Storage ranges from 100 MB free plan to 80 GB and each plan includes different features. If you need more space later, you can add storage to your account at any time.
Can I create aliases and forwarding rules? #
Yes. You can create unlimited aliases and forwarding addresses per mailbox at no extra cost.
Which email protocols are supported? #
xCloud supports IMAP, POP3, and SMTP. You can set it up on Outlook, Thunderbird, Apple Mail, Gmail, iPhone, Android, and most other email clients.
Where is the email hosted? On my server or somewhere else? #
Your email does not run on your server. xCloud partners with a mailbox provider that runs email on its own infrastructure with dedicated IP addresses. Your web server handles your sites. Your email runs on infrastructure built for reliable delivery.
Can I buy one large mailbox and put all my clients’ email accounts inside it? #
No. Each email account has its own storage. If you need three addresses like support@yourdomain.com, sales@yourdomain.com, and contact@yourdomain.com, you buy three separate mailboxes. Each one gets its own plan and storage. This works the same way as Google Workspace and other email platforms. Plans go up to 80 GB per mailbox. If you need more, reach out to the team.
Can self-managed server users use xCloud Mailbox? #
Yes. Self Managed server users get the same plans, pricing, and features as everyone else on xCloud. The free mailbox plan is the only exception. It is limited to xCloud-managed server users. Self-managed server users can buy any paid plan with no feature restrictions.
Can I disable the AI features for my team or clients? #
Yes. You can turn AI features off at the domain level. If you manage mailboxes for clients or staff and don’t want them using AI suggestions, you control that setting.
Will the existing mailbox provider be removed? What happens if I don’t migrate? #
The existing provider is not going away right now. You can keep using it with no disruption. Migrating to the new provider gives you more features at the same price. xCloud built a migration tool to make the switch easy, and support can help if you need it. There is no deadline to migrate.
How do I claim my free mailbox? #
Deploy your site on an xCloud managed server (xCloud or xCloud Provider). A “Claim Free Mailbox” banner shows up on your dashboard. Click it, follow the steps, and your free 100 MB mailbox is ready. Each domain on an xCloud managed server gets one free mailbox.
I am paying for email on my xCloud managed server. Will my existing mailbox become free? #
No. The free mailbox applies to new mailboxes created on xCloud managed servers. Existing mailboxes are not eligible. You can migrate your existing mailboxes to the new provider using the built-in migration tool and keep paying the same price, with access to all the upgraded features.
I don’t see the “Claim Free Mailbox” banner. What should I check? #
A few things could be going on. Your site must run on an xCloud managed server. Hetzner, AWS, DigitalOcean, and other non-managed providers don’t qualify. The site needs to be in production, not staging. Your team may have used all its free mailbox slots (default cap is 10 per team). The domain may have a free mailbox assigned to it. Legacy mailboxes on the domain that haven’t been migrated will block the banner until migration is done. You or someone on your team may have dismissed the banner (dismissal is per domain). White-label tenants don’t see the mailbox addon.
I have legacy mailboxes on my domain. Can I still get a free mailbox? #
Yes, after you finish the migration. Use the migration wizard to move all your legacy mailboxes to the new provider. Once that is done, the free mailbox banner shows up on every site that shares that base domain. You don’t need to contact support. It happens on its own.
If I create a new site on my xCloud Managed Server, does it qualify for a free mailbox? #
Yes. Any site on an xCloud managed server qualifies, including new ones. The domain can’t have claimed a free mailbox before.
Is the free mailbox available on xCloud reseller-managed servers? #
No. The mailbox addon is not available on the xCloud reseller program right now. It works on standard xCloud managed servers.
I have a lifetime deal (LTD). Am I eligible for a free mailbox? #
Free Mailbox is available for both xCloud Managed Servers and xCloud Provider Servers.
If you are using an xCloud Provider Server, you are eligible to claim the free Mailbox offer.
However, this offer is not available for self-managed servers. In other words, if you are managing your own server instead of using an xCloud Provider Server, you will not be able to claim the free Mailbox.
What happens to my free mailbox if I move my site off xCloud? #
Your free mailbox keeps working. It won’t shut down right away. An ineligibility period starts, and you get notification emails on Day 0, 7, 14, and 30. An in-app banner gives you two options: move your site back to xCloud, or upgrade to a paid mailbox plan. Auto-suspension is not active in the current version.
I brought my site back to xCloud. Will the ineligibility warning go away? #
Yes. The system picks up the change within seconds, closes the ineligibility episode, and removes the warning banner on the next page load.
I deleted my free mailbox but my counter still shows it is at the limit. #
The counter should update right when you delete a mailbox. Refresh the mailbox addons page. If the count is still wrong after refreshing, contact our support team so the team can look into it.
Can I have more than 10 free mailboxes on my team? #
Yes. The default cap is 10 per team. Contact support to request a higher limit.
I am getting a “Free plan limit reached” error but I only have a couple of free mailboxes. #
Your team may have a custom limit set lower than the default. A recently deleted mailbox might still be processing. Contact our support team so they can check your team’s settings and fix the issue.
I have a paid mailbox on my domain. Can I add a free one too? #
Yes. Paid and free mailboxes can exist on the same domain as long as everything runs on the default provider. There is no restriction on combining both plan types.
Can I claim a free mailbox through the API? #
No. Free mailbox claims go through the dashboard with a valid site context. API-based claims are not available in this version.
The migration wizard won’t let me cancel. Is this a bug? #
No. Once any mailbox in the migration reaches the DNS-verified stage, email is flowing to the new system. Canceling at that point would lose the received mail. You need to finish the migration to keep everything intact.
Is it possible to downgrade my mailbox plan? #
No, downgrading your mailbox plan is not possible. Once you have selected and activated a plan, it cannot be changed to a lower tier. If you have specific concerns about your current plan, we recommend reaching out to the xCloud support team for guidance.
Can I use my own domain or subdomain for xCloud Webmail? #
Currently, xCloud Mailbox does not support directly hosting the webmail interface on a custom domain, subdomain, or path such as example.com/webmail or webmail.example.com.
To access your mailbox, please use the official webmail/access link provided inside the xCloud Mailbox area.
If you want an easier URL for your team or clients, you may create a redirect from your own website, for example:
– example.com/webmail
– webmail.example.com
This redirect can point users to the official webmail URL. However, the actual webmail application will still open on the official xCloud-provided webmail address.
Still stuck? Contact our support team for any of your queries.


