In keeping pace with the ever-evolving nature of web hosting, xCloud has consistently worked to offer seamless integration with various cloud providers. Along with Vultr, Google Cloud Platform (GCP), and DigitalOcean (DO), xCloud now supports integration with Amazon Web Services (AWS).
This new feature opens up new possibilities for developers and agencies looking to utilize AWS’s robust cloud infrastructure for their WordPress sites. This blog post will explore the benefits of combining AWS and xCloud and provide a step-by-step guide on integrating AWS with xCloud.
Advantages of Integrating AWS with xCloud
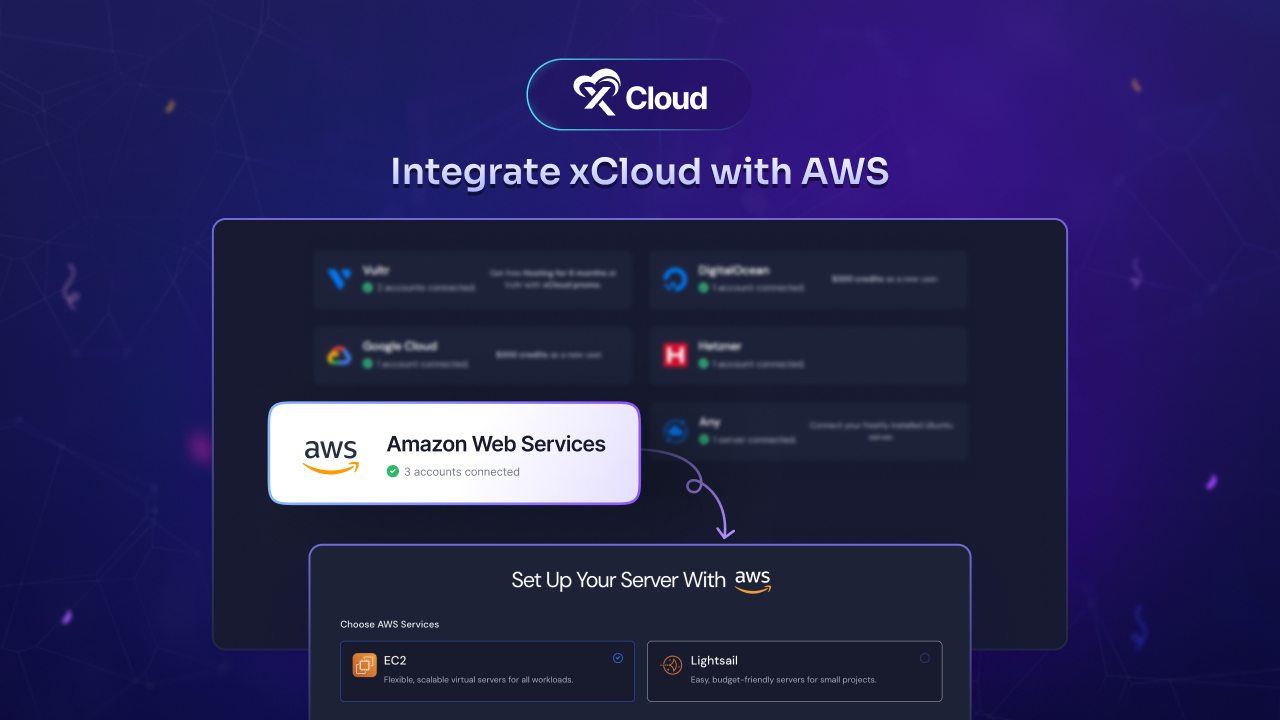
AWS, or Amazon Web Services, provides a comprehensive cloud platform. It is renowned for its comprehensive and scalable cloud solutions. AWS offers two main types of instances for cloud computing: EC2 and Lightsail.
- EC2 (Elastic Compute Cloud): Known for its flexibility and scalability, EC2 allows you to customize your server with advanced configurations to meet your needs. It is ideal for users who require detailed control over their hosting environment.
- Lightsail: Designed for simplicity, Lightsail provides pre-configured environments that make launching and managing servers easy. It is a great choice for those who want a straightforward setup with less management overhead.
There are several benefits that you can reap if you integrate AWS with xCloud. Such as:
🎯 Simplified Management: xCloud’s user-friendly interface combined with AWS’s powerful infrastructure simplifies server management and deployment. So, you can focus on what matters most—building great websites.
🎯 Performance and Reliability: AWS’s global infrastructure ensures high performance and reliability for your WordPress sites.
🎯 Advanced Security: The advanced security features of xCloud ensure that your servers and sites remain secure and protected from unwanted threats.
Streamline Hosting For WordPress: How to Integrate AWS with xCloud
xCloud is presently available with the integration of Amazon Web Services. Currently, xCloud supports EC2 and Lightsail. So, you can set up an AWS server in xCloud for both EC2 and Lightsail. This self-managed hosting is intended to make hosting and running WordPress sites easy. It helps developers and agencies to concentrate on creating great website designs without considering the structures. To get started, follow the step-by-step guide below:
Step 1: Sign Up/Login with xCloud
Before you start, make sure you have an xCloud account. First, log in to your xCloud account with the credentials. Once you are signed, you can effortlessly set up your AWS server. Now, you can proceed to create the AWS server in xCloud.
If you already have an account please visit our app URL to log in to your account to set up an AWS server in xCloud Host.
Step 2: Create Your AWS Server in xCloud
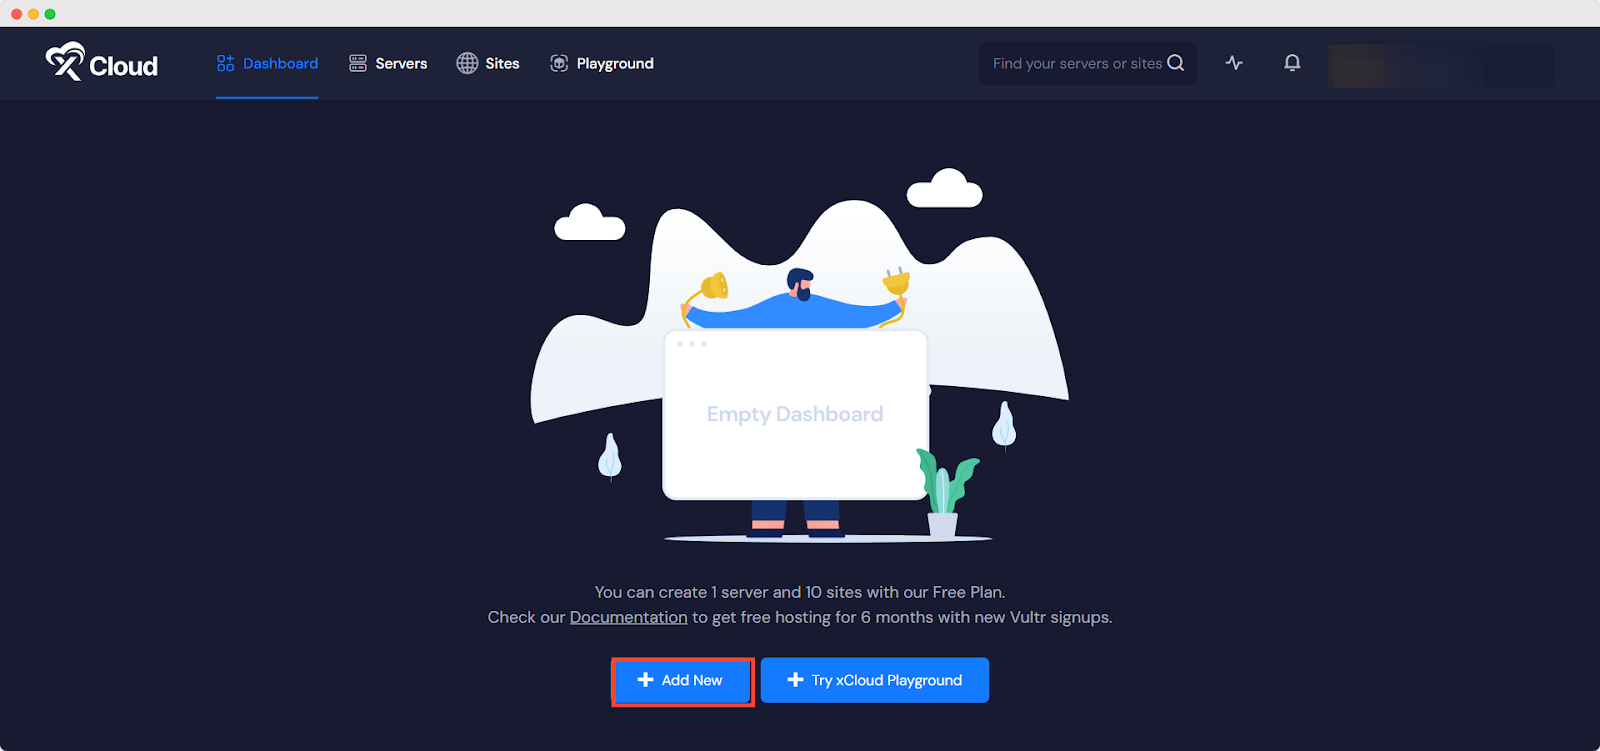
After logging in to your xCloud account, you need to create a new server. To add a new server, click on the ‘Add New Server’ button from your dashboard.
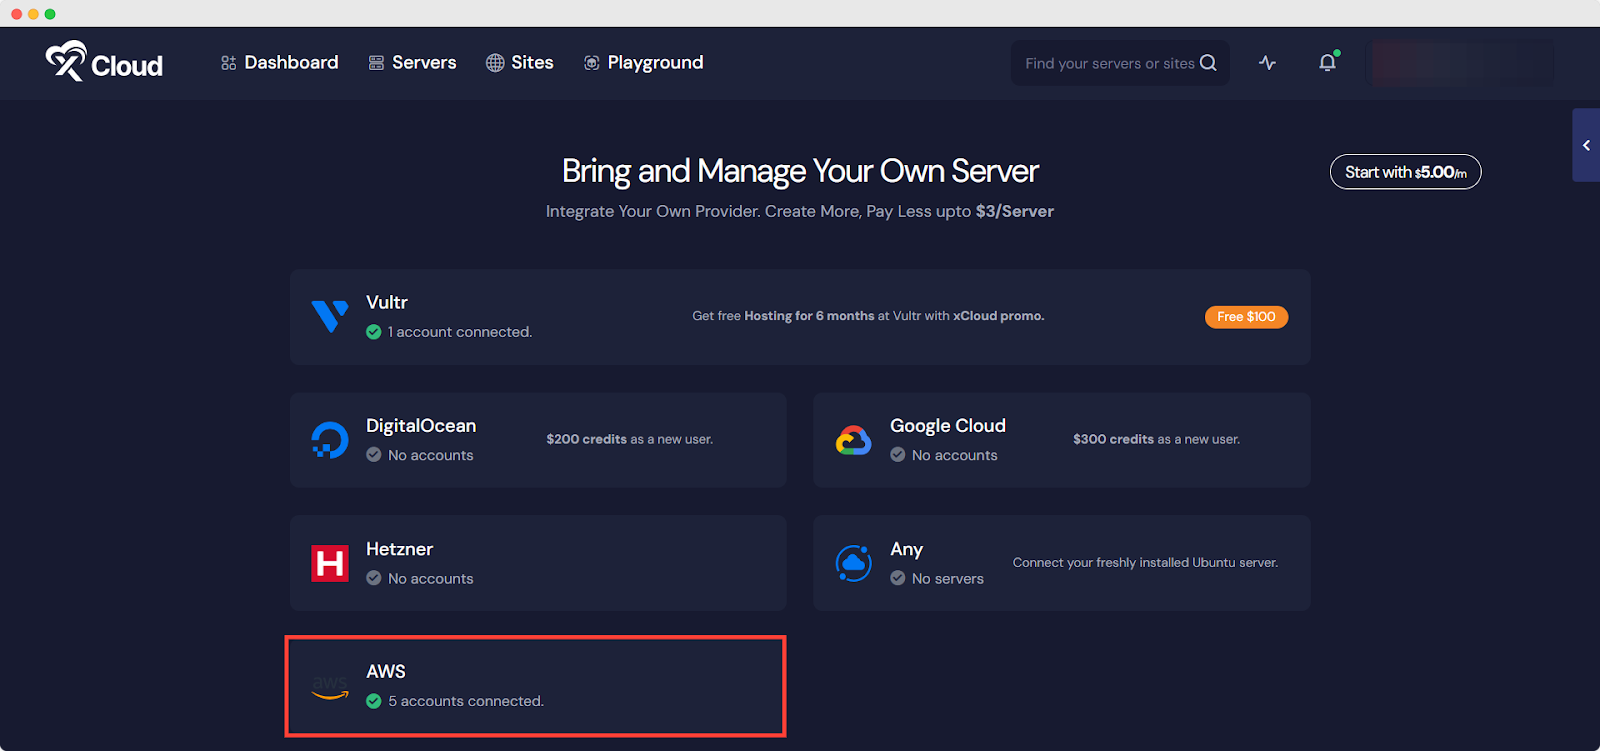
In the next screen, you will see the list of our available server providers. Select the AWS option from the list. The server billing will be handled on your AWS account.
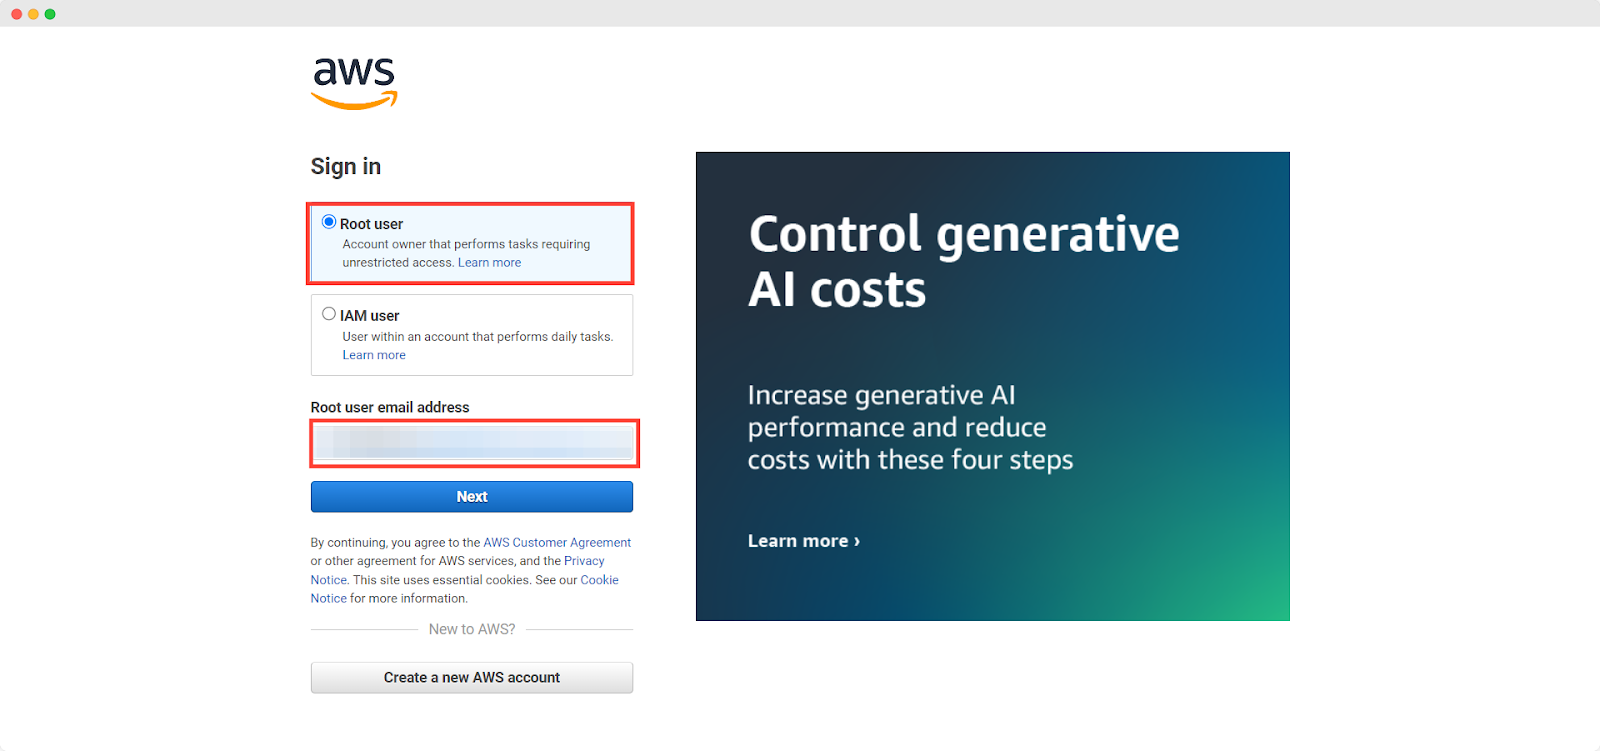
Step 3: Sign in to the AWS Management Console
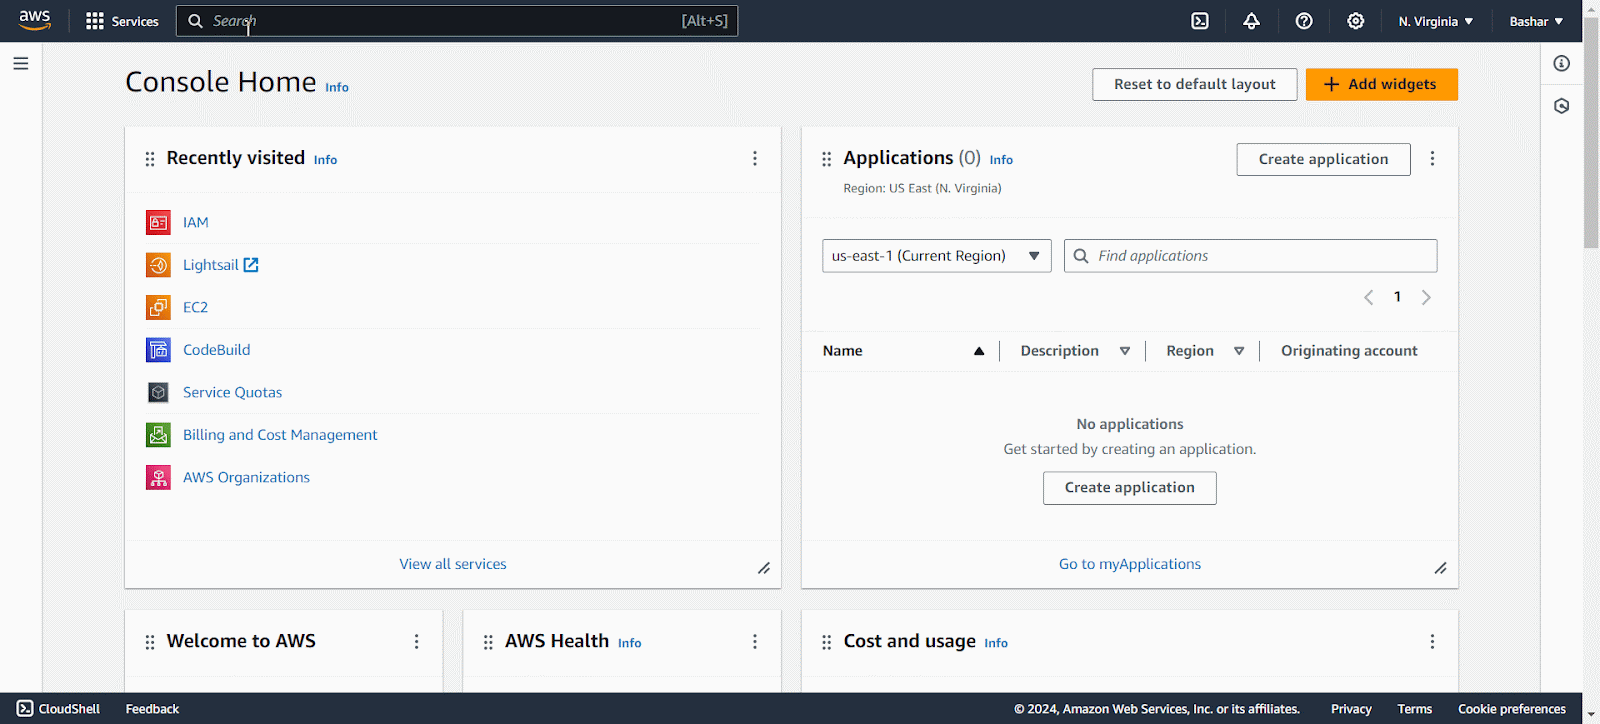
Before you move to the next step, you need to log in to the AWS management console. Sign in as a ‘Root User’ to the AWS Management Console using your AWS account credentials. Once logged in, navigate to the main dashboard where you can access various AWS services.
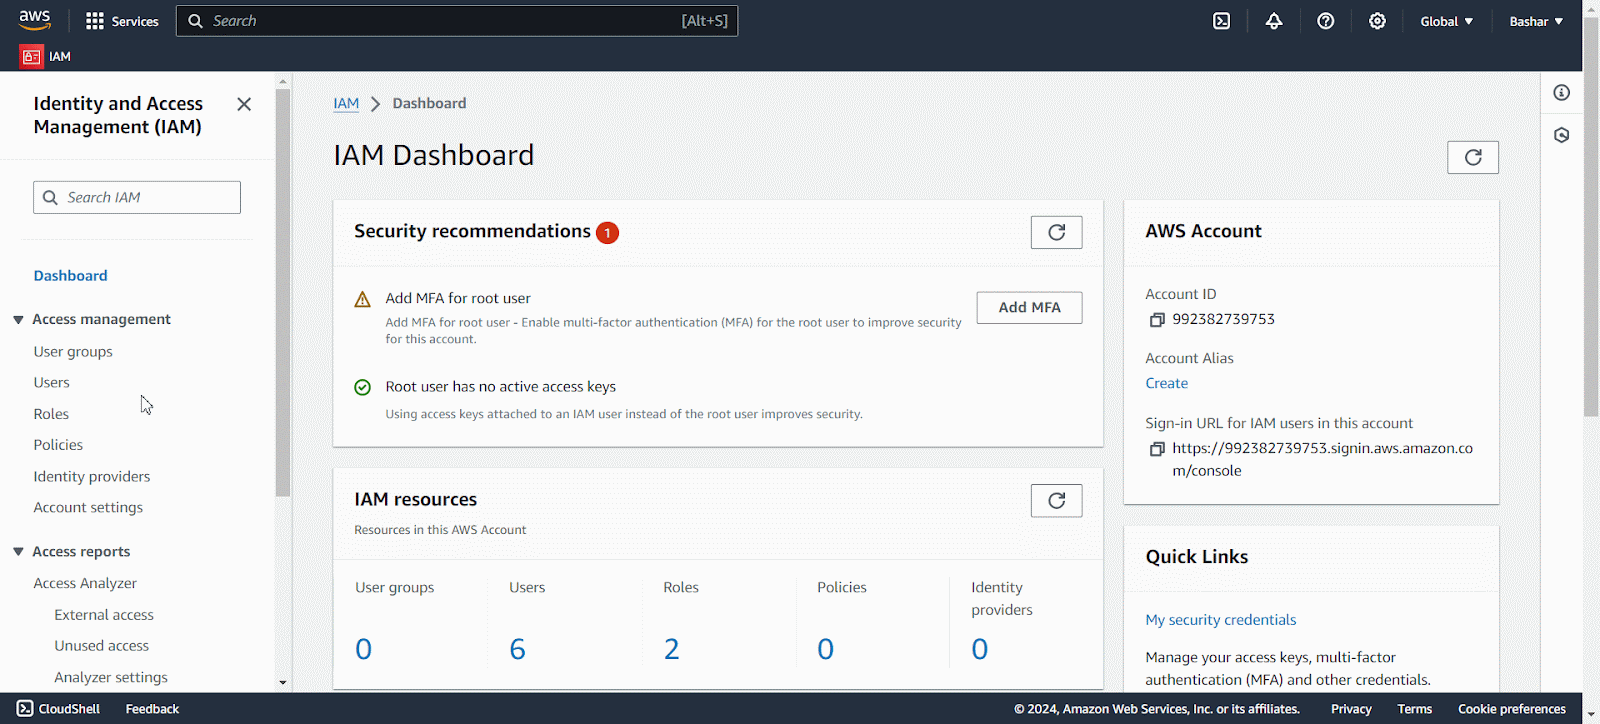
Step 4: Navigate to the IAM Console
From the AWS Management Console, click on the Services menu located at the top left corner. You can search with “IAM” and select IAM from the list of services too. This will direct you to the IAM dashboard, where you can manage users, groups, roles, and policies.
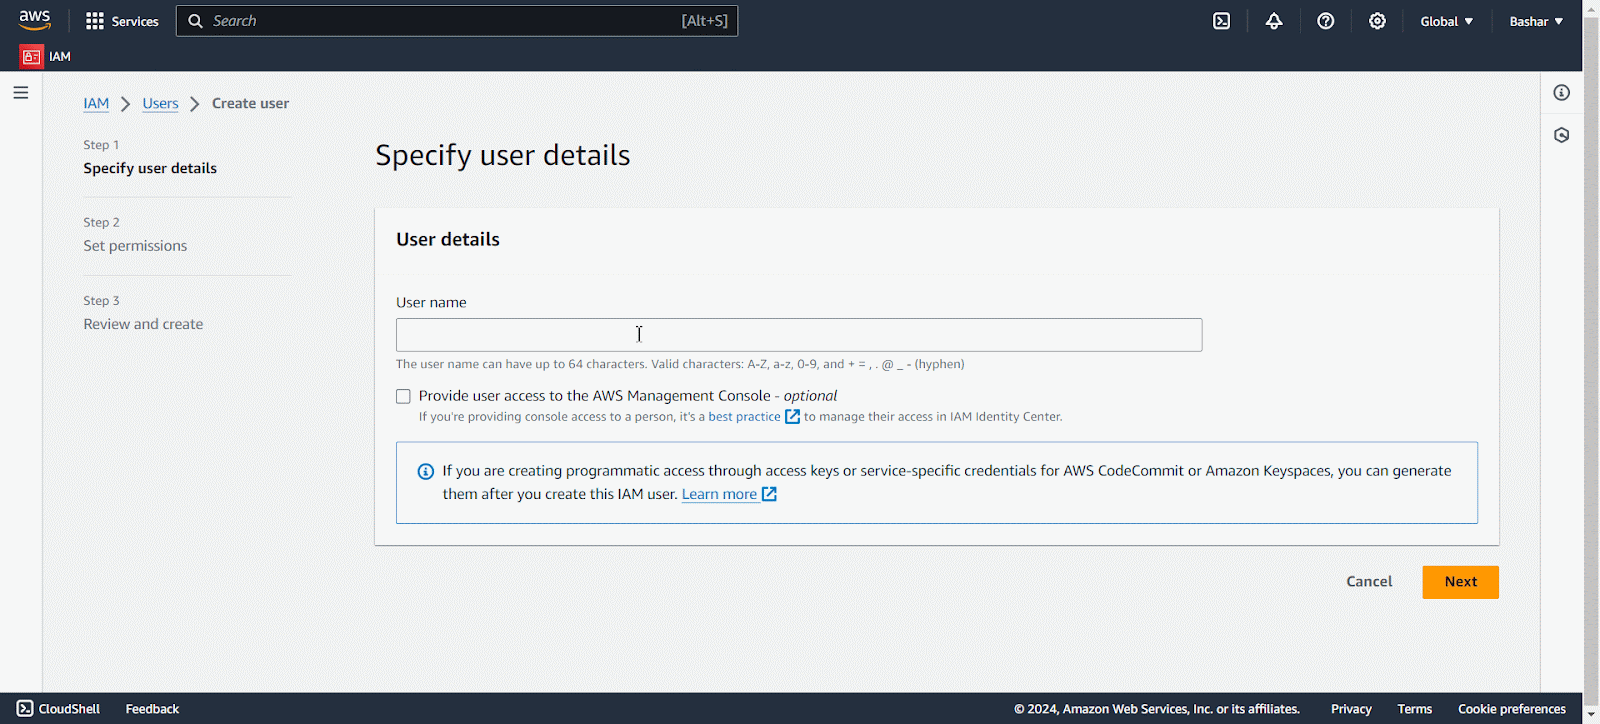
Step 5: Add a New User
On the IAM dashboard, locate and click on the Users option in the left navigation panel. This will display a list of existing IAM users. To create a new user, click on the ‘Create User’ button.
Step 6: Configure User Details
Now, enter a unique ‘Username’ for the new IAM user. Next, choose the type of access the user requires. Check in the ‘AWS Management Console’ access option if the user requires access to the AWS Management Console and click on the ‘Next’ button.
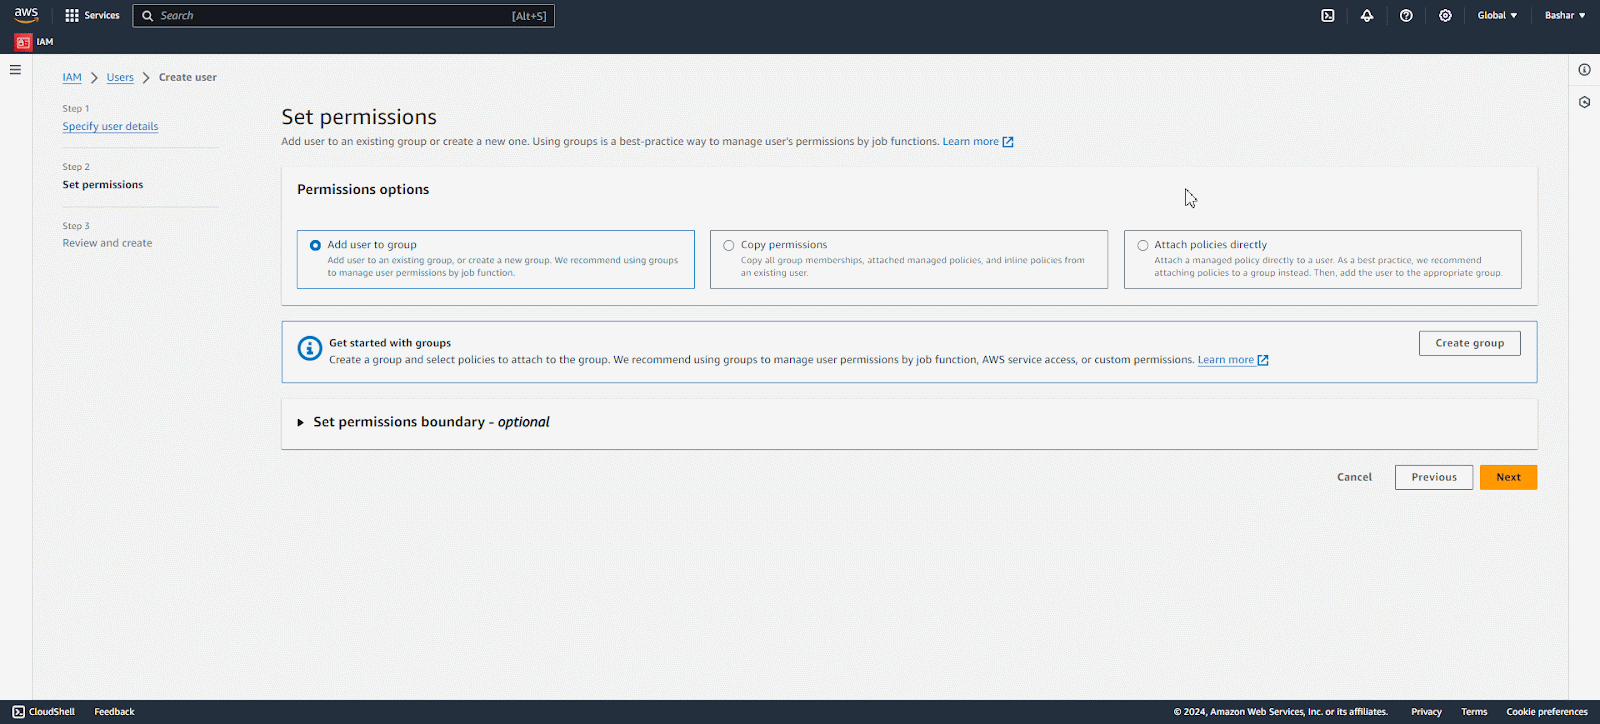
Step 7: Set Permissions for Amazon EC2 Instance
In this step, you will have three options to set permissions for the new user. The first option is ‘Add user to group’. With this option, you can add the user to an IAM group with predefined permissions. This option is effective for managing multiple users with similar access needs.
The second one is ‘Copy permissions’. Choosing this option enables you to duplicate the permissions of another IAM user. And the final policy ‘Attach policies directly’ allows you to assign AWS-managed policies or custom policies.
We are choosing the ‘Attach policies directly’ option here and assigning the access for Amazon EC2 Instance to the user and clicking on ‘Next’.
Note: If you do not find the EC2 Access here, search for the policy in the search bar.
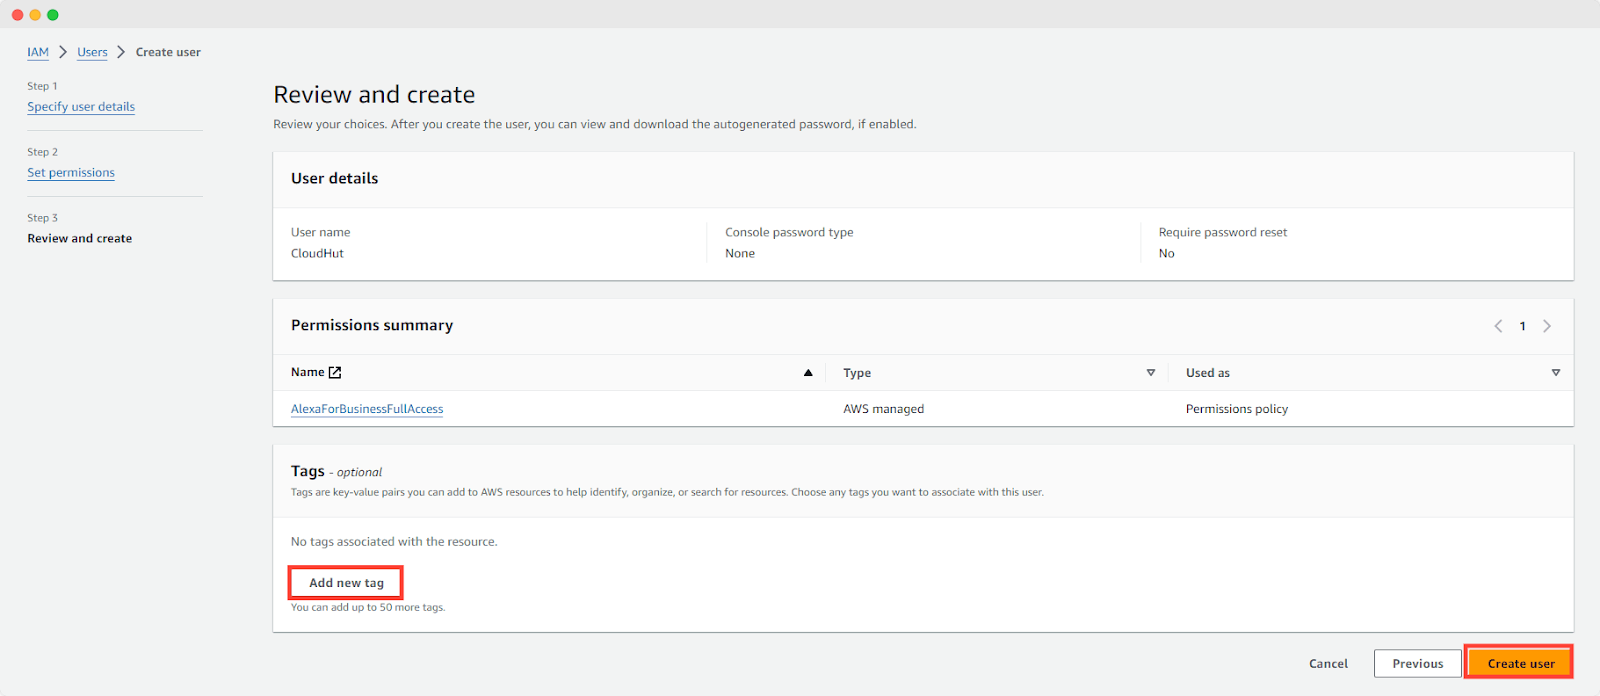
Step 8: Add Tags, Review And Create
You can add ‘Tags’ to help organize and manage users. Now carefully review all the details and permissions assigned to the new IAM user. If everything is accurate and complete, click the ‘Create user’ button to finalize the creation of the IAM user.
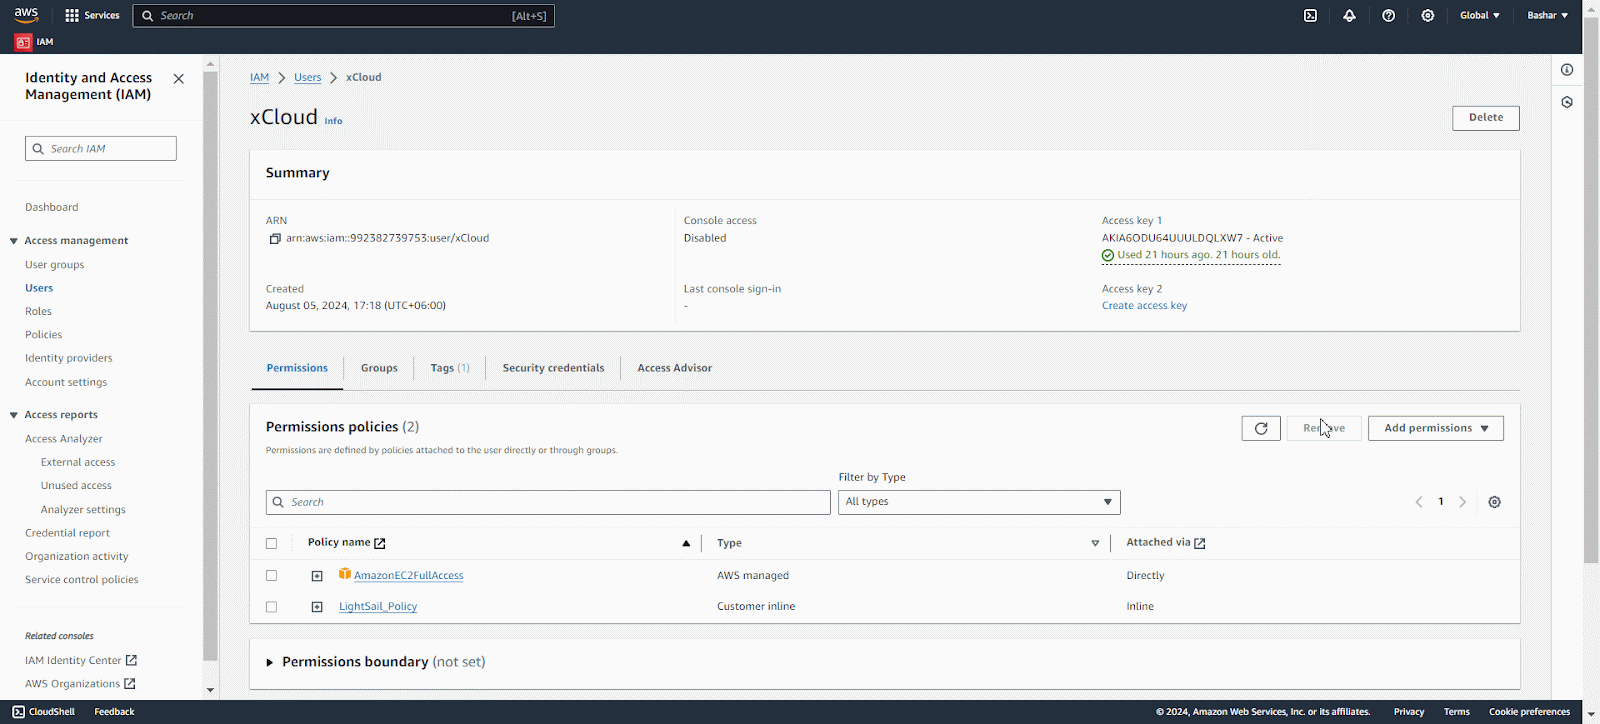
Step 9: Give Permission for Amazon Lightsail
Now, you need to set another permission for the new user for Amazon LightSail. To specify the permissions for the created user, go to the Permission Policies and click on the ‘Add Permissions Menu’. Choose the ‘Create Inline Policy’ option from the dropdown menu.
Click on the ‘JSON’ button from the Policy Editor and paste the below given JASON code in the editor. Finally, tap on the ‘Next’ button.
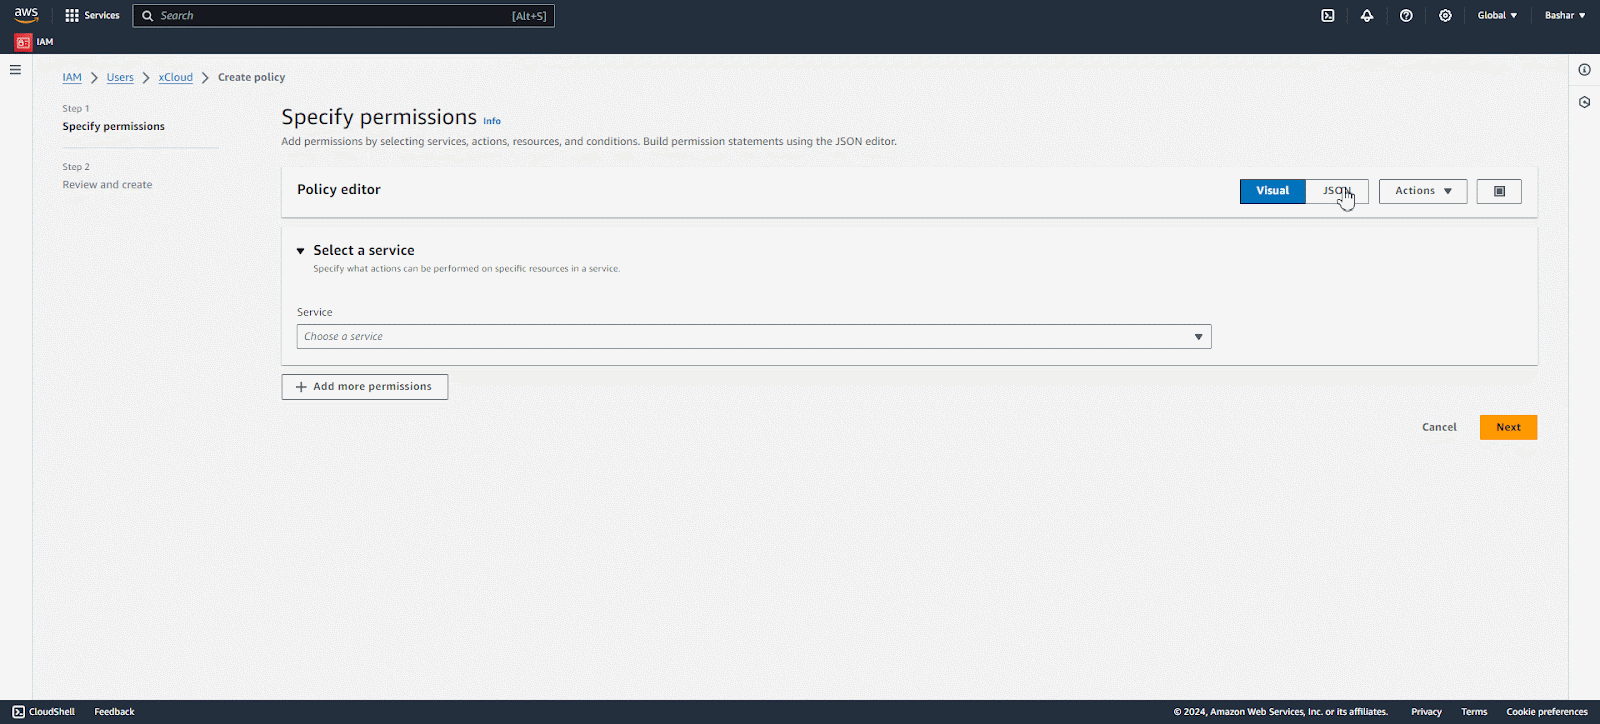
Below is the JSON code:
{
"Version": "2012-10-17",
"Statement": [
{
"Sid": "VisualEditor0",
"Effect": "Allow",
"Action": [
"lightsail:GetInstances",
"lightsail:GetKeyPair",
"lightsail:DeleteKeyPair",
"lightsail:GetStaticIp",
"lightsail:ReleaseStaticIp",
"lightsail:SetIpAddressType",
"lightsail:CreateInstances",
"lightsail:GetInstance",
"lightsail:GetInstanceAccessDetails",
"lightsail:DeleteInstance",
"lightsail:CreateKeyPair",
"lightsail:ImportKeyPair",
"lightsail:StartInstance",
"lightsail:DownloadDefaultKeyPair",
"lightsail:GetInstancePortStates",
"lightsail:StopInstance",
"lightsail:AttachStaticIp",
"lightsail:GetRegions",
"lightsail:RebootInstance",
"lightsail:GetOperation",
"lightsail:DetachStaticIp",
"lightsail:GetInstanceState",
"lightsail:GetBundles",
"lightsail:TagResource",
"lightsail:PutInstancePublicPorts"
],
"Resource": "*"
}
]
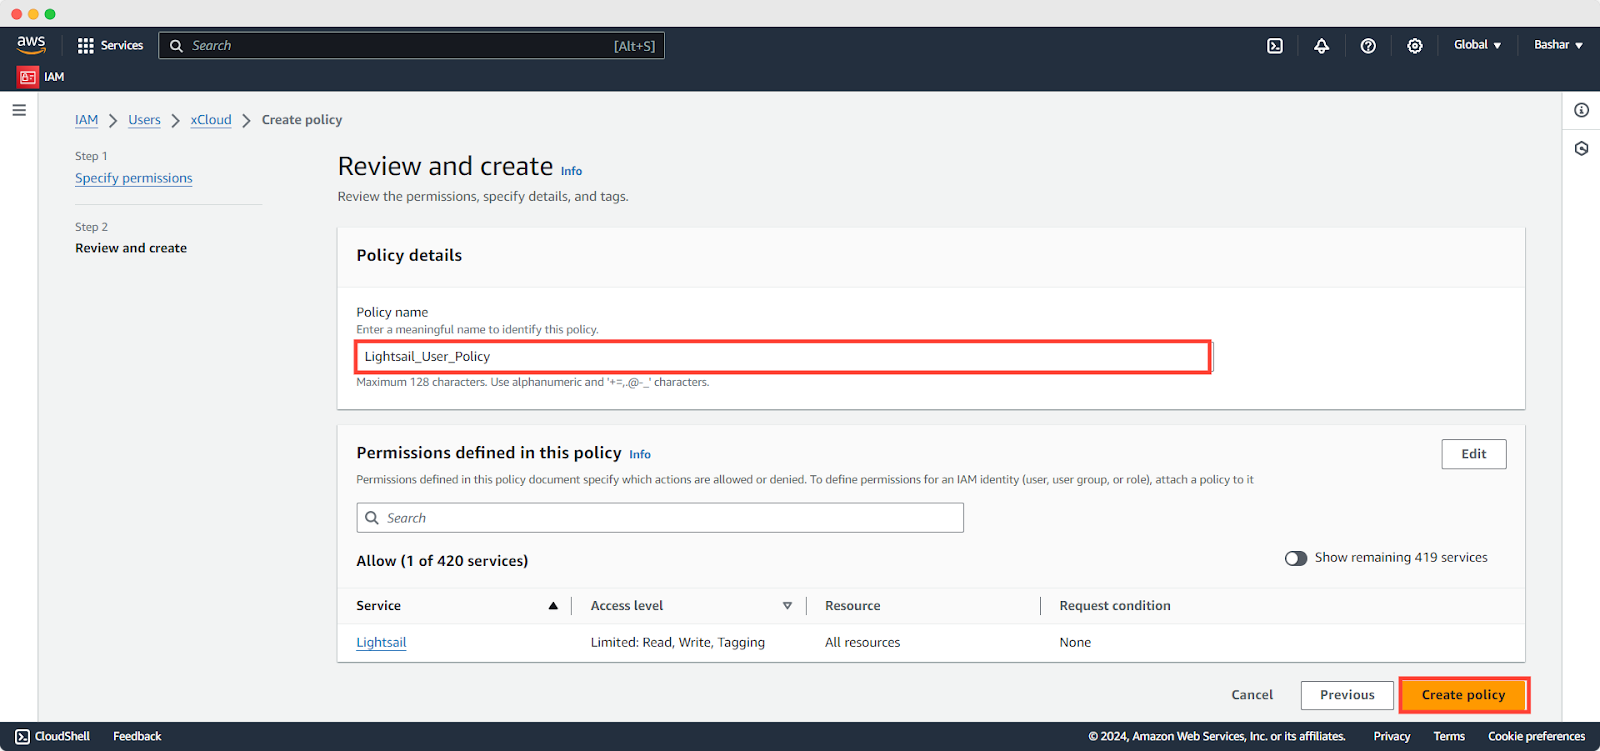
}Once the policy is created for the Lightsail instance, give the policy a name and click the ‘Create Policy’ button.
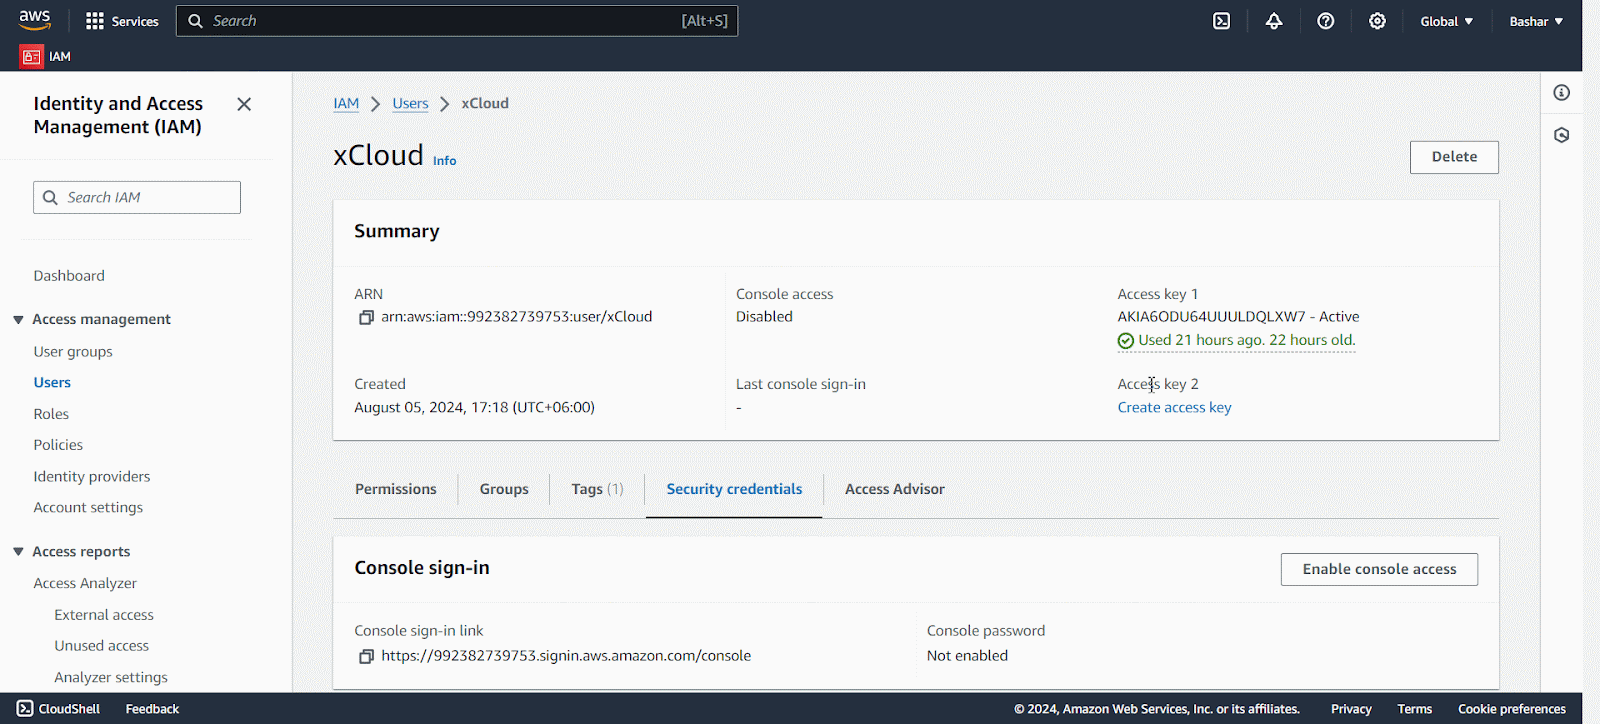
Step 10: Create & Retrieve a User Access Key
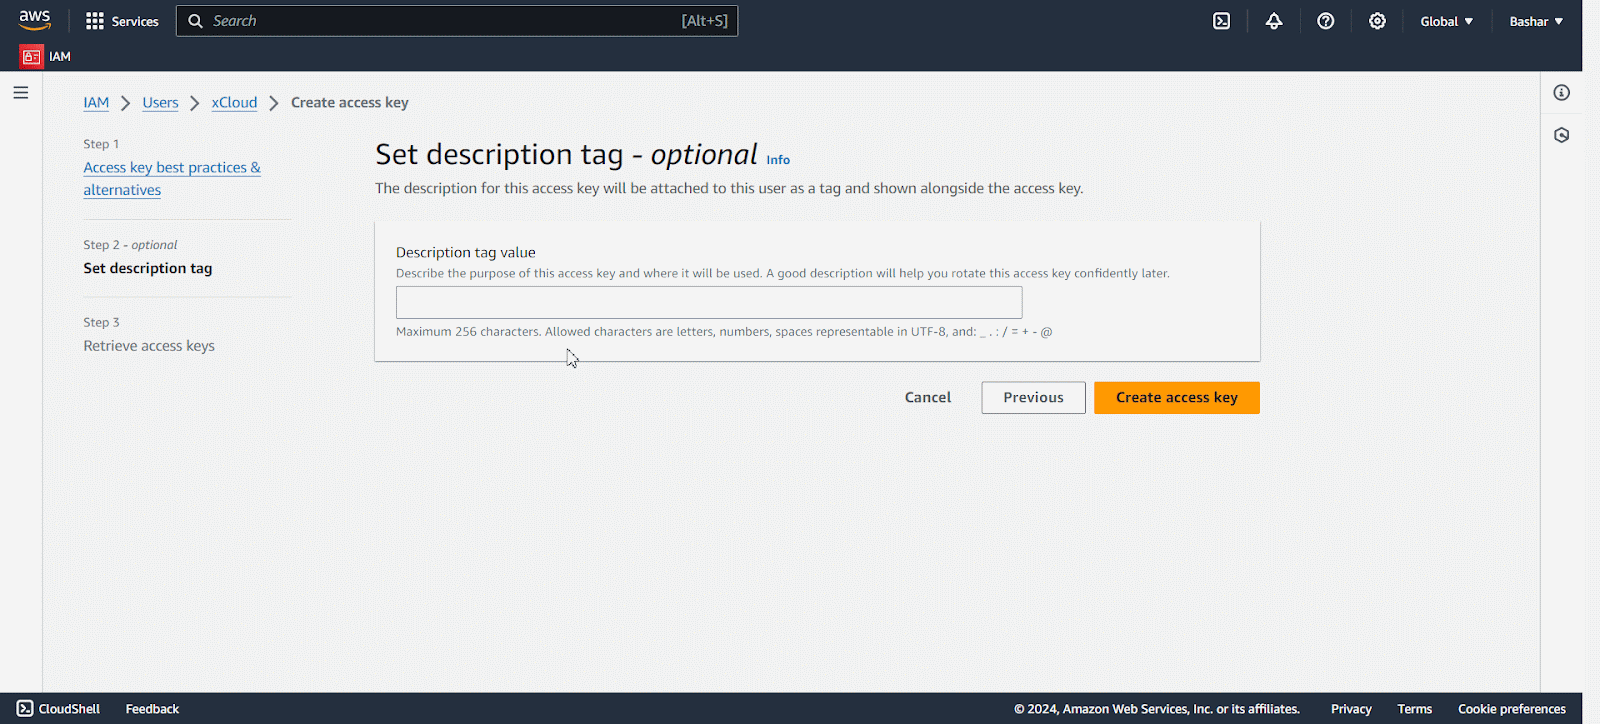
Now, we have to create a user access key. Find the ‘Create access key’ under the Summary tab and click on it. Then you will be redirected to the Access Key best practices & Alternatives page, from here select the ‘Other’ option and click on Next.
Now, give a Description Tag to proceed to create an access key. After the access key is created copy the Access Key and Secret Key from from here and go back to your xCloud Dashboard to integrate the server with xCloud.
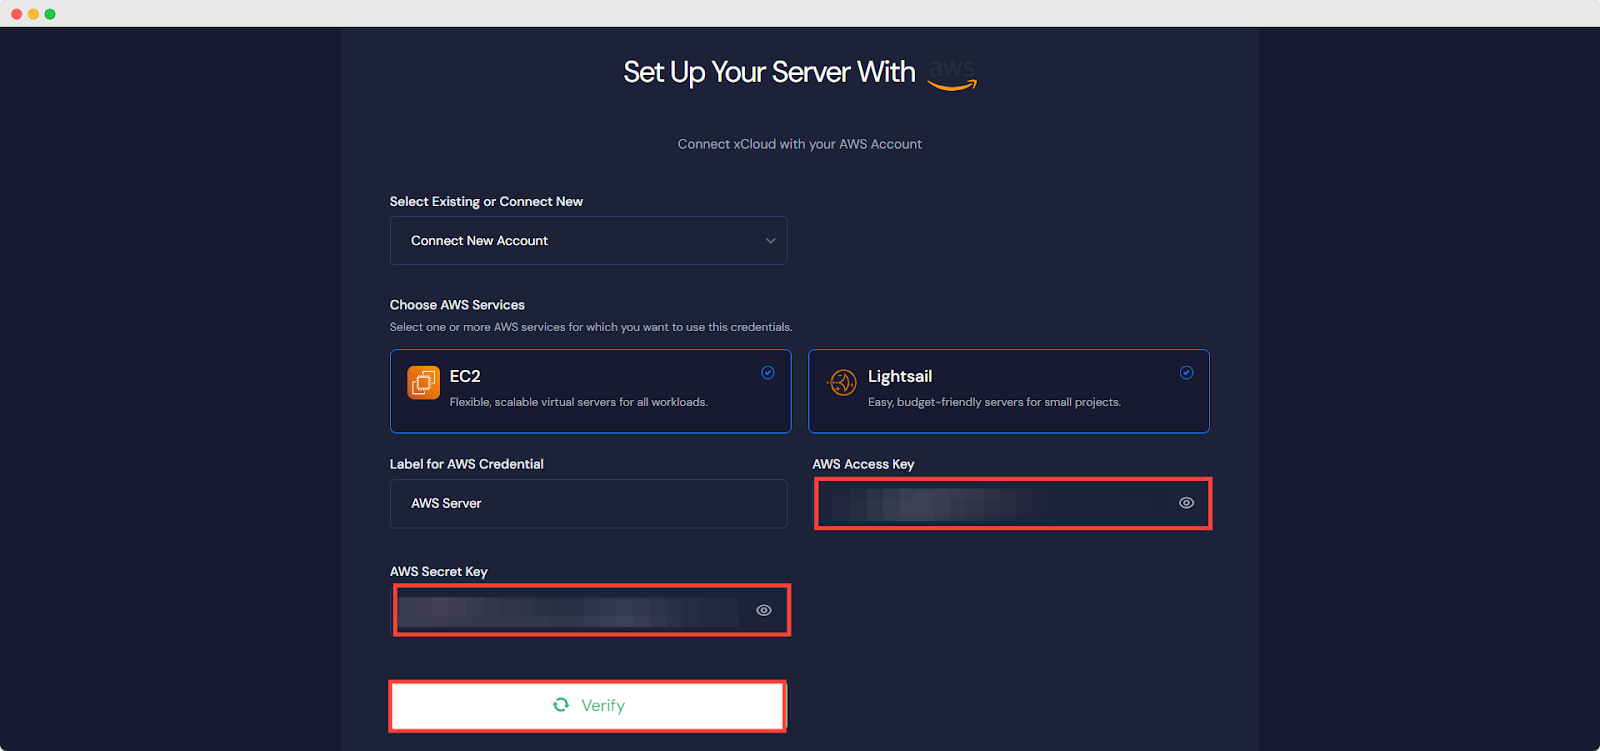
Step 11: Connect the Account & Add Necessary Information
From the AWS dashboard, select an existing or connect new account from the dropdown menu. Then choose the AWS services, you can use anyone with the proper credentials or both from the xCloud dashboard.
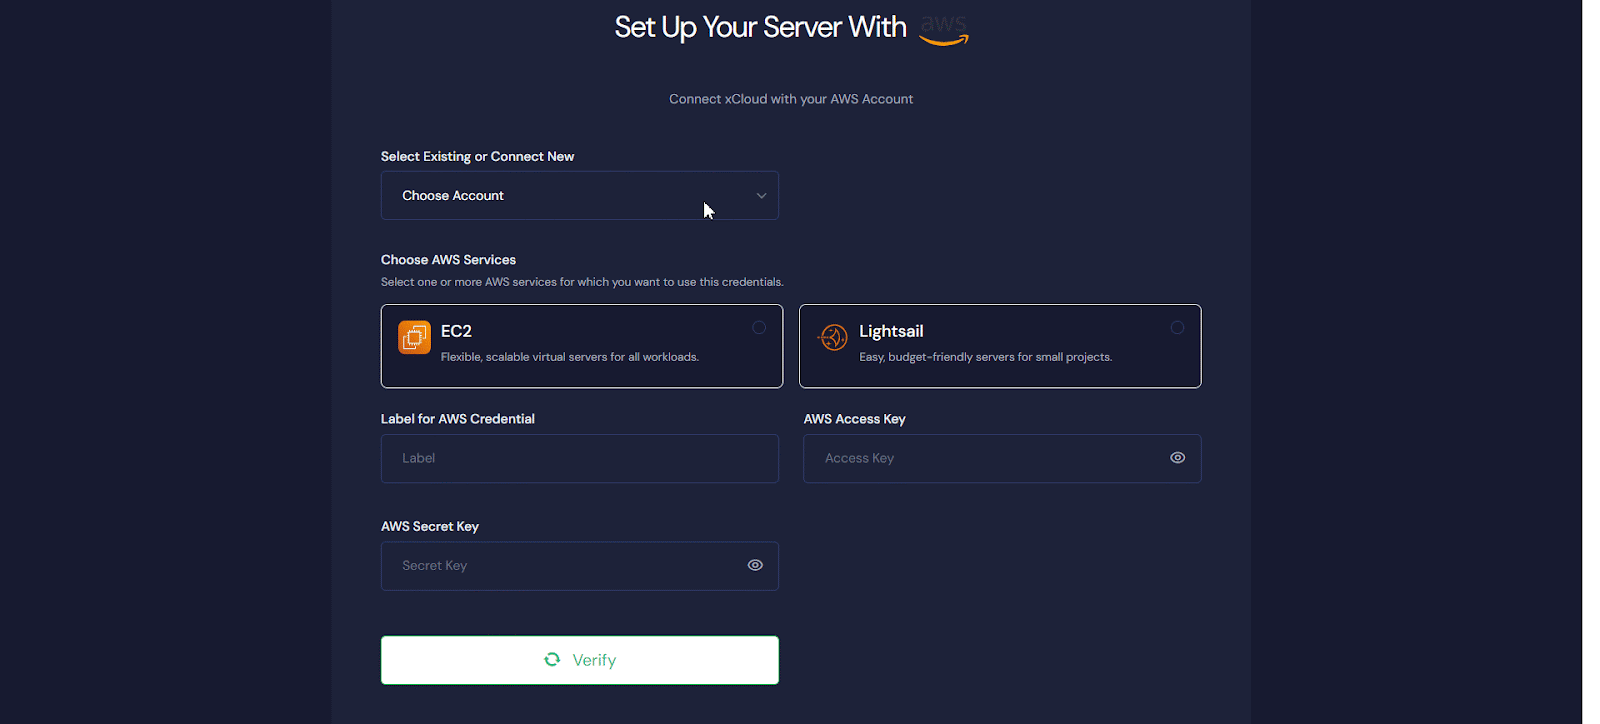
As you have the Access Key and Secret Key Paste them into the designated blank boxes one by one carefully. Now click on the ‘Verify’ button, it will start verifying the credential and connect you with the AWS server.
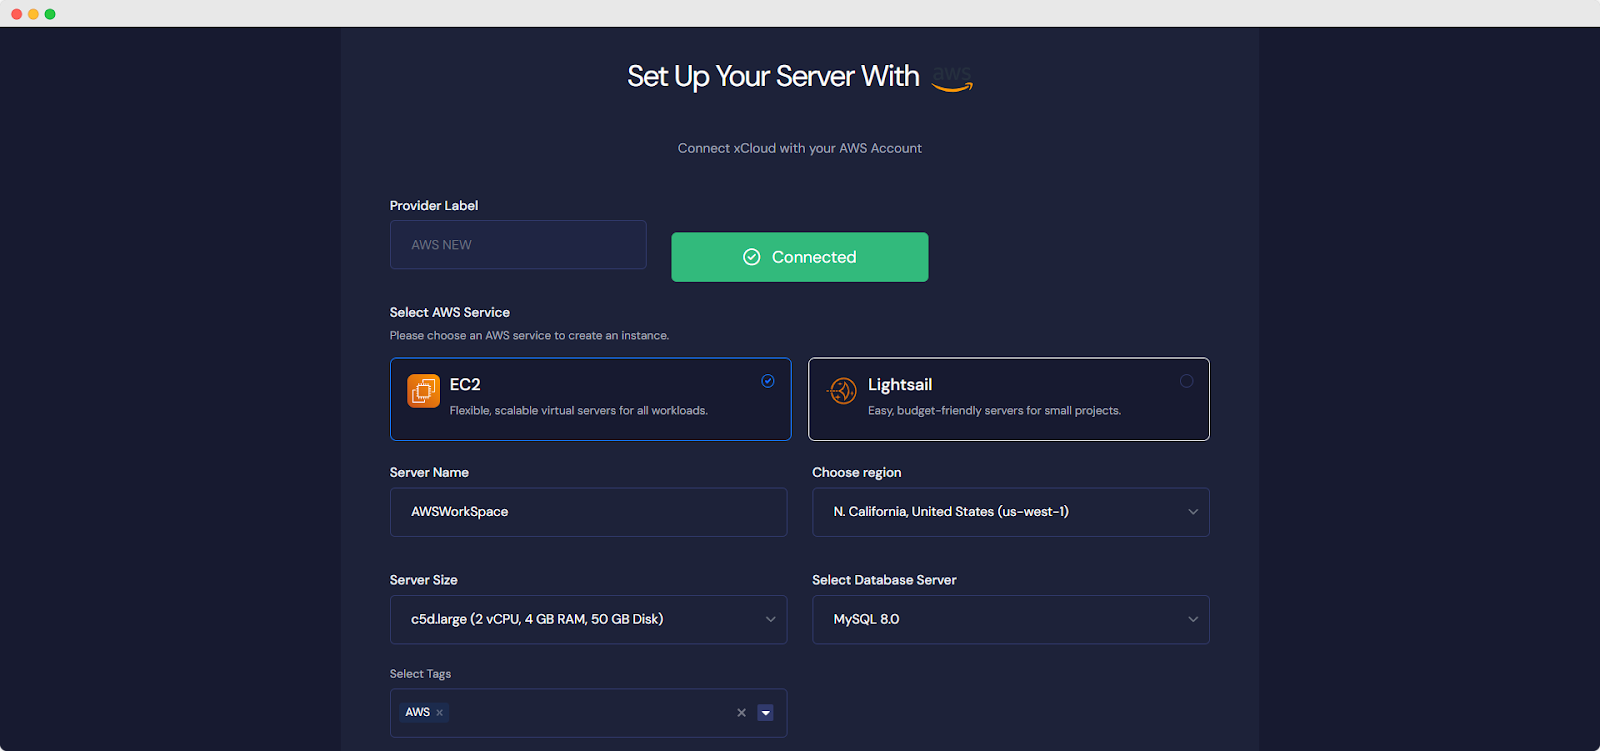
Fill in all the information like ‘Server Name’, ‘Server Region’, ‘Server Zone’,’ Server Size’, etc according to your preference.
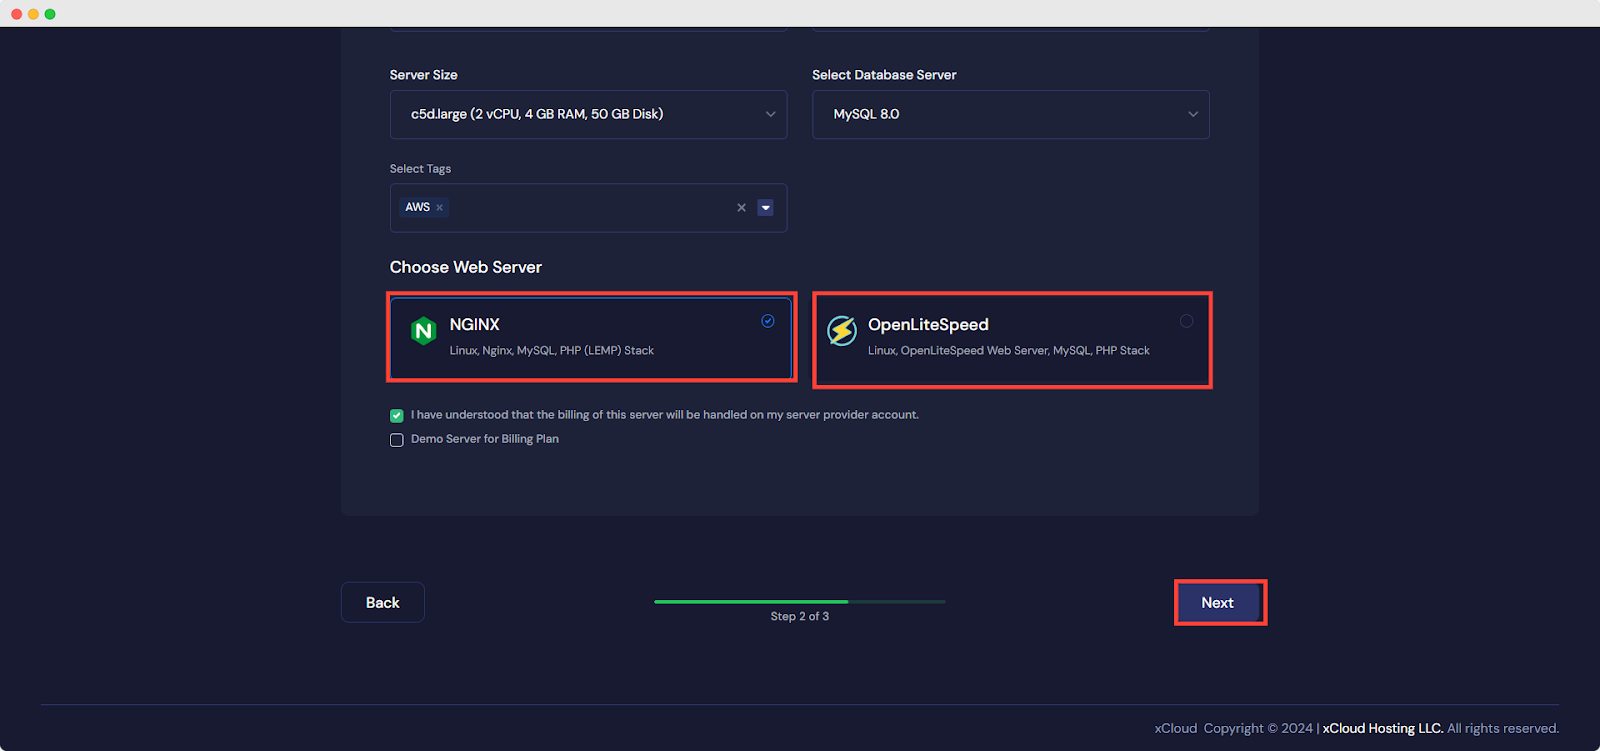
Next, choose the web server stack from NGINX or OLS as your requirements and click on ‘NEXT’ button to proceed with the server creation process.
It will start creating an AWS server with xCloud within a while and if you go to the ‘Servers’ from the menu you can see your created server and create as many sites as you want under this server.
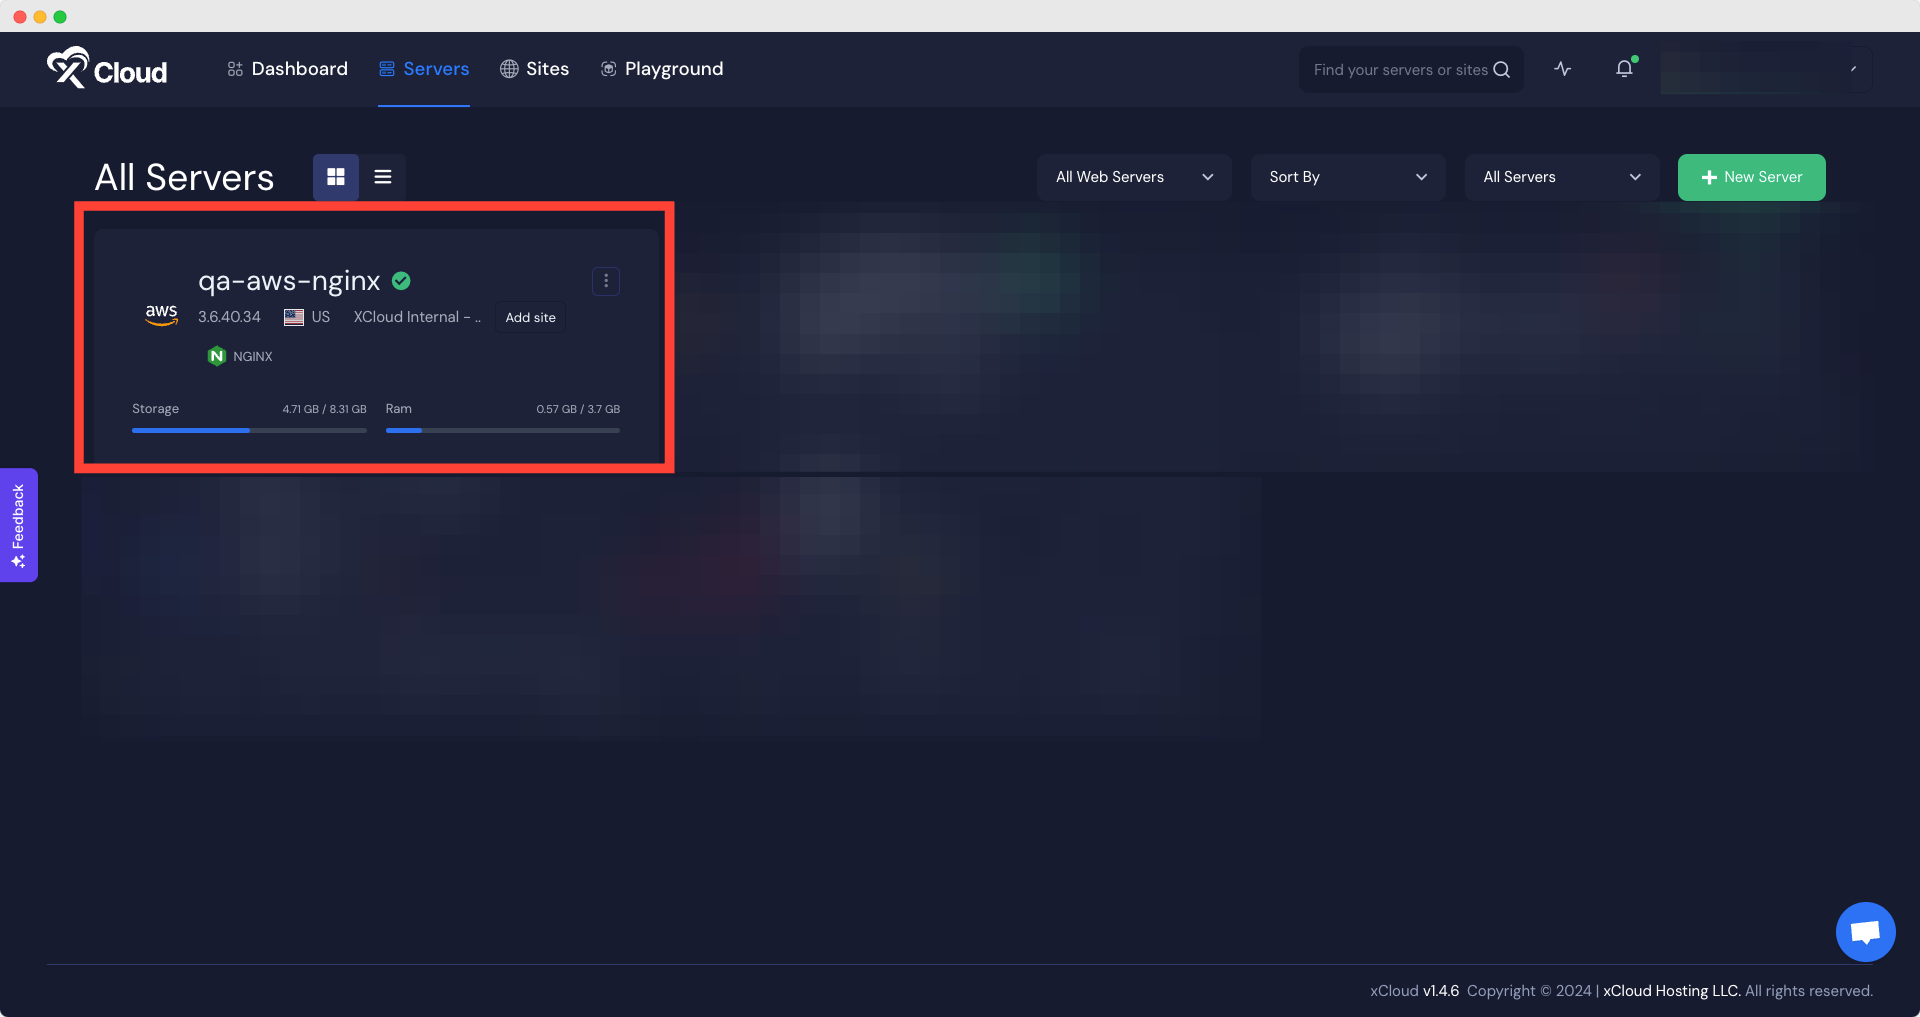
This is how you can create an AWS server from xCloud seamlessly without going through any difficulties.
After creating your server with AWS, you can create your first site with xCloud. Follow this documentation to learn how to do that. If you get stuck, you can contact our support team for any of your queries.
Harness the Power of AWS And xCloud for Effortless WordPress Management
By integrating AWS with xCloud, you can apply the high-functioning AWS infrastructure with the simple management interfaces of xCloud. That way no matter if someone chooses EC2 for its flexibility or Lightsail for its simplicity, they are guaranteed high performance, scalability, and ease of use. So, you can relax and make your hosting straightforward which enables you to concentrate on what matters most – creating great content for your website.
Did you find this blog helpful? If you find this blog useful and want to read more blogs like this one, Subscribe to our blogs and join our Facebook Community to connect with more people with common interests.