


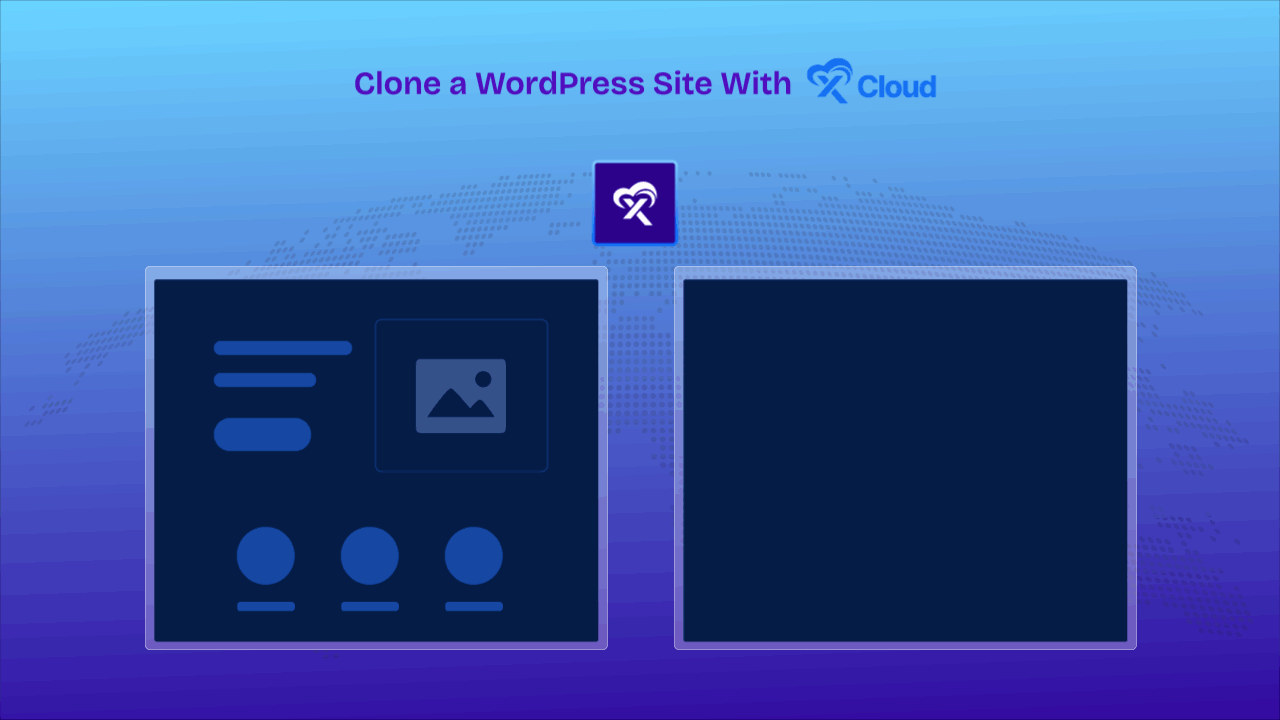
Creating a carbon copy of your WordPress site might be a techy task for you, what if there was a way to clone your site without diving into the depths of coding? To make this process streamlined xCloud comes into play, which can help you clone WordPress sites easily with a few clicks.
If you are looking to migrate your site to a new host, this guide on how to clone a WordPress site can show you an easier way without being a coding wizard. So, without further delay let us jump in.
What Is Cloning a WordPress site?
Cloning a WordPress site means making an exact copy of it. Imagine you have a favorite picture, and you use a copier machine to make a new picture that looks just the same. Cloning a website is similar. You take everything that makes up your website – like its design, words, pictures, and settings – and make a new website that has all the same things.
When you clone a WordPress site, you create a twin of your site. This twin site can be used for many reasons. For example, if you want to try out new ideas or make changes without affecting your original site, you can use the clone. It is like having a practice area where you can play and experiment without worrying about making a mess.
Cloning a WordPress site is an excellent feature because it lets you safely work on your website. You can make updates, try new designs, or add new features to the cloned site first. If everything looks good and works well, you can then apply those changes to your main website. If something goes wrong, your main site is still safe and unchanged.
In short, cloning a website is like having a backup plan. It gives you the freedom to be creative and try new things, knowing you have a safety net.
Why Clone a WordPress Site?
Sometimes, you might want or need to make a clone of a WordPress site. Here are some reasons why cloning a WordPress site can help you with different aspects:
- Moving Your Site: If you are changing where your website is hosted, or moving it to a different place on the internet, cloning lets you do this smoothly.
- Testing Changes: When you want to try out new things on your site without risking problems, you can clone a WordPress site and test changes there first.
- Making a Backup: It is smart to have a backup, or a saved copy, of your site. If something goes wrong, you have a copy to go back to.
- Working on Your Site: If you are making big changes or building something new for your site, cloning lets you work on a copy. This way, your main site stays untouched until you are ready.
xCloud makes it easy to clone WordPress sites. Whether you are making a whole new site or making big updates, knowing how to clone a WordPress site with xCloud gives you more freedom to work without worries.
How Does xCloud Clone a WordPress Site?
xCloud simplifies the process of cloning a WordPress site. It offers a straightforward and efficient method for duplicating your website. You clone your site directly from the xCloud dashboard by just following simple steps.
By streamlining the cloning process, xCloud provides a hassle-free solution for developers, site managers, and content creators looking to replicate their WordPress sites quickly and accurately, making site migration, testing, or backup creation a breeze.
Other than that, you can even clone a site from the Git repository with xCloud. Git is a powerful version control system that developers use to track changes in source code during software development. This integration allows for seamless cloning and migration of WordPress sites as well.
What Should You Do Before Cloning a WordPress Site?
Before you start cloning your WordPress site with xCloud, it is very important to get your site ready. This preparation helps make sure the cloning goes well and avoids problems. Here is what you should do:
- Backup Your Site: First, make a complete backup of your WordPress site. This includes everything – your site’s files, themes, plugins, and database. Having a backup is like a safety net, just in case something goes wrong during the cloning.
- Update Everything: Make sure your WordPress site, along with any themes and plugins you use, are all updated to their latest versions. This helps prevent any issues with things not working right on the cloned site because they are outdated.
- Clean Up Your Site: Get rid of any files, plugins, or themes you do not use anymore. This not only helps the cloning go faster but also makes your site run better.
- Check Hosting Environment: Make sure the place you are cloning your site to can support WordPress properly. This means it should have the right PHP version, MySQL/MariaDB version, and support for HTTPS.
By doing these things before you clone, you help ensure the cloning process goes smoothly. This preparation helps prevent issues and makes sure the cloned site works well and looks just like your original site.
Step-by-Step Guide to Clone a Website with xCloud
Cloning your website can serve various purposes, such as creating backups, testing updates safely, or smoothly migrating to a new server. xCloud helps you with the simple way to clone a WordPress website. Here, we will talk about how to efficiently clone a WordPress site under the same or a different server using xCloud. With xCloud’s intuitive interface and robust features, you will learn the precise steps to duplicate your site hassle-free. So, let us begin the process of cloning your site with xCloud.
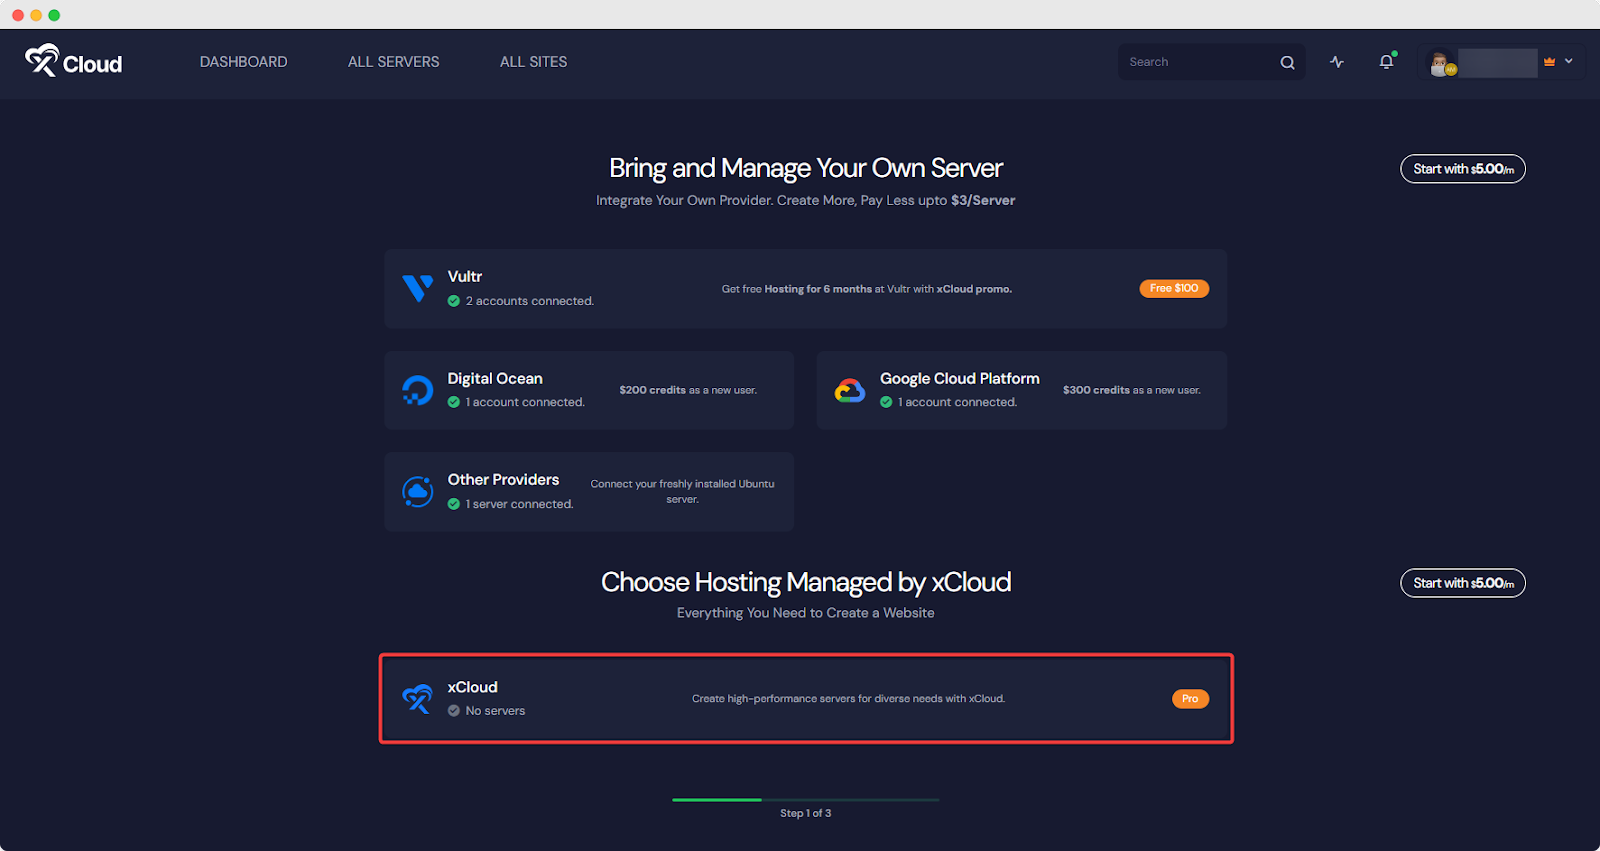
Step 1: Choose Your Server Provider
Login to your xCloud account & click on ‘Add A New Server’. From the dashboard choose xCloud as your server provider.
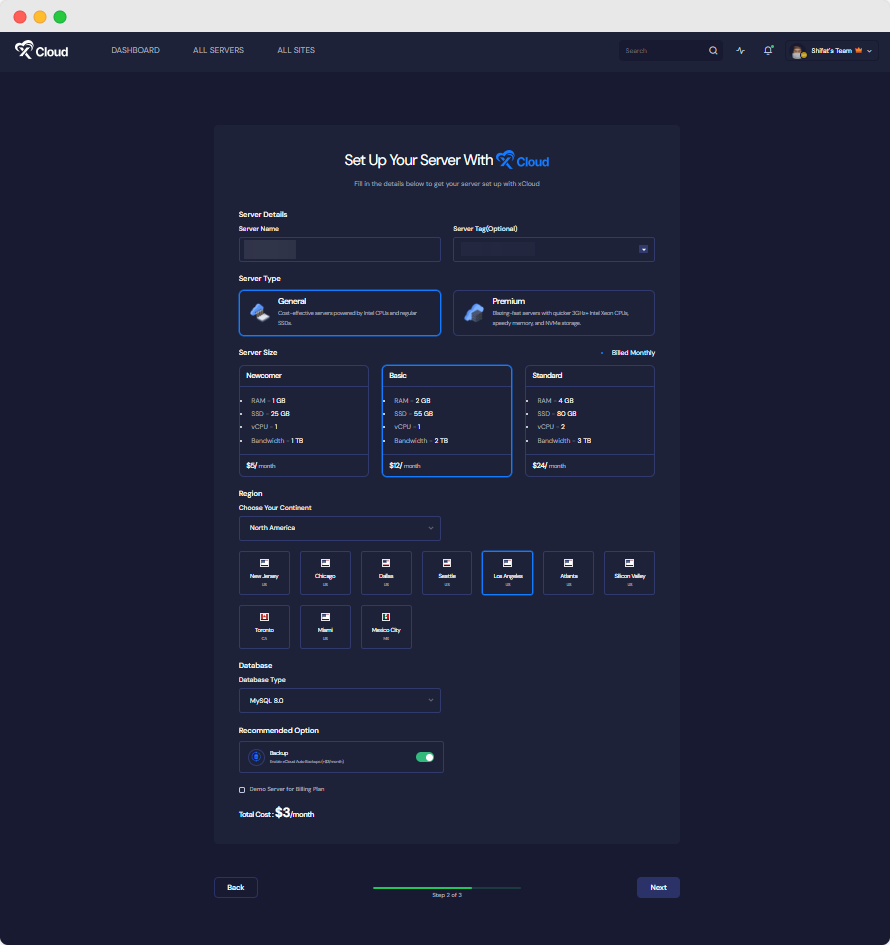
Step 2: Add All the Details of Your Server
You will be taken to the server creation page after the previous step. Now you need to provide the Server name, your preferred Server Size (CPU, RAM, storage), and the ‘Region’ nearest to you and your visitors. Only the MySQL 8.0 database server is now available. By default Database, the Root Password will be auto-filled but you can change this and save it in a safe place. After submitting the form this might take up to 12-15 minutes to make the server live.
You should use at least 2GB/ 1 shared CPU server for 10-20 sites with cache enabled and the site whose pages cannot be cached you should use at least 4 GB / 2 dedicated CPUs server for them.
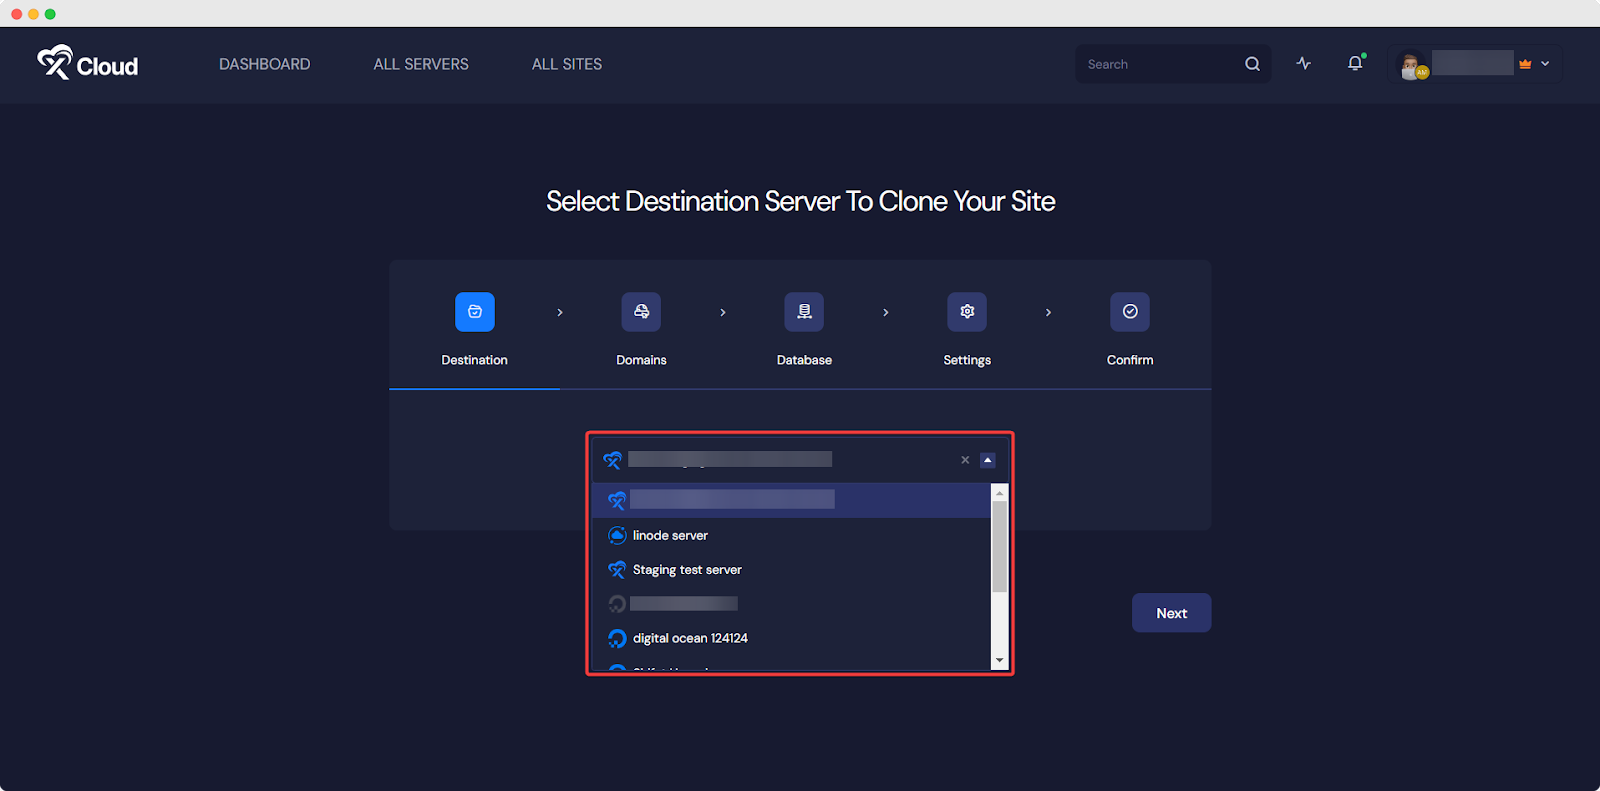
Step 3: Clone Your Site From the xCloud Dashboard
After successful server creation, you will need to explore the dashboard. That is where you will start your cloning process. First, choose the source site that you want to clone then from the ‘Action’ button dropdown, click on the ‘Clone Site’ to get started.
Now, you can clone the site under the same or a different server. For that, just choose the option that suits your preferences.
With xCloud, you can take advantage of a temporary staging domain to showcase your site’s progress and gather valuable feedback from teammates or clients. This feature enables you to share your work rapidly and efficiently.
Once you are satisfied with the changes and ready to go live, xCloud allows you to seamlessly add your own domain, making your website accessible to your users and visitors. Enjoy the flexibility of testing and refining your site before presenting it to the world with xCloud’s staging and domain management capabilities.
This is how easily you can clone a WordPress site under the same or different server in xCloud.
What Should You Do After Cloning a WordPress Site?
After you clone a WordPress site, there are a few important steps you need to take. These steps make sure your cloned site works well and matches what you need. Here’s what to do:
Update the Site URL
Your cloned site might still point to the original site’s address. You need to go into the settings and change the website’s address to the new one. This makes sure when people visit your cloned site, they go to the right place.
Check Themes And Plugins
Sometimes after cloning a WordPress site, themes or plugins might not work the same way on the new site. Go through your themes and plugins to make sure they are all working correctly. If anything is not working, you might need to reinstall it.
Test the Website
Now, it is time to thoroughly check your cloned site. Look at different pages, click on links, and test out features to make sure everything works as it should. This is your chance to catch any problems and fix them before you use the site for real tasks.
Check for Broken Links
Utilize tools like Broken Link Checker to scan your cloned site for any broken links. This step is vital to avoid negative SEO impacts and ensure a smooth user experience. Broken links can occur due to changes in URLs, especially if you have migrated to a new domain.

Update Google Analytics And Search Console
If your clone is a new site on a different domain or a significant change in structure, update your Google Analytics and Search Console settings. This update ensures your traffic and site performance data continue to be accurately tracked. Add the new property to Google Search Console and update the domain settings in Google Analytics to maintain your insight into site performance and search visibility.
Adjust Other Settings If Needed
You might find some settings that need to be changed for the cloned site to work correctly. This can include things like email settings, user accounts, or security settings. Take some time to go through the WordPress settings and adjust anything that is needed.
By meticulously following these post-cloning considerations, you can ensure that your cloned WordPress site not only mirrors the original in functionality and design but also maintains its standing in search engines and provides a seamless experience for visitors.
Clone Your WordPress Site with xCloud Easily
Making a copy of your WordPress site with xCloud is not as hard as it might seem.Cloning a site provides many benefits. After the cloning, there are a few important things to do to make sure the new site works right after cloning a WordPress site. With xCloud, you can easily clone a WordPress site without getting into complicated steps. So, If you are making a clone to try out new things, the possibilities are endless, they are all in your hands with your new cloned site.
We hope this guide has demystified how to clone a WordPress site with xCloud. So go ahead, clone a WordPress site easily and if you find this blog helpful, please subscribe to our blog, and do not forget to join our Facebook Community to get our daily updates.