Are you setting up a WordPress website for incoming heavy traffic and want to know the limits of your website to handle lots of visitors? In this blog, you can learn how to stress test a WordPress website to define site limits. Also, You will be able to identify any changes needed in hosting plans and be easily prepared for having lots of visitors action even if you are just a beginner.

What is a Stress Test?
Stress testing is like putting your website through a series of challenges to see how well it can handle heavy traffic. Just like how you would test a new backpack by loading it up with books to see if it holds up, stress testing checks if your website can handle the weight of lots of visitors clicking around.
Stress testing your WordPress site is important. It helps you spot any weak spots in your site’s performance before they become big problems. Plus, it gives you peace of mind knowing your site can handle whatever comes its way, whether a sudden surge in traffic or a big sale on your online store. So, get ready to learn to perform stress testing and get your WordPress site running smoothly.
Why You Should Stress Test a WordPress Website
Stress testing your WordPress website helps you see how strong it is. But why put your website through this workout? Let’s break it down:
1. Checking server capacity
Your web hosting company is like the engine powering your website. Website Stress testing helps you see if it can handle all the visitors without slowing down or crashing. Imagine a highway with too many cars – if it is not wide enough, there will be a traffic jam!
2. Evaluating user experience under heavy loads
Think of your website as a store. If too many customers come in at a time, will they be able to browse smoothly or will it feel like they are stuck in a crowded aisle? Stress testing helps you find out if your site can keep up with the rush.
3. Determining if server scaling is necessary
Sometimes, your website needs a boost like adding more RAM to a computer to make it faster. Stress testing helps you figure out if your server needs to bulk up to handle the load.
4. Resource optimization
Just like cleaning out your closet to make room for new clothes, Website stress testing helps you find unused resources that can be put to better use. It is all about making your website run more efficiently.
5. Protection against traffic spikes
Think your website is featured on a popular TV show, and suddenly, everyone’s rushing to check it out. Stress testing helps you prepare for those unexpected surges in traffic so your site doesn’t crash when it’s in the spotlight.
You are not just making sure your WordPress website can handle the heat by stress testing. Also, you are ensuring a smoother experience for your visitors and protecting your site from potential hiccups. Now, let us dive into each reason to see why it matters and how it can make a difference for your site.
How to Stress Test A WordPress Website?
We know why stress testing is important, so let us talk about how to Stress Test a WordPress Website. One handy website as a tool for your WordPress site stress test online is Loader.io. Think of it like a personal trainer for your site. It helps you push your website to its limits to see how well it performs under pressure.
Step 1: Registration and Account Setup
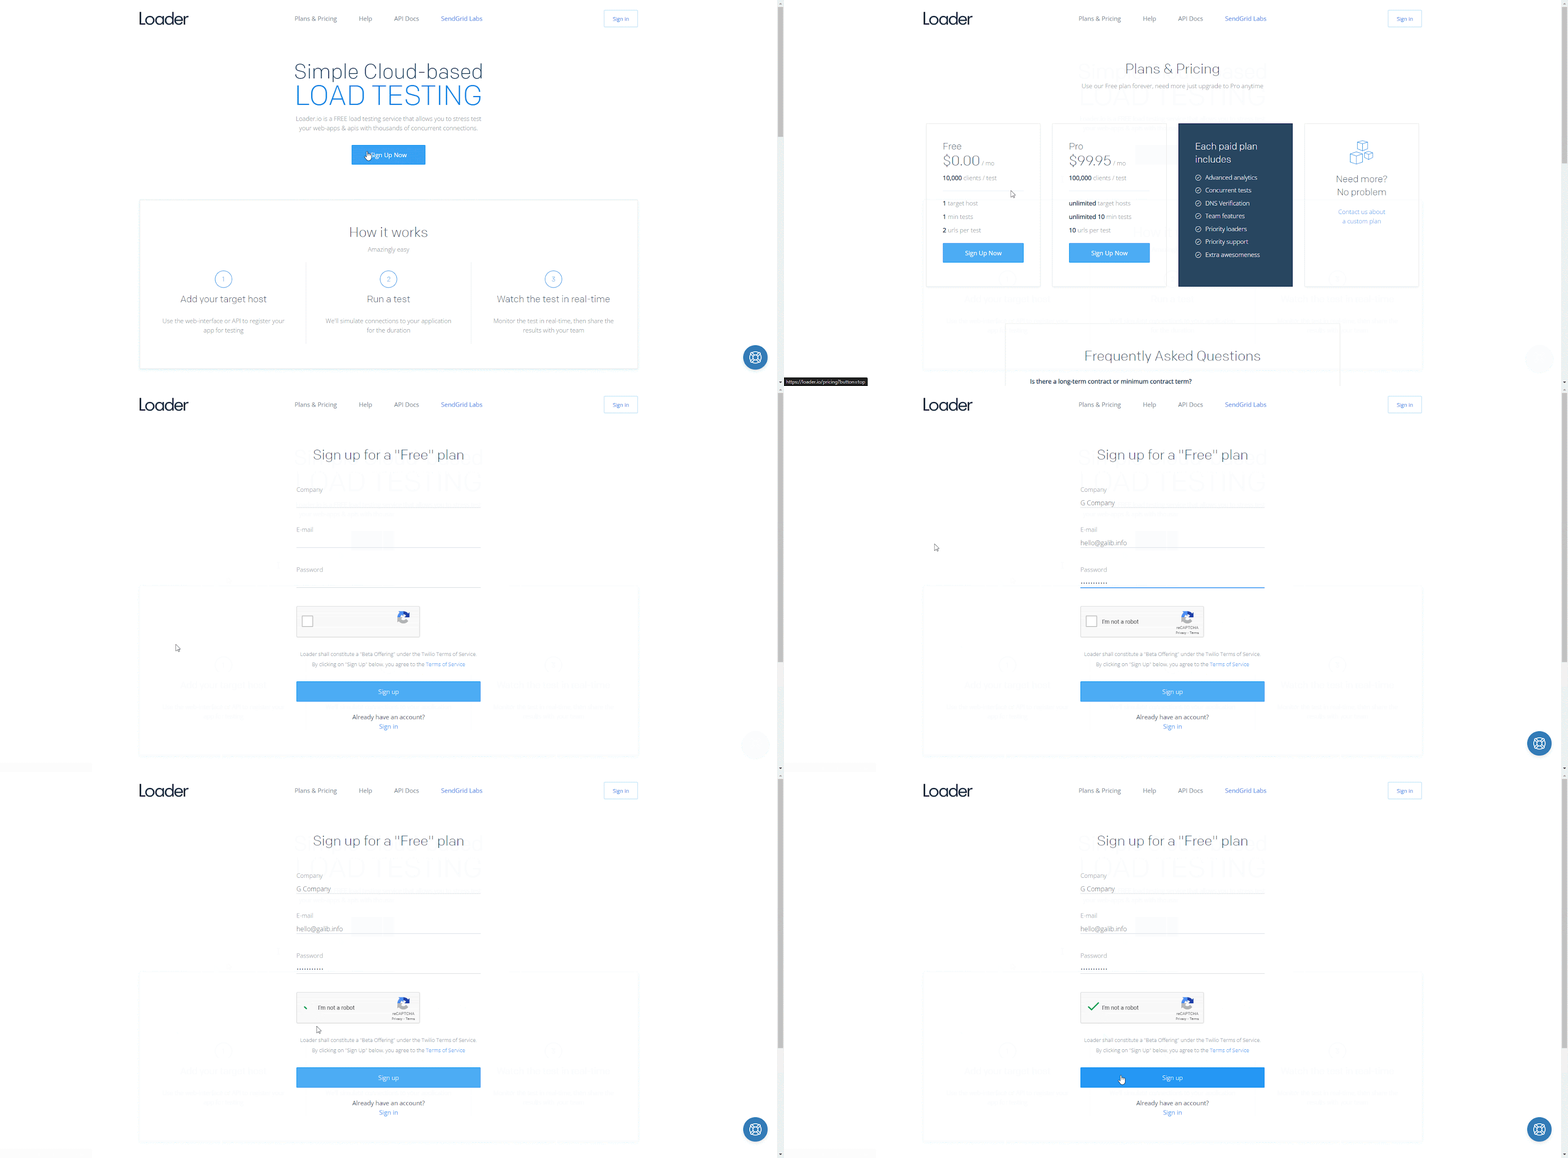
First things first, you will need to sign up for an account on Loader.io. It is as easy as creating an account on your favorite social media platform. Just fill in your details and you are good to go!
Step 2: Create a Target Host and Verify Domain
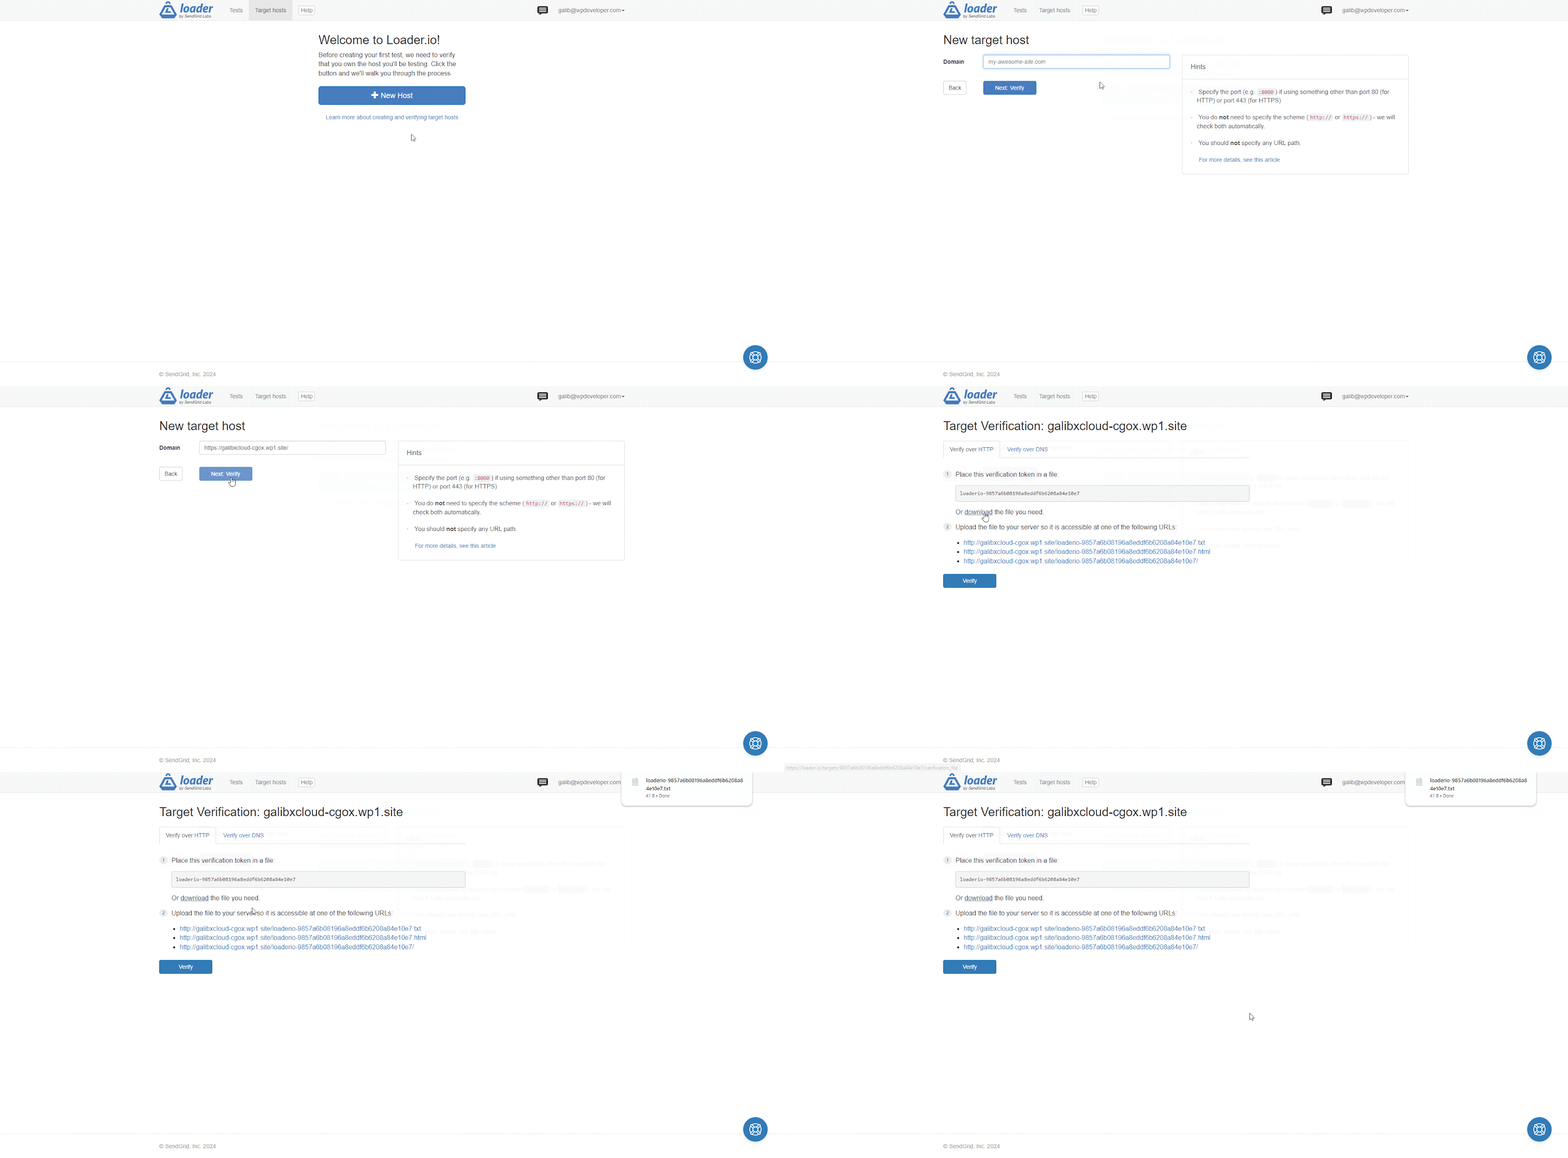
Once you are logged in, it is time to set up your website stress test online. Click on the ‘+Add New Host’ button. Add the WordPress domain you want to test in the empty box and click on the ‘Next: Verify’ button. Now, click on ‘Download’ the file you need to verify your domain’s host as a targeted host.
Now, verify your domain by uploading the file you downloaded to your website’s server. We are using xCloud Hosting for this stress test which comes with a pre-installed file manager. If a file manager feature is not available in your current hosting, use any SFTP client of your preference to upload the file.
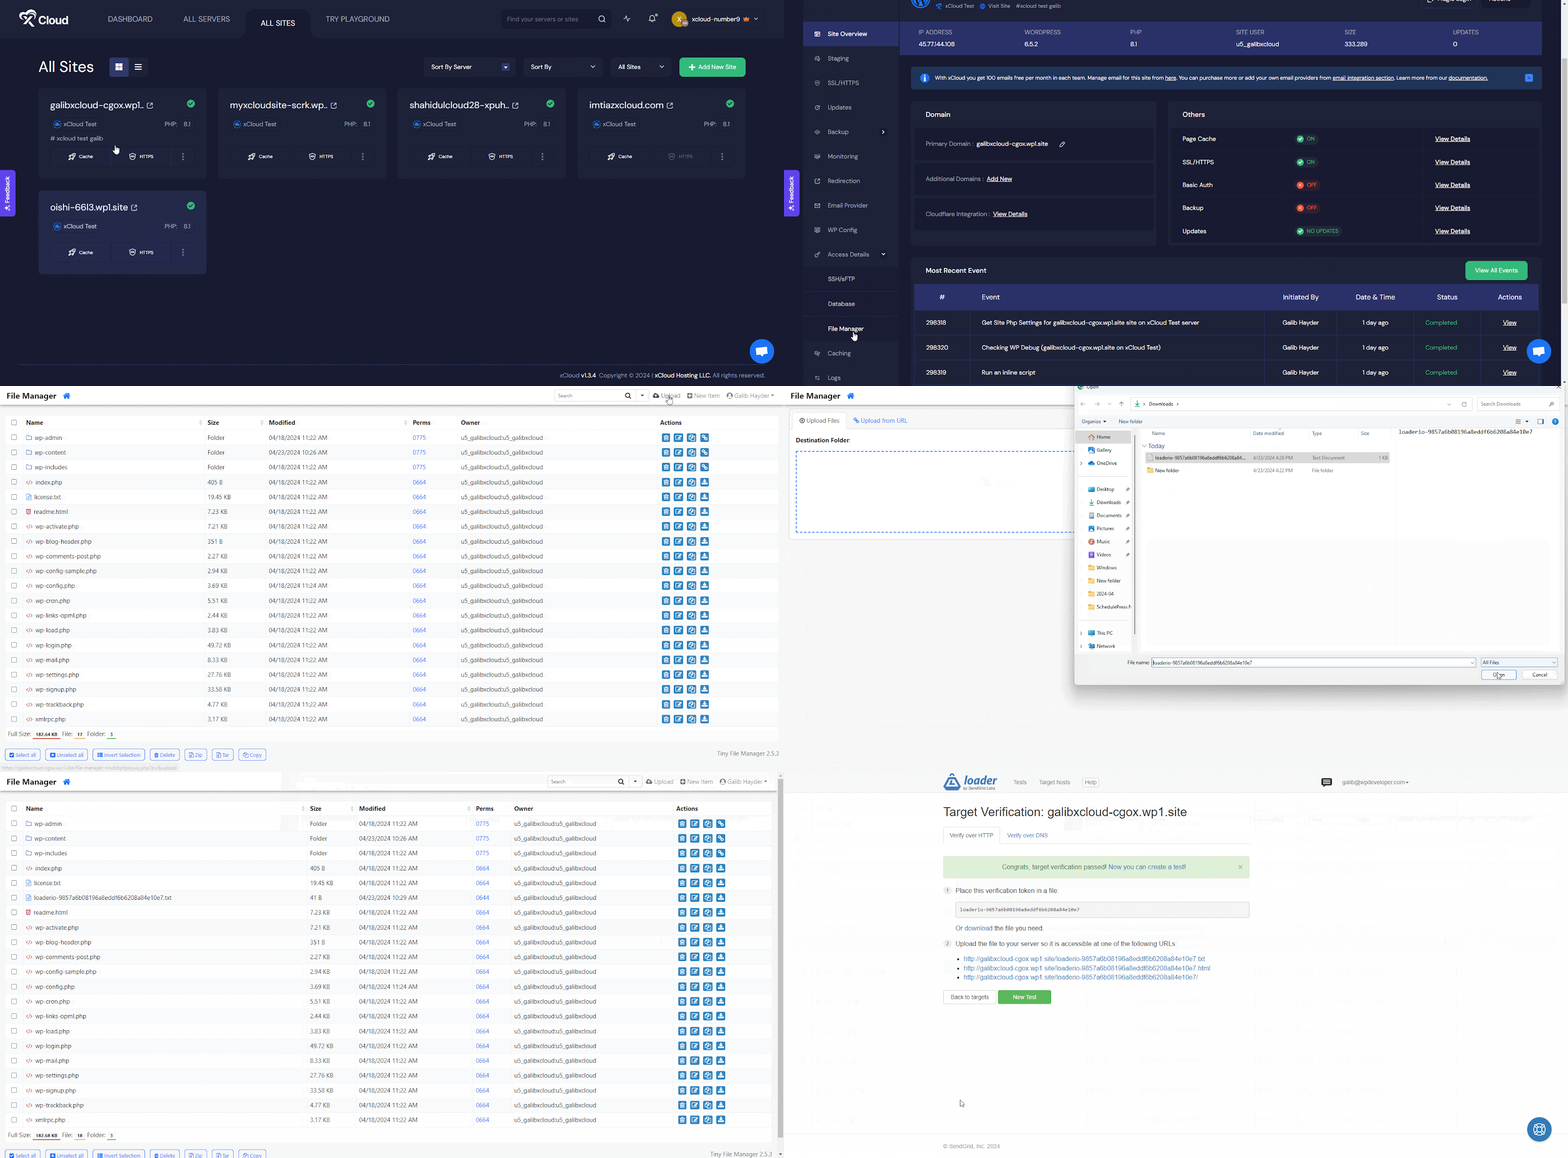
From the hosting dashboard, navigate to your domain file manager as shown and upload the file you downloaded in File Manager. Now, go back to the loader.io site and click on the ‘Verify’ button to complete the verification of your targeted host. Once your domain is verified, you are ready to start stress testing!
Step 3: Setting Up Tests with Varying Client Loads
Now that you have got your website all set up on Loader.io, it is time to put it to the test! We are going to change one thing at a time to see how your website reacts. Loader.io makes it easy to do this by allowing you to set up different tests with varying numbers of visitors, called clients.
Test 1: Low Load
Let us start with a gentle warm-up. In this test, we will send a small group of clients to your website to see how it handles a light load.
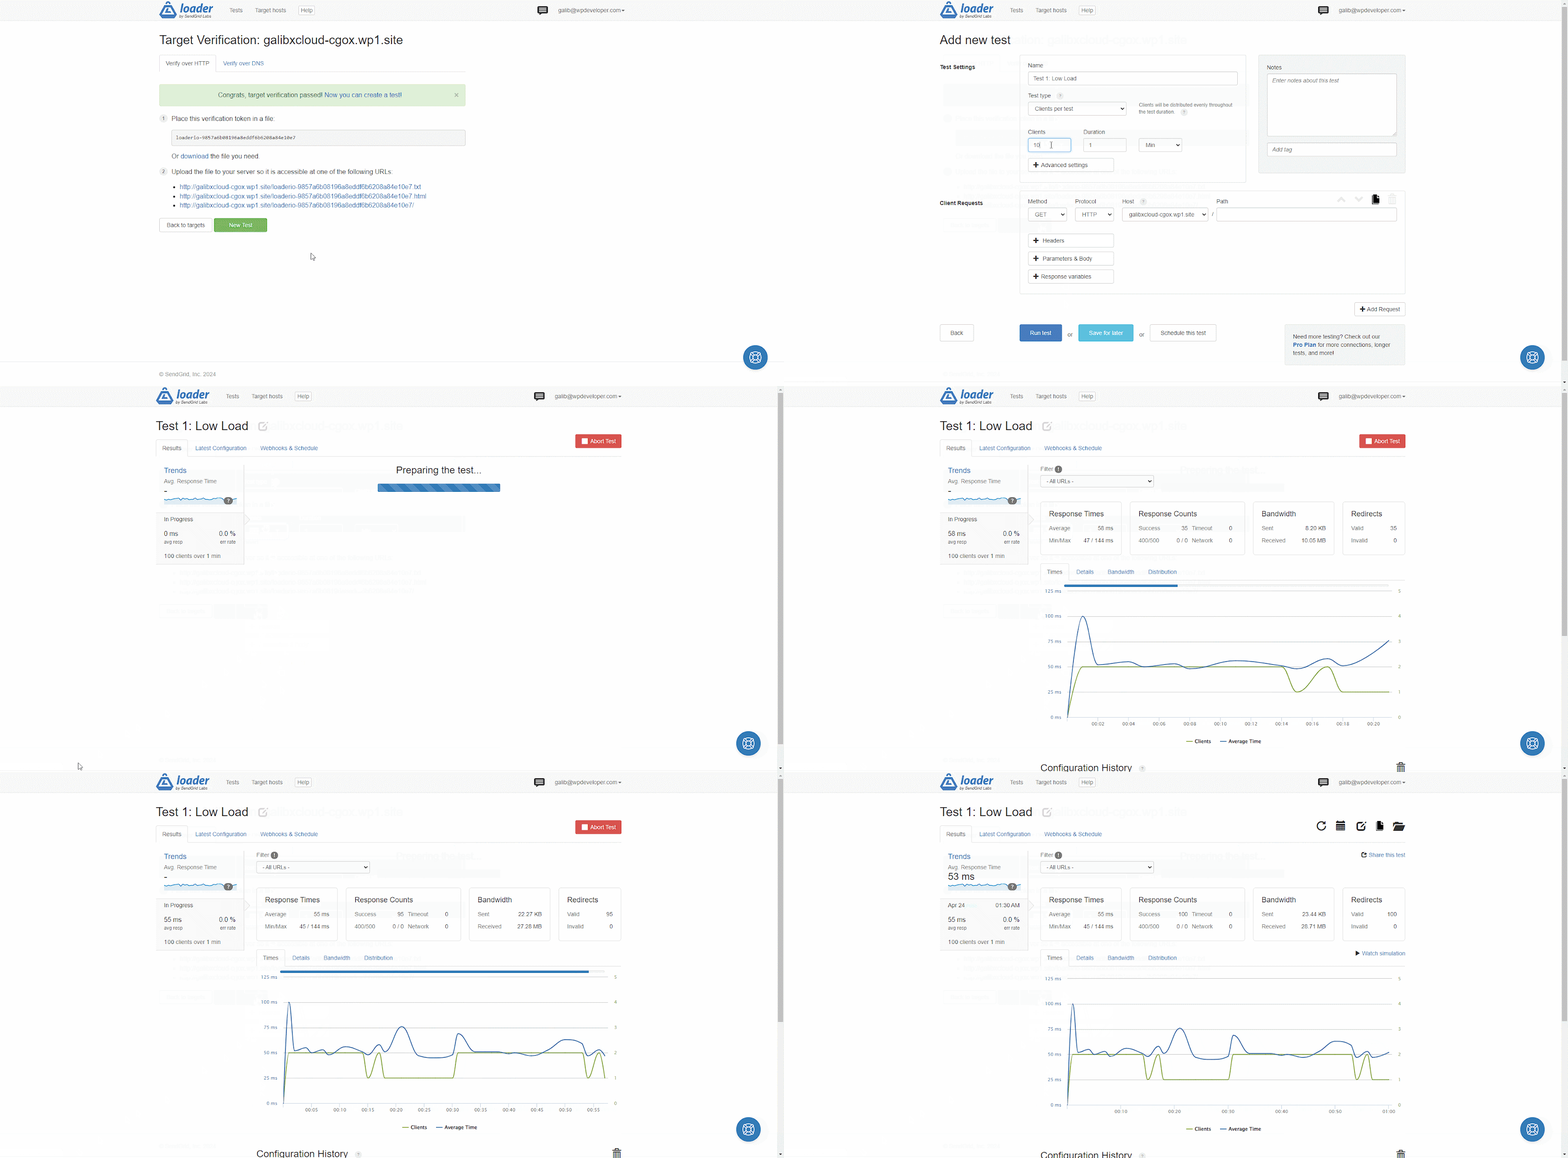
Think of this test to see the performance of your site when traffic is low. We will start with 100 clients and run the test for a minute.
Test 2: Medium Load
Now, let us turn up the heat a little. In this test, we will send a larger group of clients to your website to see how it holds up under a moderate load.
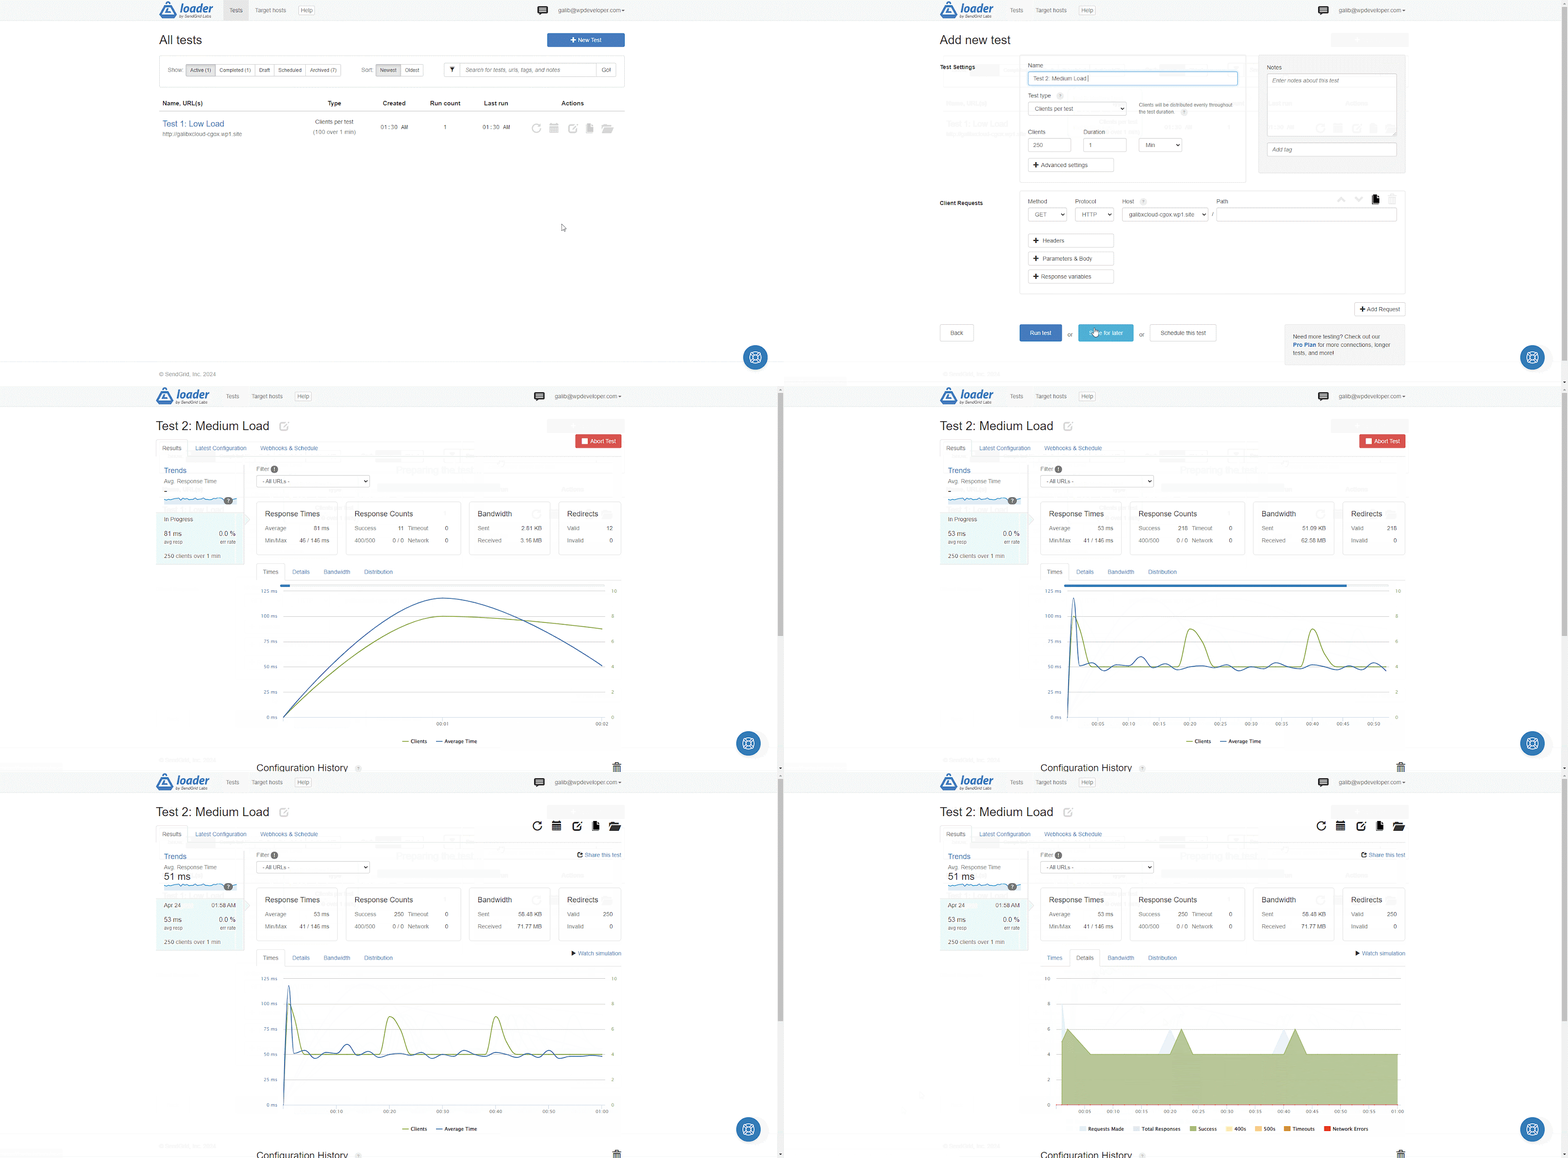
This test is to see how your WordPress website performs in medium load which is large in number but manageable. We will increase the number of clients to, let us say, 250 and run the test for a minute.
Test 3: High Load
Time to crank it up to the max! In this test, we will send a big crowd of clients to your website to put it to the test.
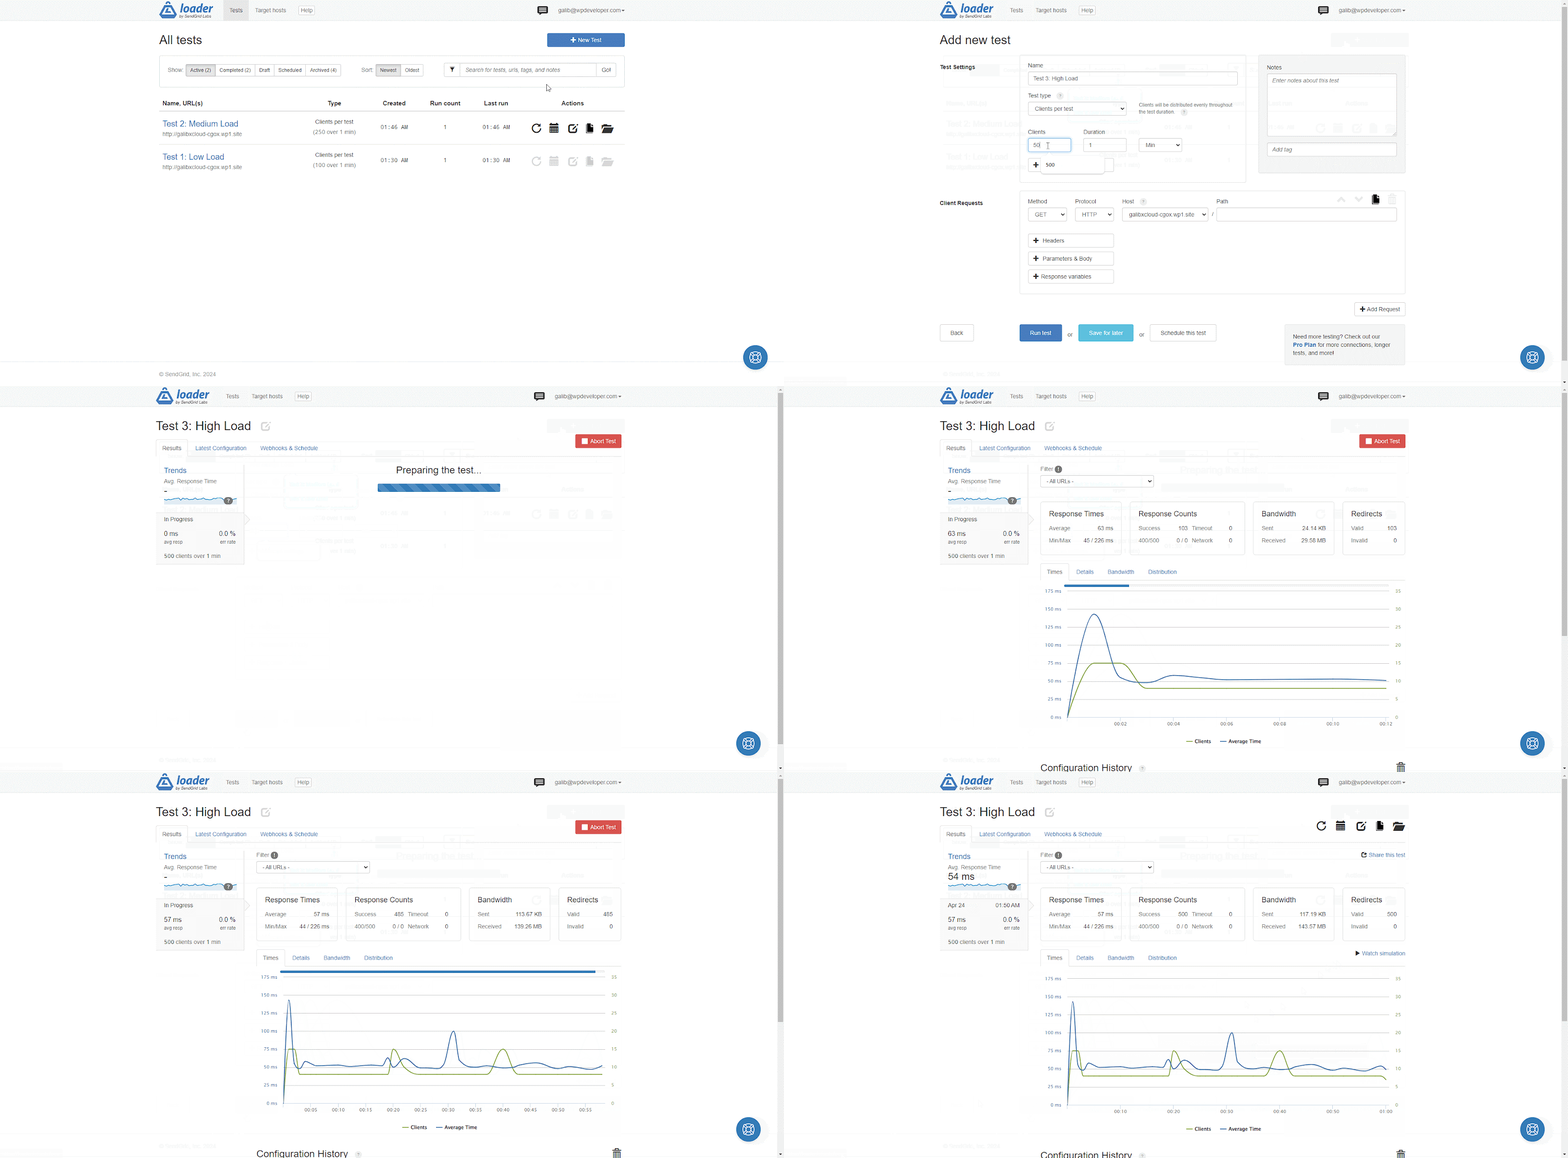
It is like rush hour traffic in the city. Everyone is trying to get somewhere. We will ramp up the number of clients to, say, 500 or even 1000, and run the test for a minute to see how your website handles the pressure.
Analyzing the Results
After each test, Loader.io will give you detailed results showing how your website performed under different loads. Pay attention to metrics like response time and error rate. Use this information to identify any weak spots and make improvements to ensure your website can handle whatever comes its way.
By setting up tests with varying client loads, you will get a clear picture of how your website performs under different levels of traffic. It is like giving your website a stress test to make sure it is strong and healthy enough to handle anything that comes its way. So, let us test and make sure your website is ready for whatever the internet throws at it!
Step 4: Interpreting test results
Now that you have run your website stress test online on Loader.io, it is time to make sense of the results. Think of it like reading the report card for your website. It tells you how well your site performed under different conditions. Here is what to look for:
Response Time
This is how quickly your website responds to requests from visitors. Ideally, you want this number to be low – the faster, the better. If the response time is high, it could mean your website is struggling to keep up with the demand. In our stress test response time was quite low proving that the hosting we used is quite dependable.
Error Rate
This tells you how many errors occurred during the test. A high error rate could indicate issues with your website’s code or server configuration. We can see in our test error rate was 0.0% which indicates that our WordPress can handle traffic well.
Throughput
This measures the amount of data transferred between your website and its visitors. A higher throughput means your website is handling more traffic efficiently. Our high-load test has a good amount of data transferred in one minute.
By analyzing these metrics, you can identify any areas where your website may need improvement and make adjustments accordingly. Remember, the goal is to ensure your website can handle whatever the internet throws at it, so use these insights to keep your site running smoothly.
Also, your WordPress website is as powerful as your chosen hosting plans. Sometimes choosing a cheap hosting plan and meeting the minimum requirements may initially save you money. As your traffic grows, it will be unable to run your website smoothly.
Do your research while choosing a managed hosting for WordPress. You will need the flexibility to adjust your plan while scaling in the future along with useful features. Fortunately among many hosting providers for WordPress, xCloud comes with flexible plans and useful features.
Tips for Stress Test WordPress Website
Here are some tips to make your stress testing effective and ensure accurate results:
Start with a plan
Before you begin stress testing, outline your goals and objectives. Determine what you want to achieve from the tests and what metrics you will be focusing on.
Simulate real-world scenarios
Try to simulate real-world situations as closely as possible when setting up your website stress tests. Consider factors like peak traffic times, seasonal fluctuations, and expected visitor behavior.
Gradually increase the load
Start with a small number of clients and gradually increase the load in each test. This will help you identify the point at which your website starts to struggle and determine its maximum capacity.
Monitor server resources
Keep an eye on your server’s resources during the stress tests. Look for signs of strain such as high CPU usage, memory consumption, or disk I/O. This will give you insight into how well your server is handling the increased load.
Test different scenarios
Do not just focus on one aspect of your website during stress testing. Test different scenarios such as page load times, checkout processes, and database queries to get a comprehensive view of your site’s performance.
Repeat tests
Running multiple tests and averaging the results will give you a more accurate picture of your website’s performance. Do not rely on a single test to make conclusions. Repeat the tests several times to ensure consistency.
Use realistic data
Make sure the data you are using in your website stress tests is realistic. Use actual user data, traffic patterns, and content to simulate real-world conditions as accurately as possible.
Review and analyze results
Once the stress tests are complete, take the time to review and analyze the results thoroughly. Look for patterns, trends, and abnormalities that could indicate areas for improvement.
By following these tips, you can ensure that your website stress testing efforts are effective and that you can obtain accurate results that will help you optimize your WordPress website for peak performance.
Boost Your WordPress Experience by Utilizing Your Site’s Performance Test
Stress testing your WordPress website is not just a precautionary measure. It is a strategic investment in its performance and reliability. You can optimize your site for peak performance, ensuring a seamless experience for your visitors even during times of high traffic. So, start stress testing today and empower your WordPress website to thrive in the dynamic online landscape of 2025 and beyond.
If you want to be equipped with the latest WordPress solution like this one, subscribe to our blog and join our Facebook Community to share your experience.


