

![How to Self-Host Vaultwarden Password Manager on a VPS [Complete Guide]](/_landing/blog/self-host-vaultwarden-password-manager-cover.jpg)
Vaultwarden needs about 50 MB of RAM, so the software has never been the hard part. The hard part is everything around it: a reverse proxy, a valid certificate, firewall rules, and backups you have actually restored.
Skip any of those and you end up with a password vault reachable over plain HTTP, open to public registration, with nothing to recover from. The container runs fine. The setup is a liability.
This guide takes the shortcut that removes most of that risk. Using xCloud One Click Apps, you deploy Vaultwarden onto a Docker and Nginx server with SSL issued automatically, then spend your remaining effort on the two things that genuinely protect a vault: closing registration and testing a restore. If you want background on the software first, read what Vaultwarden is and whether it is safe to self-host.
Table of Contents
- TL;DR
- What You Need Before Starting
- Step 1: Create a Docker + NGINX Server
- Step 2: Go to One Click Apps and Choose Vaultwarden
- Step 3: Set Up the Vaultwarden Application
- Step 4: Deploy and Let SSL Issue
- Step 5: Visit the Application
- Step 6: Complete the Vaultwarden Setup
- Step 7: Connect Your Bitwarden Clients
- Step 8: Sort Out Backups
- Common Problems and Fixes
- Would You Rather Do It Manually?
- Get Your Vault Running This Week
- Frequently Asked Questions
- What are the minimum VPS requirements for Vaultwarden?
- Can I self-host Vaultwarden without a domain name?
- Do I need to know Docker to deploy Vaultwarden this way?
- How do I add family members or teammates to my Vaultwarden server?
- How often should I update Vaultwarden?
- Is a self-hosted Vaultwarden less secure than Bitwarden’s cloud?
- What happens if my server dies? Can I recover my passwords?
- Can I move my Vaultwarden instance to another host later?
TL;DR
- A 1 GB VPS is plenty. Vaultwarden uses under 50 MB, so the cheapest sensible tier is the right call.
- One Click Apps provisions the container, Nginx, and the certificate, which removes the three steps people most often get wrong.
- Use a custom domain, not a demo domain, for a real vault. Bitwarden clients need stable HTTPS.
- Close registration the moment your own account exists.
- Leave the admin panel disabled. That component is where Vaultwarden’s most severe advisories have landed.
- Export an encrypted vault backup and keep it off the server, then confirm it imports.
What You Need Before Starting
| Requirement | Details |
|---|---|
| An xCloud account | Free to create, no server required up front. |
| A server | Either an xCloud Managed Server or your own VPS from DigitalOcean, Vultr, Hetzner, AWS, or Linode. |
| 1 vCPU and 1 GB RAM | Comfortable for a household or small team. |
| A domain or subdomain | For example vault.example.com. Needed for a production vault. |
| DNS access | To point an A record at the server. |
| About 15 minutes | Most of it is waiting for the server to provision. |
No SSH keys, no Docker install, and no Certbot commands. If you are still weighing where to run this, our roundup of Vaultwarden hosting providers compares nine options, and the primer on how cloud hosting works covers the fundamentals.
Step 1: Create a Docker + NGINX Server
First, create the server that will run Vaultwarden. From the dashboard, click New Server and enter the credentials needed to connect.
You can deploy to your own server or to an xCloud Managed Server. Choose your provider next. This guide uses the xCloud Managed Server, though the flow is identical if you bring your own VPS through self-managed hosting.
Enter a Server Name, set the App Type to Vaultwarden, and add any Tags that will help you identify this server later. The App Type field is optional and only affects how the server is labeled.
You will see the Docker + NGINX stack already selected. This is required for Vaultwarden, since the app runs as a container behind Nginx. Our explainer on Docker and its components covers what that stack is doing if the terms are unfamiliar.
Choose your server options and region, pick the plan that fits, then click Create. Vaultwarden is light enough that the smallest plan is usually the right one.
Provisioning takes a few minutes. Wait until the server reports as fully operational before deploying, since starting too early can leave services half-initialized.
Step 2: Go to One Click Apps and Choose Vaultwarden
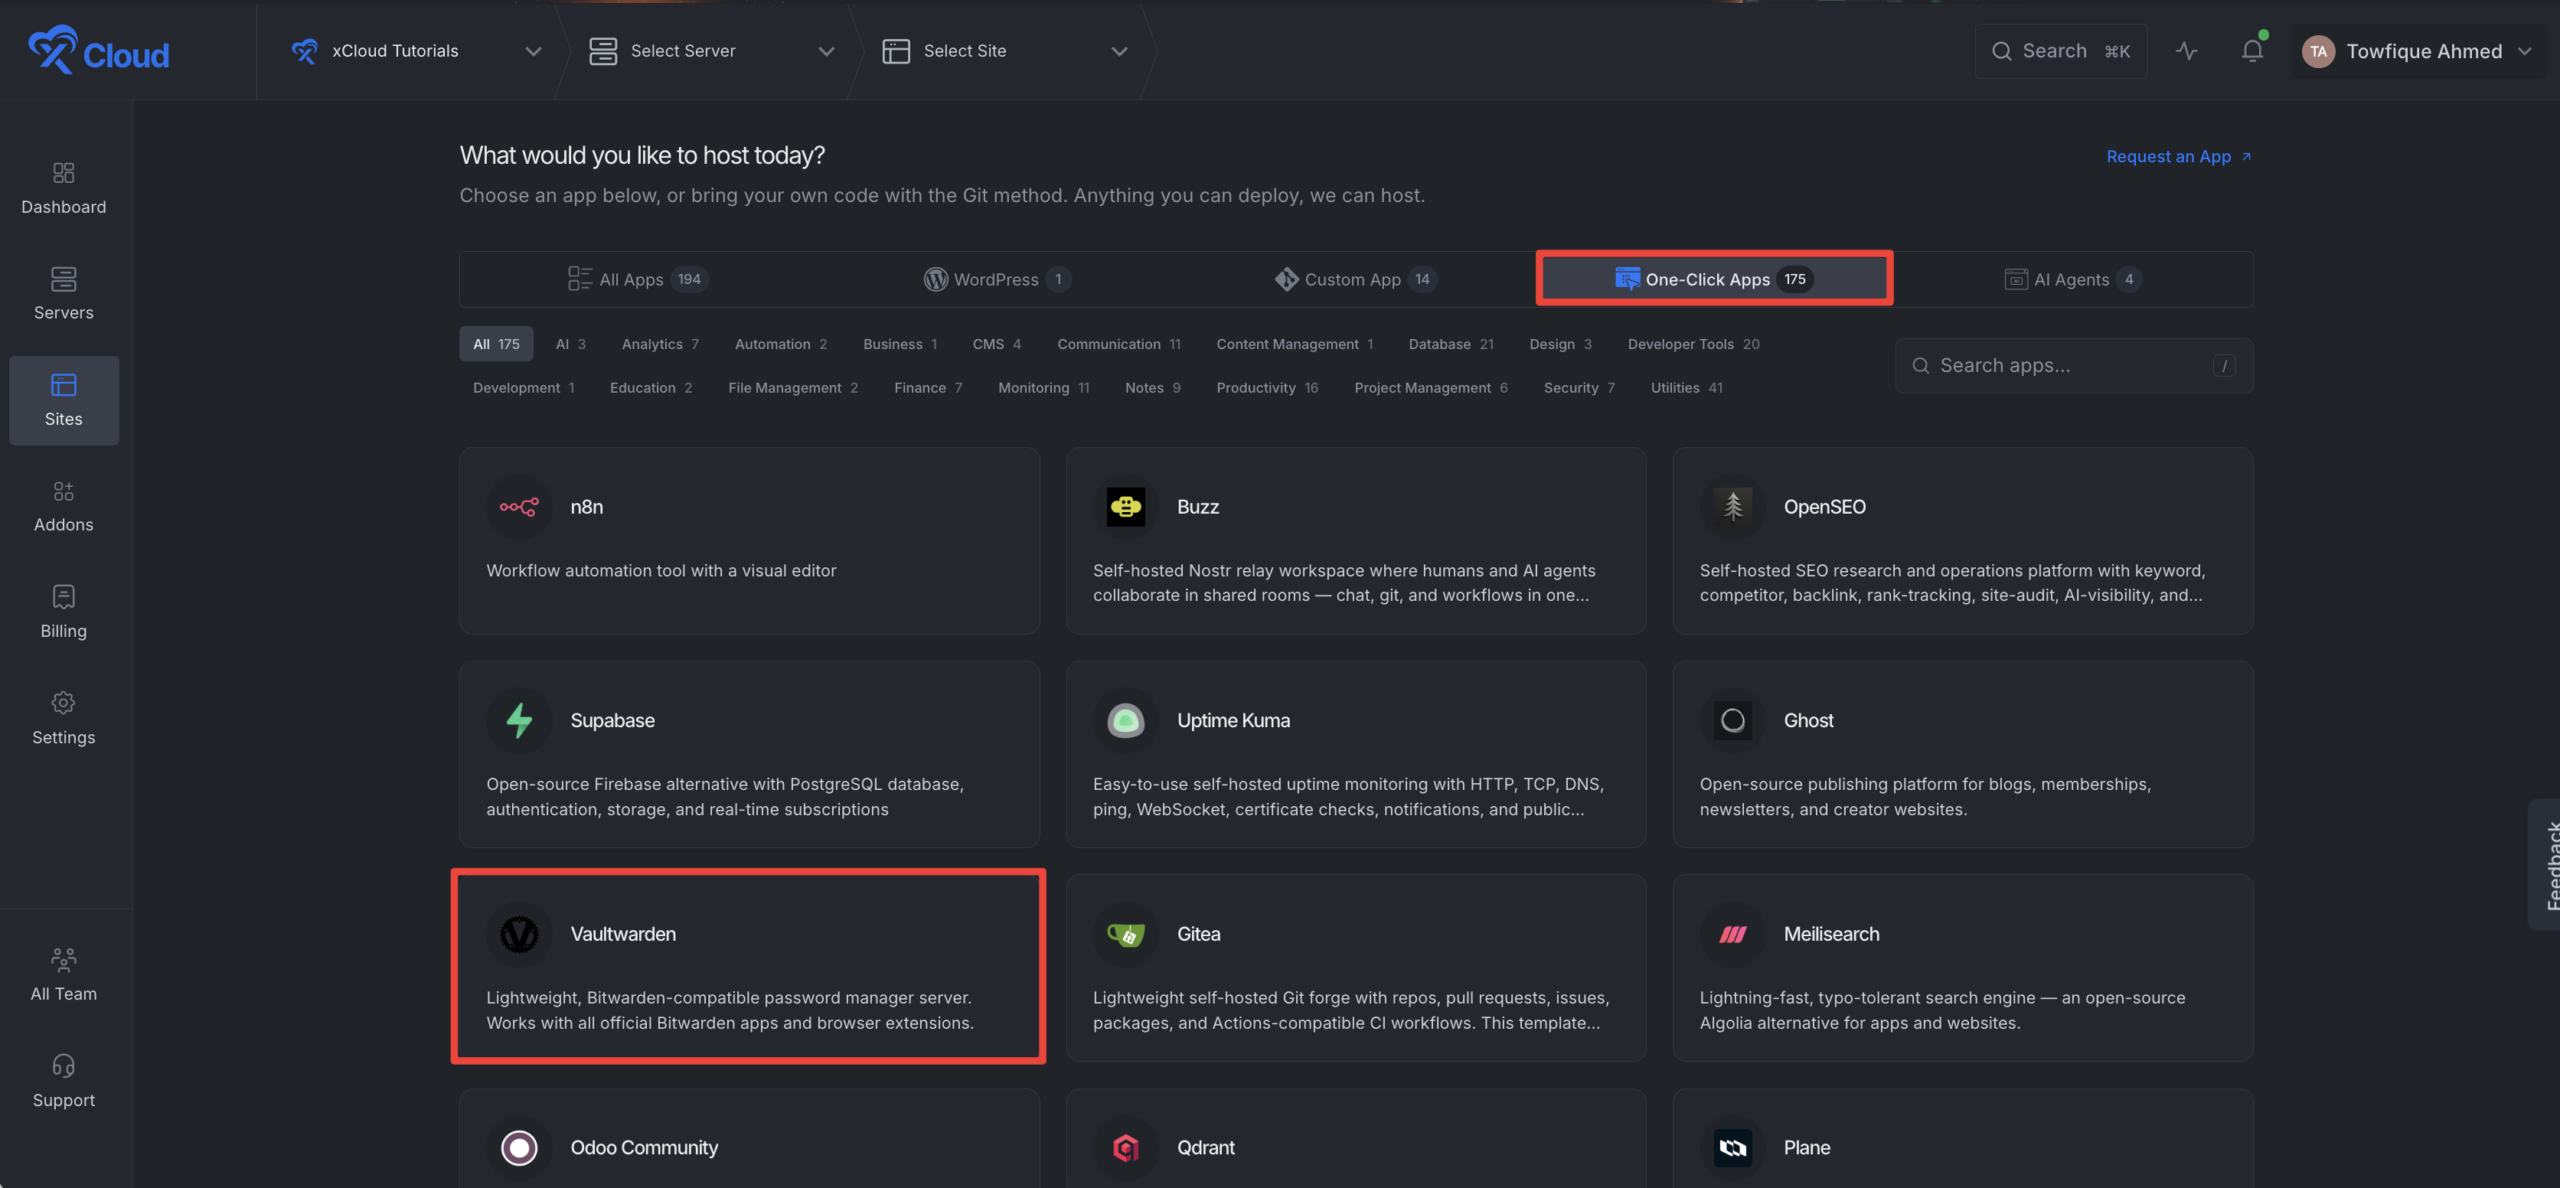
From your dashboard, click One Click Apps and select Vaultwarden from the catalog. The same One Click Apps library holds well over a hundred other open-source tools, so the server you just built can host more than the vault.
Step 3: Set Up the Vaultwarden Application
On the site setup screen, enter a Site Title and add any Tags that help organize the deployment.
You will then see two deployment options. Go Live attaches your own custom domain, and Demo Site assigns a free xCloud demo domain instead.
For a password vault, choose Go Live with a custom domain. A demo domain is fine for evaluating Vaultwarden, but every Bitwarden client stores the server URL you log in with, so moving off a demo domain later means reconfiguring every device. Point an A record at your server, then enter the domain here. The demo site documentation 👉 covers the alternative if you only want to test.
Step 4: Deploy and Let SSL Issue
Click Next to start the deployment. xCloud pulls the Vaultwarden container, wires it to Nginx, and requests a Let’s Encrypt certificate for your domain.
This is the part that usually costs an hour of manual work. The reverse proxy configuration, the WebSocket headers that keep devices in sync, and certificate renewal are all handled during this step. If you want to understand what is being configured, the Let’s Encrypt SSL guide 👉 walks through the manual equivalent.
Wait for the deployment to report success before continuing.
Step 5: Visit the Application
From the dashboard, click Visit Site to open your Vaultwarden instance.
You should land on the Vaultwarden login page over HTTPS with a valid padlock. If the certificate has not issued yet, give it a minute and reload before assuming something went wrong.

Step 6: Complete the Vaultwarden Setup
Click Create account and set a strong master password. Nobody can reset this for you, so use a passphrase you will remember and keep a written copy somewhere physically secure.
After logging in, open Settings → Security → Keys and confirm the KDF is set to Argon2id. This is what protects you if an encrypted backup ever leaks, so it is worth checking rather than assuming.
Now close the door behind you. In your Vaultwarden environment settings, set SIGNUPS_ALLOWED to false and redeploy. Leave registration open and anyone who finds your domain can create an account, which scanners tend to discover faster than people expect.
Two more settings worth deciding deliberately:
Leave the admin panel off. Vaultwarden’s published advisories include remote code execution and CSRF issues in the optional admin panel, which activates only when ADMIN_TOKEN is set. Leave it unset unless you have a specific need.
Configure SMTP if you want invites. Organization invitations and password hints need mail credentials before they will send.
Step 7: Connect Your Bitwarden Clients
Vaultwarden speaks the Bitwarden API, so you use the official apps rather than anything custom.
- Install the Bitwarden app, browser extension, or CLI
- On the login screen, open the settings icon before signing in
- Set Server URL to your Vaultwarden domain
- Save, then log in with the account you created
- Import an existing vault from a JSON or CSV export if you are migrating
Do this on every device before you decommission whatever you are moving away from.
Step 8: Sort Out Backups
xCloud runs scheduled server backups, which covers hardware failure and most of what goes wrong. Configure the schedule and an off-server destination from the server’s backup settings.
Add one more layer that costs nothing. From the Vaultwarden web vault, export an encrypted JSON copy and store it somewhere off the server, such as an encrypted drive at home.
Then import that export into a throwaway account and confirm your entries arrive. A backup nobody has restored is a hope rather than a backup, and ten minutes now is what makes the rest of this setup trustworthy.
Common Problems and Fixes
| Symptom | Cause | Fix |
|---|---|---|
| Login page shows a certificate warning | SSL still issuing, or DNS not propagated | Confirm the A record resolves, wait, then reload |
| Mobile app refuses to connect | Server URL typed without https:// | Re-enter the full URL in client settings |
| Strangers registering accounts | Registration left open | Set SIGNUPS_ALLOWED to false and redeploy |
| Attachment uploads fail | Upload size limit too low | Raise the body size limit in the site’s Nginx settings |
| Invite emails never arrive | SMTP not configured | Add mail credentials in the app’s environment settings |
| Deployment fails immediately | Server not fully provisioned | Wait for the server to report operational, then retry |
| Devices do not sync new entries | Client cached an old session | Log out and back in on the affected device |
Two more worth knowing. Vaultwarden releases sometimes state a minimum supported Bitwarden client version, so check your server version first if mobile logins break after an app update. And if you ever migrate to a different server, preserve the RSA key files from the data directory, since replacing them logs every user out. The project wiki documents both areas.
Would You Rather Do It Manually?
Nothing here is magic. Every step xCloud automated is one you can perform yourself: install Docker, write a compose file that binds the container to localhost, configure Nginx with the right proxy headers, run Certbot, and write a backup script driven by cron.
That path takes about an hour the first time and gives you full control of every config file. It also makes you responsible for certificate renewal, container updates, and noticing when a backup job stops running. Your time is the line item people forget when comparing a subscription to a cheap VPS.
If you want the panel but prefer writing your own compose file, xCloud supports that too: 👉 how to deploy Custom Docker with xCloud. And whichever route you take, the server itself still needs attention, so our guide on maximizing VPS security is worth an hour of your time.
| ✅ One Click Apps suits you if | ❌ Manual setup suits you better if |
|---|---|
| You want the vault live today | You enjoy running servers |
| Nobody on staff owns server maintenance | You want control of every config file |
| A team depends on the vault | It is a personal vault only |
| You would rather not renew certificates by hand | You are learning Linux administration deliberately |
Being straight about it: a bare VPS running Vaultwarden costs a few dollars a month, and managed convenience costs more. You are buying the operations work rather than the compute. Our comparison of self-managed and managed hosting lays the trade-off out in full.
Ready to deploy? Compare xCloud plans and have your vault running in about five minutes.

Get Your Vault Running This Week
You now have a working path: a Docker and Nginx server, Vaultwarden deployed from One Click Apps, SSL issued automatically, registration closed, clients connected, and an encrypted export you have tested.
The steps that protect you are the unglamorous ones. Registration disabled, admin panel off, an export stored somewhere else, updates applied when they ship. Those four decisions separate a vault you can rely on from one that quietly becomes a problem.
Set aside fifteen minutes this week and work through it, then spend ten more on the restore test. That second block of time is what turns self-hosting into something you can trust with every credential you own.
If you have found this blog helpful, feel free to subscribe to our blogs for valuable tutorials, guides, knowledge, and tips on web hosting and server management. You can also join our Facebook community to share insights and engage in discussions.
Frequently Asked Questions
What are the minimum VPS requirements for Vaultwarden?
One vCPU, 1 GB of RAM, and 20 GB of disk is comfortable for a household or small team. Vaultwarden itself uses under 50 MB, so the headroom is for the operating system, Nginx, and file attachments rather than the vault.
Can I self-host Vaultwarden without a domain name?
Not for real use. Bitwarden’s mobile and desktop clients require a valid HTTPS certificate, and public certificate authorities do not issue them for bare IP addresses. An xCloud demo domain works for evaluation, but move to a custom domain before you store anything you depend on.
Do I need to know Docker to deploy Vaultwarden this way?
No. One Click Apps provisions the container, the Nginx configuration, and the certificate for you, so the deployment is a form rather than a terminal session. Understanding Docker helps when you want to change environment variables later, though it is not required to get running.
How do I add family members or teammates to my Vaultwarden server?
Create an organization from your account, then invite users by email from the organization’s Members tab. This works with registration disabled, which is the point of closing it. SMTP credentials need to be configured for those invites to send.
How often should I update Vaultwarden?
Check monthly, and immediately when a security advisory is published. The Vaultwarden repository publishes release notes with each version, and reading them takes two minutes. Some releases change the minimum supported client version, which is the usual cause of sudden mobile login failures.
Is a self-hosted Vaultwarden less secure than Bitwarden’s cloud?
The encryption model is identical, since your vault is encrypted on your device before it reaches any server. What differs is who handles operations, and an unpatched or unbacked-up server is a real risk that a hosted service absorbs for you. Our Vaultwarden and Bitwarden comparison covers this in detail.
What happens if my server dies? Can I recover my passwords?
Only if you have backups stored somewhere other than that server. Scheduled server backups plus an encrypted JSON export kept offline will get you back, and restoring means deploying Vaultwarden again and importing. Without either, the vault is unrecoverable, which is why the test in Step 8 matters more than any other step here.
Can I move my Vaultwarden instance to another host later?
Yes. Export an encrypted JSON copy from the web vault, deploy Vaultwarden on the new host, and import it there, then update the server URL in each client. If you have file access on both ends, copying the entire data directory preserves users and organizations as well. Broader hardening advice lives in our web hosting security best practices guide.
The same server-ownership tradeoffs apply to automation platforms; see this n8n self-hosting guide for Docker, security, backup, and scaling considerations.
Last updated September 27, 2026
← All articles