


xCloud hosting recognizes the importance of well-integrated email systems like Mailgun to minimize the risk of emails being marked as spam or failing to reach their intended recipients. So, it has streamlined the way to configure Mailgun into its environment for site emails.
Mailgun is one of the most popular email delivery services that combines powerful features and compatibility to ensure a more innovative mailing experience. Plus, it’s one of the cheapest options available. You can send up to 5000 emails per month on the Free plan. On the other hand, it will cost you $0.001 per email on the Flex plan.
Follow the step-by-step guide below to learn how to configure Mailgun for your site emails.
Step 1: Domain Authentication With Mailgun #
Before getting started with the Mailgun integration into your xCloud team, you need to authenticate your domain with the email service. Please follow their detailed documentation on how you can do that: Mailgun Domain Verification Walkthrough.
Step 2: Integrate Mailgun into xCloud #
Once you authenticate your domains with Mailgun, you can integrate the email service into the xCloud environment by following these two methods:
- Integrate Mailgun With SMTP Credentials
- Integrate Mailgun With API
Integrate Mailgun With SMTP Credentials #
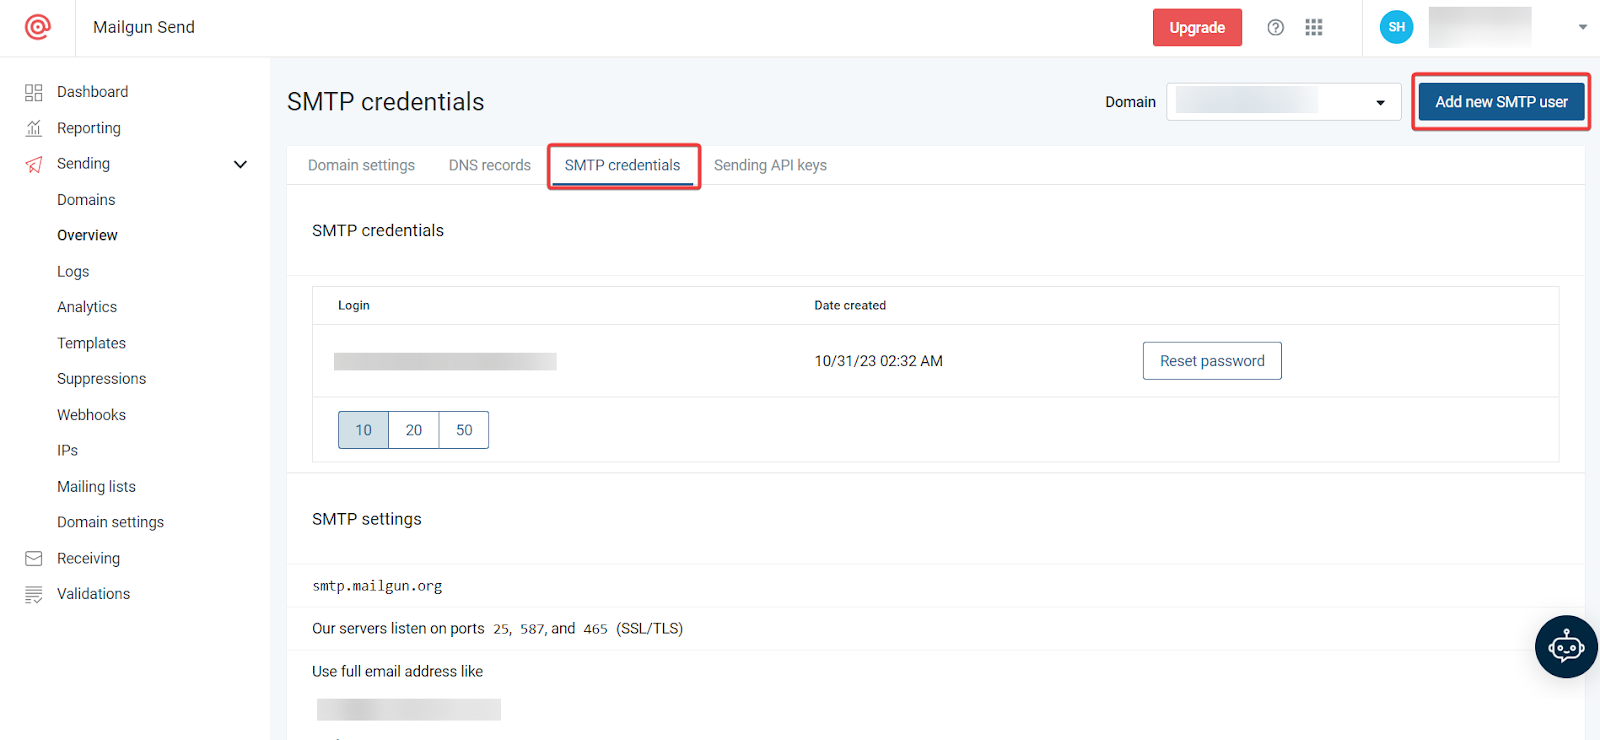
Log in to your Mailgun account and navigate to Sending → Domains from the dashboard. Then navigate to the Domain Settings → SMTP Credentials. Add a new domain by tapping the ‘Add new domain’ button. Once you add the domain, save your login credentials (username and password) for using it in the xCloud mail integration.
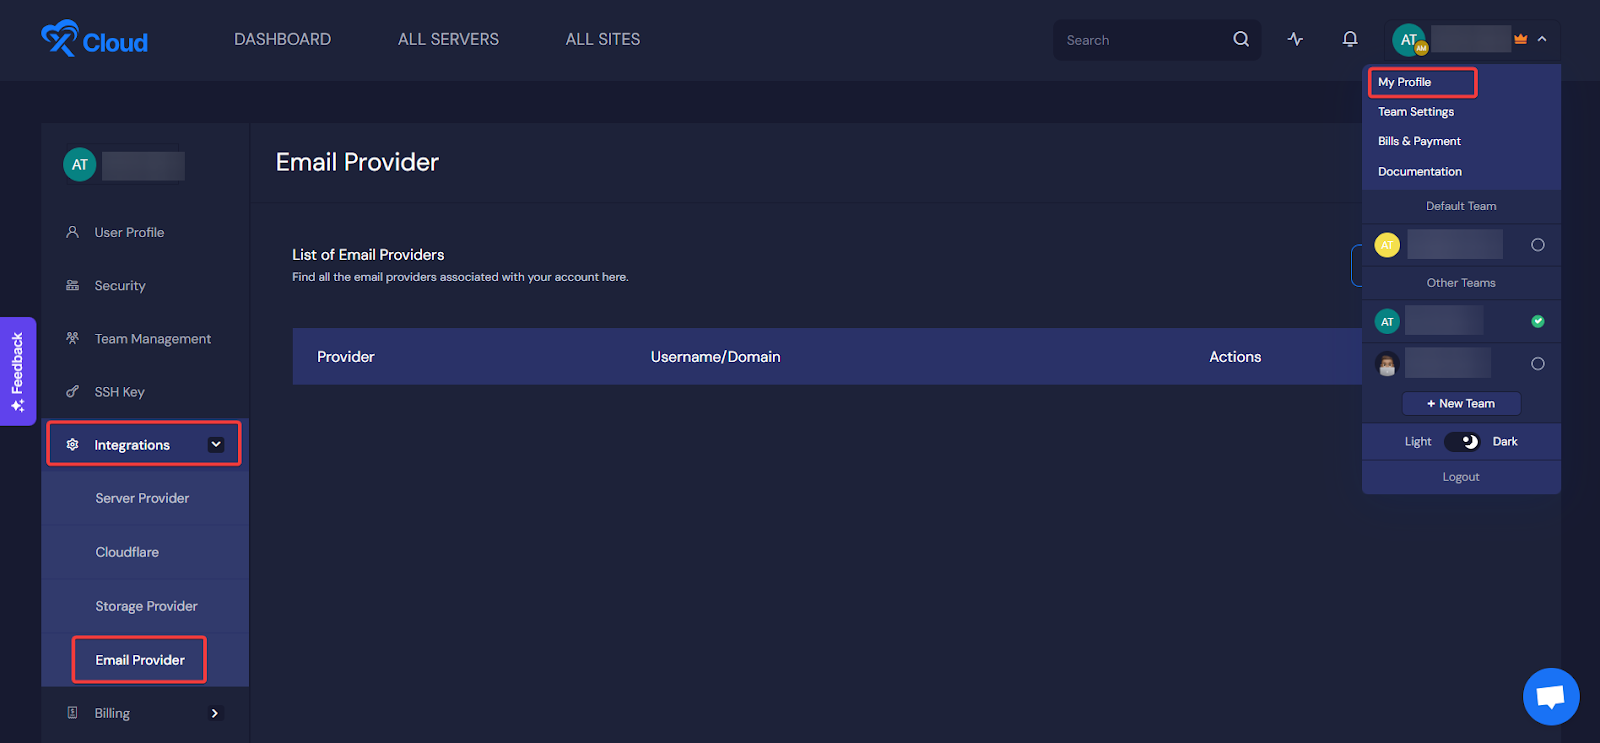
Once you are done collecting your SMTP credentials for Mailgun, it’s time to add Mailgun as the email provider in xCloud. From your xCloud dashboard, navigate to My Profile → Integrations → Email Provider. You need to integrate your Mailgun account domain with the credentials by clicking the ‘Add New Provider’ button.
Once you hit the ‘Add New Provider’ button, you will see a pop-up asking you to select the email provider, SMTP username, and SMTP password.
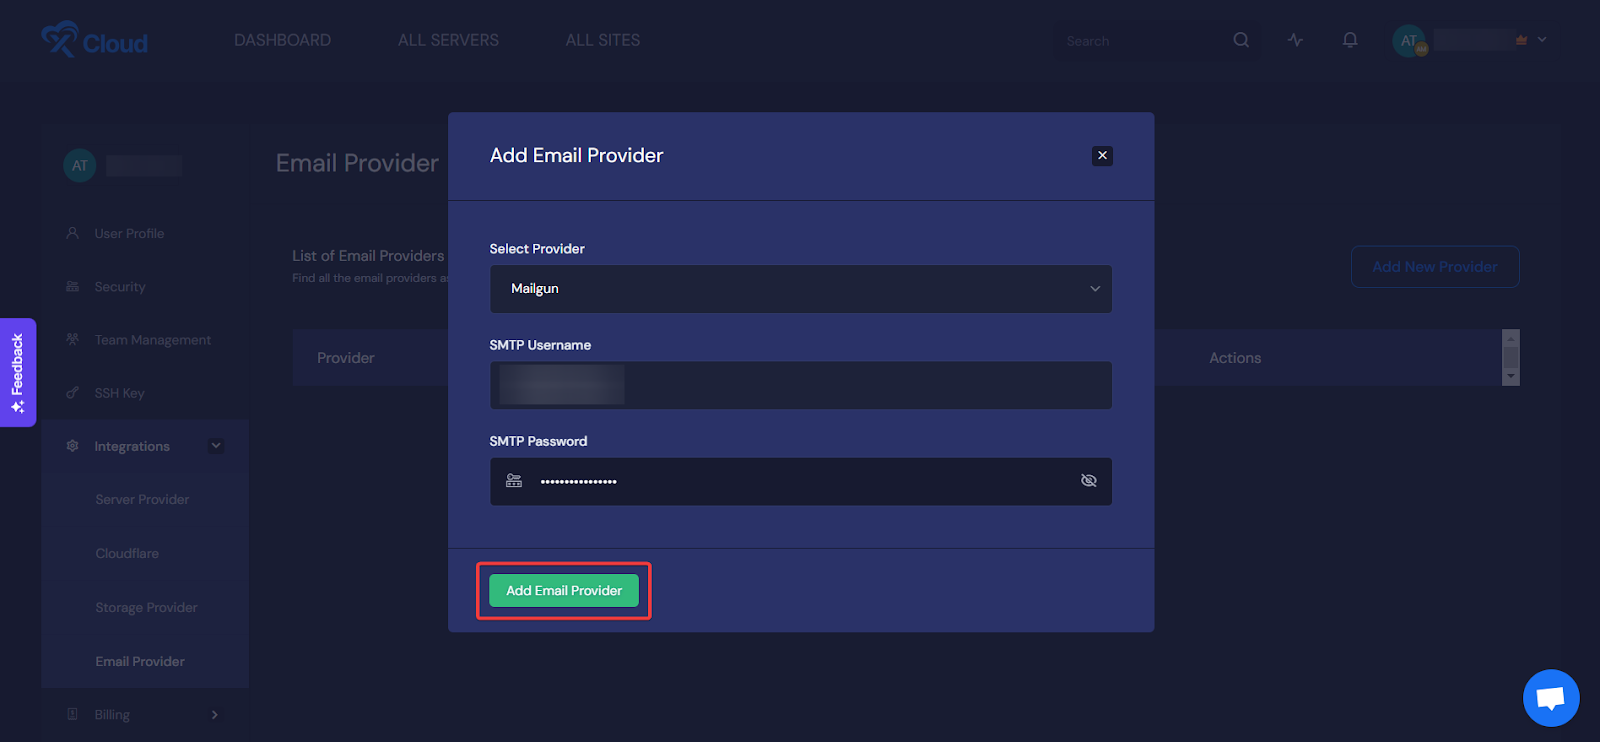
Select Mailgun as the provider, and input your credentials in the SMTP username and SMTP password fields. The email provider will be added instantly.
Integrate Mailgun With API #
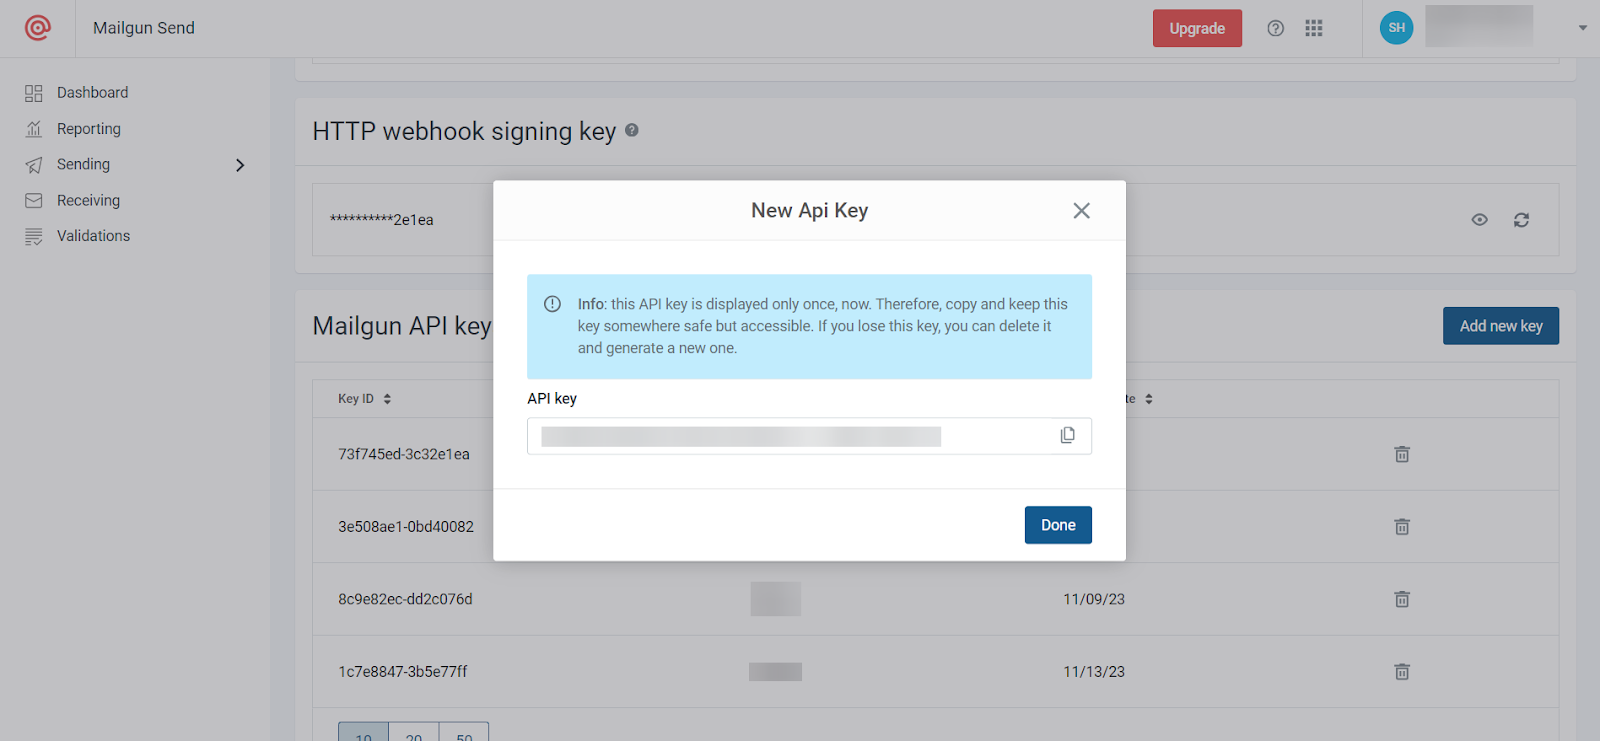
Alongside using the Mailgun SMTP credentials, you can integrate Mailgun with the API keys. For that, log in to your Mailgun account and navigate to API Security page. Add a new key by clicking the ‘Add new key’ button and setting a description. Save your API key for future use.
From your xCloud dashboard, navigate to My Profile → Integrations → Email Provider. You need to integrate your Mailgun account domain with the credentials by clicking the ‘Add New Provider’ button.

Once you hit the ‘Add New Provider’ button, you will see a pop-up asking you to select the email provider name. Select Mailgun API as the provider, and input your collected API from the Mailgun API Security page. Then, provide your authenticated domain name and hit the ‘Add Email Provider’ button.
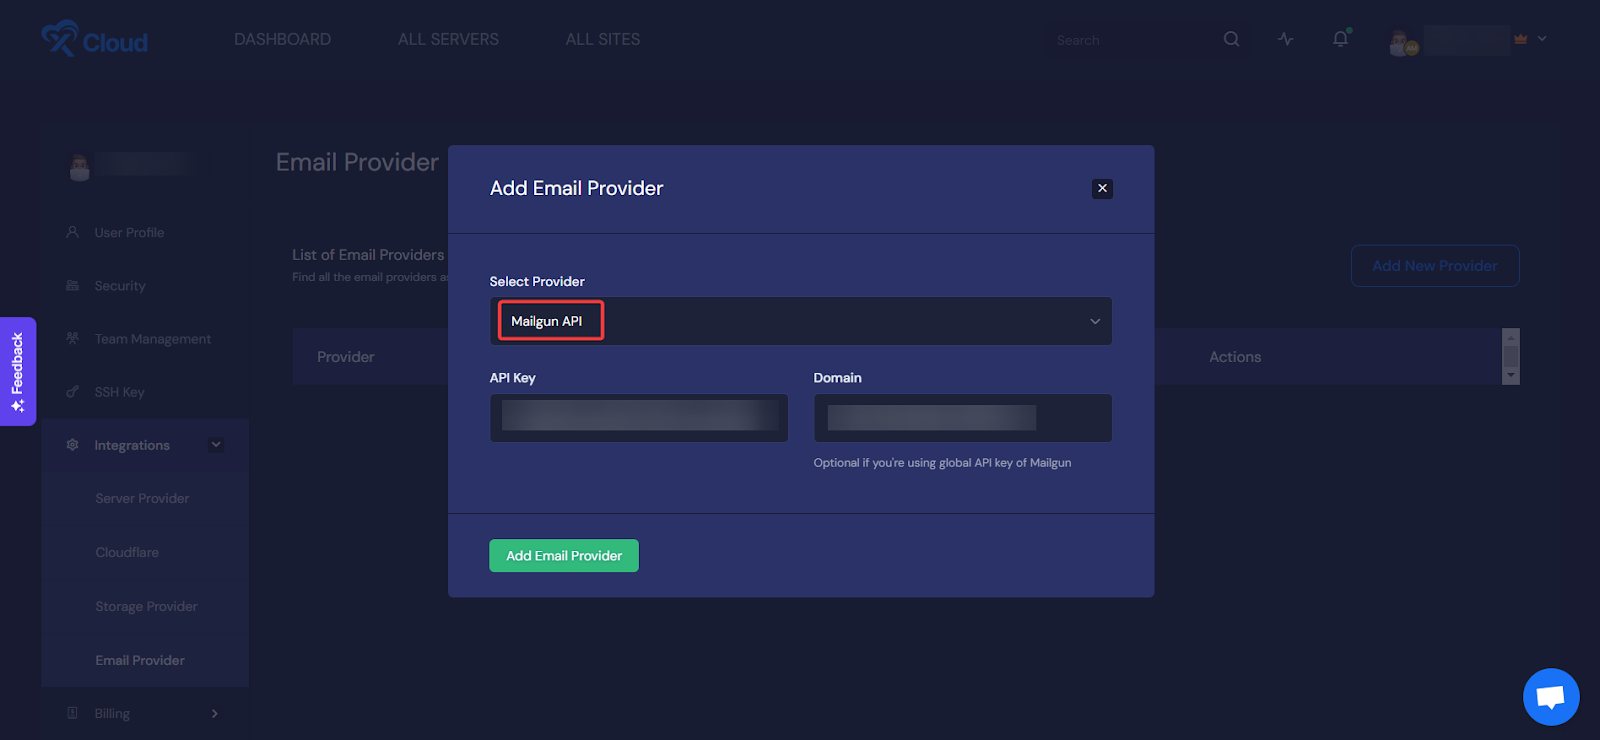
That’s how easily you can integrate Mailgun into your xCloud team with API keys.
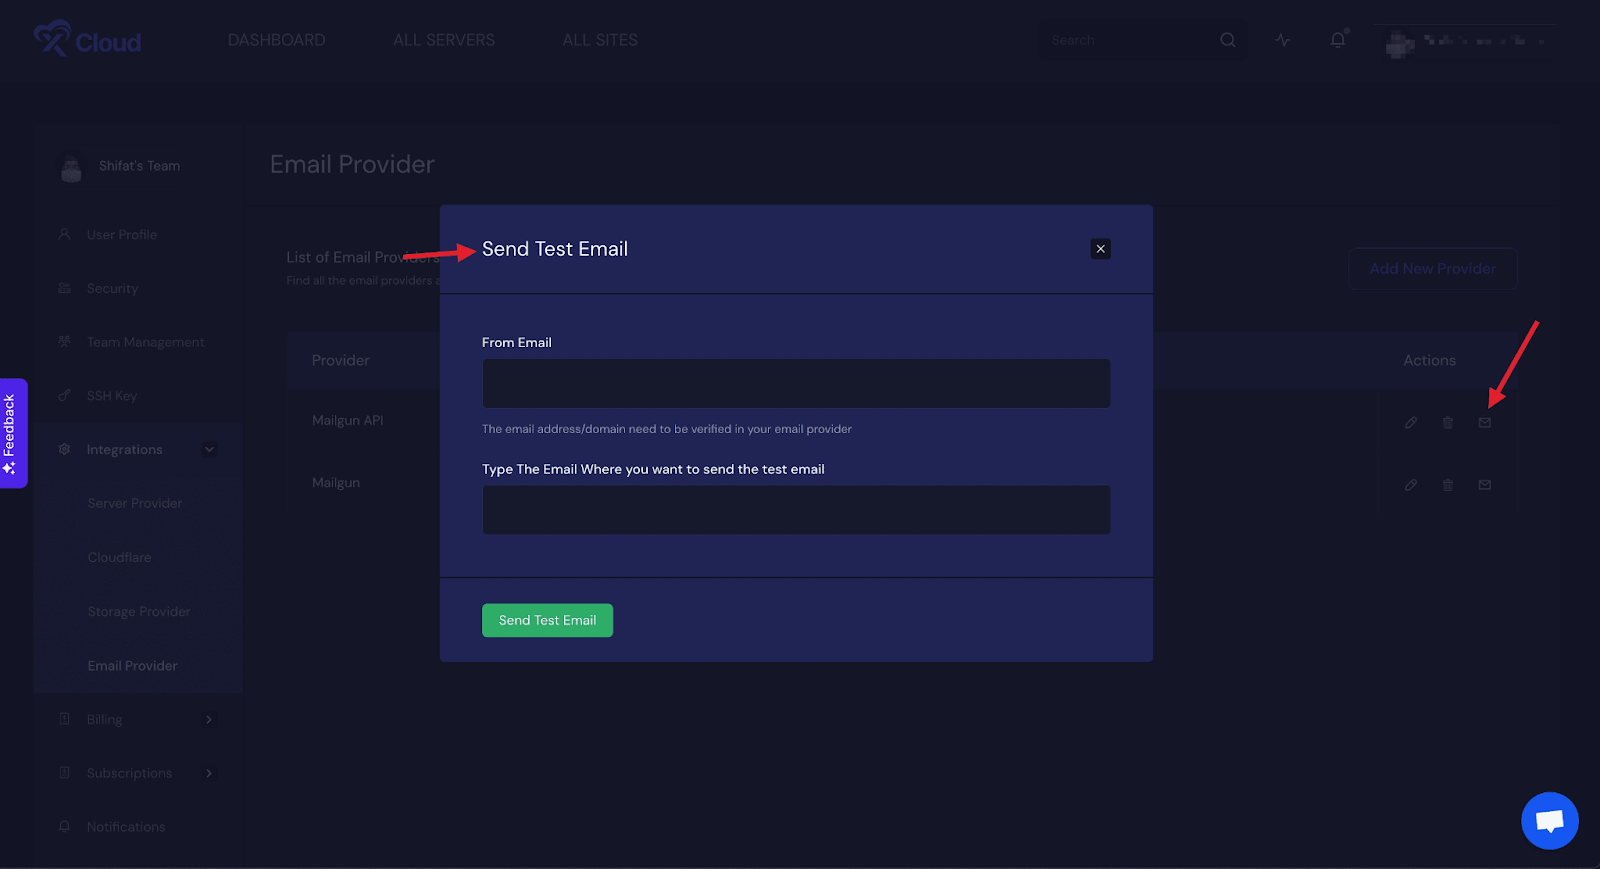
Step 3: Testing Your Email Integration #
After adding Mailgun successfully, you can test your email service by sending a test email straight from the Email Provider section.
Step 4: Add Mailgun Service To Site #
After integrating Mailgun into your xCloud environment, you need just to add the provider to the site. Go to All Sites and choose your website to add the email provider. Select your site and navigate to Email Provider tab.
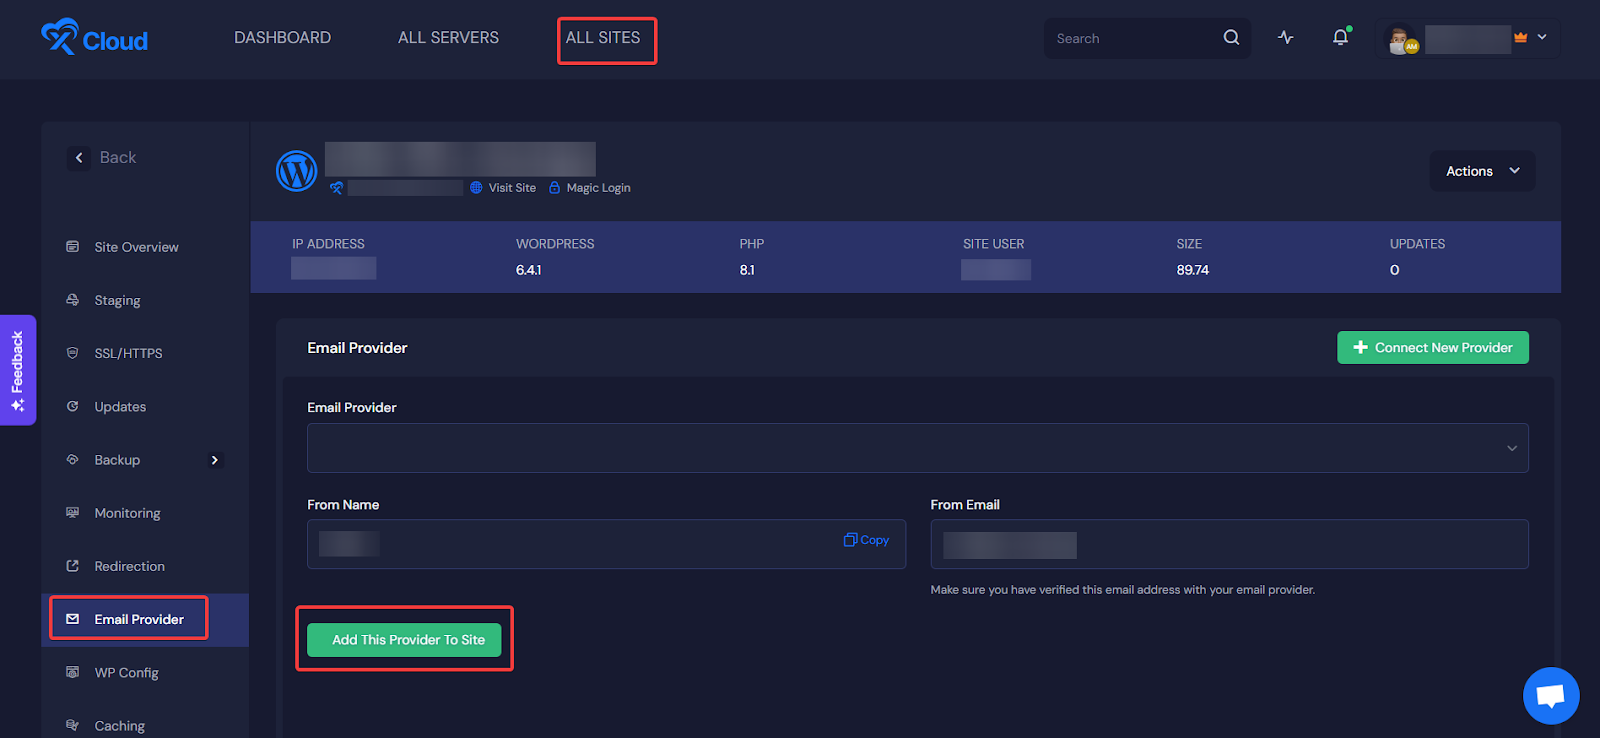
Now select your domain from the ‘Email Provider’ options, set the sender’s name in the ‘From Name’ field, and input your email sender’s address in the ‘From Email’ field. Once done, hit the ‘Add This Provider To Site’ button.
If you don’t find it convenient to configure your site emails with Mailgun using the SMTP credentials or API, you can check the process of configuring with the Mailgun plugin below.
Configure Site Emails With Mailgun Plugin #
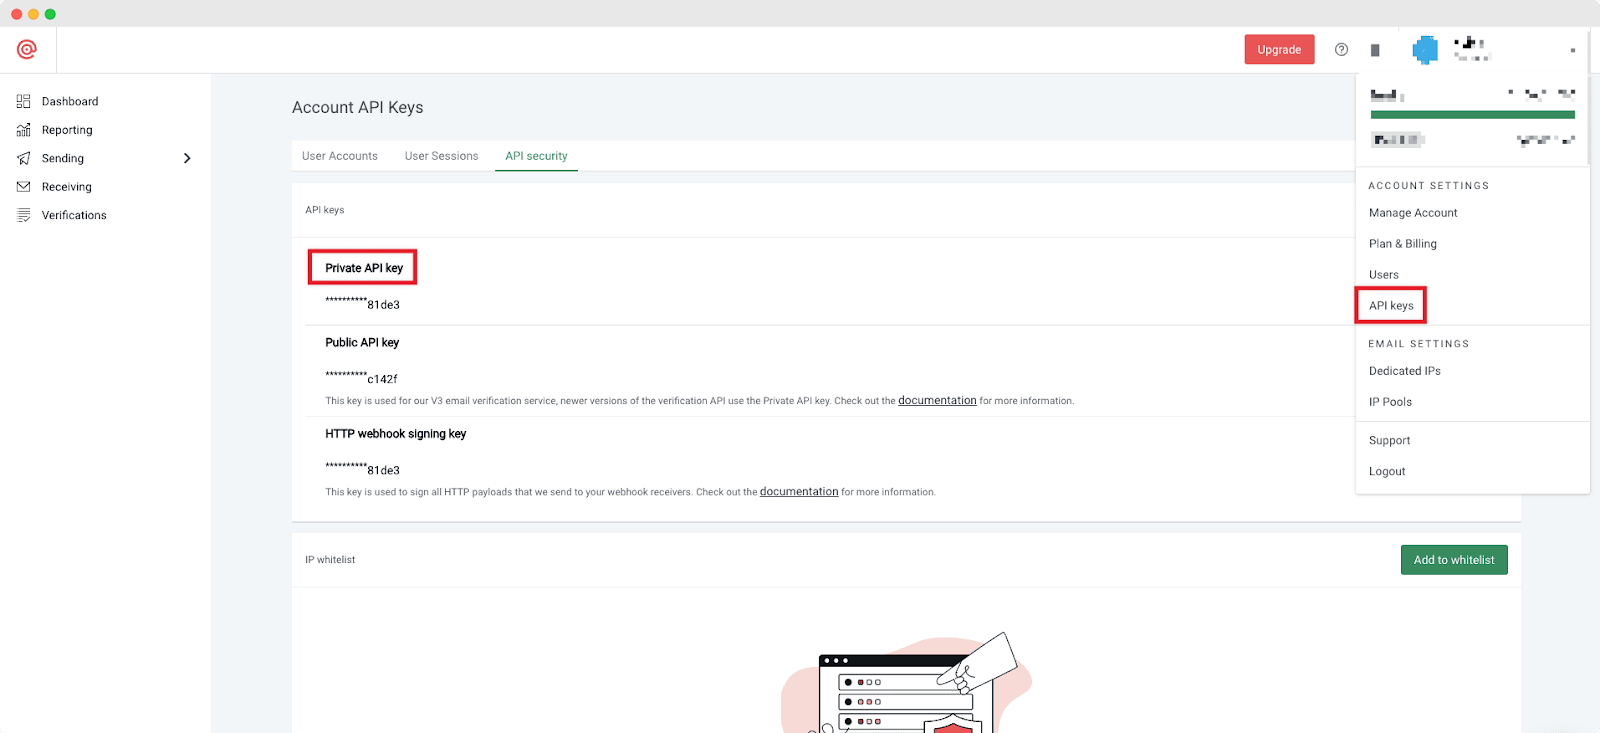
Get started by signing up for an account. Follow the Quickstart Guide to verify your domain, and once it’s confirmed, your API key will be revealed and ready for use!
Click on your profile, and from the dropdown menu, select API Keys. Collect your private key and copy it for using it on your WordPress dashboard.
Now, you need to install the Mailgun plugin on your WordPress site. Follow these simple steps below:
- Log in to your WordPress site.
- Visit the Add Plugins page.
- Search for “Mailgun for WordPress” and install the plugin.
- Access the Mailgun screen from the Settings menu.
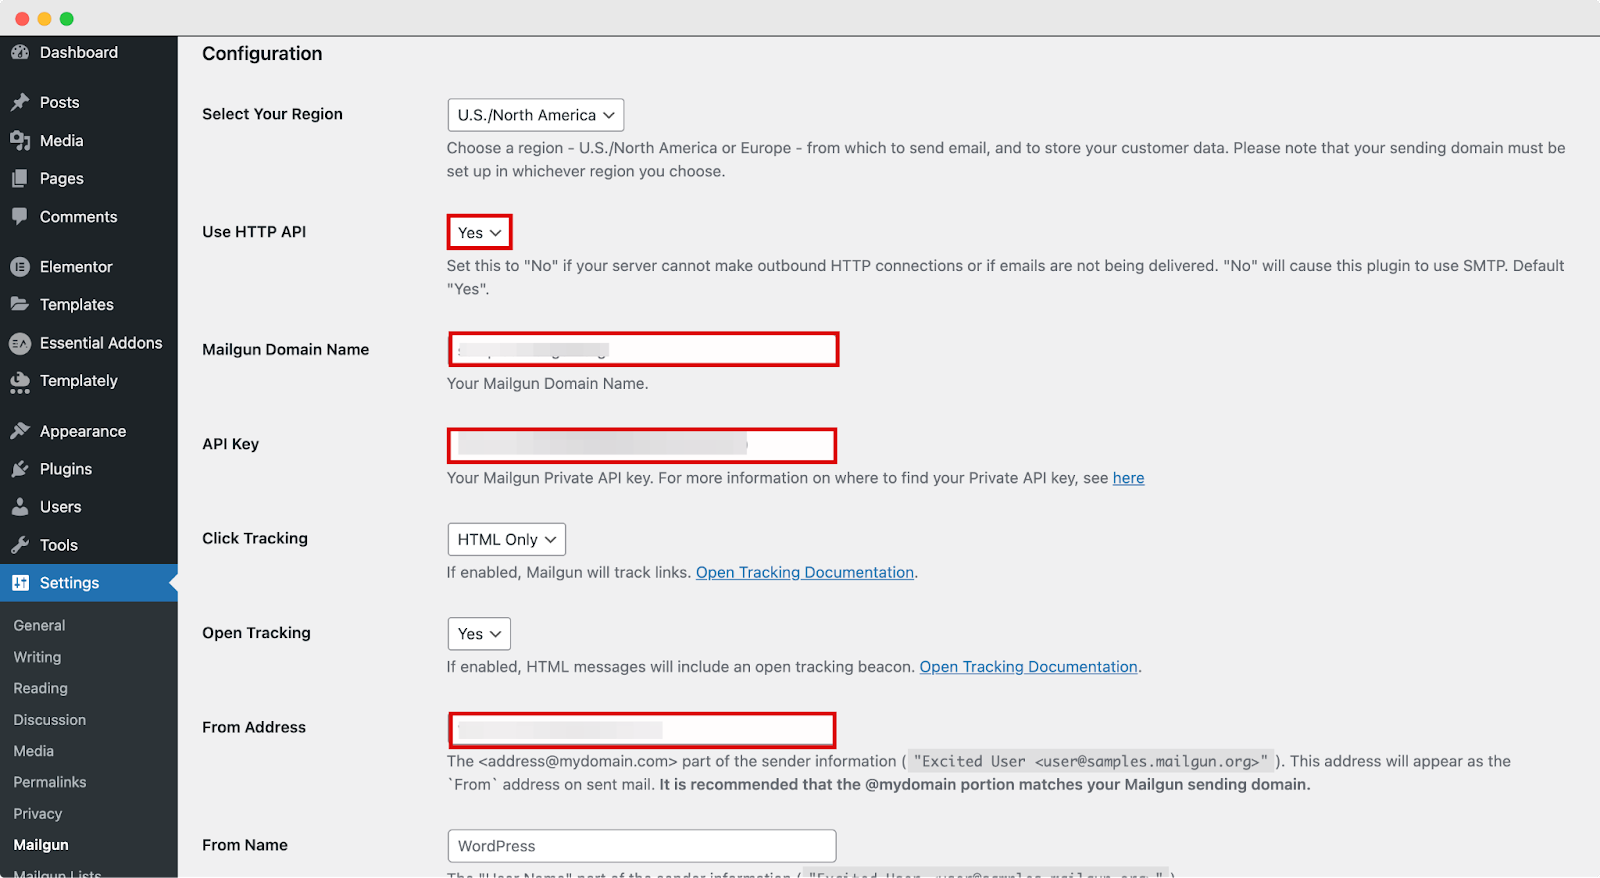
- Enable Use HTTP API to Yes.
- Enter your Mailgaun domain in the Domain Name field.
- Copy and paste your Private API key into the API Key field.
- Save the changes and click Test Configuration to send a test email.
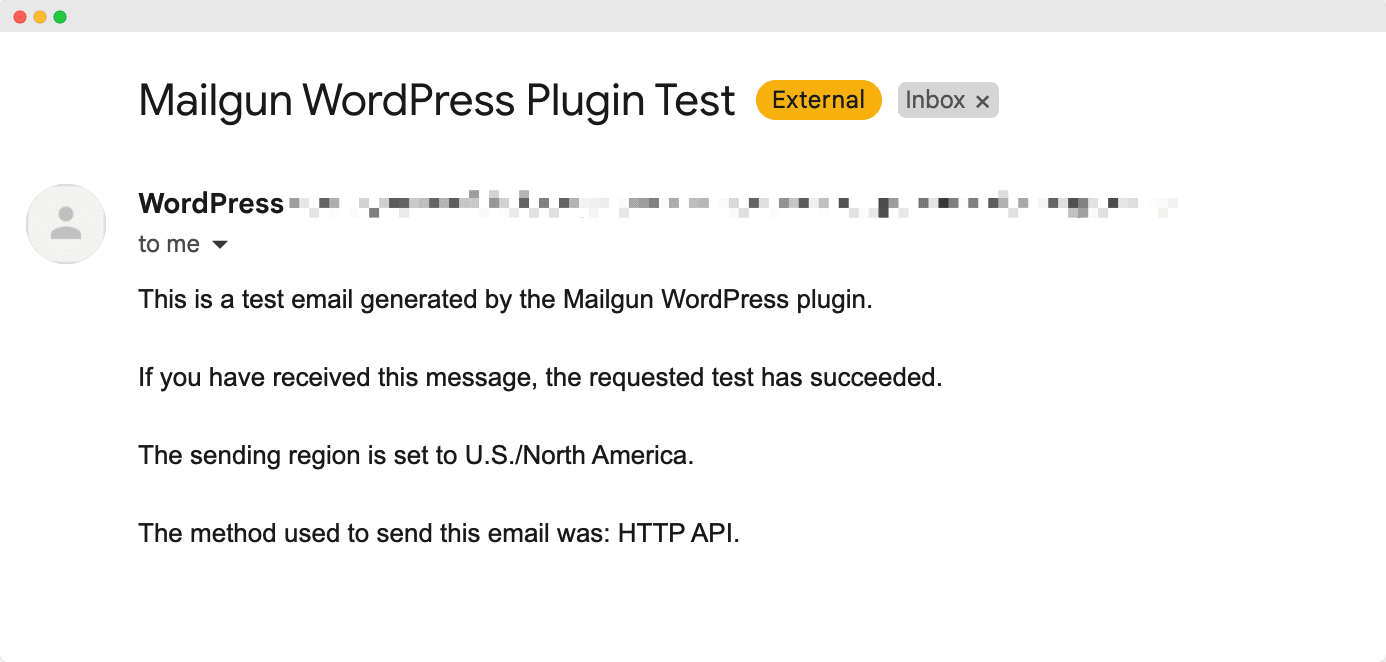
After saving all the changes:
- Save the settings after configuration.
- Send a test email to ensure proper setup.
- If errors occur, check if DNS settings are still propagating or if settings are misconfigured.
- Ensure the Mailgun domain status shows as “Active.”
- Upon successful sending, you’ll receive a confirmation email with the following text:
- If you have received this message, as shown in the image, the requested test has succeeded.
That’s how easily you can configure Mailgun for site emails for xCloud environment as an SMTP provider to streamline the email delivery process of transactional emails.
Still stuck? Contact our support team for any of your queries.


