


To self-host Supabase, you run its official Docker Compose stack on a Linux server with at least 4 GB of RAM, put HTTPS in front of it, and change every default secret before the first start. You can do it by hand in about an hour, or deploy it from xCloud One Click Apps in a few clicks.
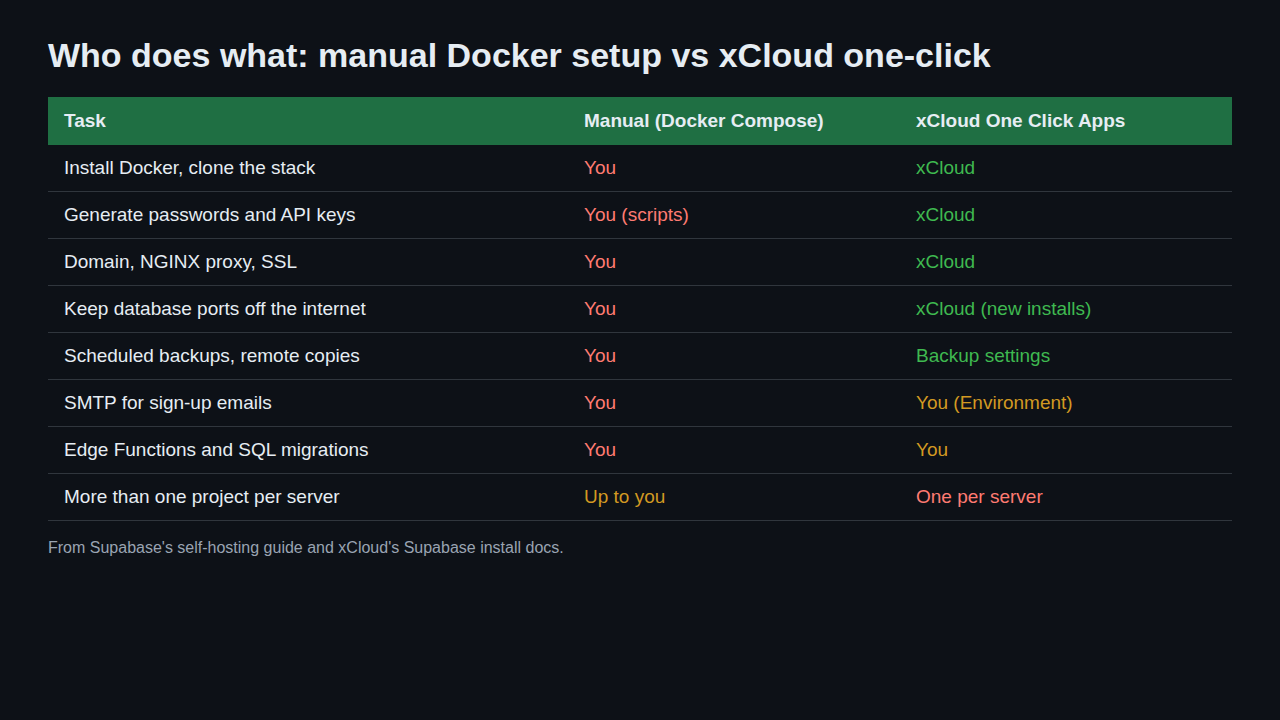
Both paths give you the same thing: your own Postgres database, Auth, Storage, Realtime and the Studio dashboard on a server you control. The difference is who handles the parts around the stack: the proxy, the certificate, the secrets, the firewall and the backups.
This guide walks through both, step by step. If you are new to containers, start with what Docker Compose is, then come back.
TL;DR
- Requirements: 4 GB RAM, 2 CPU cores and 40 GB SSD minimum; 8 GB, 4 cores and 80 GB recommended (Supabase’s own figures).
- Manual way: clone the
self-hostedrelease, copydocker/, generate keys, setDASHBOARD_PASSWORD, runsh run.sh start, then add a reverse proxy for HTTPS. - The trap: Docker publishes ports past UFW. The stock Compose file opens the API gateway on port 8000 and the database pooler on 5432 and 6543 to the whole internet.
- One-click way: on xCloud, pick Supabase in One Click Apps. Passwords, API keys, the domain and SSL are set for you, and the database stays private.
- Still on you, either way: SMTP for sign-up emails, SQL migrations and Edge Functions.
- Limit: xCloud supports one Supabase project per server.
The Port Most Supabase Guides Skip
If you only remember one line: UFW does not protect Docker ports. Docker’s own documentation says traffic to a published port “gets diverted before it goes through the ufw firewall settings,” so your firewall rules are ignored.
That matters for Supabase. In the official Compose file (release self-hosted/v0.8.3), the API gateway publishes port 8000 and the Supavisor pooler publishes 5432 and 6543, all without a host address. That means every interface, the public one included.
Studio sits behind basic auth on port 8000. But the pooler on 5432 is a direct path to Postgres, guarded only by its password.
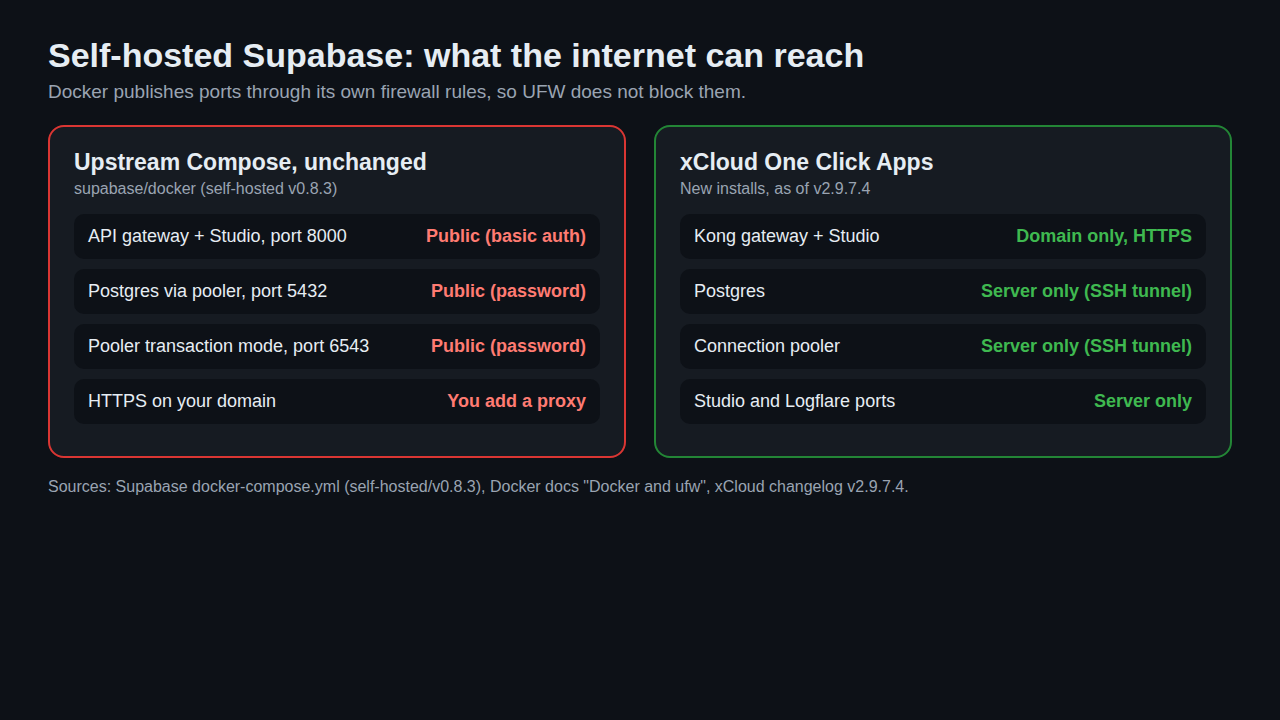
New xCloud installs keep these ports private. Studio, Logflare and Kong are only reachable through your domain, and the database and connection pooler stay on the server, so you connect to the database through an SSH tunnel.
If you set Supabase up by hand, make the same change yourself. It takes one line per port, and Step 6 below shows it.
What Supabase Is and When Self-Hosting Makes Sense
Supabase is an open-source backend built on Postgres: a SQL database, user sign-in, auto-generated REST and GraphQL APIs, realtime updates, file storage and Edge Functions, all managed from the Studio dashboard. It is often described as an open-source Firebase alternative.
Self-hosting makes sense when you want:
- your users’ data on a server and in a region you choose;
- a flat server bill instead of usage-based pricing;
- a backend for an AI-built app, such as a Lovable app, that you own end to end.
It makes less sense if you need features that only exist on Supabase’s hosted platform, or if no one on your team is comfortable with Linux, Docker and Postgres. Supabase’s guide lists exactly those skills as prerequisites.
Server Requirements for Self-Hosted Supabase
These figures come from Supabase’s official Docker self-hosting guide, which says they suit “development and small to medium production workloads.”
| Resource | Minimum | Recommended | Note |
|---|---|---|---|
| RAM | 4 GB | 8 GB or more | The stack runs about a dozen containers |
| CPU | 2 cores | 4 cores or more | |
| Disk | 40 GB SSD | 80 GB or more SSD | xCloud’s installer stops if under 15 GB is free |
| OS | Linux with Docker Engine and Compose | Ubuntu LTS | Docker Desktop is for laptops, not servers |
| Ports | 80 and 443 for HTTPS | Keep 5432 and 6543 private |
The full stack includes Studio, an API gateway, Auth, PostgREST, Realtime, Storage, imgproxy, postgres-meta, Postgres, Edge Runtime and the Supavisor pooler. Supabase says you can remove Realtime, Storage, imgproxy or Edge Runtime from the Compose file to cut resource use.
Option 1: Self-Host Supabase Manually with Docker Compose
Here is the manual path on a fresh Ubuntu server, following Supabase’s guide. You need Git and Docker Engine installed, and a domain pointed at the server.
Step 1: Get the Supabase Docker files
Clone the pinned self-hosted release and copy the docker folder into a project folder:
git clone --depth 1 --branch self-hosted/v0.8.3 https://github.com/supabase/supabase
mkdir supabase-project
cp -rf supabase/docker/. supabase-project
cd supabase-project && cp .env.example .env
printf 'ref=self-hosted/v0.8.3\n' > .supabase-version
Check the guide for the latest tag before you copy this.
Step 2: Generate every secret
Supabase is blunt about this: never start with the placeholder passwords and keys from .env.example. Run the two helper scripts:
sh utils/generate-keys.sh
sh utils/add-new-auth-keys.sh
Then open .env and set DASHBOARD_PASSWORD. It must include at least one letter. Keep the secret key out of any frontend code; only the publishable key belongs in your app.
Step 3: Set your URLs and SMTP
In .env, set SUPABASE_PUBLIC_URL, API_EXTERNAL_URL and SITE_URL to your real domain. Then fill in the SMTP_ values with a production mail provider. Without SMTP, sign-up confirmation and password-reset emails never arrive.
Step 4: Pull and start the stack
docker compose pull
sh run.sh start
docker compose ps
sh run.sh start is the same as docker compose up -d --wait. Every service should show Up. If one is stuck on “created,” read its logs with sh run.sh logs <service>.
Step 5: Put HTTPS in front
Studio and the APIs answer on port 8000 over plain HTTP. Supabase recommends a reverse proxy such as Caddy or NGINX in front of the gateway, with a valid TLS certificate, especially if you use OAuth sign-in.
Step 6: Close the database ports
This is the step most tutorials leave out. Edit the ports: lines in docker-compose.yml so each port only answers on the server itself (127.0.0.1), for example "127.0.0.1:${POSTGRES_PORT}:5432", and do the same for 6543 and 8000 once your proxy runs on the same server. Then recreate the stack with sh run.sh recreate.
Test it from your laptop: a connection to SERVER_IP:5432 should now time out.
Option 2: One-Click Supabase on xCloud (Step by Step)
The one-click path replaces Steps 1 to 6 with a form. The full walkthrough with every screen is in 👉 How to Install Supabase with xCloud.
Step 1: Create an NGINX server
Click New Server, choose an xCloud Managed Server or connect your own (DigitalOcean, Vultr, AWS and others, see the DigitalOcean guide). Under Choose Web Server, keep NGINX. Docker apps need an NGINX server, and xCloud installs Docker the first time you deploy one.
Pick a plan with enough memory. Supabase’s minimum is 4 GB; our Supabase hosting page recommends the 16 GB tier for real projects.
Step 2: Pick Supabase in One Click Apps
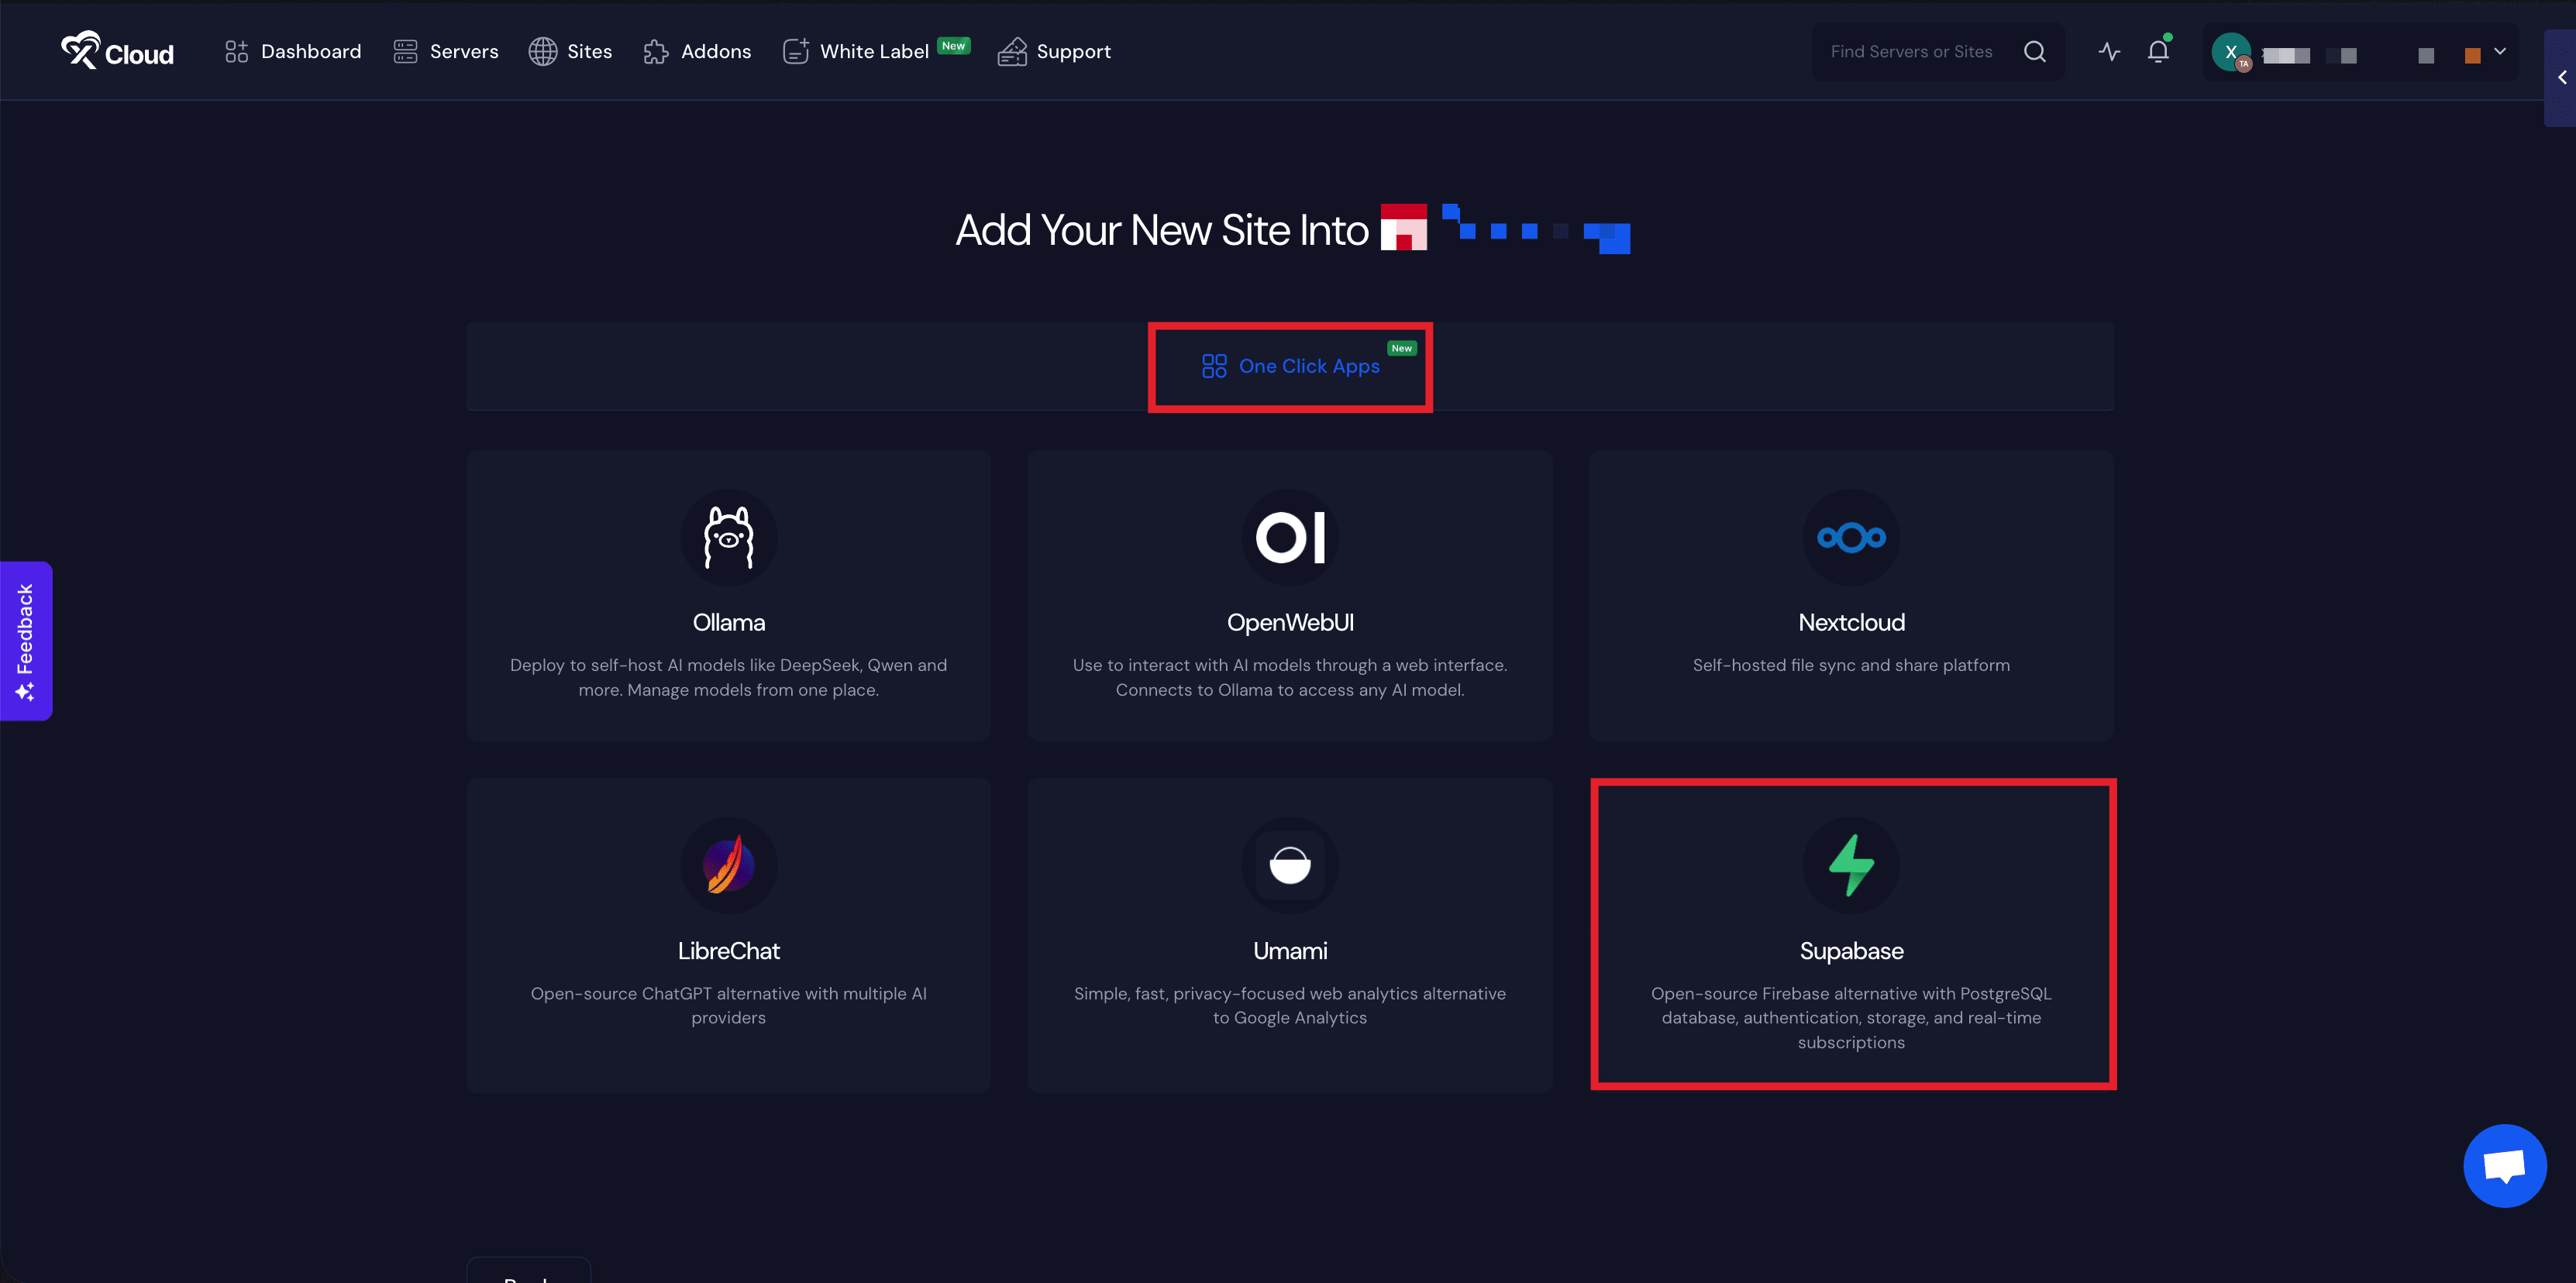
Click New Site, choose your server, open One Click Apps and click Supabase.
Step 3: Name it, choose Go Live or Demo Site, set the domain
Add a Site Title and tags. Choose Go Live for your own domain, or Demo Site to test on a demo domain first.
Step 4: Save the generated credentials
xCloud fills in the Admin Username, Admin Password and Admin Email Address, plus the Database Name, Database Username and Database Password. Copy them now. If you forget, they are also in the site’s Environment later.
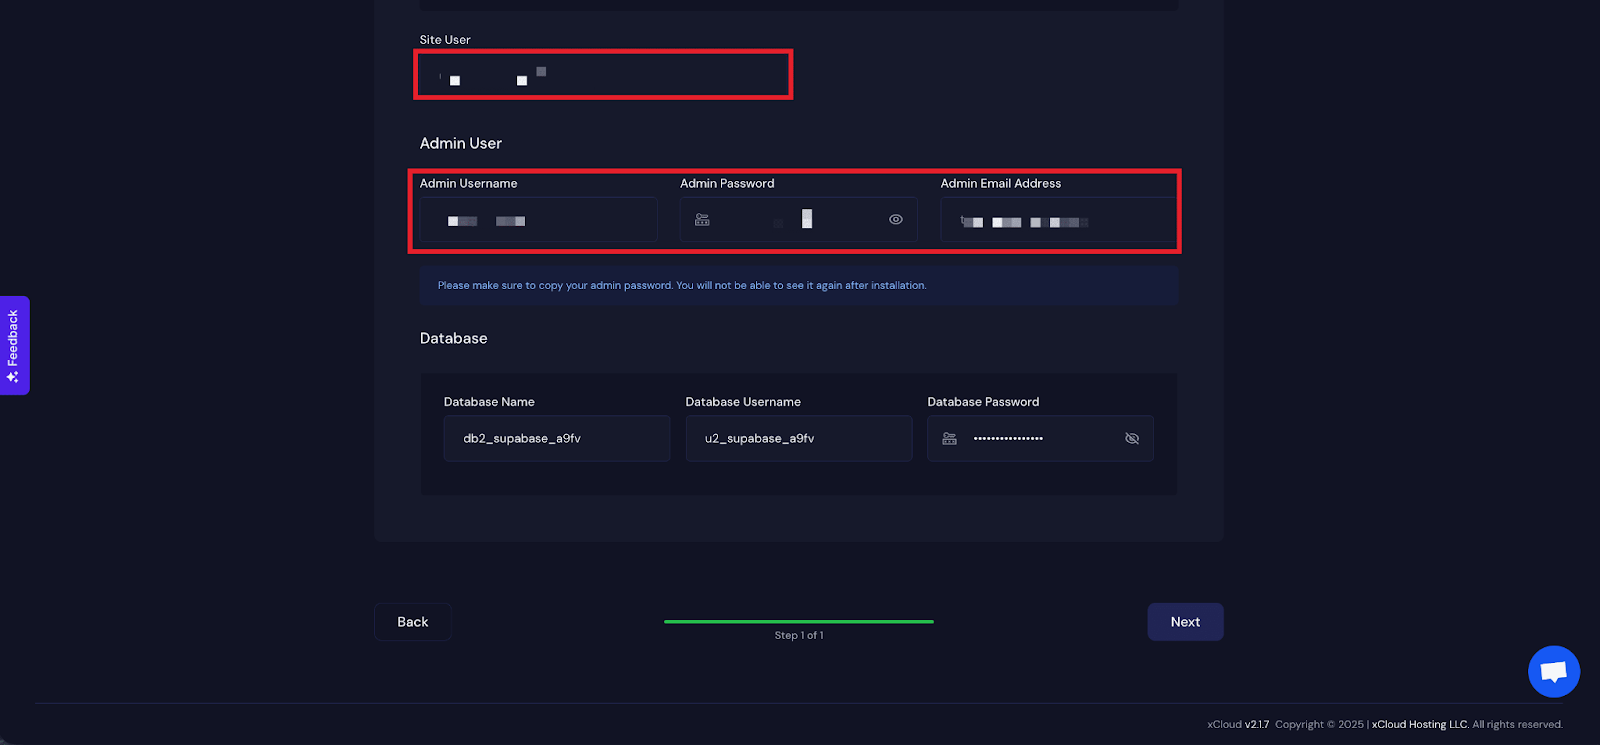
Behind the form, the installer generates a fresh JWT secret and signs new anon and service-role keys for this site, so no example key from .env.example ever goes live.
Step 5: Visit the site and sign in to Studio
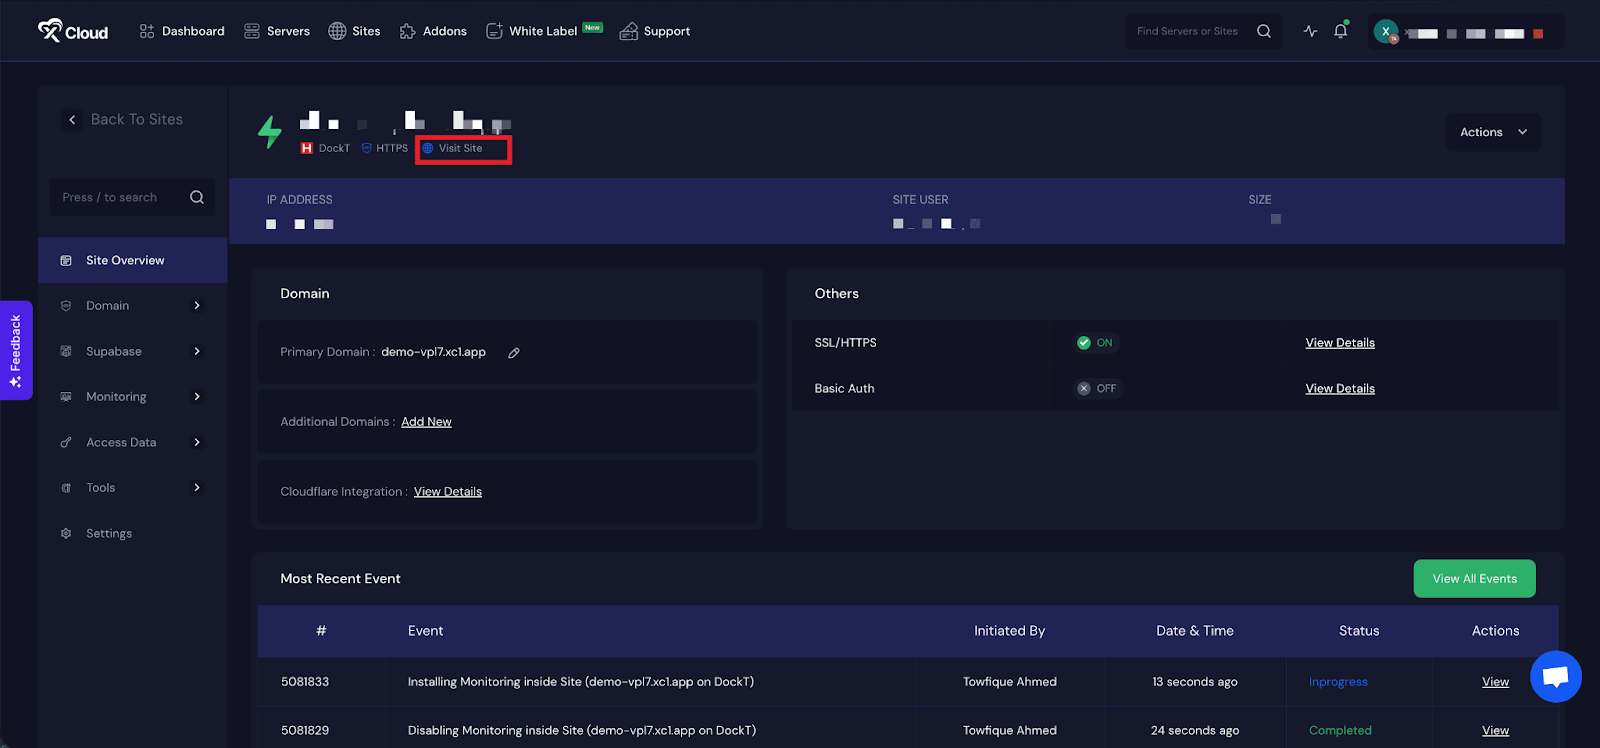
When the install finishes, click Visit Site. Studio opens on your domain over HTTPS and asks for the admin username and password. From here you can create tables, policies and storage buckets, or connect a Lovable app.
After Install: Backups, Updates and Security
Set up SMTP before you launch
On a fresh xCloud install, email sign-up is on, new users are confirmed automatically, and no mail server is set. That is fine for testing. Before real users arrive, open Environment, add your SMTP host, port, user and password, set ENABLE_EMAIL_AUTOCONFIRM to false, and click Update Environment.
Back up the database and files together
A Supabase backup is only useful if Postgres and Storage come from the same moment. On xCloud, Supabase supports Docker app backups: open the site, go to Backup → Previous Backups and click Backup Now, or schedule them under Backup Settings with up to two remote destinations. The capture briefly stops the app. 👉 Backup and restore Docker apps.
On a manual setup, script a pg_dump plus a copy of volumes/storage, and store both off the server.
Update with care
Nothing updates itself. Supabase’s update.sh merges the newest self-hosted release into your files, and Supabase warns that mixing image versions is not guaranteed to work. Back up first.
Reach the database through SSH
On xCloud, new installs keep Postgres private. Add your SSH key, find SUPABASE_POSTGRES_PORT in the site’s Environment, then open a tunnel:
ssh -N -L 5432:127.0.0.1:YOUR_POSTGRES_PORT YOUR_SSH_USER@SERVER_IPYour local database client then connects to 127.0.0.1:5432.
What This Setup Does Not Do
Here is the honest list, for both paths:
- No automatic migrations. Pulling a newer Compose file or changing versions does not update your database schema. You apply SQL migrations yourself.
- No automatic Edge Functions. You deploy them to the self-hosted instance by hand.
- One project per server on xCloud. The dashboard will not install a second Supabase on the same server. Use one server per project.
- xCloud’s stack trails upstream. Our template pins its own image versions (Postgres 15 and the Kong gateway today), while Supabase’s latest release has moved to the Envoy gateway. Check the image tags in the site’s Compose file if you need a specific version.
- Older installs keep their database setting. A domain change makes an older install’s Studio, Logflare and Kong private, but its database stays where it was. If yours predates v2.9.7.4, check it: find
SUPABASE_POSTGRES_PORTin the site’s Environment, then from your laptop runnc -vz -w 5 SERVER_IP YOUR_POSTGRES_PORT. If it times out or is refused, the database is private. If it connects, contact xCloud support and ask them to make the Supabase database private.
To undo a one-click install, delete the site from the dashboard; take a backup first if you might want the data.
Self-Hosted Supabase vs Supabase Cloud
| Self-hosted (manual) | Self-hosted on xCloud | Supabase Cloud | |
|---|---|---|---|
| Software cost | Free (Apache 2.0) | Free (Apache 2.0) | Set by Supabase’s plans |
| Server | Any VPS you run | Managed Cloud VPS or your own | Run by Supabase |
| Setup time | About an hour, plus proxy and SSL | A few minutes | Minutes |
| Secrets and SSL | You | Generated | Handled |
| Database exposure | Public until you change it | Private by default | Managed by Supabase |
| Backups | Your scripts | Docker app backups, scheduled | Set by plan (Supabase backups docs) |
| Migrations and Edge Functions | Manual | Manual | Manual (CLI), with platform tooling |
| Data location | Your server | Your server, 30+ regions | Supabase’s regions |
The trade-off is the usual one. Self-hosting costs less on paper and gives you control. The hidden cost is your time: the occasional 3 a.m. restart, the upgrade that needs care, the backup you never tested.
Run Supabase on Your Own Terms with xCloud
xCloud gives you the self-hosted stack without assembling it:
- Supabase deployed from One Click Apps on an NGINX server
- Admin, database and API keys generated per site
- Your domain with a free SSL certificate
- Database and pooler kept off the internet on new installs
- Scheduled Docker app backups with remote copies
- Server security updates and monitoring on managed servers
Deploy Supabase on xCloud → or browse the other one-click apps, including lighter backends such as PocketBase.
Get Your Own Supabase Running This Week
If you like full control and know Docker well, the manual path is a solid afternoon’s work. Just finish Step 6: close the database ports before you put real users on it.
If you would rather spend that afternoon on your app, deploy Supabase from One Click Apps, then set up SMTP and backups on day one. Whichever direction you go, a private database and a tested backup are the two moves worth making first.
For more on choosing where to run containers, read our guide to the best Docker hosting providers and the trade-offs of self-managed vs managed hosting.
If you have found this blog helpful, feel free to subscribe to our blogs for valuable tutorials, guides, knowledge, and tips on web hosting and server management. You can also join our Facebook community to share insights and engage in discussions.
Frequently Asked Questions
Can you self-host Supabase for free?
Yes. Supabase is open source under the Apache License 2.0, so the software costs nothing. You pay for the server it runs on and for your own time to run it.
How much RAM does self-hosted Supabase need?
Supabase’s self-hosting guide asks for at least 4 GB of RAM, 2 CPU cores and 40 GB of SSD, and recommends 8 GB or more, 4 cores and 80 GB. xCloud’s installer also checks for 15 GB of free disk before it starts.
Is the Supabase dashboard (Studio) included when you self-host?
Yes. Studio ships in the Docker stack and is protected with a username and password (HTTP basic auth). On xCloud it opens on your domain over HTTPS, and the login is the Admin Username and Admin Password from the install screen.
Can I run two Supabase projects on one server?
On xCloud, no: the dashboard supports one Supabase project per server, so put each project on its own server. On a manual setup it is up to you, but you have to change every published port and container name yourself.
Do database migrations and Edge Functions run automatically on self-hosted Supabase?
No. On a self-hosted instance you apply SQL migrations and deploy Edge Functions yourself. Pulling a newer Compose file does not update your database schema, so keep both in your own Git repository.
How do I connect to the Postgres database of a Supabase install on xCloud?
New installs keep Postgres and the connection pooler reachable from the server only. Open an SSH tunnel to the server and connect through it, using the port shown in the site’s Environment.