


A safer Vaultwarden Docker Compose setup runs the official image at a pinned version behind a reverse proxy that handles HTTPS, with no app port open to the internet. It also closes sign-ups, protects the admin page with a hashed token, and copies the data folder off the server.
Getting the container to start is the easy part. The risk sits in what the short examples leave out, and for a password vault those gaps matter.
This guide gives you every file in full, then explains each change. Treat it as a set of files to test, not a tested recipe: the note below says what we did and did not run. If you are new to the format, read what Docker Compose is first. If you would rather not write any of it, skip to the xCloud section.
How this guide was checked: we have not run this full stack on a live server. The files follow Vaultwarden’s wiki and Docker’s documentation, for Vaultwarden 1.37.5 and Caddy 2. We checked that the Compose file parses and that the backup and restore scripts pass a shell syntax check. The certificate, the admin token hash, a real backup and a real restore have not been run by us, so each “What to check” line below tells you what to look for, not output we saw. Try it on a spare server with test data before you trust it with real passwords.
TL;DR
- The short example in Vaultwarden’s wiki is a starting point. It uses open sign-ups, plain HTTP on a public port, and no backups.
- Docker can skip your firewall. Docker’s docs say traffic to a published port gets diverted before ufw rules apply, so publish only your proxy.
- Caddy handles HTTPS with a few lines of config, and Vaultwarden stays on a private network behind it.
- Hash the admin token, or leave it out. With no token, the admin page stays off.
- Back up the database properly. Use SQLite’s backup command, so you get a clean copy while the vault is running.
- A backup only counts once you have restored it. Run the restore once on a spare server.
The Official Example Leaves Six Gaps on a Public Server
Most Vaultwarden Compose guides copy the minimal example from the Vaultwarden wiki. It is meant as a template, and the same page also shows a Caddy version. Here is what each line of the minimal one does on a public server.
| Line in the minimal example | What it means on a public server | What this guide uses |
|---|---|---|
image: vaultwarden/server:latest |
The next pull can move you to a new version | A pinned version, updated on purpose |
11001:80 |
Plain HTTP on the server’s public address | No published port, only Caddy can reach it |
# DOMAIN: ... (commented out) |
Vaultwarden doesn’t know its HTTPS address, which attachments need | DOMAIN set to your real address |
SIGNUPS_ALLOWED: "true" |
Anyone who finds the address can register | Closed after your account exists |
No ADMIN_TOKEN |
Admin page off, which is a safe default | Off, or on with a hashed token |
| No backup | The server is your only copy | A daily archive, kept off the server |
The second row is the easiest to miss. Docker’s documentation says traffic to a published port “gets diverted before it goes through the ufw firewall settings”. A deny rule in ufw won’t close that port.
One fair point for the other side: the wiki recommends latest for most users, because it tracks tagged releases. Pinning suits a password vault if you want to read the notes and take a backup first. The cost is that you must watch for releases yourself.
What You Need
| Requirement | Details |
|---|---|
| A Linux server | xCloud’s own Vaultwarden template asks for at least 512 MB of RAM, 1 CPU core and 2 GB of disk |
| Docker with Compose | The Docker Engine and the docker compose plugin |
| A user who can run Docker | Root, or a user in the docker group. Step 1 shows how to add yourself |
| A domain or subdomain | For example vault.example.com, with an A record pointing at SERVER_IP |
| Ports 80 and 443 open | Caddy needs port 80 to get its certificate and port 443 to serve the vault |
sqlite3 on the server |
For the backup script (sudo apt install sqlite3 on Ubuntu) |
Still choosing where to run it? We compared Vaultwarden hosting providers, and Vaultwarden vs Bitwarden covers which server to pick. Harden the server itself with our VPS security guide.
Step 1: Create the Project Folder
Keep everything in one folder, so the backup and any later move stay simple.
sudo mkdir -p /opt/vaultwarden
sudo chown "$USER" /opt/vaultwarden
cd /opt/vaultwarden
The docker commands in this guide need root or membership of the docker group. To run them as your own user, follow Docker’s post-install steps, then log out and back in:
sudo usermod -aG docker "$USER"Docker warns that this group grants root-level privileges, so add only people you would trust with root.
Step 2: Create the Admin Token Hash
The admin page can change server settings, so Vaultwarden’s admin page guide suggests a long random password and has a built-in command to hash it. First make the password and save it in your password manager.
openssl rand -base64 32
docker run --rm -it vaultwarden/server:1.37.5 /vaultwarden hash
The second command asks for that password twice, then prints a long string starting with $argon2id$. You need that string for the next step.
Don’t want the admin page? Skip this step and leave out the token lines in Steps 3 and 4. The guide says that to keep the page off, neither ADMIN_TOKEN nor DISABLE_ADMIN_TOKEN should be set, and config.json should have no admin_token key. If you do want the page, turn it on only after HTTPS works.
Step 3: Write the .env File
This file keeps your settings and the hash out of the Compose file. Keep the single quotes around the hash, with single $ signs, as the wiki shows.
DOMAIN=https://vault.example.com
EMAIL=[email protected]
SIGNUPS_ALLOWED=true
VAULTWARDEN_ADMIN_TOKEN='$argon2id$v=19$m=65540,t=3,p=4$PASTE_THE_REST_OF_YOUR_HASH'
Then lock it so only your user can read it: chmod 600 .env.
Step 4: Write the docker-compose.yml File
This is the wiki’s Caddy layout with four changes: a pinned image, your own settings from .env, the admin token, and a restart rule that respects a manual stop. Vaultwarden 1.37.5, published on 1 November 2026, was marked as the latest release on the GitHub releases page as of 9 November 2026, so check that page for a newer one.
services:
  vaultwarden:
    image: vaultwarden/server:1.37.5
    container_name: vaultwarden
    restart: unless-stopped
    environment:
      DOMAIN: ${DOMAIN}
      SIGNUPS_ALLOWED: ${SIGNUPS_ALLOWED}
      ADMIN_TOKEN: ${VAULTWARDEN_ADMIN_TOKEN}
    volumes:
      - ./vw-data:/data

  caddy:
    image: caddy:2
    container_name: caddy
    restart: unless-stopped
    ports:
      - 80:80
      - 443:443
      - 443:443/udp
    volumes:
      - ./Caddyfile:/etc/caddy/Caddyfile:ro
      - ./caddy-config:/config
      - ./caddy-data:/data
    environment:
      DOMAIN: ${DOMAIN}
      EMAIL: ${EMAIL}
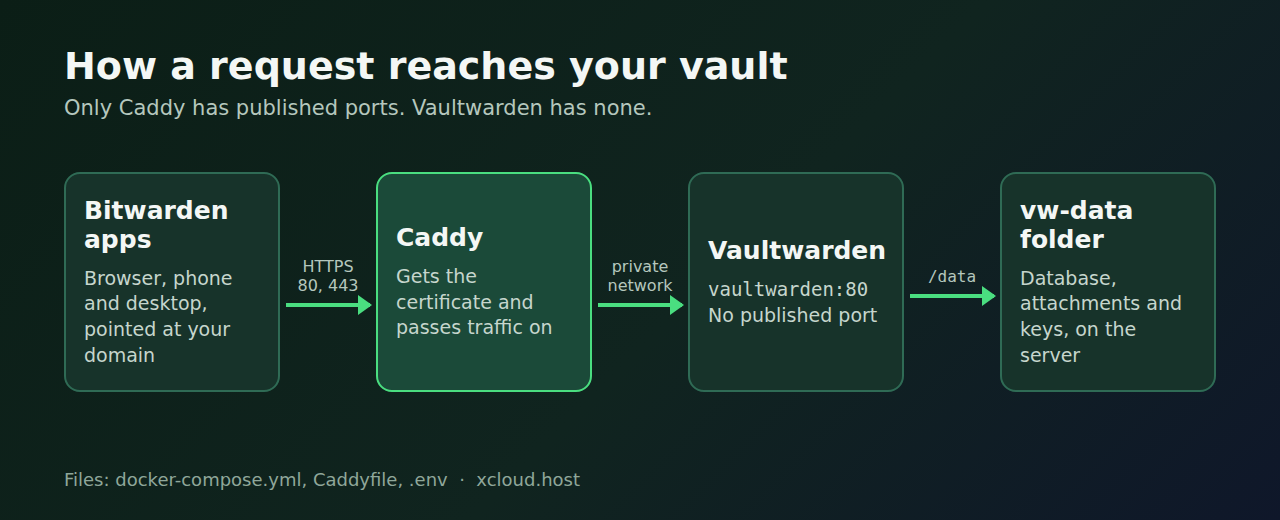
Notice what the vaultwarden service doesn’t have: a ports section. Your vault is only reachable through your domain, not by server IP and port.
Step 5: Write the Caddyfile
Caddy gets and renews the Let’s Encrypt certificate for you. This is the wiki’s Caddyfile, cut down to the parts this setup needs.
{$DOMAIN} {
  tls {$EMAIL}

  reverse_proxy vaultwarden:80 {
    header_up X-Real-IP {remote_host}
  }
}
Step 6: Start the Stack and Create Your Account
docker compose up -d
docker compose logs -f
Press Ctrl+C once the logs settle. Open your domain, check for a valid padlock, create your account and set your master password. Nobody can reset that password for you, so keep a written copy somewhere physically safe.
Then open the Bitwarden app or browser extension, set the server URL to your domain, and log in. The official Bitwarden apps work with Vaultwarden, though very new app versions can need a recent Vaultwarden release.
What to check: docker compose ps should list both containers as running, your domain should load over HTTPS with no certificate warning, and the app should show the account you just created.
Step 7: Close Sign-Ups
Once everyone has an account, change one line in .env:
SIGNUPS_ALLOWED=falseApply it with docker compose up -d, which recreates the container with the new setting. Then try to register a test account in a private browser window.
What to check: Vaultwarden should refuse to create the account, either with an error or by not offering a way to sign up.
Organization owners and admins can still invite people, and setting INVITATIONS_ALLOWED to false turns that off as well.
One trap: the first time you save settings on the /admin page, Vaultwarden writes a config.json file, and its values win over your environment settings. If sign-ups stay open after this step, that file is the first place to look.
Step 8: Add Email (Optional)
Invites, email login codes and password hints need a mail provider. Add these to .env with your provider’s details:
SMTP_HOST=smtp.example.com
SMTP_FROM=[email protected]
SMTP_PORT=587
SMTP_SECURITY=starttls
SMTP_USERNAME=your-username
SMTP_PASSWORD=your-password
Then pass them to the container under environment: in docker-compose.yml, using the same pattern as the other settings (SMTP_HOST: ${SMTP_HOST}, and so on). Add the full set at once, because Vaultwarden may not start if a setting is missing or empty. Run docker compose up -d to apply it.
Step 9: Schedule the Backup
Vaultwarden’s “Backing up your vault” wiki page marks the database and attachments as required, and config.json and the rsa_key* files as recommended. It warns against relying on filesystem or VM snapshots, and gives SQLite’s own backup command instead.
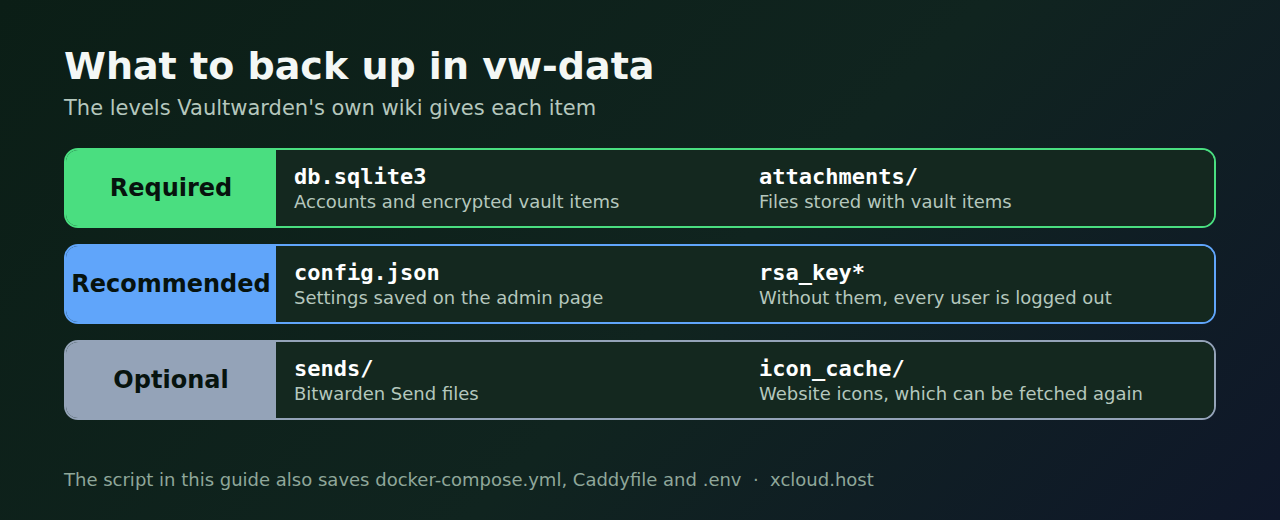
Save this as /opt/vaultwarden/backup.sh. Replace the BACKUP_USER@BACKUP_SERVER placeholder with a machine you control, and set up an SSH key so the copy can run unattended.
#!/usr/bin/env bash
set -euo pipefail
umask 077

STAMP=$(date '+%Y%m%d-%H%M')
DEST=/var/backups/vaultwarden
WORK=$(mktemp -d)
ARCHIVE="$DEST/vaultwarden-$STAMP.tar.gz"

mkdir -p "$DEST"
cd /opt/vaultwarden

sqlite3 vw-data/db.sqlite3 ".backup '$WORK/db.sqlite3'"

for item in vw-data/attachments vw-data/sends vw-data/config.json vw-data/rsa_key*; do
  if [ -e "$item" ]; then
    cp -a "$item" "$WORK/"
  fi
done

cp -a docker-compose.yml Caddyfile .env "$WORK/"

tar -czf "$ARCHIVE" -C "$WORK" .
rm -rf "$WORK"

find "$DEST" -name '*.tar.gz' -mtime +14 -delete

scp "$ARCHIVE" BACKUP_USER@BACKUP_SERVER:/backups/vaultwarden/
The container’s files belong to root, so run the script as root once and check that a new archive appears on the other machine. Then schedule it with a line in /etc/cron.d/vaultwarden-backup:
15 3 * * * root /bin/bash /opt/vaultwarden/backup.shWhat to check: a new vaultwarden-STAMP.tar.gz file should appear in /var/backups/vaultwarden and on the other machine, and tar -tzf on it should list db.sqlite3 and .env.
Our cron jobs guide explains the schedule format. Treat every archive as sensitive: it holds your encrypted vaults, your keys and your .env file, so store it on encrypted storage.
Step 10: Restore It Once
Do this on a spare server with a test subdomain, not on the live one. Install Docker, then run these commands as root to extract the newest archive and put the files back in the same layout:
mkdir -p /opt/vaultwarden/vw-data /tmp/vw-restore
cd /opt/vaultwarden
tar -xzf /path/to/vaultwarden-STAMP.tar.gz -C /tmp/vw-restore
cp -a /tmp/vw-restore/docker-compose.yml /tmp/vw-restore/Caddyfile /tmp/vw-restore/.env .
cp -a /tmp/vw-restore/db.sqlite3 vw-data/
for item in /tmp/vw-restore/attachments /tmp/vw-restore/sends /tmp/vw-restore/config.json /tmp/vw-restore/rsa_key*; do
  if [ -e "$item" ]; then cp -a "$item" vw-data/; fi
done
rm -f vw-data/db.sqlite3-wal
Change DOMAIN in .env to your test subdomain. If you ever saved settings on the /admin page, also change domain in the restored vw-data/config.json, because that file wins over .env. Then run docker compose up -d and log in with a Bitwarden app pointed at that address.
The wiki says to delete any old db.sqlite3-wal file when restoring this kind of backup, which the last line does. On a live restore, stop Vaultwarden first. If you can see your items and open an attachment, the backup works.
Step 11: Update on Purpose
Read the release notes first, because some releases change the minimum client version or add startup checks. Then run the backup, change the image tag in docker-compose.yml, and pull:
sudo /bin/bash /opt/vaultwarden/backup.sh
docker compose pull
docker compose up -d
What to check: docker compose images should show the new tag, and you should still be able to log in and see your items.
Security fixes are the reason not to let this slide. The 1.37.5 release notes list security fixes; read them before you update.
Already Running Nginx?
If Nginx already owns ports 80 and 443 on your server, drop the caddy service and add this to the vaultwarden service:
    ports:
      - 127.0.0.1:8000:80
That keeps the vault only reachable through your domain, not by server IP and port. In your Nginx site, send traffic to 127.0.0.1:8000, set client_max_body_size 525M; for attachments, and pass the Upgrade and Connection headers as the wiki’s proxy example shows.
Older guides still mention port 3012 and WEBSOCKET_ENABLED. You can ignore both: the 1.29.0 release notes moved live sync (WebSocket notifications) onto the normal HTTP port, so no separate port or setting is needed, and the 1.31.0 release notes dropped the old port 3012 altogether.
Common Problems and Fixes
| Symptom | Likely cause | Fix |
|---|---|---|
| Certificate warning, or Caddy logs show errors | DNS doesn’t point at the server yet, or port 80 is closed | Check the A record and the port, then run docker compose restart caddy |
The argon2id variable is not set warning |
The hash’s $ signs were read as variables |
Use single quotes in .env, or $$ for each $ if the hash is in the Compose file |
| Admin page rejects the token | You pasted the hash | Enter the password you hashed, not the hash |
| Sign-ups stay open | config.json overrides your environment setting |
Change it on the admin page, or review that file |
| Vaultwarden stops after adding email | An SMTP_ setting may be missing or empty |
Add all the settings, then run docker compose up -d |
| Everyone is logged out after a restore | The rsa_key* files weren’t restored |
Restore them from the archive, or log in again |
What This Setup Does Not Do
This setup runs on one server, so if that server is down, syncing and new logins wait until it returns. It does not patch your operating system, watch your disk, or tell you when a backup fails, so you still need to handle those yourself.
Vaultwarden is a community project. It has no paid support line, and our safety breakdown covers the audit gap honestly.
To undo it: export your vault as an encrypted JSON file from the web vault first. Then run docker compose down in the project folder, which stops the containers and leaves vw-data in place. Delete the folder only once you have confirmed your export imports somewhere else.
The Same Setup Without Writing the File
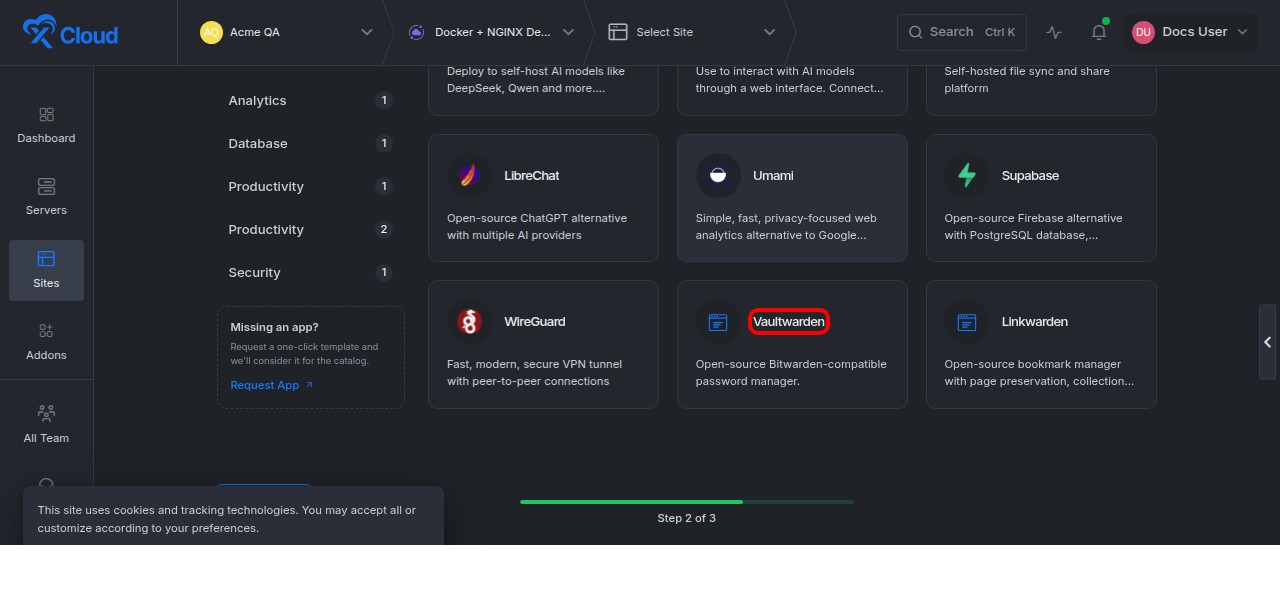
If you read this far and decided you would rather not own these files, xCloud’s Vaultwarden hosting deploys it from One Click Apps on an NGINX server. The steps are in our one-click guide and the Vaultwarden doc 👉.
We read our own template to compare it with the file above, line by line.
| Part of the setup | Your Compose file | xCloud’s Vaultwarden template |
|---|---|---|
| HTTPS | Caddy | NGINX and an SSL certificate, set up for you |
| Access | Only through Caddy | Only reachable through your domain, not by server IP and port |
| Version | Pinned tag | A fixed version that won’t change unless it is updated on purpose |
| Admin token | Hash you create | Random 48-character token, shown on Site Overview |
| Sign-ups | Edit .env |
Edit SIGNUPS_ALLOWED on Environment, then Save & Redeploy |
| Health check | None in this file | Built in: xCloud’s setup checks that Vaultwarden is responding |
| Backups | Your script | Backup Now or Automatic Backup |
What xCloud doesn’t do:
- ❌ It costs more than a bare VPS. The hosting page started at 6 GB for $24.99/month as of November 2026, while a small VPS costs a few dollars.
- ❌ The admin token is a plain token, not a hash, so keep it safe. If you want a hash instead, ask support first, because a wrong format can lock you out of the admin page.
- ❌ Vaultwarden doesn’t update itself, and a site stays on the version it was installed with. Check the image line on the site’s Compose page. To move to a newer version, contact support to update it.
- ❌ Docker app backups are not on the Free plan. Buying a Cloud VPS moves a Free team to the Starter plan, which includes Docker backups, at no charge beyond the Cloud VPS price. The app stops briefly while each backup runs.
Prefer your own file on an xCloud server? See our Custom Docker doc 👉.
Want the vault without the upkeep of these files? See Vaultwarden hosting on xCloud.
Run the Restore Test Before You Trust the Vault
The Compose file is the easy part. What makes this setup safe to rely on is the short list around it: no public app port, sign-ups closed, the admin page off or hashed, and a backup stored somewhere else.
This week, get the stack running, move a few test items in, and run Step 10 on a spare server. Move your real passwords over only after that restore works.
If you have found this blog helpful, feel free to subscribe to our blogs for valuable tutorials, guides, knowledge, and tips on web hosting and server management. You can also join our Facebook community to share insights and engage in discussions.
Frequently Asked Questions
Does Vaultwarden need a reverse proxy with Docker Compose?
For real use, yes. The Bitwarden web vault relies on browser crypto features that most browsers only allow over HTTPS, and Vaultwarden’s wiki recommends a reverse proxy to handle HTTPS rather than its built-in option. Caddy is the simplest choice if you have no preference.
Should I use the latest tag or a pinned version?
Either can work. Vaultwarden’s wiki recommends latest for most users, because it tracks tagged releases. Pin a version if you want to read the release notes and take a backup before each update, and accept that you must then watch for new releases yourself.
Will docker compose down delete my vault?
No. With the file in this guide, your data sits in the vw-data folder on the server, so stopping or removing the containers leaves it in place. Deleting that folder is what destroys the vault, so back it up before you clean anything up.
Why does Vaultwarden reject my admin token?
You probably typed the hash instead of the password. The admin page asks for the password you entered when you ran the hash command. If Docker Compose also warns that the argon2id variable is not set, the dollar signs in the hash were not stored correctly in the .env file.
Can I use PostgreSQL or MySQL instead of SQLite?
Yes. The same image supports SQLite, MySQL and PostgreSQL. Vaultwarden’s wiki says SQLite is the most widely used and tested backend and recommends it for most users, so a household or small team rarely needs a separate database.
Last updated November 15, 2026
← All articles