

If you run more than one or two sites, you have probably felt it. The same logins, the same clicks, and the same routine checks, repeated day after day. Each task on its own takes only a minute, but together they eat into the hours you would rather spend building. As your setup grows, doing everything by hand quietly becomes the thing that slows you down.
This is where the xCloud Public API comes in. It gives you a way to automate server management directly from your own scripts, pipelines, and tools, using the same operations you already run in the dashboard.
Instead of repeating each step yourself, you write the instruction once and let it run whenever you need it. The rest of this guide explains how the API works, how to create your first token, and what you can do once you have one.
What the xCloud API actually does
Think of the API as a second set of hands. Anything you can do by clicking through the dashboard, you can also do with a simple HTTP request, whether that is listing a server, creating a site, triggering a backup, or checking on performance. The difference is that a request can be saved, scheduled, and repeated without you sitting there to run it. That small shift is what turns a pile of manual chores into a workflow that runs on its own.
Once your tasks live in code rather than in your daily to-do list, a few things become possible that are hard to manage by hand. Here is what that looks like in practice.
Full platform access
The API mirrors the dashboard, so the operations you already know are all available from your own code. You are not limited to a handful of actions or a cut-down feature set. If you can do it in xCloud, you can almost certainly script it.
Seamless integration
Your servers do not exist in isolation, and neither should the way you manage them. The API lets you connect xCloud to the tools you already rely on, from CI/CD pipelines to internal scripts and reporting jobs. That means fewer tabs to switch between and fewer steps that depend on someone remembering to do them.
Automation
Some tasks need to happen on a regular rhythm, like restarts, deployments, and backups. With the API, you can set these to run on a schedule and stop thinking about them. The work still gets done, just without a person triggering it each time.
Real-time insights
Good decisions depend on knowing what your servers are actually doing. The API lets you pull CPU, memory, disk, and network data on demand, exactly when you need it. From there, you can feed those numbers into your own dashboards or wire them up to alerts that warn you before a small issue becomes a real one.
Scoped permissions
Not every script needs the keys to everything. The API lets you hand each token a specific set of permissions, with separate read and write access for servers and sites. A reporting tool can be given read-only access, while a deployment script gets just enough to do its job and nothing more.
Bulk management
Repeating the same change across many sites by hand is slow and easy to get wrong. The API lets you act on many servers and sites in a single workflow, applying the same update everywhere at once. For anyone managing sites for clients, this alone can save hours every week.
How to create your API token
Getting your first token takes only a few minutes inside the xCloud dashboard The process is simple, but each step matters, so here is how to do it from start to finish.
Step 1: Open API settings
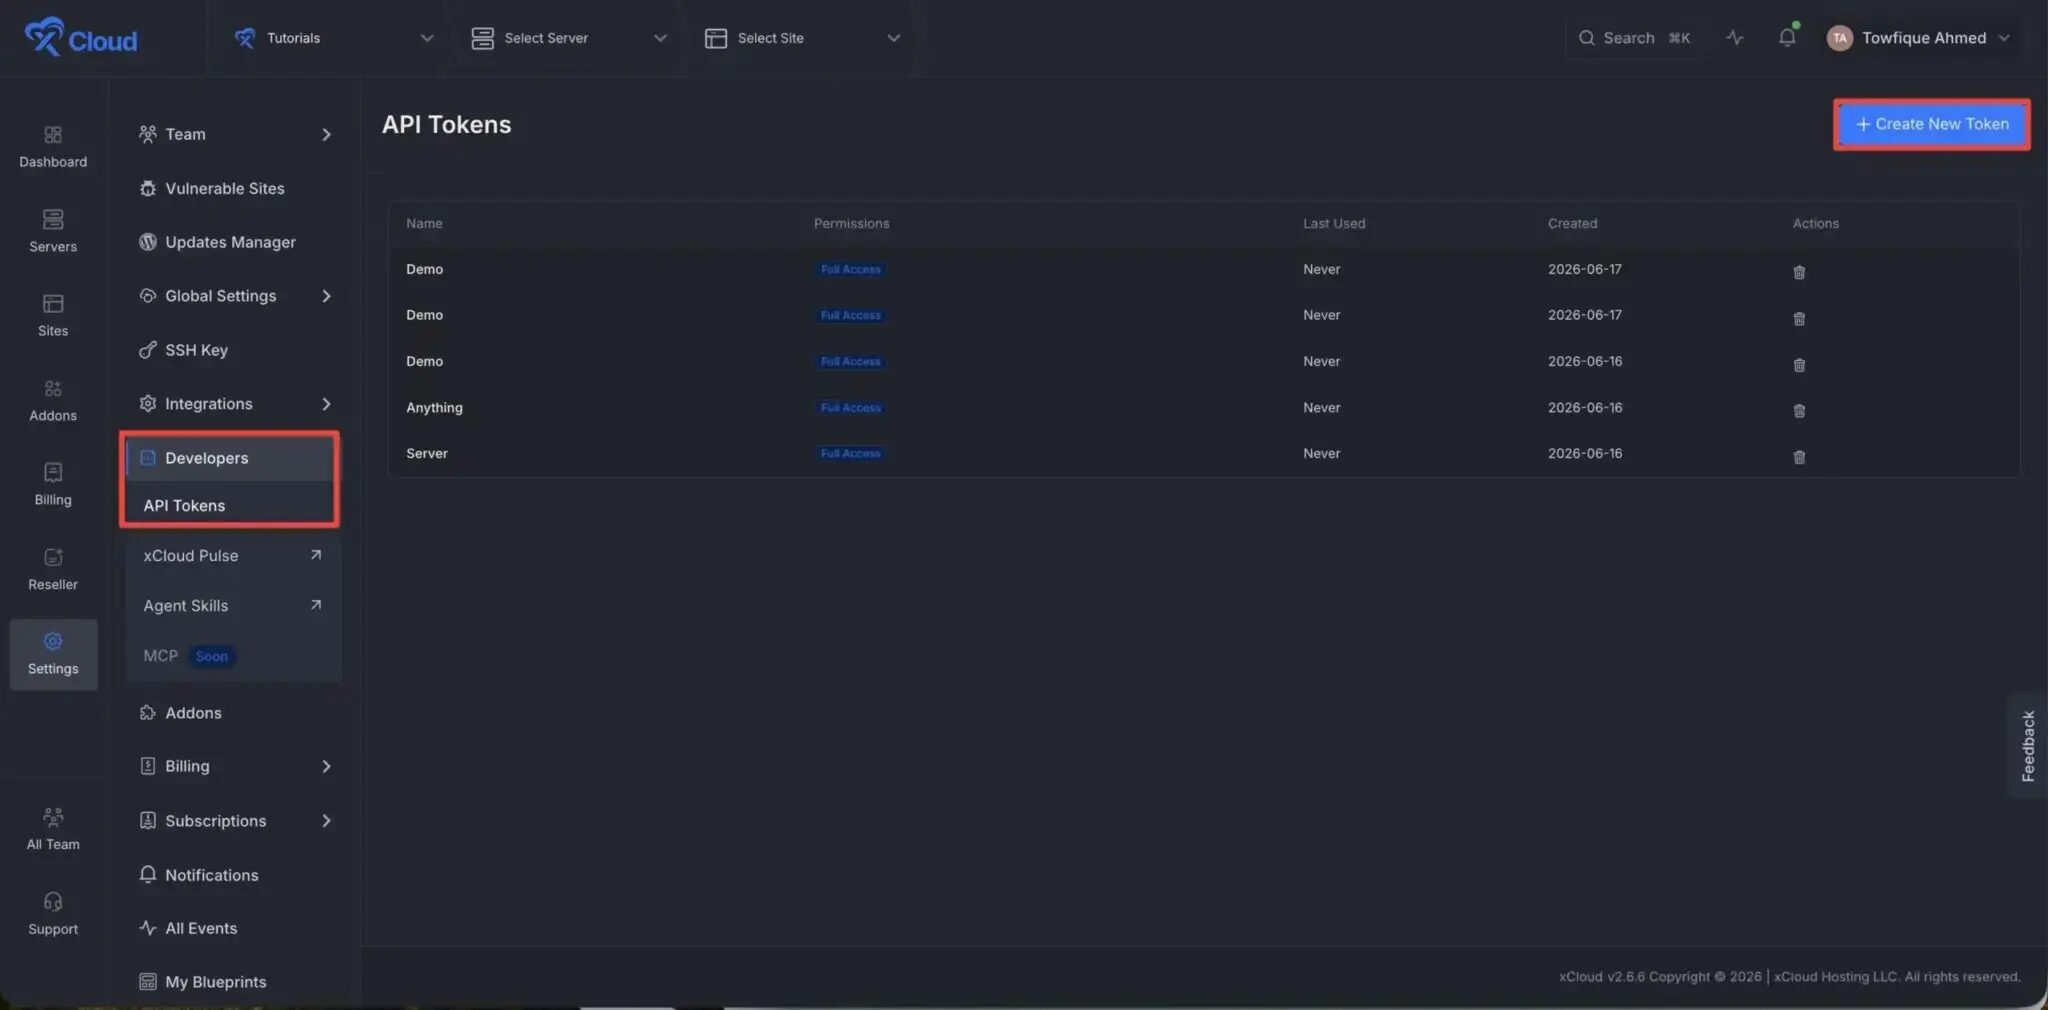
Log in to your xCloud dashboard to begin. From the left sidebar, go to Settings, select Developers, and then open API Tokens. This is the home for every token tied to your account, and it is where you create, view, and remove them. Click Create New Token to get started.
Step 2: Name the token and choose permissions
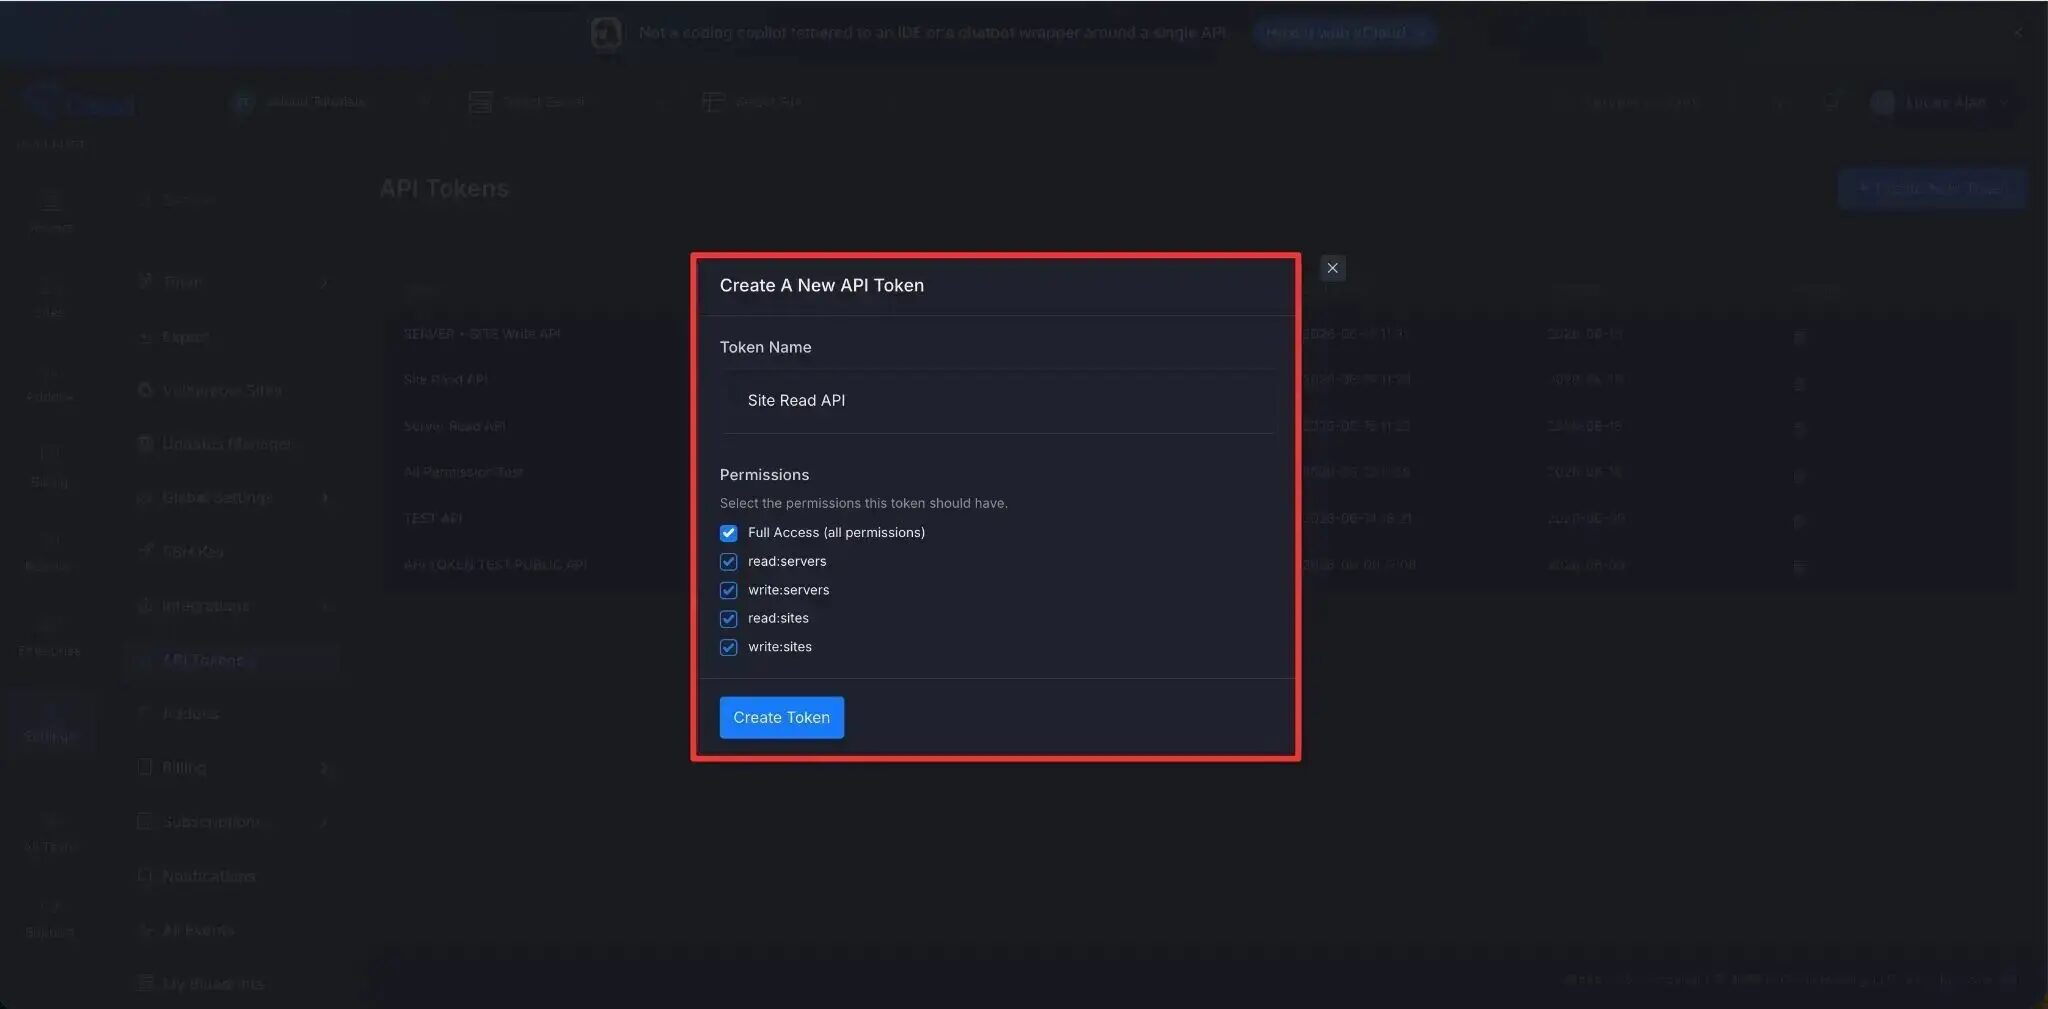
A dialog will appear asking for a name and a set of permissions. Give the token a clear name that tells you where it will be used, such as “Reporting Dashboard” or “Deployment Pipeline,” so you can recognize it later. Then choose the scopes it should carry from the options below.
- Full Access (all permissions)
- read:servers
- write:servers
- read:sites
- write:sites
A good rule of thumb is to give each token the least access it needs to do its job, since a reporting script rarely needs permission to change anything. Once you are set, click Create Token.
Step 3: Copy and store your token
Your token is shown only once, right after you create it, and it will never be displayed in full again. Copy it straight away and keep it somewhere safe, such as a secrets manager or an environment variable. Avoid pasting it into a plain file or anywhere it might be shared by accident. If you do lose it, you cannot recover the original, so you will simply create a new one and update wherever the old one was used.
What you can build with it
Now for the more interesting part: what all of this actually saves you. The examples below are some of the most common jobs teams hand over to the API, but they are only a starting point. Each one replaces a task you would otherwise do by hand, often more than once a week.
Automated WordPress management
Keeping WordPress updated across many sites is important, but doing it manually is tedious. The API lets you update plugins, themes, and core, activate what you need, and rescan sites after manual changes. You can run all of this on a schedule, with an optional backup taken before an update so you always have a safe point to return to.
Deployment pipelines
If you deploy code regularly, the manual steps around each release add up fast. The API lets you trigger Git deployments and clear cache as part of your pipeline, so new code reaches production without extra clicks. This keeps your releases consistent and removes the small mistakes that creep in when steps are done by hand.
Backups and maintenance
Backups and upkeep are easy to put off until the moment you wish you had not. With the API, you can start backups, manage cron jobs, and run routine maintenance at times that suit your traffic rather than your calendar. Setting these to run automatically means the work happens whether or not anyone remembers to do it.
Security monitoring
Staying on top of security is far easier when the information comes to you.The API lets you pull vulnerability scan results, manage firewall rules, and review banned IP addresses across your sites. You can build this into a regular check or a dashboard, so a new risk is something you notice quickly rather than weeks later.
Performance tracking
A site that slows down rarely announces it, which is why steady monitoring matters. The API lets you queue PageSpeed Insights scans and follow Core Web Vitals over time. With that history in hand, you can spot a slowdown early and act on it before it starts to affect your visitors.
Agency and multi-site work
Managing sites for clients multiplies every routine task by the number of sites you run. The API lets you handle many servers and sites from a single workflow, applying updates and checks across all of them at once. For an agency, this keeps client work organized and frees up time that scaling would otherwise eat away.
A quick tour of what is available
The full documentation lists every endpoint in detail, but a map helps before you dive in. Here is the lay of the land, grouped by the part of your hosting each set of endpoints controls. Knowing roughly where things sit makes it much faster to find the exact call you need later.
Server operations
This is where you manage the servers themselves. You can list and inspect them, reboot when needed, manage services, set PHP versions, and read monitoring data. In short, it covers the health and configuration of the machines your sites run on.
Site management
These endpoints handle everything at the site level. You can create and view sites, and manage SSL certificates, domains, staging environments, and deployment logs. It is the day-to-day side of running individual sites rather than the servers beneath them.
WordPress operations
For WordPress sites, a dedicated set of endpoints handles the software itself. You can list plugins and themes, queue updates for plugins, themes, and core, and activate components. This is what powers the automated WordPress management described earlier.
Backups and scheduling
Protecting your data and automating recurring jobs both live here. You can trigger backups, check their status, and manage cron jobs at both the server and site level. Together, these cover the routine work that keeps a site safe and running smoothly.
Security and integrations
This group helps you keep sites protected and connected to outside services. You can review vulnerabilities from Patchstack and Wordfence, manage firewall and fail2ban rules, and see connected Cloudflare accounts. It brings your security signals and integrations into the same automated workflow.
Performance
Finally, a set of endpoints focuses on how fast and healthy your sites are. You can run PageSpeed Insights scans and track Core Web Vitals and Lighthouse scores for each site. This is the data that tells you whether your performance work is paying off.
Put Your API Token to Work with xCloud Pulse
If you would rather not write any code yet, there is an easy way to put your new token to use right away. xCloud Pulse is a native macOS app that lives in your menu bar and keeps a live view of your whole xCloud account. It is built on the same xCloud Public API you have just set up, so the token you created is all it needs to connect. Best of all, it is free for every xCloud user.
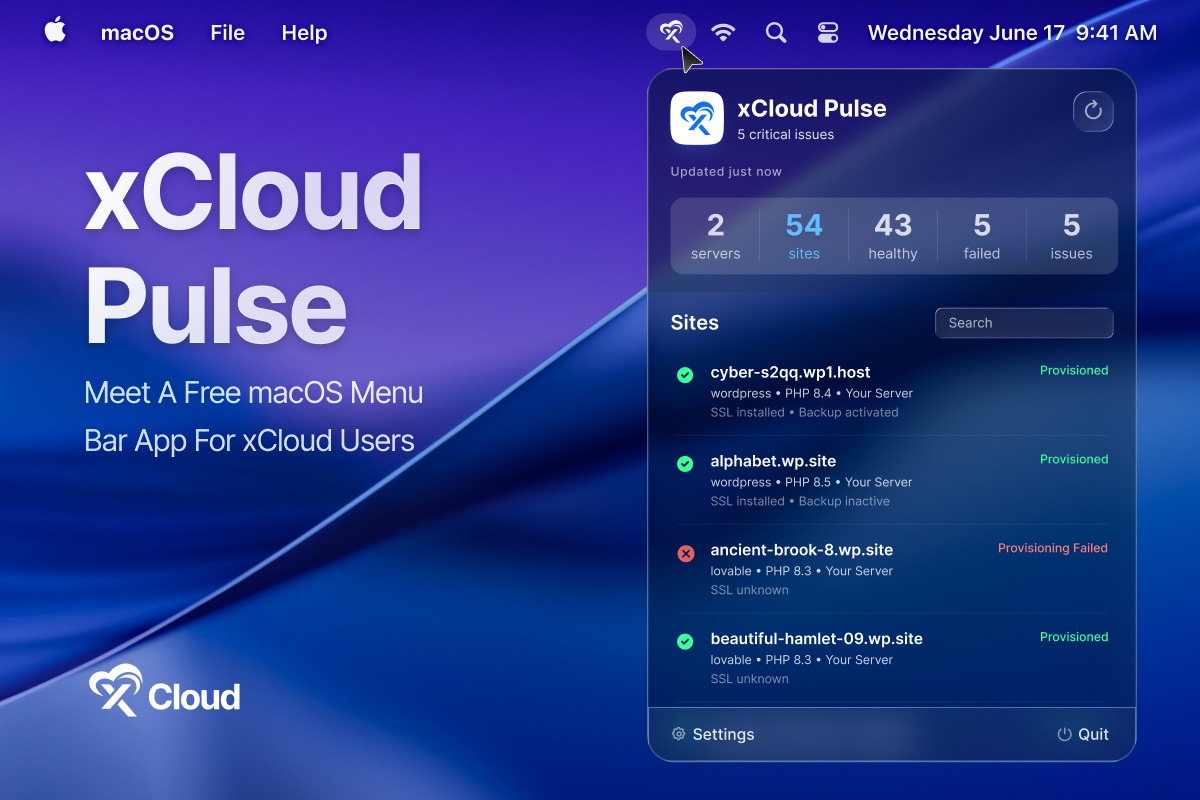
Once connected, Pulse shows every site and server the moment you open it, along with status, SSL, backups, vulnerabilities, and any open issues. You can act on what you find right there, whether that is purging a cache, triggering a backup, or copying a server IP, all without opening a browser. A built-in search lets you jump to any site, server, or action by typing a few letters. Because it is a true native app rather than a browser tab, it stays light on your machine.
In many ways, Pulse is the clearest example of what the API makes possible: a single token, powering a tool you can use every day. Setting it up takes only a few minutes, from installing the app to connecting your account and choosing how often it refreshes. For the full step-by-step setup, head to the xCloud Pulse documentation, which walks through everything from installing the app to reading your dashboard.
Start automating & Take Full Control of Your Hosting Today
Moving from manual clicks to a few well-placed scripts is one of the simplest upgrades you can make to how you run your hosting. The setup takes only a few minutes, and the payoff in saved time and fewer repetitive tasks shows up almost right away. You do not have to automate everything at once, either, since even one scheduled task is a clear step forward. The xCloud API puts the full range of dashboard operations within reach of a single request.
The best way to get comfortable is to start small. Create a token, give it the right scopes, and use it to automate server management for one task you repeat often. When you are ready to go further, the API documentation walks through every endpoint so you can keep building at your own pace.
If you found this guide helpful, feel free to subscribe to our blog for more tutorials, guides, and tips on web hosting and server management. You can also join our Facebook community to share ideas and connect with other xCloud users.
If you have found this blog helpful, feel free to subscribe to our blogs for valuable tutorials, guides, knowledge, and tips on web hosting and server management. You can also join our Facebook community to share insights and take part in discussions.
Last updated June 22, 2026
← All articles