


An Uptime Kuma status page is a public page that shows whether your services are up, built from the monitors you run. Create it under Status Pages → New Status Page, pick a name and slug, add monitors and save. To serve it from status.example.com, install Uptime Kuma on that domain and share status.example.com/status/your-slug. The slug in that address picks the page, so this guide uses the /status/your-slug address throughout.
Customers check a status page at the worst moment: when something is already broken. If yours is missing, slow or on a confusing address, they open a support ticket instead. If you are new to the tool, start with what Uptime Kuma is and what it can monitor.
This guide walks through the whole setup, the custom domain step most guides skip, maintenance notices and the limits worth knowing before you share the link.
TL;DR
- Create the page in Uptime Kuma under Status Pages → New Status Page: a Name, a Slug, then Add a monitor for each service to show.
- The default address is
https://your-domain/status/your-slug. - A custom domain on xCloud: a Docker Uptime Kuma site has one domain, so install it on the status subdomain from the start. Your page is then at
https://status.example.com/status/your-slug. This guide uses that address, not Uptime Kuma’s Domain Names field. - Status pages are public and refresh every 5 minutes by default (you can change this in the status page settings). Show only what visitors should see.
- Maintenance windows show a planned-work notice on the page and pause alerts.
The Custom Domain Rule Most Guides Skip
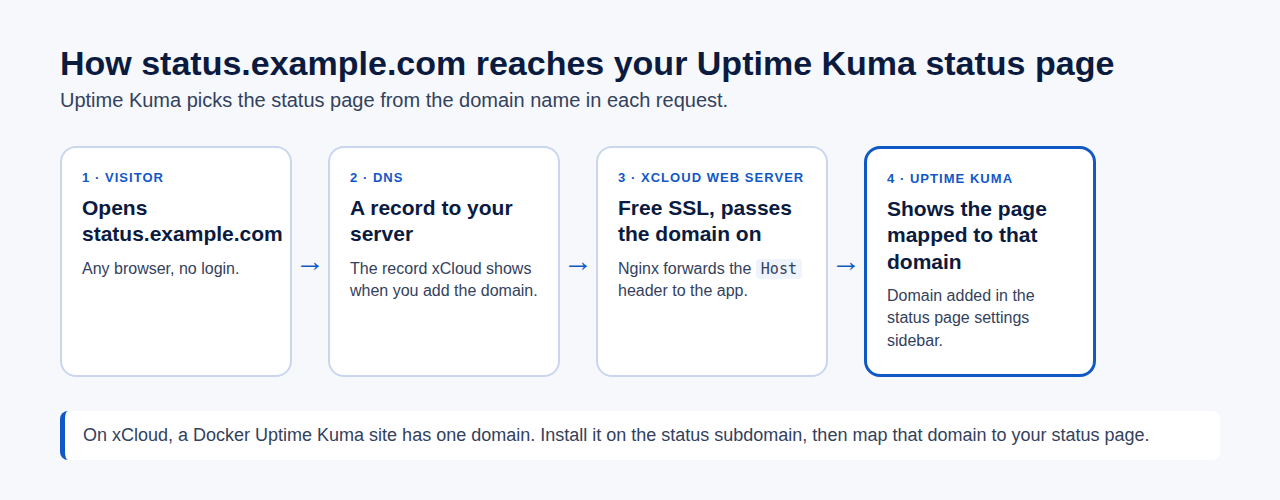
Here is the part that trips people up. The slug picks the page. Every status page lives at /status/your-slug on whatever domain Uptime Kuma runs on, so the domain you install Uptime Kuma on is the domain your status page uses.
Uptime Kuma also has a Domain Names field in the status page settings, for opening a page at the bare domain instead. This guide does not cover it: we have not checked that flow on an xCloud install, so every step here uses the /status/your-slug address.
On xCloud you do not edit any proxy file. xCloud sets up the web server and free SSL for one-click Docker apps.
The catch worth knowing: a Docker Uptime Kuma site on xCloud holds one domain, with no Additional Domain field, as our Uptime Kuma deploy guide notes. So you cannot add status.example.com next to monitor.example.com on the same site.
| Your setup | Custom status domain works? | What to do |
|---|---|---|
| Uptime Kuma on xCloud, installed on status.example.com | Yes | Share status.example.com/status/your-slug |
| Uptime Kuma on xCloud, installed on another domain | Not as a second domain | Share /status/your-slug instead |
| Your own web server in front of Uptime Kuma | Yes, at /status/your-slug | Set it up as the Uptime Kuma reverse proxy guide shows, including live connections |
| Uptime Kuma on a raw port, no proxy | Not recommended | Use a web server in front so you get SSL on your domain |
| A folder such as example.com/status | No | Uptime Kuma does not support subfolders |
If you only remember one line: give the status page its own subdomain, and run Uptime Kuma on that subdomain.
What You Need Before You Start
- A running Uptime Kuma with an admin account and at least one working monitor.
- A domain you control and access to its DNS settings.
- A clear list of public services: the website, the app, the API, email. Leave out internal tools.
- Optional: a logo and a short support line for the footer.
Not running it yet? The Uptime Kuma hosting page shows what the one-click install sets up, and the best Uptime Kuma hosting providers compares other places to run it.
Step 1: Install Uptime Kuma on Your Status Subdomain
On xCloud, click New Site and choose Uptime Kuma from the apps list. Under Where should it run?, pick Deploy on a new server or one of your Nginx servers, then click Continue.
On the next screen, enter a Site Title. Under Domain Setup, choose Go Live and enter the status subdomain, for example status.example.com. Add the DNS record xCloud shows at your DNS provider first; the DNS record guide covers that.
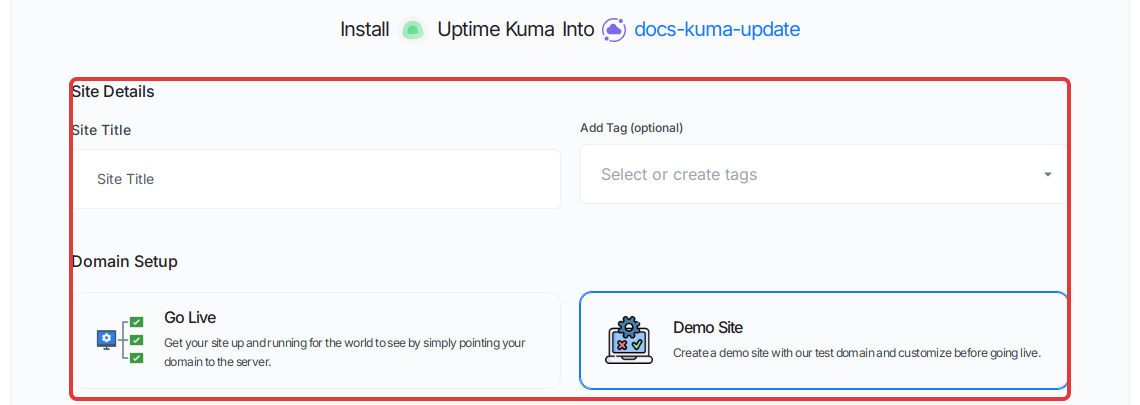
Want to try it before the domain is ready? Pick Demo Site, then later open Domain on the site and click Go Live to move it to status.example.com, as the Uptime Kuma deploy guide shows.
Step 2: Create Your Admin Account and First Monitor
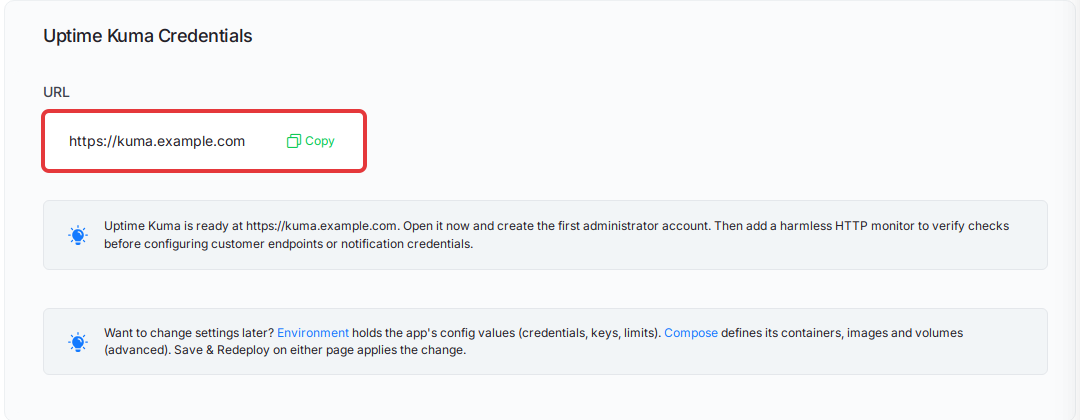
Open the site in xCloud. Site Overview shows Uptime Kuma Credentials with your site’s URL. Open it right away and create the first administrator account, because xCloud does not create one for you.
Add one simple HTTP monitor for your homepage and wait for a green check. A status page with no working monitors shows nothing useful.
Since Uptime Kuma sits behind xCloud’s web server, also open Settings → Reverse Proxy and set Trust Proxy to Yes under HTTP Headers. The project’s reverse proxy guide recommends this when Uptime Kuma runs fully behind a proxy.
Step 3: Create the Status Page
In the Uptime Kuma dashboard, click Status Pages in the top menu, then New Status Page.
Enter a Name (what visitors see, such as “Example Status”) and a Slug (part of the URL, such as example). Click Next.
A few naming tips:
- Keep the slug short and lowercase. It appears in every shared link.
- One page per audience. You can make one page per client.
Step 4: Add Monitors and Page Details
The page opens ready to edit. Click Add a monitor and choose each service to show. Each one appears as a live status row with recent history.
Add a short Description at the top, such as “Live status of our website and app”, and Footer Text with your support contact. Click Save.
Your page is now live at https://status.example.com/status/example. This guide keeps that /status/example address and leaves the Domain Names field empty. Open it in a private browser window to see exactly what a visitor sees.
Step 5: Share the Status Page Link
Share the full page address, https://status.example.com/status/example, wherever customers look for help: your website footer, your help center and your support replies. Because Uptime Kuma runs on its own status subdomain, the link stays on your domain.
If the page does not open for visitors, check these in order:
- DNS: the A record points at the server running Uptime Kuma.
- Slug spelling: the link uses the exact slug from Step 3.
- SSL: the site shows a valid certificate in xCloud.
Step 6: Plan Maintenance So the Page Tells the Truth
A status page that turns red during planned work causes the same tickets as a real outage. Uptime Kuma’s maintenance feature fixes that.
Open the profile menu at the top right, click Maintenance, then Schedule Maintenance. Fill in a Title, a Description, the Affected Monitors and the Status Pages to show it on. Then choose a strategy, such as Single Maintenance Window or a recurring one.
During the window, alerts for those monitors pause and the affected rows show as maintenance (blue) on the status page.
| Maintenance strategy | Use it for |
|---|---|
| Active/Inactive Manually | Ad hoc work you start and stop yourself |
| Single Maintenance Window | One planned upgrade or migration |
| Recurring - Interval | Work that repeats every set number of days |
| Recurring - Day of Week | A weekly patch window |
| Recurring - Day of Month | Monthly jobs |
| Cron Expression | Anything a cron schedule describes |
Honest Limits: What a Status Page Does Not Do
- It is public. Uptime Kuma’s docs describe status pages as meant for public users. Never add a monitor whose name reveals an internal host.
- It lags a little. Results are cached and refresh every 5 minutes by default (you can change this in the status page settings), so a short blip may never reach the page.
- It shares your server’s fate. If the server running Uptime Kuma goes down, the status page goes with it. Run it on a different server from the sites it watches.
- No subfolders. It cannot live at example.com/status on your main website.
- Undo is simple. Delete the page and your monitors keep running.
Running Your Status Page on xCloud
On xCloud, Uptime Kuma installs from One Click Apps in Docker on an Nginx server, with free SSL on your domain. Your monitors, history and status pages stay in their own storage on the server.
What xCloud does today:
- Installs Uptime Kuma 2.5.7 with free SSL on your domain.
- Lets you run Backup Now or scheduled backups that include your status pages; see backing up Docker apps.
- Lets you change the version yourself in Environment; see updating Uptime Kuma. Newer releases may be available; you choose when to update.
What it does not do:
- One domain per Docker site, so no second status domain on the same install.
- No automatic Uptime Kuma updates. You choose when to move to a new version.
- Plans vary. See pricing for which plans include One Click Apps.
Prefer a different tool? Gatus also offers status pages as a one-click app. For uptime basics, read what uptime means and how it is measured.
👉 Deploy Uptime Kuma on xCloud and serve your status page from its own domain today.
Publish Your Status Page Before the Next Outage
A status page is only useful if it is live before something breaks. Install Uptime Kuma on its own status subdomain, build the page from the monitors that matter to customers and share its link.
This week, add the link to your website footer and support replies, and schedule your next maintenance window in Uptime Kuma so the page stays accurate.
If you have found this blog helpful, feel free to subscribe to our blogs for valuable tutorials, guides, knowledge, and tips on web hosting and server management. You can also join our Facebook community to share insights and engage in discussions.
Frequently Asked Questions
Is an Uptime Kuma status page free?
Yes. Uptime Kuma is free and open source, and status pages are part of it. You only pay for the server it runs on. On xCloud, see the pricing page for which plans include One Click Apps.
Can I put my Uptime Kuma status page on a custom domain?
Yes. On xCloud, install Uptime Kuma on the domain you want, such as status.example.com, because a Docker Uptime Kuma site holds one domain. Your page is then at status.example.com/status/your-slug. This guide uses that /status/your-slug address; it does not cover the Domain Names field in the status page settings.
Can I make an Uptime Kuma status page private?
Not in the way a login page is private. Uptime Kuma’s own docs describe status pages as meant for public users. Add only the monitors you are happy for anyone to see.
Why does my status page not update straight away?
Uptime Kuma caches status page results and refreshes them every 5 minutes by default (you can change this in the status page settings). Your dashboard shows a failure at once, while the public page can lag by a few minutes.
Can I serve the status page under a folder like example.com/status-page?
No. Uptime Kuma does not support running under a subfolder. Use a domain or subdomain, such as status.example.com.
How many status pages can one Uptime Kuma run?
Uptime Kuma supports multiple status pages, each with its own slug and its own set of monitors. One install can serve a separate page for each client.