


The quickest Immich Docker setup uses the two files Immich publishes with every release: a docker-compose.yml and an .env file. Together they start four containers (server, machine learning, PostgreSQL and Valkey) on a Linux server with at least 6 GB of RAM. Add NGINX and an SSL certificate in front, and your phone can back up to it.
That is the part most tutorials cover. The harder part comes later: a backup that holds both the photos and the database, upgrades that cannot be rolled back, and a disk that fills faster than you planned.
This guide covers both paths. First the Docker Compose way on any Ubuntu server, step by step, then the one-click way on xCloud, with what each one leaves on your plate. If containers are new to you, start with what Docker Compose is.
TL;DR
- Immich is a free, open-source (AGPL-3.0) photo and video library with automatic phone backup, albums, sharing, face recognition and search by what is in the picture.
- Requirements: a 64-bit Linux server, 6 GB RAM and 2 cores minimum (8 GB and 4 cores recommended), and local SSD storage for the database.
- Docker path: download Immich’s
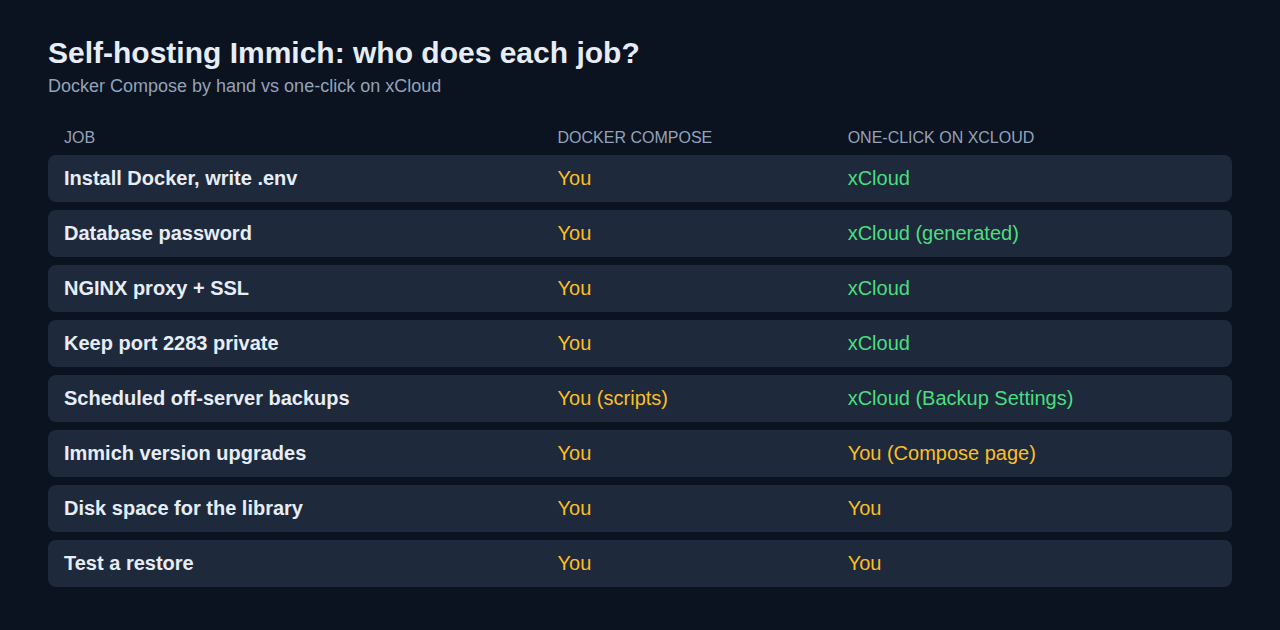
docker-compose.ymland.env, set the folders and password, rundocker compose up -d, then put NGINX and HTTPS in front of port 2283. - One-click path: pick Immich in xCloud’s One Click Apps on an NGINX server. There are no app fields to fill in; xCloud writes the files, the proxy and the certificate.
- Either way, you still own upgrades, storage planning and testing a restore.
- Database dumps are not photo backups. Back up the media folder and the database together.
What the One-Click Install Actually Runs
Here is what xCloud’s Immich one-click app sets up, read from xCloud’s Immich template and catalog entry (template version 1.0.1, as of November 2026):
| Part | What it does |
|---|---|
| Immich version | Pinned to Immich v3.3.5, so a restart never jumps to a newer release |
| Immich server | The web app, the mobile app connection, uploads and background work such as thumbnails |
| Machine learning | Face recognition and smart search. The template does not set up graphics card acceleration; this work runs on the CPU |
| Database | PostgreSQL for Immich’s data, with a random 32-character password that xCloud creates for you |
| Queue and cache | Valkey |
| Web server | NGINX with HTTPS for your domain, the only way in: Immich is not reachable by server IP. Immich needs an NGINX server on xCloud |
| Upload limit | Up to 50 GB per upload, so long videos go through |
| Your data | Docker volumes for your library and the database. Their names are managed by the template |
| Safety check | xCloud checks the server for at least 6 GB of RAM, 2 CPU cores and 20 GB of free disk and will not install Immich on a smaller server; that server shows as unavailable |
| Install form | No Immich fields to fill in |
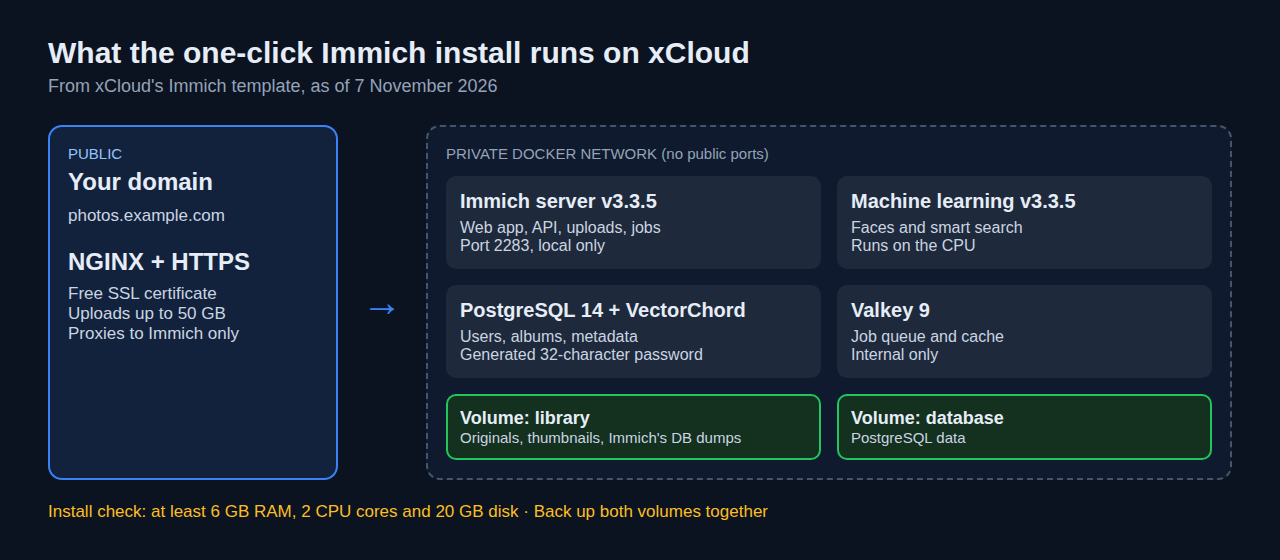
One line matters later: the requirements check is only a floor. Your library needs far more disk, which we cover in sizing.
What Immich Is and When Self-Hosting It Makes Sense
Immich is a self-hosted alternative to Google Photos. You get a web timeline, albums, shared links, a map, face grouping and search like “dog on a beach”, plus mobile apps for Android and iOS that back up your camera roll.
Self-hosting makes sense when your library has outgrown a free cloud plan, or when you would rather keep family photos on a server you choose. Households use it to share one archive. Photographers use it to keep originals in full quality.
The honest catch: you become the administrator, and these are photos you cannot take again. If nobody will check backups, a hosted photo service is the safer choice.
Server Requirements for Immich (RAM, CPU, Disk)
The table comes from Immich’s requirements page, checked on 7 November 2026.
| Item | Immich’s requirement or advice |
|---|---|
| Operating system | 64-bit Linux recommended (Ubuntu, Debian); Windows and macOS only through Docker Desktop |
| RAM | 6 GB minimum, 8 GB recommended (4 GB works only with machine learning turned off) |
| CPU | 2 cores minimum, 4 recommended; on x86 servers, Immich v3 machine learning needs an x86-64-v2 CPU |
| Docker | Docker Engine with the docker compose command; the old docker-compose v1 is no longer supported |
| Database disk | Local SSD, never a network share |
| Media disk | Your whole library, plus about 10–20% for thumbnails and converted videos |
Rule of thumb: plan disk first. A 300 GB phone library needs roughly 330 to 360 GB for Immich’s copies, plus room for database dumps and a year of new photos. CPU matters most during the first import, when every photo gets thumbnails and face detection.
Option 1: Self-Host Immich With Docker Compose
This path follows Immich’s official Docker Compose guide on a fresh Ubuntu server. Use the files Immich publishes rather than a copy from a blog: they change between releases.
Step 1: Prepare the server and domain
Point an A record for a subdomain (for example photos.example.com) at SERVER_IP. Immich must sit at the root of a domain or subdomain; it does not work under a path such as /photos.
Install Docker Engine from Docker’s own apt repository, not Ubuntu’s older docker.io package. Then open only ports 22, 80 and 443 in your firewall. Our VPS security guide covers SSH keys and firewall basics.
Step 2: Download the Compose and .env files
mkdir ./immich-app
cd ./immich-app
wget -O docker-compose.yml https://github.com/immich-app/immich/releases/latest/download/docker-compose.yml
wget -O .env https://github.com/immich-app/immich/releases/latest/download/example.env
Step 3: Edit the .env file
Open .env and change these lines:
| Variable | Default | What to set |
|---|---|---|
UPLOAD_LOCATION |
./library |
A folder on the disk that will hold your photos, with plenty of free space |
DB_DATA_LOCATION |
./postgres |
A folder on local SSD, never a network share |
IMMICH_VERSION |
v3 |
Pin an exact release tag so a restart never jumps versions |
DB_PASSWORD |
postgres |
A long random password, letters and numbers only |
TZ |
commented out | Uncomment it and set your time zone, such as Europe/Berlin |
Leave DB_USERNAME and DB_DATABASE_NAME as they are.
Step 4: Start Immich
docker compose up -dThe command is docker compose, with a space. If you see unknown shorthand flag: 'd', you have the old Docker package; reinstall Docker from Docker’s repository. Immich now listens on port 2283. Immich’s default file lets anyone reach port 2283 by your server’s IP address, even past your firewall. Open docker-compose.yml, find the ports line '2283:2283' under immich-server, change it to '127.0.0.1:2283:2283', then run docker compose up -d again, so Immich is only reachable through NGINX and your domain.
Step 5: Put NGINX and SSL in front
Install NGINX and Certbot, then create a server block for your subdomain. These settings come from the reverse proxy page in Immich’s documentation:
server {
    listen 80;
    server_name photos.example.com;

    client_max_body_size 50000M;
    proxy_request_buffering off;
    client_body_buffer_size 1024k;
    proxy_read_timeout 600s;
    proxy_send_timeout 600s;
    send_timeout 600s;

    location / {
        proxy_pass http://127.0.0.1:2283;
        proxy_set_header Host $host;
        proxy_set_header X-Real-IP $remote_addr;
        proxy_set_header X-Forwarded-For $proxy_add_x_forwarded_for;
        proxy_set_header X-Forwarded-Proto $scheme;
        proxy_http_version 1.1;
        proxy_set_header Upgrade $http_upgrade;
        proxy_set_header Connection "upgrade";
        proxy_redirect off;
    }
}
Run sudo certbot --nginx -d photos.example.com to issue the certificate and switch the block to HTTPS. The large body size and long timeouts stop big video uploads from failing halfway.
Step 6: Create the admin account and pair your phone
Open https://photos.example.com and choose Getting Started. The first account you create becomes the administrator, so do this before you share the address.
Then install the Immich mobile app, enter the same HTTPS address as the server, sign in and turn on backup for the albums you want. Upload one test photo and check that it shows in the web timeline before you trust it with the whole camera roll.
These steps follow Immich’s documentation as of 7 November 2026. Immich changes its files between releases, so check each step against those pages for the version you install.
Option 2: One-Click Immich on xCloud
The one-click path gives you the stack from the table above without writing any of it. The full walkthrough with screenshots is in 👉 How to Deploy Immich with xCloud One-Click Apps.
Step 1: Pick an NGINX server with enough room
Click New Server and choose an xCloud managed server or connect your own provider. Keep NGINX as the web server: Docker apps run on NGINX servers, and xCloud installs Docker with the first container app, as described in enabling Docker on an NGINX server. xCloud needs at least 6 GB of RAM, 2 cores and 20 GB of free disk for Immich; Immich itself recommends 8 GB of RAM and 4 cores.
Step 2: Choose Immich in One Click Apps
Go to Sites → New Site → One-Click Apps and select Immich. Pick your server and click Continue. If a server is listed as unavailable, expand that group to see why (for example, not enough RAM).
Step 3: Choose Demo Site or Go Live, then click Next
Enter a Site Title. Choose Demo Site to test on a temporary address, or Go Live with your own subdomain. There are no Immich settings to fill in. Click Next, and xCloud sets up the Compose-based app, starts Immich and its database and completes HTTPS setup.
Step 4: Create the first account and connect the app
Open the HTTPS address xCloud shows and choose Getting Started. As with the manual path, the first person to register becomes the administrator. Then point the mobile app at the same address and turn on backup.
After Install: Backups, Updates and Security
This is the part that decides whether self-hosting Immich works long term. The same three tasks apply on either path.
Backups
Immich makes its own database dumps every day at 2:00 AM and keeps the last 14, in the backups folder inside your upload location. Immich’s backup and restore guide is clear that those dumps hold metadata only, not photos or videos. A restore needs the media folder and a matching database copy.
On a manual install, copy the whole upload folder and a recent database dump to another machine or cloud storage. If you cannot stop Immich during the copy, back up the database first and the files second. Our list of website backup mistakes covers the usual traps.
On xCloud, open the site and go to Backup → Previous Backups to take a backup with Backup Now, or schedule them in Backup → Backup Settings (every 12 hours, daily, weekly or monthly), with up to two remote destinations. xCloud briefly stops the app, saves its data volumes with the Compose and .env files, then starts it again. 👉 See how to back up and restore Docker apps.
Updates
Immich changes its database on the first start of a new version, and that change may not be reversible. Treat every upgrade as one-way: take a backup you have checked, read each release note between your version and the new one, then upgrade.
On a manual install, change IMMICH_VERSION in .env, then run docker compose pull and docker compose up -d. On xCloud, App Actions → Update pulls the images the app’s Compose file names and recreates the containers; your data volumes are kept. Because the template pins Immich to a fixed version, App Actions → Update pulls that same version again; to move to a newer Immich, change the image tag on the Compose page.
The app’s Compose page lets you edit that file directly, but it is an advanced tool, and our Immich deploy guide advises against changing template-managed Compose files unless you must. Only the team owner, or a member a team admin has given Compose access, sees the Compose page. If you do edit it, copy the current file to a safe place first, because xCloud keeps no earlier versions, then click Save & Redeploy. See updating a One Click App and editing its Compose file. Never remove or rename the data volumes.
Security
Create the admin account straight after install, with a strong password, because until then anyone who finds the address can claim it. Add family members as users from Immich’s administration settings. Keep Immich behind HTTPS only, and on a manual install, keep Immich reachable only through your domain, not by server IP and port 2283.
What the One-Click Install Does Not Do
Here is the honest list, read from our docs:
- It does not move you to a newer Immich. Update pulls the pinned version again; a newer release means changing the image tag on the Compose page, after a backup and a read of Immich’s release notes.
- The template does not set up graphics card acceleration. Face recognition, smart search and video conversion run on the CPU.
- Disk is still yours to plan. The requirements check is a floor. Watch free space as the library grows.
- It needs an NGINX server. OpenLiteSpeed servers cannot run Docker apps.
To undo the install, delete the site from xCloud. Take a backup first if you want to keep any photos.
Docker Compose vs One-Click: Which to Choose
Immich itself is free. What you pay for is where it runs and who looks after it.
| Docker Compose by hand | One-click on xCloud | |
|---|---|---|
| Software cost | Free (AGPL-3.0) | Free (AGPL-3.0) |
| Server | You rent and set it up | xCloud server or your own |
| Setup | Docker, .env, NGINX, Certbot, firewall |
A short form, no Immich fields |
| Port 2283 | Open by default; you lock it down | Reachable only through NGINX and your domain |
| Backups | Your own scripts, plus Immich’s dumps | Scheduled Docker app backups, up to two remote copies, plus Immich’s dumps |
| Upgrades | Edit .env, pull, restart |
Change the pinned image tag on the Compose page |
Choose Docker Compose if you want full control of every file, for example to add graphics card acceleration with Immich’s extra files, or to run on a home server. Choose one-click if you want the proxy, certificate and backups set up for you and would rather spend that time sorting albums. Your time is the hidden cost; our guide to self-managed vs managed hosting goes deeper on that choice.
Get Your Photo Library Off the Cloud This Week
If you like owning every layer, the Docker Compose steps above are a solid start: pin the version, put NGINX and HTTPS in front, keep port 2283 closed and restore a backup once before you delete anything from your phone.
If you would rather skip the plumbing, deploy Immich from xCloud Immich hosting and spend that hour on your backup plan instead. Compare server sizes on the pricing page, or browse other apps in One Click Apps and on Docker hosting. For more apps set up the same way, see our guides to self-hosting Nextcloud and self-hosting Vaultwarden.
If you have found this blog helpful, feel free to subscribe to our blogs for valuable tutorials, guides, knowledge, and tips on web hosting and server management. You can also join our Facebook community to share insights and engage in discussions.
Frequently Asked Questions
How much RAM does Immich need in Docker?
Immich’s requirements page lists 6 GB of RAM and 2 CPU cores as the minimum, with 8 GB and 4 cores recommended. Machine learning and video processing are the heavy parts, so a large first import needs the most headroom. On xCloud, a server below Immich’s minimum shows as unavailable when you pick a server.
Can I run Immich without Docker?
Docker Compose is the install method Immich documents and supports. Immich also says the old docker-compose v1 command is no longer supported, so use the docker compose plugin from Docker’s own repository. The xCloud one-click install runs on Docker too.
Is the Immich database backup enough to restore my photos?
No. Immich’s automatic database dumps hold metadata such as albums and users, not the photos or videos. Back up the upload folder and the database together and keep a copy off the server.
Does xCloud update Immich for me?
No. The template pins Immich to a fixed version, so App Actions → Update pulls that same version again and recreates the containers while keeping your data volumes. To move to a newer Immich, change the image tag on the Compose page. Back up first and read Immich’s release notes before you update, because Immich does not support going back to an older version.
Can I put Immich under a path like example.com/photos?
No. Immich’s reverse proxy guide says it cannot be served on a sub-path. Give it its own domain or subdomain, such as photos.example.com.
Last updated November 11, 2026
← All articles