

How to Deploy Immich with xCloud One-Click Apps
Updated September 27, 2026 · 13 min read
Deploy Immich from Sites → New Site → One-Click Apps → Immich → Docker + Nginx server → Demo Site or Go Live → Next. xCloud provides the current Immich template, so you do not need to author a custom docker-compose.yml for this flow. The guide is for xCloud users who want a private photo and video library with mobile backup, search, albums, and sharing on a server they control.
Why use xCloud for Immich hosting?
xCloud turns the Immich Docker stack into a guided site-creation flow while keeping the workload on a dedicated or connected server.
| Need | How xCloud handles it |
|---|---|
| Correct deployment route | Immich appears as a named app in the One-Click Apps catalog. |
| Compatible infrastructure | The catalog requires a Docker + Nginx server and shows whether an existing server meets the template requirements. |
| Domain routing | You can start with a temporary Demo Site or attach your own domain with Go Live. |
| Reverse proxy | xCloud routes the web service through Nginx instead of asking you to expose Immich’s application port directly. |
| Repeatable configuration | The template supplies the Compose-based deployment definition. You do not write your own Compose file in this flow. |
Prerequisites
| Requirement | Recommendation | Why it matters |
|---|---|---|
| xCloud access | An active account with permission to create sites | You need site-creation access in the server’s owning team. |
| Server stack | Docker + Nginx | The current Immich template accepts this xCloud stack. |
| Memory | 8 GB RAM or more | The xCloud catalog recommends 8 GB. Upstream Immich also recommends 8 GB for normal operation. |
| CPU | At least 4 cores for a comfortable starting point | Immich performs thumbnail generation, video processing, and machine-learning work. Upstream lists 2 cores as a minimum and 4 as recommended. |
| Storage | Local SSD capacity for the database plus enough durable capacity for the media library | Photos, videos, thumbnails, and transcoded media can grow quickly. Upstream advises keeping PostgreSQL data on local SSD, not a network share. |
| Domain access | DNS control if you choose Go Live | You must point the hostname to the server and allow xCloud to complete HTTPS setup. |
| Backup destination | Storage separate from the application server | A useful Immich backup must include both the database and uploaded media. |
How the Immich template is structured
The current xCloud catalog identifies Immich as a Docker Compose web app, proxies container port 2283, requires the docker_nginx stack, recommends 8 GB RAM, and asks for no app-specific input fields during site creation. The table below describes the logical Immich topology. Exact internal container and volume names are template-managed and can change.
| Component | Purpose | Operational note |
|---|---|---|
| Immich web service | Serves the web interface and API | xCloud sends public traffic through Nginx. Do not expose port 2283 directly to the internet. |
| Machine-learning service | Supports face recognition and image-content search | Initial indexing can use substantial CPU and memory. |
| PostgreSQL | Stores users, albums, metadata, and file paths | Keep database data on a local Unix-compatible filesystem, preferably SSD. The database is required for recovery. |
| Valkey | Supports caching and background work | Treat it as an internal service rather than a public endpoint. |
| Media storage | Holds originals, thumbnails, profile images, and transcoded video | Size the server for library growth and back up the media separately from database dumps. |
Deploy Immich
Step 1: Open the app catalog
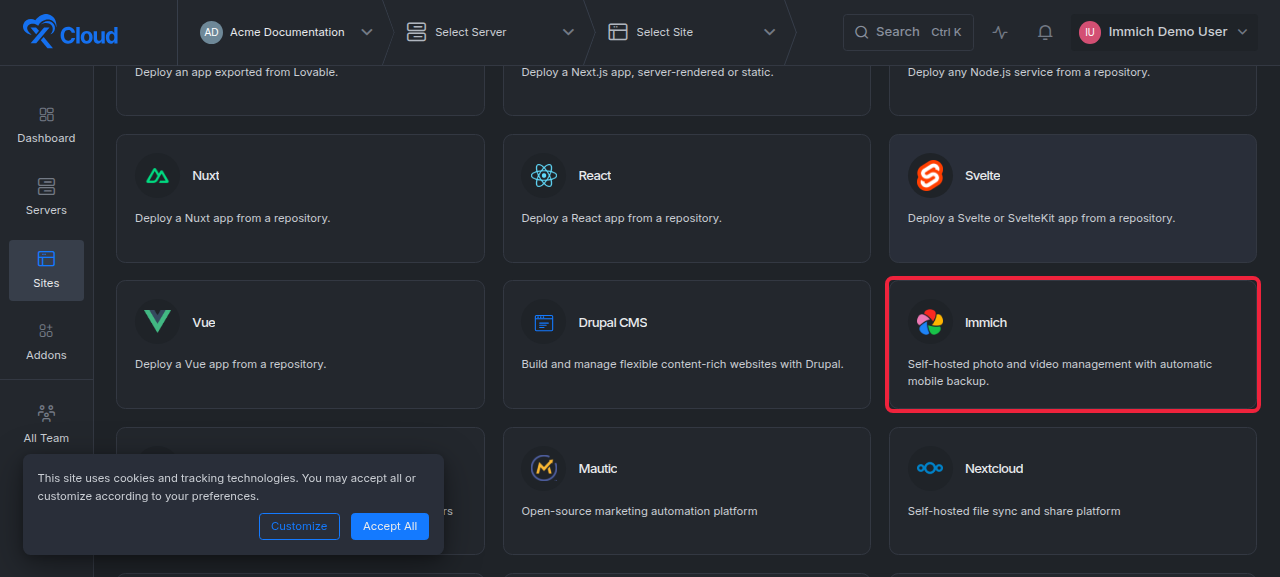
In xCloud, select Sites → New Site, then choose One-Click Apps.
Expected result: The catalog lists supported applications, including an Immich card.
Step 2: Select Immich
Search for Immich, then select its card. Confirm that the app description identifies self-hosted photo and video management with automatic mobile backup.
Expected result: xCloud shows that Immich runs on Docker + Nginx and recommends 8 GB RAM.
Step 3: Choose a compatible server
Select an existing Docker + Nginx server that meets the displayed resource requirements. If no compatible server appears, choose the new-server option and provision a supported server first.
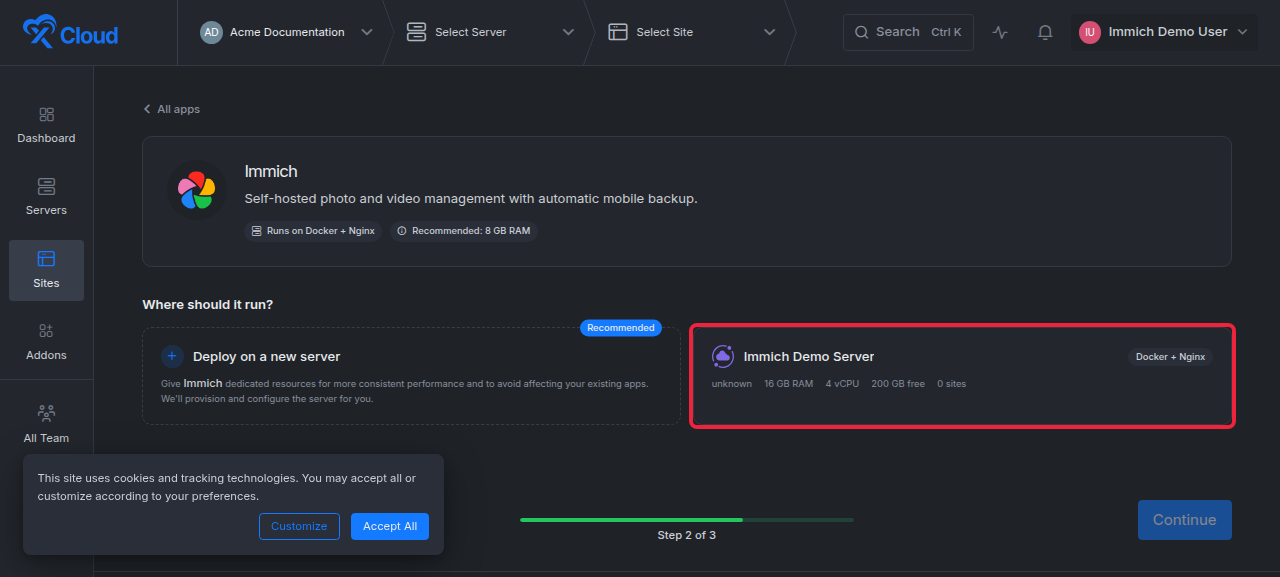
Expected result: The selected server card shows its stack, RAM, CPU, free disk space, and current site count. The Continue button becomes available.
Step 4: Continue to the Immich site form
Select Continue. xCloud opens the single-page Immich installation form for the server you chose.
Expected result: The page heading names both Immich and the selected server.
Step 5: Enter the site details
Enter a descriptive Site Title. Add tags only if your team uses them to organize sites.
Expected result: The title identifies this Immich installation in the xCloud dashboard.
Step 6: Choose Demo Site or Go Live
Choose Demo Site for a temporary xCloud test address, or Go Live when you already control the final domain and DNS.
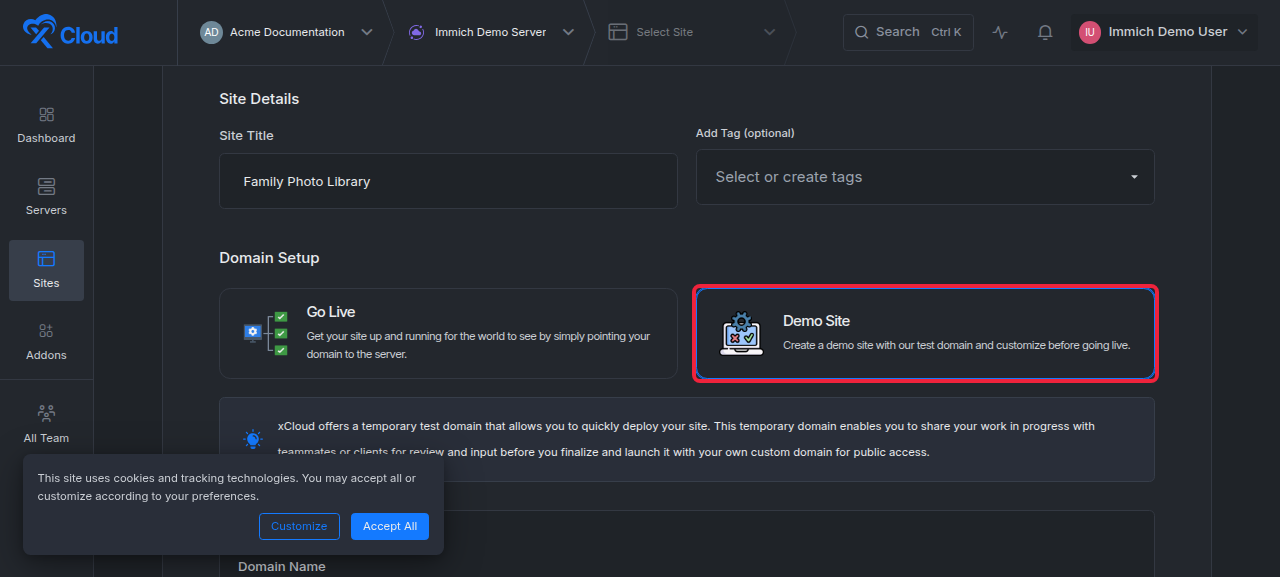
Expected result: Demo Site shows a temporary-address field. Go Live asks for the domain information required for public routing and HTTPS.
Step 7: Review the template-managed settings
Confirm the server, title, and domain choice. The current Immich template does not show user-configurable app fields in this step. xCloud manages the template definition and its generated deployment values.
Expected result: The form is ready without a custom repository, manual Nginx configuration, or hand-authored docker-compose.yml.
Step 8: Start the installation
Select Next to submit the site.
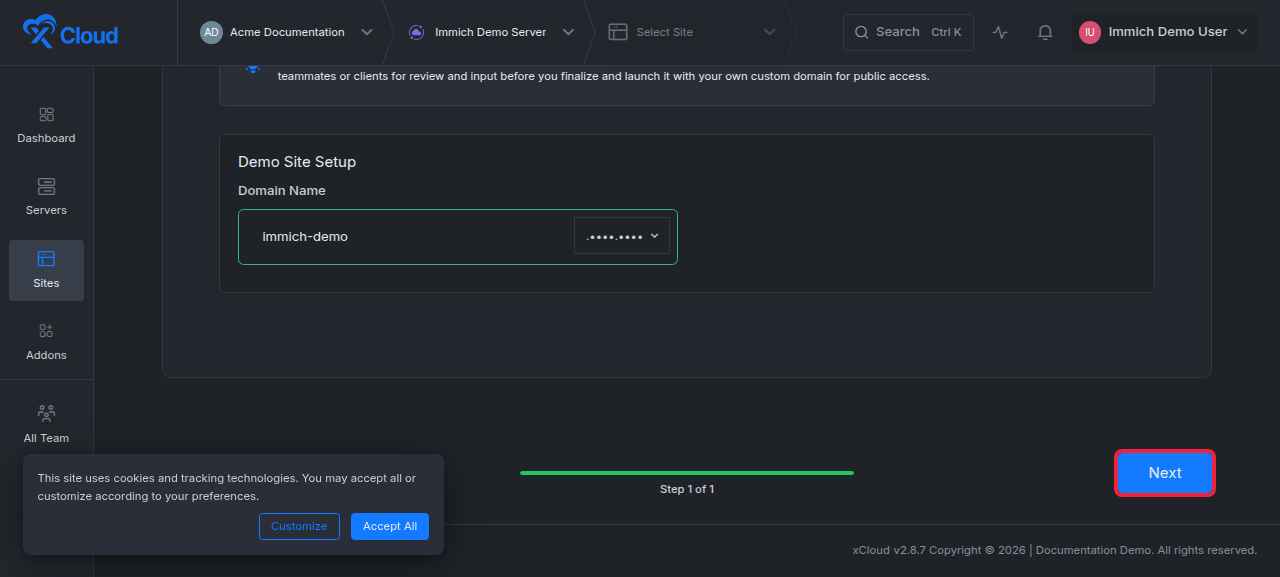
Expected result: xCloud creates the site record and starts the template deployment on the selected server. Wait for the site to become available before opening Immich.
Complete the first-run setup
Open the site only after xCloud reports that deployment has finished. Immich uses its first registered account as the initial administrator, so complete this step from a trusted device.
| Setup area | What to do | Success check |
|---|---|---|
| Administrator | Register the first Immich account with a unique password | You can sign in and open Administration. |
| Mobile app | Install the official Immich app and enter the HTTPS server URL | The app signs in and shows the server library. |
| Backup albums | Choose the phone albums Immich may upload | A test photo appears in the web library after synchronization. |
| Storage template | Review Immich’s storage-template behavior before enabling or changing it | New assets follow the expected library structure. |
| External access | Use the xCloud-managed HTTPS hostname | The browser reports a valid certificate and no mixed-content warning. |
Operate Immich safely
Protect public access
Use the HTTPS hostname managed through xCloud. Upstream Immich warns against forwarding port 2283 directly to the internet because plain HTTP can expose credentials and media traffic. Immich must run at the root of a domain or subdomain, not below a path such as /immich.
Use a strong administrator password, enable available Immich authentication protections, and keep public sharing links limited to the intended audience. HTTPS protects data in transit, but it does not replace account security or prompt updates.
Plan storage
Monitor the filesystem that holds uploads and the local filesystem that holds PostgreSQL. Upstream Immich estimates that thumbnails and transcoded video can add roughly 10 to 20 percent to the size of the source library. Leave working space for imports, background processing, and updates rather than filling the disk to its limit.
Do not manually rename, move, or delete files inside Immich-managed storage. Immich stores file paths and metadata in PostgreSQL, so filesystem-only changes can break the library.
Back up both data layers
Follow a 3-2-1 strategy: keep three copies, on two storage types, with one copy off-site. Back up both the upload location and PostgreSQL. Immich’s automatic database dumps contain metadata, not the original photos and videos, and therefore are not a complete backup by themselves.
Upstream Immich currently creates database dumps under the upload location by default, daily at 02:00, and retains the latest 14. Verify that behavior in your deployed version. For the most consistent backup, stop the Immich server service during the copy. If that is not possible, back up the database first and the filesystem second.
Update deliberately
Read the Immich release notes and breaking-change notices before an update. Upstream recommends updating mobile clients before the server, does not support downgrades, and does not backport fixes to older releases. Create and verify a backup before any database-extension migration or major-version change.
The xCloud manifest currently reports the Immich app version as latest, but that value does not prove that every installation updates automatically. Use the update controls and release process presented by your xCloud site, and avoid replacing template-managed Compose files manually.
xCloud vs Railway vs Coolify for Immich
Each platform can reduce setup work, but they assign infrastructure responsibility differently.
| Platform | Best for | Deployment model | Operational tradeoff |
|---|---|---|---|
| xCloud | Users who want a guided Immich One-Click App on a dedicated or connected server | Select Immich, choose a compatible Docker + Nginx server, choose Demo Site or Go Live, then submit | You retain server-capacity and data-protection decisions. Exact update and backup behavior must be verified for the deployed site. |
| Railway | Users who prefer a hosted platform and a marketplace template | A community marketplace template can create a multi-service Railway project with Immich Server, machine learning, PostgreSQL, Valkey, and persistent volumes | Current Immich templates may be community-authored. Review the template owner, storage, costs, and update path before relying on it. |
| Coolify | Operators who want a self-hostable control plane on servers they manage | Choose the Immich Docker Compose service from Create New Resource | The operator remains responsible for the server, persistent storage, backups, and control-plane maintenance. |
Verify the deployment
Confirm the complete workflow with these checks:
- xCloud shows the Immich site on the intended Docker + Nginx server.
- The public URL opens over HTTPS without a certificate warning.
- You can create the first administrator and sign in again.
- The mobile app connects to the same HTTPS URL.
- A test photo uploads and appears in the web library.
- Search, thumbnail generation, and background processing complete.
- A database dump exists, and a separate backup includes the uploaded media.
- Your restore procedure can recover both the database and media into an isolated test location.
Troubleshooting
| Symptom | Likely cause | Fix |
|---|---|---|
| No existing server can run Immich | The server uses another stack, monitoring has not reported resources, or it has less than the required RAM | Use a Docker + Nginx server, wait for fresh monitoring data, or provision a server with at least the displayed capacity. |
| Continue stays disabled | No compatible server is selected | Select an eligible server card. Expand an unavailable-server group to read the exact reason. |
| The site form cannot load template configuration | The authenticated background request failed or the template is temporarily unavailable | Reload the page, select Immich again, and retry. If the problem persists, contact xCloud support with the site and server context, but never include credentials. |
| Immich opens without HTTPS | DNS has not propagated or the final domain does not point to the server | Correct the DNS record, wait for propagation, then let xCloud finish HTTPS setup. Do not expose port 2283 as a workaround. |
| Uploads fail or processing stalls | The disk is full, memory is constrained, or background work is saturated | Check free storage, RAM, CPU, and xCloud site logs. Add capacity before retrying large imports. |
| Mobile backup cannot connect | The app uses the wrong URL, a path-based URL, or an invalid certificate | Enter the root HTTPS hostname. Do not append /immich, and confirm the browser trusts the certificate. |
| A database dump restores but photos are missing | Only PostgreSQL metadata was backed up | Restore the upload-location backup as well as the matching database backup. |
| The library breaks after moving files manually | Immich’s database still points to its managed paths | Restore the files to their managed locations. Use supported Immich import or storage features instead of manual file moves. |
Common mistakes
- Choosing an Nginx-only server: Immich requires the Docker + Nginx stack in the current xCloud catalog.
- Treating 8 GB as storage: The catalog recommendation refers to RAM. Media capacity is a separate requirement.
- Publishing port
2283: Use the xCloud-managed HTTPS route instead of exposing the application port directly. - Backing up only database dumps: The dumps contain metadata, not the photo and video files.
- Using a path such as
example.com/immich: Immich expects the root of a domain or subdomain. - Editing template-managed Compose files: Manual changes can drift from xCloud’s template and complicate later operations.
- Updating without reading release notes: Immich can include major-version and database-extension changes that need preparation.
Frequently asked questions
Do I need a custom docker-compose.yml to deploy Immich on xCloud?
No. The xCloud One-Click Apps flow supplies the template. Choose Immich, select a compatible Docker + Nginx server, configure the site and domain, then select Next.
Can I deploy Immich on an existing xCloud server?
Yes, when xCloud marks that server as compatible. It must use Docker + Nginx and meet the Immich template’s resource requirements.
Should I choose Demo Site or Go Live?
Choose Demo Site when you want to evaluate the installation before changing DNS. Choose Go Live when you control the final domain and are ready to point it to the server.
Is an Immich database dump a complete backup?
No. A database dump contains metadata and paths, not the original photo and video files. Back up the upload location separately and keep it matched with the database backup.
Can I expose Immich directly on port 2283?
Do not expose port 2283 directly to the internet. Use the HTTPS domain routed through xCloud and Nginx. Upstream Immich explicitly warns that direct plain-HTTP exposure creates a man-in-the-middle risk.
Does xCloud automatically update every Immich installation?
Do not assume that from the catalog’s latest label. Check the update controls and status for your deployed site, read both xCloud and Immich release notes, and verify a backup before updating.
Next steps and related resources
- Immich hosting on xCloud, the plans and what is included
- How to use One-Click App Templates for App Actions, the Environment editor and events
- Back up and restore Docker apps for the xCloud side of the backup story
- Explore the One-Click Apps catalog
- Upstream: Immich mobile app and backup and restore
If Immich does not come up after deployment, feel free to reach out to our support team with the site’s failed event output.