


A Gitea Docker setup takes one Compose file, one command and an install wizard. You can follow Gitea’s official Docker setup on any Linux server, or deploy the one-click Gitea app on xCloud, which adds the domain, SSL and first admin for you. Either way, backups and upgrades stay your call.
Gitea is a lightweight, MIT-licensed Git forge: repositories, pull requests, issues, a wiki and a package registry, in one Go application. Teams self-host it when their code and the list of people who can see it should sit on a server they control.
This guide covers both paths step by step. If containers are new to you, read what Docker Compose is first. Then we cover the part most tutorials skip: what you still own after the first git push.
TL;DR
Short on time? Here is the whole guide in a few lines:
- Requirements: a Linux server with Docker. Gitea’s docs say 2 CPU cores and 1 GB of RAM is typically enough for small teams. The xCloud template asks for 1 GB of RAM, 1 core and 4 GB of disk.
- Docker way: save Gitea’s
docker-compose.yml, rundocker compose up -d, then finish the wizard athttp://server-ip:3000. You add HTTPS and a reverse proxy yourself. - One-click way: in xCloud, go to Sites → New Site → One-Click Apps, pick Gitea, fill in the admin username, email and password, and click Create.
- What differs: the xCloud app has no Git over SSH and no public sign-up. You clone over HTTPS, and the admin creates every account.
- After install: turn on backups, add mail settings if you want email, and plan upgrades yourself. The one-click app is pinned to Gitea 1.27.3.
What the xCloud Gitea Template Actually Sets Up
Most Gitea tutorials stop at “the wizard is done”. We read the xCloud Gitea template line by line (its docker-compose.yml, .env file, manifest and post-install script) so you can see exactly what a one-click install changes from Gitea’s defaults.
| Setting | What the template does | What it means for you |
|---|---|---|
| Image | gitea/gitea:1.27.3, pinned |
Your install stays on that version until you change it |
| Database | SQLite at /data/gitea/gitea.db |
No database server to run; fine for small teams |
| Web access | Port 3000 bound to 127.0.0.1, behind Nginx |
Only reachable through your domain, not by server IP and port |
| Address | ROOT_URL set to https://your-domain/ |
Clone links in the UI use your domain |
| SSH | DISABLE_SSH=true, START_SSH_SERVER=false |
Clone and push over HTTPS only |
| Sign-up | DISABLE_REGISTRATION=true |
Strangers can’t create accounts; the admin adds users |
| Install wizard | INSTALL_LOCK=true |
The public setup page never appears |
| First admin | Created after a health check passes | You sign in straight away with the form’s credentials |
| Storage | One volume, gitea_data, mounted at /data |
Back up this one volume |
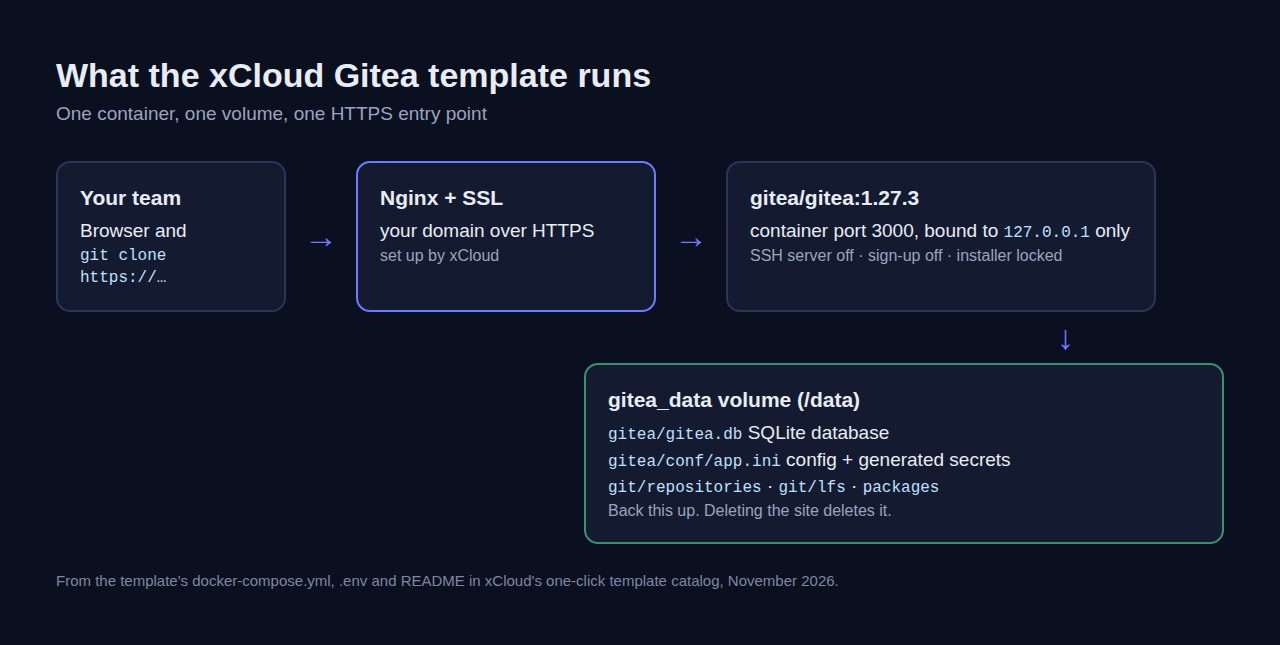
If you only remember one line: the template closes the doors a fresh Gitea leaves open (the public installer, open sign-up and a raw port on the server IP), and it gives up SSH cloning to do it simply.
What You Need to Self-Host Gitea
Gitea is light. The system requirements in its docs say a Raspberry Pi 3 can run it for small workloads, and that “2 CPU cores and 1GB RAM is typically sufficient for small teams/projects.”
| Requirement | Gitea docs | xCloud Gitea template |
|---|---|---|
| CPU | 2 cores typical for small teams | At least 1 core |
| Memory | 1 GB typical for small teams | At least 1024 MB |
| Disk | Not stated | At least 4 GB |
| Database | SQLite, MySQL, PostgreSQL and others | SQLite |
| Ports | 3000 (web) and 222 (SSH) in the example | HTTPS on your domain only |
| Server stack | Any Linux server with Docker | An NGINX server in xCloud |
Treat these as a starting point rather than a strict rule. Repositories, Git LFS files and packages all live on disk, so size storage for where your team will be in a year.
Option 1: Self-Host Gitea With Docker Compose
This follows Gitea’s Docker install guide. It runs Gitea with the built-in SQLite database, which is the simplest setup.
Step 1: Prepare the server
Start with a Linux server that has Docker and Docker Compose installed. Point a DNS record for your Git domain (for example git.example.com) at the server.
If the server is new, lock it down first. Our guide to securing a VPS covers SSH keys, firewall rules and updates.
Step 2: Create the Compose file
Make a folder called gitea and save this as docker-compose.yml. It is the basic example from Gitea’s docs, with the image tag the docs showed in November 2026:
networks:
  gitea:
    external: false
services:
  server:
    image: docker.gitea.com/gitea:28.3.0
    container_name: gitea
    environment:
      - USER_UID=1000
      - USER_GID=1000
    restart: always
    networks:
      - gitea
    volumes:
      - ./gitea:/data
      - /etc/timezone:/etc/timezone:ro
      - /etc/localtime:/etc/localtime:ro
    ports:
      - "3000:3000"
      - "222:22"
Here is the part that trips people up: the ./gitea folder must be owned by the user and group in USER_UID and USER_GID. Gitea’s docs warn that the container may not start if the permissions are wrong.
Step 3: Start Gitea
docker compose up -d
docker compose ps
docker compose logs
ps shows whether the container started, and logs shows why if it didn’t.
Step 4: Finish the install wizard
Open http://server-ip:3000 and complete the installation wizard. Set the server domain and base URL to the address your team will use, such as https://git.example.com/, so clone links come out right.
Do this straight away. Until the wizard is finished, anyone who can reach port 3000 sees the setup page.
Step 5: Put HTTPS in front
The example publishes port 3000 on every network interface, over plain HTTP. Put a reverse proxy such as Nginx or Caddy in front with a TLS certificate, then close port 3000 in your firewall or bind it to 127.0.0.1 in the ports line.
Port 222 is Gitea’s built-in SSH server. Keep it open only if your team clones over SSH, and tell them to use port 222 in their clone URLs.
Step 6: Know how upgrades work
Gitea’s docs upgrade a Compose install with three steps, run from the gitea folder:
# Edit docker-compose.yml to the new version tag first
docker compose pull
docker compose up -d
Back up the data folder before every upgrade. Read the release notes too, because a new Gitea version can change the database on first start.
Option 2: One-Click Gitea on xCloud
The xCloud way replaces the Compose file, the wizard and the proxy setup with a short form. The general walkthrough with every screen is in the docs: 👉 How to use One-Click App Templates in xCloud.
Step 1: Open One-Click Apps and pick Gitea
From the xCloud dashboard, go to Sites → New Site and select One-Click Apps. Search for Gitea and select its card.
Step 2: Choose an NGINX server
Gitea runs in a container, so it needs an NGINX server with at least 1024 MB of RAM, 1 CPU core and 4 GB of disk. It can be a server that already hosts WordPress or PHP sites. If Docker isn’t installed yet, xCloud installs it during the app install, or you can enable Docker ahead of time. OpenLiteSpeed servers can’t run Docker apps.
Step 3: Fill in the admin account
The form asks for three things: Admin Username (defaults to admin), Admin Email and Admin Password. A 24-character password can be generated for you. Store it in your password manager.
Choose Go Live with your own domain, or Demo Site to try Gitea on a temporary demo address first. Then click Create.
Step 4: Sign in and push your first repository
When the deployment finishes, the app overview shows the URL, Username, Email and Password. Open the URL, sign in and create your first repository.
git clone https://git.example.com/your-team/your-repo.gitFor pushes from the command line, use your password or a personal access token from Settings → Applications in Gitea.
Step 5: Add your team
Public sign-up is turned off, so nobody can register on their own. Add each person from Gitea’s Site Administration area as the admin.
One catch worth knowing: the admin username, email and password in the app’s Environment page are used once, at install. Changing them later and clicking Save & Redeploy doesn’t change the real admin account. To reset the admin password, open a terminal on the server and run:
docker exec gitea-SITE_NAME su git -c 'gitea --config /data/gitea/conf/app.ini admin user change-password --username "YOUR_ADMIN" --password "NEW_PASSWORD"'Replace SITE_NAME, YOUR_ADMIN and NEW_PASSWORD with your own values.
Updates, Backups and Security After Install
The install is the easy part, on any host. These three jobs decide whether your Git server is still healthy a year from now.
1. Back up with Gitea stopped
Gitea’s backup guide is blunt: to keep the backup consistent, the instance “must be shutdown during backup.” On a Docker install, that means stopping the container before you copy the data folder, or using Gitea’s built-in gitea dump command.
On xCloud, open the site’s Backup → Backup Settings, turn on Automatic Backup on the Local Backup tab, and add a Remote Backup destination so a copy lives off the server. Each backup stops the app during capture, then saves the gitea_data volume, the compose file and the environment file. The full guide is 👉 How to back up and restore Docker apps.
Restore one backup to a test site before you rely on it.
2. Add mail settings if you want email
A fresh Gitea doesn’t send email. Gitea reads mail settings from environment variables such as GITEA__mailer__ENABLED, GITEA__mailer__FROM, GITEA__mailer__PROTOCOL, GITEA__mailer__SMTP_ADDR, GITEA__mailer__SMTP_PORT, GITEA__mailer__USER and GITEA__mailer__PASSWD.
On xCloud, add the full set on the site’s Environment page and click Save & Redeploy. Add every setting in the list at once. If some are missing, Gitea may not send email.
3. Plan Gitea upgrades on purpose
The xCloud template is pinned to Gitea 1.27.3. Gitea has since dropped the “1.” from its version numbers, and its 28.0.0 release followed in September 2026, so the one-click app runs an older release than Gitea’s latest.
App Actions → Update pulls the images named in the app’s compose file and recreates the container, with your data volume kept. Because the image is pinned, Update installs 1.27.3 again; it never moves you to a newer Gitea. A newer template only changes new installs.
Team owners, and members given the Compose permission, can change the image tag on the app’s Compose page. xCloud doesn’t check that the edited app still works, so take a backup first, read Gitea’s release notes, and keep a copy of the original file. See 👉 how to update a One Click App and edit its Docker Compose file.
Docker vs One-Click: Which to Choose
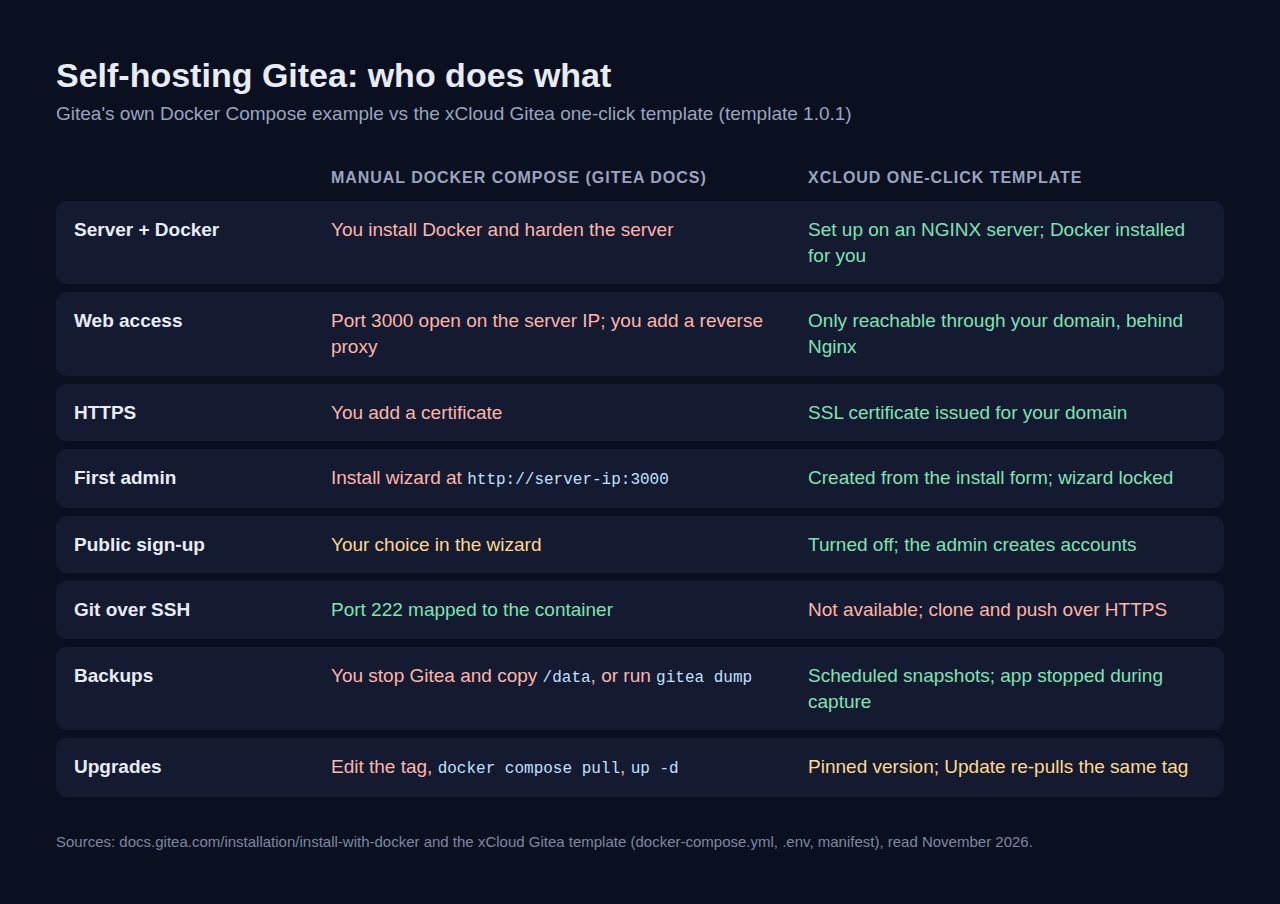
Both paths run the same official Gitea image. The difference is who sets up the parts around it, and which Gitea features you keep.
| Manual Docker Compose | One-click on xCloud | |
|---|---|---|
| Setup work | Compose file, wizard, reverse proxy, certificate | A short form |
| Gitea version | Any version you choose, including 28.x | Pinned to 1.27.3 |
| Git over SSH | Yes, on port 222 | No, HTTPS only |
| Public sign-up | Your choice | Off |
| CI runner | Not included; you add one | Not included; you add one |
| Backups | You script them, with Gitea stopped | Scheduled local and remote backups in the dashboard |
| Server upkeep | Yours | xCloud sets up the server and can install security updates and monitor it for you |
✅ Pick manual Docker Compose if you need SSH cloning, the newest Gitea release, or a database other than SQLite.
✅ Pick the one-click app if HTTPS cloning is fine for your team and you would rather not maintain a proxy, a certificate and a backup script.
The honest take: for a solo developer or a small team pushing over HTTPS, the one-click app removes most of the setup. For a team that lives on SSH keys, the manual setup is the better fit today.
What the xCloud Gitea App Does Not Do
Know these limits before you move your repositories over:
- No Git over SSH. The built-in SSH server is off. Every clone and push goes over HTTPS.
- No CI runner. Gitea reads Actions workflow files, but jobs only run once you add and register your own runner.
- No automatic Gitea upgrades. The install stays on 1.27.3 until you change it.
- SQLite only. It suits small teams. Heavier use may need a PostgreSQL or MySQL setup, which this template doesn’t offer.
- No mail by default. Password resets and notifications by email need the mail settings above.
- No OpenLiteSpeed. Docker apps need an NGINX server.
Deleting the Gitea site from the dashboard also deletes its Docker volume, so your repositories go with it. Before you delete it, make sure a recent remote backup exists. A local backup on the same server is not a safe copy.
Run Your Own Gitea Server With xCloud
If you would rather spend your time on code than on proxy configs, the Gitea hosting page has the server plans, and One Click Apps lists everything else you can run next to it. Comparing forges? See Forgejo hosting (PostgreSQL), GitLab hosting and Gogs hosting.
- ✅ The official Gitea image, behind Nginx with SSL on your domain
- ✅ First admin created, installer locked and public sign-up off
- ✅ Scheduled local and remote backups of the
gitea_datavolume - ✅ Your own server or an xCloud one, on the Docker hosting stack
Gitea can share a server with other self-hosted tools, like Vaultwarden or Nextcloud. Not sure whether to run the server yourself? Our comparison of self-managed vs managed hosting walks through the trade-off, and pricing lists both options.
Deploy Gitea on xCloud and push your first commit today.
Get Your Gitea Server Live This Week
Self-hosting Gitea with Docker is a short job. The official Compose file is about 20 lines, and the one-click app is a three-field form.
What separates a healthy Git server from a fragile one is the work after install. This week, pick your path, create the admin and team accounts, turn on backups with a remote copy, and write down the Gitea version you run.
If you have found this blog helpful, feel free to subscribe to our blogs for valuable tutorials, guides, knowledge, and tips on web hosting and server management. You can also join our Facebook community to share insights and engage in discussions.
Frequently Asked Questions
Can I self-host Gitea with Docker?
Yes. Gitea publishes an official Docker image and a Docker Compose example in its docs. You run docker compose up -d, finish the install wizard and then add HTTPS in front of it. The xCloud one-click app runs the same image for you, with the domain, SSL and first admin set up.
How much RAM does a self-hosted Gitea server need?
Gitea’s docs say 2 CPU cores and 1 GB of RAM is typically enough for small teams. The xCloud template asks for at least 1024 MB of RAM, 1 CPU core and 4 GB of disk. Repositories, Git LFS files and packages are what grow the disk over time.
Can I clone over SSH with the xCloud Gitea app?
No. The template turns off Gitea’s built-in SSH server, so you clone and push over HTTPS. Use your password or a personal access token from Settings → Applications. If SSH cloning is a must, the manual Docker setup maps an SSH port for you.
Does Gitea include CI/CD runners?
Gitea reads Actions workflow files, but jobs run on separate runners. Neither Gitea’s basic Docker Compose example nor the xCloud template includes a runner. You set one up yourself and register it with your Gitea server.
How do I back up a self-hosted Gitea server?
Back up Gitea’s data folder or volume with Gitea stopped, because its docs say the instance must be shut down for a consistent backup. On xCloud, scheduled Docker backups stop the app during capture and save the gitea_data volume, the compose file and the environment file.
Which Gitea version does the xCloud one-click app install?
The template is pinned to Gitea 1.27.3. Gitea has since moved to version 28, so the one-click app runs an older release than Gitea’s latest. App Actions → Update pulls the same pinned version again, so plan any upgrade yourself and back up first.