


For a Keycloak Docker setup that real users can sign in to, you start the official image with the start command (not start-dev), connect it to PostgreSQL, set its public hostname and put HTTPS in front. Doing it by hand means writing Compose, a proxy and backups yourself; with One-Click Apps on xCloud it is one short form.
Keycloak’s own quick start is one docker run line, and it works in seconds. But it runs in development mode with a file database and admin / admin, so it is a demo, not a login server for your apps.
This guide covers both paths step by step: Docker Compose on any Ubuntu server, then the one-click way on xCloud. New to containers? Read what Docker Compose is first.
TL;DR
- Requirements: Keycloak’s container guide recommends a 2 GB memory limit for smaller production setups. xCloud’s template asks for 4 GB RAM, 2 vCPU and 5 GB disk, so PostgreSQL fits too.
- The trap: the quick start uses
start-devand thedev-filedatabase. Keycloak says to avoid both in production. - Docker way: Keycloak plus PostgreSQL in one Compose file,
startmode,KC_HOSTNAME,KC_PROXY_HEADERS=xforwardedand port 8080 bound to127.0.0.1. Then add HTTPS yourself. - First login: the bootstrap admin is temporary by design. Create a named admin, then delete the bootstrap one.
- One-click way: on xCloud, pick Keycloak in One-Click Apps. PostgreSQL, HTTPS, the hostname and a random admin password are set up for you.
- Still on you, either way: realms, clients, SMTP, MFA and version upgrades.
Five Settings Separate the Keycloak Quick Start From Production
If you only remember one thing: the Docker command on Keycloak’s getting-started page is not a production setup. Five settings change before real users sign in.
Keycloak’s Docker getting-started guide runs this:
docker run -p 127.0.0.1:8080:8080 \
  -e KC_BOOTSTRAP_ADMIN_USERNAME=admin -e KC_BOOTSTRAP_ADMIN_PASSWORD=admin \
  quay.io/keycloak/keycloak:26.8.2 start-dev
The same page lists what to do before production: a production database such as PostgreSQL, your own certificates and a stronger admin password. Keycloak’s container guide adds that start-dev “should be strictly avoided in production environments because it has insecure defaults.”
We compared that command with xCloud’s Keycloak one-click template, which runs Keycloak in production mode. Here is every setting that differs:
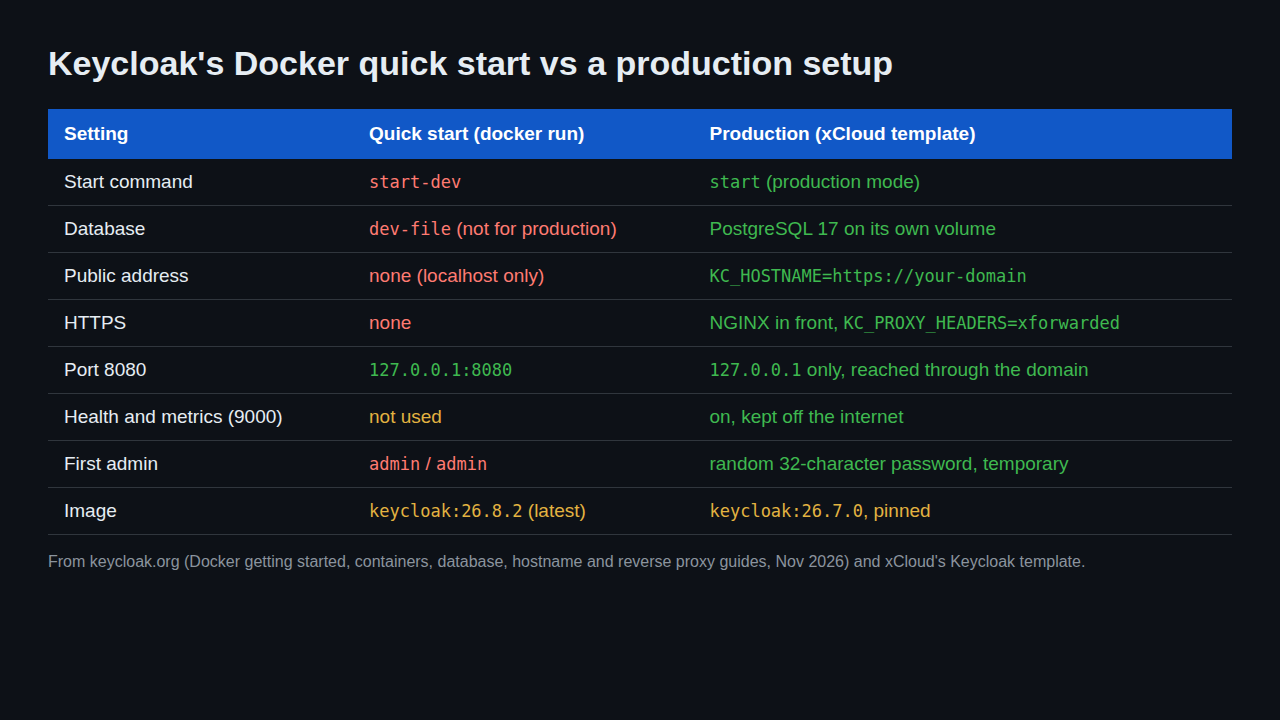
| Setting | Quick start | Production | Why it matters |
|---|---|---|---|
| Command | start-dev |
start |
Dev mode has insecure defaults |
| Database | dev-file |
PostgreSQL on a named volume | Keycloak says dev-file “is not suitable for production use-cases” |
| Hostname | not set | KC_HOSTNAME=https://auth.example.com |
start refuses to run without a hostname or hostname-strict=false |
| Proxy | none | KC_PROXY_HEADERS=xforwarded and KC_HTTP_ENABLED=true |
Keycloak builds HTTPS links and tokens from the proxy’s headers |
| Admin | admin / admin |
Long random password, deleted after first use | Keycloak calls the bootstrap admin temporary |
The port line is already safe in the quick start: 127.0.0.1:8080:8080 only answers on the server itself. Keep it that way. Docker’s firewall documentation says traffic to a published port “gets diverted before it goes through the ufw firewall settings,” so 8080:8080 with no address would put Keycloak’s plain-HTTP port on the internet.
What You Need to Self-Host Keycloak
These figures come from Keycloak’s server guides and xCloud’s Keycloak template.
| Resource | Minimum | Note |
|---|---|---|
| RAM | 2 GB for Keycloak, 4 GB server | Keycloak recommends a 2 GB container limit for smaller production setups; xCloud’s template asks for a 4 GB server |
| CPU | 2 cores | xCloud template minimum; more for many logins at once |
| Disk | 5 GB | xCloud template minimum; grows with users, sessions and events |
| Database | PostgreSQL | MariaDB, MySQL, SQL Server and Oracle also work |
| Ports | 80 and 443 public | Keep 8080 and the management port 9000 private |
| Domain | One subdomain | For example auth.example.com, pointed at the server |
Keycloak is a Java app. The container guide says the heap can grow to 70% of the container’s memory, and that you “should always set the memory limit” for the container. So size the server for Keycloak plus PostgreSQL, not Keycloak alone.
Option 1: Self-Host Keycloak With Docker Compose
Here is the manual path on an Ubuntu server with Docker Engine and the Compose plugin installed, and a domain pointed at the server. This setup follows xCloud’s template and Keycloak’s guides; we have not run this exact file on a fresh server for this post.
Step 1: Create a project folder and an env file
mkdir ~/keycloak && cd ~/keycloak
nano .env
Put the database login, hostname and first admin in .env. These are standard Keycloak settings, the same ones xCloud’s template uses:
POSTGRES_DB=keycloak
POSTGRES_USER=keycloak
POSTGRES_PASSWORD=use-a-long-random-password

KC_DB=postgres
KC_DB_URL_HOST=db
KC_DB_URL_DATABASE=keycloak
KC_DB_USERNAME=keycloak
KC_DB_PASSWORD=use-a-long-random-password
KC_HOSTNAME=https://auth.example.com
KC_HTTP_ENABLED=true
KC_PROXY_HEADERS=xforwarded
KC_HEALTH_ENABLED=true

KC_BOOTSTRAP_ADMIN_USERNAME=tempadmin
KC_BOOTSTRAP_ADMIN_PASSWORD=another-long-random-password
Use the same value for POSTGRES_PASSWORD and KC_DB_PASSWORD. Then run chmod 600 .env so only your user can read it. You can generate a password with openssl rand -base64 32.
Step 2: Write the Compose file
Create docker-compose.yml. Keycloak waits for PostgreSQL to be ready, and port 8080 only answers on the server:
services:
  db:
    image: postgres:17-alpine
    restart: unless-stopped
    environment:
      POSTGRES_DB: ${POSTGRES_DB}
      POSTGRES_USER: ${POSTGRES_USER}
      POSTGRES_PASSWORD: ${POSTGRES_PASSWORD}
    volumes:
      - keycloak_db:/var/lib/postgresql/data
    healthcheck:
      test: ["CMD-SHELL", "pg_isready -U $${POSTGRES_USER} -d $${POSTGRES_DB}"]
      interval: 10s
      timeout: 5s
      retries: 10

  keycloak:
    image: quay.io/keycloak/keycloak:26.8.2
    restart: unless-stopped
    command: ["start"]
    env_file:
      - .env
    depends_on:
      db:
        condition: service_healthy
    ports:
      - "127.0.0.1:8080:8080"

volumes:
  keycloak_db:
Pin a version tag, as above, so a later docker compose pull never jumps to a new major version by surprise. 26.8.2 was the latest release on Keycloak’s downloads page in November 2026.
Step 3: Start Keycloak
docker compose up -d
docker compose ps
docker compose logs -f keycloak
The first start takes longer, because Keycloak builds its configuration and creates its database tables. On the server, curl -I http://127.0.0.1:8080/ should get an HTTP response. From your laptop, SERVER_IP:8080 should not answer.
Step 4: Put HTTPS in front
Keycloak now answers only on the server, so a reverse proxy has to publish it. With Caddy, which fetches a Let’s Encrypt certificate on its own and sends X-Forwarded-* headers, the config is:
auth.example.com {
    reverse_proxy 127.0.0.1:8080
}
NGINX with Certbot works too; it is just more lines. Keycloak’s reverse proxy guide says not to proxy port 9000, because health checks and metrics use it. In the file above, 9000 is not published at all.
Step 5: Sign in and replace the temporary admin
Open https://auth.example.com/admin/ and sign in with the bootstrap admin from .env. Keycloak’s bootstrap admin guide says this account “should exist only for the duration necessary” to set up permanent admin access, then be removed by hand.
- In the
masterrealm, create a named admin user and give it the admin role. - Sign out, sign in as that user, then delete the bootstrap admin.
- Create a new realm for your apps. Keep
masterfor admins only.
Changing KC_BOOTSTRAP_ADMIN_PASSWORD in .env later does nothing to an existing admin. Manage admins inside Keycloak from here on.
Option 2: One-Click Keycloak on xCloud
The one-click path replaces Steps 1 to 4 with a form. The full walkthrough with screenshots is in 👉 how to deploy Keycloak with xCloud One Click Apps, and the general flow for every app is in how to use One-Click App templates.
Step 1: Pick Keycloak and a server
Go to Sites → New Site → One-Click Apps, search for Keycloak and click its card. Under Where should it run?, choose an NGINX server with at least 4 GB RAM, 2 vCPU and 5 GB free disk, or Deploy on a new server. xCloud installs Docker during the setup if it is missing.
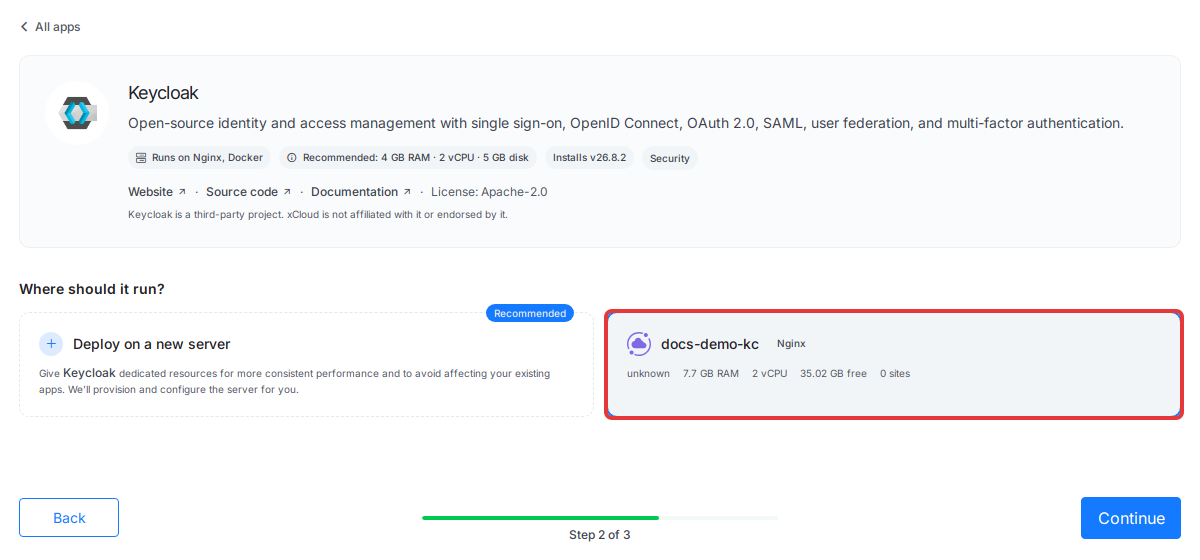
A server that is too small, or runs OpenLiteSpeed, can’t be picked, and its card says why. See Keycloak hosting on xCloud for the plans.
Step 2: Fill in the form
Enter a Site Title, then choose Go Live for your own domain or Demo Site to try it first. Keep admin in Bootstrap Admin Username or type another name, then click Next.
xCloud generates the PostgreSQL database name, user and password, and a 32-character bootstrap admin password. You never type them in.
Step 3: Copy the sign-in details
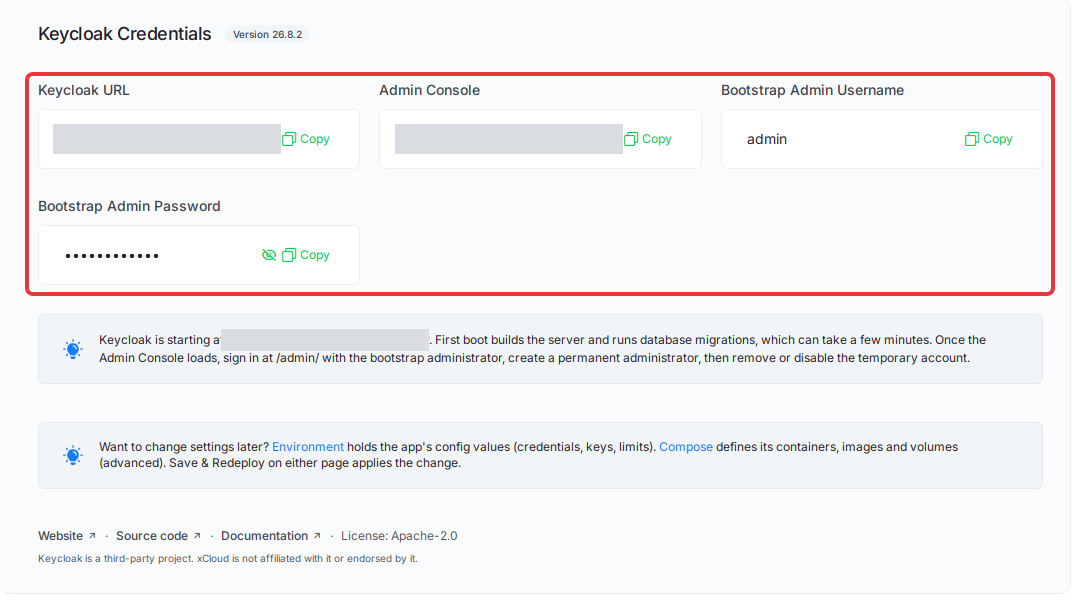
When the setup finishes, the Keycloak Credentials card on Site Overview shows the Keycloak URL, the Admin Console link, the Bootstrap Admin Username and the Bootstrap Admin Password. Copy the password into your password manager.
Step 4: Replace the temporary admin
Open the Admin Console link, sign in, and follow Step 5 from the Docker path: a named admin, then delete the bootstrap one, then a realm for your apps. If the page does not load at first, wait a few minutes; the first start prepares the database.
Behind the form, xCloud runs Keycloak 26.7.0 in production mode with PostgreSQL 17, sets the hostname and proxy headers, and makes Keycloak only reachable through your domain, not by server IP and port. Health checks run on both containers.
Updates, Backups and Security After Install
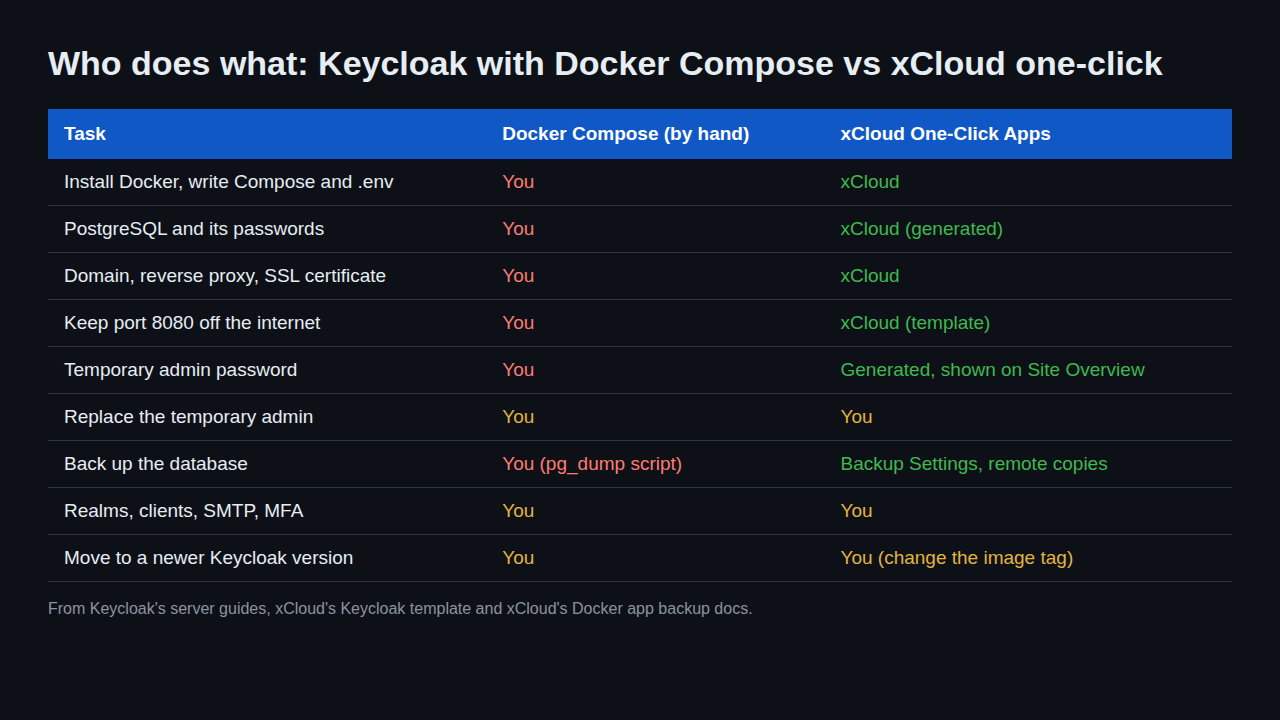
Back up the database, not just the server
Everything Keycloak knows lives in PostgreSQL: realms, users, clients, credentials and signing keys. Lose it and every app that signs in through Keycloak stops working.
On a manual setup, a pg_dump from the database container is the simplest backup:
cd ~/keycloak
docker compose exec -T db pg_dump -U keycloak keycloak | gzip > keycloak-$(date +%F).sql.gz
Copy the file off the server, and test a restore on a separate server. This is identity data, so keep the copies encrypted.
On xCloud, open the site and go to Backup → Previous Backups → Backup Now, or schedule backups under Backup Settings with remote copies. The capture briefly stops the app. 👉 Backup and restore Docker apps.
Update without breaking logins
On a manual setup, change the image tag, then run docker compose pull && docker compose up -d. Back up first and read Keycloak’s upgrading guide for every version in between. If an upgrade goes wrong, the database backup is your way back.
On xCloud, App Actions → Update pulls the pinned 26.7.0 image again; it does not upgrade you. To move to a newer version, back up, then change the image tag as shown in 👉 Update a One Click App and edit its Docker Compose. Don’t change the PostgreSQL major version (17) without a migration plan.
Lock down the Admin Console
Keycloak’s reverse proxy guide marks /admin/ and /realms/master/ as “Only internally”. Both setups in this post serve them on your domain, so the admin login is the main defence.
- Turn on OTP for admin accounts in the
masterrealm. - Set SMTP in each realm before you turn on password reset or email checks.
- For each client, enter the exact redirect URIs and web origins. Avoid
*. - On a manual setup, you can block
/admin/in the proxy and reach it over an SSH tunnel instead.
What This Setup Does Not Do
Here is the honest list, for both paths:
- Single node only. Both setups run one Keycloak and one PostgreSQL. High availability needs several Keycloak nodes and a shared database, which neither covers.
- xCloud’s version trails upstream. The template pins Keycloak 26.7.0, while 26.8.2 is on Keycloak’s downloads page. Update stays on 26.7.0 until you change the image tag or a newer template ships.
- No app is connected for you. Neither path creates realms, clients or users. Connecting each app’s OpenID Connect or SAML login is your work.
- No email until you add SMTP. Password reset and email checks need a mail server set in each realm.
- Not Red Hat build of Keycloak. This is the open-source community image. xCloud has no partnership with Keycloak or Red Hat.
To undo a one-click install, take a backup, then delete the site from the dashboard. On a manual setup, docker compose down stops it and docker compose down -v also deletes the database volume, so be careful with -v.
Docker Compose vs One-Click: Which to Choose
| Docker Compose (by hand) | xCloud One-Click Apps | |
|---|---|---|
| Software cost | Keycloak is free (Apache 2.0); you pay for the server | Keycloak is free; you pay for the server and your xCloud plan |
| Setup time | Longer: Compose, .env, proxy and SSL |
One form |
| Image | Your choice, any version | keycloak:26.7.0, pinned |
| Database | You set up PostgreSQL | PostgreSQL 17, passwords generated |
| Admin login | You set it in .env |
32-character password, generated |
| Who can reach Keycloak | Only your domain, if you keep 127.0.0.1 in the ports line |
Only through your domain |
| HTTPS | Your proxy and certificate | Free SSL, issued and renewed |
| Backups | Your pg_dump script and storage |
Scheduled, with remote copies |
| Upgrades | Any version, any time | Change the image tag on the Compose page |
Rule of thumb: choose Docker Compose if you need the newest Keycloak, custom themes or providers baked into your own image, or full control over every file. Choose one-click if you want a working login server today and would rather not maintain a proxy, a certificate and a backup script.
Run Keycloak on Your Own Server With xCloud
xCloud gives you a self-hosted Keycloak without assembling the pieces:
- Keycloak deployed from One-Click Apps on an NGINX server
- PostgreSQL 17 with generated passwords
- Your domain with a free SSL certificate
- Keycloak only reachable through your domain
- Scheduled Docker app backups with remote copies
- Live server monitoring for the server under it
Deploy Keycloak on xCloud → or browse the other one-click apps, including lighter login servers such as Authelia and Zitadel. Prefer your own Compose file? Docker hosting on xCloud runs that too.
Put Single Sign-On in Front of Your Apps This Week
If you know Docker and want the latest Keycloak, the Compose path is a good fit. Use start, PostgreSQL and KC_HOSTNAME from day one, and keep port 8080 on 127.0.0.1.
If you would rather spend that time connecting apps, deploy Keycloak from One-Click Apps and schedule a backup on day one. Whichever direction you go, replacing the bootstrap admin and testing a database restore are the two moves worth making first.
For more self-hosting guides, see how to self-host Vaultwarden, self-host Gitea and self-host Grafana, or compare the best Docker hosting providers.
If you have found this blog helpful, feel free to subscribe to our blogs for valuable tutorials, guides, knowledge, and tips on web hosting and server management. You can also join our Facebook community to share insights and engage in discussions.
Frequently Asked Questions
Can I run Keycloak in Docker with start-dev in production?
No. Keycloak’s container guide says start-dev “should be strictly avoided in production environments because it has insecure defaults.” Use the start command with a real database such as PostgreSQL, a hostname and HTTPS.
How much RAM does Keycloak need in Docker?
Keycloak’s container guide recommends a 2 GB memory limit for smaller production setups, and the heap can use up to 70% of the container’s memory. xCloud’s one-click template asks for a 4 GB server with 2 vCPU, so PostgreSQL and the system have room too.
What database should I use for Keycloak in Docker?
PostgreSQL is the common choice. Keycloak’s default dev-file database “is not suitable for production use-cases.” MariaDB, MySQL, Microsoft SQL Server and Oracle are also supported. xCloud’s template uses PostgreSQL 17.
What is the default Keycloak admin login in Docker?
There is none built in. You set KC_BOOTSTRAP_ADMIN_USERNAME and KC_BOOTSTRAP_ADMIN_PASSWORD on the first start, and Keycloak’s guide calls that account temporary. Create a permanent admin, then delete the temporary one.
Does the xCloud one-click Keycloak update itself?
No. The template pins Keycloak 26.7.0, and App Actions → Update pulls that same version again. To move to a newer version, back up PostgreSQL, read Keycloak’s upgrade notes, then change the image tag on the app’s Compose page.