


A MinIO Docker setup in 2026 starts with one choice most tutorials skip: which image. The upstream minio/minio repository was archived in April 2026, so the open-source, maintained path is a community fork. You can run that fork yourself from its README, or deploy the one-click MinIO app on xCloud, which adds HTTPS and credentials.
MinIO is S3-compatible object storage. You point S3 clients, SDKs and backup tools at your own server instead of a paid cloud bucket, and they work as if they were talking to Amazon S3.
This guide walks through the one-click path step by step and shows what running the fork yourself involves. If containers are new to you, read what Docker Compose is first. Then we cover the part most tutorials leave out: the S3 port, backups and upgrades after the first bucket.
TL;DR
Short on time? Here is the whole guide in a few lines:
- Image first: the upstream MinIO repository is archived and no longer ships community binaries. Use the PGSTY community fork,
docker.io/pgsty/silo(formerlypgsty/minio), with a pinned release tag. - Doing it yourself: the fork’s README has a Quick Start. The S3 API is on port 9000 and the console on 9001. You add HTTPS, backups and upgrades yourself.
- One-click way: in xCloud, go to Servers → Add New Site → One Click Apps, pick Minio, choose a domain and click Next. xCloud generates the root login.
- What differs: on xCloud the console gets HTTPS on your domain, but the S3 API stays plain HTTP on a server port.
- After install: back up the
minio_datavolume, limit who can reach the S3 port, and plan upgrades yourself.
Which MinIO Docker Image to Use in 2026
This is the finding that changes every older MinIO tutorial. The minio/minio repository on GitHub was archived in April 2026. As of November 2026, its README opens with “THIS REPOSITORY IS NO LONGER MAINTAINED.” It also says the community edition “is now distributed as source code only,” with no pre-compiled binary releases, and that “legacy binaries will not receive updates.”
As of November 2026, MinIO, Inc. points community users to AIStor Free, a separate product under its own free license. For people who want to keep running the open-source server, one maintained option is the PGSTY fork, Silo.
| Option | What it is | License | Docker image |
|---|---|---|---|
| Upstream MinIO | Archived April 2026, source code only | AGPL-3.0 | No new community builds |
| PGSTY fork (Silo) | Community fork with the full web console | AGPL-3.0-or-later | docker.io/pgsty/silo (formerly pgsty/minio) |
| xCloud MinIO app | Runs the PGSTY fork, locked to one exact build | AGPL-3.0-or-later | pgsty/minio:RELEASE.2026-06-18T00-00-00Z |
| xCloud Silo app | Runs the same fork under its new name, locked to one exact build | AGPL-3.0-or-later | pgsty/silo:RELEASE.2026-09-16T00-00-00Z |
As of November 2026, the fork’s README says it is “not affiliated with, endorsed by, or sponsored by MinIO, Inc.” It was renamed from pgsty/minio to pgsty/silo on 6 August 2026, so you will see both names. As of November 2026 the newest release is RELEASE.2026-11-09T00-00-00Z; pick the newest tag on the releases page when you install.
If you only remember one line: pin a fork release tag, never latest, so a restart can’t change the server under your data.
What the xCloud MinIO Template Actually Sets Up
We read the xCloud MinIO template line by line (its docker-compose.yml, .env file and manifest) so you can see what a one-click install does for you.
| Setting | What the template does | What it means for you |
|---|---|---|
| Image | pgsty/minio:RELEASE.2026-06-18T00-00-00Z, locked to one exact build |
Your install stays on that exact build until you change it |
| Root login | Random 12-character user and 32-character password | No default minioadmin login to forget about |
| Console | Only reachable through your domain, with HTTPS, not by server IP and port | Open the console at your domain |
| S3 API | Open on your server’s IP, on a port xCloud picks | S3 clients connect to http://SERVER_IP:PORT, plain HTTP |
| Storage | One volume, minio_data, mounted at /data |
Back up this one volume |
| Health check | Checks every 10 seconds that MinIO is answering | Docker marks the app unhealthy if MinIO stops answering |
| Credentials card | Console URL, S3 Endpoint, Root User, Root Password | Everything your app needs, in one place |
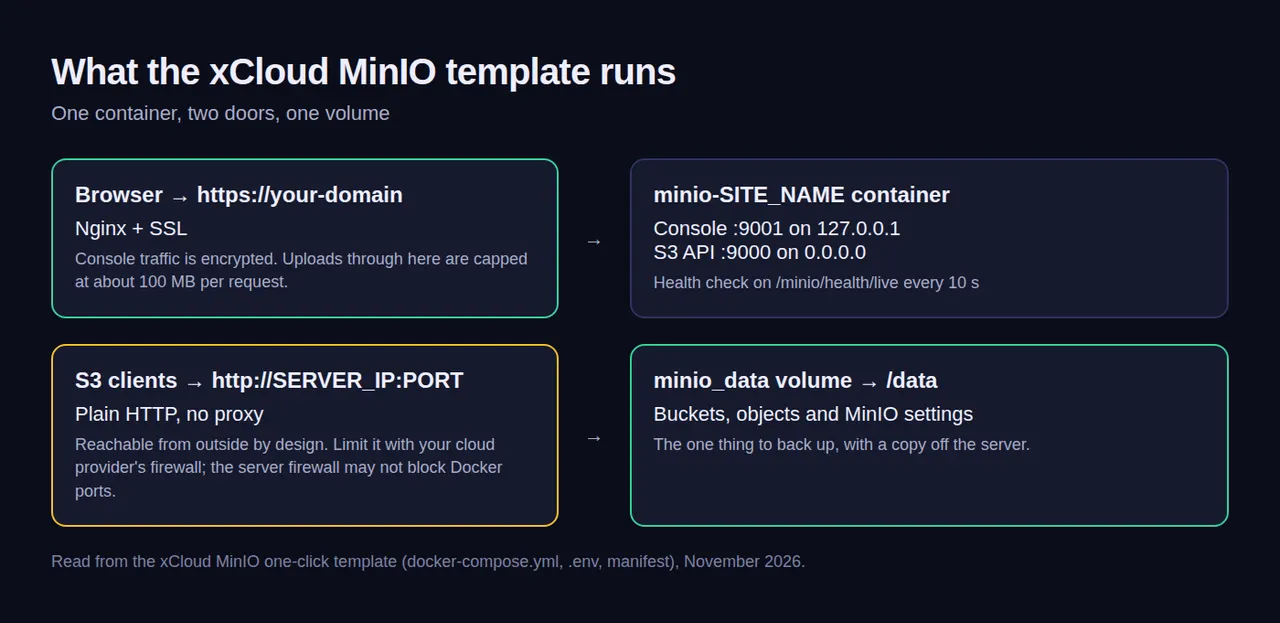
The short version: the console is locked behind HTTPS, the S3 API is left open on purpose so external clients can connect, and controlling who reaches it is your job.
What You Need to Self-Host MinIO
MinIO itself is light. Storage is what you plan for, because every object you keep sits on the server’s disk.
| Requirement | Manual Docker setup | xCloud MinIO template |
|---|---|---|
| CPU | Your choice | At least 1 core |
| Memory | Your choice | At least 256 MB |
| Disk | Your data, plus room to grow | At least 5 GB |
| Ports | 9000 (S3 API) and 9001 (console) | Console on your domain, S3 API on a server port |
| Server stack | Any Linux server with Docker | An Nginx server in xCloud |
| Domain | Optional, for HTTPS on the console | Demo site or your own domain |
Treat the minimums as a floor, not a target. Pick disk for where your buckets will be in a year, not where they are today.
Option 1: Run the Fork Yourself
The Silo README has a Quick Start with a docker run command, using port 9000 for the S3 API and port 9001 for the console. We have not run it ourselves for this guide, so follow the README for the exact command.
If you go this way, plan for these jobs yourself:
- A root login. Don’t keep the
minioadminuser from the README example. Use a long random password and store it in your password manager. - HTTPS. Add a reverse proxy with a TLS certificate in front of the console, and in front of the S3 API too if your clients send data over the internet.
- Who can reach the ports. Docker sets its own network rules, so a host firewall may not block a published port. Our MinIO doc explains how to check who can reach the S3 port.
- Backups and upgrades. Copy the data folder off the server on a schedule, and pick each new release on purpose.
If the server is new, lock it down first. Our guide to securing a VPS covers SSH keys, firewall rules and updates.
Option 2: One-Click MinIO on xCloud
The xCloud way replaces the container setup, the credentials and the proxy setup with a short form. The full walkthrough with every screen is in the docs: 👉 How to deploy MinIO with xCloud One Click Apps.
MinIO runs in a container, so it needs an Nginx server with at least 256 MB of RAM, 1 CPU core and 5 GB of free disk. If Docker isn’t installed yet, you can enable Docker on the server ahead of time.
Step 1: Open One Click Apps and pick Minio
From the xCloud dashboard, open Servers, open the menu for your server and click Add New Site. Click the One Click Apps tab, type Minio in the search box and click its card. The general guide to templates is here.
Step 2: Name the site and pick a domain
Enter a Site Title. Under Domain Setup, choose Demo Site to try it on a generated test domain, or Go Live with your own. There are no other fields, because xCloud generates the root user and password. Click Next.
Step 3: Find the console and S3 address
When the install finishes, open the site and go to Access Data → Credentials. The Minio Credentials card lists the Console URL, the S3 Endpoint (http://SERVER_IP:PORT), the Root User and the Root Password.
Step 4: Sign in and create a bucket
Open the Console URL, sign in with the root login, click Create a Bucket and then create an access key for your app. Point your S3 client at the S3 Endpoint.
You can move from a demo domain to your own later. The console moves to your domain, and the S3 address stays on the server’s IP and port. See how to manage One Click App domains and public endpoints.
Updates, Backups and Security After Install
The install is the easy part, on any host. These three jobs decide whether your storage is still healthy a year from now.
1. Back up the data volume
Everything MinIO stores (buckets, objects and its own settings) sits in /data. On a manual install, copy that data folder off the server on a schedule.
On xCloud, all of it lives in the minio_data volume. Open the site’s Backup → Backup Settings, turn on automatic backups and add a remote destination so a copy lives off the server. The full guide is 👉 How to back up and restore Docker apps. A restore puts the data back in the same site the backup came from. Before you rely on it, create a test bucket, take a backup, delete the bucket and restore into the same site.
xCloud stops the app while it takes a Docker backup and starts it again afterwards. S3 clients can’t connect during that window, so schedule backups for a quiet time.
2. Limit who can reach the S3 port
On xCloud, the S3 port can already be reached from outside, and its traffic is plain HTTP. If only some clients should connect, add a rule in your cloud provider’s firewall, then test it with curl -I --max-time 10 http://SERVER_IP:PORT from a machine that should be blocked.
Don’t rely on the server firewall for this port. Docker sets its own network rules, so it may not block it.
3. Plan MinIO upgrades on purpose
Your xCloud MinIO app stays on RELEASE.2026-06-18T00-00-00Z of the fork. App Actions → Update reinstalls the same build. A newer template only changes new installs.
To move to a newer build, read the Silo release notes, take a backup, then open the app’s Compose page. On the image line, change both the release and the sha256 value after it, because that value fixes the exact image. See 👉 how to update a One Click App and edit its Docker Compose file.
For a new install on a newer build, xCloud also has a Silo one-click app. It runs pgsty/silo at RELEASE.2026-09-16 and accepts console uploads of up to 5 GiB per request.
Docker vs One-Click: Which to Choose
Both paths run the same community fork. The difference is who sets up the parts around it.
| Run the fork yourself | One-click on xCloud | |
|---|---|---|
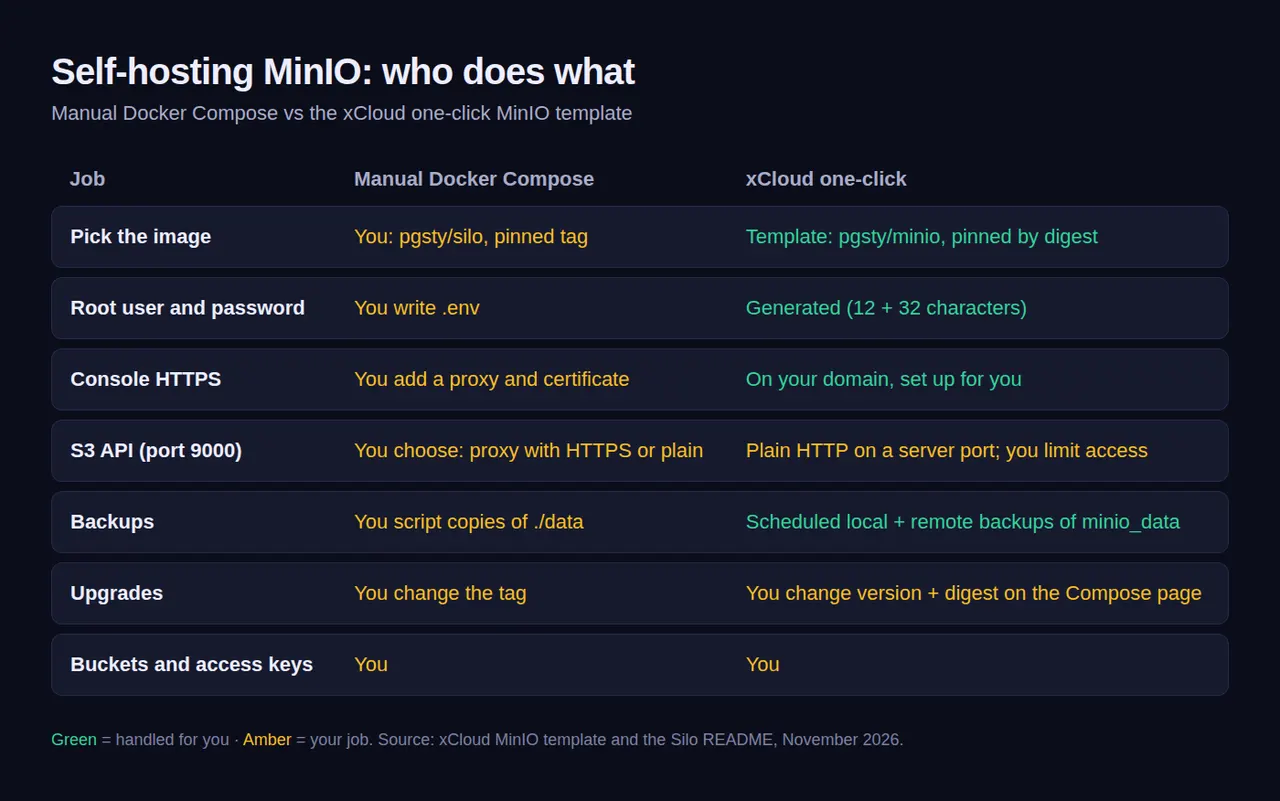
| Setup work | Container, root login, reverse proxy, certificate | A short form |
| MinIO build | Any fork release you choose | RELEASE.2026-06-18 (MinIO app) or RELEASE.2026-09-16 (Silo app) |
| Root login | You set it | Generated for you |
| Console HTTPS | You add it | On your domain, set up for you |
| S3 API HTTPS | Possible with your own proxy | No, plain HTTP on a server port |
| Upload size in the console | Set by your proxy | About 100 MB per request in the MinIO app, up to 5 GiB in the Silo app; use an S3 client for larger files |
| Backups | You script them | Scheduled local and remote backups in the dashboard |
| Server upkeep | Yours | xCloud sets up the server and can install security updates for you |
✅ Run the fork yourself if your S3 clients need HTTPS on the API, or you need a fork release newer than the ones xCloud’s MinIO and Silo apps run.
✅ Pick the one-click app if you want a working console, generated credentials and scheduled backups without writing a proxy config.
The honest take: for backups, build artefacts or media on a private network, the one-click app removes most of the setup. If your apps send data to MinIO over the public internet, the manual setup with HTTPS on the API is the safer fit today.
What the xCloud MinIO App Does Not Do
Know these limits before you move data over:
- No HTTPS on the S3 API. Only the console is encrypted. S3 traffic to
http://SERVER_IP:PORTis plain HTTP. - No large uploads through the console. Requests over about 100 MB through the console domain are rejected. Use an S3 client with multipart upload.
- No automatic MinIO upgrades. The install stays on one exact build until you change it.
- One server, one disk. It is a single container, not a distributed MinIO cluster.
- Not official MinIO. It runs the PGSTY community fork, which is not affiliated with MinIO, Inc.
- No OpenLiteSpeed. Docker apps need an Nginx server.
Your buckets, access keys and the apps that connect to them stay yours to manage. Docker app backups restore only into the site they came from, so copy your buckets somewhere else before you delete the site. See backups and the site lifecycle.
Run Your Own MinIO Server With xCloud
If you would rather spend your time on your apps than on proxy configs, the MinIO hosting page has the server plans, and One Click Apps lists everything else you can run next to it. Comparing S3-compatible storage? See Silo hosting, Garage hosting, RustFS hosting and SeaweedFS hosting.
- ✅ The PGSTY MinIO fork, with the console behind Nginx and SSL on your domain
- ✅ Random root user and password generated at install
- ✅ Scheduled local and remote backups of the
minio_datavolume - ✅ Your own server or an xCloud one, on the Docker hosting stack
MinIO can share a server with other self-hosted tools, like Nextcloud, Supabase or Gitea. Not sure whether to run the server yourself? Our comparison of self-managed vs managed hosting walks through the trade-off, and pricing lists both options.
Deploy MinIO on xCloud and create your first bucket today.
Get Your MinIO Server Live This Week
Self-hosting MinIO with Docker is a short job once you pick the right image. On xCloud, the one-click app is a title and a domain.
What separates healthy storage from fragile storage is the work after install. This week, pick your path, create an access key per app, turn on backups with a remote copy, and write down the MinIO build you run.
If you have found this blog helpful, feel free to subscribe to our blogs for valuable tutorials, guides, knowledge, and tips on web hosting and server management. You can also join our Facebook community to share insights and engage in discussions.
Frequently Asked Questions
Is MinIO still free to self-host with Docker?
Yes, but not from the old upstream project. The minio/minio GitHub repository was archived in April 2026 and, as of November 2026, says it is no longer maintained. One open-source, maintained option is the AGPL-licensed community fork from PGSTY, which publishes ready-made Docker images.
Which Docker image should I use for MinIO in 2026?
For a free, maintained build, use the PGSTY fork: docker.io/pgsty/silo, formerly pgsty/minio. Pin the newest release tag from the fork’s releases page (RELEASE.2026-11-09T00-00-00Z as of November 2026) rather than latest. The fork says it is not affiliated with MinIO, Inc.
What ports does MinIO use in Docker?
Port 9000 is the S3 API and port 9001 is the web console. On xCloud, the console sits behind your domain with HTTPS, and the S3 API is published as plain HTTP on a server port that xCloud picks at install.
How much RAM does a self-hosted MinIO server need?
Very little to start. The xCloud MinIO template asks for at least 256 MB of RAM, 1 CPU core and 5 GB of disk. Disk is what grows, because every bucket and object lives on the server, so size storage for the data you plan to keep.
Is the MinIO S3 endpoint on xCloud served over HTTPS?
No. xCloud puts HTTPS on the console domain only. The S3 Endpoint is a plain HTTP address on your server’s IP and port, so its traffic is not encrypted. Limit who can reach that port with your cloud provider’s firewall.
Does the xCloud MinIO app update itself?
No. Your app stays on one exact build of the fork, and App Actions → Update reinstalls that same build. To move to a newer one, read the fork’s release notes, take a backup, then open the app’s Compose page. On the image line, change both the release and the sha256 value after it, because that value fixes the exact image. See the xCloud doc on updating a One Click App.