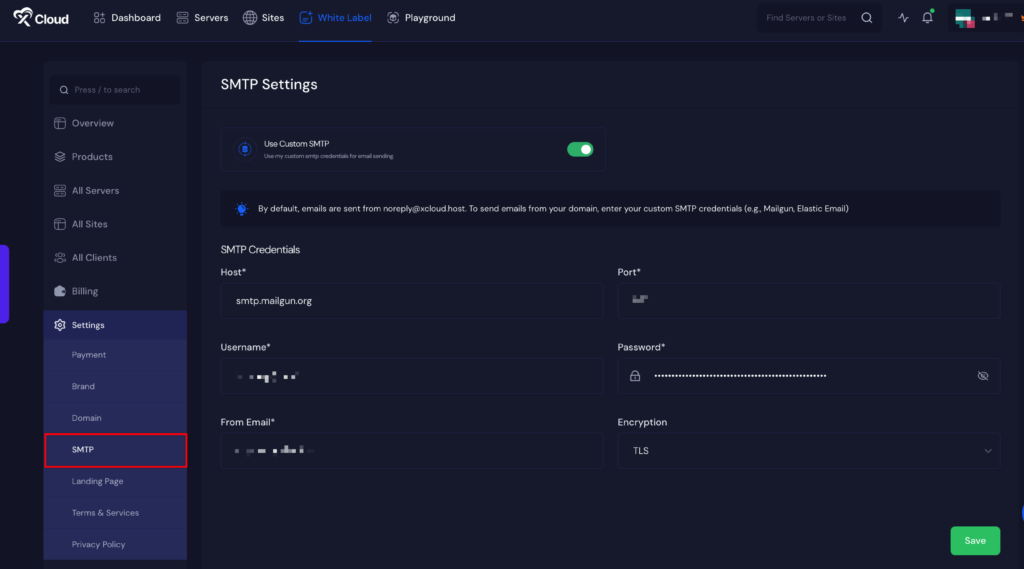
Setting up your custom SMTP allows you to send branded emails from your domain to clients, enhancing your professionalism and brand identity. Follow these steps to configure custom SMTP in your xCloud White Label dashboard.
Step 1: Access the White Label Dashboard #
- Log in to your xCloud account.
- Navigate to the White Label Dashboard from your main account menu.
Step 2: Open White Label Settings #
- Inside the White Label Dashboard, locate and click on Settings in the sidebar.
- Look for the SMTP section in the settings menu.
Step 3: Configure Custom SMTP #
- In the SMTP section, click Add SMTP Credentials.
- Fill in the fields with your SMTP provider’s details:
- SMTP Host: (e.g.,
smtp.yourdomain.com) - SMTP Port: (e.g.,
465for SSL or587for TLS) - Encryption Type: Select SSL, TLS, or None depending on your provider’s settings.
- SMTP Username: Enter the username for your email account.
- SMTP Password: Enter the password for your email account.
- SMTP Host: (e.g.,

Step 4: Test the Configuration #
- After entering the credentials Test SMTP setup.
- Try a forget password method from your own dashboard as one of your own registered clients.
Step 5: Save and Apply Settings #
- Once tested successfully, click Save Changes to finalize your setup.
- Your custom SMTP is now ready to send branded emails to your clients.
Best Practices for Custom SMTP #
- Ensure your email domain has valid DNS records like SPF, DKIM, and DMARC to prevent emails from being marked as spam.
- Use a reliable SMTP provider to ensure email deliverability.
- Follow your specific SMTP provider’s guidelines.
Still stuck? Contact our support team for any of your queries.


