

How To Set Up Redirects In xCloud With Site Rules
Updated November 2, 2026 · 5 min read
To add a redirect in xCloud, open your site and go to Tools → Site Rules → Redirect Rules. A redirect sends visitors and search engines from an old address to a new one, so moved pages keep their traffic and links don’t break.
Site Rules replaced the older Redirection page for WordPress sites on Nginx and OpenLiteSpeed servers. This guide shows how to create a redirect, limit it with a condition, and handle the redirects you already have.
Before you start
- Plan: you need a paid plan. On the free plan, opening Site Rules takes you to the billing page.
- Site type: Site Rules works on WordPress sites on Nginx or OpenLiteSpeed servers. For other sites, see Sites that are not WordPress.
- Limit: each site can have 25 redirect rules. The counter next to Add Rule shows how many you have left.
Step 1: Open Site Rules
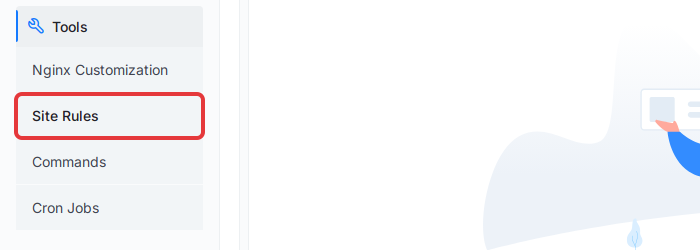
Open your site, then go to Tools → Site Rules in the left sidebar.
Step 2: Open the Redirect Rules tab
Click the Redirect Rules tab. On OpenLiteSpeed servers, this tab is called Redirect / Rewrite Rules.

Step 3: Click Add Rule
Click Add Rule at the top right. The Create Redirect Rule form opens. On OpenLiteSpeed servers, this form is called Create Redirect / Rewrite Rule.

Step 4: Fill in the redirect
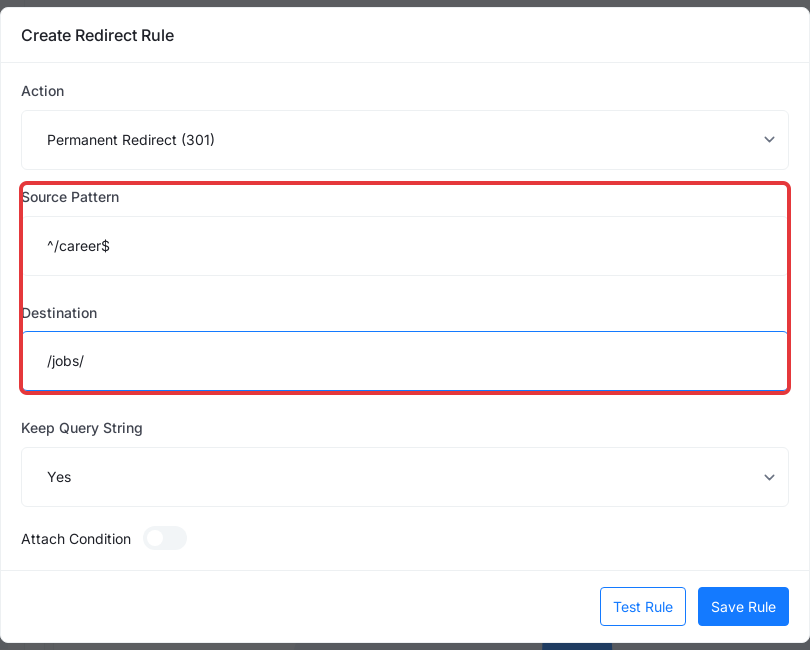
In Create Redirect Rule, enter the Source Pattern and the Destination, then choose the other options.
| Field | What to enter |
|---|---|
| Action | Permanent Redirect (301) for a page that has moved for good, or Temporary Redirect (302) for a short-term change such as a seasonal offer. OpenLiteSpeed servers also offer Rewrite (Internal), which shows other content without changing the address. |
| Source Pattern | The old address. It must start with / or ^/. |
| Destination | The new address. It must start with /, http:// or https://. |
| Keep Query String | Yes keeps anything after the ? in the old address. For example, /career?x=1 goes to /jobs/?x=1. No drops it. |
The Source Pattern is a regular expression, so these patterns are the ones to know:
| Source Pattern | Destination | What it does |
|---|---|---|
^/career$ |
/jobs/ |
Redirects /career only. It doesn’t match /career/ or /careers. |
^/career/?$ |
/jobs/ |
Redirects /career and /career/. |
^/members/(.*)$ |
/$1 |
Redirects /members/some-page to /some-page, and does the same for every page under /members/. |
Use ^ and $ to match one exact address. Without them, /career also matches other addresses that contain it, such as /careers.
Step 5: Add a condition (optional)
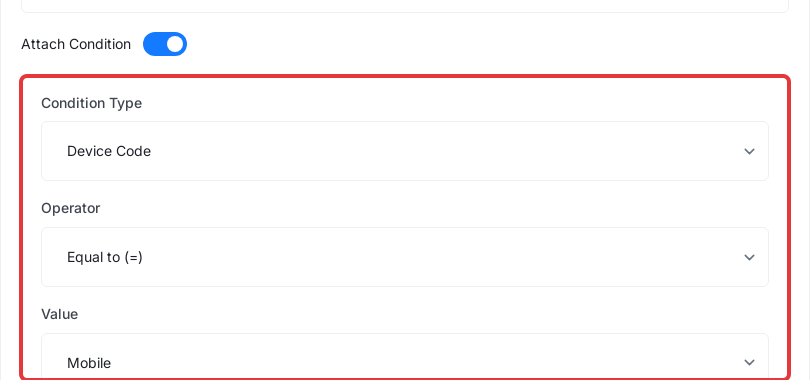
A condition makes the redirect apply only to some requests. Turn on Attach Condition, then choose the Condition Type, Operator and Value.
| Condition Type | Value to enter | Example |
|---|---|---|
| Host | A domain name | www.example.com |
| URI | A path | /old-page |
| Query Argument | The name of a query argument, using only letters, numbers and underscores | utm_source |
| Device Code | Mobile, Tablet or Desktop | Mobile |
Operator can be Equal to (=), Not equal to (!=), Regex matches (~) or Negative regex matches (!~). Device Code offers only the first two.
For example, a rule with Source Pattern ^/offers$, Destination /mobile-offers/ and Device Code equal to Mobile redirects phone visitors. Desktop visitors stay on /offers.
Step 6: Test and save the rule
Click Test Rule to check the rule without saving it. A passing test shows Configuration test passed.
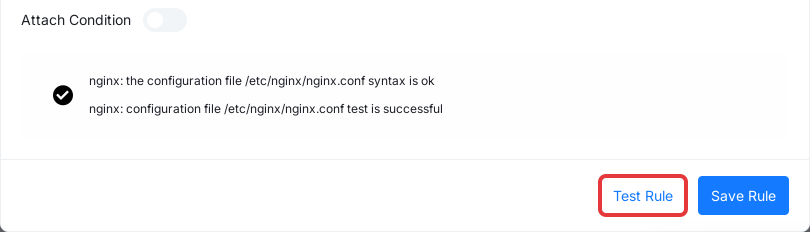
Then click Save Rule. xCloud tests your server’s configuration again as it saves. If that test fails, the rule isn’t saved and your site keeps running as it was.
The new rule appears in the Redirect Rules list.
Step 7: Check that the redirect works
Open the old address in a private browser window, or run this command with your own domain:
curl -I https://example.com/careerYou should see 301 or 302 and a location line with the new address. Browsers can remember a 301, so a normal window may keep showing an older result.
Edit, delete or reorder redirects
To change or remove a rule, click the three dots in its Actions column, then choose Edit or Delete.
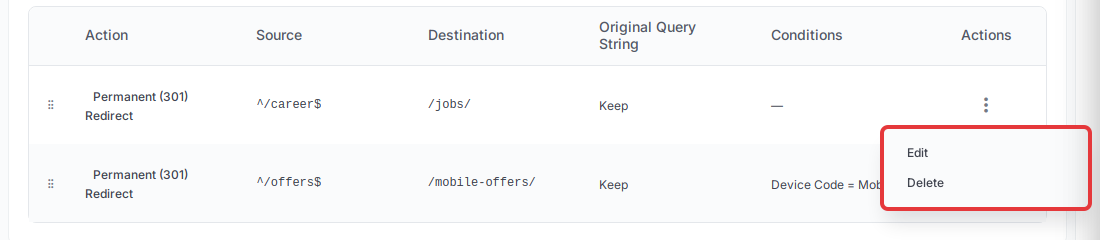
Deleting asks you to confirm with Yes, Delete, and the rule can’t be restored.
To change the order, drag a rule by the handle at the start of its row, then click Save Order. Click Discard to go back to the old order. xCloud applies rules in the order listed.
Your older redirects
Redirects you made before Site Rules keep working. They aren’t moved to Site Rules. When a site has any, the Redirect Rules tab shows a notice with a link to them.
You can also find them under Domain → Redirection (Legacy). This page is read-only, so you can view or delete rules there, but you can’t add or edit them.
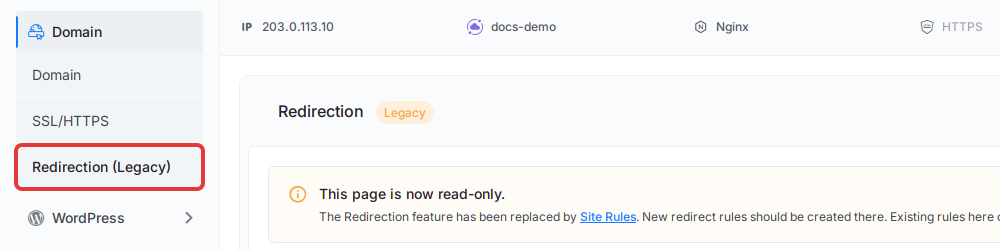
To change an older redirect:
- Create the new rule in Tools → Site Rules.
- Check that it works.
- Delete the old rule on the Redirection (Legacy) page, so that it can’t catch the same address.
Sites that are not WordPress
Sites that can’t use Site Rules, such as a custom PHP site, still add redirects under Domain → Redirection. Node.js sites and apps such as n8n, Uptime Kuma, Lovable and AI agents don’t have this page.

Choose a Redirect Type, fill in From and To, then click Add Redirection. For example, old-page to new-page redirects one page, and ^about/(.*)$ to about-us/$1 moves every page under about/ to about-us/.
If something goes wrong
| What you see | What to do |
|---|---|
| Site Rules isn’t in the sidebar | Check that the site is WordPress on an Nginx or OpenLiteSpeed server. If you’re a team member, ask your team admin whether your role can manage Site Rules. |
| Source must start with / or ^/. | Start the Source Pattern with / or ^/, not with your domain name. |
| Destination must start with / or http:// or https://. | Start the Destination with one of these. |
| A redirect rule with this source and destination already exists. | Edit the existing rule instead of adding a new one. |
| Configuration test failed. Site Rule was not saved. | Your site isn’t affected. Check the pattern for a mistake and try again. |
| Please enable config regeneration from your site settings. | Go to Security → Overview & Firewall and turn off Disable Nginx Config Regeneration (Disable OpenLiteSpeed Config Regeneration on OpenLiteSpeed). Click Yes, Enable to confirm, then save the rule again. |
| Maximum 25 redirect rules per site. | Delete rules you no longer need, or combine similar ones into one pattern. |
| The redirect doesn’t happen | Test in a private window. If you added a condition, check its value. Also check for a rule higher in the list, or an older redirect, that catches the same address. |
Related guides
- How to create and manage Site Rules also covers header rules.
- Monitor and fix broken links shows how to create a redirect from a broken link.
- Manage Site Rules with the xCloud Public API and MCP is for developers who automate rules.
Frequently asked questions
Do my older redirects still work?
Yes. Redirects you made before Site Rules stay active. You can view or delete them under Domain → Redirection (Legacy).
Can I edit a redirect on the Redirection (Legacy) page?
No. That page is read-only. Create the redirect again in Tools → Site Rules, then delete the old one.
Is Site Rules on the free plan?
No. Site Rules needs a paid plan. On the free plan, opening Site Rules takes you to the billing page.
How do I add a redirect to a site that is not WordPress?
Most other sites, such as a custom PHP site, use Domain → Redirection. Site Rules is only for WordPress sites on Nginx or OpenLiteSpeed servers. Node.js sites and apps such as n8n, Uptime Kuma, Lovable and AI agents don’t have a Redirection page.
If you run into any issues with redirects, feel free to reach out to our support team.