

How to Detect & Fix Security Bugs with Vulnerability Checker in xCloud?
Updated November 6, 2026 · 6 min read
To ensure the best security practices and a simplified web hosting experience, xCloud brings the Vulnerability Checker option. Teaming up with Wordfence, the global leader in WordPress security, xCloud is fully committed to addressing the vulnerabilities & helping users safeguard all WordPress applications. For an overview of what it does and which plans include it, see the WordPress vulnerability scanner feature page.
See the WordPress vulnerability scanner feature page for what it does, who it is for and which plans include it.
With xCloud’s Vulnerability Checker, you can scan and identify the security issues of core, plugin, and theme versions that are installed on your WordPress site. Once any vulnerabilities are detected, you can find all the details within the app and it will be marked as (e.g., 3 Issues Found). Let us dive into the step-by-step process.
How to Check Vulnerability Issues from Site & Fix Accordingly?
By following the below simple steps, you will be able to check and fix vulnerabilities from the individual site end.
Step 1: Enter Into The Site to Check Vulnerability Issues
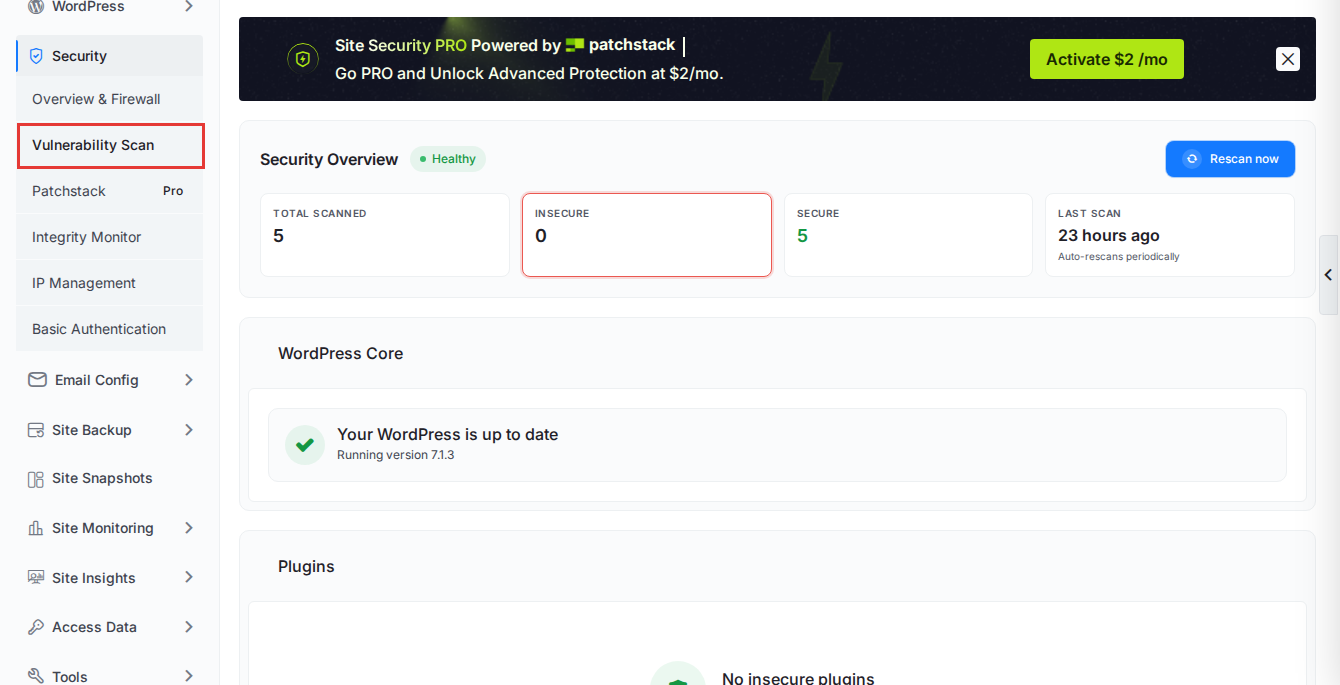
To check vulnerability issues for an individual site, log in to the dashboard, go to the Sites tab and click the site. In the left sidebar, open Security → Vulnerability Scan to see whether the site has any vulnerabilities.
The page opens with a Security Overview that shows how many items were scanned, how many vulnerabilities were found and when the last scan ran. The scan runs again on its own from time to time; click Rescan now to run it immediately. Below the overview, the results are grouped into WordPress Core, Plugins and Themes.
💡 Note: Vulnerability Scan used to sit under the WordPress menu. It is now part of the Security menu, next to Overview & Firewall, Patchstack and Integrity Monitor. The Vulnerabilities tile on Security → Overview & Firewall also links to this page.
Step 2: See Details & Fix Vulnerabilities within Clicks
Each row shows the item’s Status and Severity. If an item shows the Insecure status, click Details to see where the issue is and what you need to do to fix it. The details show the issue’s CVSS Score, the version it is Fixed in and the Remediation for your installed themes, plugins and WordPress core.
Remember, the CVSS Score is very important here to understand! The score has been classified into three different categories: Low, Medium and High. In any case, if you see any red signal with High alert that means you need to take action immediately.
To fix an issue, click Update in the Action column. If you have reviewed an issue and accept the risk, click Ignore beside it instead.
Moreover, if you want to see the issues in detail before clicking on the ‘Update’ button, the Vulnerability Checker of xCloud also provides you with that option. To see so, hit the ‘Details’ option beside the status of your vulnerability.
Notes: All notifications for vulnerabilities including email, WhatsApp, Slack, and others will be sent at a 10-day interval.
If the site has Site Security PRO active, Security → Vulnerability Scan shows Patchstack’s vulnerability list instead, with its security score, blocked attacks and security activity. Sites without it see an Activate banner for Site Security PRO on this page.
How to Disable/Enable Vulnerability Scanner Feature On Server/ Sites?
What if you need to set the vulnerability scanners for all the sites under a specific server? With xCloud, you can do this as well. All you need to do is follow the below steps.
Step 1: Open the Server’s Vulnerability Settings
Click Servers and open the server. In the server’s left menu, click Security → Vulnerability Settings.
💡 Note: Vulnerability Settings is available on paid plans. On the free plan, opening Vulnerability Settings takes you to Bills & Payment with the message “You need to upgrade your plan to access this feature.”
Step 2: Turn On the Scan and Choose What It Covers
Turn on Vulnerability Scan. Then choose what Scan covers:
- Every WordPress site, including new ones: the scan follows every WordPress site on the server.
- Only the sites ticked below: the scan covers only the sites you tick in the Scan column.
Click Save Settings. Until you save, the page tells you that you have changes.
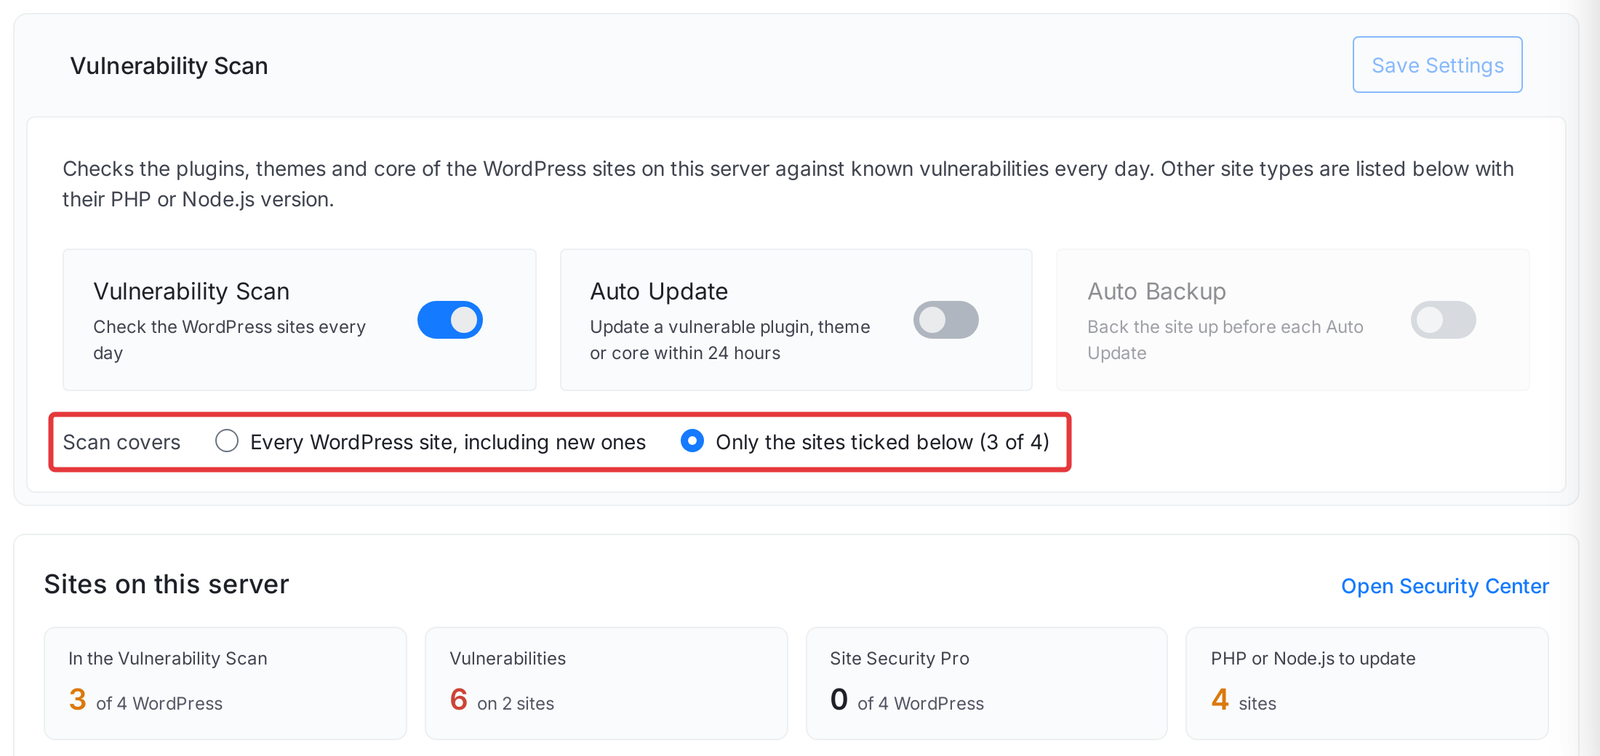
Sites on this server lists every site on the server. The cards above the list show how many sites are in the scan, the open vulnerabilities, Site Security Pro use, and the PHP or Node.js versions to update. Use them, the search, Sort By, Filter and the state menu to narrow the list. The state menu includes Not in the scan.
The Scan column has a tick box for each WordPress site. Other site types show a dash, because the scan only covers WordPress.
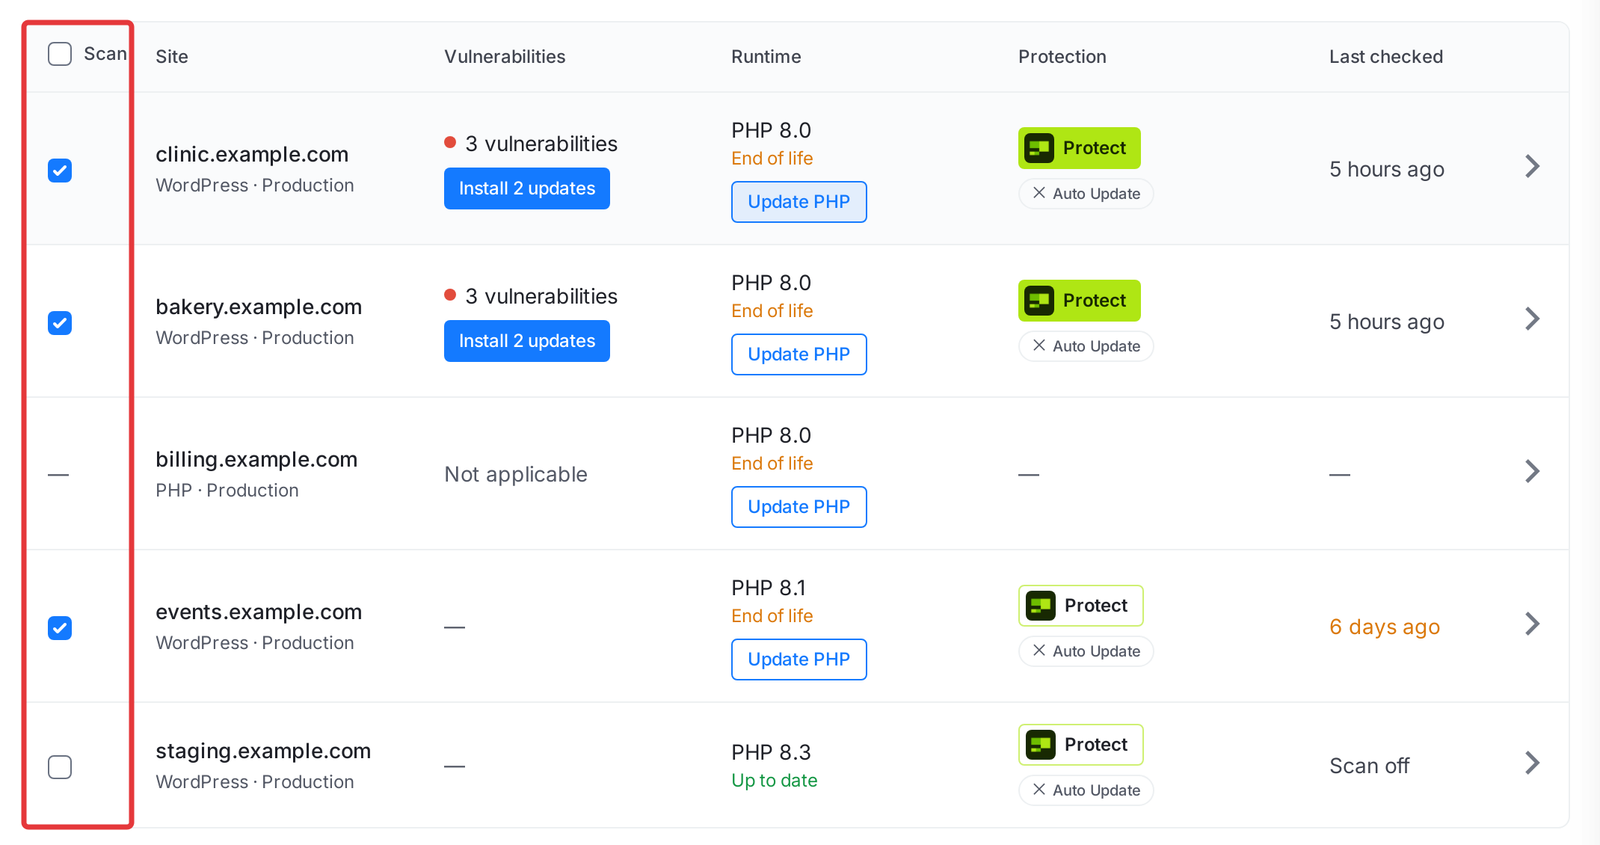
If you later untick a site, or turn off Vulnerability Scan for the server, xCloud clears the Wordfence vulnerability list of the sites that are no longer covered.
Step 3: Turn On Auto Update and Auto Backup
Turn on Auto Update to update a vulnerable plugin, theme or core within 24 hours. Then turn on Auto Backup if you want the site backed up before each Auto Update. Click Save Settings.
Auto Update only applies to sites the scan covers, so the Protection column shows it as on only for those sites. It covers known vulnerabilities reported by Wordfence and by Site Security PRO (powered by Patchstack). Premium plugins that update from inside the plugin, such as Rank Math Pro, are updated too. If an update fails, xCloud tries again the next day, and the vulnerability stays on the list until it is fixed.
How to Turn the Vulnerability Scan Off or On for One Site?
Each WordPress site also has its own scan switch, separate from the server’s Vulnerability Settings. Use it when one site should stay out of scans, for example a test copy, while the rest of the server is still scanned. The switch is on for every site unless you turn it off.
When a site’s scan is off:
- xCloud stops including the site in scheduled scans.
- The site no longer shows a vulnerability count in your site lists.
- The site’s saved vulnerability list is kept. It shows again when you turn the scan back on.
You turn a site’s scan off through the xCloud Public API or an AI agent connected to xCloud MCP (see For developers below). You can turn it back on from the dashboard.
Step 1: Open the Site’s Vulnerability Scan Page
Go to Sites, click the site, then open Security → Vulnerability Scan. If the site’s scan is off, the page shows a Vulnerability Scan panel with an Enable button instead of the scan results.
Step 2: Click Enable
Click Enable. The page reloads. If the server’s Vulnerability Settings cover this site, the site is part of scheduled scans again, with its earlier results back on the list.
If the page then says vulnerability detection is disabled, the server’s Vulnerability Settings don’t cover this site yet: click click here, then turn on Vulnerability Scan or tick the site in the Scan column, and click Save Settings.

For developers: Public API and MCP
PUT /api/v1/sites/{uuid}/vulnerability-scan/settingswith{"enabled": false}or{"enabled": true}turns one WordPress site’s scan off or on. It needs a token with thewrite:sitesscope and the site:vulnerability-scan team permission. A non-WordPress site gets a 422 error.GET /api/v1/servers/{uuid}/vulnerability-settingsreads a server’s Vulnerability Settings:vulnerability_scan,auto_update,auto_backup,all_sitesandsites(site UUIDs, ornullfor every site). It needs theread:serversscope.PUT /api/v1/servers/{uuid}/vulnerability-settingschanges them. Sendvulnerability_scan, plusauto_updateandauto_backupwhen the scan is on, andsites(nullcovers every site). It needs thewrite:serversscope. Both server calls need the server:vulnerability-settings team permission and return 403 on the free plan.- A site with the scan off is left out of vulnerability lists and counts in the Public API.
- The xCloud MCP server offers the same actions to AI agents, and asks for your confirmation before it changes these settings.
POST /api/v1/vulnerabilities/fixupdates only the vulnerable plugins, themes and WordPress core on up to 100 sites, with a backup first. See Fix Vulnerable Plugins, Themes and Core on Many Sites with the Public API and MCP.
How to See Vulnerabilities Across All Your Sites
The Vulnerable Sites page is now the Security Center, and old links to it open the new page. Click Settings → Security Center to see every vulnerable plugin, the PHP and Node.js versions behind your sites, and each server’s status in one place. See the Security Center guide for each page.
This is how you can easily check and fix vulnerability issues in the themes, plugins and core in your WordPress site directly from the dashboard.
Frequently asked questions
Does turning off a site’s vulnerability scan delete its results?
No. Turning off the scan for one site takes it out of scheduled scans and vulnerability lists, but its saved vulnerability list is kept. It shows again when you turn the scan back on.
Does Auto Update fix vulnerabilities that Site Security PRO finds?
Yes. With Auto Update on, xCloud fixes known vulnerabilities in plugins and themes found by Wordfence or Site Security PRO. If an update fails, xCloud tries again the next day.
Can I manage vulnerability scans on the free plan?
No. The server’s Vulnerability Settings page is for paid plans. On the free plan, opening Vulnerability Settings takes you to Bills & Payment with the message “You need to upgrade your plan to access this feature.”
Which sites can xCloud scan for vulnerabilities?
WordPress sites only. The scan checks the WordPress core, plugin and theme versions installed on the site.
Still stuck? Contact our dedicated support team for any of your queries.