

How To Enable 8G Firewall in xCloud?
Updated October 26, 2026 · 4 min read
The 8G Firewall is a robust security solution for OpenLiteSpeed and Nginx servers, protecting a variety of threats, including SQL injections, cross-site scripting (XSS), remote code execution, and malicious bots. With xCloud, you can easily enable 8G Firewall in xCloud with a few clicks. For an overview of what it does and which plans include it, see the 7G and 8G firewall feature page.
What Is An 8G Firewall?
The 8G Firewall, an enhanced web application firewall (WAF), is a set of web-server rules that filter out common malicious traffic before it hits your website. This lightweight firewall is an advanced iteration of the earlier 7G Firewall developed by Perishable Press. The 8G Firewall aims to reduce the cost of traffic requesting PHP/WordPress resources and enhance overall site security.
8G Firewall: Top Features & Goals
- Security via simplicity
- Extensive firewall protection
- Fine-tuned to minimize false positives
- Lightweight (only 14 KB!), modular, flexible, and fast
- Completely plug-&-play with no configuration required
- Improves security, reduces server load, and conserves resources
- Git/SVN friendly (does not block svn/git files et al)
- Open source, easy to use, and completely free
- 100% compatible with WordPress
- Enhanced bad bot detection
- Built-in logging
Types Of Attacks & Threats 8G Protects Against
- Directory Traversal
- HTTP Response Splitting
- (XSS) Cross-Site Scripting
- Cache Poisoning
- Dual-Header Exploits
- SQL/PHP/Code Injection
- File Injection/Inclusion
- Null Byte Injection
- WordPress exploits such as revslider, timthumb, fckeditor, et al
- Exploits such as c99shell, phpshell, remoteview, site copier, et al
- PHP information leakage
📚 Read more on the 8G Firewall here.
How To Enable 8G Firewall On Website With OLS
With a few clicks, you can enable the 8G Firewall on your website from your xCloud end. Follow the steps below to enable it.
Step 1: Open your site’s security page
Log in to your xCloud dashboard and open your website. In the site menu, go to Security → Overview & Firewall. The browser tab reads Security on OpenLiteSpeed servers and Nginx and Security on Nginx servers.
The Web firewall tile at the top of the page shows which firewall is on right now, for example 8G on or Off.
Step 2: Turn on the 8G Firewall and save
In the Security Settings card, find the Firewall rules group and turn on 8G Firewall. The bar at the bottom of the card now says You have unsaved changes. and Save Settings turns solid blue. Click Save Settings.
xCloud rewrites the site’s web server config and reloads it. When it finishes, the Web firewall tile shows 8G on. To undo a change before saving, click Discard. To check the generated config first, click Preview Config.
Note: You can run only one of 7G Firewall and 8G Firewall on a site. If both are on when you click Save Settings, xCloud shows You can not enable 7G and 8G firewall at the same time. Turn the other one off, then save.
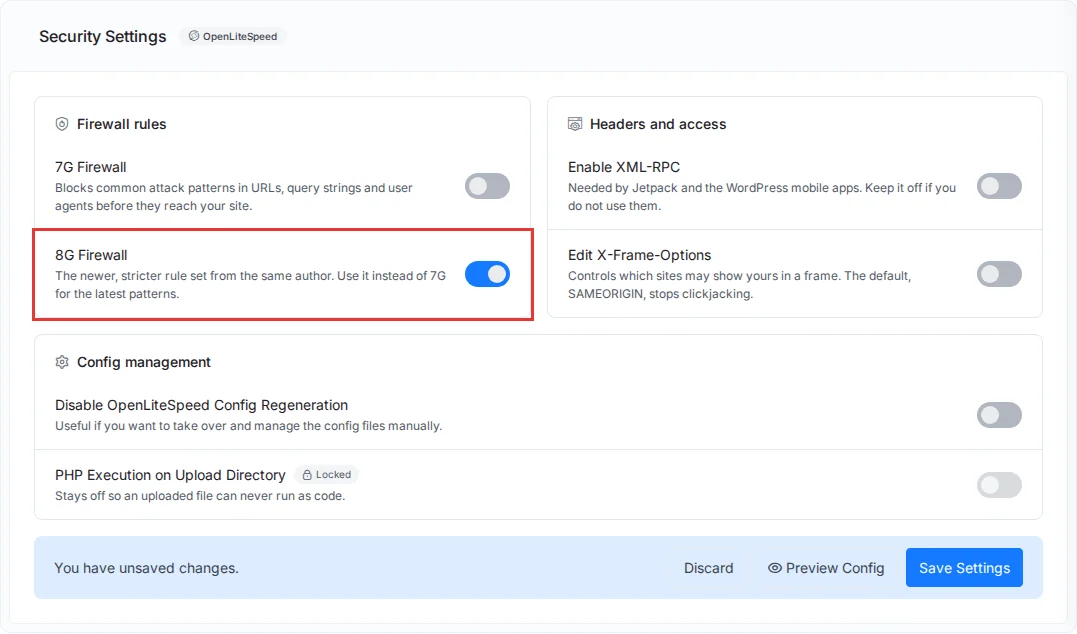
Note: If Disable OpenLiteSpeed Config Regeneration (or Disable Nginx Config Regeneration on Nginx) is on, xCloud is not managing the site’s config, so the firewall options are hidden and the Web firewall tile shows Managed by you. To change them, turn that option off in the Config management group and confirm with Yes, Enable.
This is how you can easily enable the 8G Firewall from the xCloud dashboard.
8G Firewall Location on Server
You can view the 8G Firewall configuration location With the below file path:
/var/www/yourdomain.com/.htaccess
The conditional rules for each site can be found in the .htaccess file
Check 8G Logs
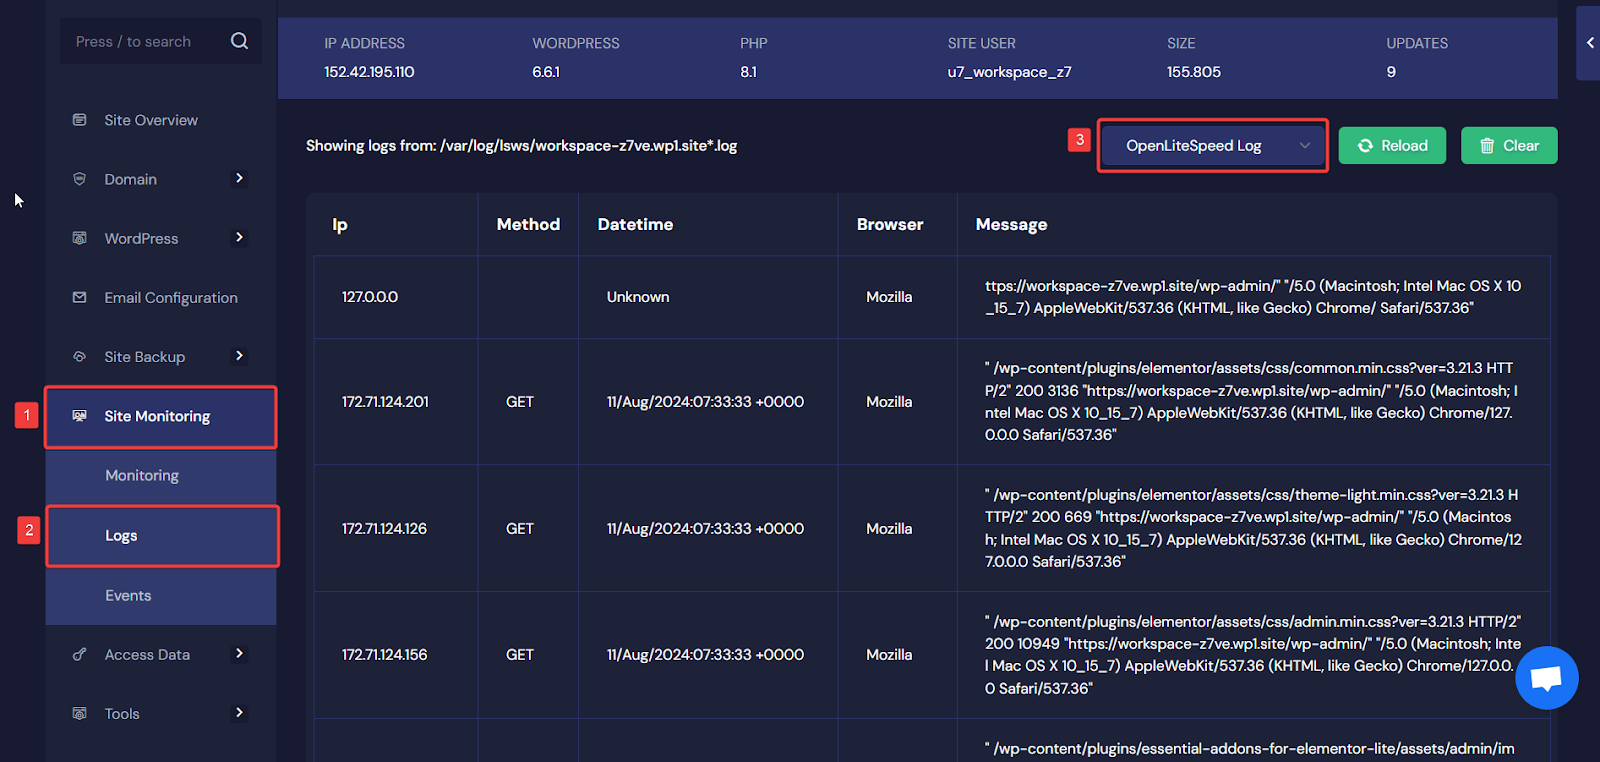
On OpenLiteSpeed there is no separate 8G log. Requests the 8G Firewall blocks are refused with a 403 response, so look for them under Site Monitoring → Logs (Monitoring → Logs on non-WordPress sites) in the OpenLiteSpeed Access Log. On Nginx, choose 8G Error Log in the same list.
How To Enable 8G Firewall on Website With NGINX
The 8G Firewall is also available on Nginx servers. Follow the same steps: go to Security → Overview & Firewall, turn on 8G Firewall under Firewall rules and click Save Settings. On Nginx, a View Logs link appears under the option once it is saved, and it opens the site’s 8G error log.
xCloud recommends 8G over 7G: it is the newer, stricter rule set from the same author.
Issues And Troubleshoots
With this type of firewall, you may face some issues or troubleshoots. One of the drawbacks is that certain legitimate activities may get blocked. The 8G Firewall is highly effective at blocking a wide range of malicious activities, but it can also inadvertently block legitimate actions and plugins due to its stringent security rules. Here are some specific issues that may arise:
- Elementor Editing: The 8G Firewall has been known to block the editing capabilities of the Elementor plugin, resulting in 403 Access Denied errors when trying to preview, edit, or access Elementor pages (WordPress.org).
- SEO Tools: Certain rules in the 8G Firewall can interfere with SEO plugins, such as blocking requests from tools like Ahrefs and preventing the loading of CSS and JavaScript files necessary for plugins like Rank Math SEO (Perishable Press).
- Admin Access: Some rules may block access to various admin functions and pages, causing issues with wp-admin and other administrative scripts. This can lead to errors when trying to access plugin settings or perform administrative tasks. (WordPress.org).
Due to these potential conflicts, users may need to deactivate the 8G Firewall temporarily, adjust its configuration to allow specific actions, or whitelist certain plugins and services.
Note: We are continually focused on enhancing security and will bring more advanced features soon.
Still stuck? Contact our dedicated support team for any of your queries.
Related docs:
How To Easily Configure Firewall Management With xCloud Hosting
How To Use xCloud 7G Firewall On Nginx
Server at 100% CPU: Find the Culprit Site and Stop Bot Traffic