


Caching plays a crucial role in boosting website performance and delivering a faster, smoother browsing experience for users. At xCloud, we know that speed and performance are critical for a great user experience. That’s why we offer powerful Edge Caching, which saves your site’s page cache to a global network of data centers, delivering content from the location closest to each visitor. This can boost your website speed and performance.
Along with edge caching, we implement heavy caching layers both at the server level and through Page Caching and Object Caching, ensuring lightning-fast load times. By default, our edge cache refreshes every 24 hours, but you have full control — you can adjust cache expiration times or manually clear caches as needed. Whether you’re deploying updates, copying your site, or simply editing a post, purging the right cache ensures your changes appear instantly.
At xCloud, edge caching is included with all plans at no extra cost — no plugins required. If your site is integrated with Cloudflare, you will be able to access this feature with a click.
Note: To use this feature, you must integrate Cloudflare with xCloud and configure your site accordingly. It is also recommended to maintain a full-page cache alongside the Edge Cache for optimal performance. You can continue using your existing full-page caching solutions, such as FastCGI (NGINX Cache), LiteSpeed Cache (LSCache), or WP Rocket, together with the Edge Cache.
Edge Full Page Cache #
Edge Full Page Cache is an optional layer of caching at the network level that improves your website’s performance. This feature caches the website’s HTML and stores it on Cloudflare’s CDN network, enhancing the Time to First Byte (TTFB) and latency for most websites.
If your domain is currently configured using Advanced Network or Global Edge Security (GES), most of your static assets are already cached through Cloudflare’s CDN. However, HTML files by default are served directly from the servers. With Edge Full Page Cache enabled, HTML pages are also cached at Cloudflare’s edge, making assets geographically closer to your visitors and improving overall page performance.
How Does Edge Caching Work? #
Edge caching operates by strategically distributing cached copies of website content across multiple servers at the edge of a content delivery network (CDN), closer to end-users. Here’s a detailed breakdown of how it works:
Request Routing: When a user/visitor requests content from a website, such as HTML files, images, videos, or other resources, their request is initially routed to the CDN’s edge servers, which are distributed worldwide.
Edge Server Selection: The CDN intelligently selects the edge server nearest to the user requesting the content. This selection is based on factors such as the user’s geographical location, network conditions, and server availability.
With over 200 edge server locations worldwide powered by Cloudflare, your content is delivered from the edge server nearest to the visitor. This reduces the need for requests to travel across continents to your origin server, minimizing latency and improving page load times significantly.
Steps to Enable the Edge Full Page Cache in xCloud #
Caching content at the network edge significantly improves website performance by reducing latency and load times for visitors. xCloud makes it easy to enable full-page caching using their Edge Caching feature, allowing for a faster and more responsive experience for your users. This guide will walk you through the process of enabling Edge Full Page Cache in xCloud step-by-step.
Step 1: Access the Site Dashboard #
First, navigate to the dashboard of the site where you want to enable Edge Caching. Once logged in, locate and click on the ‘Caching’ option from the main menu.

Step 2: Enable Edge Caching #
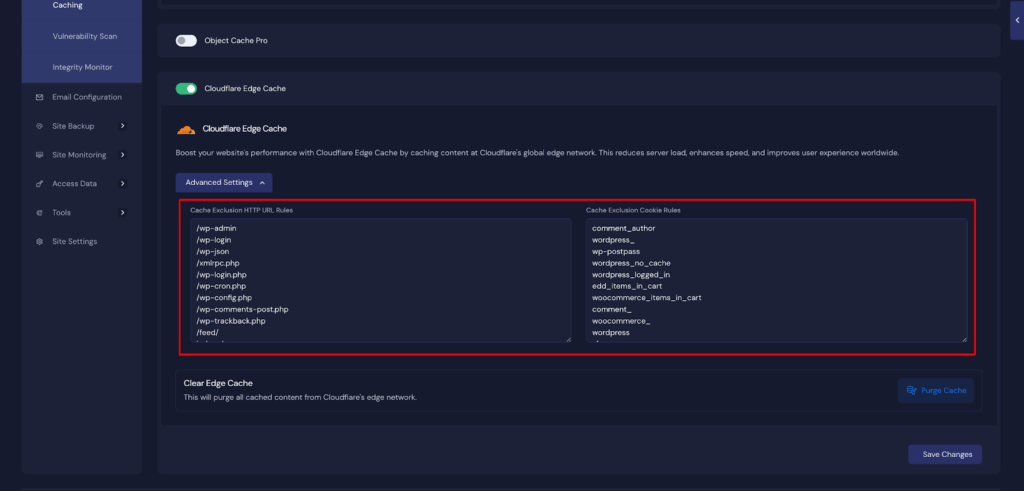
Within the Caching section, click on the ‘Edge Caching’ button to activate the feature.Next, click on ‘Advanced Settings’ to access additional configuration options.

Step 3: Configure Cache Exclusion Rules #
In the Advanced Settings menu, you will find options to customize caching behavior:
- Cache Exclusion HTTP URL Rules: Specify URL patterns you want to exclude from being cached.
- Cache Exclusion Cookie Rules: Define cookie-based rules to prevent caching for certain sessions or users.
Set these rules according to your specific preferences or requirements.
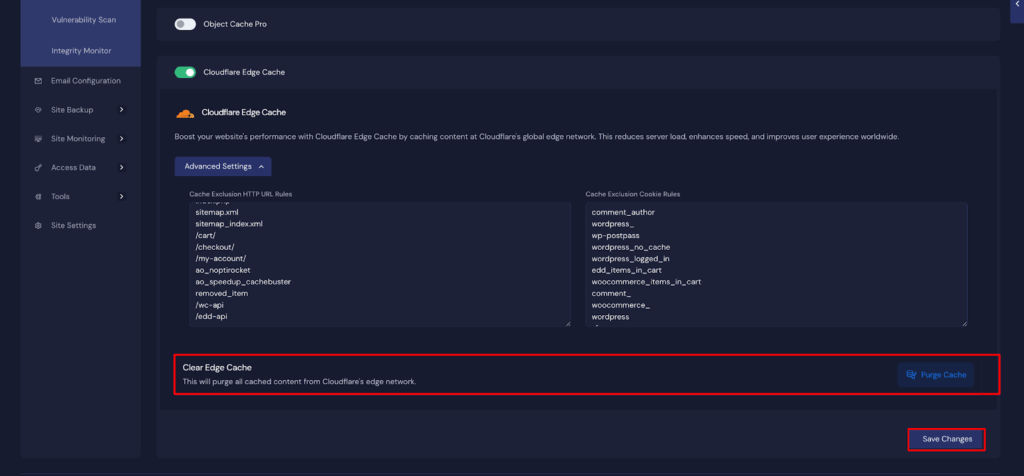
Step 4: Purge Cache #
After configuring the caching settings, click on the ‘Purge Cache’ button. This action will clear all previously cached content from Cloudflare’s edge network, ensuring the updated rules are applied immediately. After all the configurations, click on the ‘Save Settings’ button.
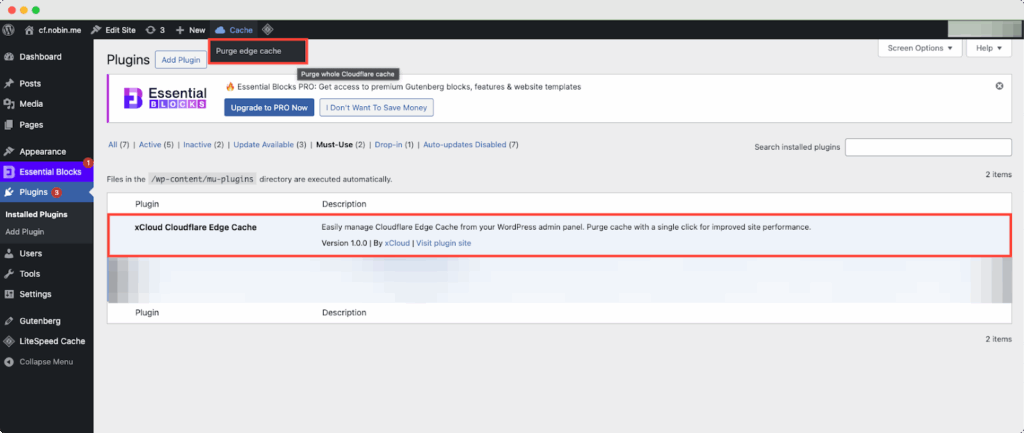
Afte that, if you go to your xCloud dashboard, you will see the plugin ‘xCloud Cloudflare Edge Cache’ has been installed on your site. From here, if you go to the header menu, you will see the ‘Purge Cache’ button from the dashboard which you can click to purge your site caches easily.
And that’s it. This is how easily you can enable Edge Full Page Cache in xCloud and enhance your site’s performance and user experience. By carefully setting exclusion rules and purging outdated cache, you ensure that your visitors receive the most up-to-date and optimized content.
Things to Know Before Enabling Edge Caching #
Here are some important considerations to keep in mind when using Edge Caching with xCloud.
Geolocation Variations #
Edge Caching does not support narrow-scope geolocation variations, such as caching based on city, state, or border proximity. Sites relying heavily on localized content variations may need to consider alternative caching strategies.
Geo-blocking and IP Blocking #
Geo-blocking and IP Deny rules are enforced at the server level (Nginx). Since Edge Caching happens on Cloudflare’s network, visitors from blocked IPs or regions could still access cached versions of your site. Additionally, visits from these blocked IPs will still appear in your site’s analytics data.
Set-Cookie Header Conflicts #
Pages that send a Set-Cookie header by default are not cached at the edge. To prevent caching visitor-specific data, Cloudflare automatically removes the Set-Cookie header from cached responses for all new sites. This ensures the cache remains consistent and secure.
Cloudflare APO #
If you are using your own Cloudflare account, you can utilize Edge Caching only if Cloudflare’s Automatic Platform Optimization (APO) feature is disabled. Edge Caching and APO cannot be active simultaneously, so you will need to choose one or the other.
General Behavior and Compatibility #
It’s important to note that after clearing the Edge Cache, you should allow 2 to 5 minutes for the purge to fully propagate across all Cloudflare data centers, as the process isn’t instantaneous.
Where Edge Caching Can Be Used #
Edge Caching is supported on both Live Sites, Staging Environments and demo site. However, it is not available for Standard Staging Environments. If you are working within a Standard Staging Environment, Edge Caching will not be an option.
Content Served by Edge Caching #
Edge Caching only caches and serves the page cache of your site, which refers to the HTML output, static assets such as images, JavaScript files, or CSS files.
WordPress Compatibility #
Edge Caching is fully compatible with standard WordPress setups as well as popular plugins and frameworks like BuddyPress, WooCommerce, and Easy Digital Downloads. Pages that need to bypass caching, such as the WordPress Admin, Cart, Checkout, and My Account pages, are automatically excluded from Edge Caching.
For highly customized WordPress installations, additional custom caching rules may be necessary. The xCloud Support team is available to assist with creating these custom configurations if needed.
Cache Clearing Automation #
Whenever you update pages or make changes within WordPress, both the Site Cache and Edge Cache are automatically purged. In most cases, manual cache clearing is unnecessary unless you have a specific reason to do so.
Custom Cache Exclusions #
If your site uses Advanced Site Cache custom exclusions — such as specific combinations of custom cookies and URIs — these are not yet honored by edge caching.
Custom Cache Rules #
You can safely enable edge caching as long as our Support team has not set up special cache rules for your site involving custom cookies or geolocation-based logic.
Cloudflare Edge Cache File Size Limit #
When using Cloudflare with xCloud, it’s important to understand that there are limitations on how large a file can be cached at the network edge. According to Cloudflare’s official guidelines, the maximum size for any single file cached on the edge is 512 MB for users on Free, Pro, and Business plans. This limit increases to 5 GB for Enterprise customers.
And files that exceed this size threshold won’t be cached at Cloudflare’s edge. Instead, those requests will bypass the edge and be delivered straight from your origin server — potentially resulting in slower performance for large files such as video content or software downloads.
If your site serves large files, consider these alternatives:
- Cloudflare R2: An object storage solution that lets you deliver large files efficiently without incurring egress costs.
- Disabling Cloudflare Proxy Temporarily: You can set the DNS proxy (orange cloud icon) to “off” to allow large files to be delivered directly from your server without passing through Cloudflare.
Also note that changing TTL (time-to-live) settings for caching does not bypass these file size limits — they are enforced regardless of your cache duration configuration.
Edge Full Page Cache respects the cache-control headers configured by your page caching solution. For example, xCloud installs the FastCGI Cache plugin for NGINX servers, the LiteSpeed Cache plugin for OpenLiteSpeed (OLS) servers, or popular caching plugins like WP Rocket, depending on your server environment.
Troubleshooting Edge Caching #
If Edge Caching doesn’t seem to be working properly on your xCloud site, there are a few steps you can take to diagnose and fix the issue.
Check for Excluded URL Patterns or Cookies #
Another potential cause is exclusion based on URL patterns or cookies. Specific sections of your site, like /cart or /checkout, might be configured to bypass caching automatically. Similarly, pages that depend on custom cookies, such as login sessions or shopping carts, might also be excluded. If you expect a page to be cached but notice that it isn’t, it’s a good idea to contact xCloud Support. They can help verify whether certain pages or cookies have been intentionally excluded from caching or whether any additional custom caching rules are influencing this behavior.
Password Protection and Edge Caching #
If your site has Password Protection enabled, Edge Caching cannot function. Password protection must be disabled for Edge Caching to work successfully. Make sure to check this setting if Edge Caching appears inactive after other troubleshooting steps.
Conflict with Cloudflare APO #
If you are using Cloudflare’s Automatic Platform Optimization (APO) service through your own Cloudflare account, it will conflict with Edge Caching. In order for Edge Caching to operate correctly, you must disable APO. It’s important to ensure that only one optimization service is managing cache behavior to avoid conflicts.
Geo-blocking and IP Blocking Considerations #
Since Edge Caching operates at Cloudflare’s network level, it does not respect geo-blocking rules that are configured at the server (Nginx) level. This means visitors from regions that you intended to block might still receive cached content. Similarly, IP addresses that have been blocked via xCloud’s IP Deny tool may still be able to access cached pages through Cloudflare’s edge network. If maintaining strict geo- or IP-based access control is critical for your site, you may want to reconsider enabling Edge Caching.
Still stuck? Contact our support team for any of your queries.


