


A mailbox stores and manages your emails. It allows you to send, receive, and organize messages using an email address that includes your own domain. For example, instead of using a generic email like yourname@gmail.com, you can use yourname@yourbusiness.com.
Having a professional mailbox with your domain helps you build trust with customers. It gives your communication a branded, business-like look. It also helps you manage business emails more securely and efficiently, all in one place.
To create professional email addresses with your own domain, use the Mailbox Addon. With xCloud MailBox Addon, you can create and manage professional email addresses using your own domain name.
You can send and receive emails securely from your email addresses. It helps you manage business emails with ease and gives you full control over your mailbox setup. Follow the steps below to set up your Mailbox easily:
Note: This Addon is not available on our Reseller Hosting Program. To learn about the features that are available on the Reseller Hosting Program, please visit here.
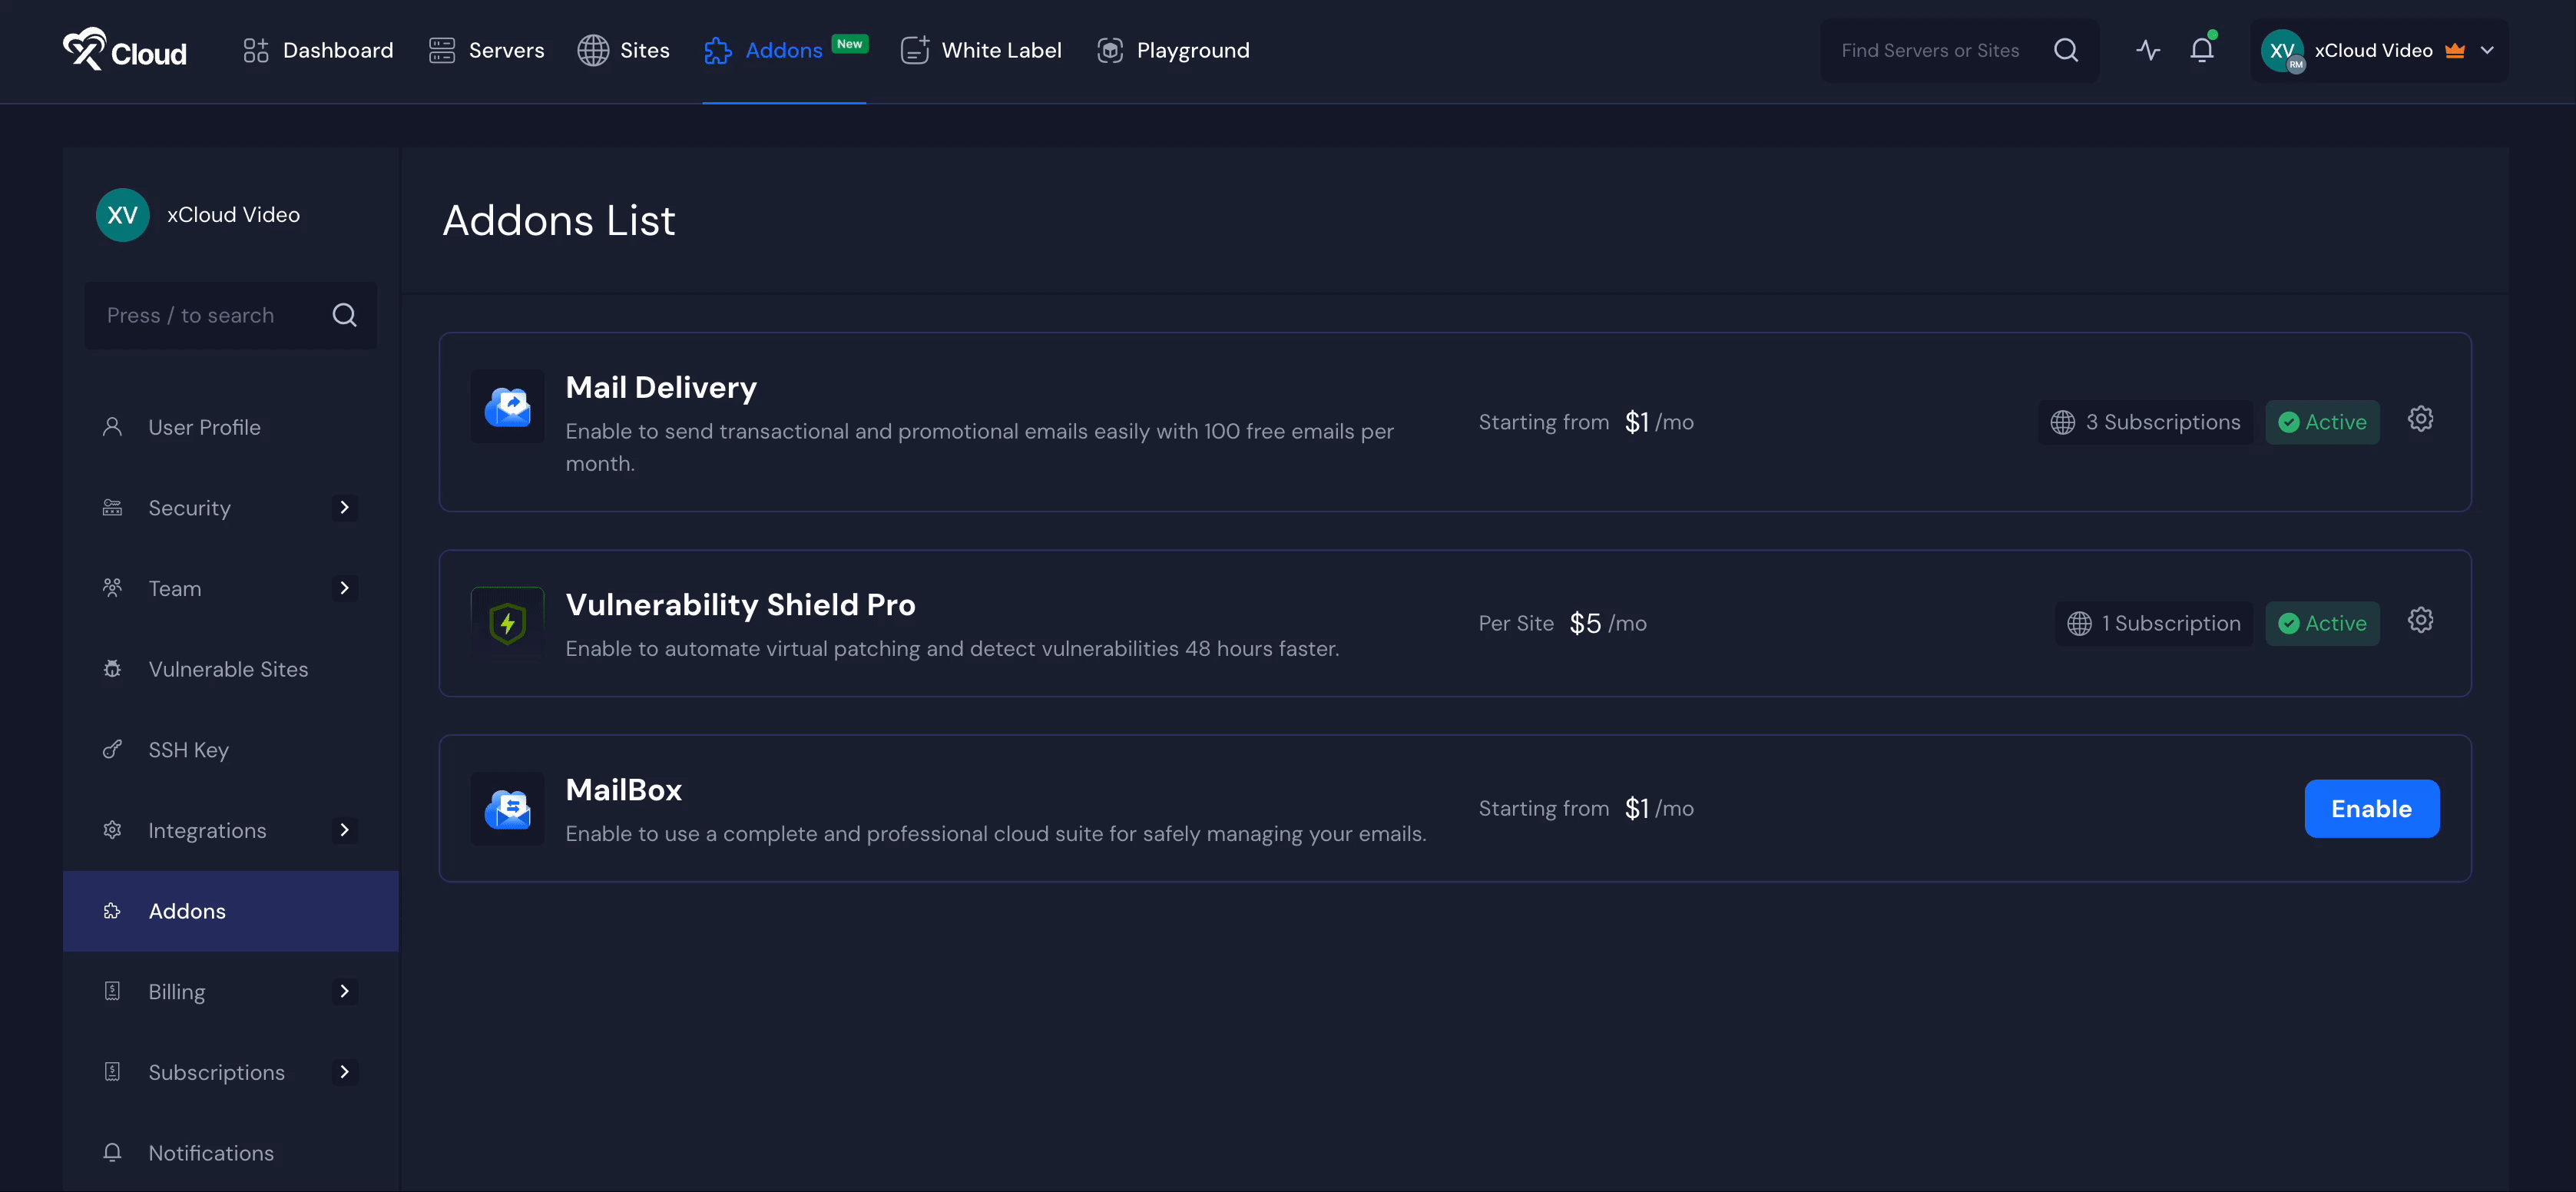
Step 1: Go to Addons #
Log in to your xCloud dashboard, then head over to the top right menu and click on the ‘Addons’ from the dashboard. Here you will find all the addons available in xCloud.
Step 2: Enable xCloud Mailbox Addon #
Look for the ‘MailBox’ addon from the list of available addons. If you have not purchased it yet, click the ‘Enable’ button to purchase it. Then hit the ‘Start’ button to proceed.
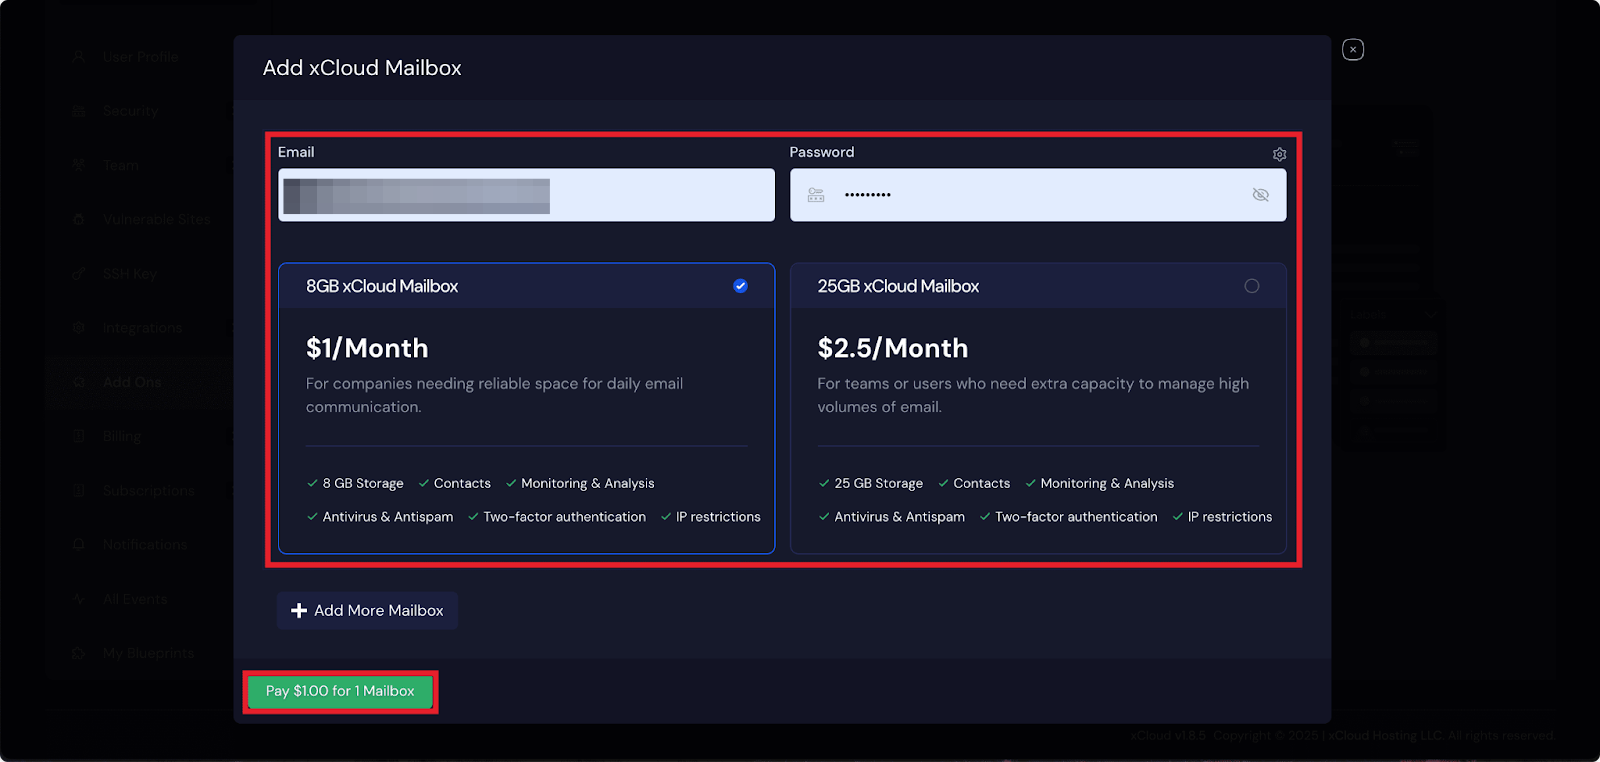
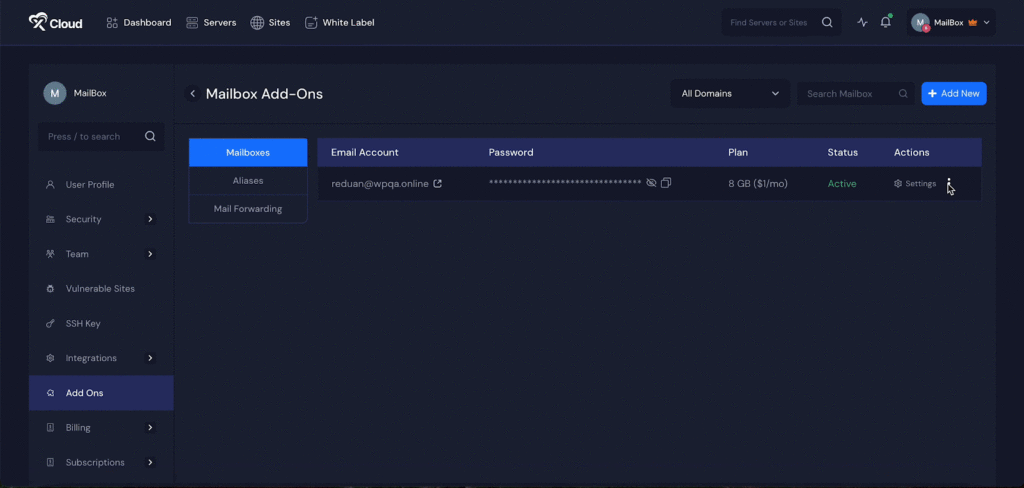
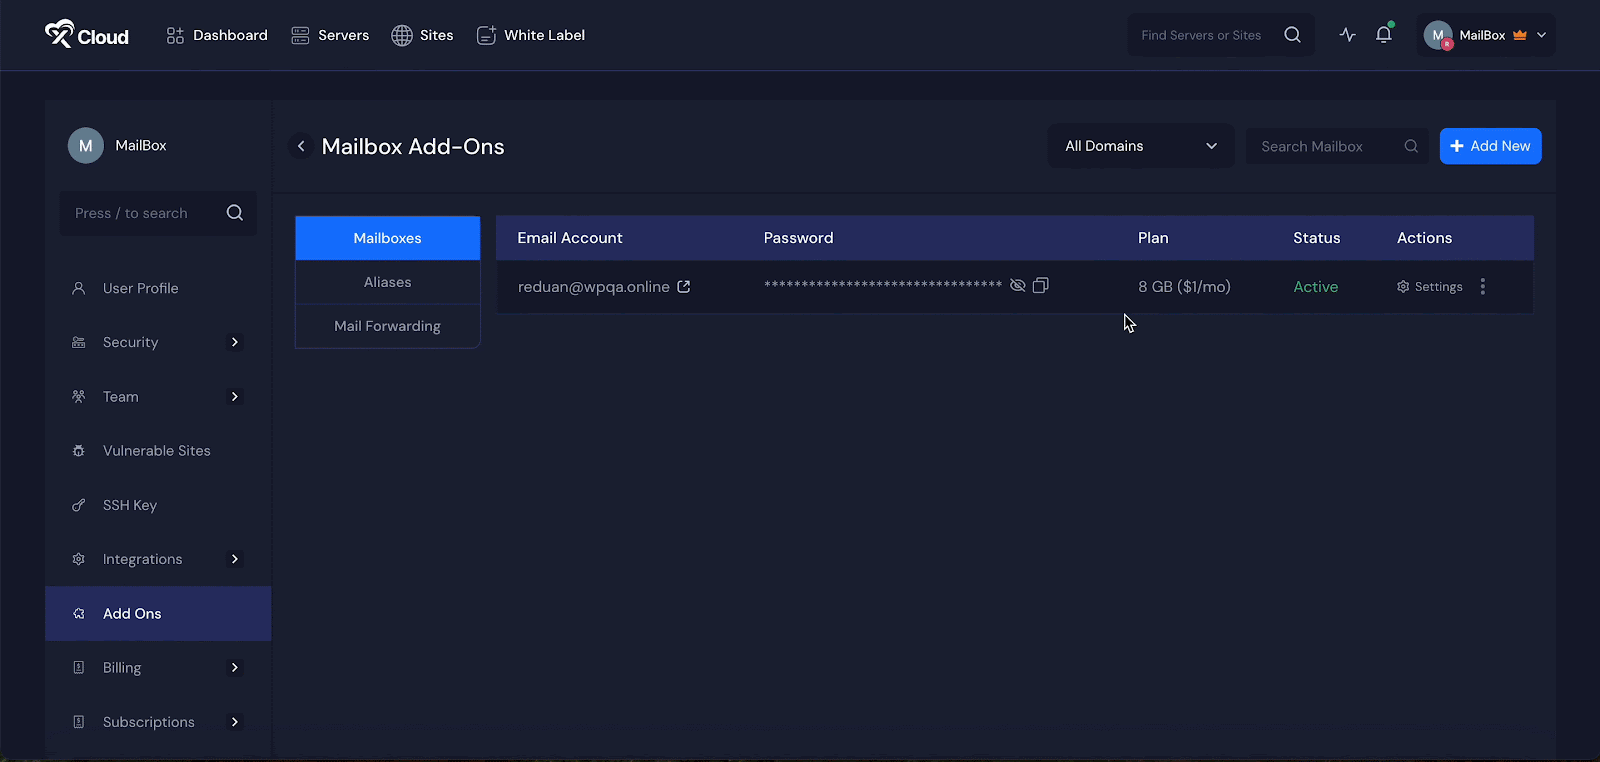
Step 3: Subscribe to a Mailbox Subscription Plan #
Next, a pop-up will appear. Enter the credentials ‘Email’ and ‘Password’ in the dedicated fields. Then choose a plan according to your needs.
Right now, xCloud Mailbox offers two plans:
- 8GB xCloud Mailbox
- $1/Month
- 8 GB Storage
- 25GB xCloud Mailbox
- $2.5/Month
- 25 GB Storage
And finally, click on the ‘Pay’ button.
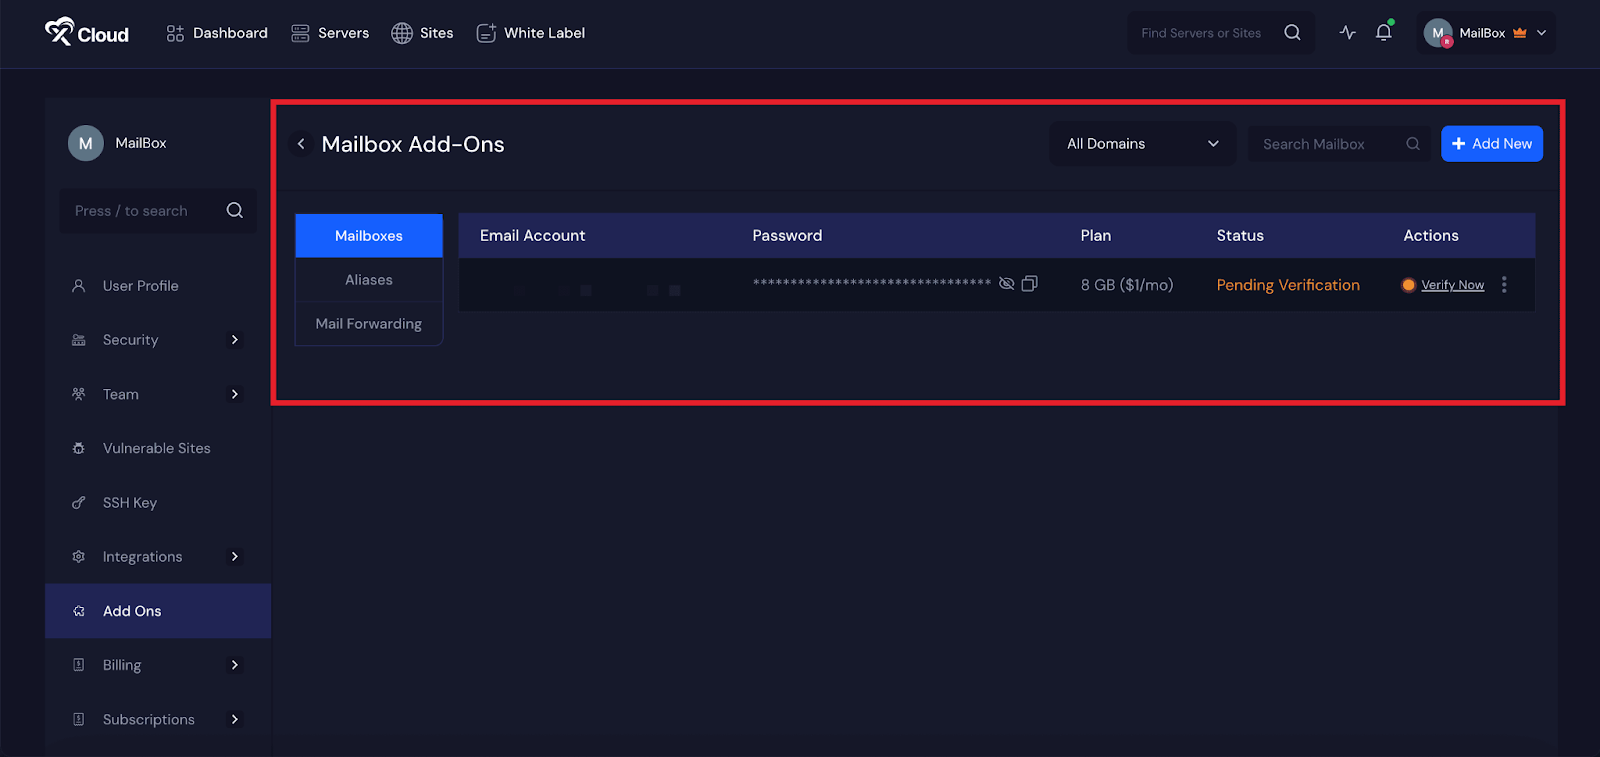
Step 4: Verify Mailbox #
Once the purchase is done, your subscription plan for the xCloud Mailbox will be shown in the dashboard. Here you can see the ‘Pending Verification’ status. Click on the ‘Verify Now’ button to start the DNS setup process.
You can do this in two ways. If you have already connected your domain with Cloudflare, the easiest method is to toggle the “Auto Manage DNS Records” switch. This will automatically add all the required DNS records like MX and SPF to your Cloudflare account and verify them. If you have enabled DKIM, the DKIM records will also be added and verified. This method is recommended because it saves time and reduces the chance of errors.
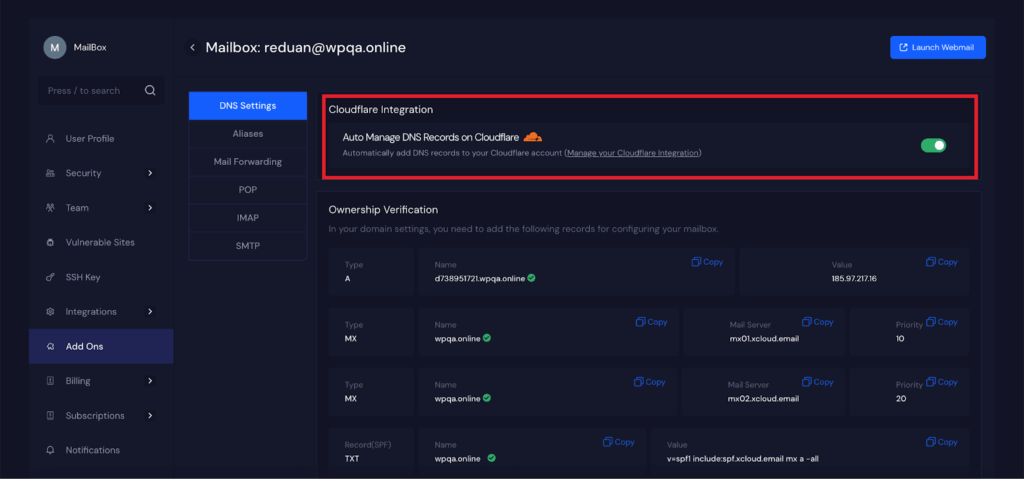
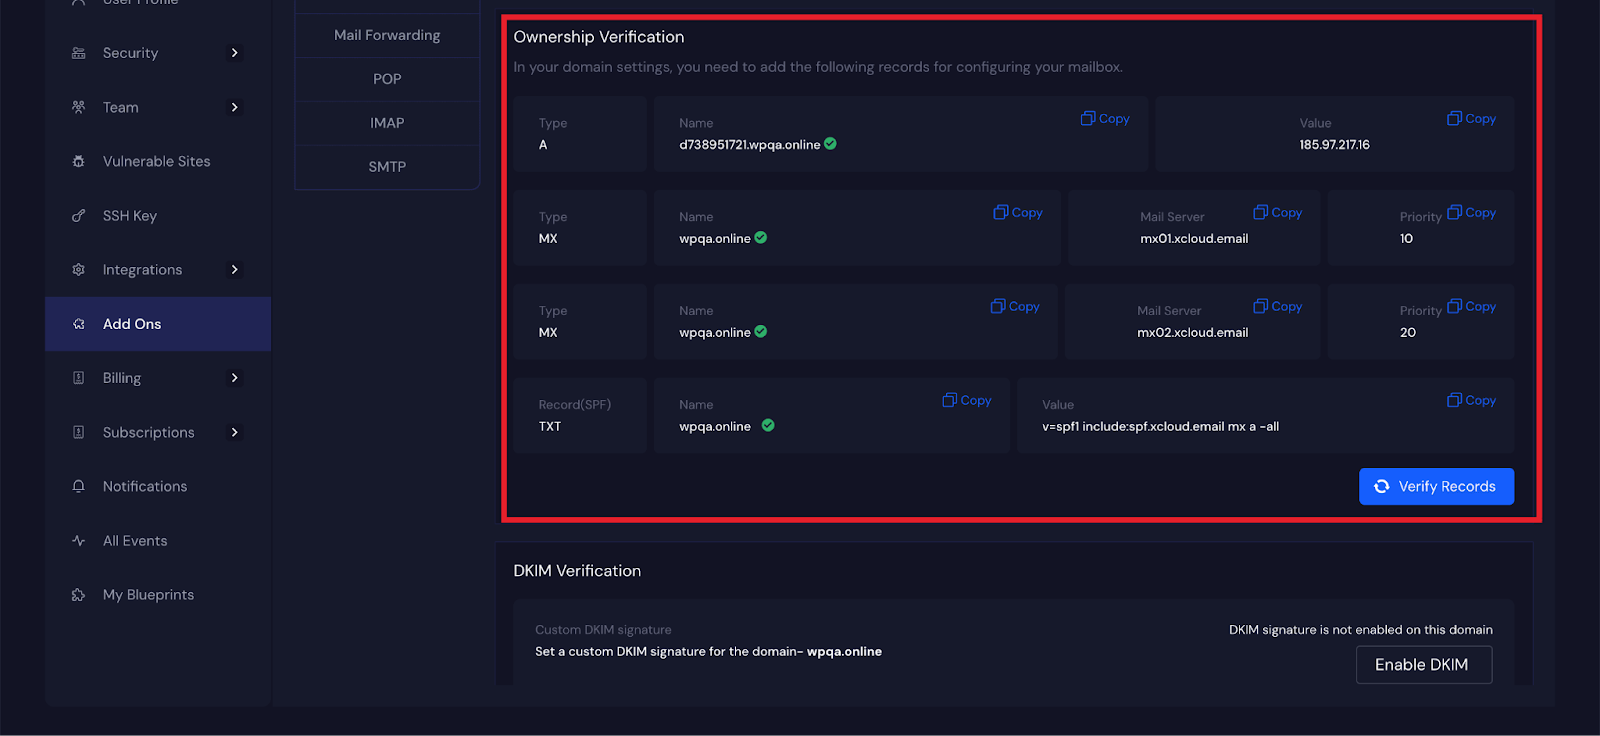
If you manage your domain’s DNS settings manually, you will need to copy the required records provided and paste them into your domain’s DNS panel. These include various types of DNS records like MX, SPF, and DKIM. After adding records on your DNS provider, click on the ‘Verify Records’ button
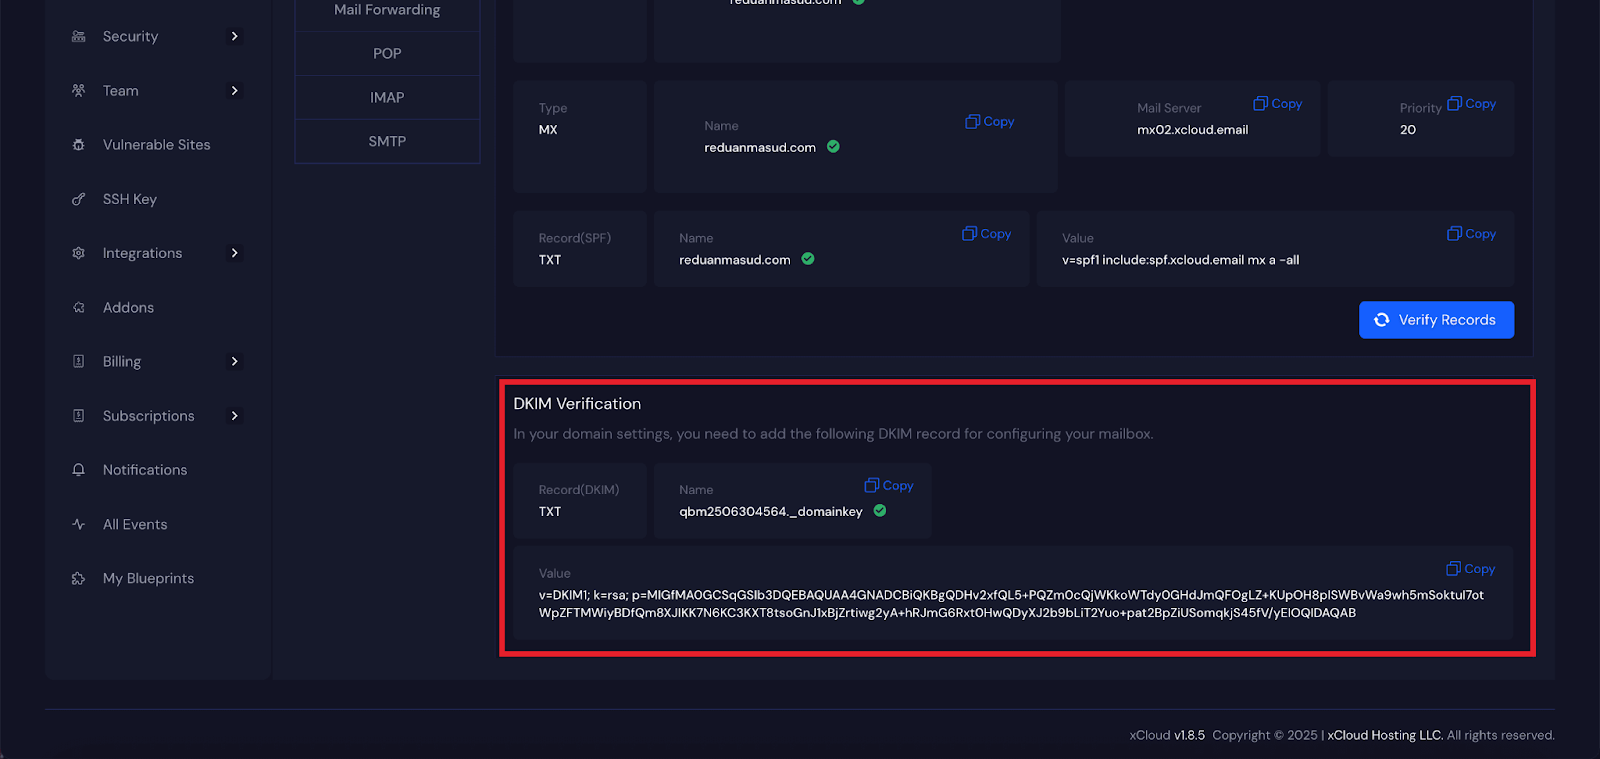
Step 5: Enable and Verify DKIM Record #
DKIM (DomainKeys Identified Mail) adds a digital signature to your emails. It helps email providers verify that your message came from your domain and was not altered. Enabling DKIM improves email security and reduces the chances of emails going to spam.
If you are setting up DNS manually, click on the ‘Enable’ DKIM button and copy the DKIM TXT record provided in your xCloud dashboard and add it to your domain’s DNS settings. After saving it, return to the dashboard and click Verify Records.
Step 6: Setup Aliases #
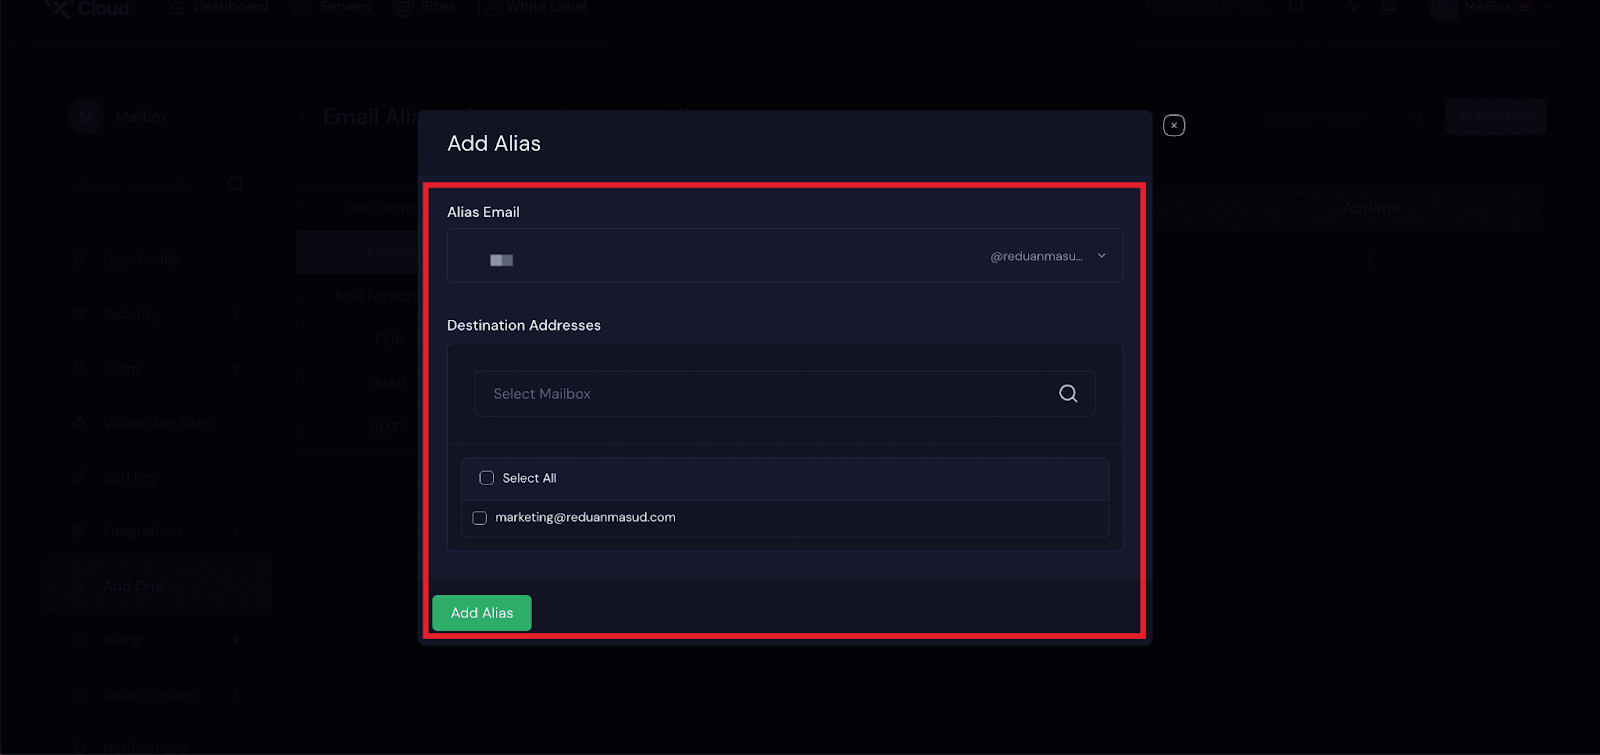
Aliases allows you to create extra email addresses that redirect to existing mailboxes without needing to set up new ones.
For instance, if you own a mailbox, user@example.com, and wish to receive emails at another address, user2@example.com, without having a separate mailbox, you can establish user2@example.com as an alias that directs to user@example.com. Now, you only need to log into user@example.com to check the emails received at both addresses.
Navigate to Aliases from the left side menu and click ‘Add Alias’. Enter the alias and select the domain from the dropdown menu. Next, select the email address you wish to be a member of that alias. Finally, click on the ‘Add Alias’ button.
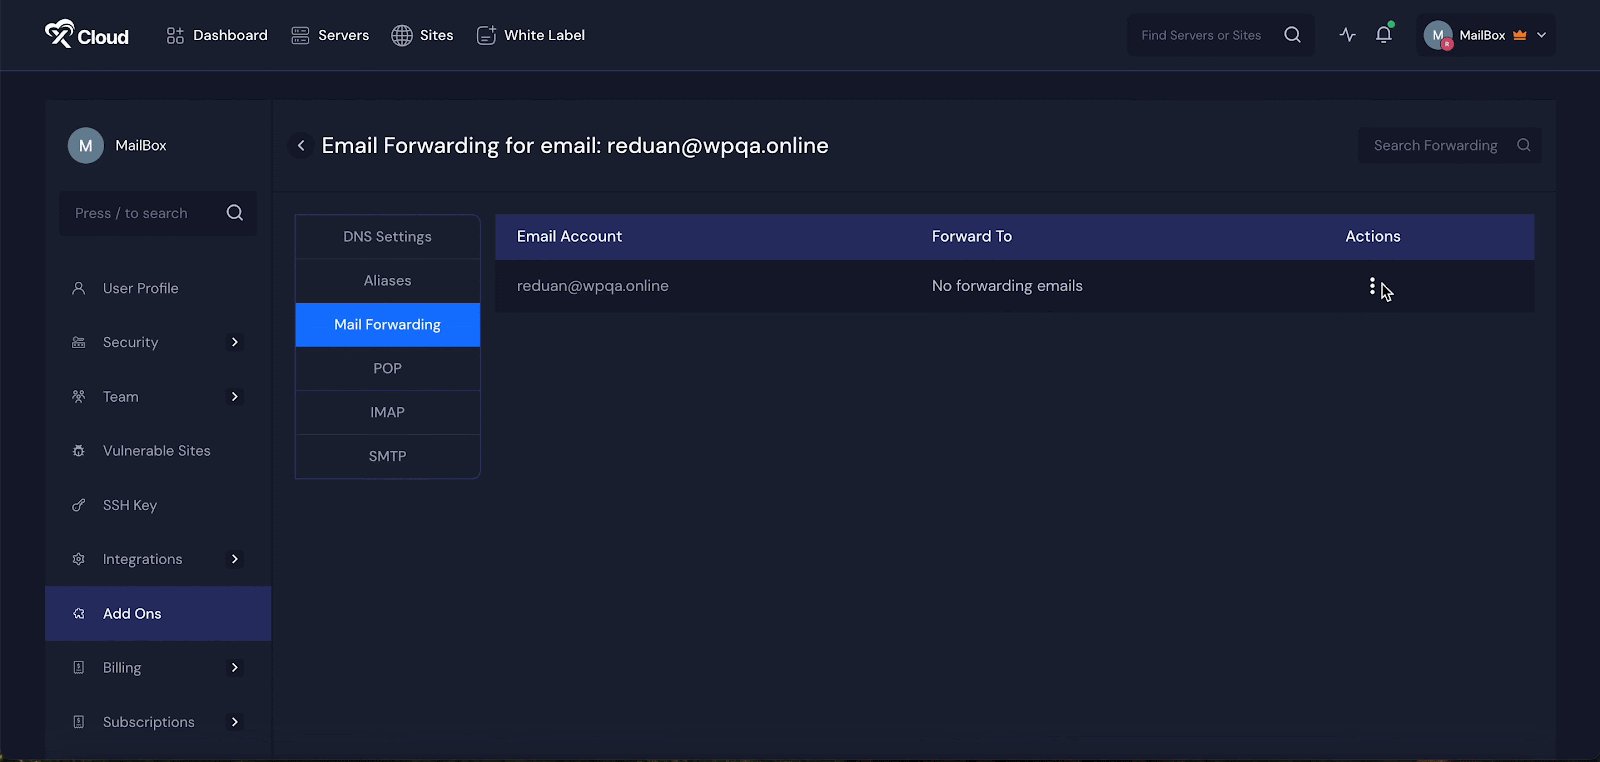
Step 7: Set up Mail Forwarding #
Mail forwarding lets you send a copy of incoming emails from one mailbox to another address. This is useful if you want to manage multiple email addresses from a single inbox.
For example, if you own info@yourdomain.com and want to receive those emails at your main address you@yourdomain.com, you can set up forwarding. All emails sent to info@yourdomain.com will automatically be sent to you@yourdomain.com.
You can also forward the emails in your mailboxes. Navigate to the ‘Forwarding Mail’ option from the dashboard. Click on the three-dot icon and enter the email address where you want to forward the emails. Finally, click on the ‘Save forwarding’ button
Note: You can set up to 20 forwarding addresses for each mailbox.
Step 8: Launch Your Mailbox #
After configuring the domain, go back to the Mailbox dashboard and click on the three-dot icon. Then hit the ‘Launch Webmail’ option.
Enter the ‘Username’ and ‘Password’ here and click on the ‘Log in’ button to go to your mailbox. Once logged in, you can check out the ‘Inbox’, ‘Draft’, and more from the dashboard. Even send the new message to your preferred email address as well.
And that’s it, this is how easily you can set up your xCloud Mailbox in just a few clicks. If you want to set up your SMTP provider, read the documentation to set up your SMTP provider with xCloud Mailbox easily.
⚠️ Important Considerations #
1. MX Record Conflicts:
If your domain already has existing MX records, verification will fail. Make sure to remove all existing MX records before connecting your mailbox.
2. Failed Verification Fix: If clicking ‘Verify Records’ does not work, Double-check that all DNS records have been correctly added. If you’re using Cloudflare, try toggling the ‘Auto Manage DNS Records’ setting OFF and then ON again. Wait a few seconds and it will start working again.
Also, keep in mind that DNS records may take some time to publish globally. Depending on your DNS provider, it can take up to a few hours for the records to fully propagate. Cloudflare usually updates DNS records the fastest, often within minutes.
📌 Limitations #
To ensure fair and stable service, here are some limitations and notes users should keep in mind:
1. There are some rules and limitations you need to be aware of. You are allowed to create multiple mailboxes under the same domain as long as they are in the same team. However, you cannot create mailboxes or aliases using the same domain in different teams. For instance, if demo@domain.com is part of Team A, then test@domain.com cannot be created under Team B.
2. You cannot have aliases with the same name as the mailboxes or the alias of aliases.
2. It is also important to avoid using POP email clients. These clients only download emails to your device and do not sync changes like read status or sent emails. To ensure full syncing across all your devices, you should use IMAP-supported email clients.
3. Each mailbox has some limits. You can send up to 250 emails in 24 hours. You can also create up to 20 email forwards for each mailbox. However, using regular expressions in email aliases is not supported.
4. If you are using Cloudflare and face verification issues even after automatic integration, try toggling the DNS integration off and on again. This often helps reset the settings and successfully verifies your domain.
xCloud Mailbox Add-on – Frequently Asked Questions (FAQs) #
What features do I get with the xCloud Mailbox Addon? #
With the xCloud Mailbox Add-on, you get:
- Professional email addresses using your custom domain
- Secure IMAP access for Outlook and mobile apps
- Webmail interface for anywhere access
- Alias support (free)
- Email forwarding (up to 20 addresses per mailbox)
- DKIM, SPF, and MX record configuration
- Easy DNS management (including Cloudflare auto-integration)
How is xCloud Mailbox Addon billed? #
The billing is monthly, based on your chosen plan:
- 8GB Plan: $1/month
- 25GB Plan: $2.5/month
You only pay for the plan you subscribe to. There are no hidden charges for aliases or forwarding.
Can I create multiple mailboxes under one domain? #
Yes, you can create multiple mailboxes as long as they’re within the same xCloud team.
You cannot use the same domain across different teams.
Example: If user@domain.com is in Team A, then admin@domain.com can’t be in Team B.
Are aliases free to use? #
Yes. Creating and using email aliases is completely free and included with your Mailbox plan.
Is there a limit on how many aliases I can have? #
No, there is no limit to how many aliases you can create under a domain. An alias cannot have the same name as an existing mailbox and aliases cannot forward to other aliases.
What is email forwarding, and is it free? #
Email forwarding automatically sends a copy of incoming mail from one address to another. Email forwarding is included for free. Each mailbox supports up to 20 forwarding addresses.
What if my domain verification fails? #
Try the following:
- Double-check all DNS records
- If using Cloudflare, toggle ‘Auto Manage DNS’ OFF and then ON again
- Wait a few minutes and try verifying again.
What’s the sending limit for emails? #
Each mailbox can send up to 250 emails per day (within a rolling 24-hour window).
After logging in, if you see the white page, what do you do? #
Once you log in to your webmail page, if you encounter a blank white screen, it may be due to your ad blocker. Please ensure that you turn off your ad blocker, clear your cache, and then refresh the page.
Can I use xCloud MailBox for transactional emails? #
The xCloud MailBox Addon allows users to send and receive emails. In contrast, a transactional email service is designed solely for outgoing emails, such as notifications for subscribers, order confirmations, marketing messages, and similar communications sent from applications or websites.
It’s important to note that the MailBox Addon has limitations for outgoing emails and is not suitable for handling mass-volume transactional emails. For such needs, we recommend using our SMTP Email Delivery Addon.
Still stuck? Contact our support team for any of your queries.


