


xCloud’s new Support Portal makes it easier for you to manage and track your technical issues. Unlike the previous portal, the new system gives you a single dashboard to view tickets, create new ones, and communicate directly with the support team.
This new Support Portal helps you save time, reduce confusion, and manage your support activity in one central place. Let’s learn how to use the new xCloud support portal, follow updates, and keep all your support activity organized in one place.
How to Access Previous Support Tickets #
We have moved to our new, built-in xCloud Support Portal to make the process faster and easier for you. In the old portal, you can no longer create any new support tickets. You can still reply to your existing tickets and view them.
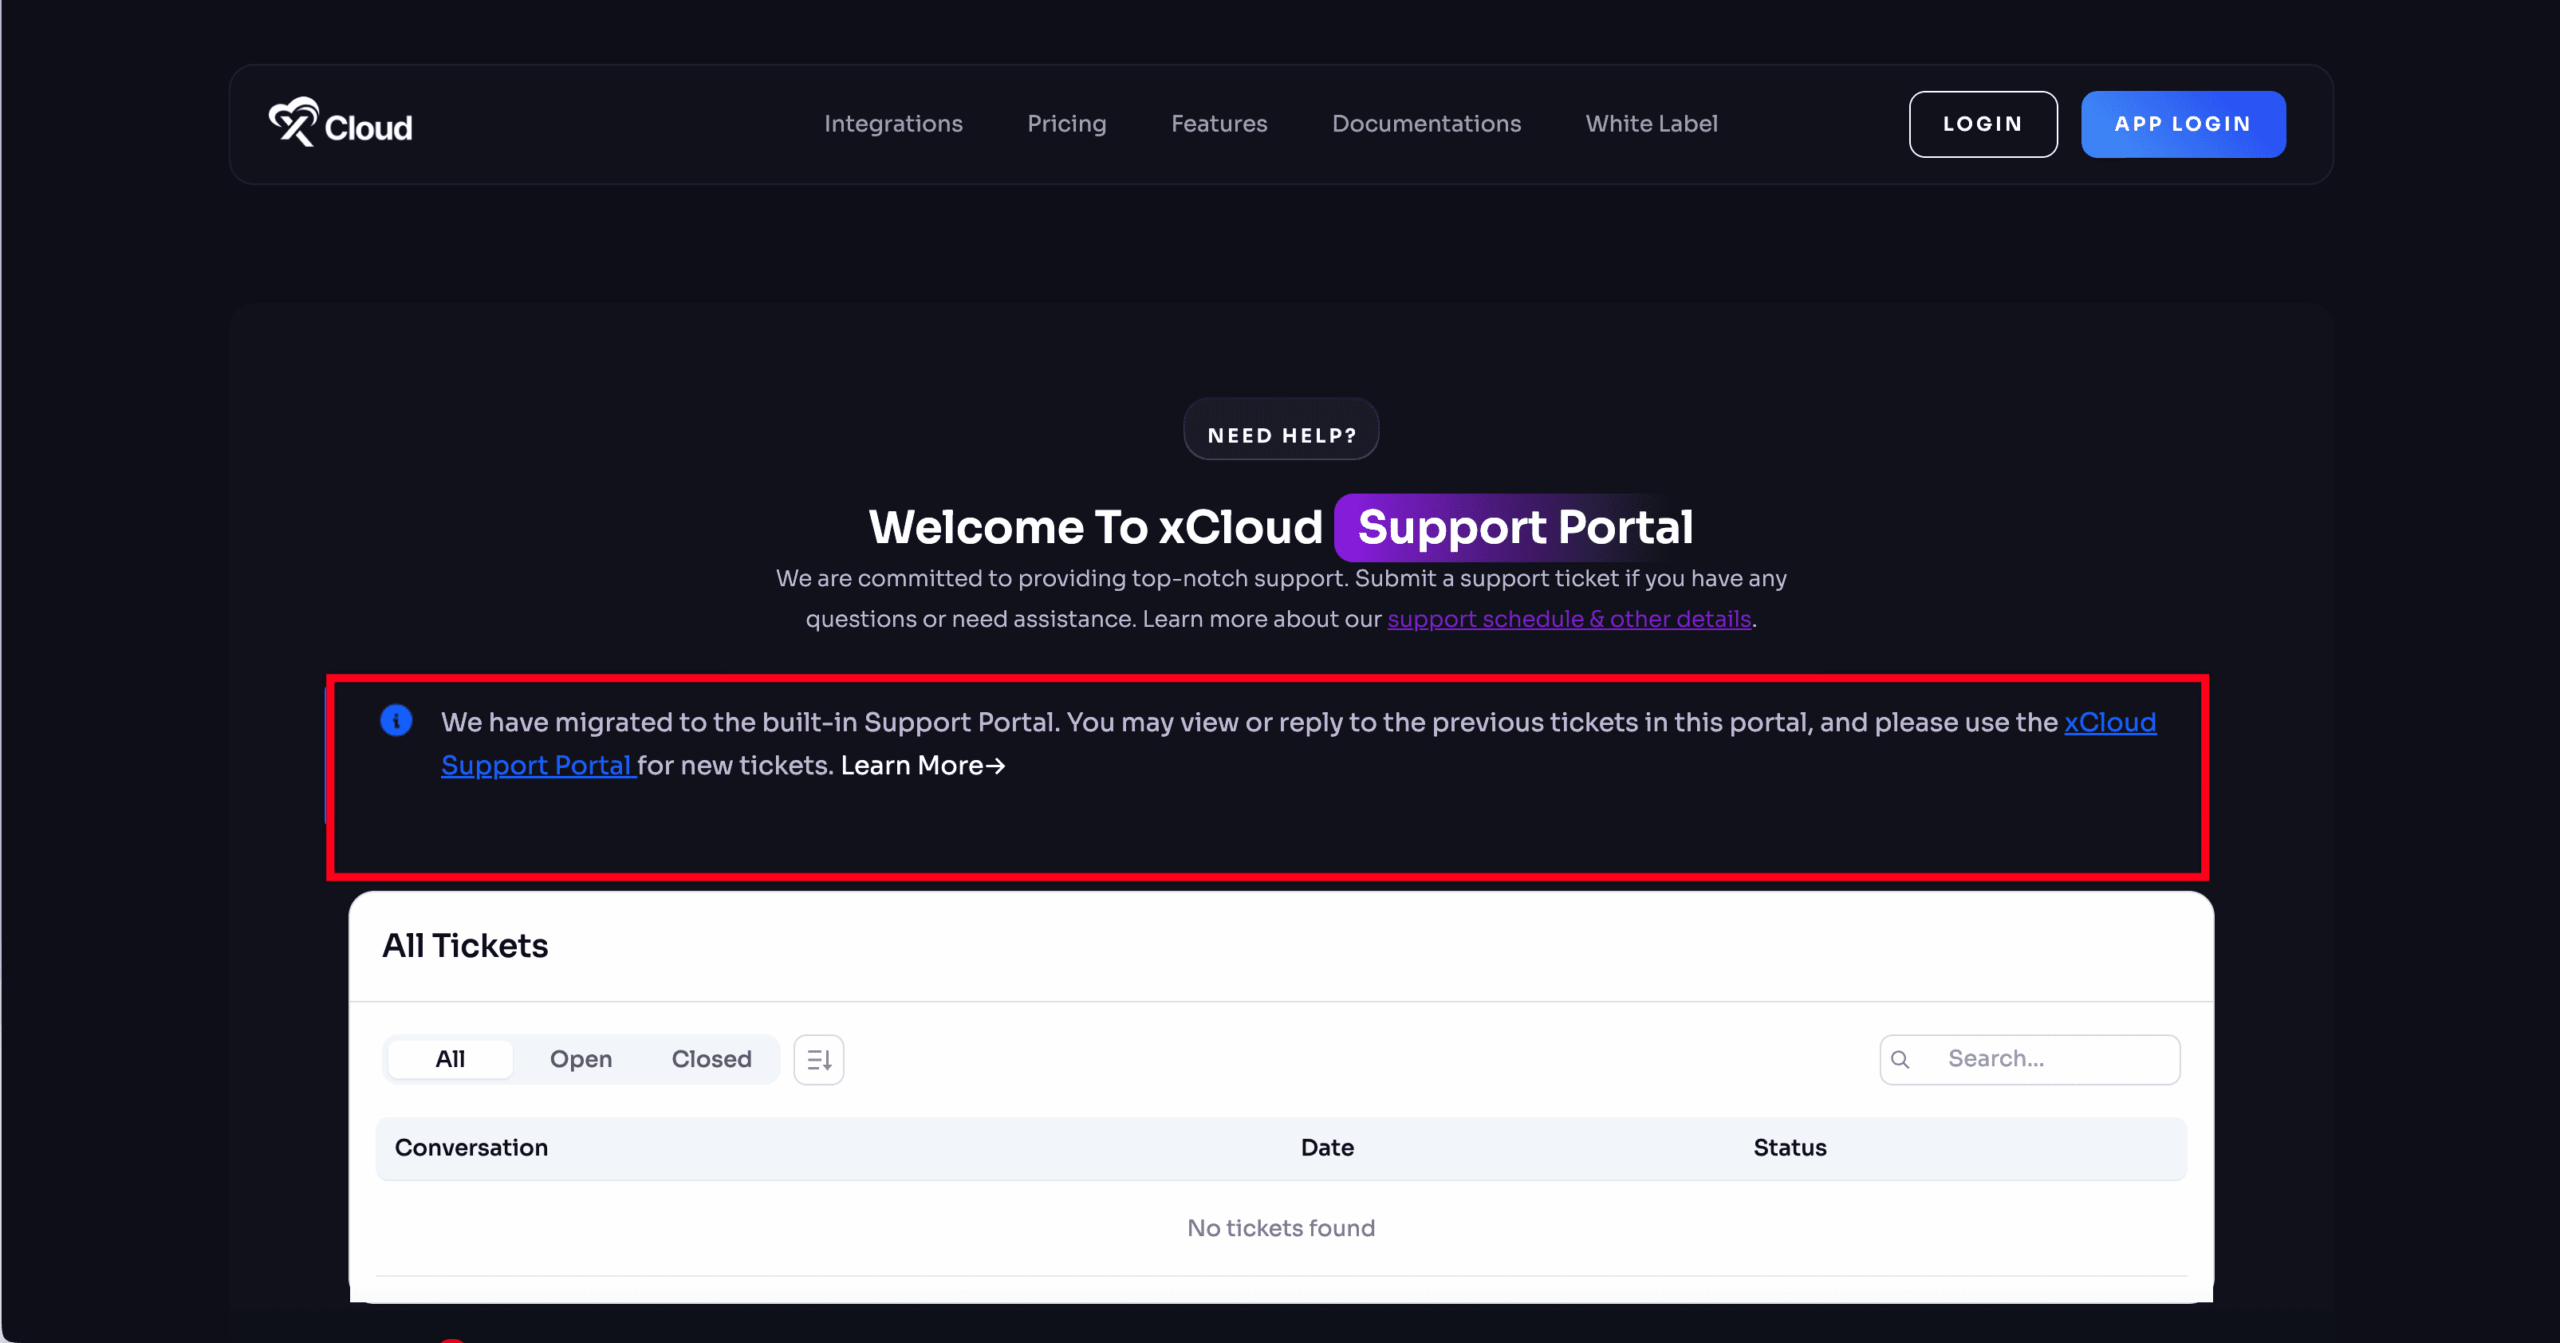
To access your old tickets, click on the Support Portal link. Once there, you will be able to see your previous tickets and continue conversations if needed. For all new issues, you must now use the new dashboard to create support tickets.
Step 1: Accessing the Support Portal #
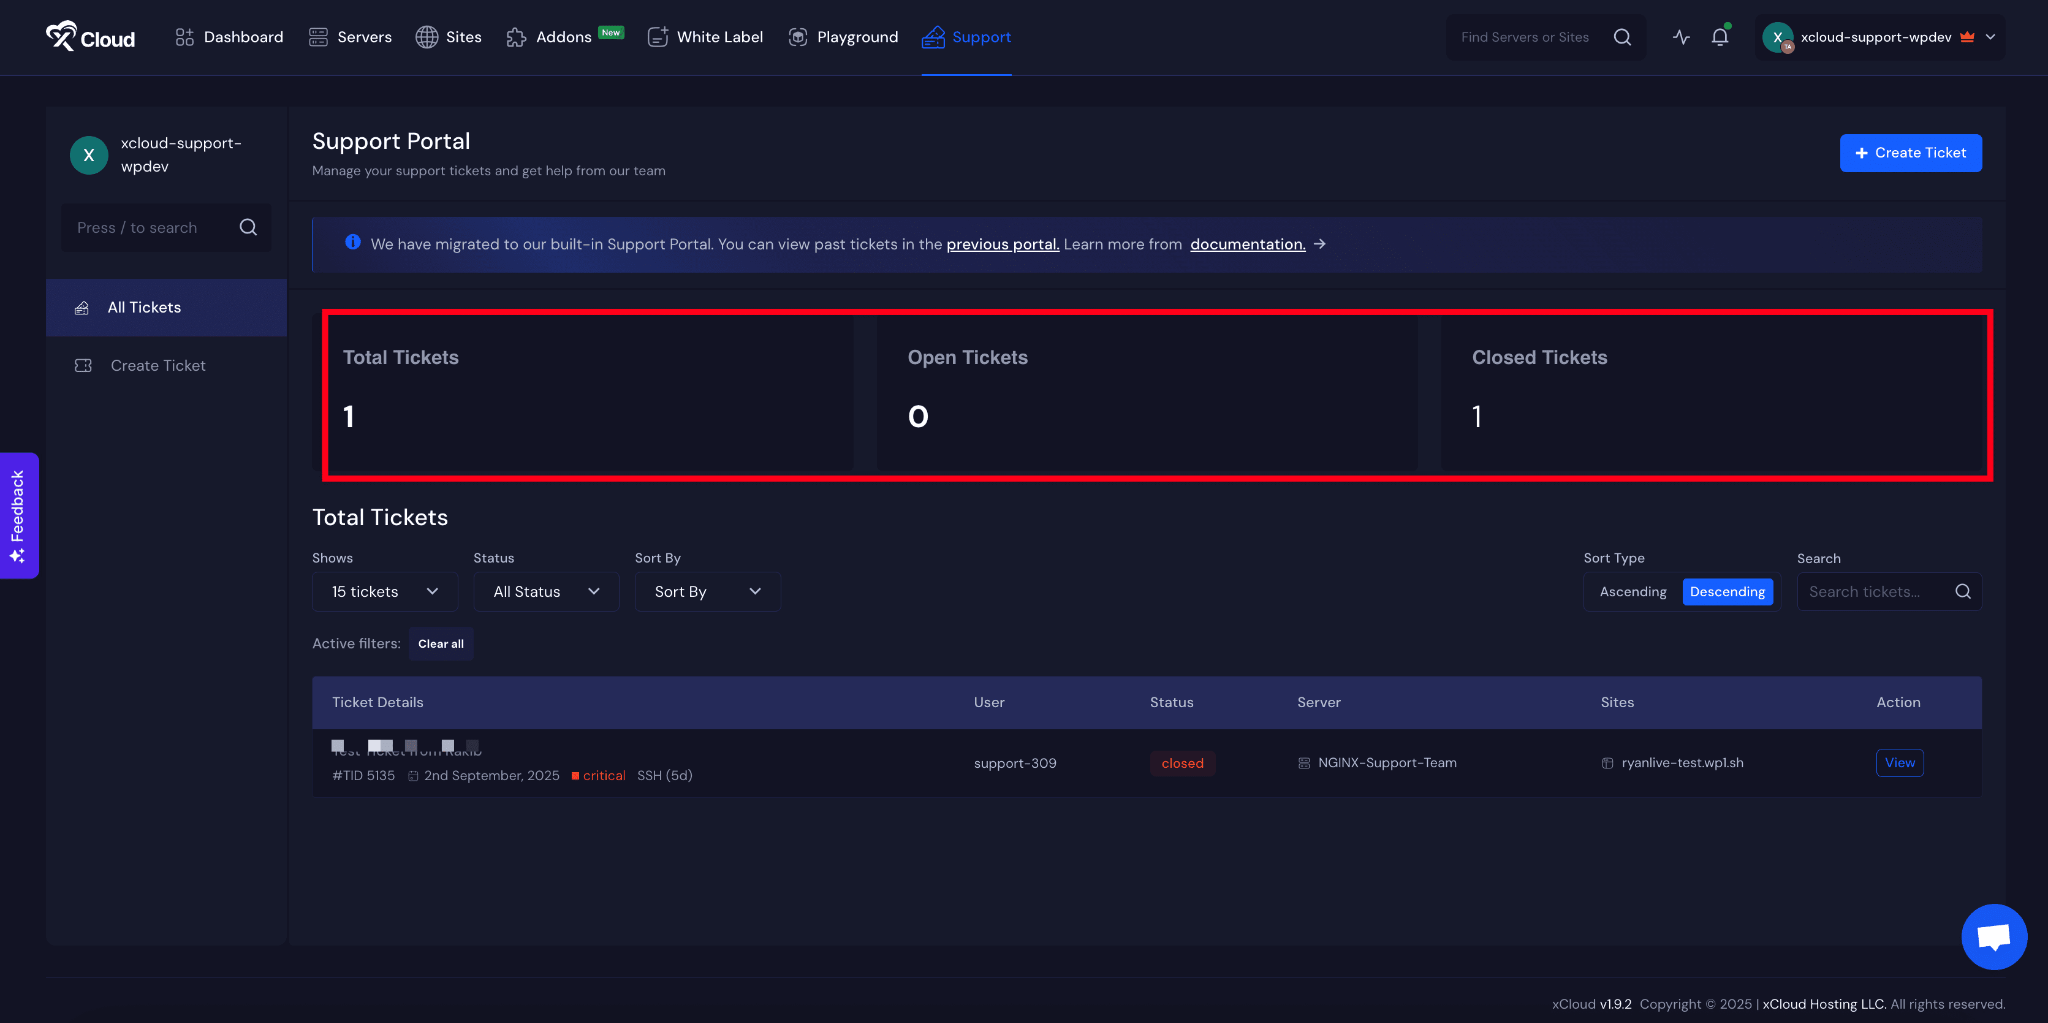
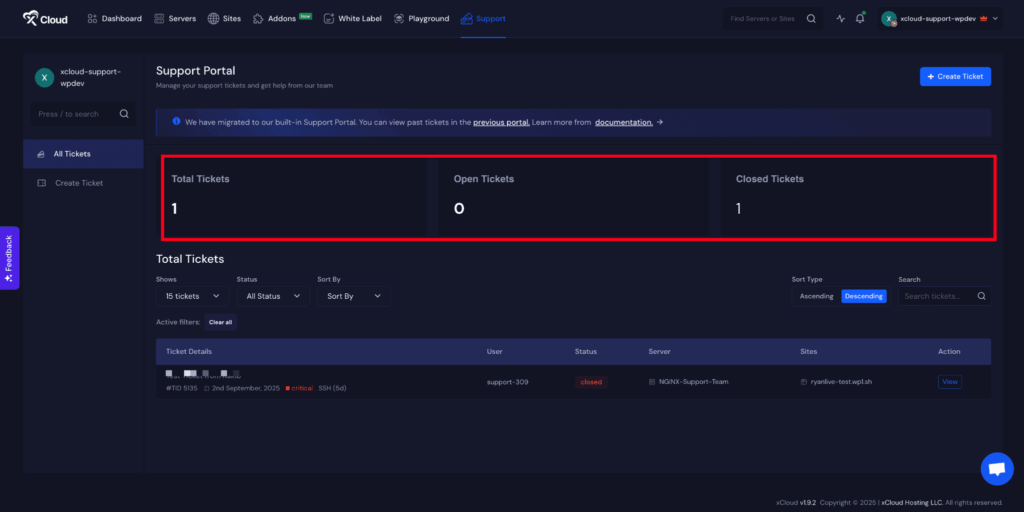
To access the support portal, go to the top menu and select the ‘Support’ option. Once you click it, you will be redirected to the ‘All Tickets’ page.
On this page, you will see an overview of your tickets, including ‘Total Tickets’, ‘Open Tickets’, and ‘Closed Tickets’. This section gives you a quick view of your overall ticket activity.
Step 2: Viewing Ticket Details #
To make navigation easier, you can filter tickets using different options such as ‘Shows’, ‘Status’, ‘All Status’, ‘Sort By’, and ‘Sort Type’ which allows you to organize tickets in either ascending or descending order. There is also a ‘Search’ field that allows you to quickly find tickets based on your preferences.
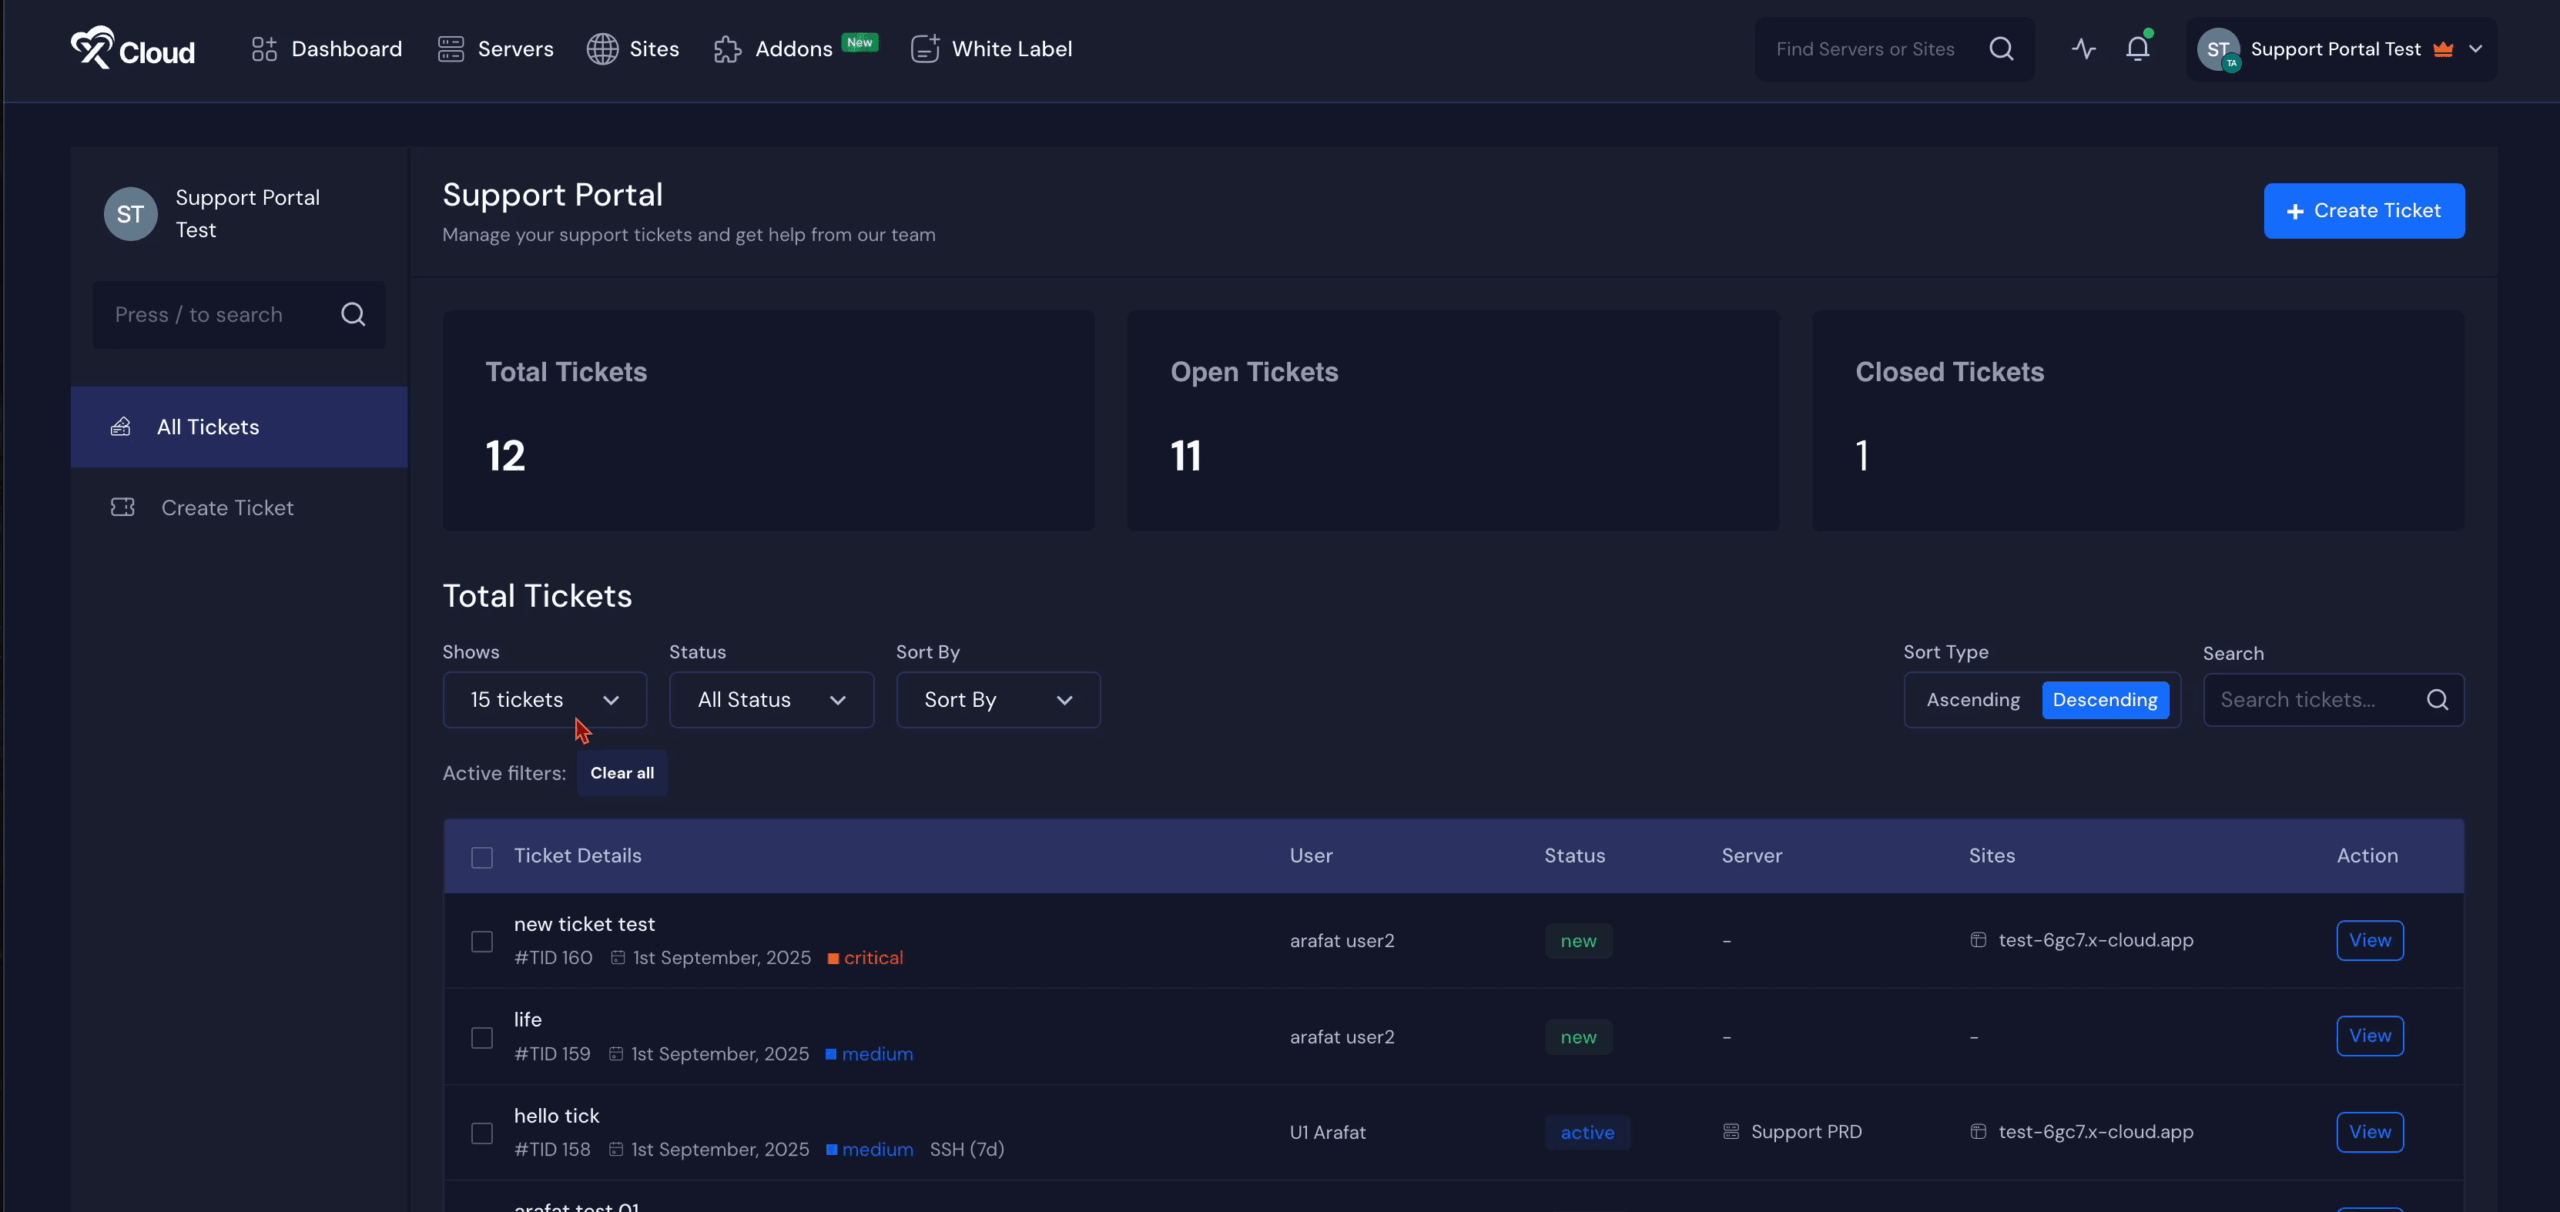
In the ‘Total Tickets’ section, you can view the important information about each ticket. This includes the ‘Ticket Details’, the ‘User’ who created it, the current ‘Status’, the related ‘Server’, the ‘Sites’, and the available ‘Action’ options. From here, you can check any tickets by clicking on the ‘View’ button.

Step 3: Creating a Ticket #
If you want to create a new ticket, you can click on the ‘Create Ticket’ button located at the top of the dashboard or use the same option from the sidebar. Once there, you need to select the ‘Team’ from the dropdown list and provide the ‘Subject’ of your ticket in the designated field.
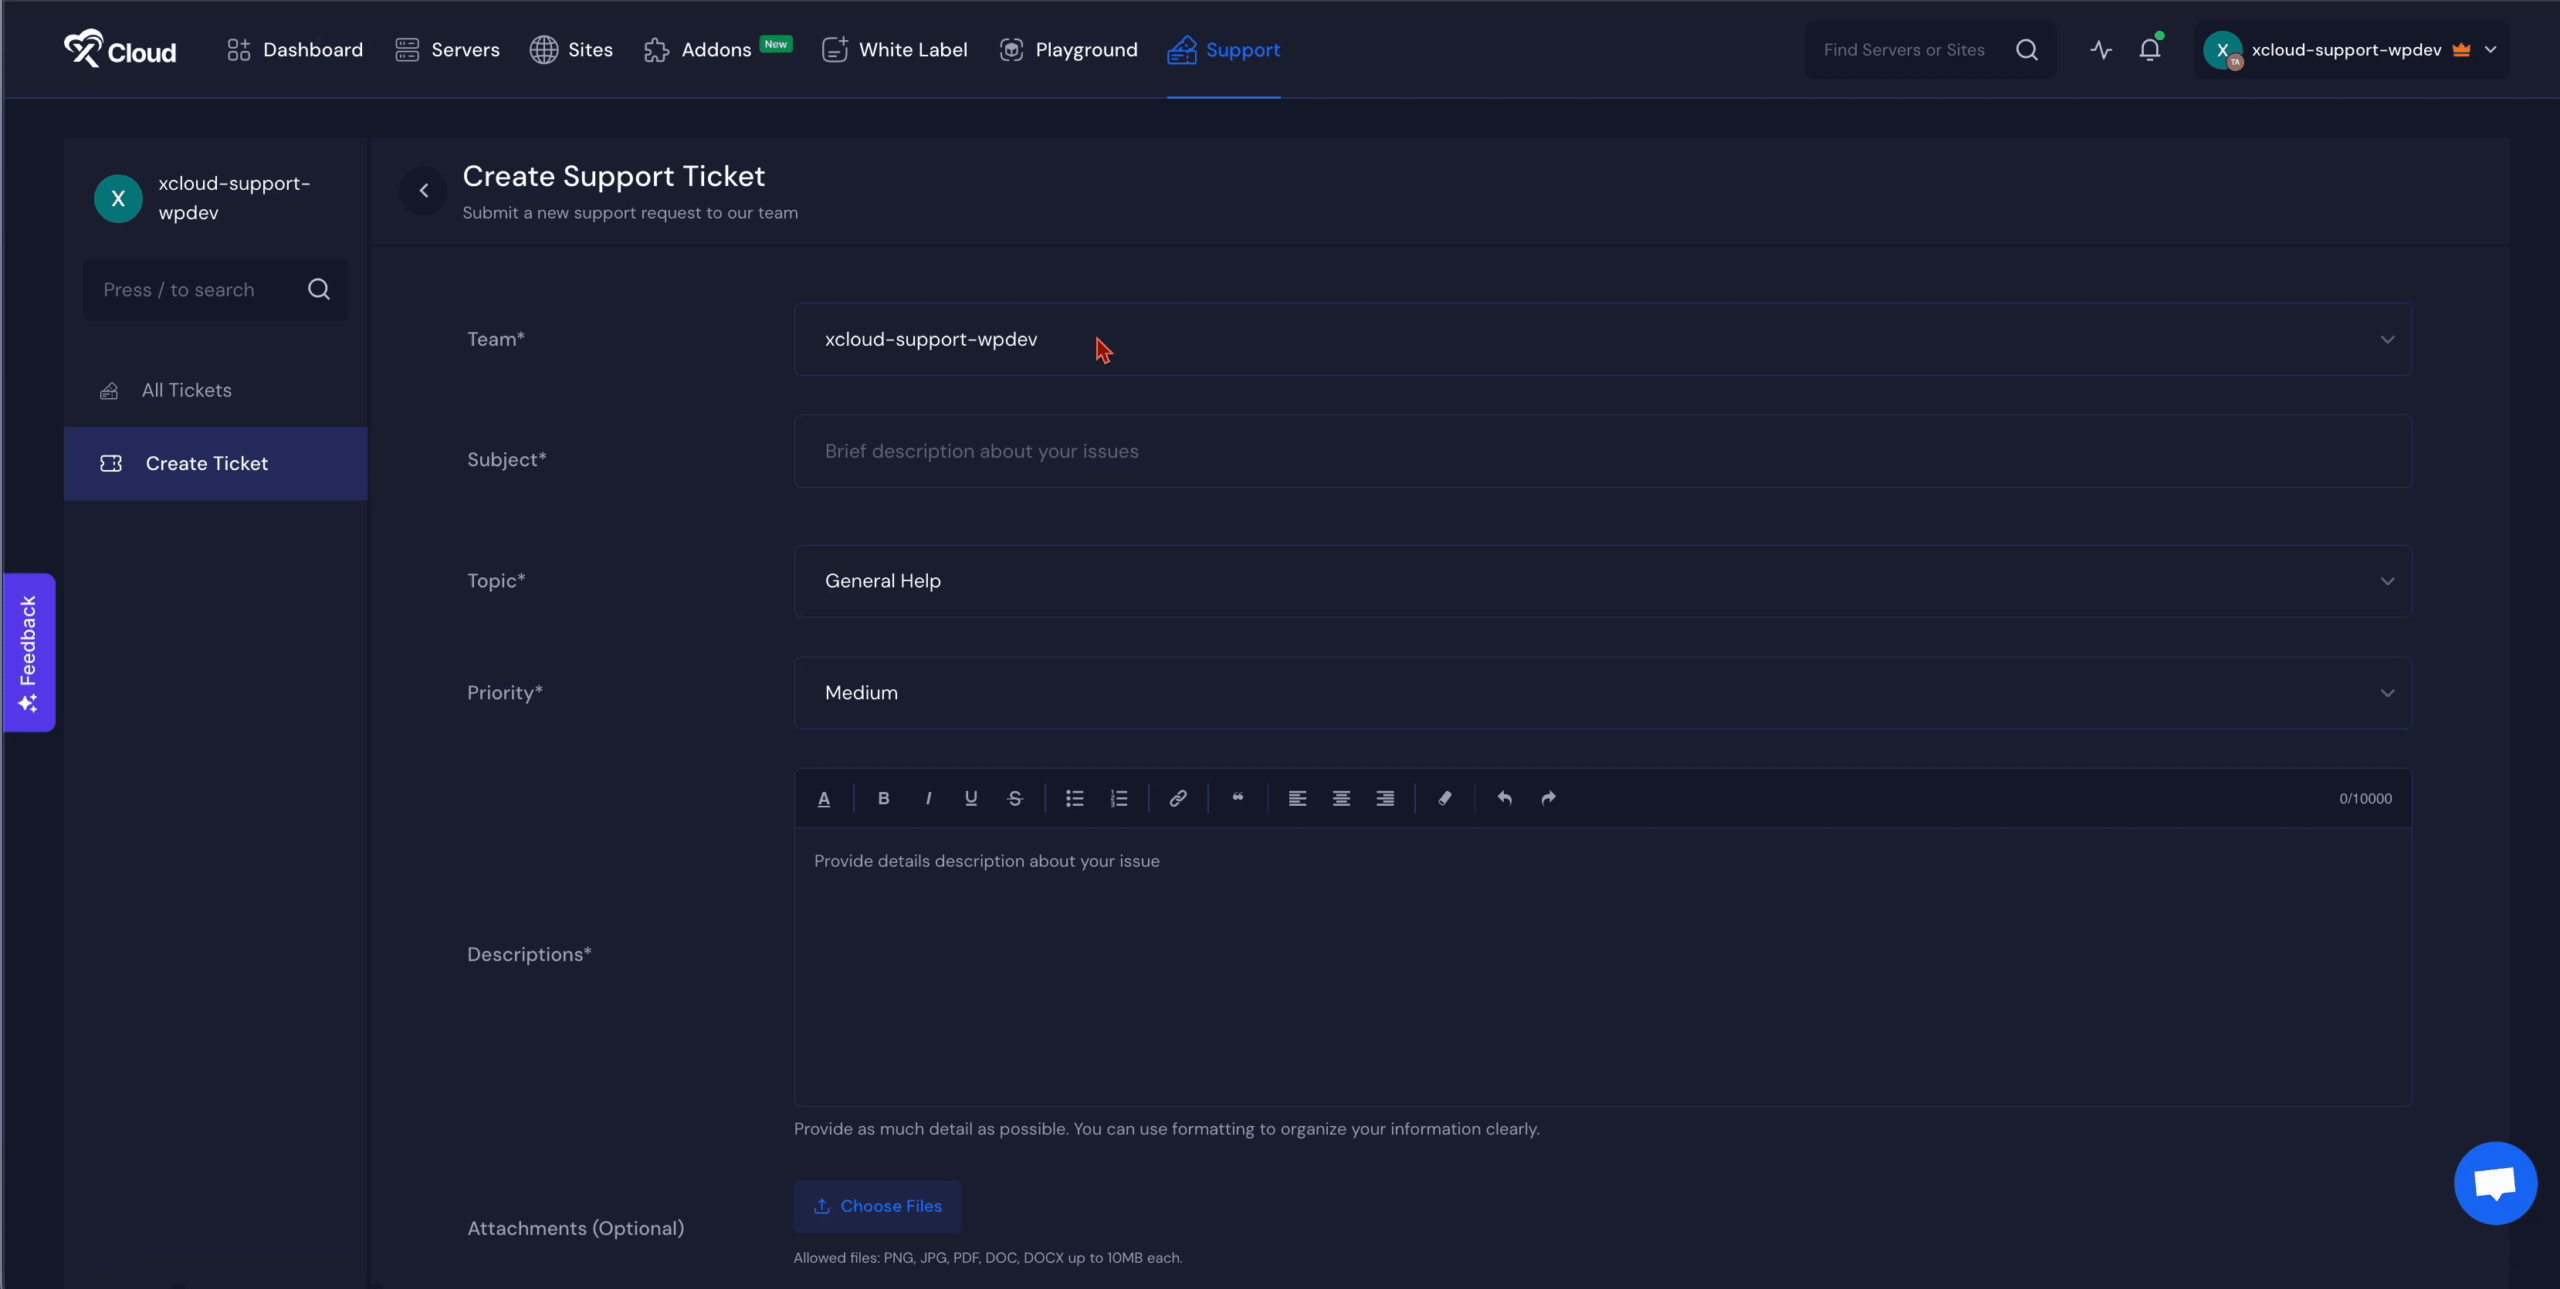
After that, choose the most suitable ‘Topic’, ‘Category’ for the issue and set its ‘Priority’ level. You should then provide a brief but clear explanation in the ‘Descriptions’ field so the support team understands the problem.

In addition to text, you can upload supporting files in the ‘Attachments’ section. These can include screenshots, GIFs, or documents that make the issue clearer. In the ‘Additional Information’ section, you can specify the related ‘Server’ or ‘Site’ that is connected to the issue. Give related permission to the support team by checking the boxes in. Once all the required fields are completed, click on the ‘Create Ticket’ button to submit it.

Step 5: After Ticket Creation #
Once your ticket is created, it will appear instantly in the system. You will be able to see replies from the xCloud support team whenever they respond. You can also continue the conversation by replying to the ticket, making it easy to track the progress of your request.

Give Role Permission to Team Member #
If you want to give one of your team members access to the xCloud Support portal and allow them to manage tickets, go to the team settings. Change the role, scroll to the end of the role permissions dashboard, and find the Support option. Then, assign the permissions according to your preference.
The xCloud Support Portal is designed to make support easier and more efficient for you. By using the options to view, filter, and create tickets, you can clearly present your issues and get timely assistance.
Once your ticket is created, you can follow up and respond just like a conversation, ensuring smooth communication until your issue is resolved.
Frequently Asked Questions #
1. How can I view my old tickets?
You can view your old tickets by visiting the previous support portal. In the old portal, you cannot create new tickets, but you can still open existing ones and continue conversations with the support team.
2. Where can I create new tickets?
You can create new tickets only in the new xCloud Support Portal. Use the ‘Create Ticket’ button on the dashboard or sidebar to submit a new issue.
3. Can I migrate old tickets to the new portal?
Yes, you can. To migrate old tickets to the new support portal, contact the support team. They will help you move your old tickets into the new system.
4. Can I provide access to my team members to see my tickets and manage them?
Yes, you can provide access to your team members so they can view and manage your tickets.
Still stuck? Contact our support team for any of your queries.


