

How to Set Up Laravel on Vultr Server with xCloud?
Updated September 27, 2026 · 8 min read
Laravel is a popular PHP framework for building modern web applications. With Vultr’s cloud hosting and xCloud’s one‑click deployment, you can set up Laravel quickly and manage it with ease. This guide walks you through the process step by step.
If you already have a Vultr server, you can skip the first phase and proceed directly to the second. First, set up your Vultr server in xCloud. Follow these steps to get started.
How to Set Up a Vultr Server in xCloud?
This guide shows how to set up a Vultr server in xCloud. Follow the steps to quickly launch, configure and start your cloud journey.
Create Your New Vultr Server in xCloud
After logging in to your xCloud account, start by adding a new server by clicking on the “New Server” button from your dashboard.
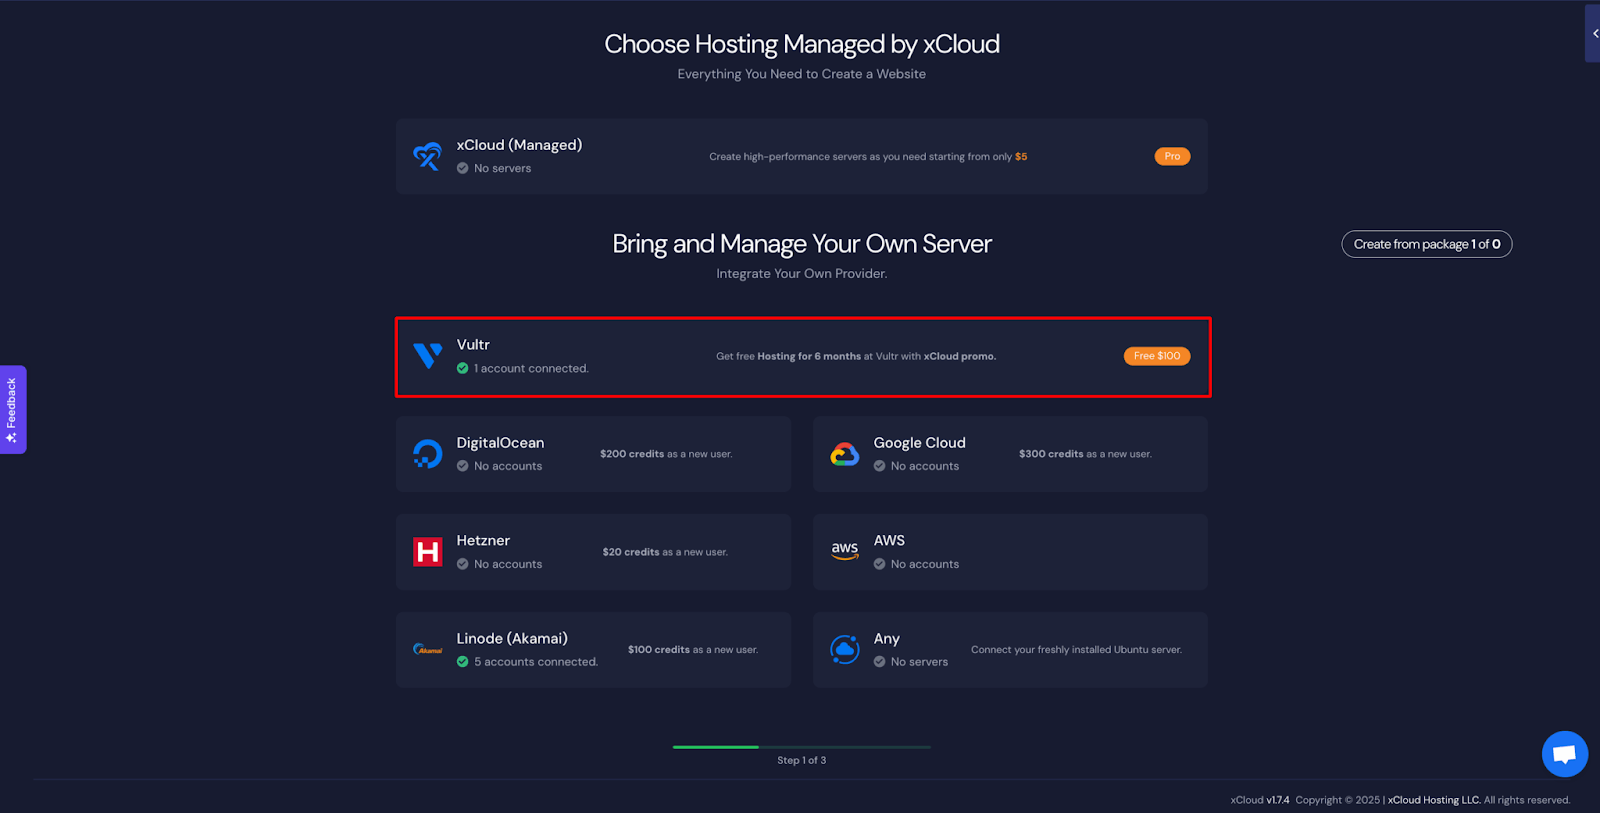
The next screen will provide the list of our available services. For this tutorial, we will create a Vultr server and for that select the Vultr option under “Bring your own server service”. The billing of the server will be handled on your Vultr account and in xCloud we won’t charge for this first server.
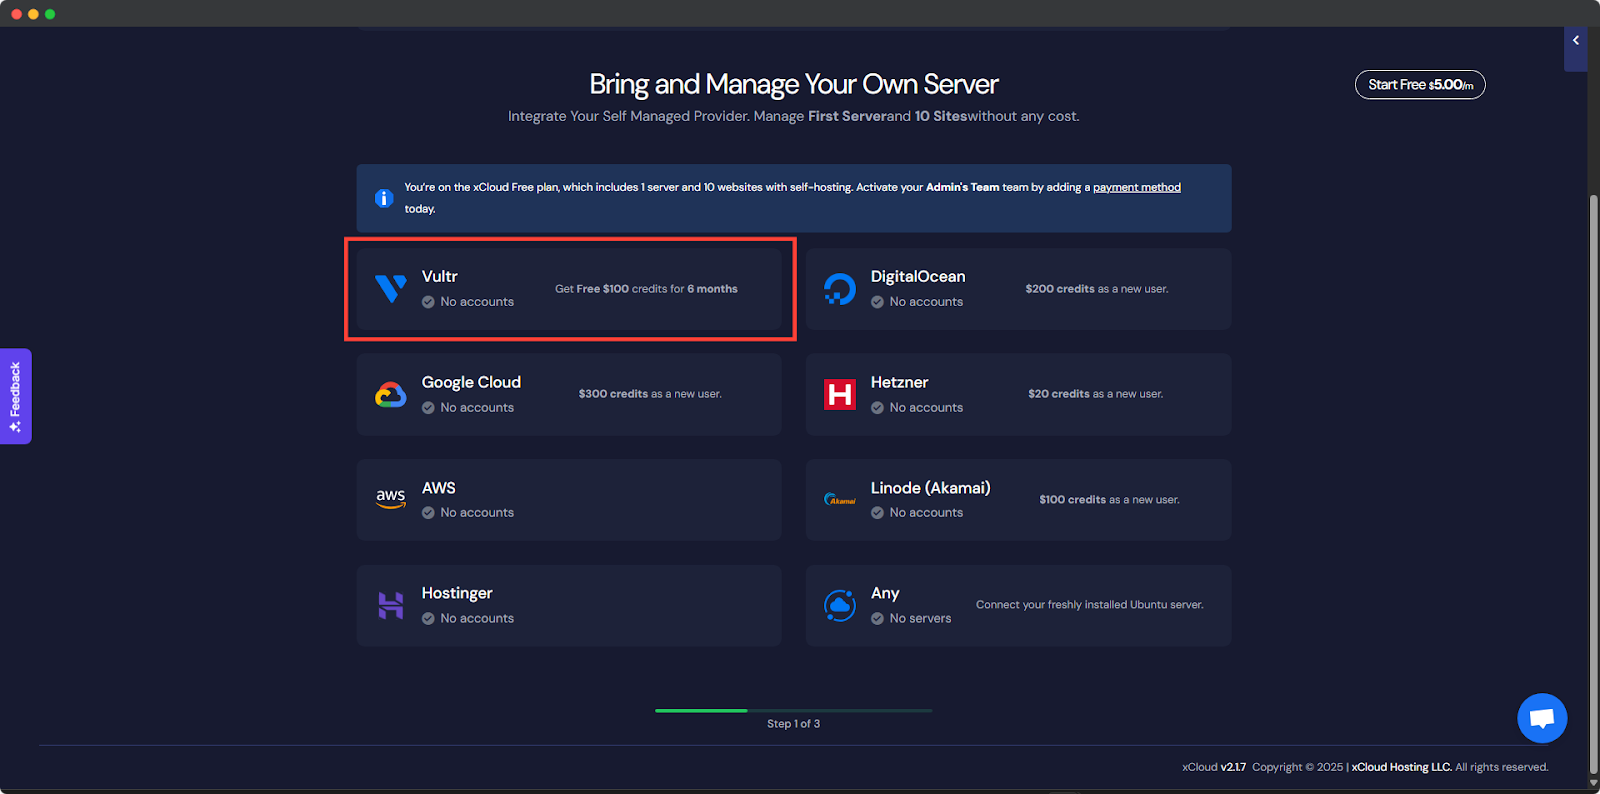
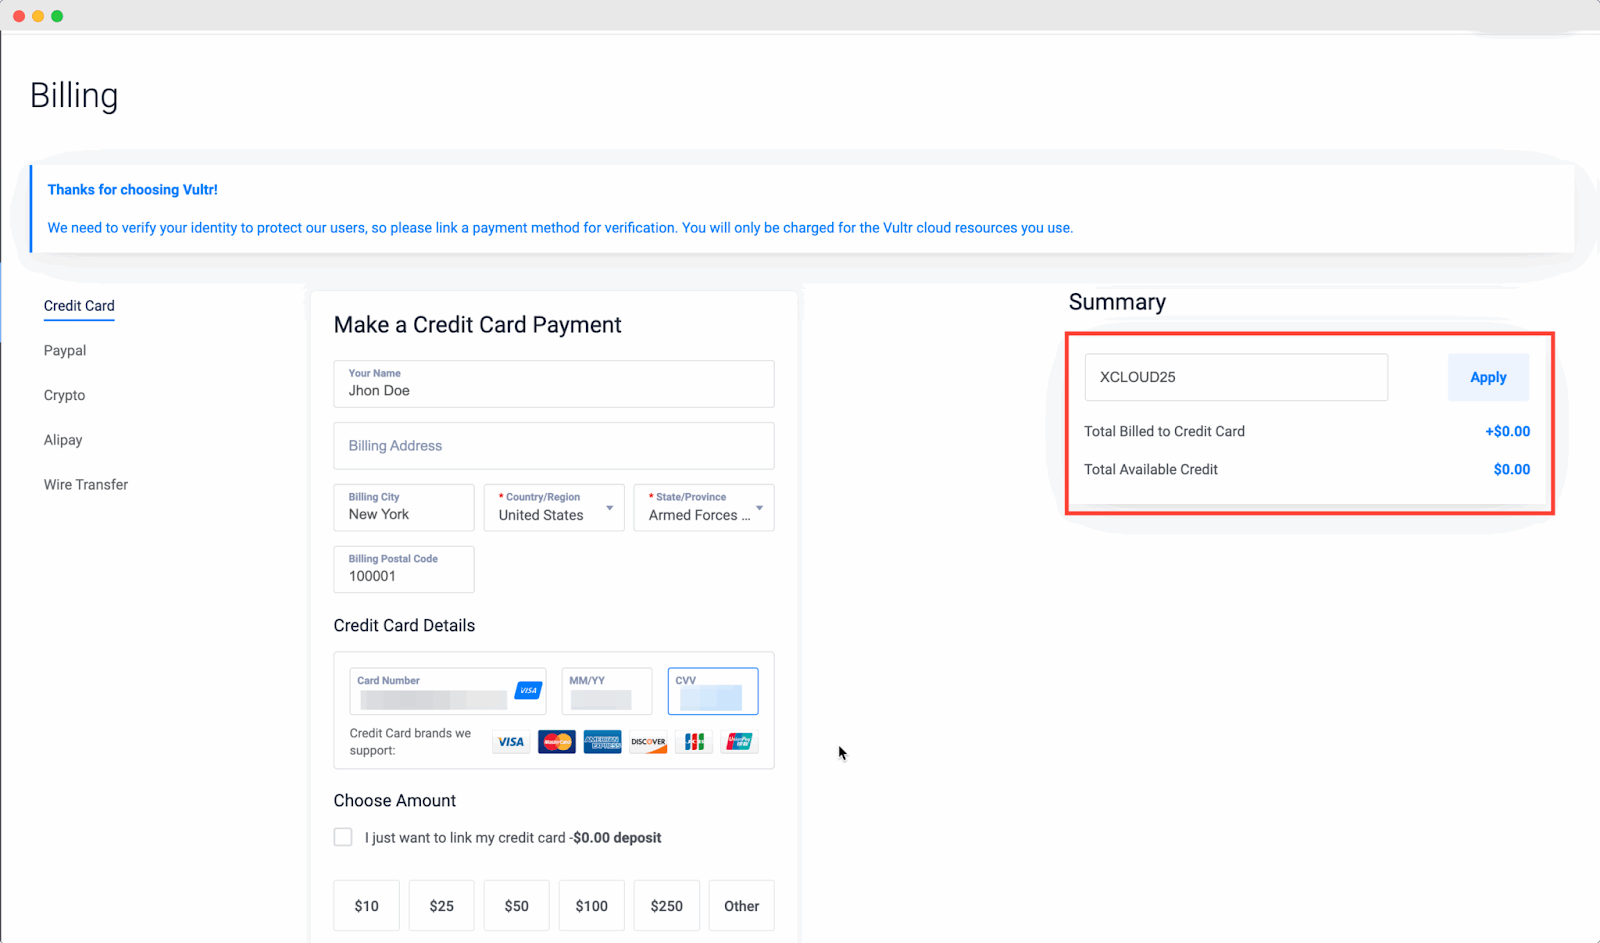
Signup in Vultr with xCloud Promo
To get started with the free hosting offer, head over to Vultr.com and sign up for a new account. During the registration process, you’ll need to link a valid credit card or a verified PayPal account to activate your account and be eligible for the $100 promotional credit. As part of the validation, Vultr will place a small temporary authorization on your credit card, approximately $2.50 USD to verify your payment method.
This charge is not permanent and will be automatically reversed by your bank, although depending on your bank’s policy, it might take up to 30 days for the funds to be released.
If you choose to verify using PayPal, note that Vultr requires a minimum payment of $5.00 USD for validation. Additionally, PayPal must be linked to a valid credit card or bank account to complete this verification process. Once your payment method is verified and your account is deemed eligible, the $100 in free credits will be automatically applied to your account. Make sure to use the promo code “XCLOUD25” during the sign-up to claim this offer.
Note: If you already have a Vultr account then please skip this step and check how to collect API from Vultr.
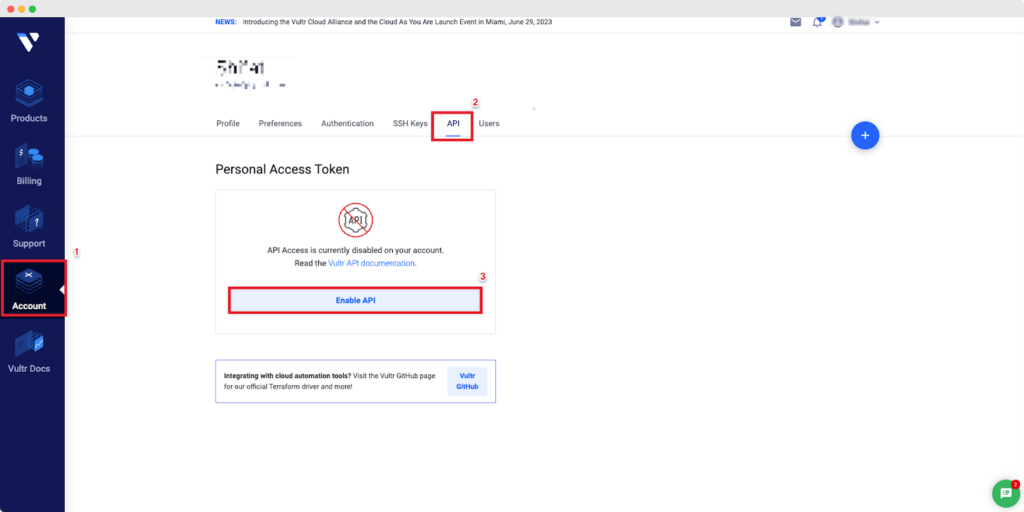
Collect API key from Vultr
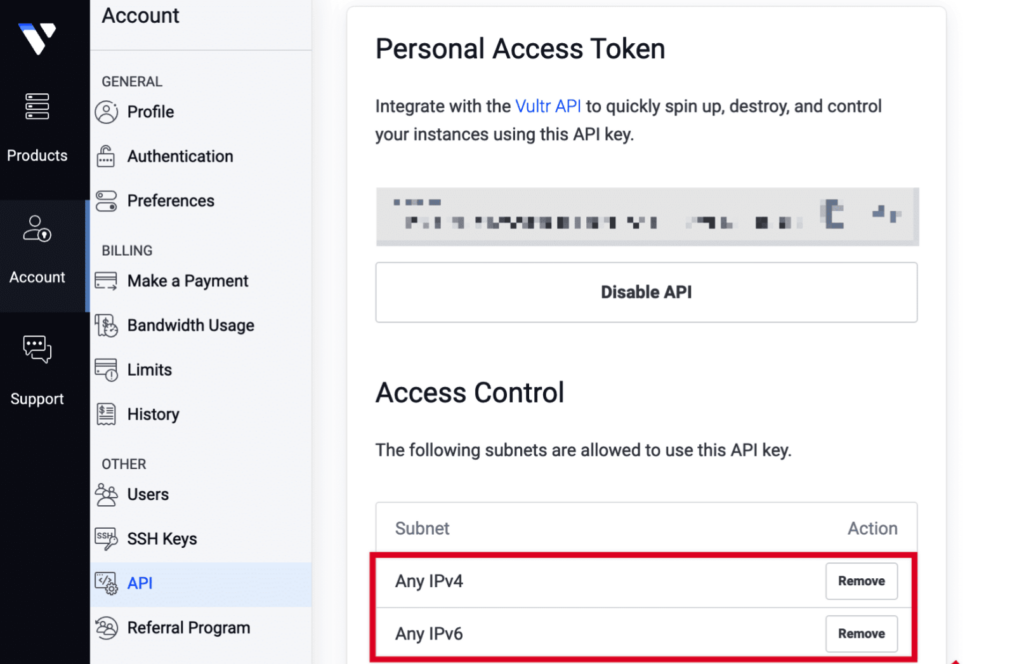
After you have successfully completed setting up your billing method, you will need to get the Vultr API key to add it to xCloud to create and manage 1 server and 10 sites for free. Navigate to the Account → API tab from your Vultr dashboard. After that click on the ‘Enable API’ button.
Now, your ‘Personal Access Token’ will be auto-generated. Copy the API Key/Token.
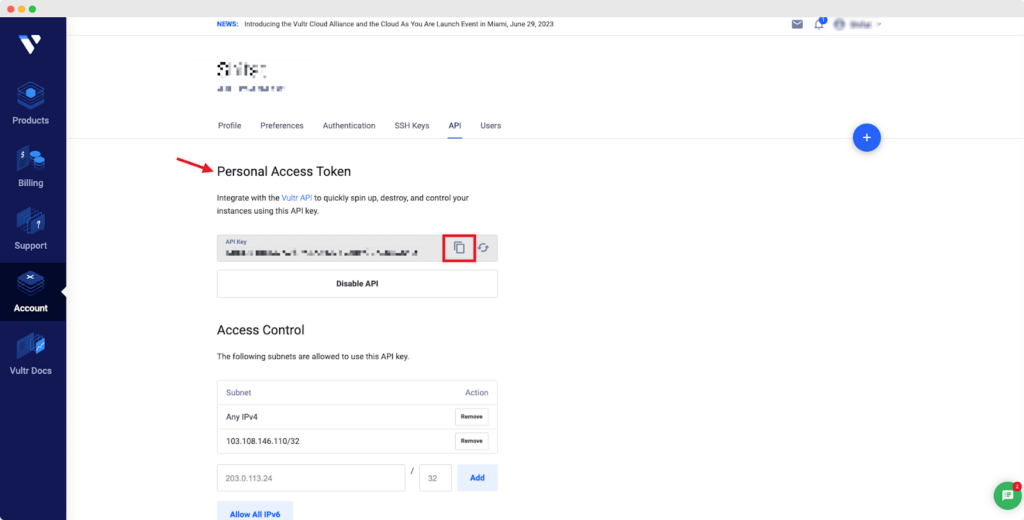
Please make sure you have added Any IPv4 and Any IPv6 both under Access Control.
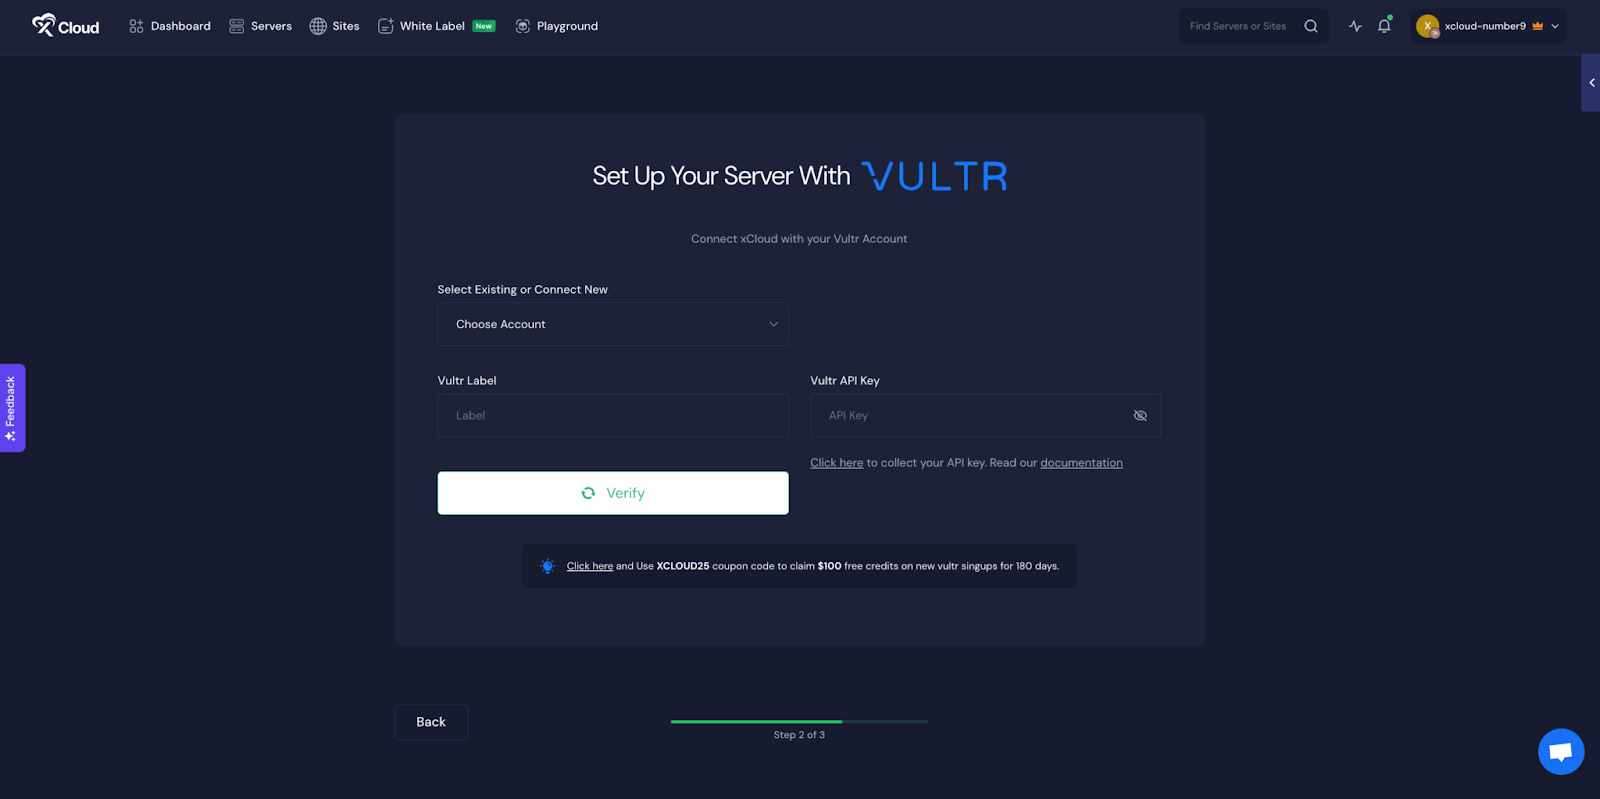
Now, you need to go back to the xCloud dashboard and add your Vultr Label & API Key.
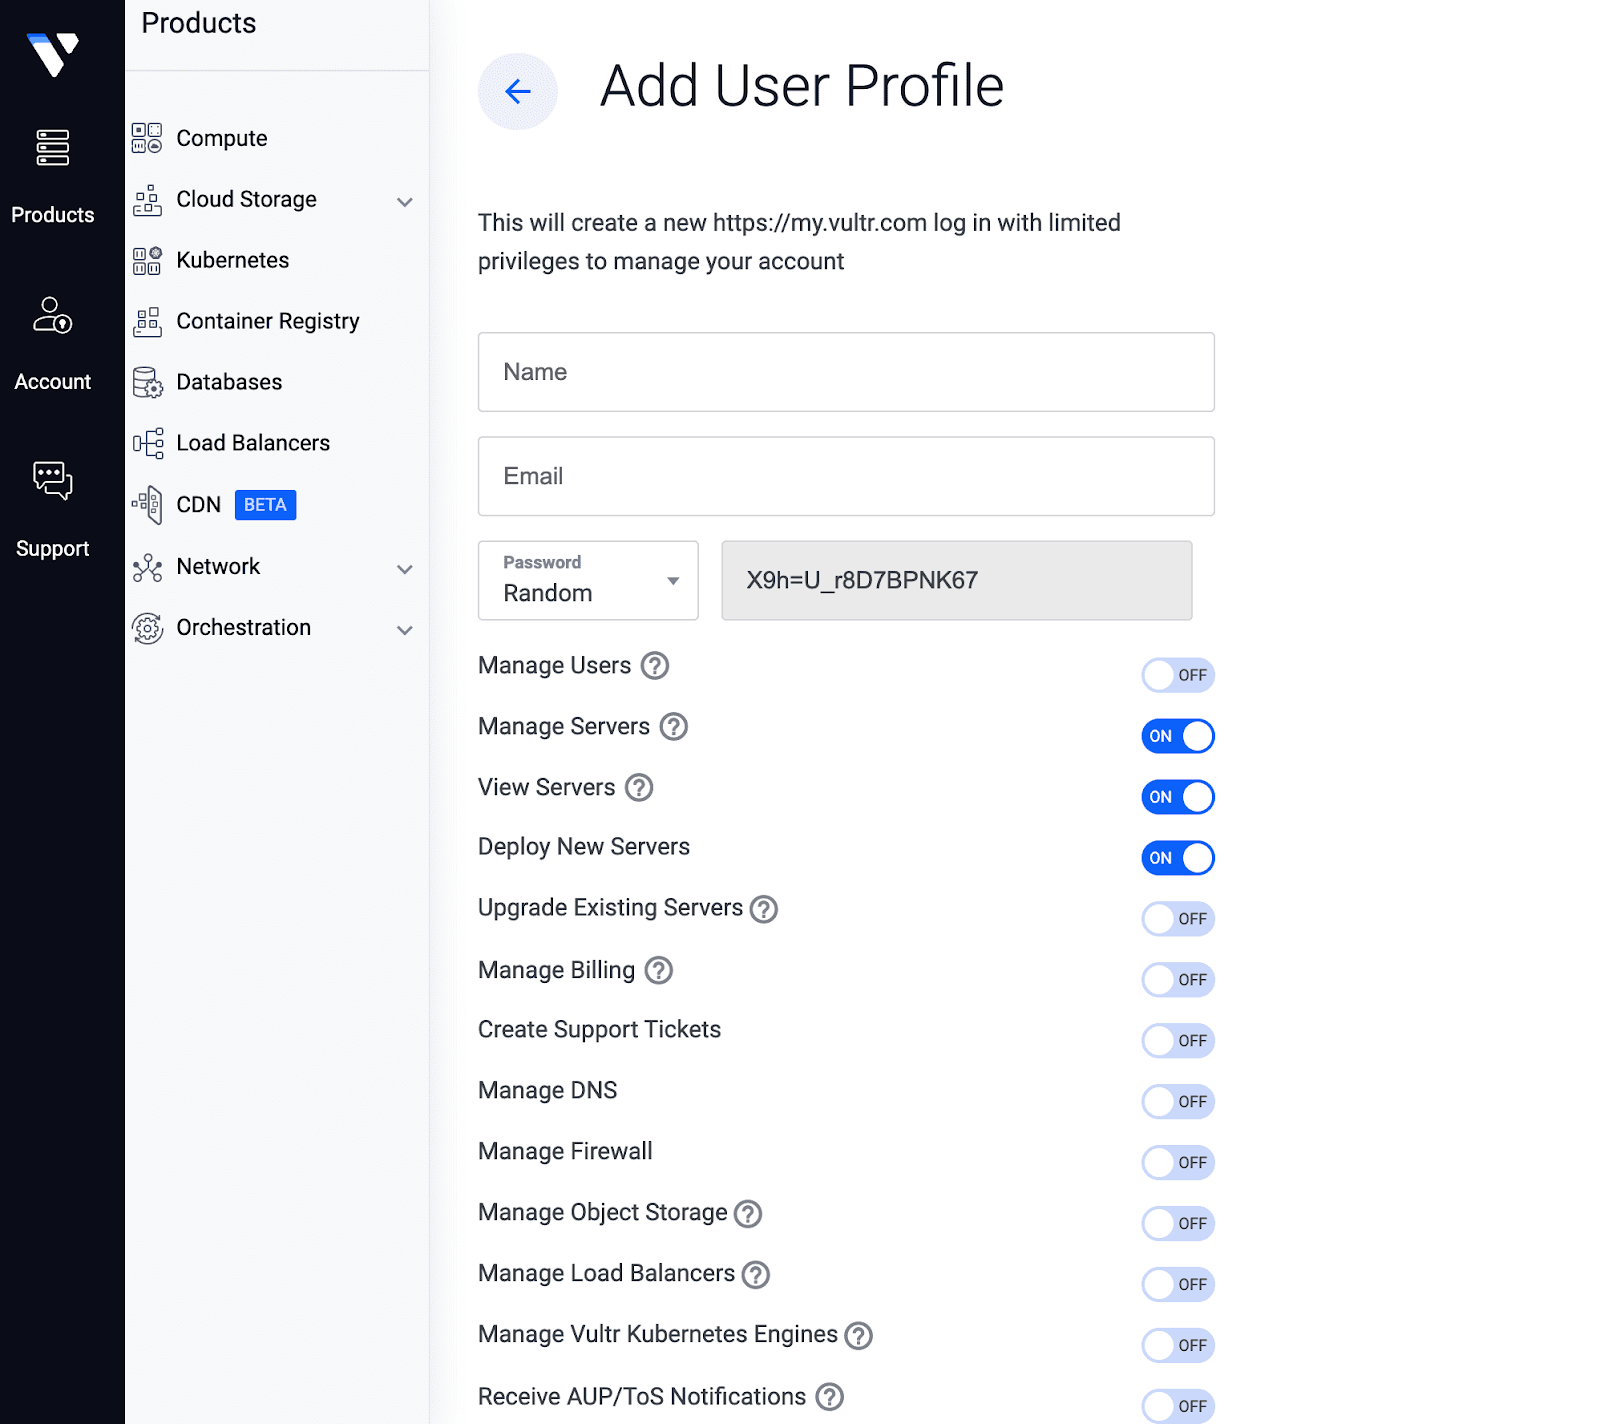
Add Team Members In Vultr
If you want your team members to use xCloud with Vultr, then make sure these permissions are given.
Add Vultr API key in xCloud
Thanks to xCloud, you can create your first server without spending any money. Now, click on ‘New Server’ from the xCloud dashboard and you will be redirected to the server selection screen. Then click on ‘Vultr’ to proceed further.
After selecting ‘Vultr’, set your ‘Key’, ‘Vultr Label’, and ‘Vultr API Key’. Then click on ‘Verify’.
Step 3: Create a Vultr Server in xCloud
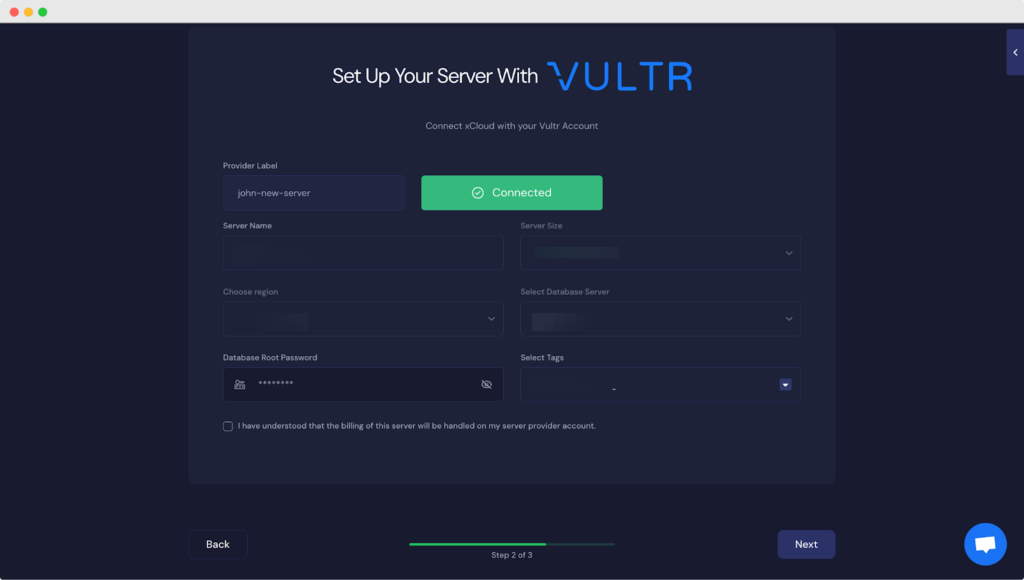
Now that you have successfully verified your Vultr account, you will need to add other details to create a server in Vultr using xCloud. Choose your Region, Database Server, Server Size, and much more from one easy dashboard.
How to Deploy Laravel Applications on Vultr with xCloud?
Deploying Laravel applications can often involve multiple steps and intricate configurations. xCloud simplifies this process by providing a streamlined platform tailored for deploying modern PHP applications, including Laravel, with minimal complexity.
Follow this step-by-step guide to configure and deploy your fully functional Laravel website with ease.
Step 1: Choose Your Server
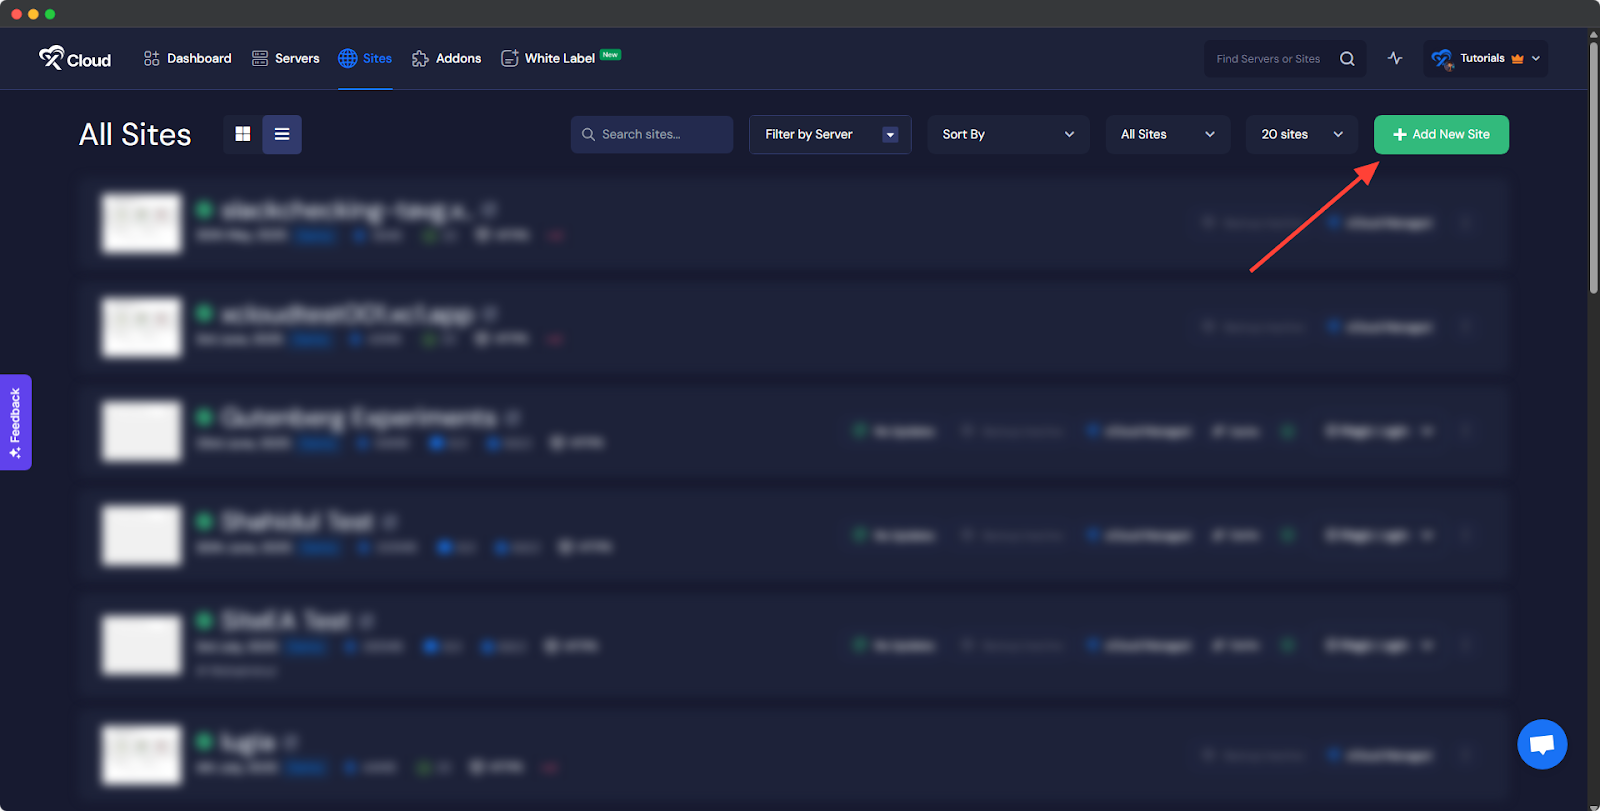
Begin by logging into your xCloud account. Once logged in, navigate to your dashboard and click on the ‘Add New Site’ button.
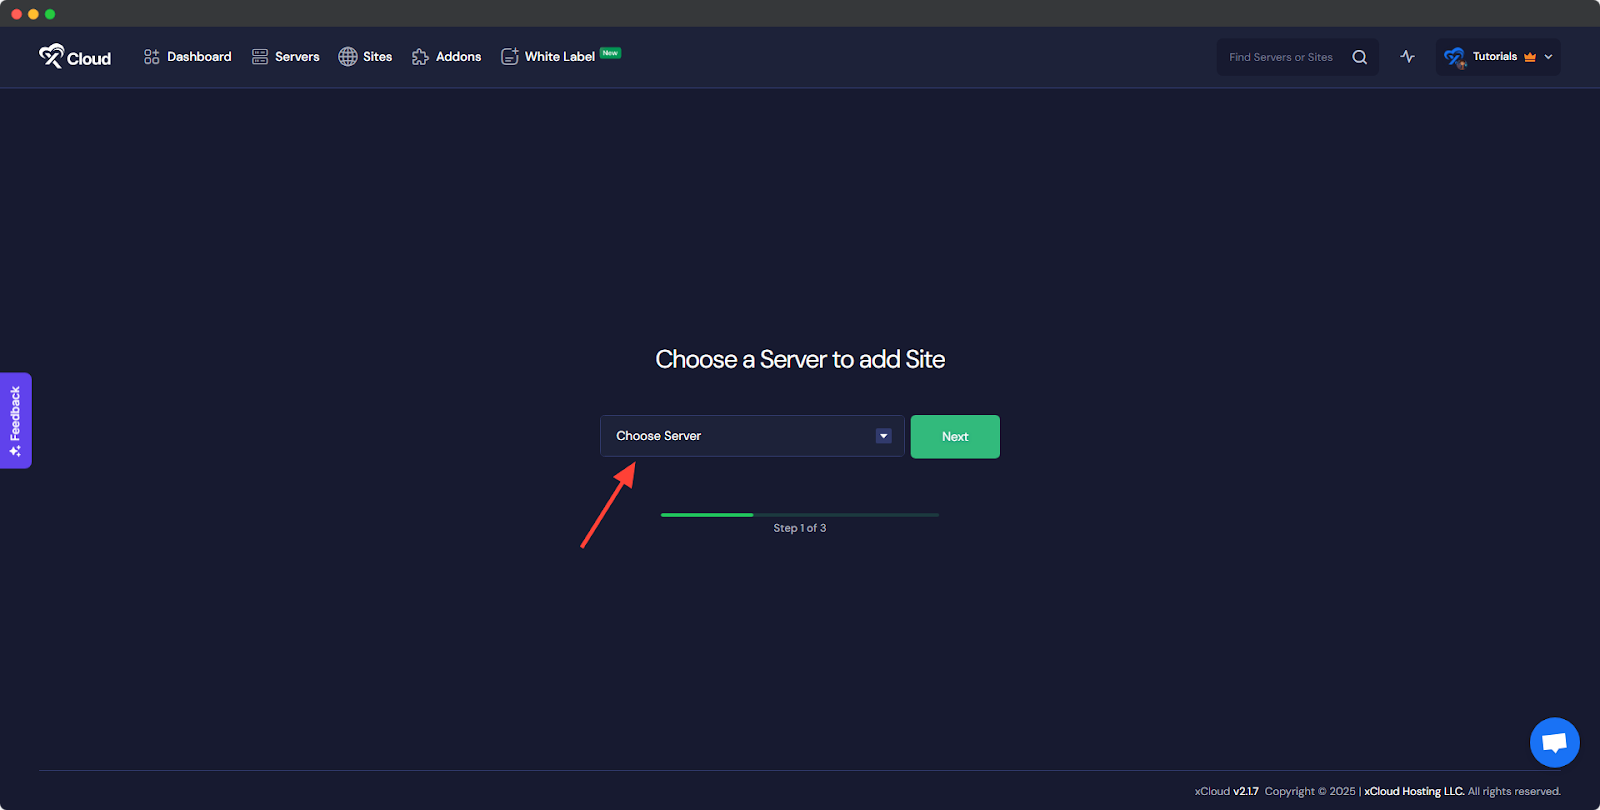
You will then be asked to ‘Choose a Server to add Site’ from the dropdown. You must select the Vultr server you set up in xCloud from this dropdown.
Step 2: Go to The Laravel Tab
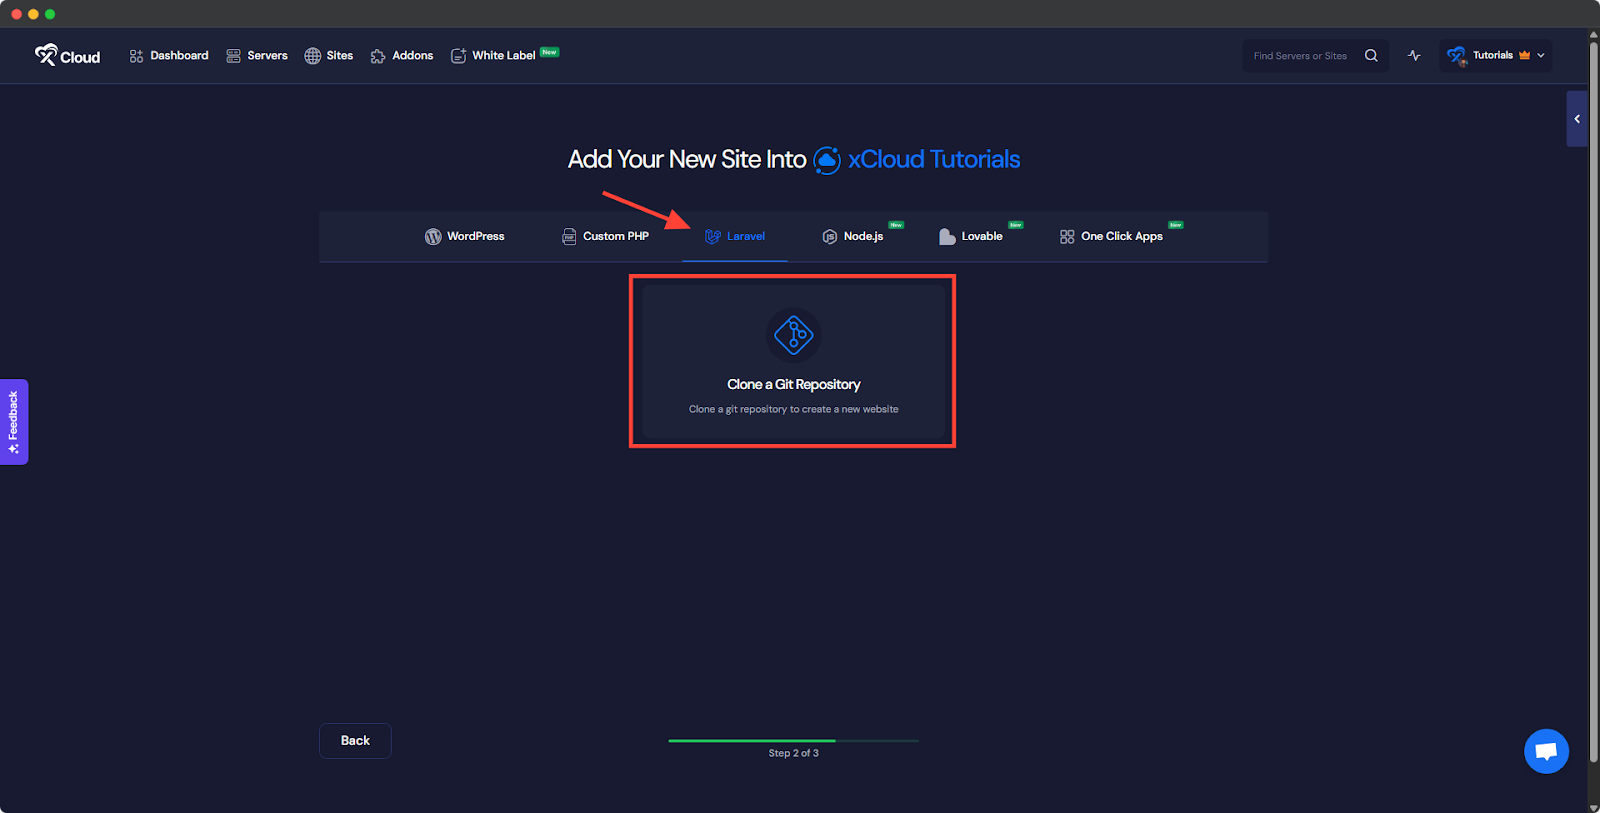
Then navigate to the ‘Laravel’ tab to deploy your Laravel applications. Now, choose ‘Clone A Git Repository’ to import your custom PHP site.
Step 3: Set Up Domains
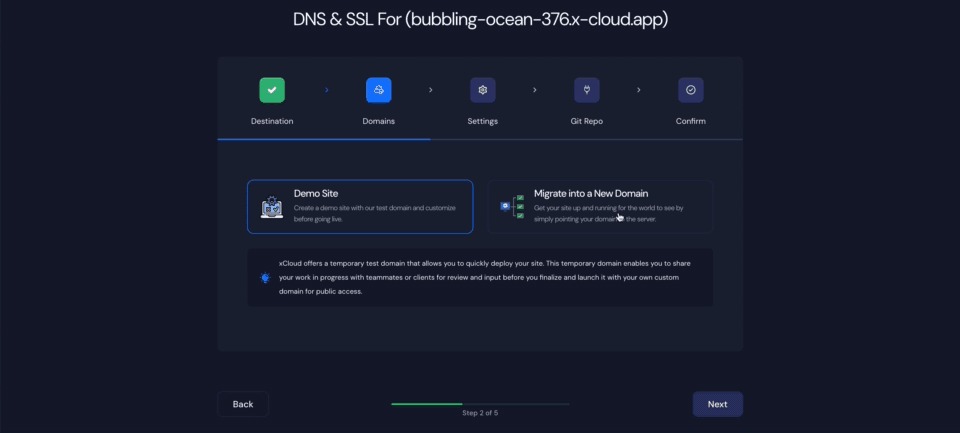
From the ‘Domains’ tab, you will get two options: either you can create a ‘Demo Site’ with a test domain and refine it until it is ready for launch or you can migrate into a new domain to get your site up and running in a new domain.
Or you can create your site with your live domain; you need to select the ‘Migrate into a New Domain’ option.Then you have to put ‘New Site Title’ and ‘Domain Name’. Here we are choosing the ‘Demo Site’ domain. Then click on ‘Next’.
Step 4: Settings To Manage Database
Now, you will be sent to the ‘Settings’ step. Make sure to correctly add your ‘PHP Version’, ‘Site User’, ‘Web root’.
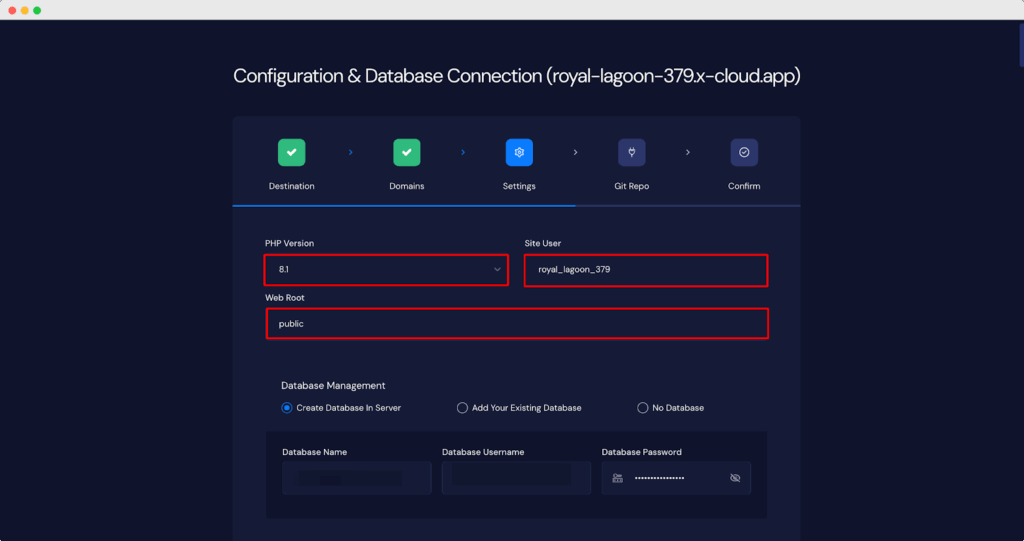
Now, it is time for database management. You will get three options. You can either create a new database on the server, you can add your existing database that is hosted on another server.
You can also proceed without any database. For this tutorial, we are going with the ‘Create Database In Server’ option.
If you select this option, enter your ‘Database Name’, ‘Database Username’ and ‘Database Password’. You can keep these auto-generated credentials or you can modify them according to your choice.
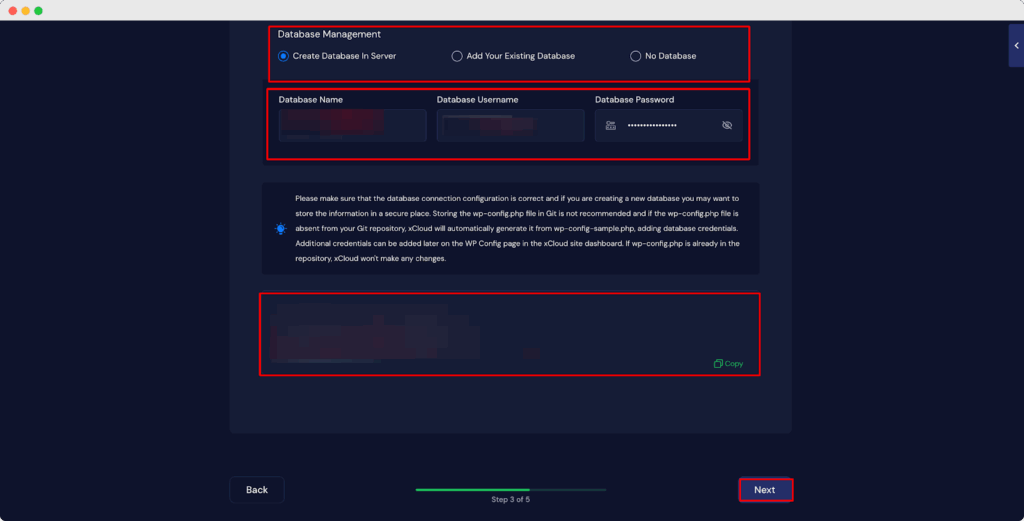
After selecting any one option and providing all essential information and credentials, click on ‘Next’.
Step 5: Insert Git Repository Credentials
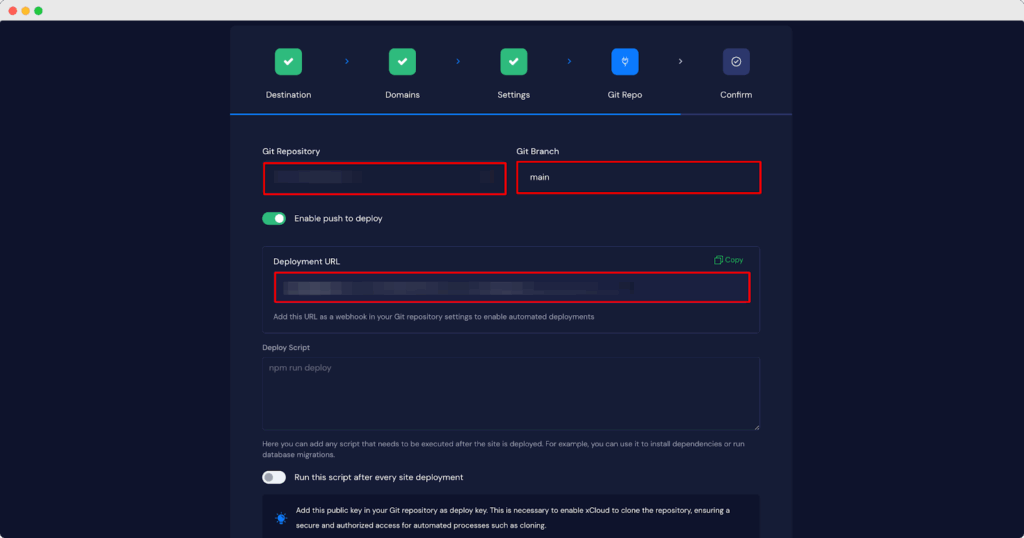
In the ‘Git Repo’ tab, add your ‘Git Repository’ and ‘Git Branch’. Also, toggle on the ‘Enable push to deploy’ option. Once you enable the ‘Push To Deploy’, it will generate a ‘Deployment URL’. We can use this URL to CICD pipeline and copy the ‘Deployment URL’ from here.
Step 6: Add the Deployment URL to the Git Repository
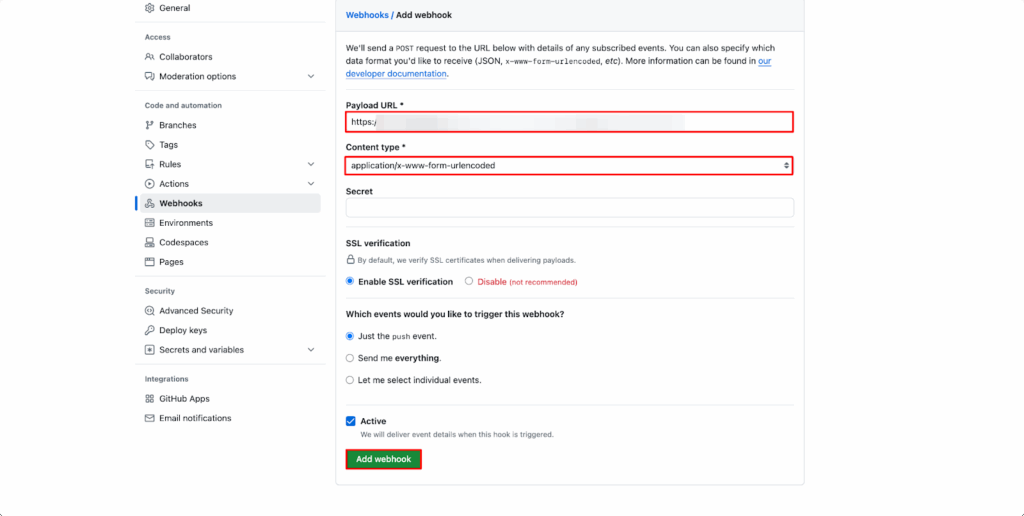
Now, go to your Git repository. From the ‘Code’ tab, go to the ‘Settings’ tab and click on the ‘Webhooks’ page from the ‘Code and Automation’ section of the left navigation. Insert the deployment URL into the ‘Payload URL’ field. Select ‘application/json’ from the ‘Content type’ dropdown.
Note: This step is optional. Adding a webhook enables automatic deployments when you push changes to the repository but it’s not required if you prefer to deploy manually.
Step 7: Add Public Key to Git Repository
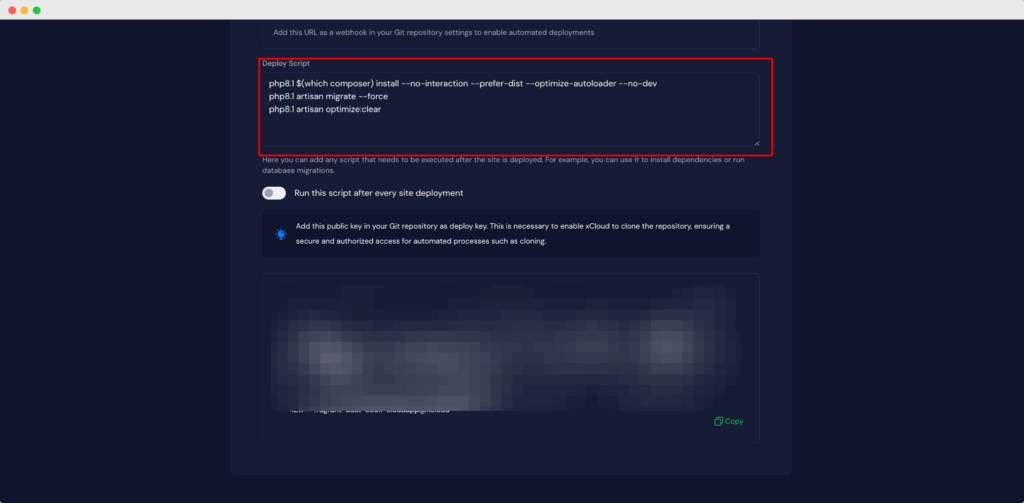
Next, in the ‘Deploy Script’ field, specify any script that needs to be executed after the site is deployed. For example, you can use it to install dependencies or run database migrations.
Next, in the ‘Deploy Script’ field, specify any commands that need to be executed after the site is deployed.
If your project uses PHP, you can specify the version (e.g., php8.1) and run Composer along with Laravel-specific commands like this:
php8.1 $(which composer) install –no-interaction –prefer-dist –optimize-autoloader –no-dev
php8.1 artisan migrate –force
php8.1 artisan optimize:clear
If your project also involves Node.js, you can include additional commands as well. These scripts ensure that your backend and frontend are fully prepared after deployment.
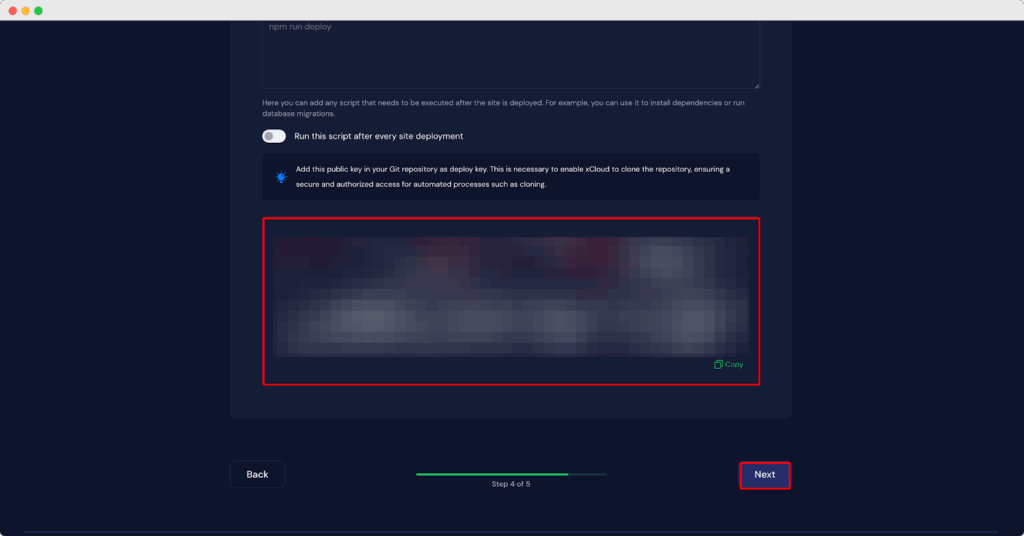
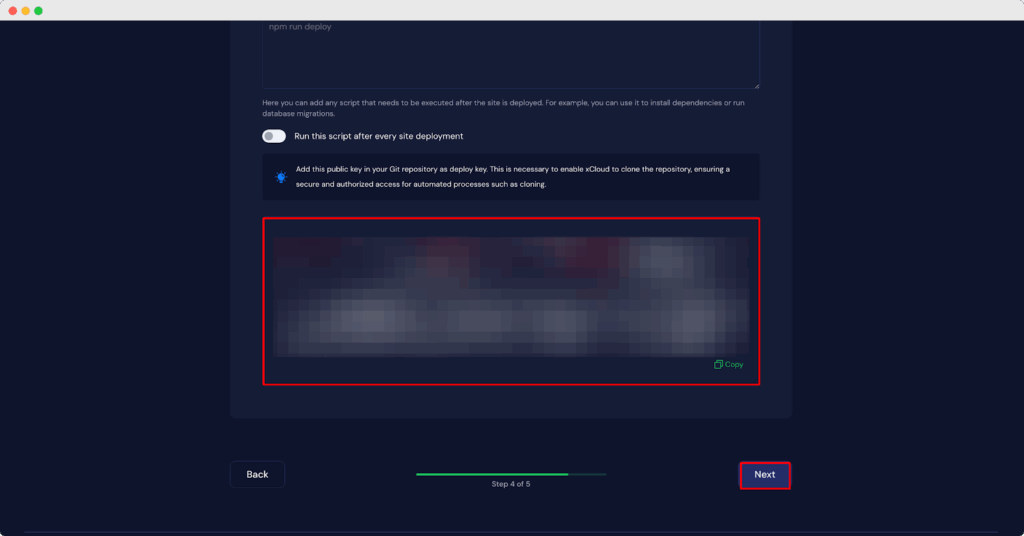
From the xCloud dashboard, copy the ‘Public Key’ to add it to your Git repository as a deploy key. Git migration uses the ‘Public Key’ for SSH authentication. This is necessary to enable xCloud to access your Git repository and clone it. It ensures secure and authorized access for the cloning process.
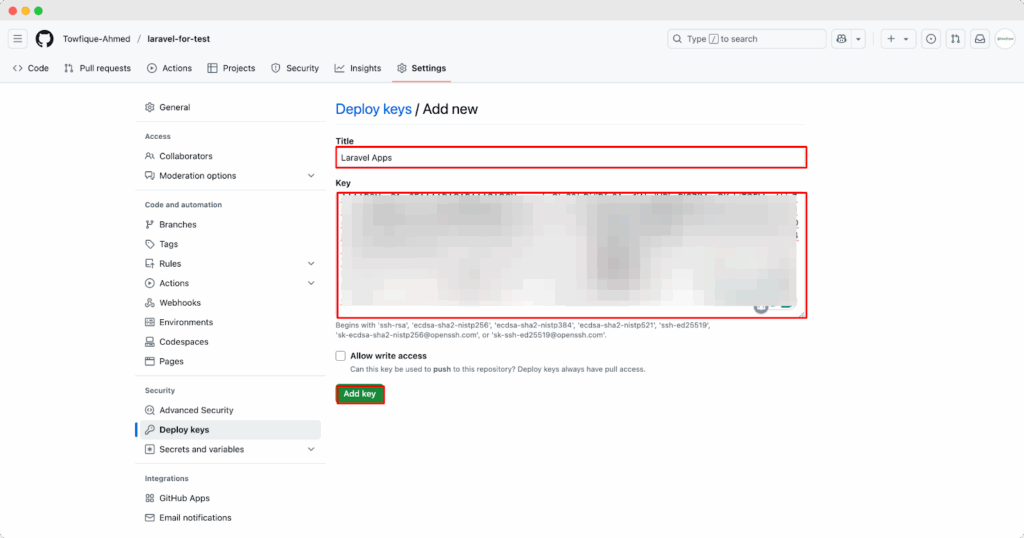
Now, again, go to your Git Repository. From the ‘Code’ tab, go to the ‘Settings’ tab and click on ‘Deploy Keys’ in the security section of the left navigation. Click on the ‘Add key’ button and paste the key that you copied from xCloud.
After inserting the deploy key in GitHub, click on ‘Next’ on your xCloud settings of the ‘Git Repo’ tab.
Step 8: Confirm Migrating The Website
Now, to start the migration process, click on the ‘Start’ button. After clicking the migration process will start and you will see the progress of migration.
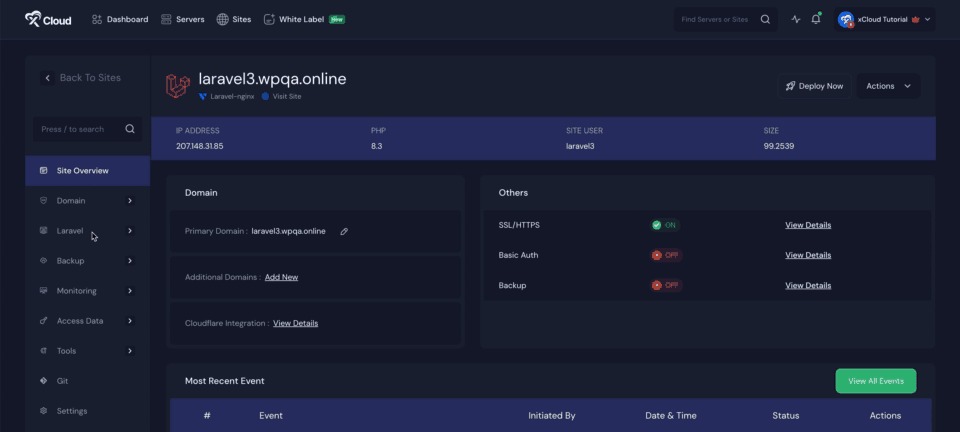
Once the migration is successfully complete, you will see the following screen. You go to the site dashboard from there. Go to the ‘Laravel’ Option from the menu and customize the ‘Application’ and ‘Environment’ as your preferences.
Check out the other features of Laravel:
- How to Use Supervisor for Process Management With xCloud
- How to Set Up Laravel Horizon with xCloud
- How to Set Up a Queue Worker for Laravel Applications
Configure Laravel Scheduler with cron job for your Laravel projects with ease. Check out this documentation for more details: How To Configure xCloud Cron Job?
And that’s it. This is how easily you can successfully deploy your Laravel application on xCloud. Now you can go to your site dashboard from xCloud and customize according to your preferences.
If you are still stuck, feel free to contact our support team.