

How to Resell Hosting with Self Managed Server Provider
Updated November 28, 2025 · 7 min read
xCloud Reseller Hosting Program allows you to integrate your own server providers so you can manage and sell products using your preferred hosting infrastructure. Whether you work with Hetzner, Vultr, DigitalOcean, or Linode (Akamai), the process is simple and efficient.
Follow the documentation to resell hosting with self managed server with easy steps.
Integrate Self Managed Server Provider with the Reseller Program
Easily connect your preferred server provider (Hetzner, Vultr, DigitalOcean, or Linode) to xCloud through the reseller dashboard. Authorize, verify, and manage multiple servers directly from a single dashboard.
Step 1: Access the Reseller Dashboard
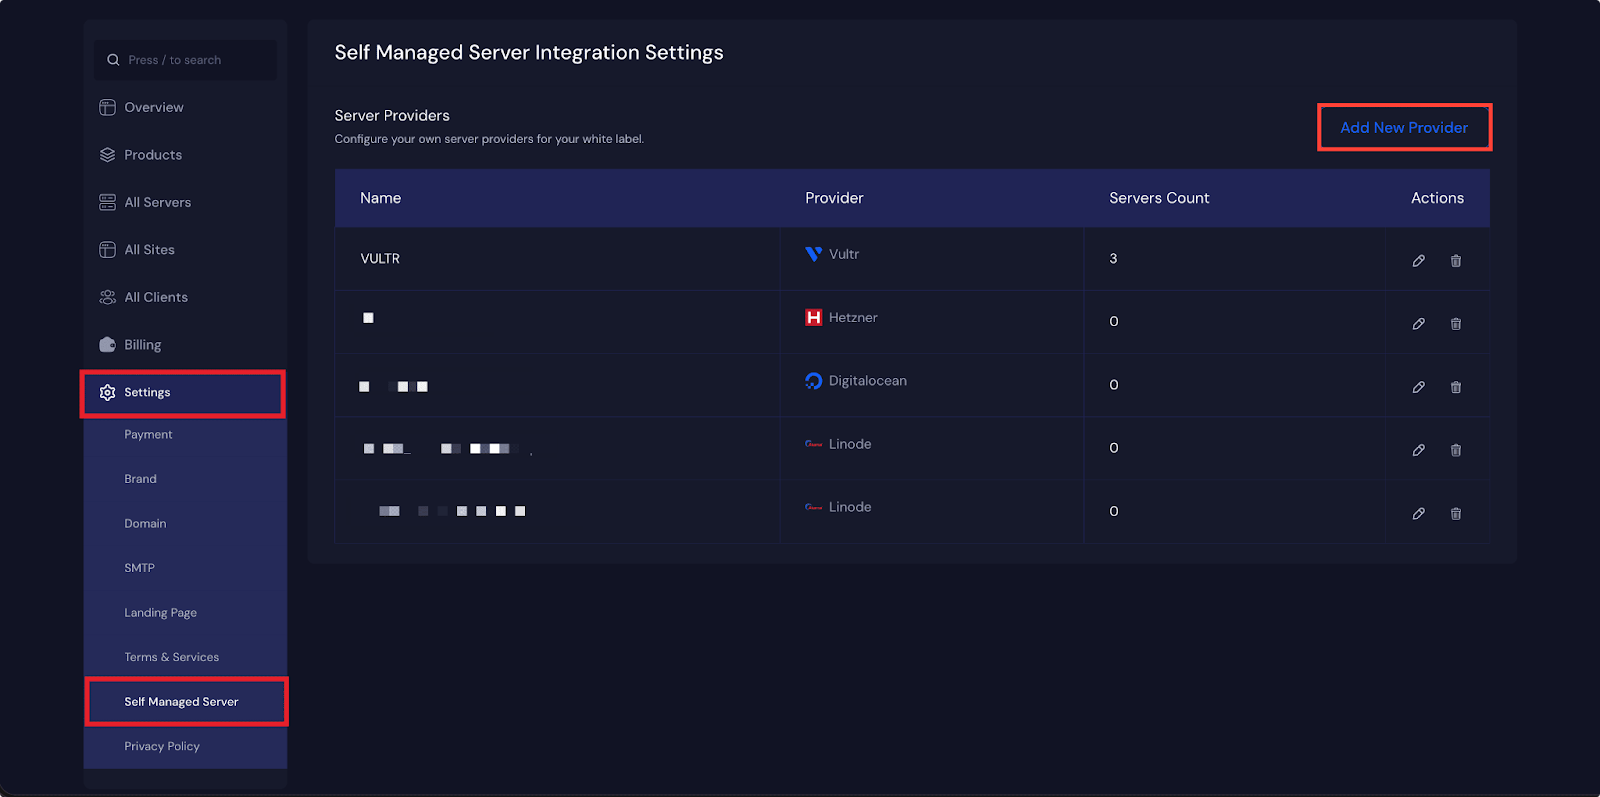
To begin, log in to your reseller dashboard. From the left-hand menu, navigate to ‘Settings’ → ‘Self Managed Server Provider’ Integration. Once you are on the integration page, click on the ‘Add New Provider’ button to start adding your server provider.
Step 2: Choose and Authorize a Server Provider
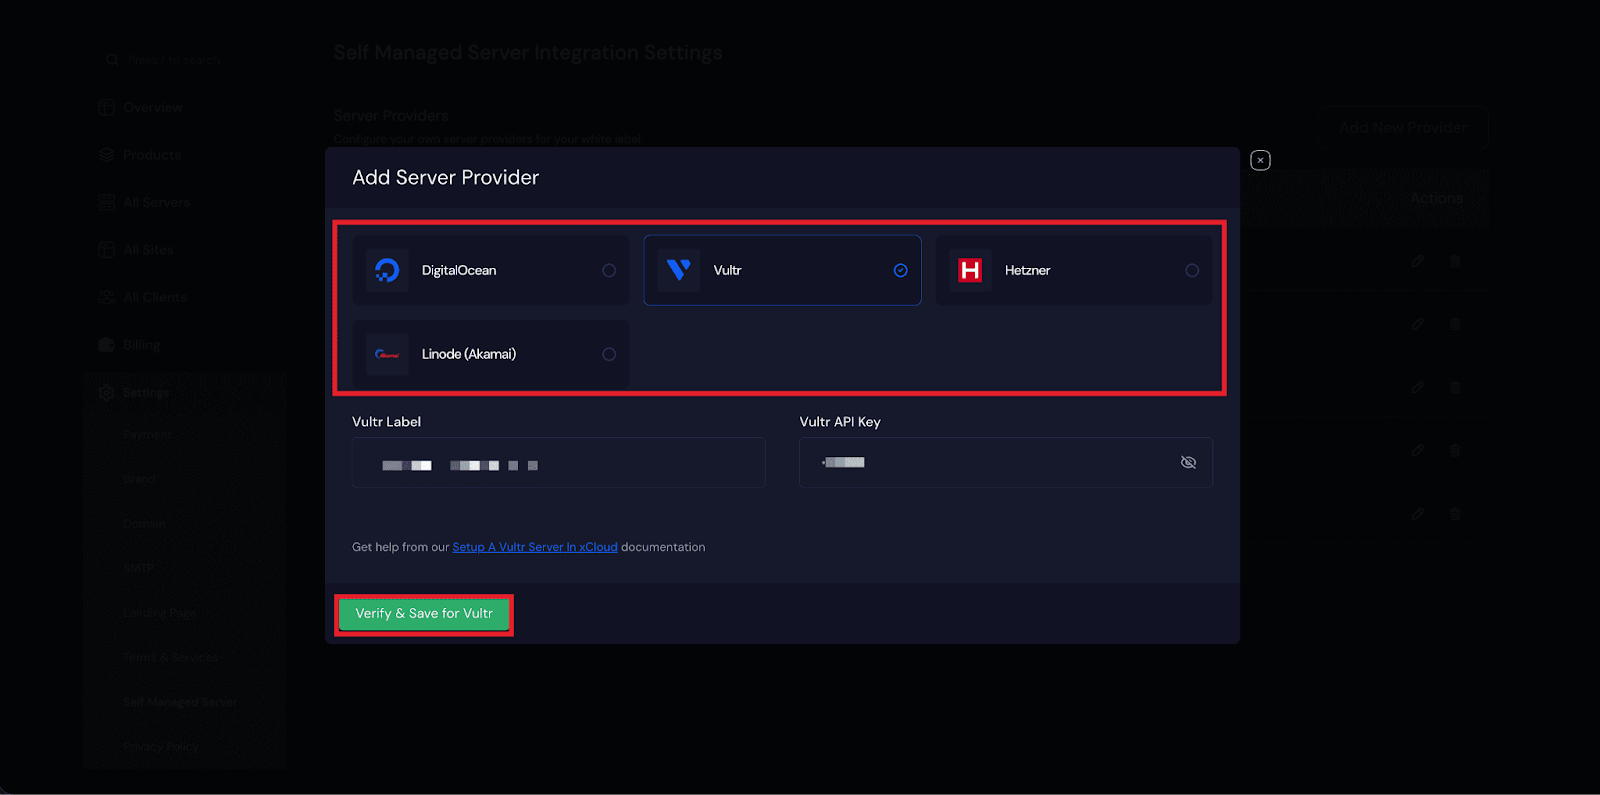
After clicking the button, a pop-up window will appear. In this window, you will be able to select a server provider from the available options, which include ‘Hetzner’, ‘Vultr’, ‘DigitalOcean’, and ‘Linode (Akamai). Once you have chosen your preferred provider, click on the ‘Authorize / Verify’ button to proceed.
If you need help with the setup process for integrating your Self Managed Server, you can follow the documentation below for setup set your own server provider with the Reseller Hosting program easily. –
👉 DigitalOcean,
👉 Vultr,
👉 Hetzner, or
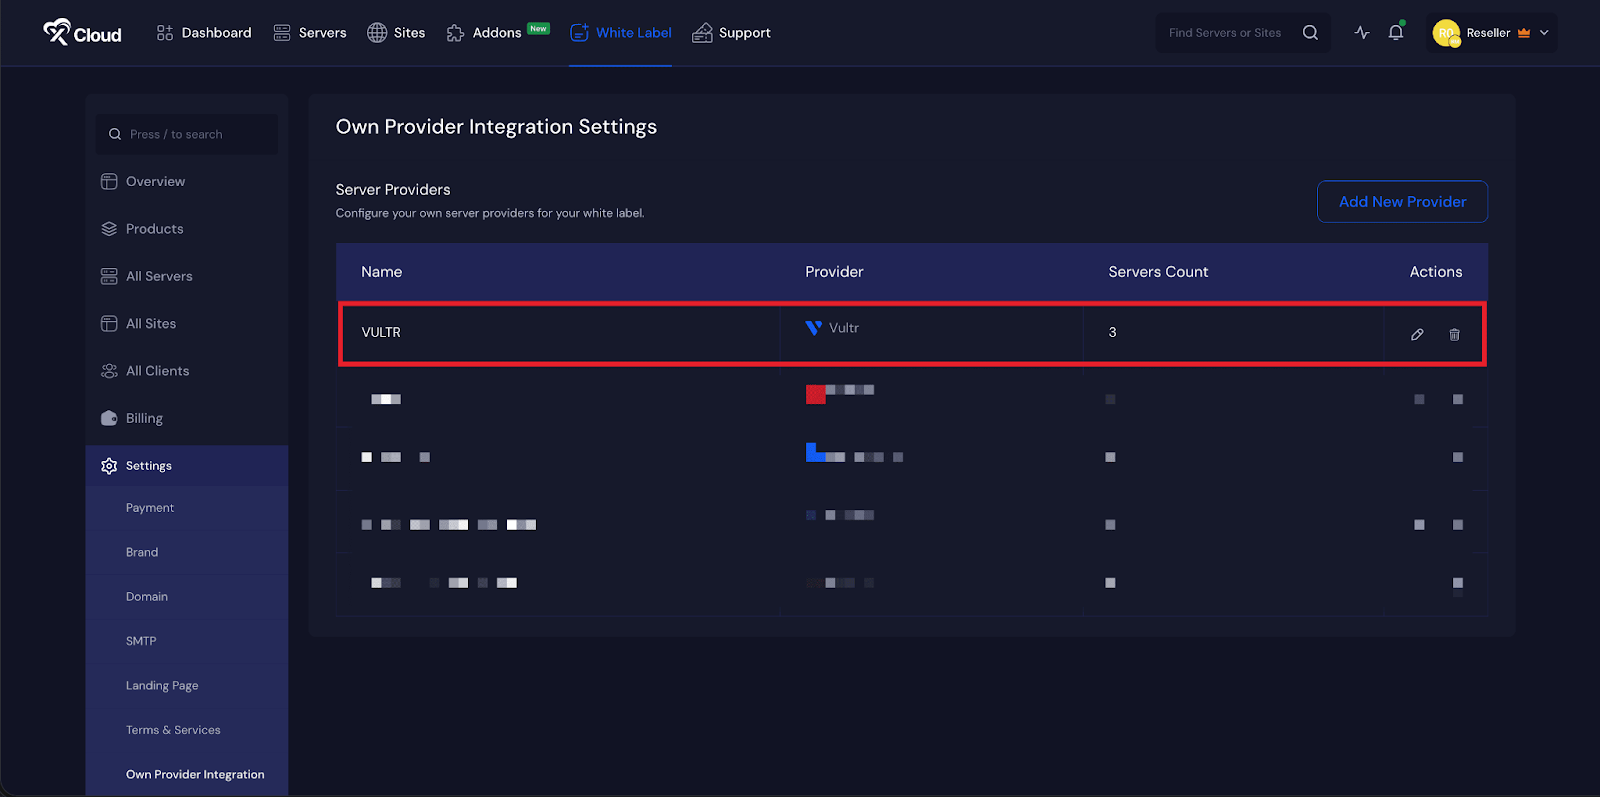
Once the setup is completed, your selected server will be connected to xCloud and added to your dashboard. The dashboard will then display important details such as the ‘Server Name, ‘Provider’, and ‘Server Count’. From the ‘Actions’ menu, you can click on the ‘Edit’ icon to update the server credentials whenever necessary or ‘Delete’ the server by clicking the Delete icon.
Note: It is also possible to integrate multiple servers from the same provider, which gives you flexibility when managing your hosting resources.
Create a Product with xCloud Reseller Hosting Program
Once your server is integrated, create and customize hosting products with your own pricing, descriptions, and packages. Publish them under your white-label brand and start reselling instantly.
Step 3: Create a Product with the Provider
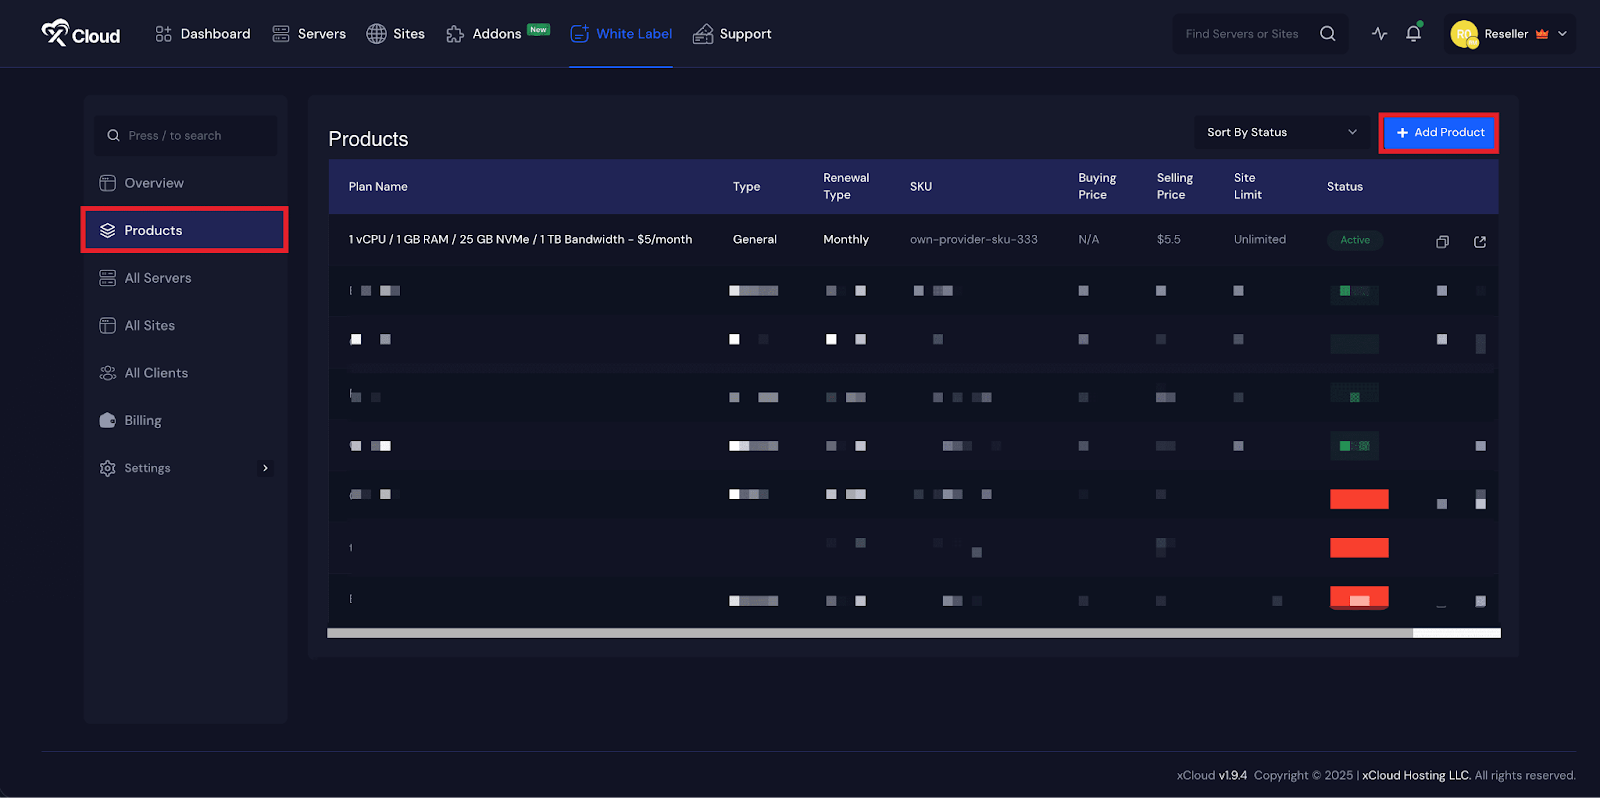
When your server integration is complete, you can move on to creating products. Go to the ‘Products’ tab in your dashboard and click on the ‘Add Product’ button.
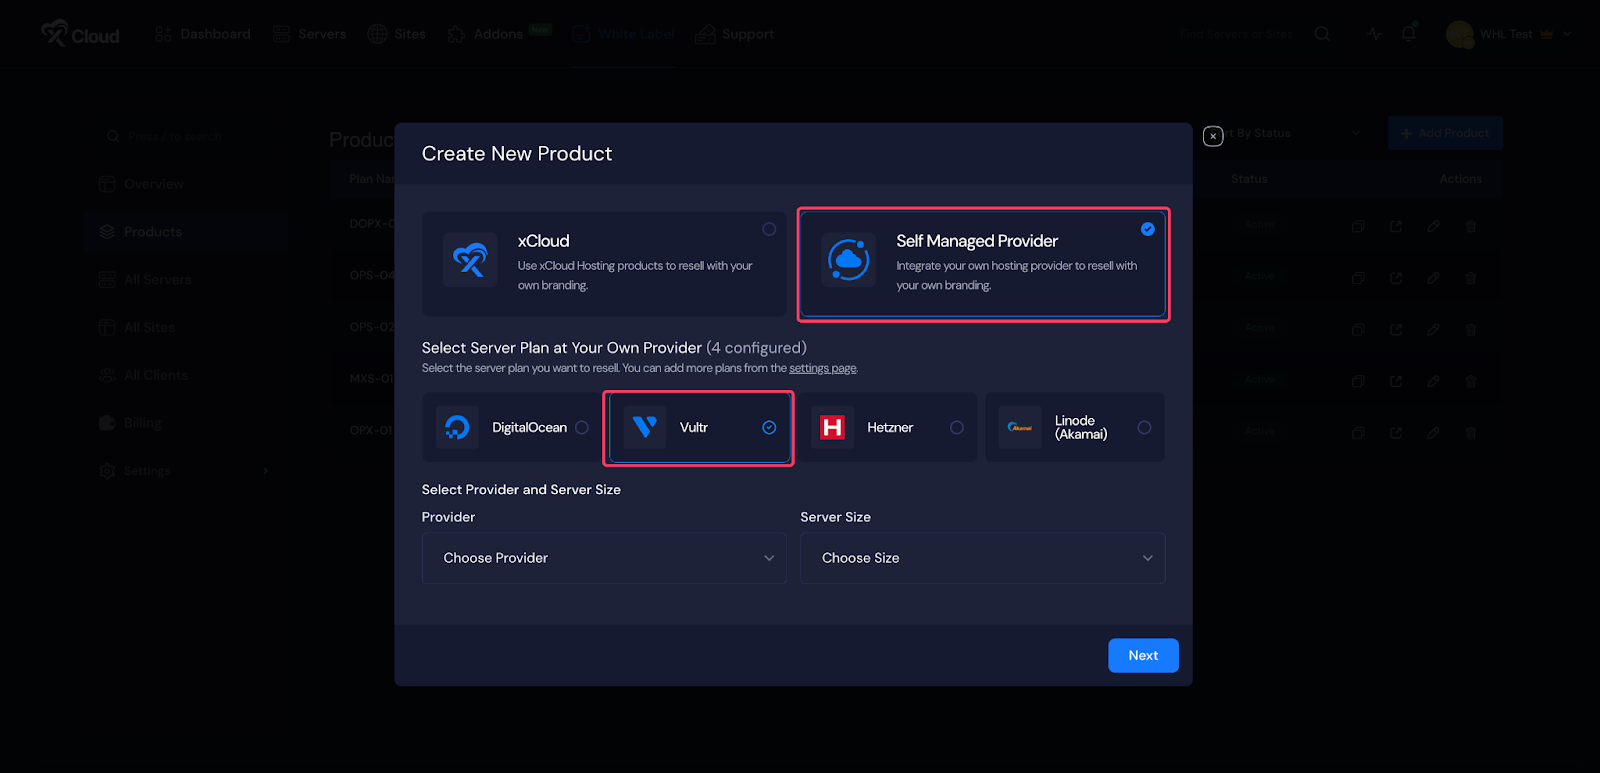
Step 4: Choose the Integrated Server Provider
A pop-up will appear, where you should select the ‘Own Provider’ option to access the self-managed servers you have already connected. From there, choose one of the integrated server providers, such as ‘Vultr’, to continue.
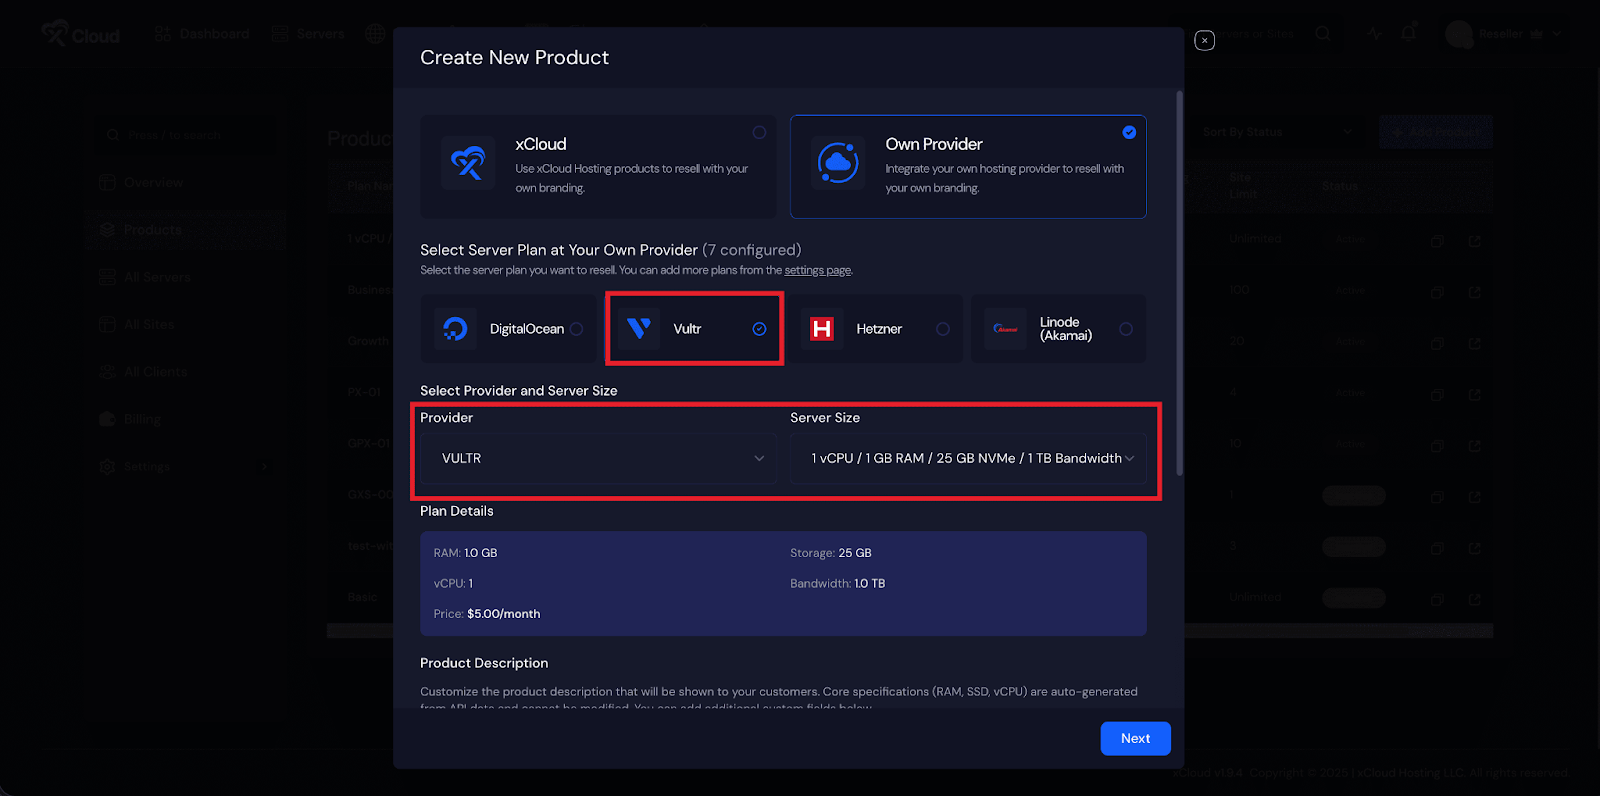
Step 5: Choose Server Provider and Size
Next, select a ‘Server Provider’ from the dropdown menu under ‘Select Provider’. You will also need to choose the ‘Server Size’ according to your preferences.
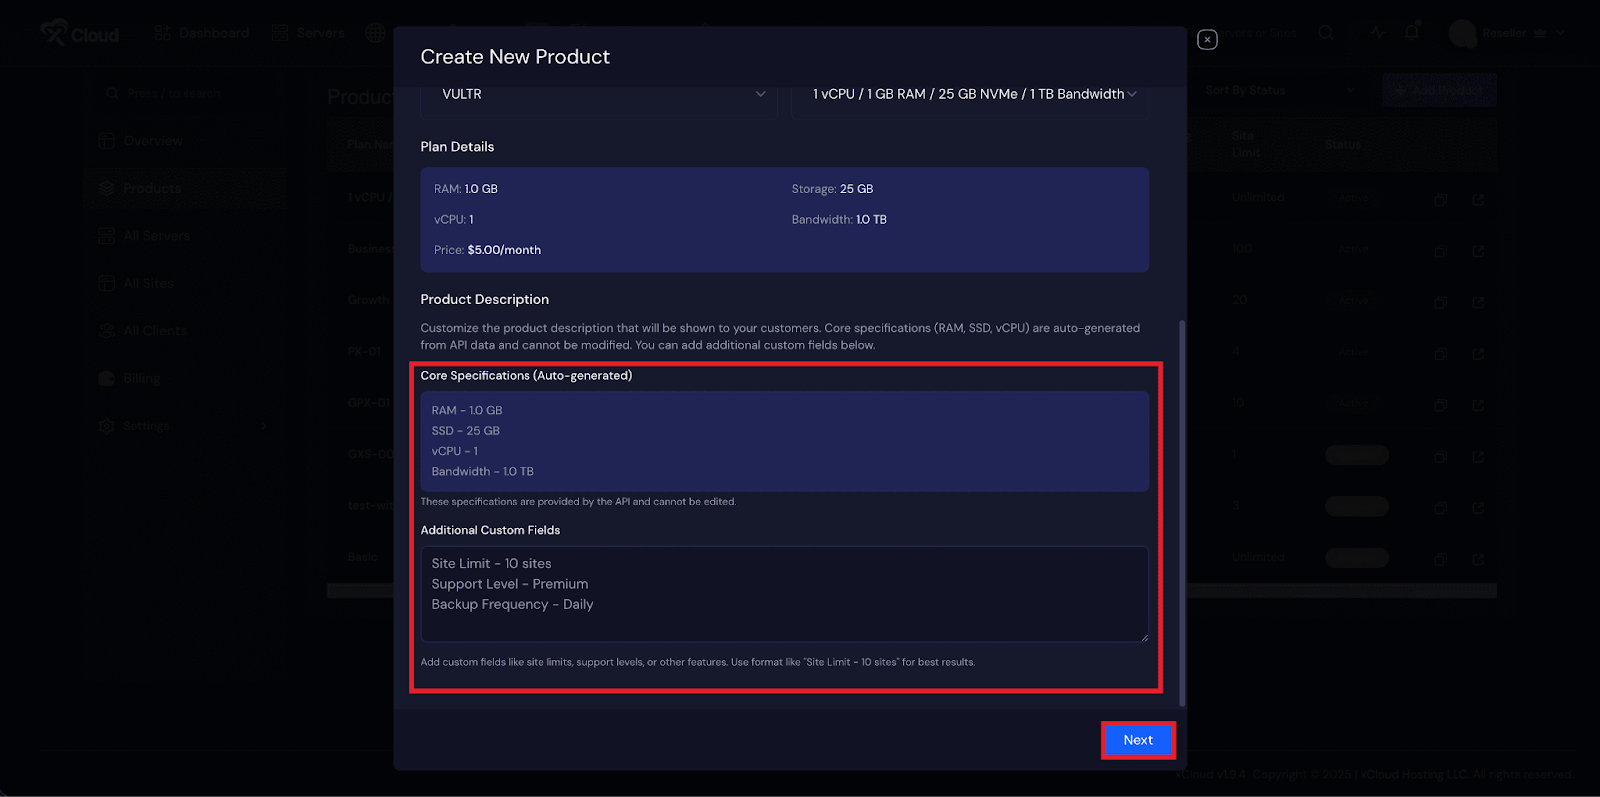
Step 6: Add your Product Description
You will now see an overview of the plan details. Next, you will receive an auto-generated ‘Product Description’ that cannot be edited. After that, you will have access to ‘Additional Custom Fields,’ where you can add your preferred details. Once finished, click the ‘Next’ button.
Step 7: Customize Package
Provide the following details for your product:
- ‘Plan Name’
- ‘Price/Month’
- ‘SKU’
- ‘Site Limit’
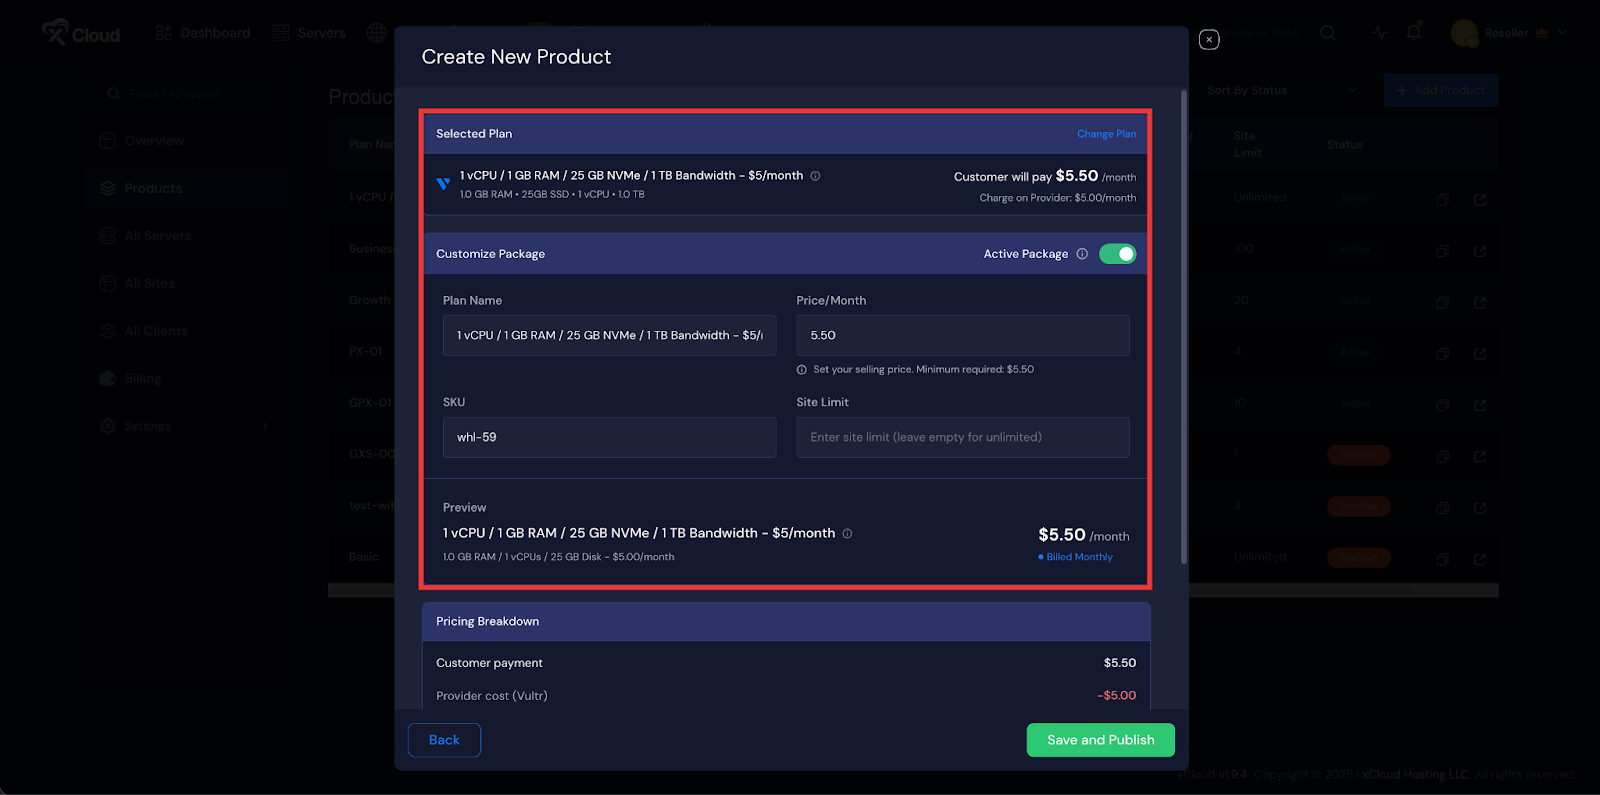
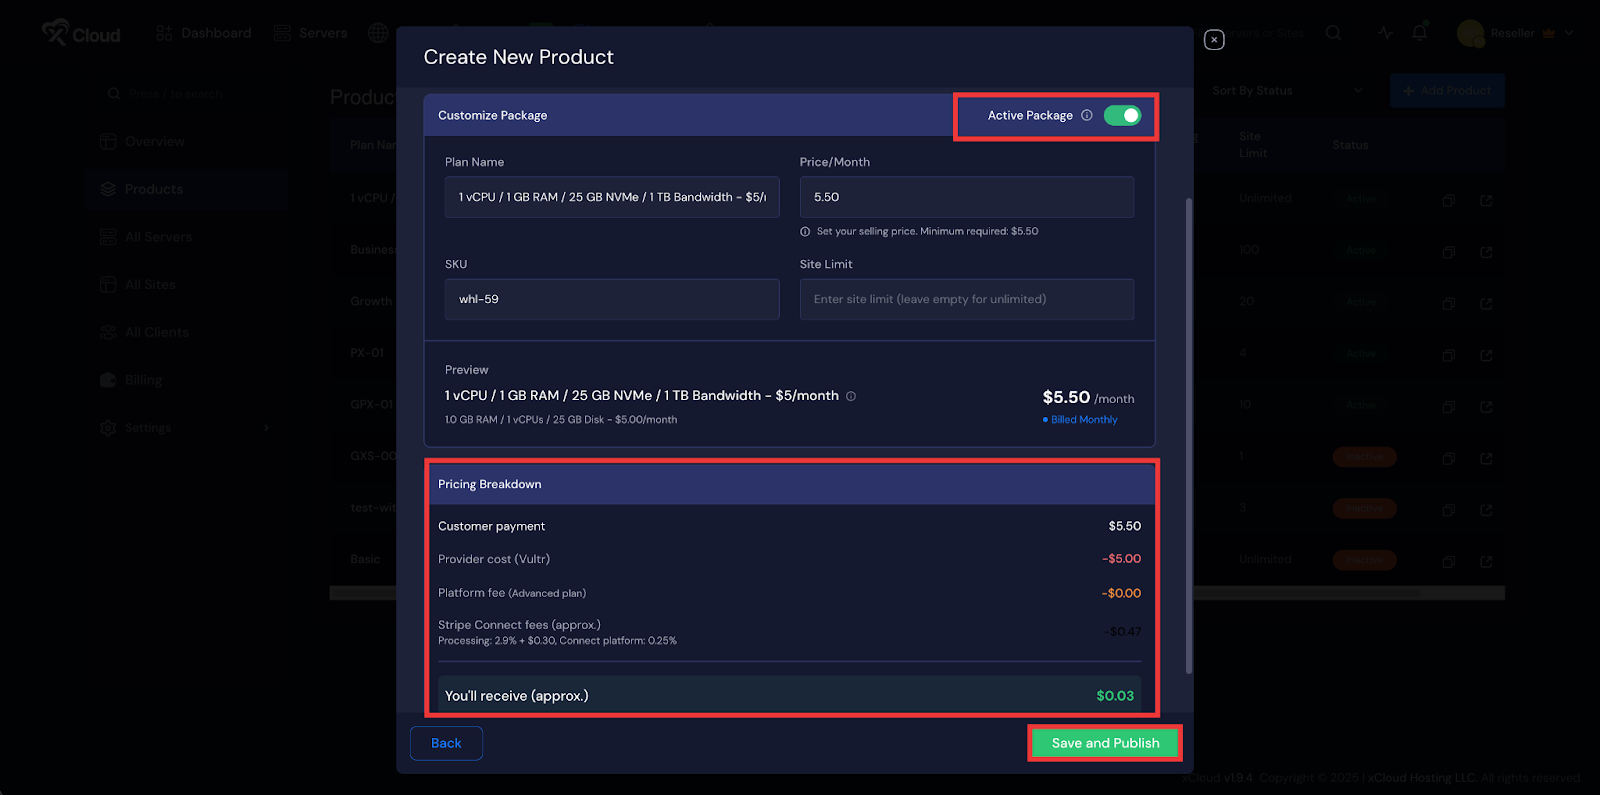
You can disable the toggle button beside the ‘Active Package’ option if you want to restrict access. Below, you will see a pricing breakdown. For example:
Pricing Breakdown
- Reseller Panel Price: $50
- Created Product Price/ Customer payment: $70.00
- Provider cost (Vultr): $5.00
- Platform fee (Advanced plan): 30% or minimum $3 per sale (Based
- Stripe Connect fees: Up to 3% (approx.)
- You’ll receive : $58.50
This gives you a complete overview of the profit you will make by selling the product. Finally, click on the ‘Save & Publish’ button.
Once you are ready, click the publish button to finalize the process. Your newly created product will then appear in the product list on your dashboard, ready for use.
Subscribe to a Reseller Hosting Panel
If you have not yet subscribed to any reseller hosting plan, log in to your xCloud Dashboard using your credentials. Once logged in, locate and click on the ‘White Label’ tab in the dashboard. This will redirect you to the xCloud White Label onboarding flow, where you can begin setting up your reseller hosting.
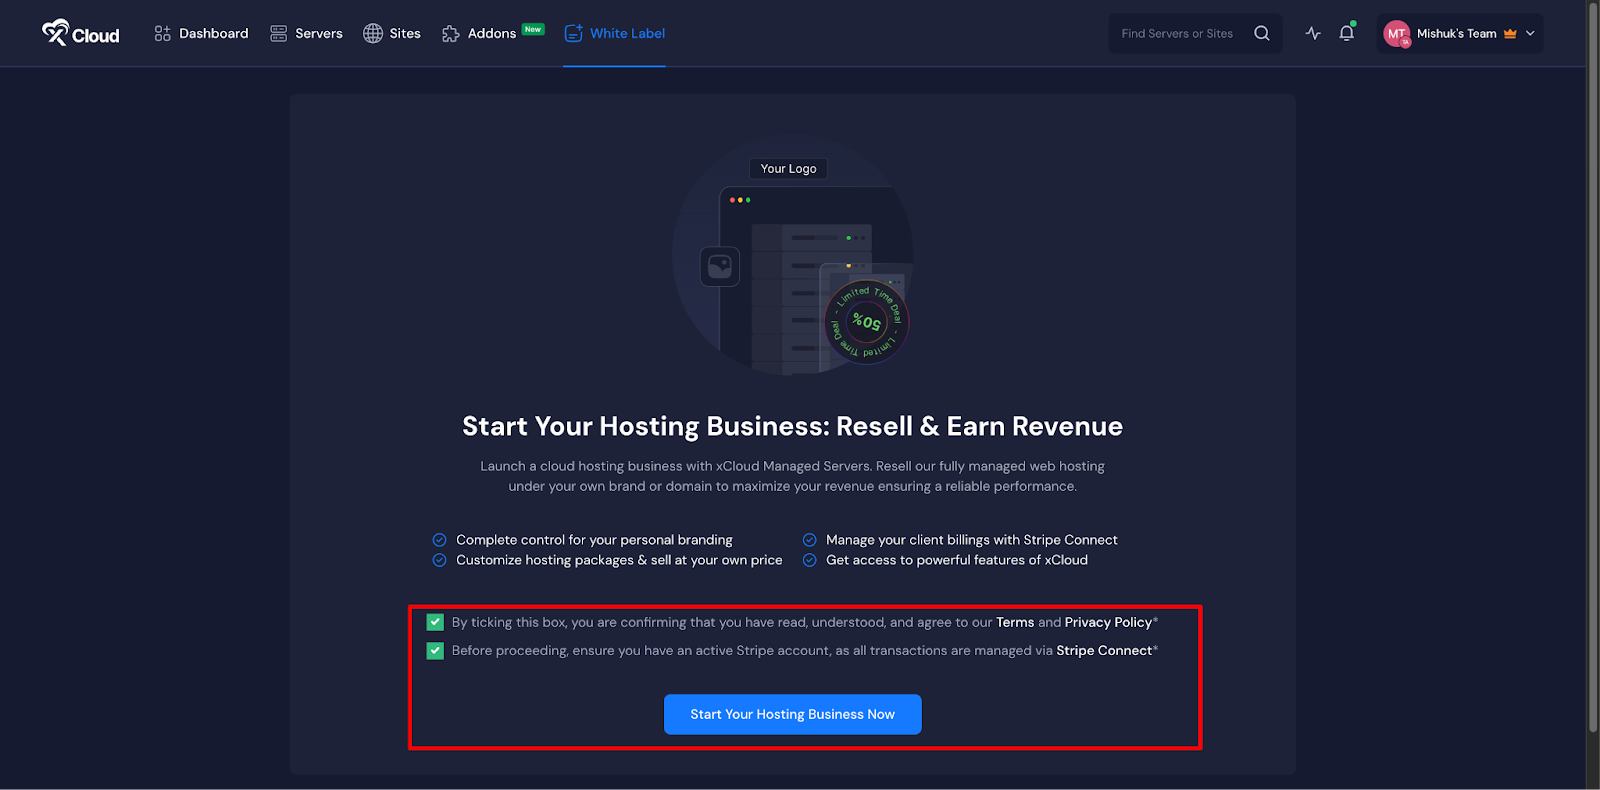
After reviewing the Terms of Service and confirming that you have a Stripe account, click on the ‘Start Your Hosting Business Now’ button.
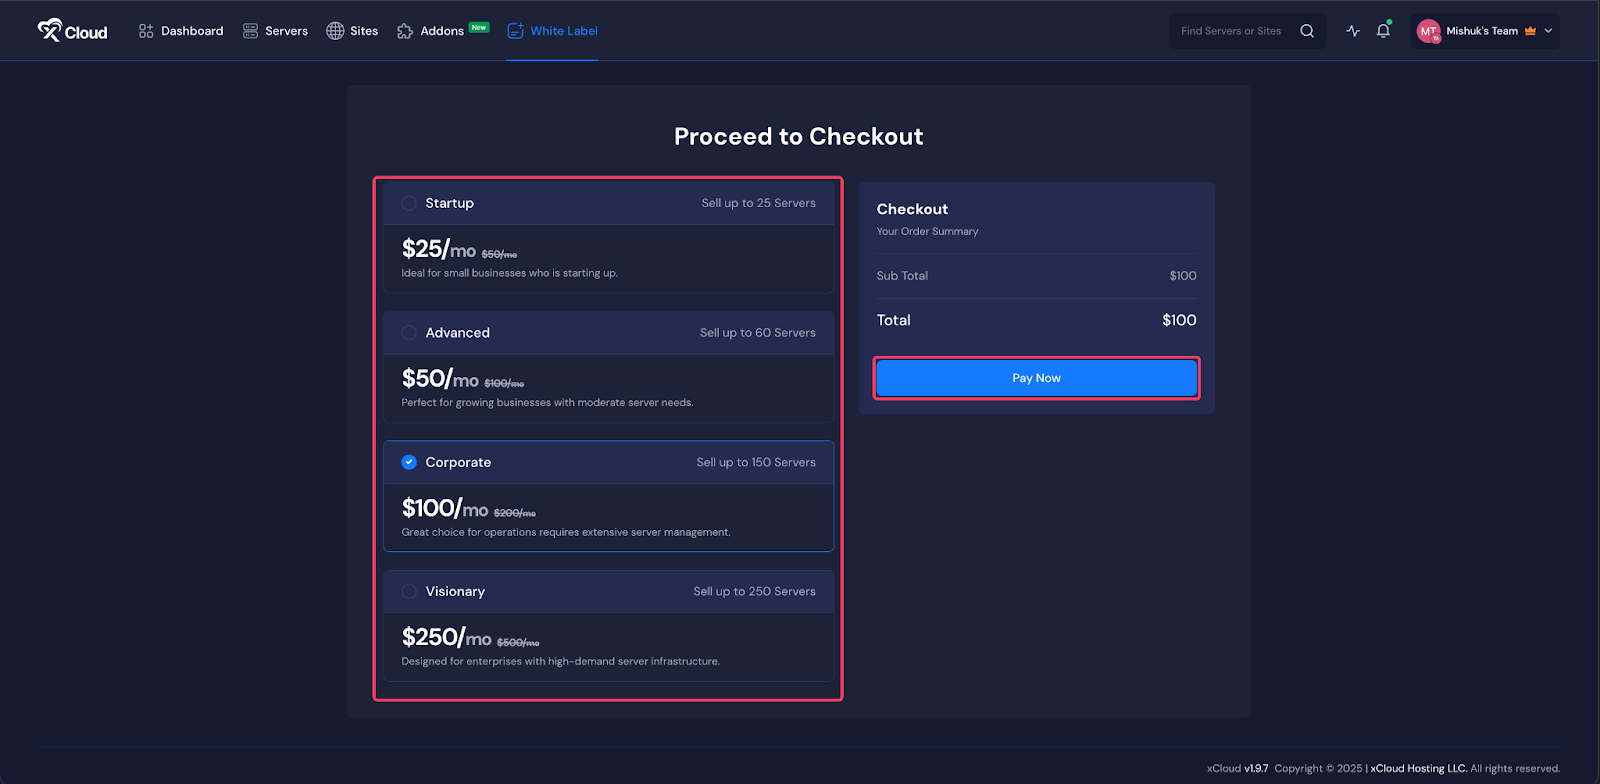
Next, choose from four different subscription plans for the xCloud White Label Control Panel. Review the available options, select the plan that best suits your needs, and click ‘Pay Now’ to proceed.
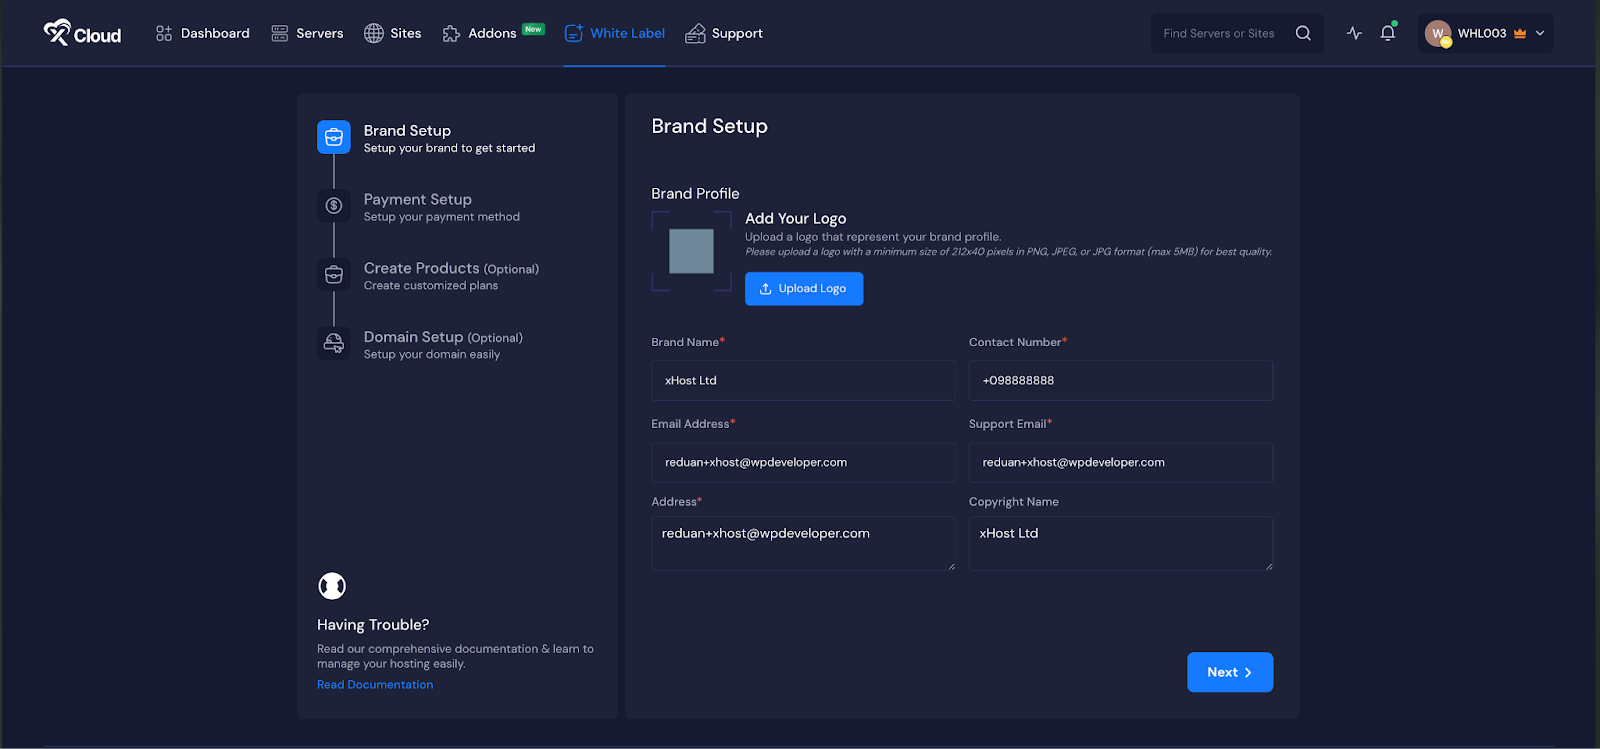
Once your payment method is configured, it’s time to set up your brand. Start by uploading your brand’s logo or icon. To do this, click the ‘Upload Logo’ button and select the file from your device. Then, provide your brand information, including Brand Name, Mailing Address, and Contact Number. After filling in all the details, click ‘Next’ to move on to the next step.
You’ll now need to integrate Stripe to process payments. If you already have a Stripe account, simply connect it by clicking ‘Connect Now’. This will redirect you to the Stripe Connect Dashboard, where you can log in with your Stripe credentials and complete the connection.
Note: If you don’t have a Stripe account yet, you’ll need to create one before proceeding.
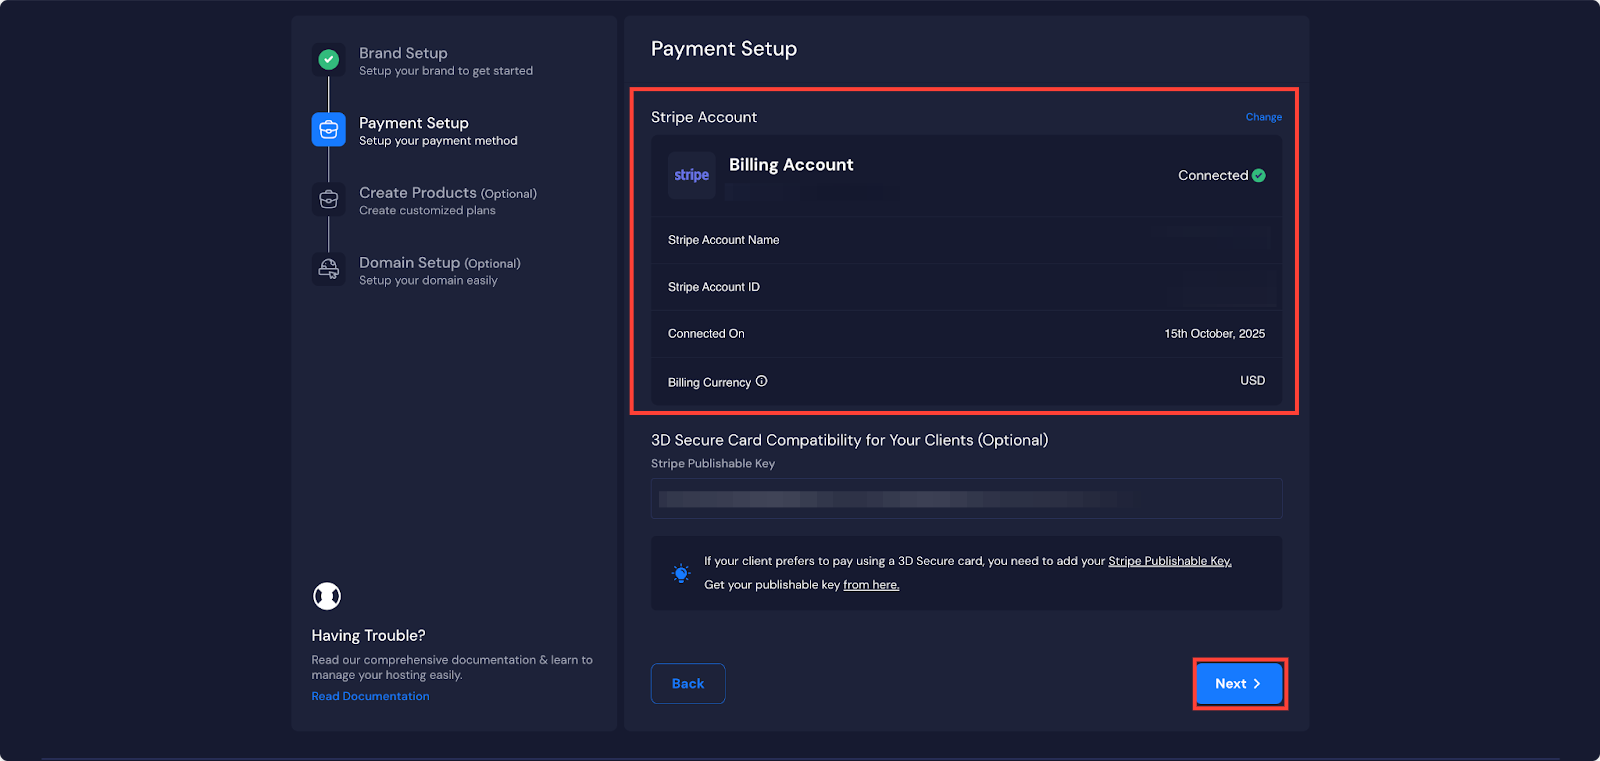
Now it is time to create your custom hosting packages. Start by clicking on the ‘Create Hosting Plan’ button.
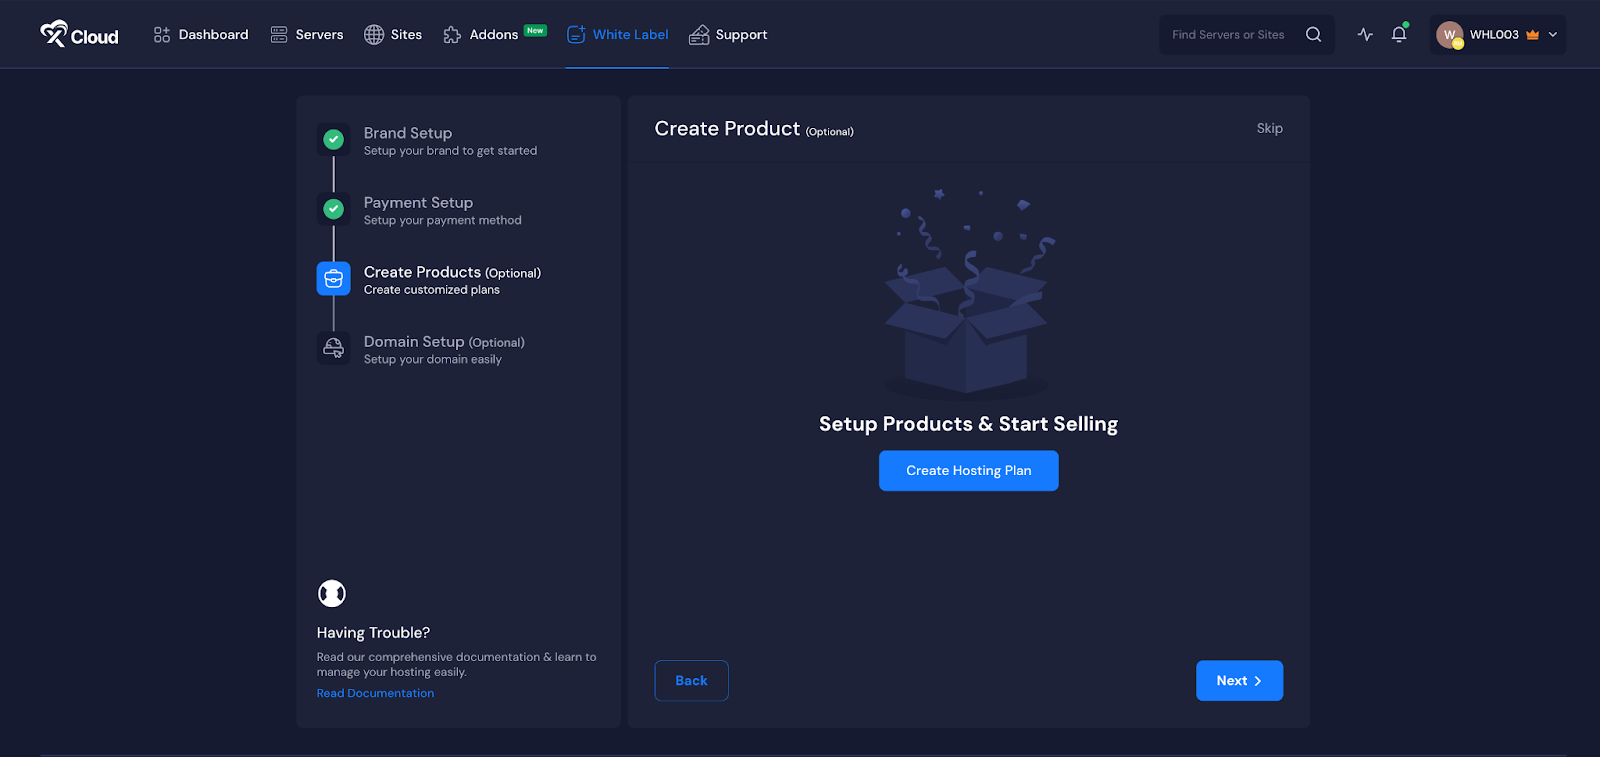
Next, create your custom hosting packages. Click the ‘Create Hosting Plan’ button to begin.
A pop-up will appear with various server configuration options. Choose ‘Self-Managed Server Provider’ and click ‘Next’.
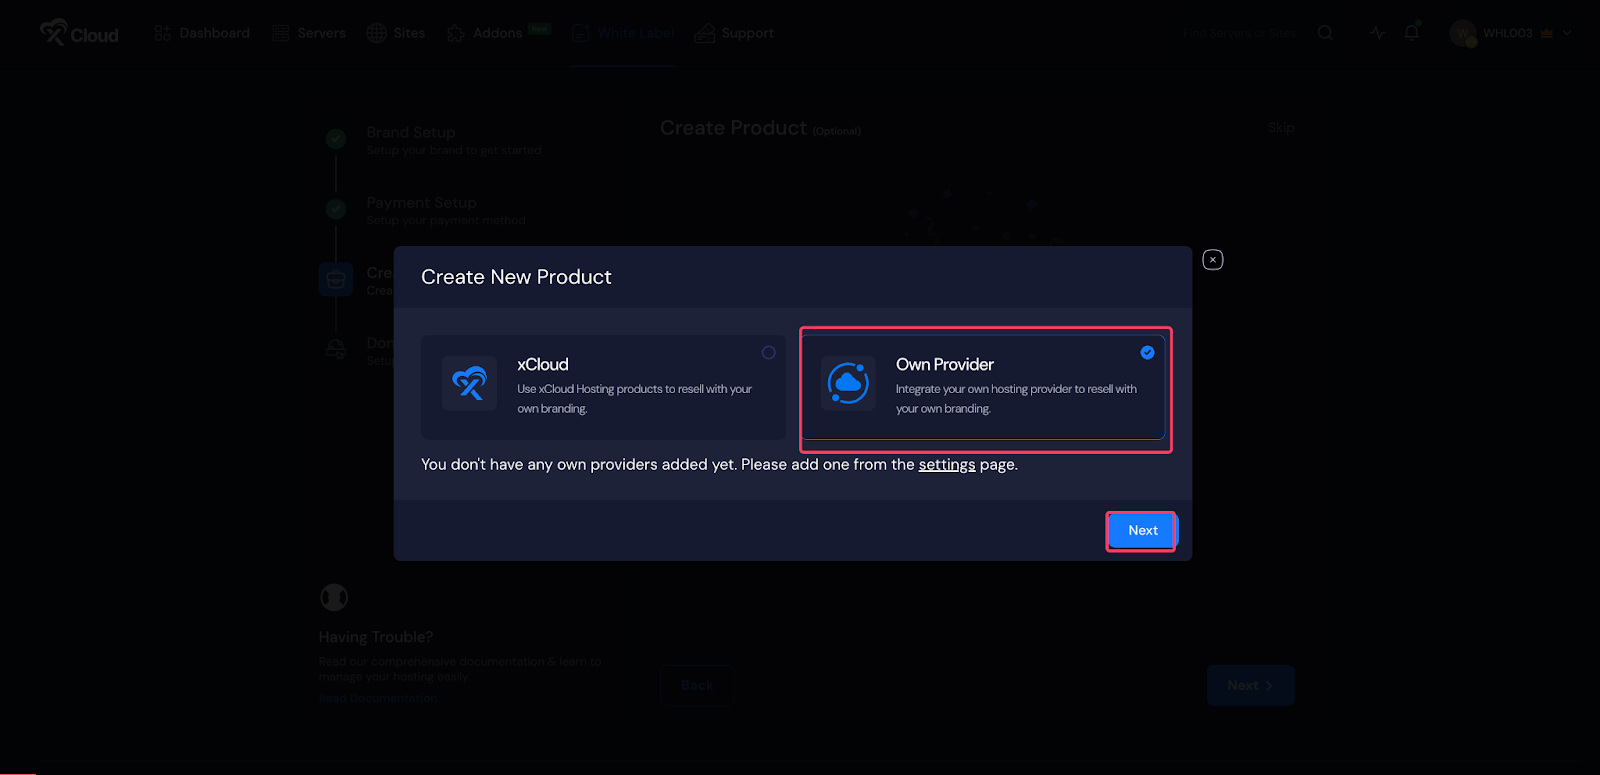
If you haven’t integrated any servers for reselling yet, click on the ‘Settings’ link and complete the integration setup. You can follow the integration process starting from Step 1 and complete the server integration and product creation process. Once your server integration is complete, you’ll be able to create products to resell.
Currency Conversion System for Reseller Hosting
xCloud supports real-time currency conversion to simplify pricing and sales for resellers using self-managed servers. This ensures that providers like Hetzner, which price services in Euros, can seamlessly be sold in any currency set in your xCloud White Label setup.
- Real-time Exchange Rates: xCloud integrates with the OpenExchangeRates API to provide accurate, live currency conversions. Prices from your server providers are automatically converted to the currency of your choice.
- Multi-Currency Support: Automatic detection and conversion allow white-label providers to sell hosting products in any currency supported by xCloud. For example, if Hetzner pricing is in Euros, xCloud can convert it to USD, GBP, or any currency you configure.
- Scheduled Updates: Exchange rates are updated daily to ensure pricing remains accurate and consistent across all reseller products.
- Seamless Reseller Experience: Once you set your preferred currency in the xCloud White Label dashboard, all integrated servers and products will display prices accordingly. Resellers can sell products directly in the chosen currency without manually calculating conversion rates.
Example:
- Hetzner Server Price: €50
- xCloud White Label Currency: USD
- Automatic Conversion: $55 (based on current exchange rate)
- Customer Sees: $55 and can pay in USD
This ensures your reselling business remains flexible and ready to serve customers worldwide, while keeping all pricing centralized and accurate within the xCloud dashboard.
And that’s it. This is how easily you can integrate your own server and resell with xCloud Reseller Hosting Program with fully white label branding. With support for multiple providers, xCloud ensures that you can build a hosting environment that matches your business needs while keeping everything centralized in one simple dashboard
Still stuck? Contact our support team for any of your queries.