


OpenClaw, also known as Clawdbot, is a self-hosted AI agent built to perform real actions instead of only replying to messages. It operates as an autonomous assistant that executes tasks, manages workflows, and interacts with external systems using secure APIs and predefined rules.
Unlike traditional chatbots, OpenClaw connects AI models with system-level access. This design allows it to automate processes, manage files, run scripts, and handle ongoing operations reliably. Users interact with OpenClaw through chat platforms, which keeps control simple while the agent handles the work in the background.
When deployed on xCloud, OpenClaw runs on a dedicated xCloud managed server with a preconfigured stack. This setup removes the complexity of self-hosting, manual configuration, updates, and infrastructure maintenance.
What OpenClaw can do #
It can handle complex and real-world actions, such as:
- Managing your calendar, inbox, messages and reminders.
- Sending emails, clearing spam or organizing files.
- Running scripts, controlling your browser, automating workflows and more.
- Execute real tasks such as running scripts, managing files, and calling APIs.
- Maintain persistent context across conversations and workflows.
- Automate multi-step workflows without manual intervention.
- Respond to events and triggers in real time.
- Operate continuously based on defined rules and permissions.
- Integrate with messaging platforms like Telegram
- .
- Allow full control through simple chat commands.
Built-In Support For AI Providers #
- Anthropic – API Key
- Anthropic – Claude Code CLI Token
- OpenAI API Key
- OpenRouter – API Key
- Moonshot Al (Kimi) – API Key
- OpenAI – API Key
- Gemini – API Key
More AI providers, such as Grok, xAI, Mistral, and more are coming soon.
Supported Messaging Channels from xCloud #
- Telegram
Important Details: #
✔️ OpenClaw Hosting is available only on xCloud Managed Servers and requires more than 4GB RAM.
✔️ You cannot install OpenClaw on existing or external servers.
✔️ After installation, the server runs only OpenClaw. You cannot host other sites or applications on the same server.
✔️ Support for this beta feature is limited. If you face any issues, please reinstall OpenClaw.
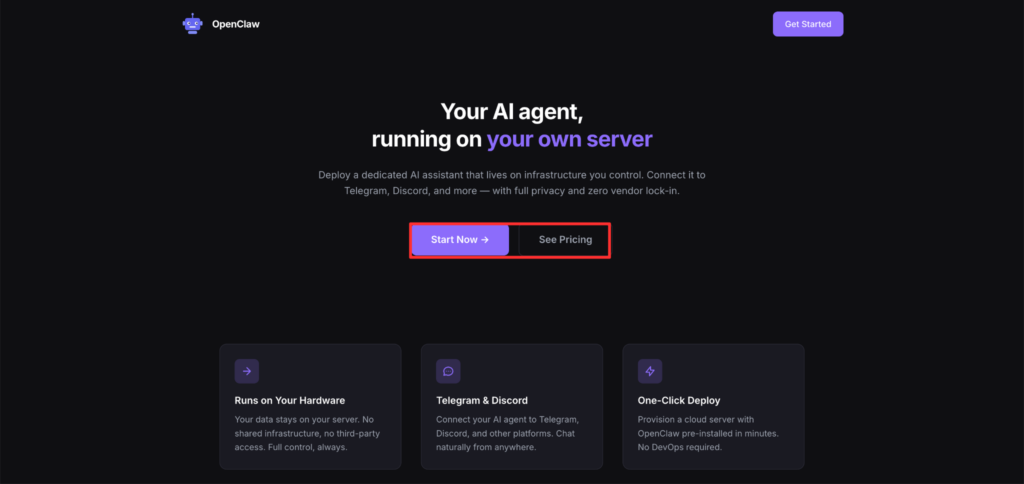
Follow the guide to deploy OpenClaw or Clawdbot on xCloud using One Click Apps and get started in just a few minutes.
Follow the guide to deploy OpenClaw on xCloud and get started in just a few minutes.
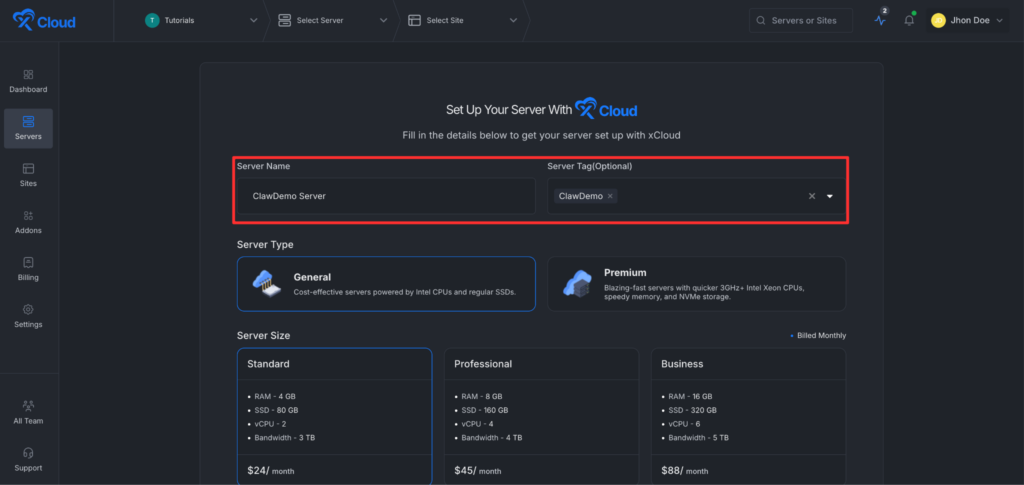
Step 1: Create an xCloud Managed Server #
First, visit this link to start creating an xCloud managed server. After that, click on the ‘Start Now’ button from the dashboard.
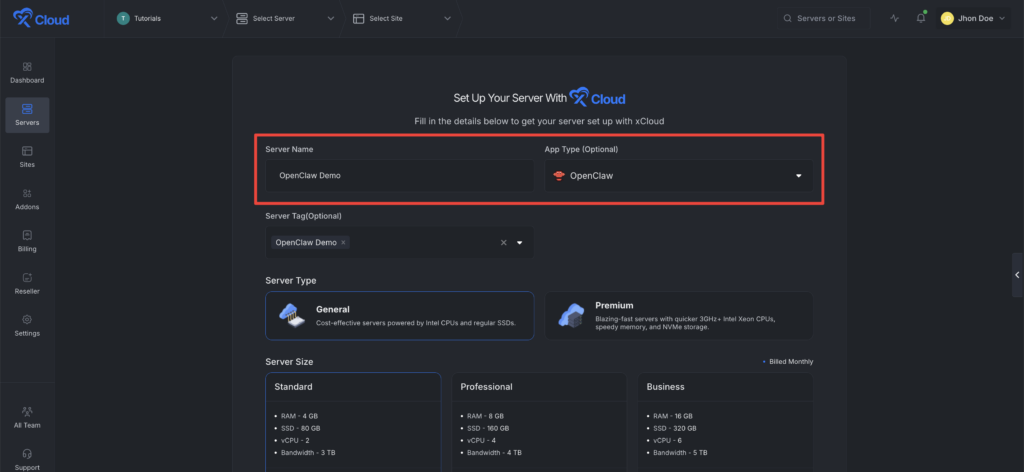
Go to the ‘Server Name’ field and enter your server name. Then add a tag for the server. This step is optional and not mandatory.
Note: If you create an xCloud Managed Server using the standard server creation flow, select App Type: OpenClaw. xCloud will automatically provision and set up OpenClaw during server creation, just like the One Click App setup.
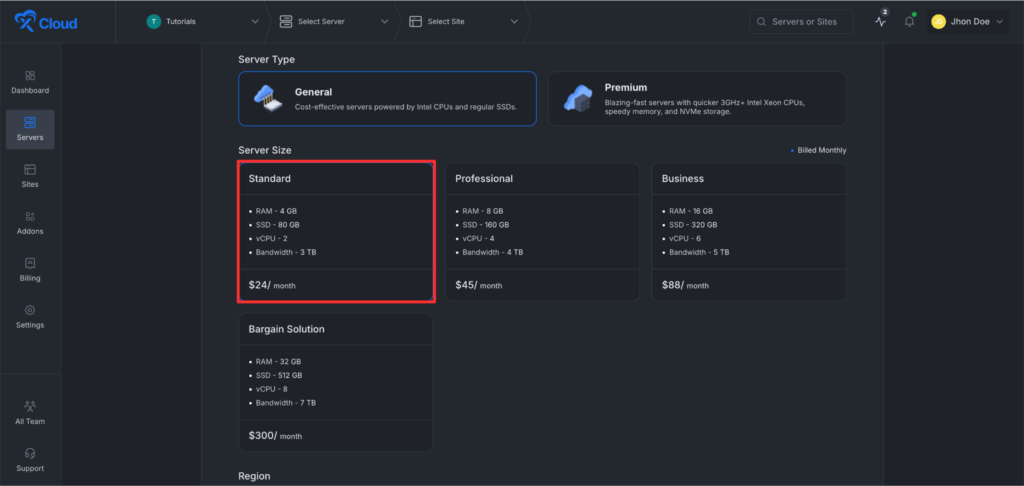
Next, go to the ‘Server Type’ option. Here, xCloud provides two types of servers. One is ‘General’, and the other one is ‘Premium’.
- General servers are cost-effective servers powered by Intel CPUs and regular SSDs.
- On the other hand, Premium servers are blazing fast with quicker 3GHz+ Intel Xeon CPUs, faster memory, and NVMe storage.
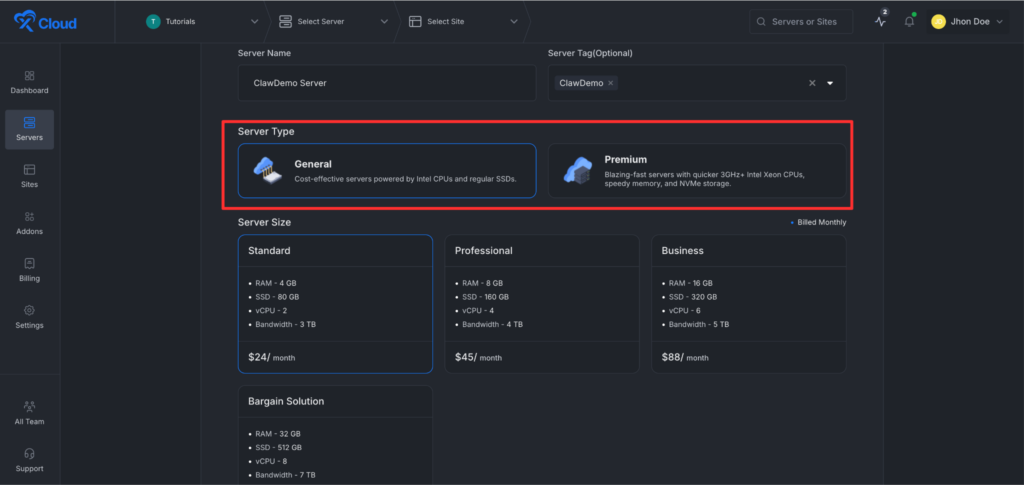
After that, go to the ‘Server Size’ option and choose your preferred server size. Please note that deploying an OpenClaw instance requires a minimum 4GB RAM server.
Next, choose your preferred continent from the dropdown menu. Then select the server location within that region.
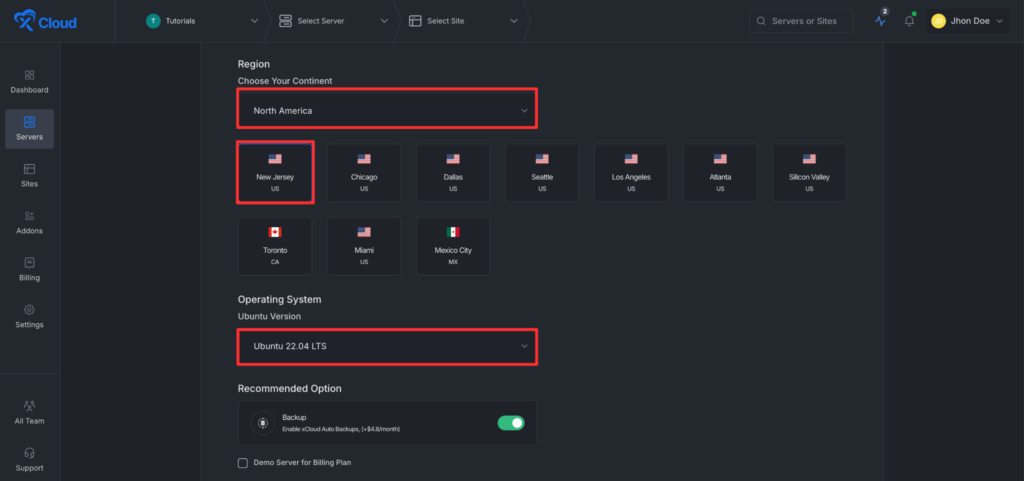
After that, choose your ‘Ubuntu version’ from the dropdown menu under the ‘Ubuntu Operating System’. You can also enable or disable backups for this application.
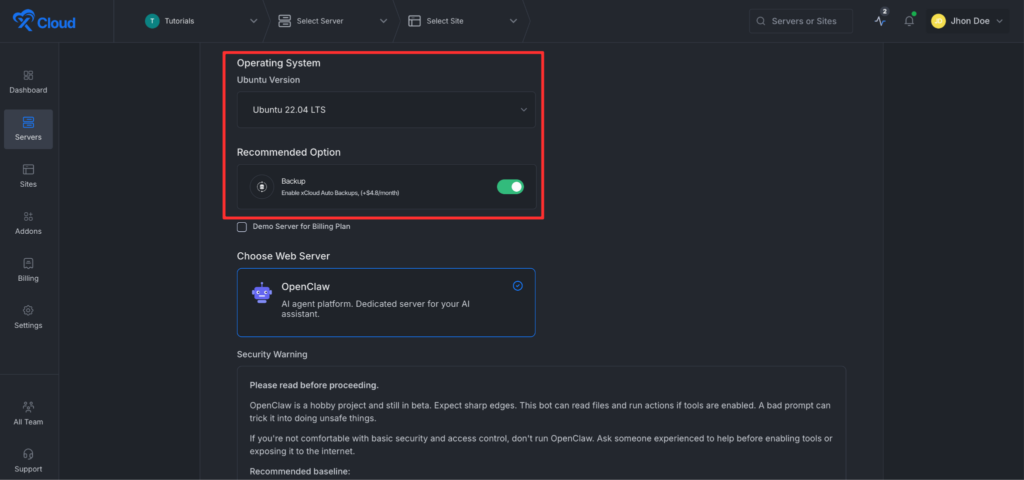
xCloud provides a separate stack for this application. You will see the ‘OpenClaw’ stack already selected.
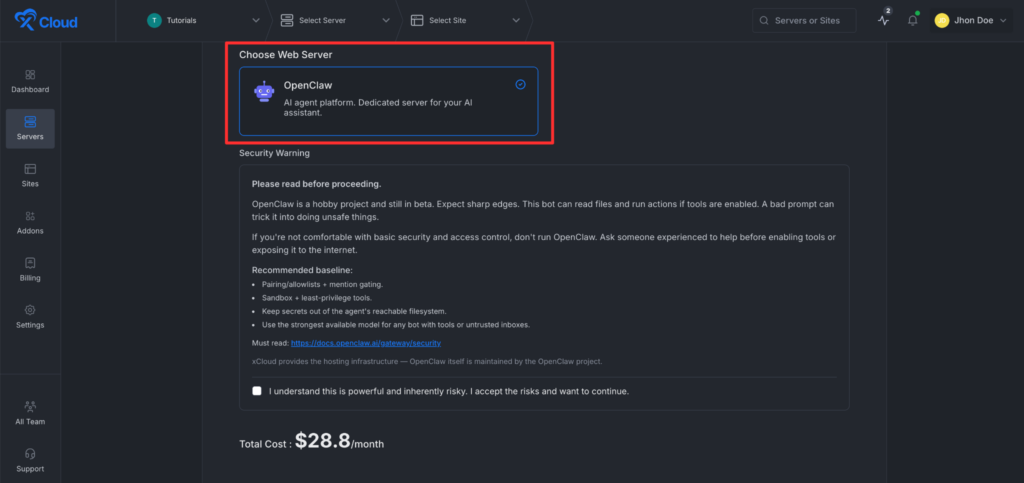
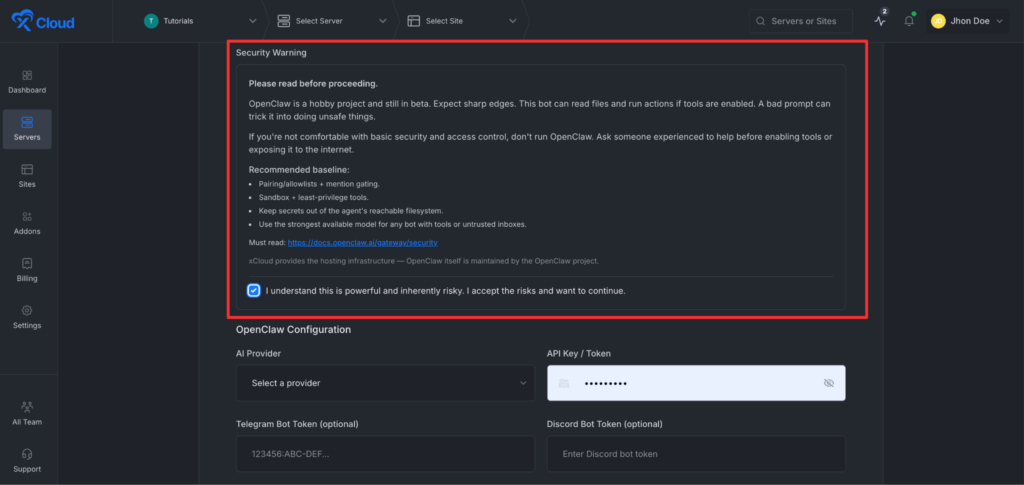
Next, go to the security warning section, read the information carefully, and click on the checkbox to confirm that you have read and understood it.
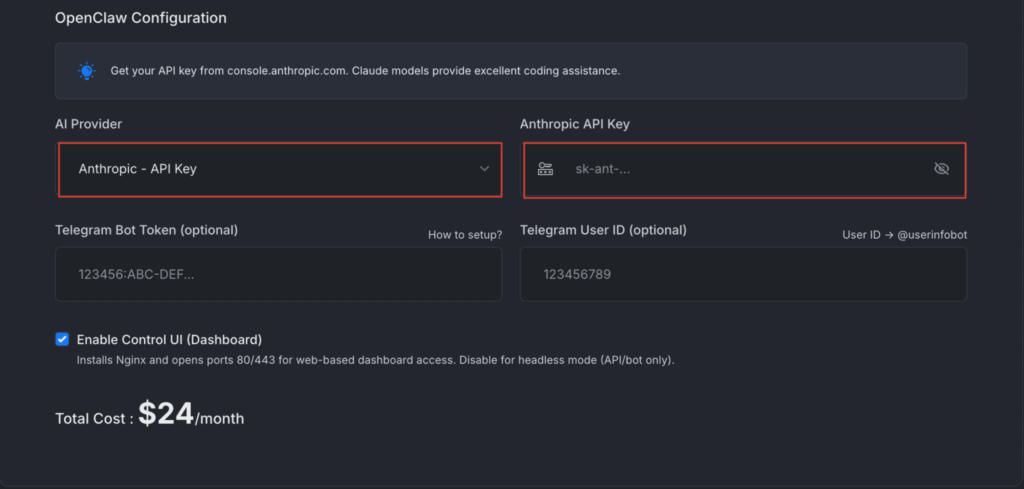
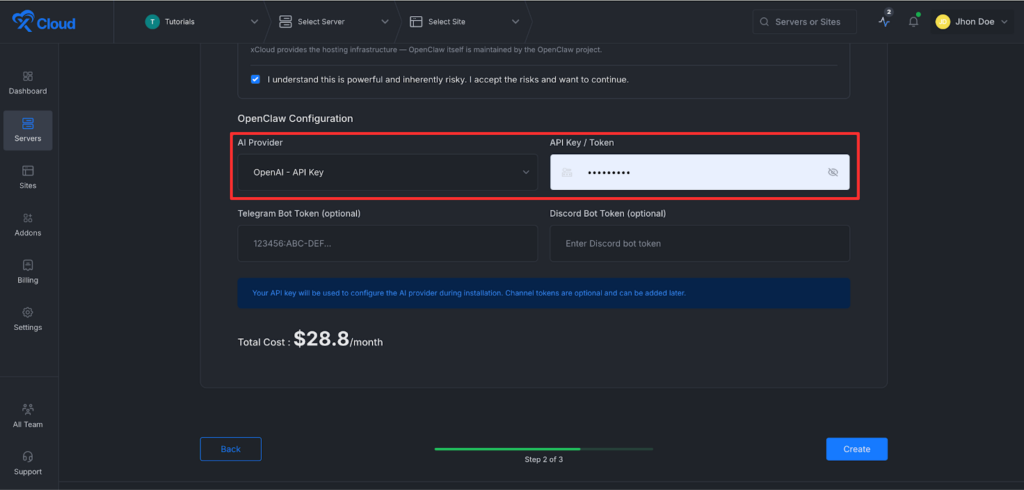
Enter Your AI Provider Credentials #
After that, go to the ‘AI provider’ section. Select your preferred AI model from the dropdown list under ‘AI Provider’, such as ‘OpenAI’, Anthropic, Claude Code, and Google Gemini. Then enter the API token for the selected AI model.
Anthropic: #
To use Anthropic, choose ‘Anthropic- API KEY’ from the ‘AI Provider’ menu and enter the API Key into the blank field.
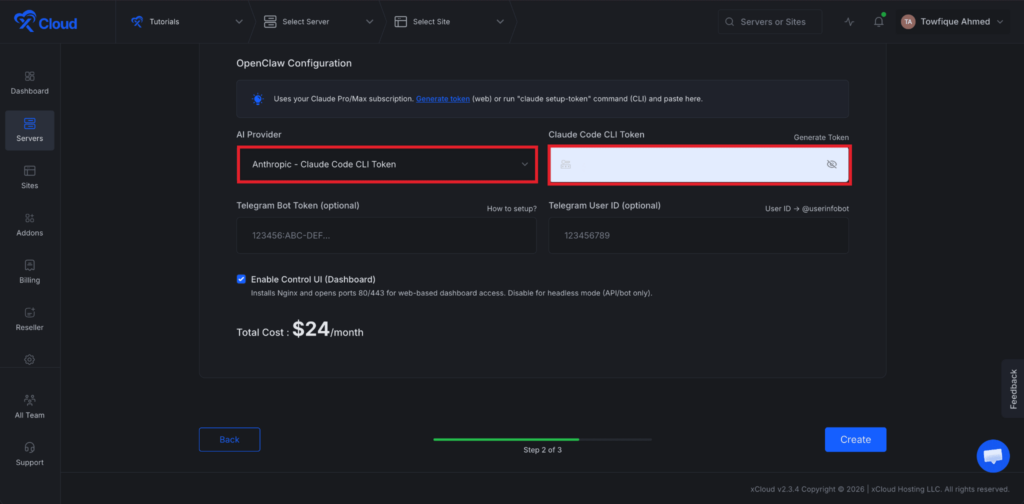
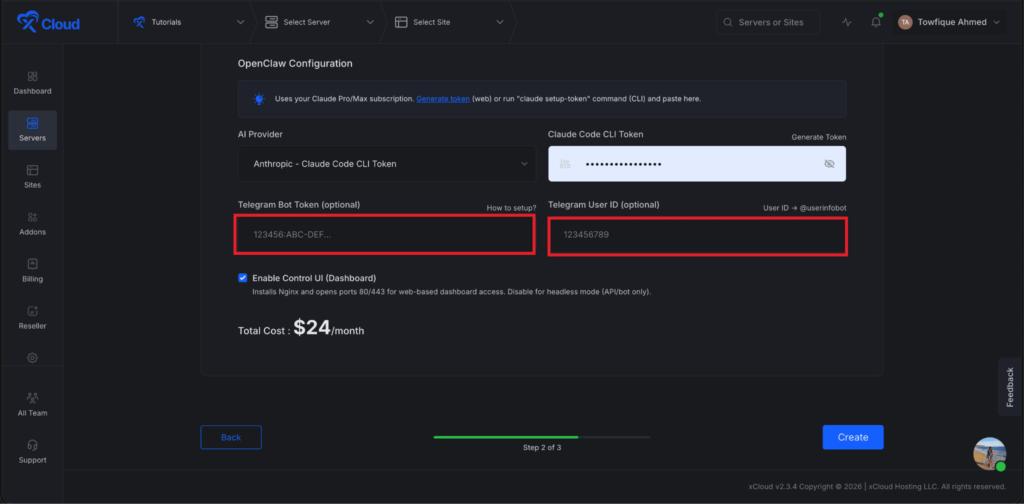
Claude Code : #
To use Claude Code, choose ‘Anthropic- Claude Code CLI Token’ from the ‘AI Provider’ menu and enter the Token into the blank field.
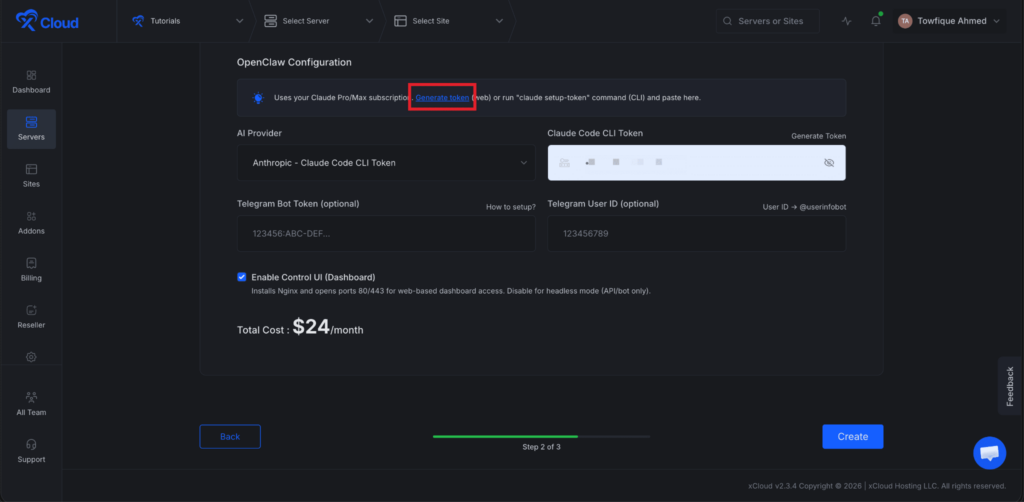
Browser-based token generation: With xCloud, there is no need to install the Claude Code CLI manually. Generate your token directly from your browser. First, select the Claude Code CLI option and then click on Generate Token.
OpenAI: #
To use OpenAI, choose ‘OpenAI – API KEY’ from the ‘AI Proider menu and enter the API Key into the blank field.
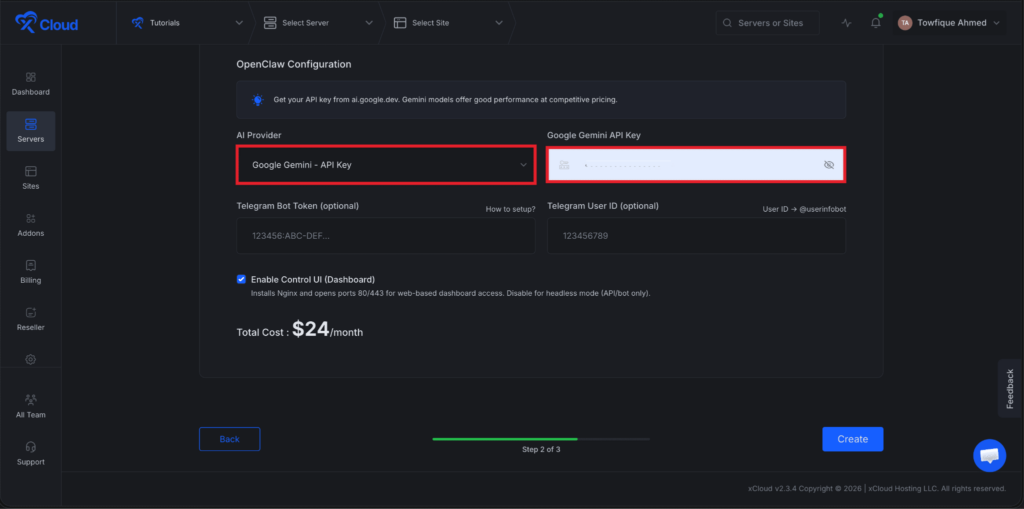
Google Gemini : #
To use Google Gemini, choose ‘Google Gemini- API Key’ from the ‘AI Provider’ menu and enter the API key into the blank field.
Set up Your Messaging Platform (Optional) #
Right now, xCloud allows you to connect to one built-in messaging platform: ‘Telegram’. Go to the section, add the ‘Bot token’ in the ‘Telegram Bot Token Field and ‘Telegram User ID’ in the respective fields, and click on the ‘Next’ button.
When you provide your Telegram User ID during setup, your account is automatically allowed to be listed with smarter auto-pairing. No need to run commands to pair your account!
Set up Your Messaging Platform (Optional) #
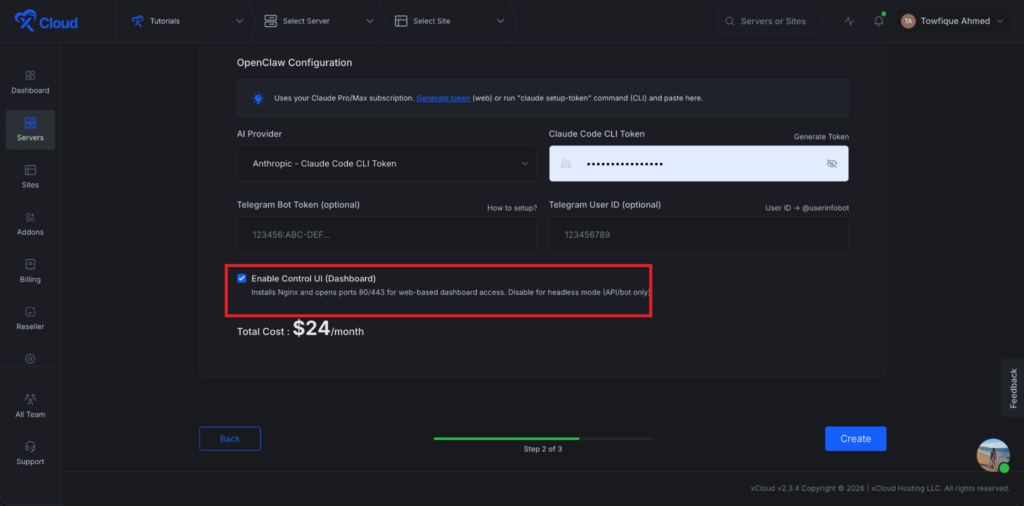
You can control the UI of OpenClaw right from the xCloud dashboard. If you want to make it more secure and do not want to make OpenClaw UI accessible for anyone, then click on the checkbox beside ‘OpenClaw Control UI Dashboard.
Finally, click on the ‘Create’ button to proceed. This action will start creating the xCloud managed server and deploying the OpenClaw application.
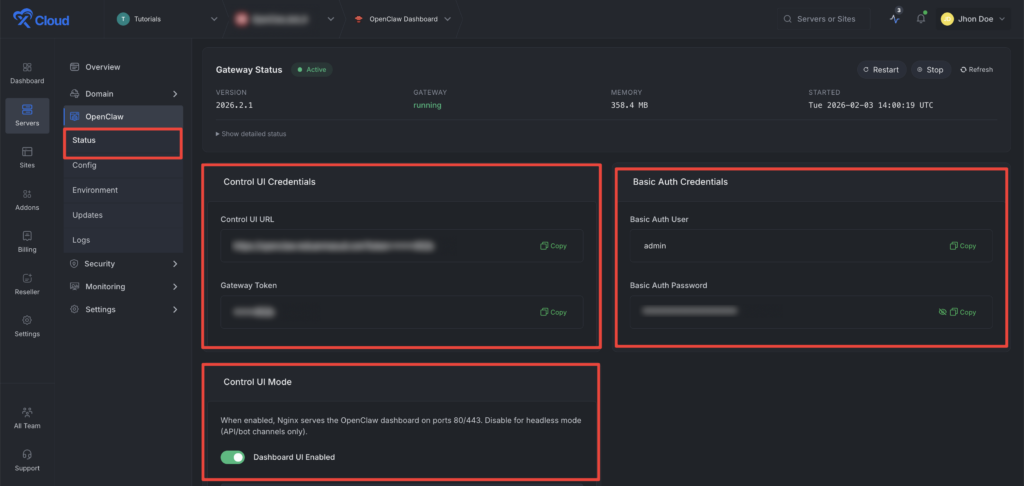
To log in to your OpenClaw account, go to the ‘Status from the dashboard. collect the credentials ‘URL’ and ‘Basic Auth Password’ from the dashboard.
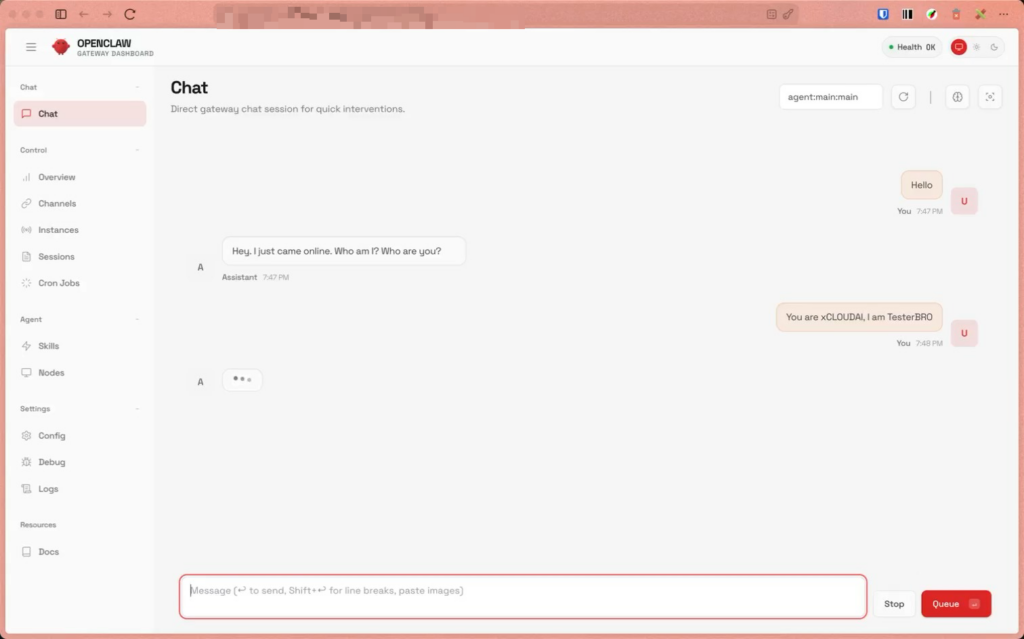
Now if you log in toyour OpenClaw account using the credentials, you will be able to start chatting with OpenClaw.
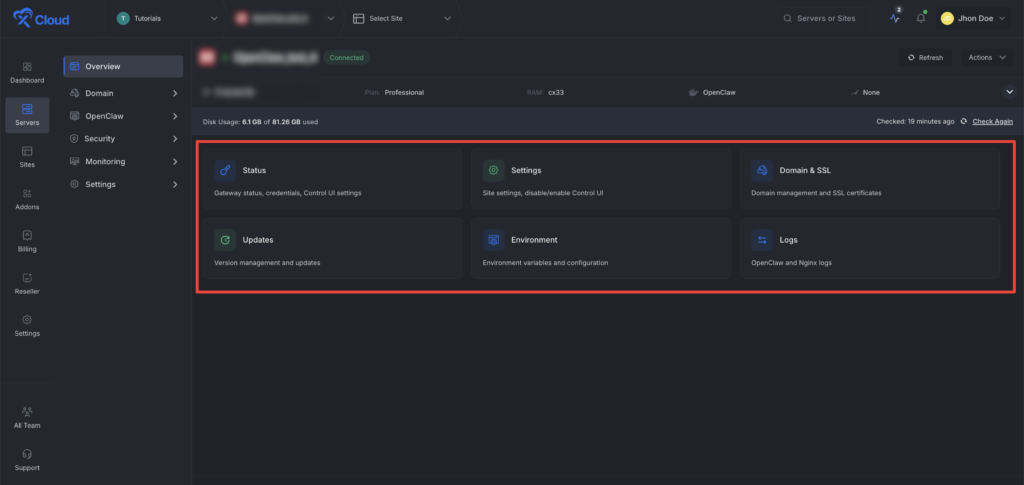
Step 2: Manage the Configurations from the xCloud Dashboard #
Now, in the ‘Status’ option from the left side menu, you will get the UI credentials and the Auth credentials. Collect the credentials when necessary. From the ‘Control UI Mode’, you can toggle ON/OFF the ‘Dashboard UI’ option according to your preferences. If you toggle off, no one will be able to access the UI of the OpenClaw dashboard.

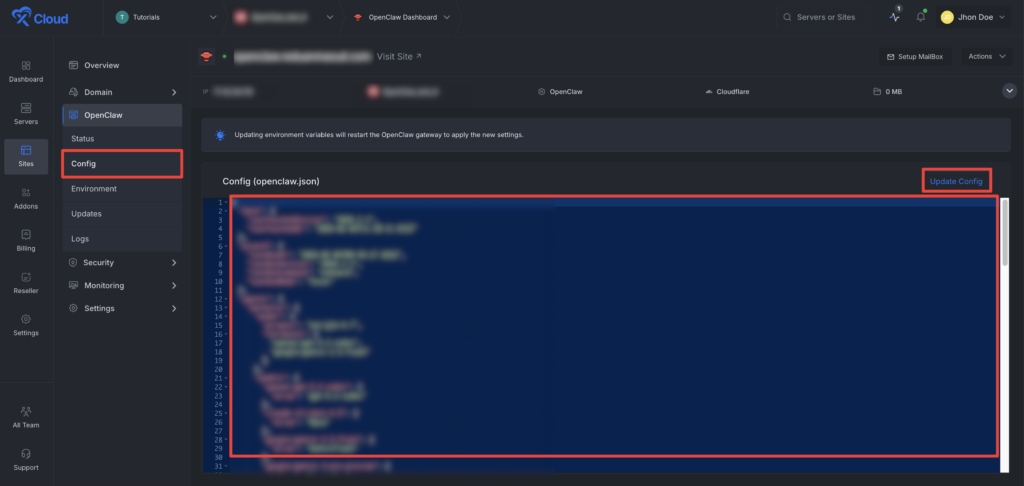
Next, go to the ‘Config’ option from the menu and adjust the credentials when needed and click on the update button right from the xCloud dashboard.
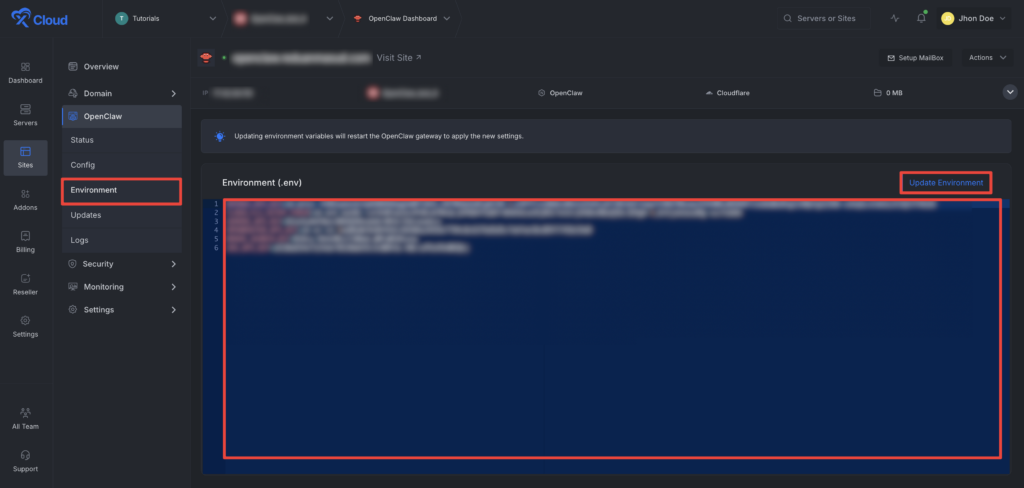
The Environment section in xCloud allows you to customize configuration settings for your OpenClaw instance. Just go to the ‘Environment’ option from the sidebar and adjust as you needed then click on the ‘Save’ button.
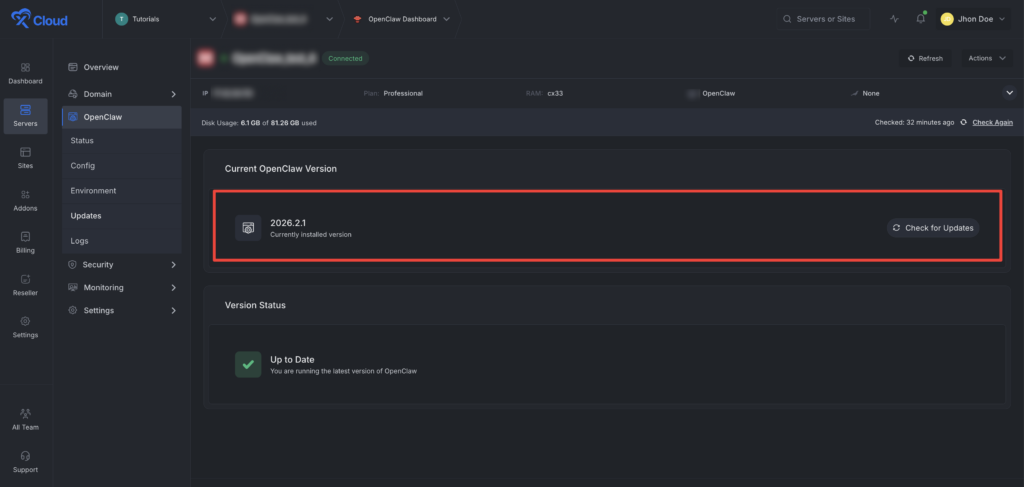
Update the OpenClaw version from the xCloud dashboard. Just go to the ‘Updates’ from the left menu and click on the ‘Check for Updates’ button to see if there are any updates available.
Next go to the ‘Logs’ option from the left menu. Here you can all the logs of the app.

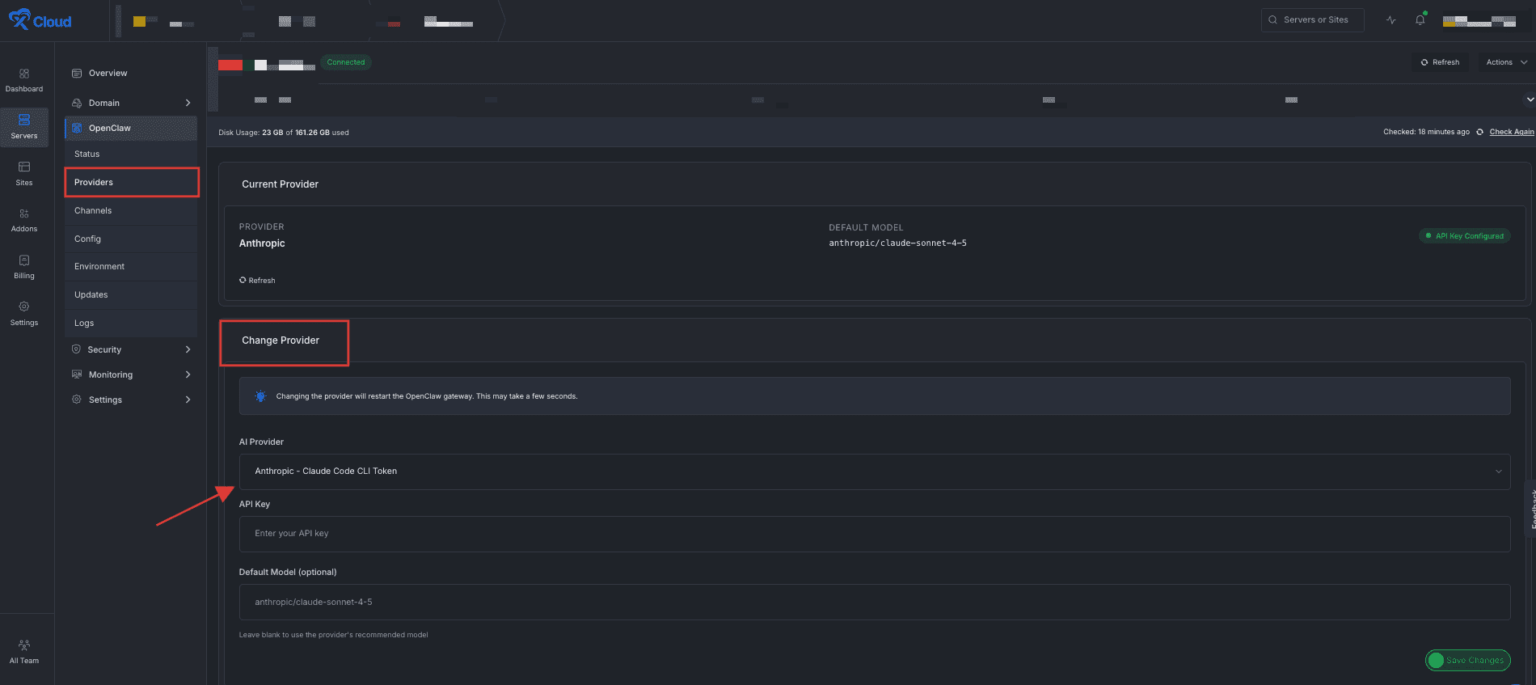
How To Update Default LLM Provider Settings #
In xCloud, you can also update the default LLM provider settings in the dashboard. Go to ‘Providers’ from the left side panel and navigate to the ‘Change Provider’ section. Add your ‘AI Provider’ and the ‘API Key’ and click on the ‘Save Changes’ button.
How to Add or Update Telegram Channels #
Similarly, you can add or update Telegram Channels in the dashboard. Go to ‘Channels’ from the left side panel to add or update your ‘Telegram Bot Token’ and ‘Telegram User ID’ easily. Click on the ‘Save Changes’ button when you are done.

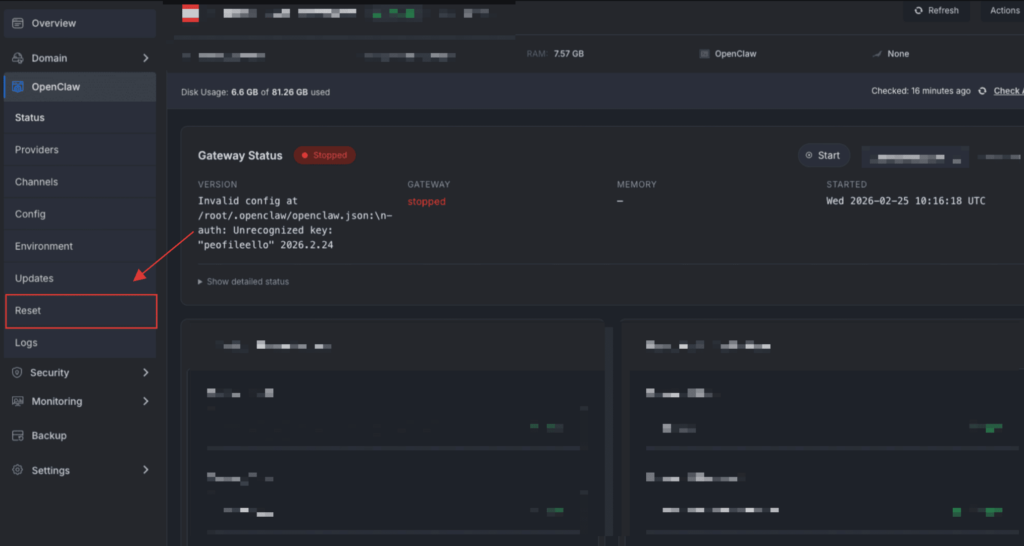
Reset OpenClaw #
OpenClaw Reset (No new server needed): You can now reinstall OpenClaw from scratch on the same server using OpenClaw Reset. With one click, it creates a backup, reinstalls a clean setup, and generates fresh credentials.
And that’s it. This is how easily you can deploy OpenClaw on xCloud. OpenClaw deployment on xCloud removes the complexity of self managed hosting and lets you focus on what matters most.
Few More Details of OpenClaw(Beta) Hosting #
✅ OpenClaw Hosting is available only on xCloud Managed Servers and requires more than 4GB RAM
✅ You cannot install OpenClaw on any existing or external servers
✅ After installation, the server runs only OpenClaw. You cannot host other sites or applications on the same server
✅ Support for this OpenClaw feature is limited. If you encounter any issues, please reinstall OpenClaw
⚠️ Security + Support Boundaries (Read This Carefully) #
AI agents are powerful tools, and careless use can introduce serious risks. Many users already run agents on personal laptops or unmanaged servers without isolation or a clear understanding of the consequences. xCloud provides a safer deployment path, but risk still exists.
What xCloud Will Do #
✅ Provision a managed server
✅ Install OpenClaw
✅ Provide basic server-level controls such as restart, reinstall, and environment configuration
What xCloud Will NOT Do #
❌ Provide support for how you run or configure your agent
❌ Troubleshoot workflows, integrations, prompts, or tool access
❌ Take responsibility for third-party API behavior or failures
❌ Debug issues caused by custom configurations
If OpenClaw becomes unstable or breaks after you start configuring it, reinstall OpenClaw.
Everything beyond server provisioning and installation remains your responsibility.
🚨 Mandatory Safety Guidelines #
❌ Do not use your primary OpenAI, Anthropic, Gemini, or similar accounts
❌ Do not connect your main GitHub account
❌ Do not connect personal Gmail or identity systems
✅ Use separate, dedicated accounts for testing
✅ Treat OpenClaw as an isolated sandbox
✅ Avoid connecting anything tied to your real identity or critical systems
You get a fully managed server, a dedicated OpenClaw stack, and seamless integration with Telegram, all without manual configuration or infrastructure headaches.
With One Click Apps, secure API-based connections, and scalable resources, xCloud makes running OpenClaw simple, stable, and efficient. Follow the steps in this guide, complete the setup, and start managing your trading strategies with speed, consistency, and confidence.
Frequently Asked Questions #
Q1. Do I need my own LLM provider, or is it included with OpenClaw hosting on xCloud? #
Answer: Yes, you need to bring your own AI provider API key such as OpenAI, Anthropic, Claude Code, OpenAI, or others.


