


Setting up PHP on Linode with xCloud is simpler than you think. This guide walks you through the essential steps to configure your server and get PHP running smoothly, so you can deploy applications with confidence
xCloud makes hosting and managing PHP sites easy, so you can focus on building great websites. This guide will show you how to set up PHP on Linode using xCloud.
How to Integrate and Set Up a Linode Server with xCloud? #
This guide shows how to set up the Linode server in xCloud. Follow the steps to quickly launch, configure and start your cloud journey.
Step 1: Create Your Linode Server in xCloud #
After logging in to your xCloud account, start by adding a new server by clicking on the “Add New Server” button from your dashboard.
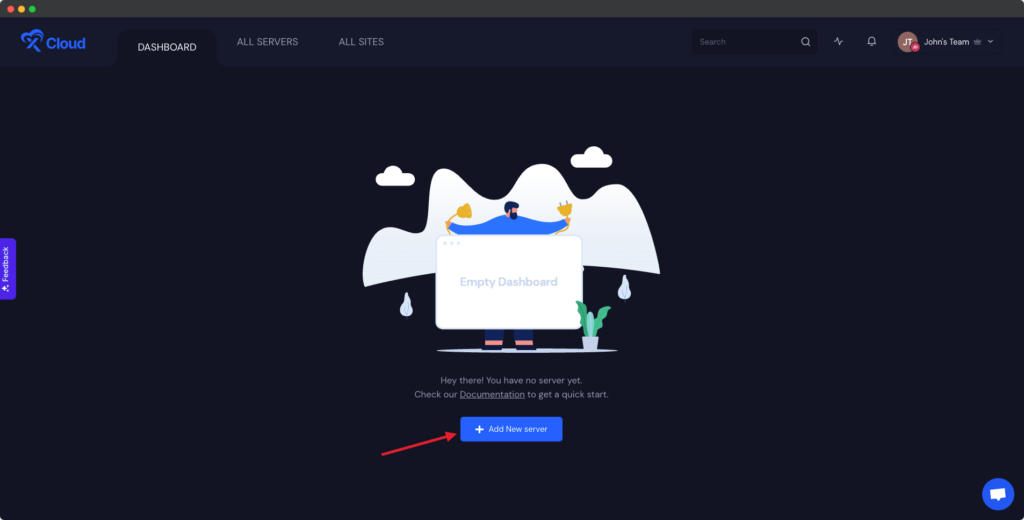
The next screen will provide the list of our available server providers. For tutorial purposes, we will create a Linode server and select the Linode option.
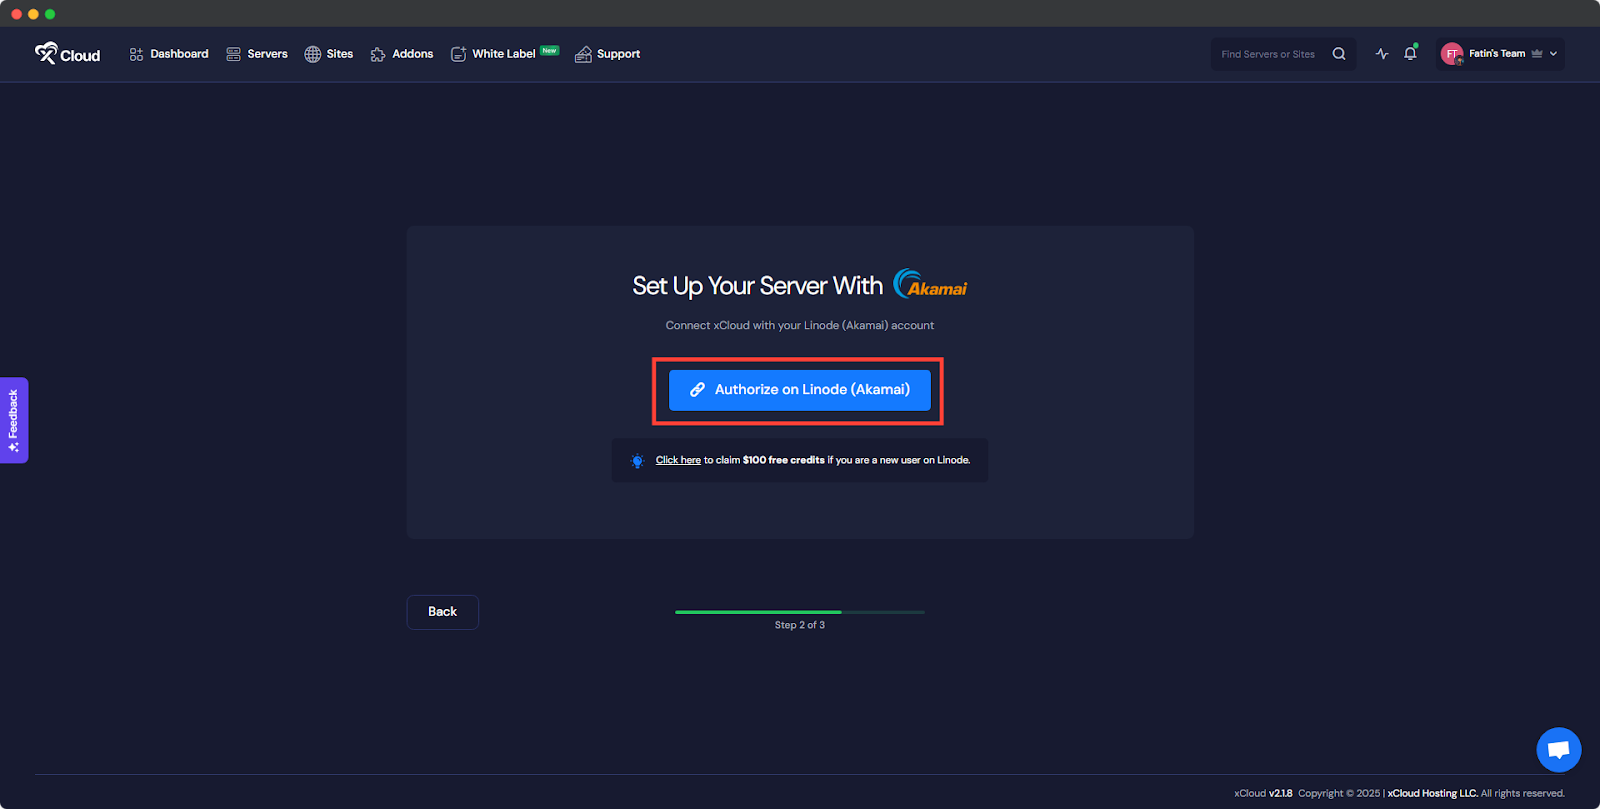
Step 2: Authorize Your Linode Account #
We have made it easier and safer for you to connect xCloud with your Linode account. Now, provision a new Linode server, click ‘Authorize on Linode’ during the setup, and you will be redirected to Linode to grant permission to your account. It is a straightforward and hassle-free process to set up your server with Linode.
Step 3: Connect the Account & Add the Necessary Information #
You will be taken to the server creation page after successfully integrating your Linode account and your server will be connected with xCloud. Now you need to provide the ‘Server name’, your preferred ‘Server Size’ (CPU, RAM, storage), the ‘Region’ nearest to you and your visitors, and then select the ‘Database Server’ from MySQL and MariaDB.
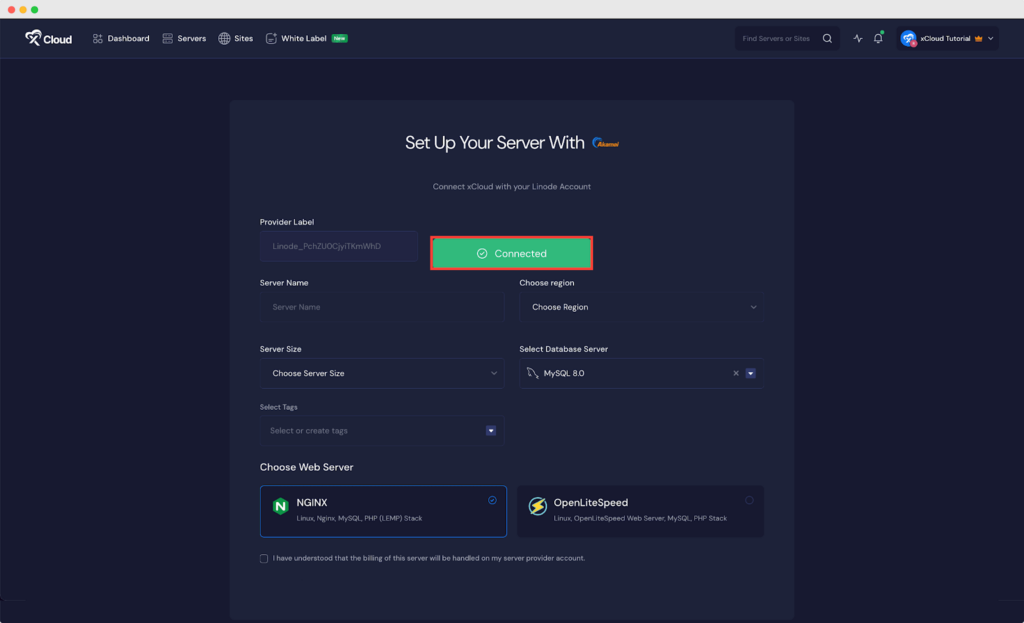
Note: We recommend at least a 2GB / 1 shared CPU server for 10-20 brochure sites with cache enabled. And for a site whose pages cannot be cached (e.g., a WooCommerce site), we recommend a 4 GB / 2 dedicated CPU server.
Next, choose the web server stack from ‘NGINX’ or ‘OpenLiteSeed’ according to your requirements and click on the ‘Next’ button to proceed with the server creation process.

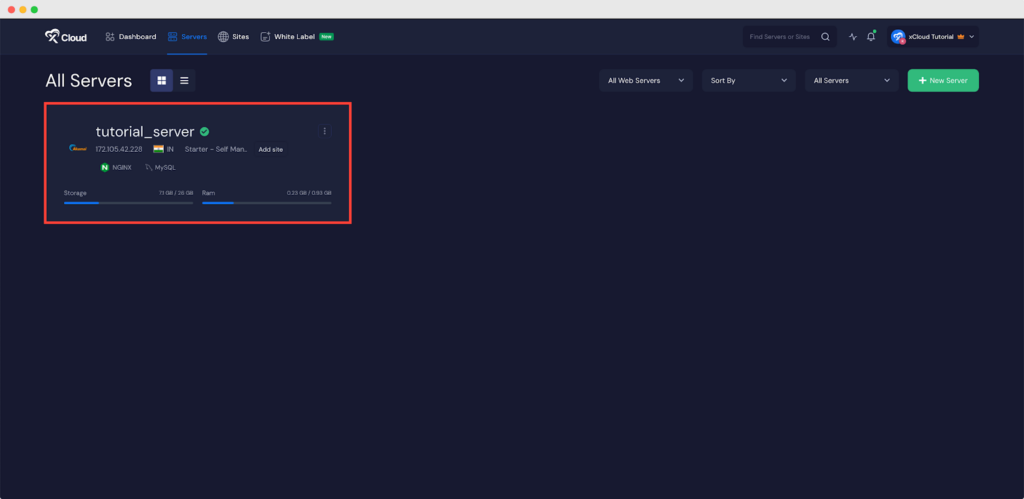
It will start creating a Linode server with xCloud within a while and if you go to the ‘Servers’ from the menu, you can see your created server and create as many sites as you want under this server.
How to Set Up PHP on Linode with xCloud #
Creating a website using custom PHP applications on xCloud can be a powerful way to build a tailored online presence. Unlike traditional WordPress-based sites, xCloud allows you to go beyond WordPress and develop fully customized PHP applications to meet your unique requirements.
Follow the guide to deploy your Node.js application easily on Linode with xCloud:
Step 1: Choose the Application #
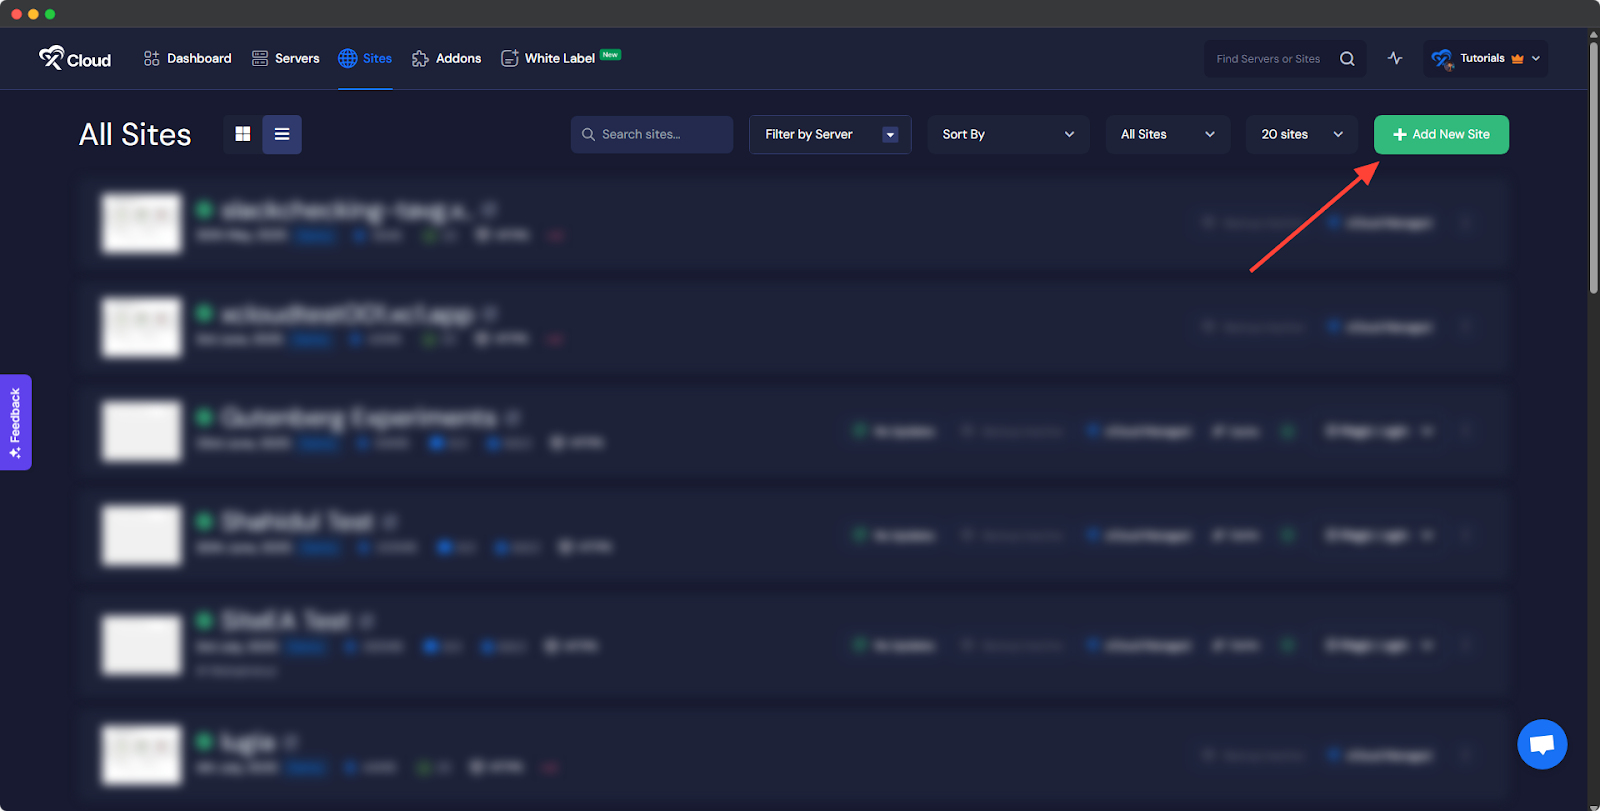
To begin deployment, click on the ‘Add New Site’ button from the dashboard.
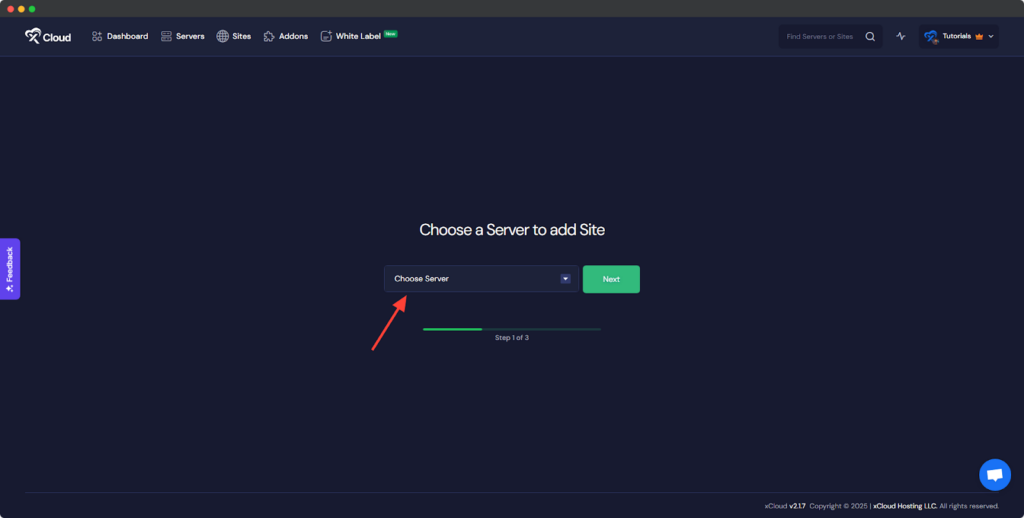
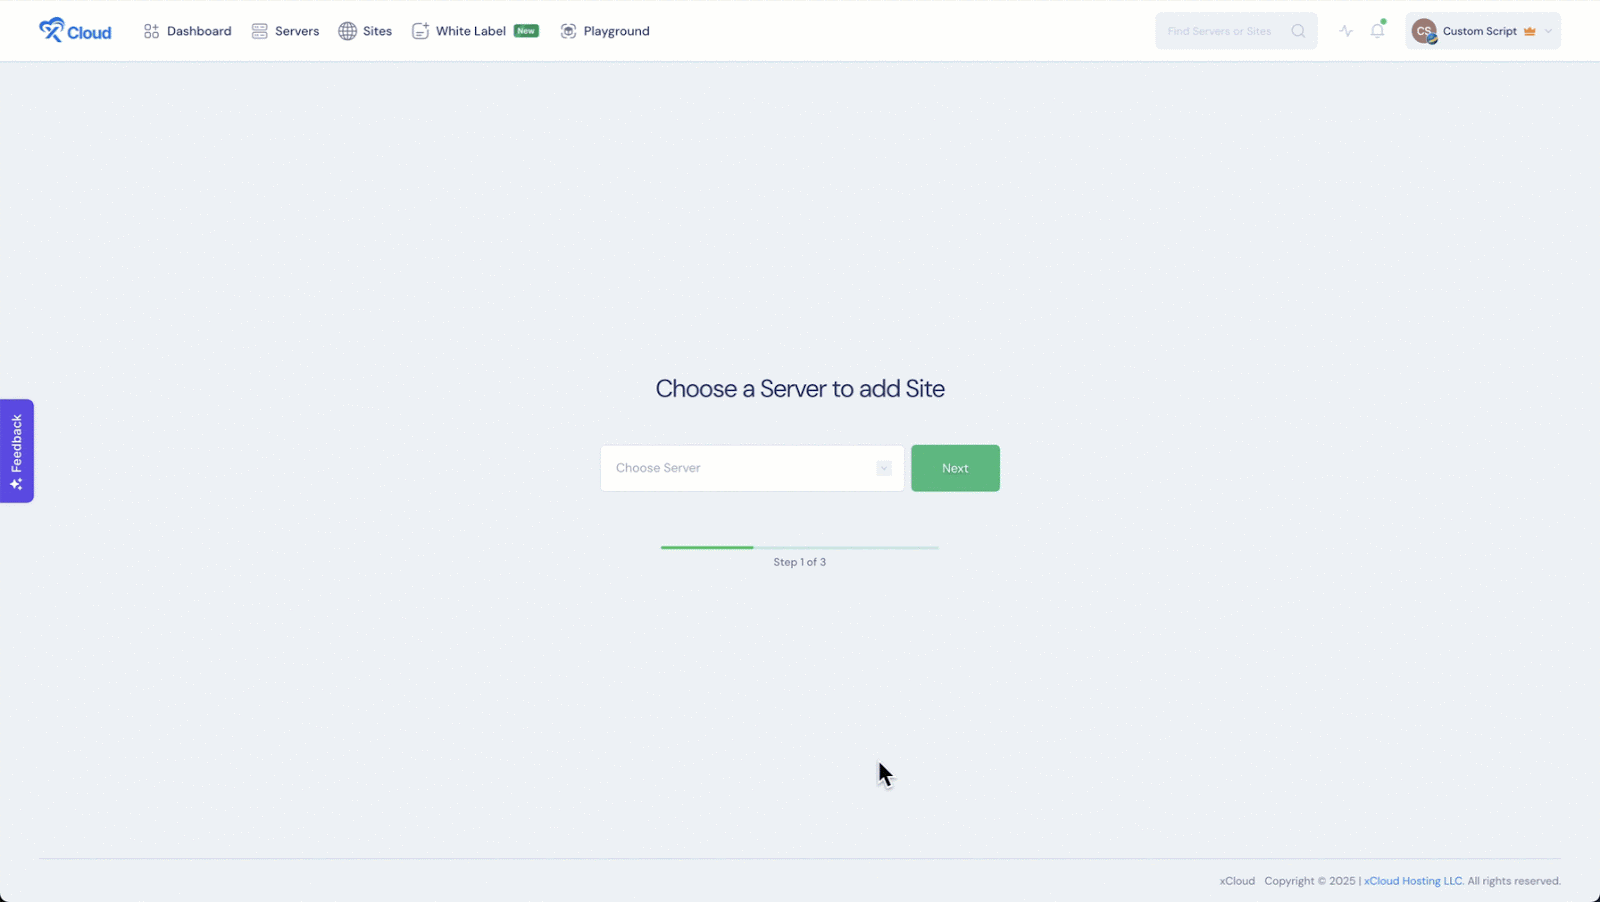
You will then be asked to ‘Choose a Server to add Site’ from the dropdown. You must select the Linode server you set up in xCloud from this dropdown.
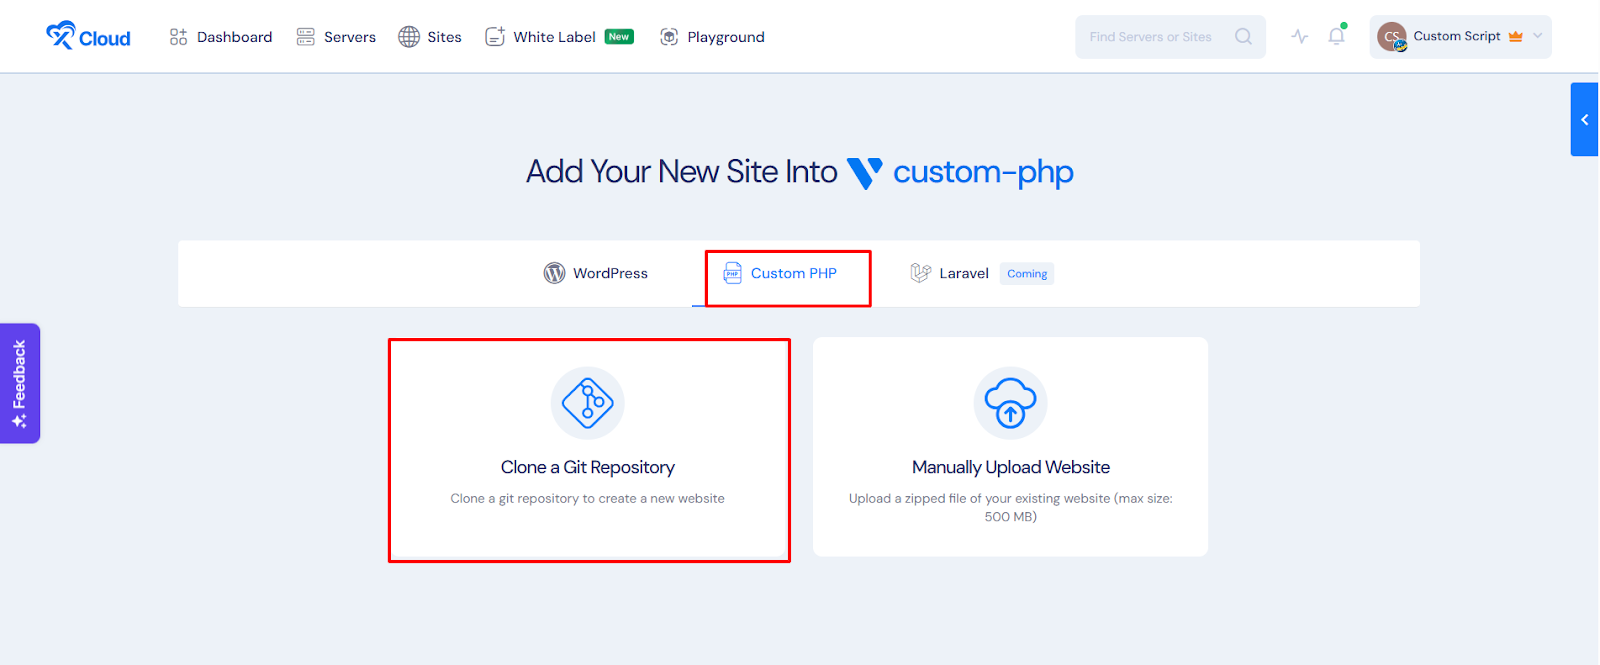
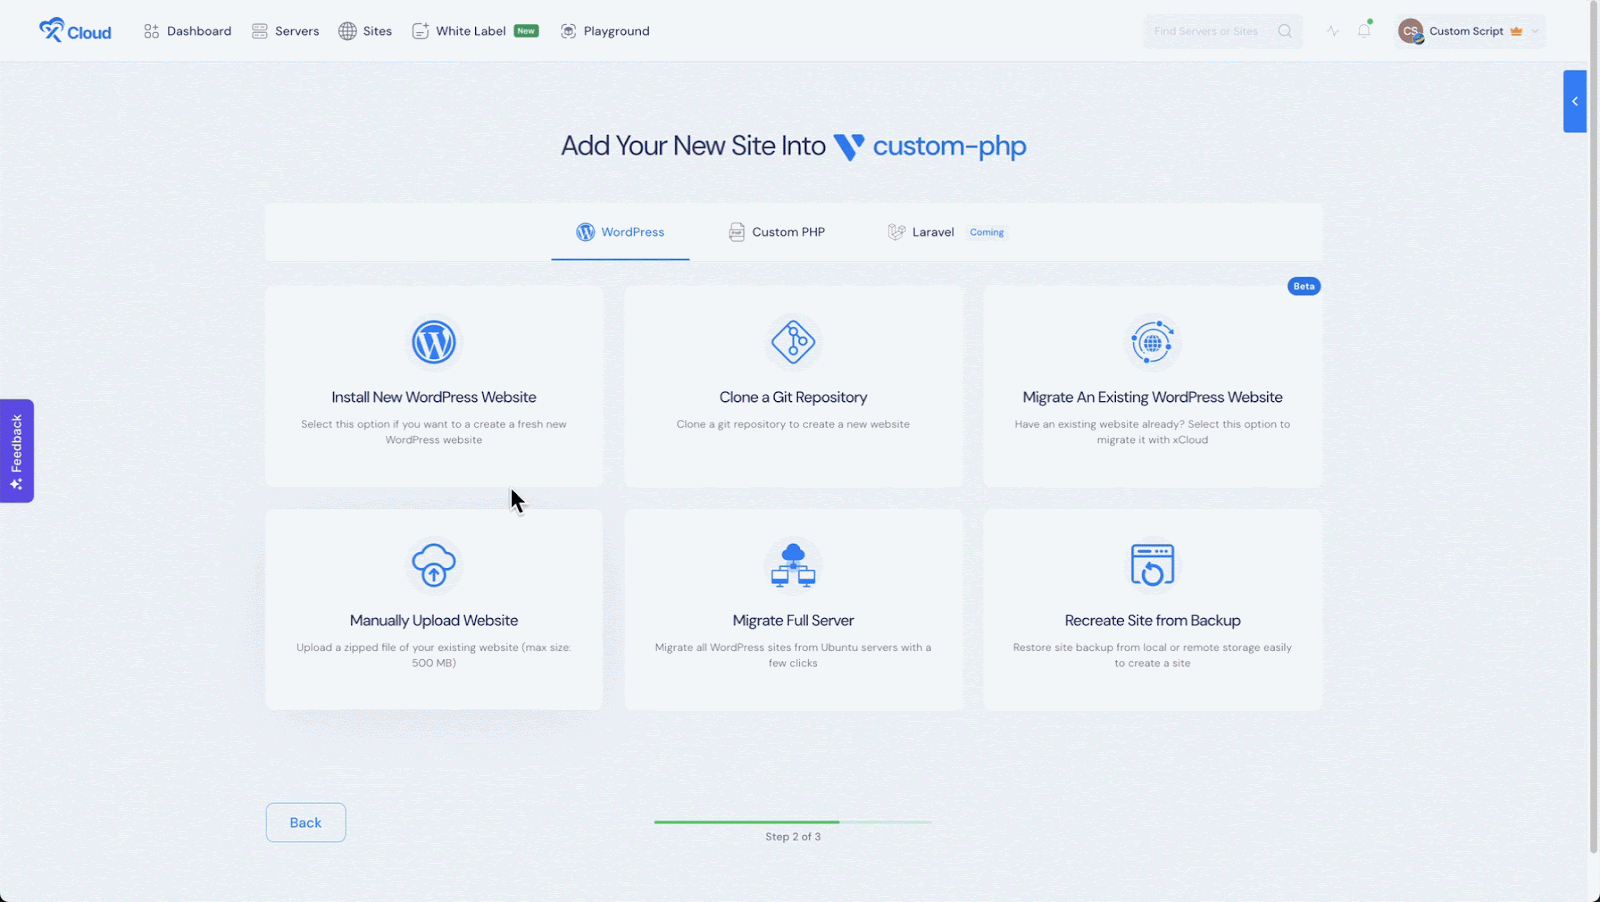
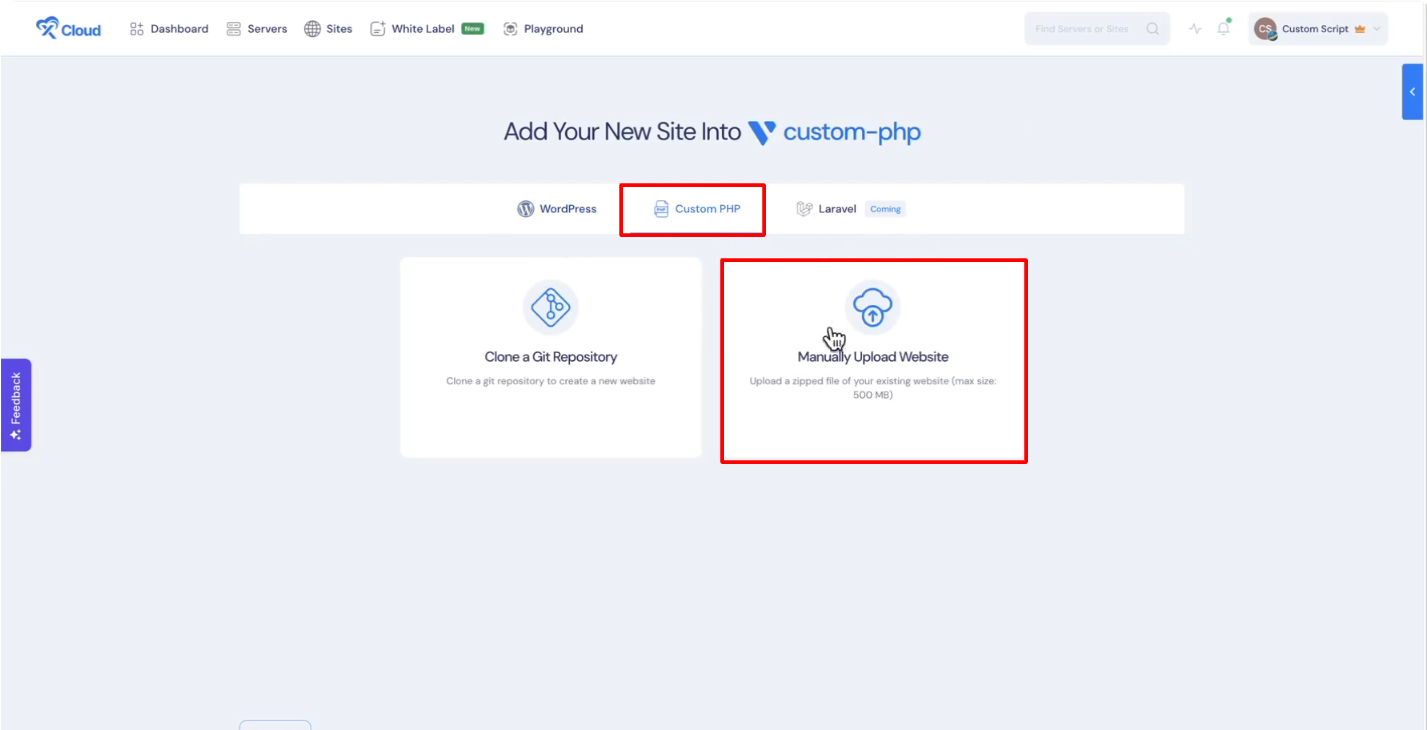
Next, you will see options such as ‘WordPress’ and ‘Custom PHP’. Go to the ‘Node.js’ option from the tab.
Then choose your preferred way from the ‘Clone a Git Repository’ and ‘Manually Upload a Website’ options.

How to Install Custom PHP Applications from Your Git Repository #
Migrating a website from a Git repository with xCloud involves several easy steps. The guide below can help you understand how you can perform this migration. Follow the steps below to migrate a custom PHP site from a Git Repository.
Step 1: Select Option To Clone A Git Repository Option #
First, click on ‘New Site’ from the xCloud dashboard. Click on the ‘Custom PHP’ field. Now, choose ‘Clone A Git Repository’ to import your custom PHP site.
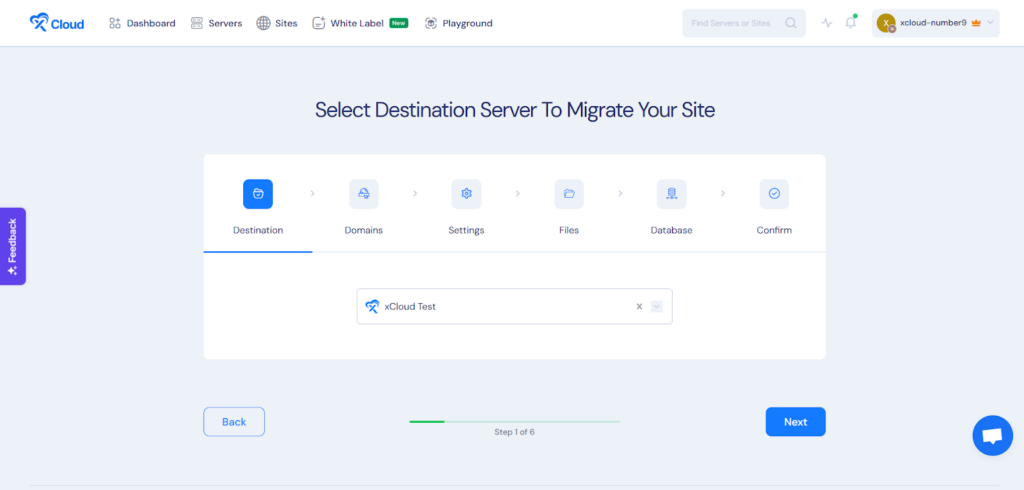
Step 2: Select Destination Server #
From the ‘Destination’ tab, select the destination server to migrate your site. You can keep the server that is already selected or you can change it from the dropdown. Then, click on ‘Next’.
Step 3: Set Up Domains #
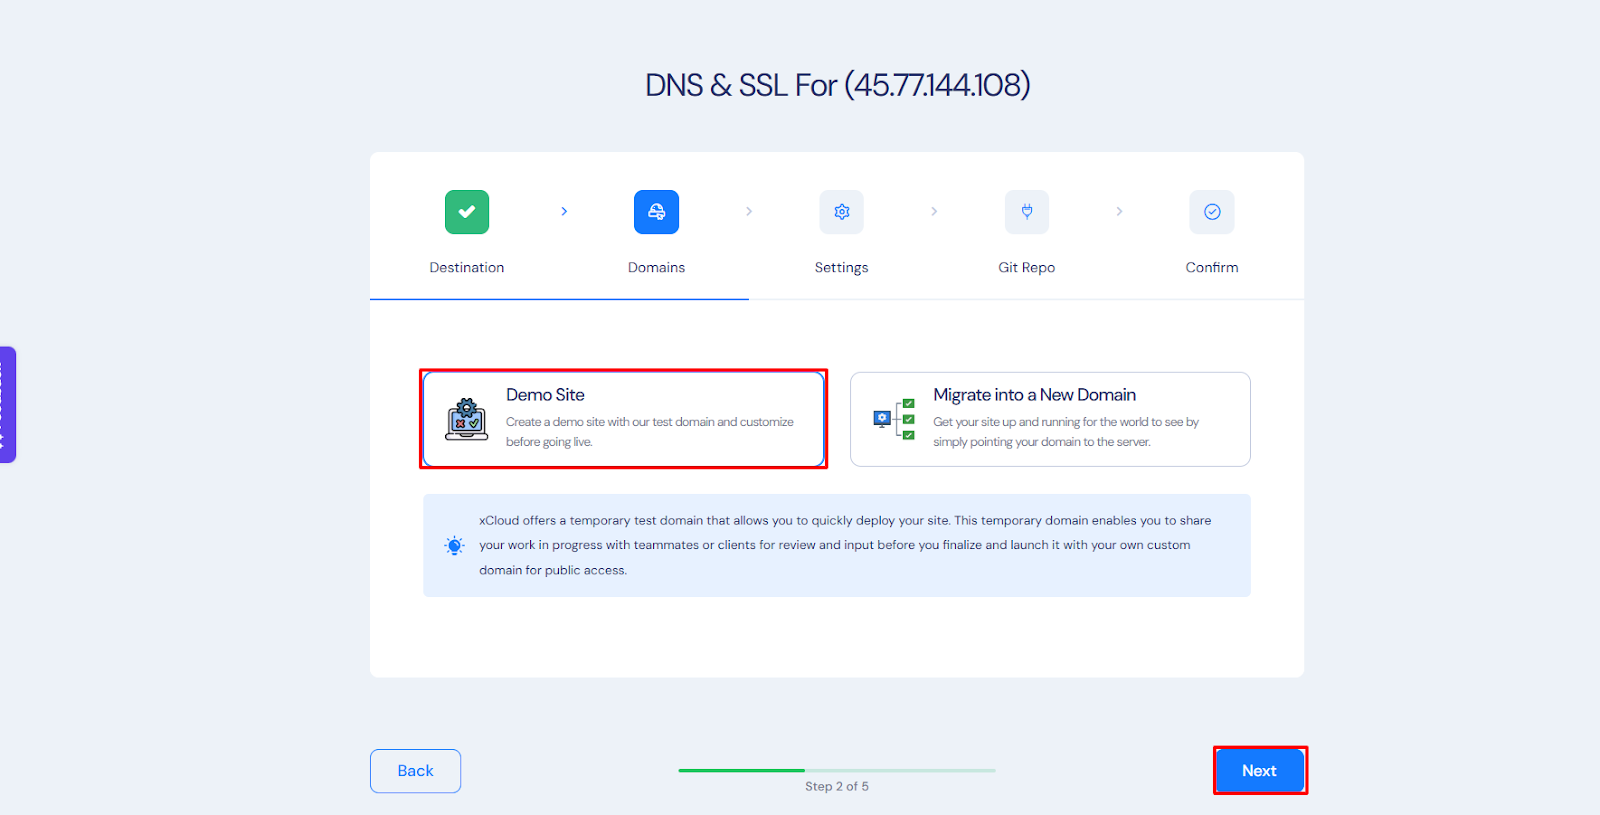
From the ‘Domains’ tab, you will get two options, either you can create your site in a staging domain and refine it until it is ready for launch or, you can migrate into a new domain to get your site up and running in a new domain. To create a site with your live domain, you need to select the ‘Migrate into a New Domain’ option. Then you have to put ‘New Site Title’ and ‘Domain Name’.
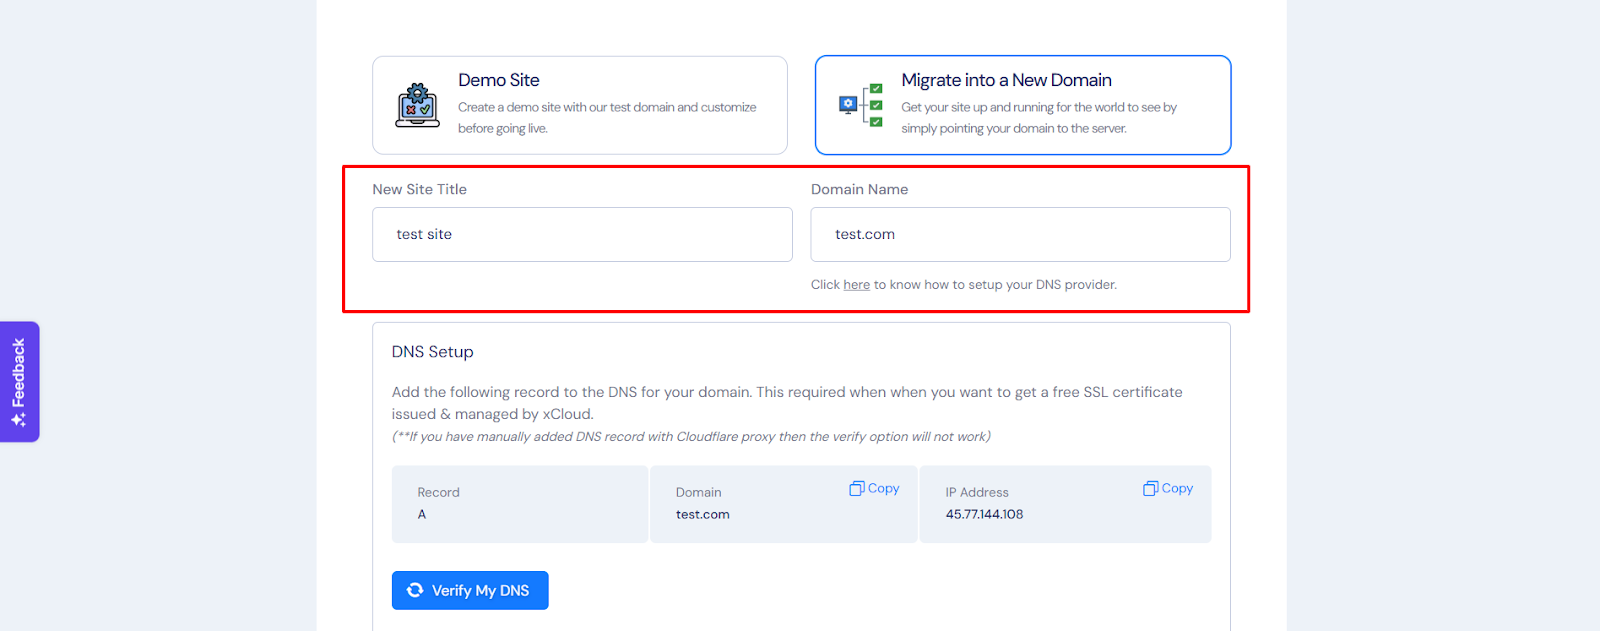
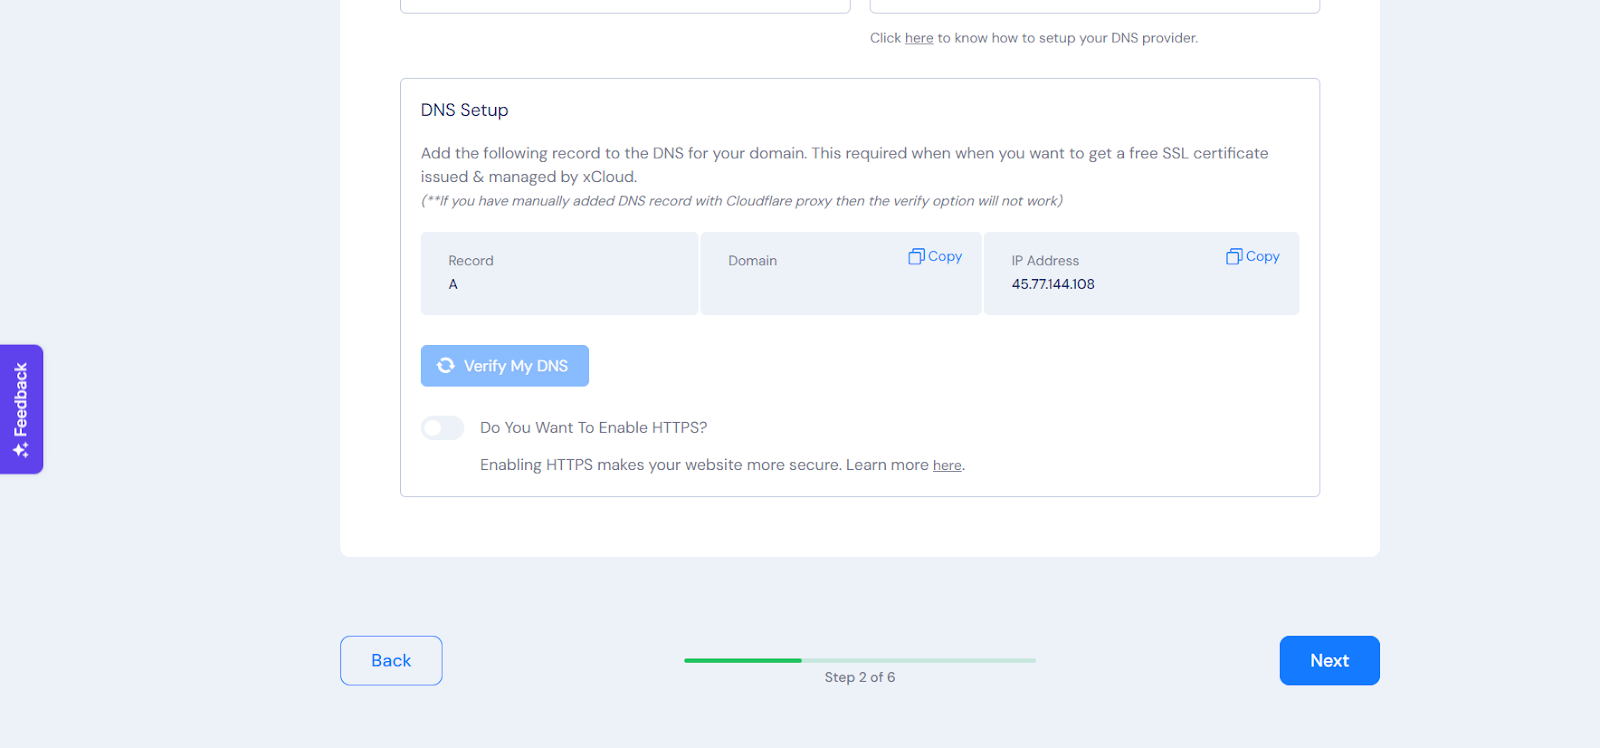
Here, you need to enable HTTPS to make your website more secure. From the DNS Setup section, toggle on the ‘Do You Want To Enable HTTPS?’ option.
After enabling it, you will get two options to select. Either choose to use a free SSL certificate issued & managed by xCloud or you can provide the certificate and manage it yourself. Select according to your choice.
Instead of migrating into a new domain, you can select the ‘Demo Site’ option. xCloud offers a temporary staging domain to make your site live, which helps promptly showcase your site’s progress and collect feedback from teammates or clients. Subsequently, you can integrate your custom domain to make the site accessible to your users or visitors. Now, click on ‘Next’.
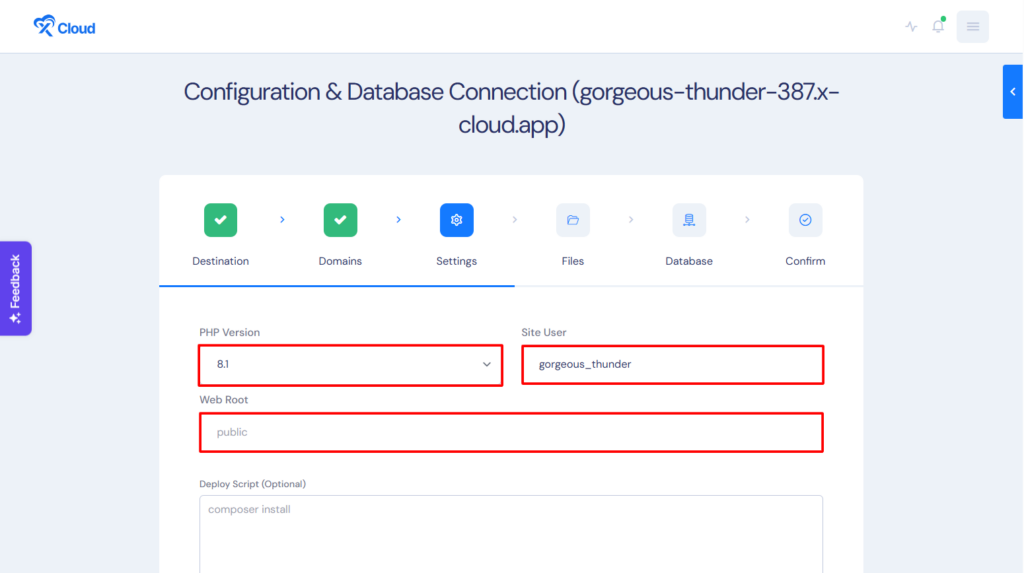
Step 4: Settings To Manage Database #
In the ‘Settings’ tab, you will see the ‘PHP Version’ and ‘Site Users’. You can change these according to your choice.
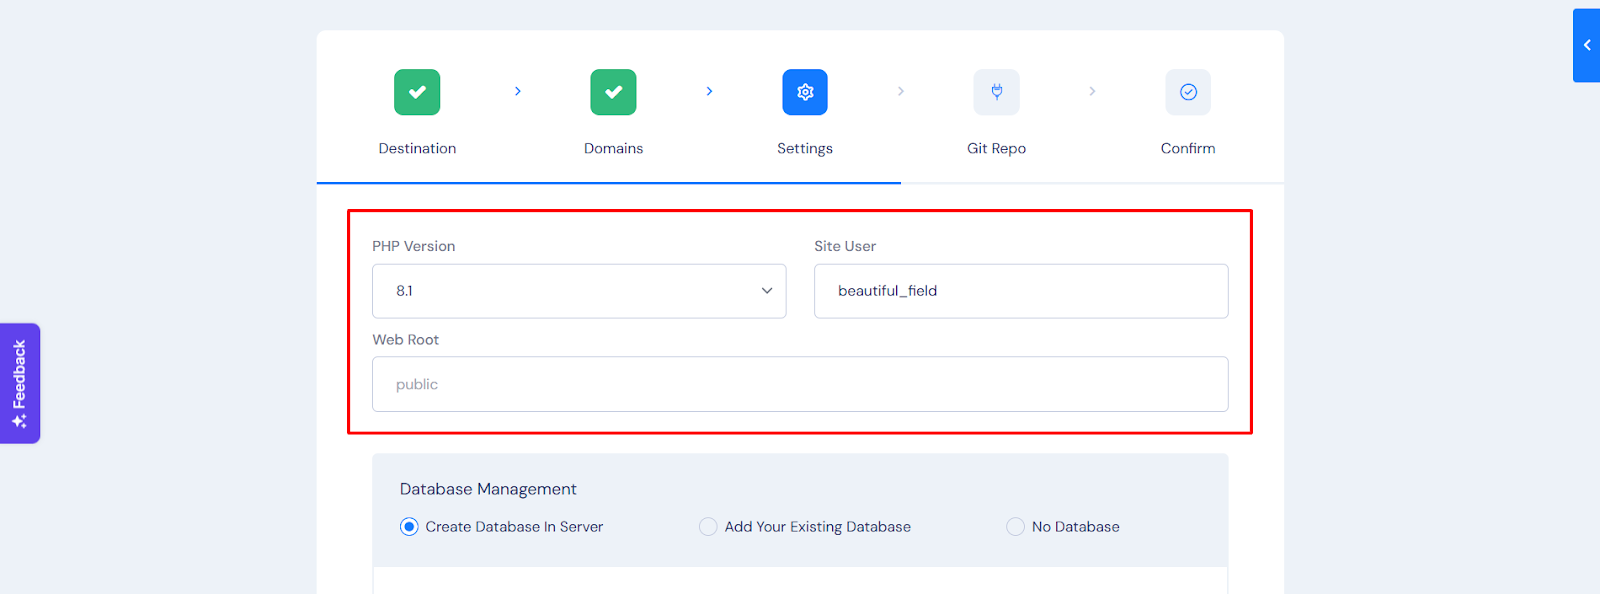
Now, it is time for database management. You will get two options. Either you can create a new database on the server, or you can add your existing database that is hosted on another server. If you select this option, you need to get a ‘Database Name’, ‘Database Username’ and ‘Database Password’. You can keep these auto-generated credentials or you can modify them according to your choice.
If you select this option, you need to put in a few information and credentials such as ‘Database Host’, ‘Database Port’, ‘Database User’, ‘Database Name’ and ‘Database Password’. Please make sure that the database connection configuration is correct.
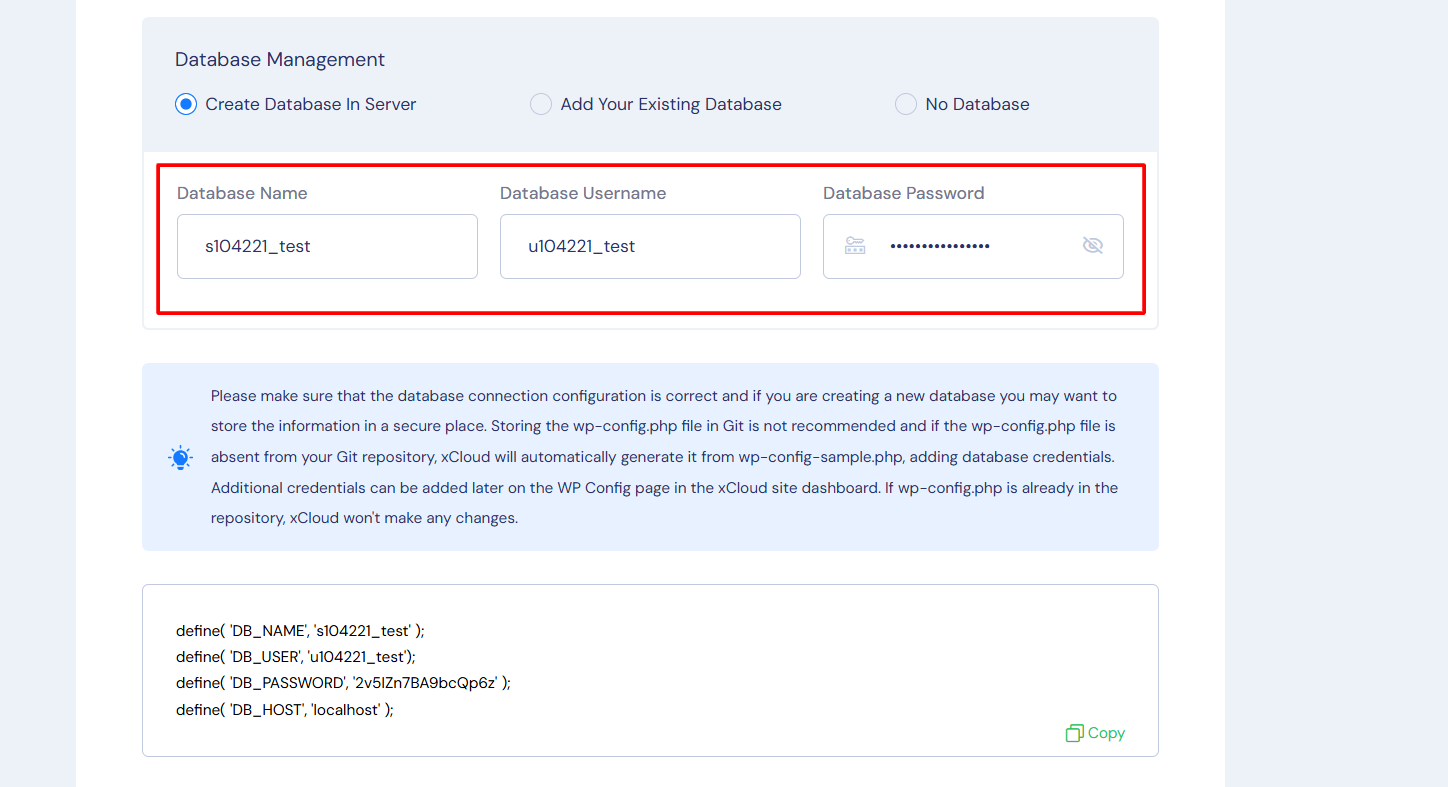
After selecting any one option and providing all essential information and credentials, click on ‘Next’.
Note: For this documentation, we are going with the ‘Create Database In Server’option.
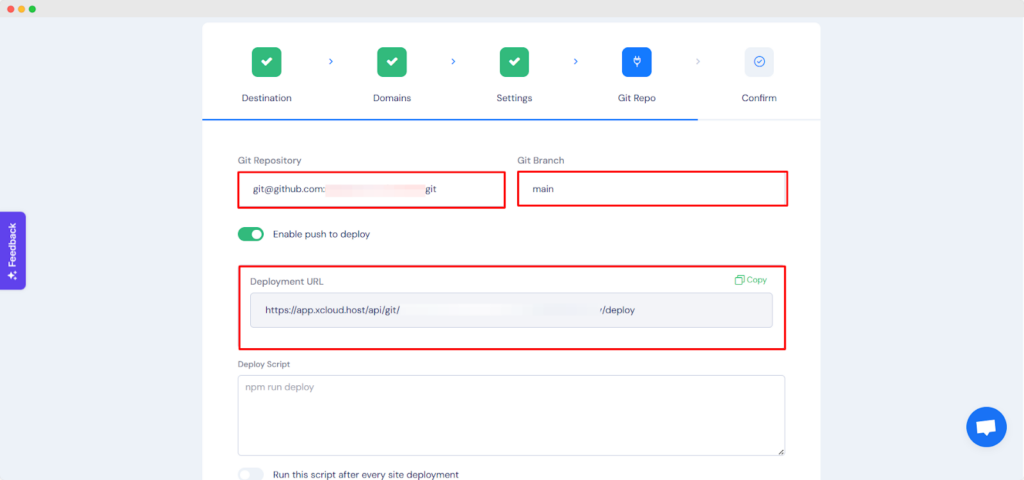
Step 5: Insert Git Repository Credentials #
In the ‘Git Repo’ Tab, add your ‘Git Repository’ and ‘Git Branch’. Also, toggle on the ‘Enable push to deploy’ option. Once you enable the ‘Push To Deploy’, it will generate a ‘Deployment URL’. We need to insert this URL into GitHub. Copy the ‘Deployment URL’ from here.
Step 6: Add Deployment URL In Git Repository #
Now, go to your Git Repository. From the ‘Code’ tab, go to the ‘Settings’ tab and click on ‘Webhooks’ page from the ‘Code and automation’ section of the left navigation. Insert the Deployment URL into the ‘Payload URL’ field. Select the ‘Application/json’ from the ‘Content type’ dropdown.

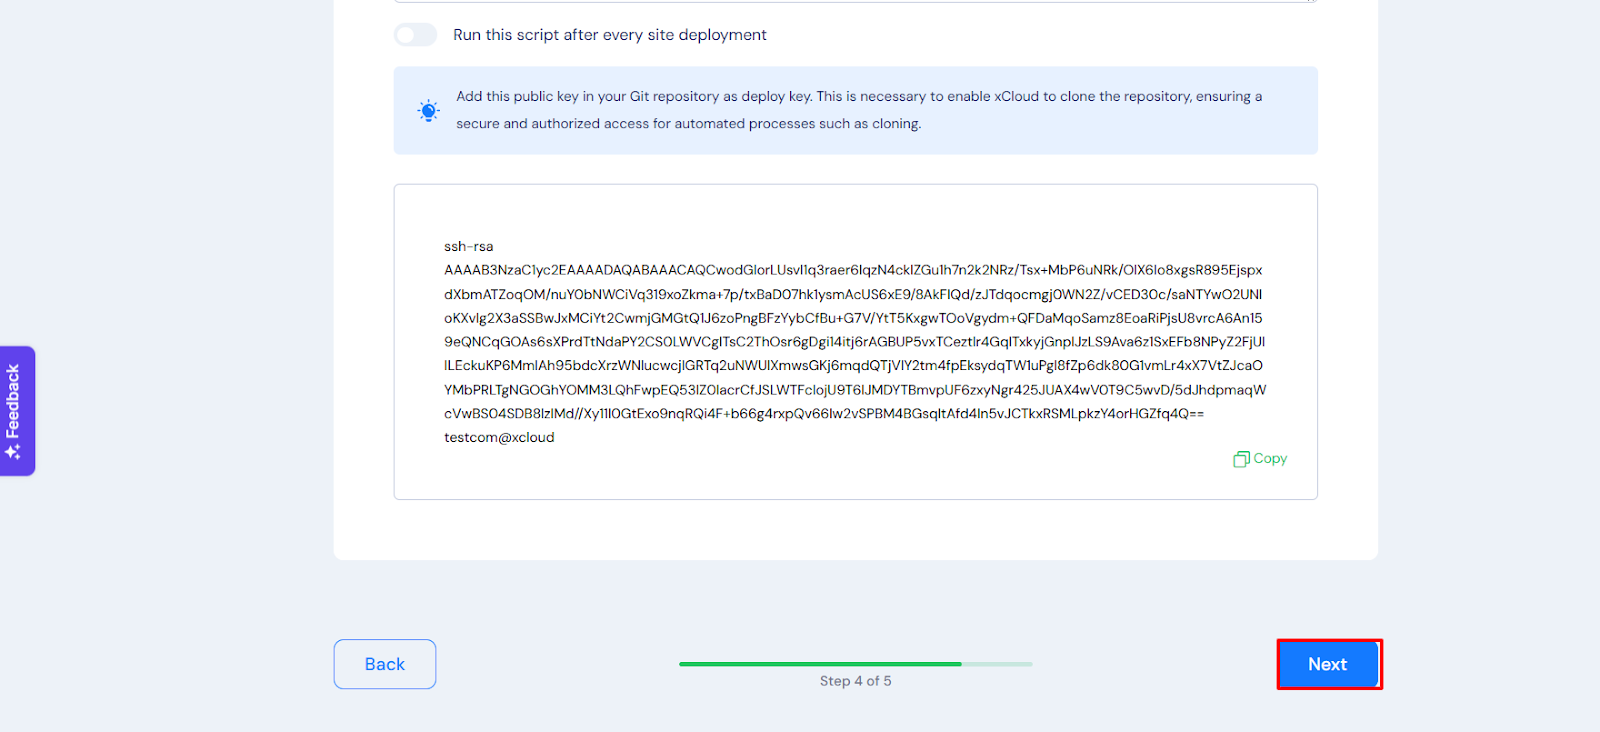
Step 7: Add Public Key to Git Repository #
From the xCloud dashboard, copy the ‘Public Key’ to add it to your Git repository as a deploy key. Git migration uses the ‘Public Key’ for SSH authentication. This is necessary to enable xCloud to access your Git repository and clone it. It ensures secure and authorized access for the cloning process.
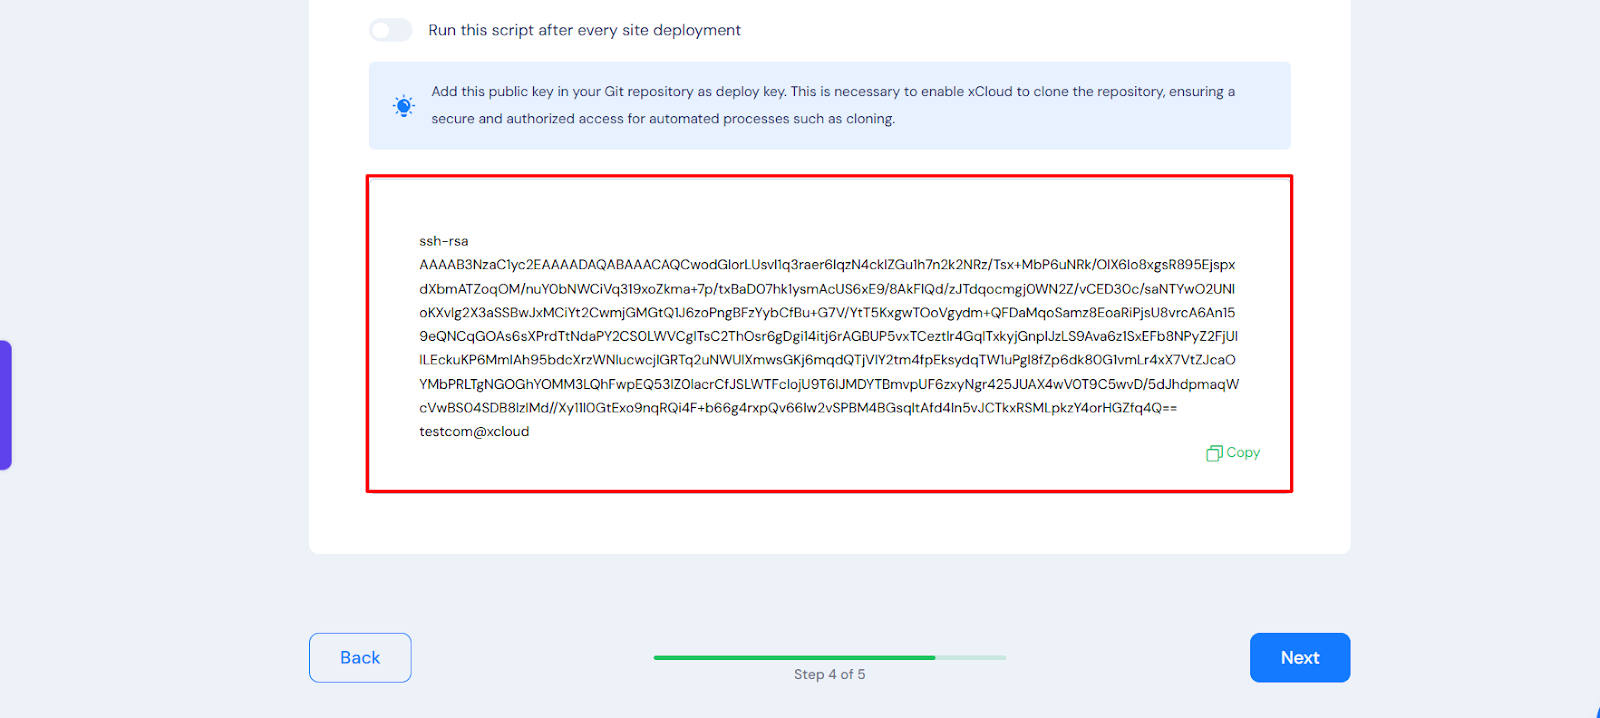
Now, again, go to your Git Repository. From the ‘Code’ tab, go to the ‘Settings’ tab and click on ‘Deploy Keys’ in the security section of the left navigation. Click on the ‘Add Deploy Key’ button and paste the key that you copied from xCloud.

After inserting the deploy key in GitHub, click on ‘Next’ on your xCloud settings of the ‘Git Repo’ tab.
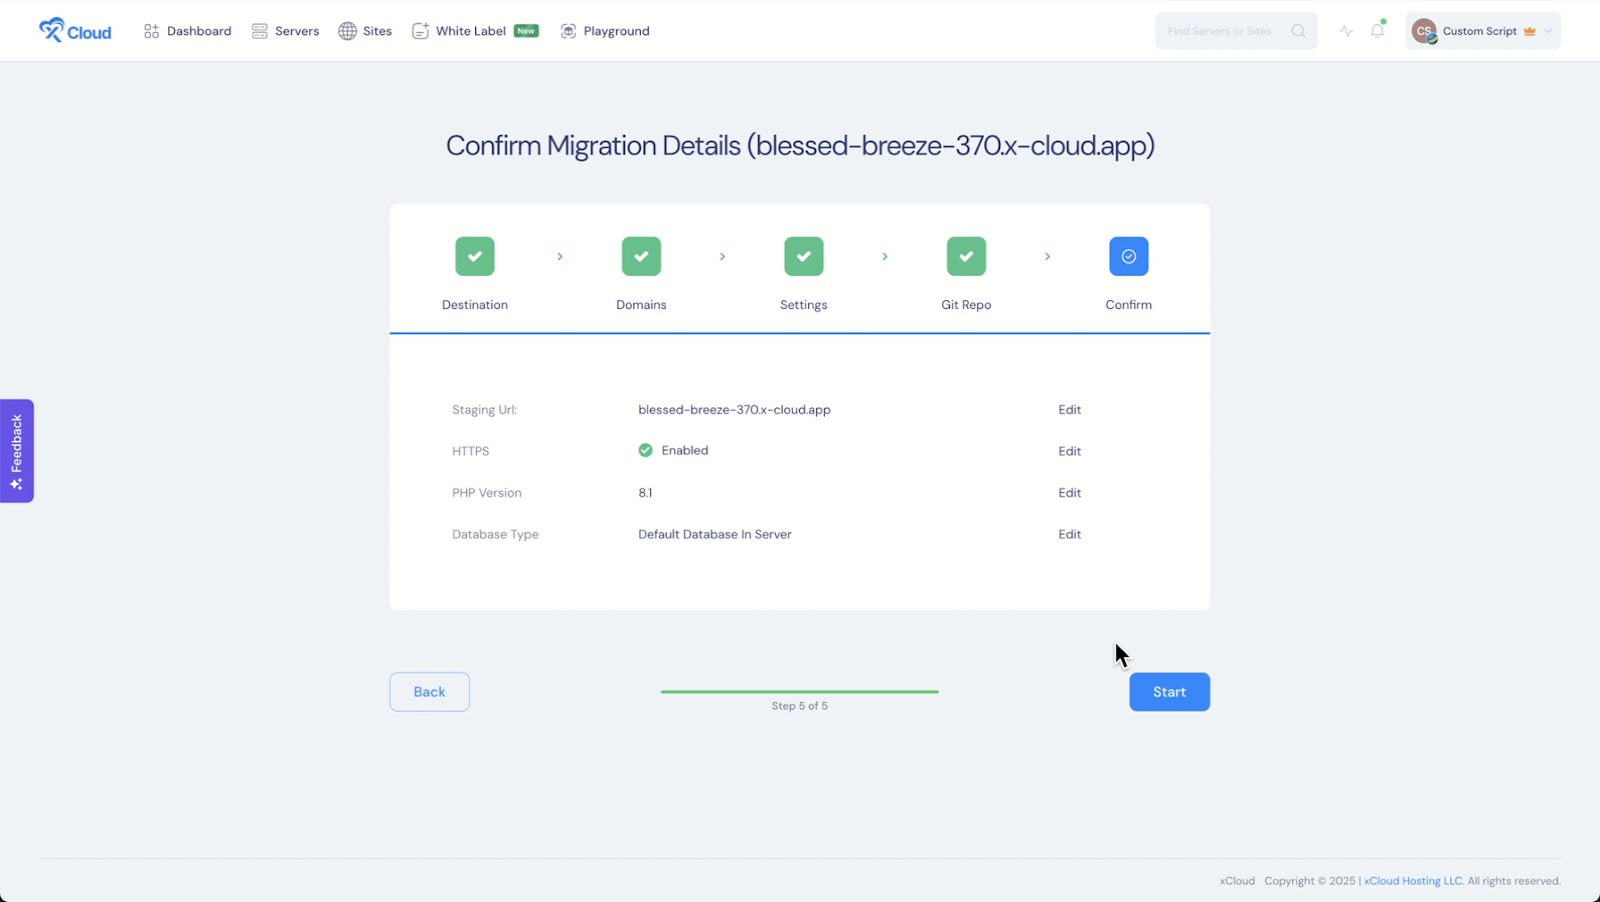
Step 8: Confirm Migrating The Website #
Now, to start the migration process, click on the ‘Start’ button. After clicking on the ‘Start’ button, the migration process will start. And you will see the progress of the migration.
Note: The Git Repository must contain a wp-config-sample.php. xCloud generates a wp-config.php file from the wp-config-sample.php file with the database information.
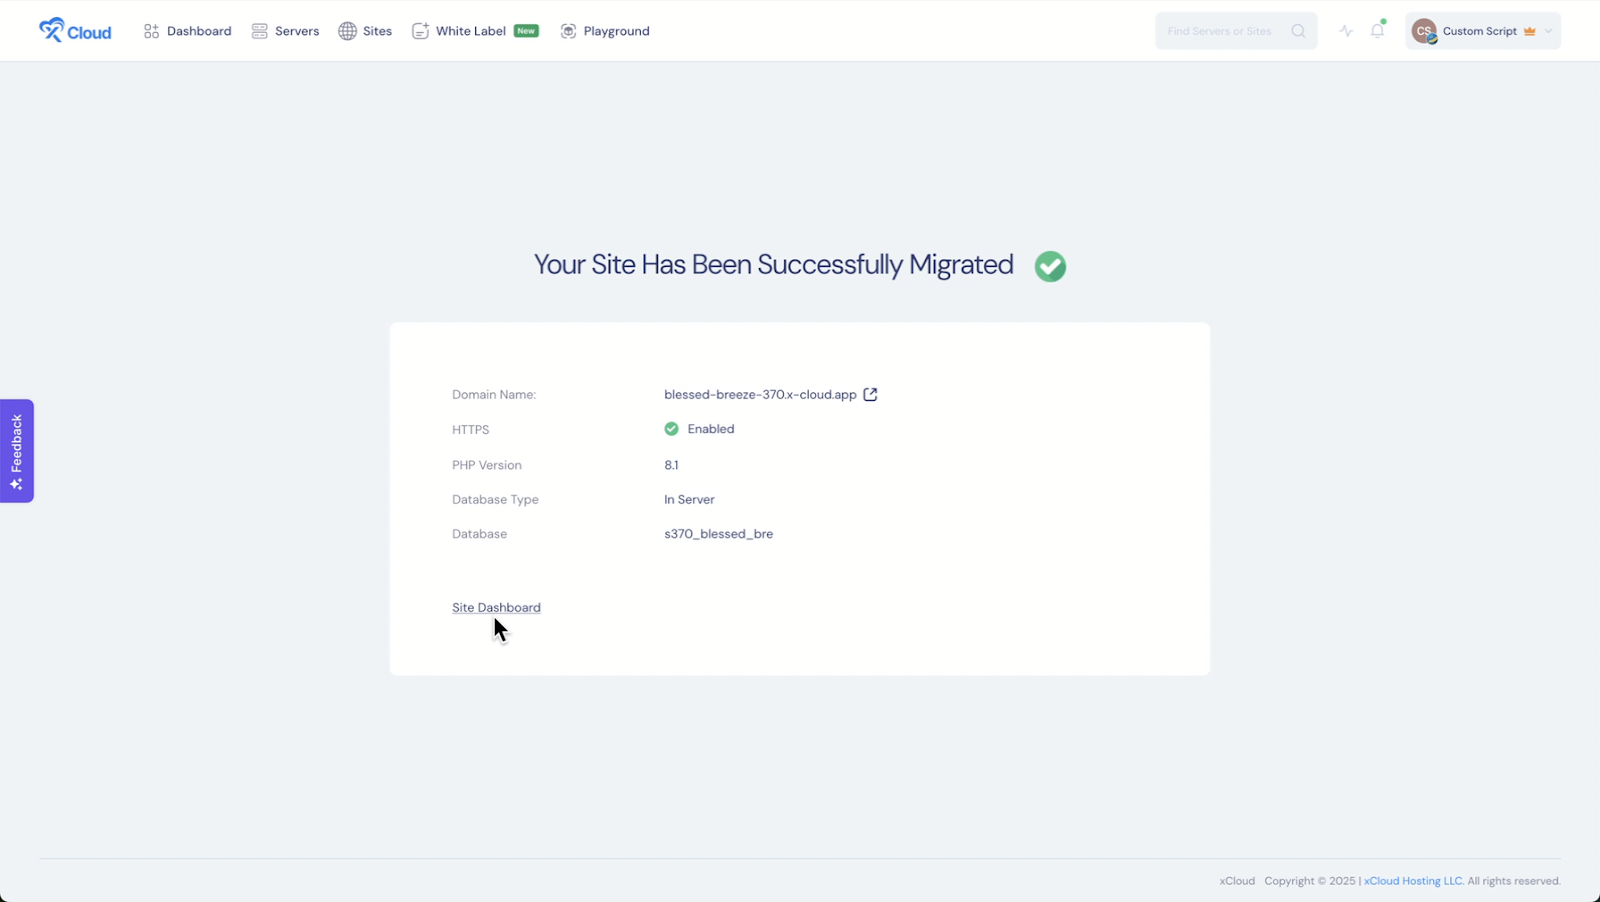
Once the migration is successfully complete will see the following screen. You go to the site dashboard from there.
How To Manually Upload a PHP Site on xCloud #
If you’re migrating an existing PHP site or starting from scratch, xCloud makes it easy to upload and configure your website. Follow the steps below to successfully upload your site, set up your database, and get your site live on a custom domain or a staging environment.
Step 1: Create A New Site #
First, click on ‘New Site’ from the xCloud dashboard. Click on the ‘Custom PHP’ field. Now, you choose ‘Manually Upload Website’ to import your custom PHP site.
Step 2: Add Information To Manually Upload Website #
Now, select the destination server to migrate your site. Afterward, click on the ‘Next’ button.
In the next step, you need to add your source site URL. And if you choose to migrate to a new domain, you can include your custom domain. xCloud offers a staging environment and with it, you can upload your site and visit it live with a temporary domain. After successfully uploading your site, you may update the site with your custom domain later.
In this tutorial, we will be working on a staging site. Select ‘Demo Site’ and then click on the ‘Next’ button.

Now, you will be sent to the ‘Settings’ step. Make sure to correctly add your ‘PHP Version’, ‘Site Users’, ‘Web root’ and other details before clicking the ‘Next’ button.
Note: The directory where your website’s main files, including index.php, are stored. The Web root defines the base folder from which your website is served, and it must be set correctly to ensure proper functionality.
Additionally, ensure that your index.php file is correctly placed for the system to function automatically. The index.php file should be located in the root directory. However, if it is placed in a subdirectory, you must update the Web Root Settings accordingly.
Users may upload their entire website directory instead of just the necessary files. For example, if the website files are inside a folder named public_html, then the root directory does not contain index.php directly.

To resolve this, you need to update the Web root settings. For this, navigate to Web Root Settings from the ‘Site Settings’. Then enter the name of the folder that contains the index.php file (e.g., public_html) and click on the ‘Update’.
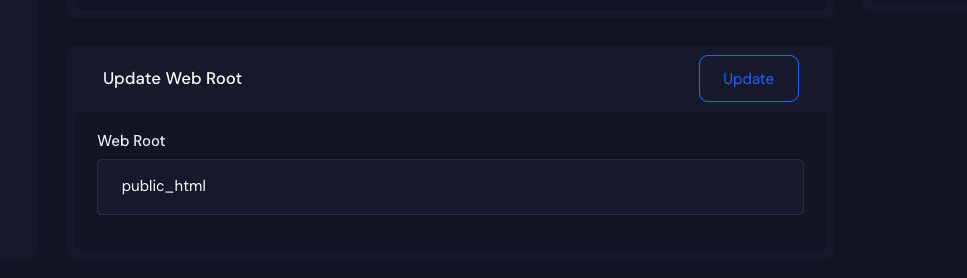
Once updated, our system will correctly detect and load the index.php file from the specified folder.
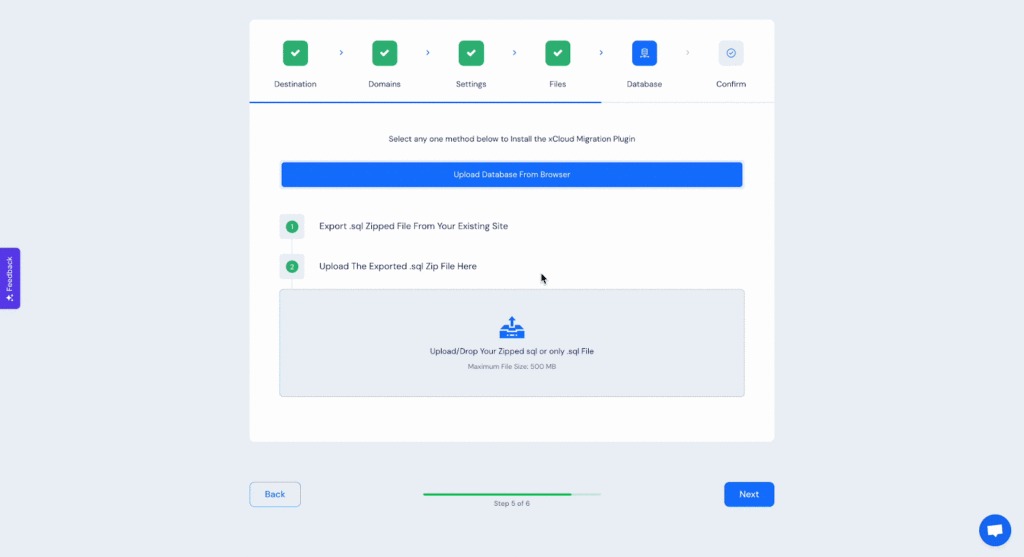
Step 3: Upload The Exported Zip File & SQL File #
You will now be directed to the ‘Settings’ step. Just upload your exported custom PHP file as shown and click on the ‘Next’ button.
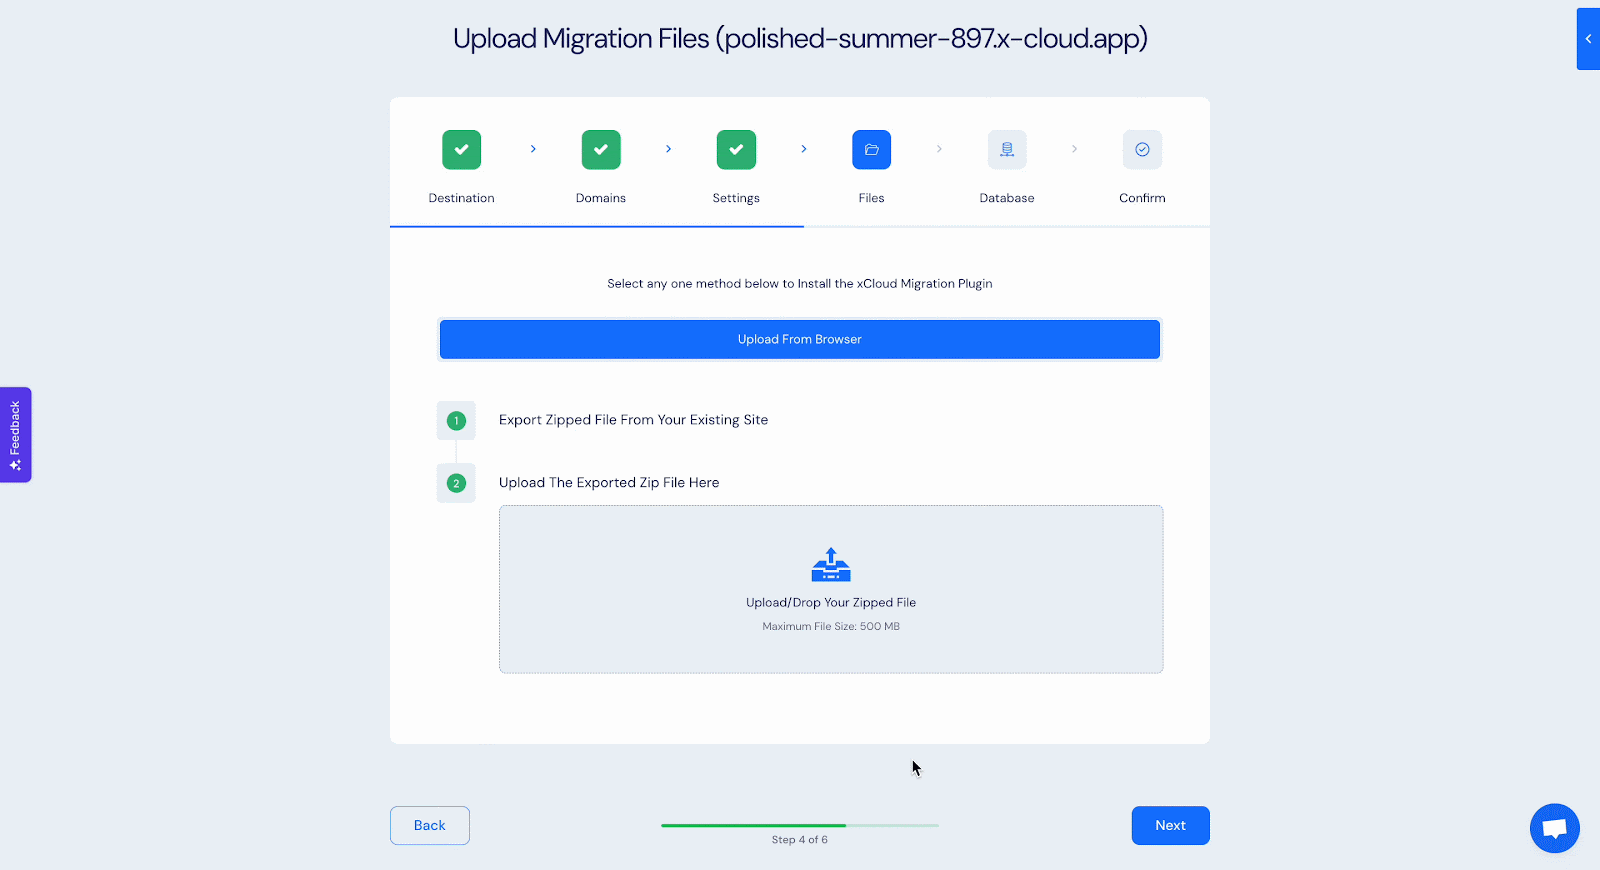
Now, from the ‘Files’ step, upload your SQL file similarly. Afterward, click on the ‘Next’ button.
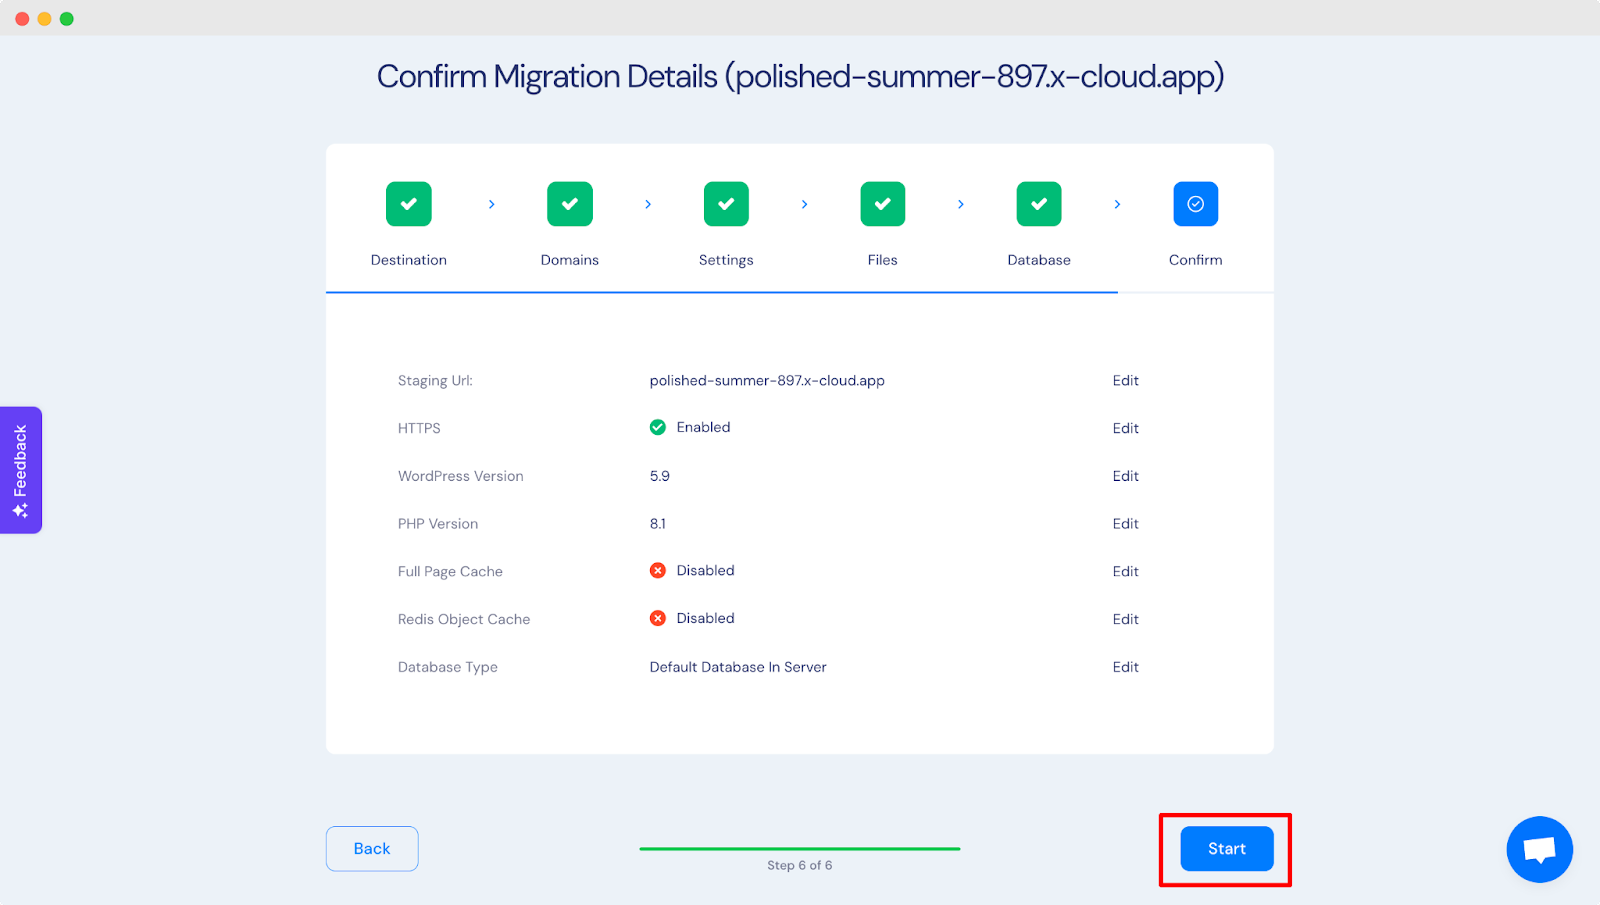
Step 4: Complete Database Settings & Finalize #
In the ‘Database’ tab, you can configure your preferred database setup. If you are good to go for uploading an existing custom PHP website with xCloud, click on the ‘Start’ button.
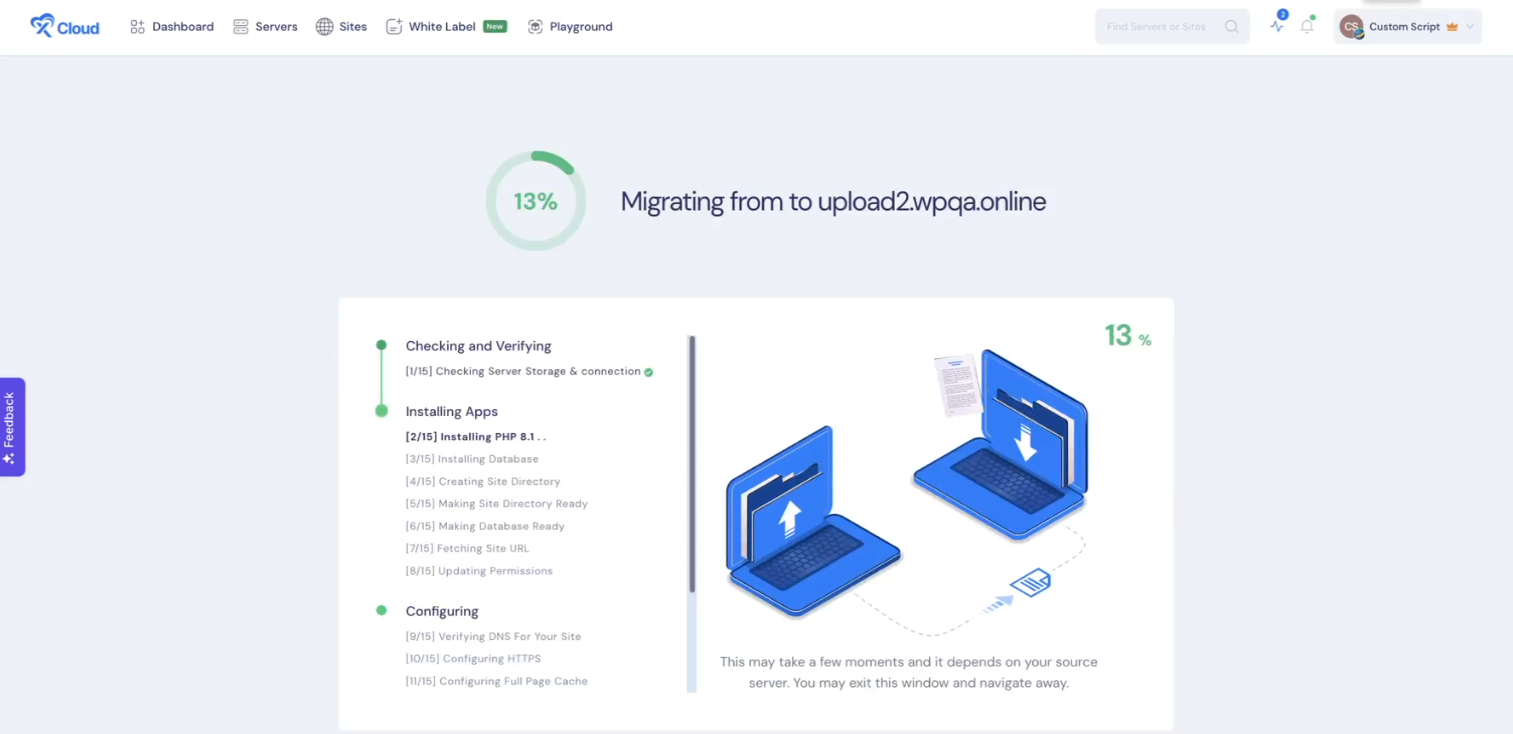
Within a few moments, your PHP website will be automatically uploaded to xCloud. You will see the following screen while uploading.
Once the migration is successfully complete will see the following screen. You go to the site dashboard from there.

Final Outcome #
After the migration is completed, if you visit the site, you can see the newly custom PHP site that you have uploaded with xCloud.
This is how easily you can create a site with custom PHP applications in xCloud. With just a few simple steps, you can quickly deploy your site, configure your database, and select your preferred domain settings. If you’re using a Git repository or uploading files directly, xCloud provides easy ways to get your website live and running smoothly.
Still feeling stuck? Contact our dedicated support team for further assistance.


