Disasters can strike unexpectedly, and you might be able to restore your WordPress website, including all the data and files. Whether due to hardware failures, cyberattacks, or accidental deletions, the ability to recover quickly is essential to minimizing downtime and preventing data loss.
xCloud allows you to restore your site from your backups. Whether from local or remote backups, you can directly restore and recreate WordPress website from backups in xCloud easily.
How to Recreate WordPress Website from Backups in your xCloud Account? #
Follow the steps below to recreate the WordPress website from backups with xCloud, whether it is an incremental or full backup.
Step 1: Initiate New Site Creation #
After logging in to your xCloud dashboard, to create a new site, click on the ‘+ New Site’ button, then choose a server from the dropdown and click the ‘Next’ button. Here select ‘Recreate Site From Backup’ to migrate your targeted site from existing backup to a new website.

Step 2: Select Migration Destination & Domain #
After choosing a server as Destination, click on ‘Next’ Button, You can either choose to migrate to a new domain or a demo site from where you can migrate later. And hit the ‘Next’ button.

Step 3: Available Backup Sources in xCloud #
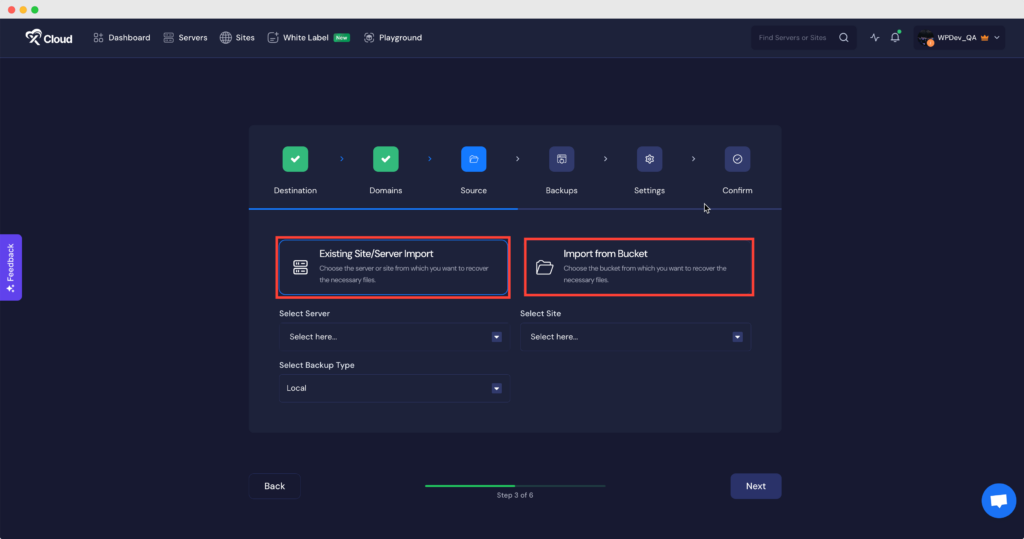
Here, you will get two options for restoring your site from backup: ‘Existing Site/Server Import’ and ‘Import From Bucket’. Choose the ‘Existing Site/Server Import’ option, if you have an existing site in xCloud that you want to migrate and create as a new site. Or you can choose the ‘Import From Backup’ option, if you want to restore your site from your storage bucket.

Step 4: Choose Your Preferred Backup Source & Files #
You can restore the full server or any specific website. Just go to the ‘Existing Site/Server Import’, then select a Server, Site, and backup type and click on the ‘Next’ button. Here, choose a backup file to restore and hit the ‘Next’ button.

If you choose the ‘Import From Bucket‘ option, you can restore from your backup that you have taken in your storage bucket. Now, Select a ‘Bucket’, add the domain from which you are migrating and click on the ‘Next’ button. Select the file you want to restore.

Step 4: Configure Settings & Start Migrating #
After choosing the necessary files to restore your site, the settings tab will come to make sure you select the necessary versions and settings according to your need and click on the ‘Next’ button. And in the next, review your preferred settings and hit the ‘Start’ button.

After restoring and completing your site, you will see a message showing that it has been successfully migrated. This is how easily you can recreate a WordPress website from backups in xCloud.

Still stuck? Contact our dedicated support team for any of your queries.


