


With xCloud White Label, you can create and sell custom hosting packages under your own brand, giving you full control over pricing, features, and limitations. One key aspect of tailoring your hosting plans is setting site limits, which helps define how many websites a customer can host under each plan. And now, you can set site limits on custom hosting plans with your reseller program.
By setting up the site limit on the server within the xCloud white label dashboard, you can offer customized hosting plans to your customers. Follow the step-by-step guide on how to set a site limit on your plans with xCloud White Label.
Step 1: Log in to Your xCloud Dashboard #
First, log in to your xCloud dashboard using your credentials. Once you are logged in, navigate to the ‘White Label’ tab on the dashboard. Clicking on this tab will redirect you to the xCloud White Label landing page, where you can manage your white label settings and create custom hosting packages.
Step 2: Create Custom Hosting Packages #
On the dashboard of White Label, click on the ‘Add Product’ button to begin creating your custom hosting package. A popup window will appear with server configuration options.
Here, you can choose your server plan by selecting between ‘General’ and ‘Premium’ plans based on your needs.
Next, select your desired server size from the available options. As you select different plans and server sizes, you will be able to see the corresponding prices. Once you have made your selections, click on the ‘Next’ button to proceed.
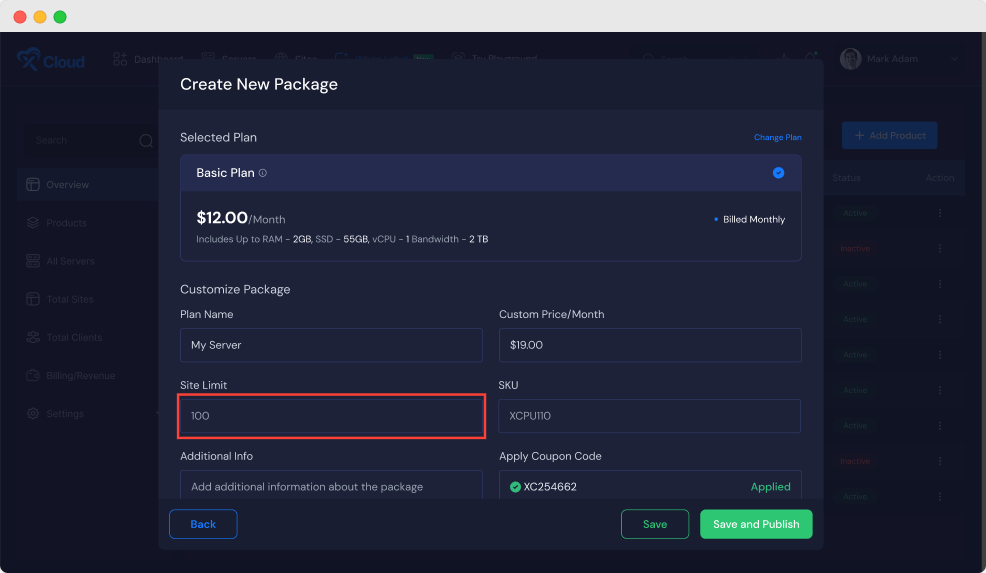
Step 3: Customize Your Hosting Plan & Implement Site Limit #
In this step, you will customize the details of your hosting package. Enter a unique ‘Plan Name’ for your package or keep it blank and it will take the original product you have chosen. In the ‘Custom Price/Month’ field, set the monthly price you wish to charge your customer.
Then enter the number of the sites into the ‘Site Limit’ field that you want to allow for the users who will the plan. After that provide a ‘SKU’ (Stock Keeping Unit). You can also deactivate any package by clicking on the ‘Active Package’ button. Once all the details are filled out, you can make it immediately available for purchase by clicking on the ‘Save and Publish’ button.
Note: Remember, your custom price needs to be higher than the server cost to ensure you make a profit. Also, the Stripe fees will be handled by the Reseller.
After completing these steps, you will be able to see your newly created product in the dashboard under your list of plans. Your custom hosting package is now ready to be offered to your customers under your own branding.
That’s it! This is how easily you can set site limits on your product with xCloud white label.
Still stuck? Contact our support team for any of your queries.


