


Node.js is a powerful runtime that enables fast, scalable and modern web applications.
With xCloud, you can easily set up Node.js on the Vultr server in xCloud.
xCloud makes hosting and managing Node.js sites easy, so you can focus on building great websites.This guide will show you how to set up Node.js on Vultr using xCloud.
First, set up your Vultr server in xCloud. Follow these steps to get started.
How to Setup A Vultr Server in xCloud? #
This guide shows how to set up a Vultr server in xCloud. Follow the steps to quickly launch, configure and start your cloud journey.
Step 1: Create Your New Vultr Server In xCloud #
After logging in to your xCloud account, start by adding a new server by clicking on the “Add New Server” button from your dashboard.

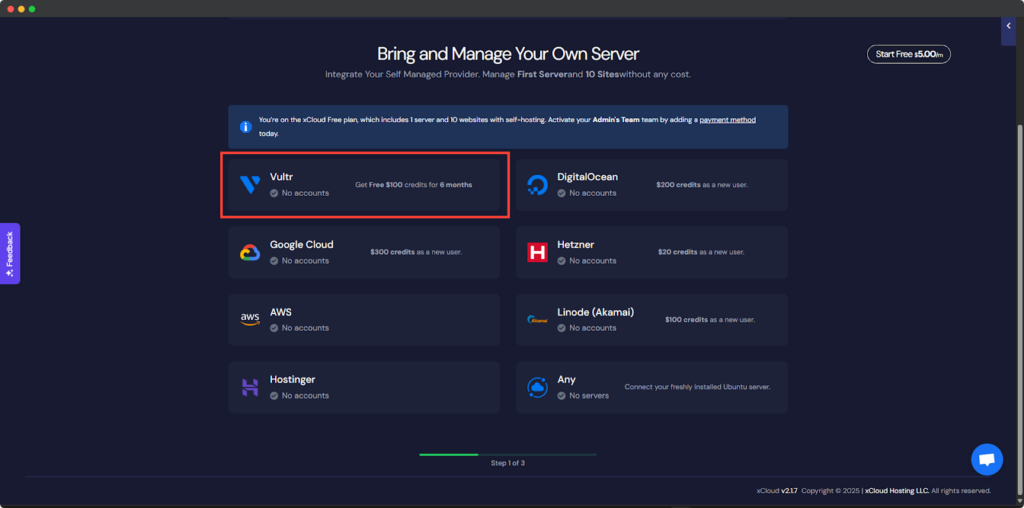
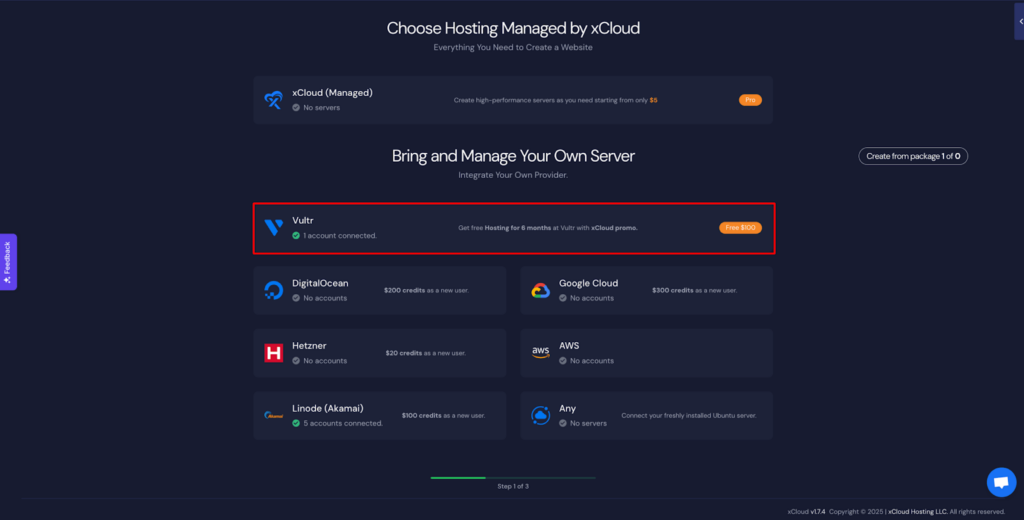
The next screen will provide the list of our available services. For this tutorial, we will create a Vultr server and for that select the Vultr option under “Bring your own server service”. The billing of the server will be handled on your Vultr account and in xCloud we won’t charge for this first server.
Signup in Vultr with xCloud Promo #
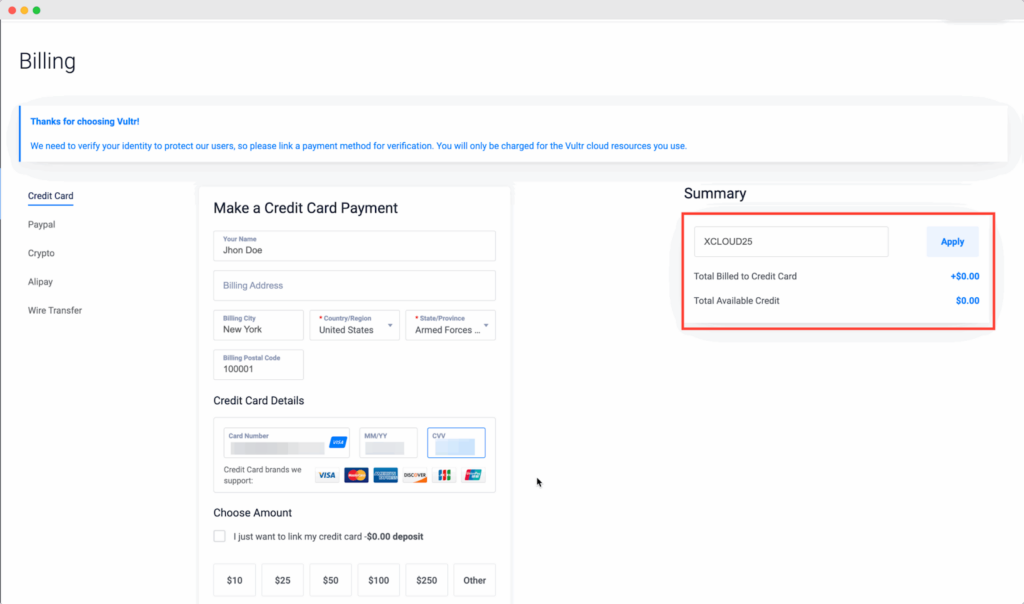
To get started with the free hosting offer, head over to Vultr.com and sign up for a new account. During the registration process, you’ll need to link a valid credit card or a verified PayPal account to activate your account and be eligible for the $100 promotional credit. As part of the validation, Vultr will place a small temporary authorization on your credit card, approximately $2.50 USD to verify your payment method.
This charge is not permanent and will be automatically reversed by your bank, although depending on your bank’s policy, it might take up to 30 days for the funds to be released.
If you choose to verify using PayPal, note that Vultr requires a minimum payment of $5.00 USD for validation. Additionally, PayPal must be linked to a valid credit card or bank account to complete this verification process. Once your payment method is verified and your account is deemed eligible, the $100 in free credits will be automatically applied to your account. Make sure to use the promo code “XCLOUD25” during the sign-up to claim this offer.
Note: If you already have a Vultr account then please skip this step and check how to collect API from Vultr.
Collect API key from Vultr #
After you have successfully completed setting up your billing method, you will need to get the Vultr API key to add it to xCloud to create and manage 1 server and 10 sites for free. Navigate to the Account → API tab from your Vultr dashboard. After that click on the ‘Enable API’ button.

Now, your ‘Personal Access Token’ will be auto-generated. Copy the API Key/Token.
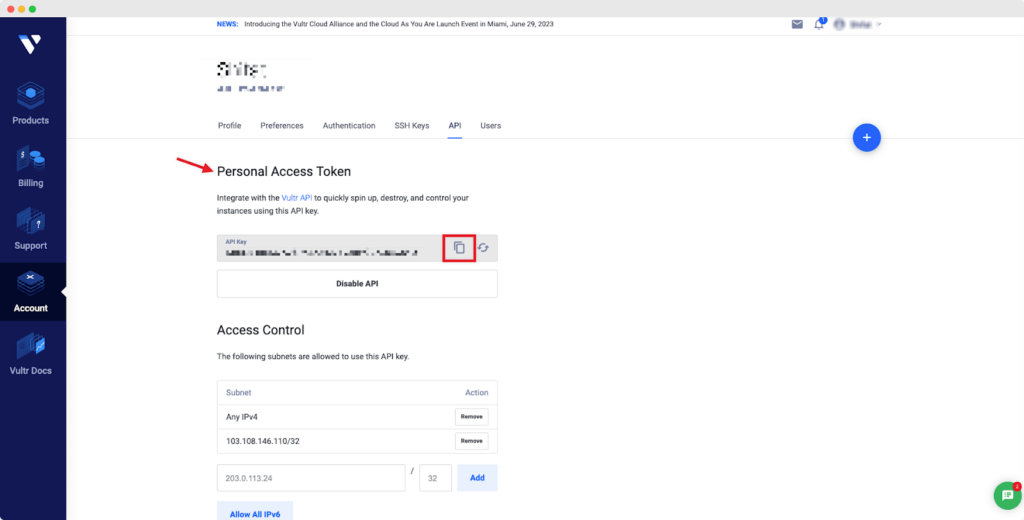
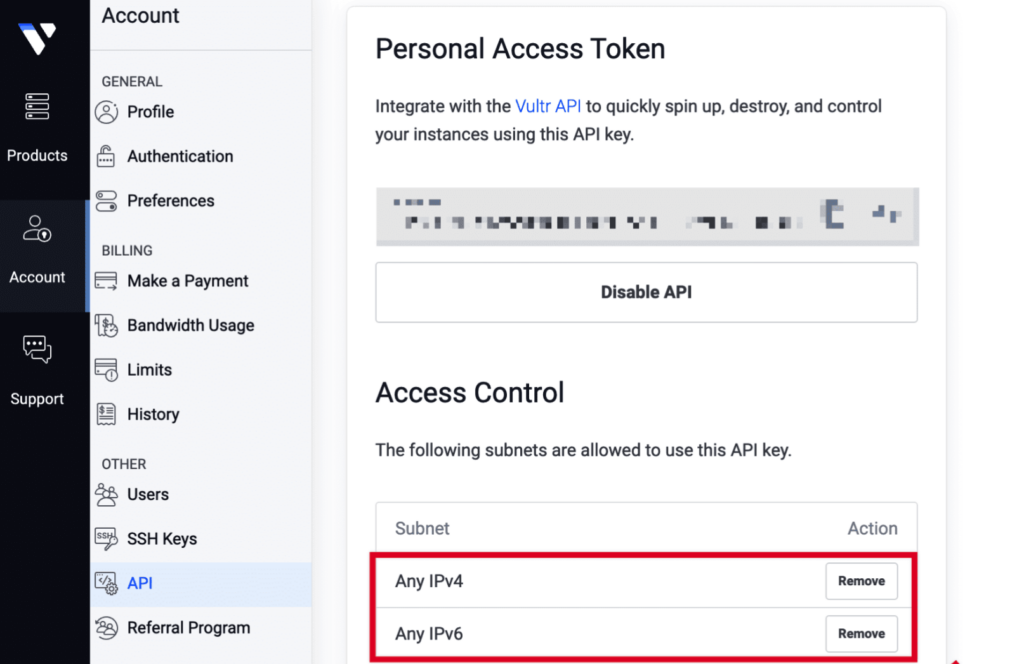
Please make sure you have added Any IPv4 and Any IPv6 both under Access Control.
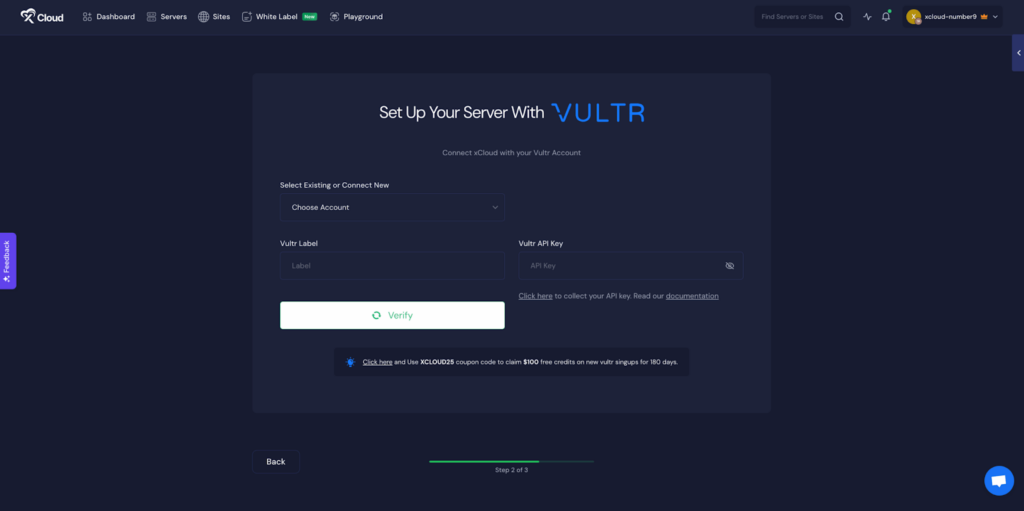
Now, you need to go back to the xCloud dashboard and add your Vultr Label & API Key.
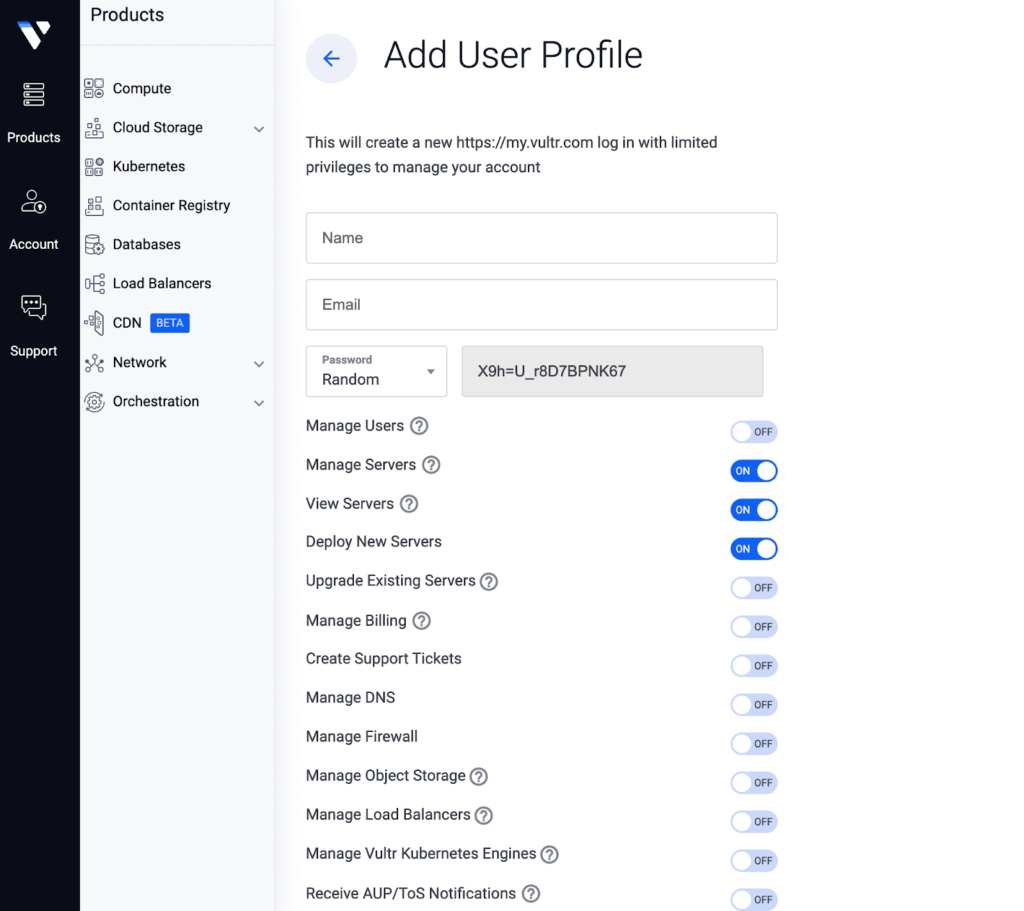
Add Team Members In Vultr #
If you want your team members to use xCloud with Vultr, then make sure these permissions are given.
Add Vultr API key in xCloud #
Thanks to xCloud, you can create your first server without spending any money. Now, click on ‘Add New Server’ from the xCloud dashboard and you will be redirected to the server selection screen. Then click on ‘Vultr’ to proceed further.
After selecting ‘Vultr’, set your ‘Key’, ‘Vultr Label’, and ‘Vultr API Key’. Then click on ‘Verify’.
Step 3: Create a Vultr Server in xCloud #
Now that you have successfully verified your Vultr account, you will need to add other details to create a server in Vultr using xCloud. Choose your Region, Database Server, Server Size, and much more from one easy dashboard.

After putting all the information, click on ‘Next’ and xCloud will automatically install and set up everything for you in a few minutes.
How to Set Up Node.js on Vultr with xCloud #
xCloud provides an intuitive interface that allows you to easily deploy, manage and scale your Node.js applications directly from your Git repository without worrying about manual setup or infrastructure maintenance.
Follow the guide to deploy your Node.js application easily on Vultr with xCloud:
Step 1: Choose the Application #
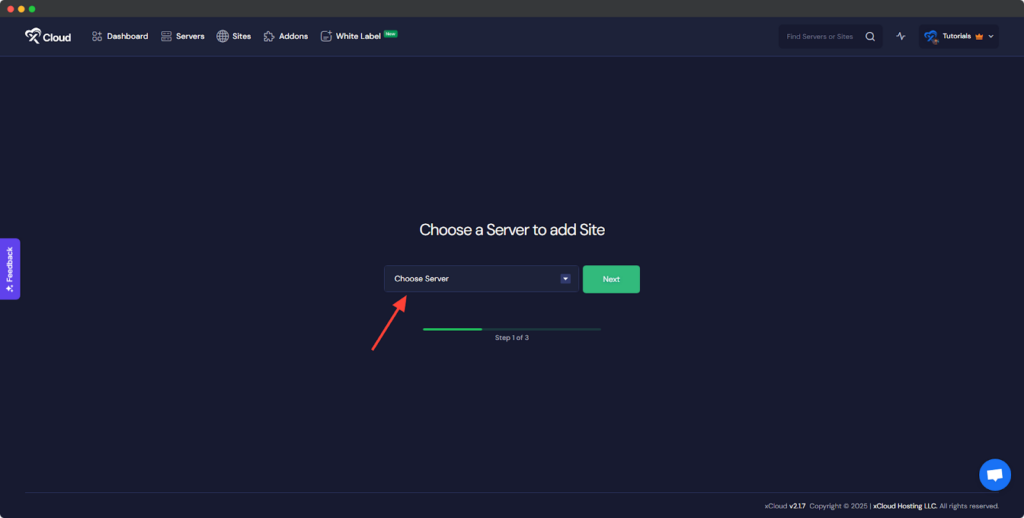
To begin deployment, click on the ‘Add New Site’ button from the dashboard.

You will then be asked to ‘Choose a Server to add Site’ from the dropdown. You must select the Vultr server you set up in xCloud from this dropdown.
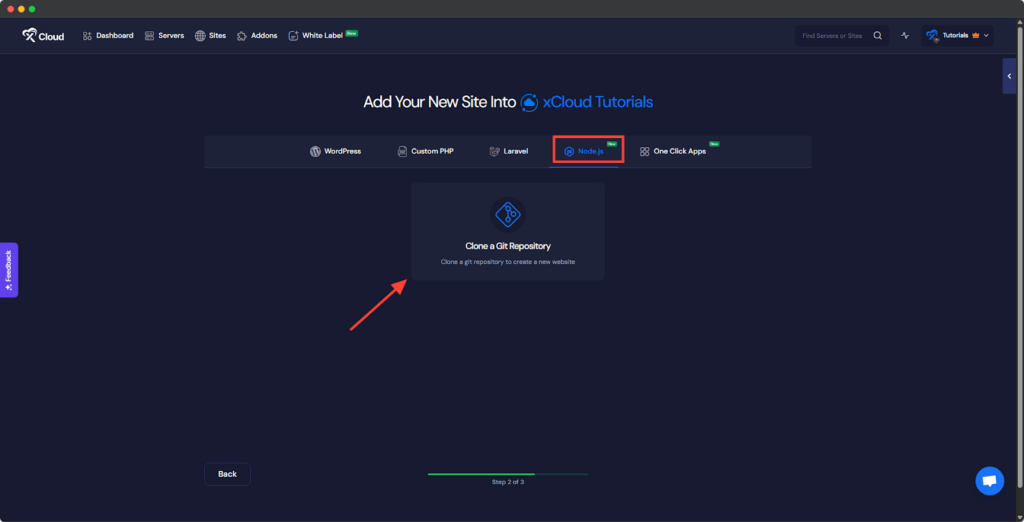
Next, you will see options such as ‘WordPress’ and ‘Custom PHP’. Go to the ‘Node.js’ option from the tab. After that, choose the ‘Choose a Git Repository’ option to import your Node.js application using a Git provider.
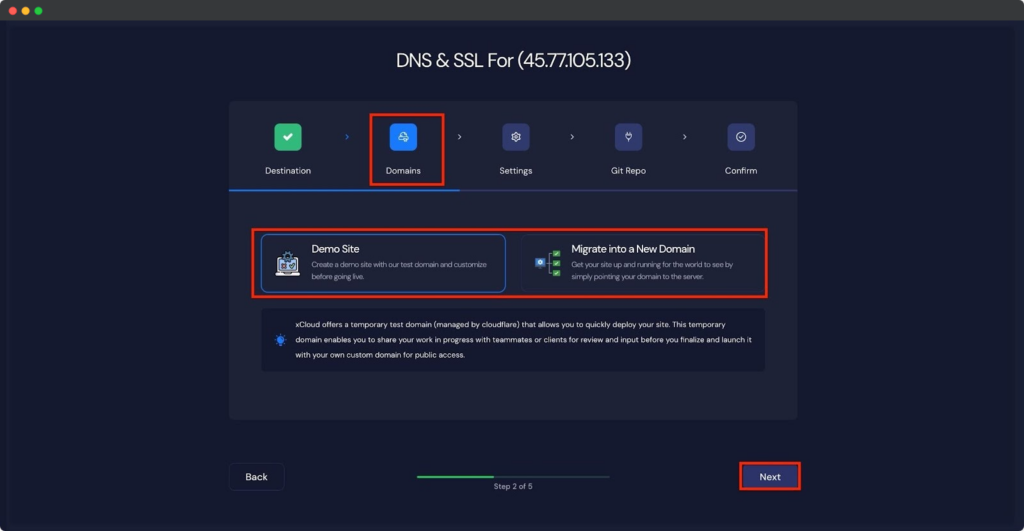
Step 2: Set Up Domains #
The ‘Domains’ tab allows you to configure your site’s domain. You can either create a ‘Demo Site’ or a ‘Live Site’. For this documentation, we’ll proceed with the ‘Demo Site’ option and click ‘Next’ to continue.
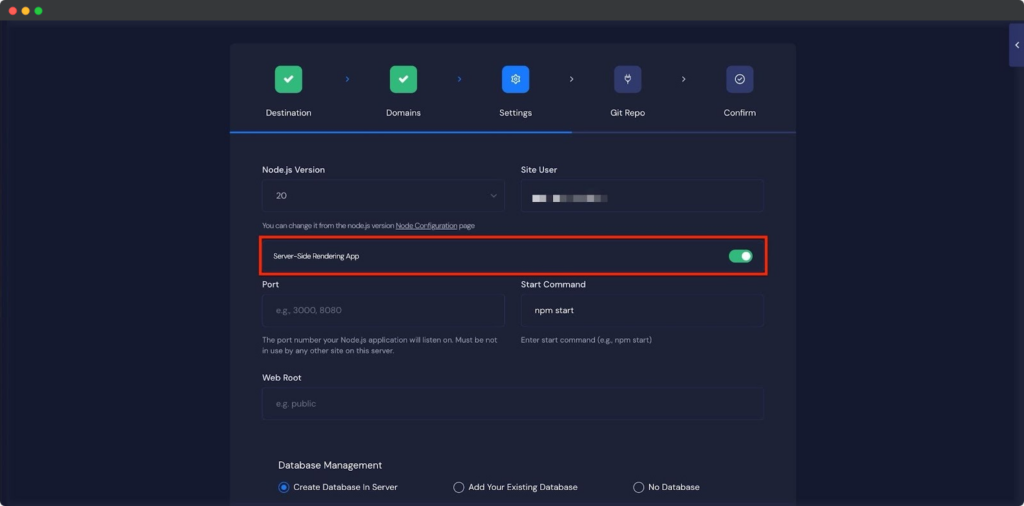
Step 3: Configure Node.js Application #
In the ‘Settings’ tab, you will find options to configure the Node.js version and manage site users. Adjust them according to your preferences.

Next, you will see the ‘Server-Side Rendering App’ option. To proceed with a ‘Client-Side Rendering App’, keep the toggle off.
To deploy a ‘Server-Side Rendered App’, toggle it on.
Client-Side Rendering (CSR): #
If your application is built using frameworks like React or Vue that render content in the browser, keep the toggle off. In this mode, the server mainly serves static files and all rendering happens on the client side.
Server-Side Rendering (SSR): #
If your Node.js application (for example, Next.js or Nuxt.js) renders pages on the server before sending them to the client, toggle this option on. This allows xCloud to configure the environment to support SSR processes properly.
Here we are proceeding with deploying a ‘Server Side Rendered App’ option →
Then you’ll need to provide a few essential details:
◽Port: Enter the port number your Node.js application listens on (e.g., 3000 or 8080). xCloud uses this port to connect incoming traffic to your app.
◽Start Command: Specify the command that runs your application (for example, npm start, node server.js, or yarn dev). This tells xCloud how to start your Node.js server after deployment.
◽Web Root Path: If your project’s main application files are located in a subdirectory (for instance, /app or /src), enter that path here. If your app is in the root directory, you can leave this field blank.
Now, insert the ‘Port’ and ‘Start Command’ in the respective fields. You can also specify a ‘Web Root’ Path for your application.
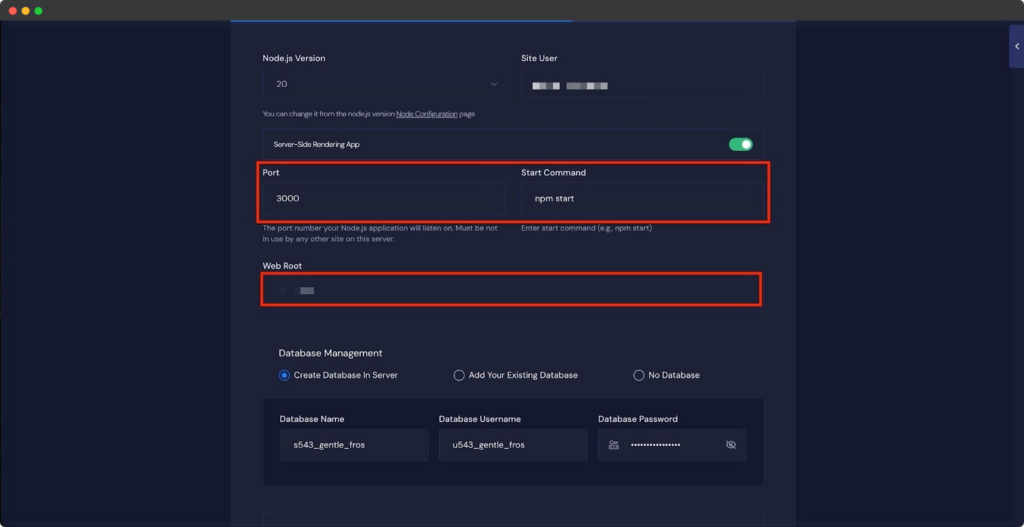
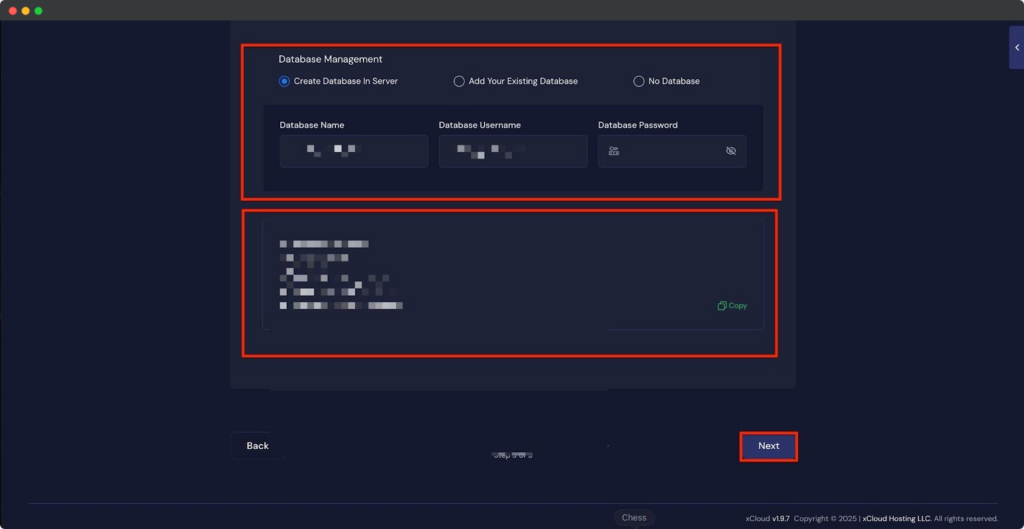
In the following step, you can choose one of the database options ‘No Database’, ‘Add an Existing Database’, ‘Create a New Database’ directly on the server. Once selected, click ‘Next’.
Step 4: Insert Git Repository Credentials #
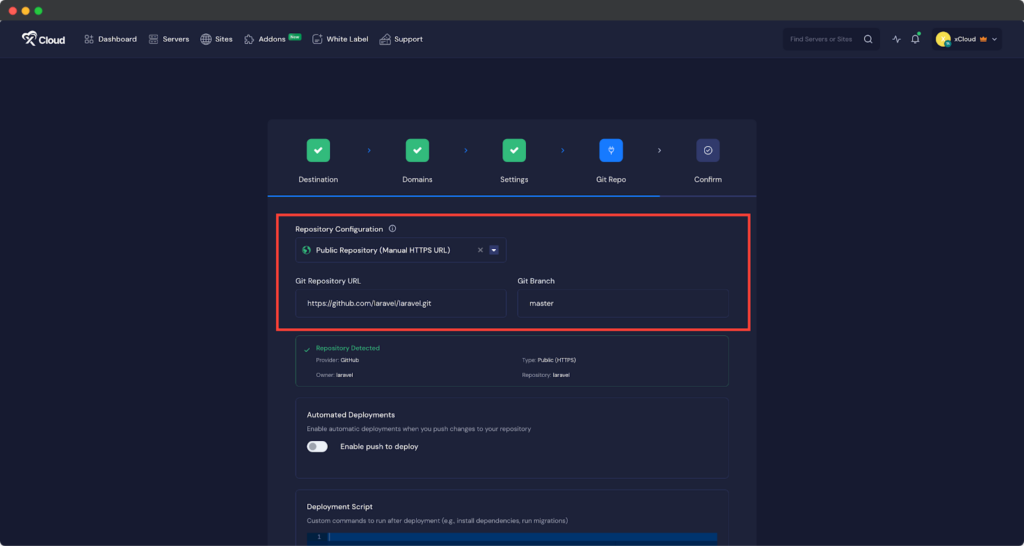
In the “Git Repo” tab, you will find three repository options: ‘Private Repository (Manual SSH URL)’, ‘Public Repository (Manual HTTPS URL)’, ‘Connected Git Provider’.
If you choose Public Repository (Manual HTTPS URL), enter your GitHub Repository URL and specify the Git Branch.
Note: Copy the HTTPS URL from your GitHub repository dashboard.
If you choose Private Repository (Manual SSH URL), enter your GitHub Repository SSH URL and specify the Git Branch.
Note: Copy the SSH URL from your GitHub repository dashboard.
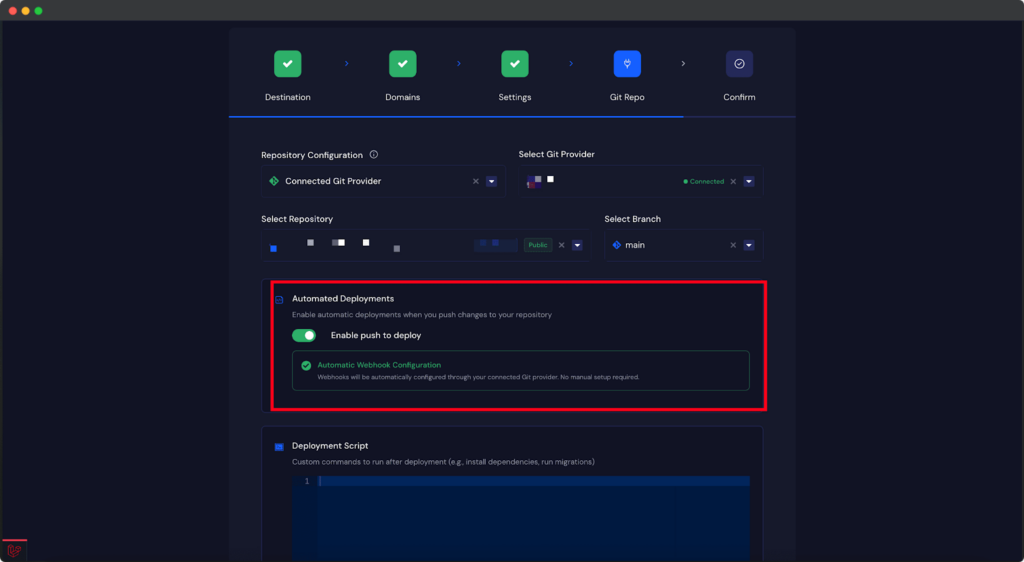
In this document, we’ll deploy the project using the “Git Provider” option.

Choose “Connected Git Provider” from the dropdown menu. From the “Select Git Provider” list, choose the connected account you want to use. Then, browse through the repositories, select the one you want to deploy and choose the specific branch of that project.
Step 5: Enable Push-to-Deploy #
The next step is to enable automated deployment. Toggle on the ‘Enable Push to Deploy’ option. Copy the ‘Deployment URL’ provided here, you will need to insert it into your GitHub repository’s webhook settings.
Step 8: Run Deployment Script #
Once the repository integration is complete, you can configure post-deployment actions.
In the ‘Deployment Script’ field, enter any custom commands you want to execute after deployment.
You can also select one of the example scripts provided. After configuring this, click ‘Next’ to continue.
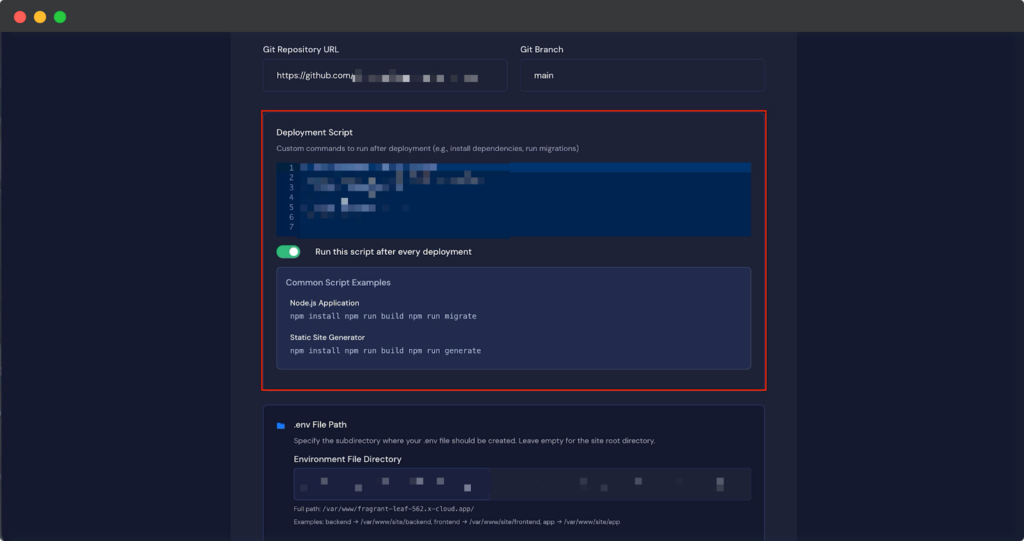
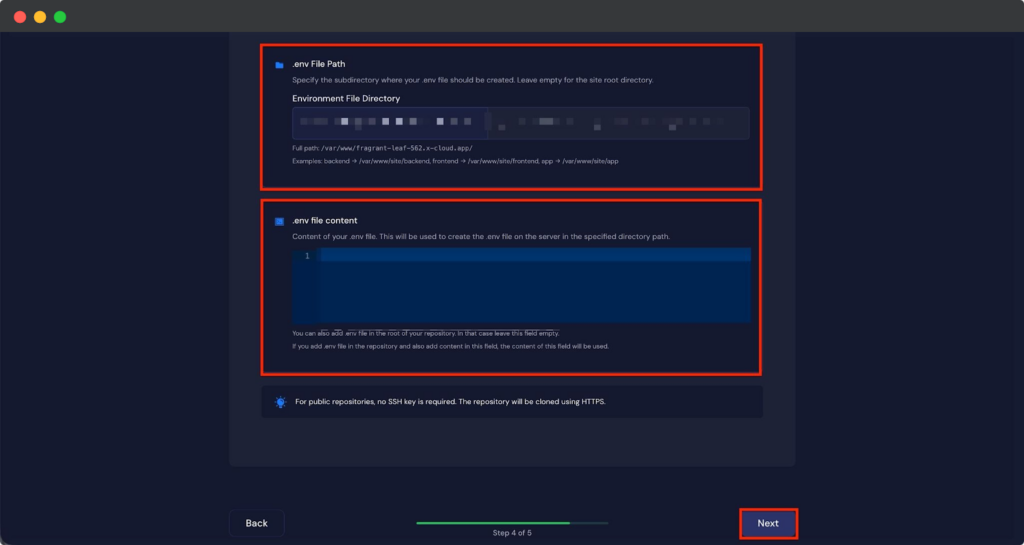
Next, you can specify the subdirectory where your .env file should be created in the “.env File Path” field. You can also enter the contents of your .env file in the “File Content” field.
Step 9: Confirm Deployment #
The final step is to confirm and start the deployment. Click the ‘Start’ button to begin the process. You can monitor the deployment progress in real time.
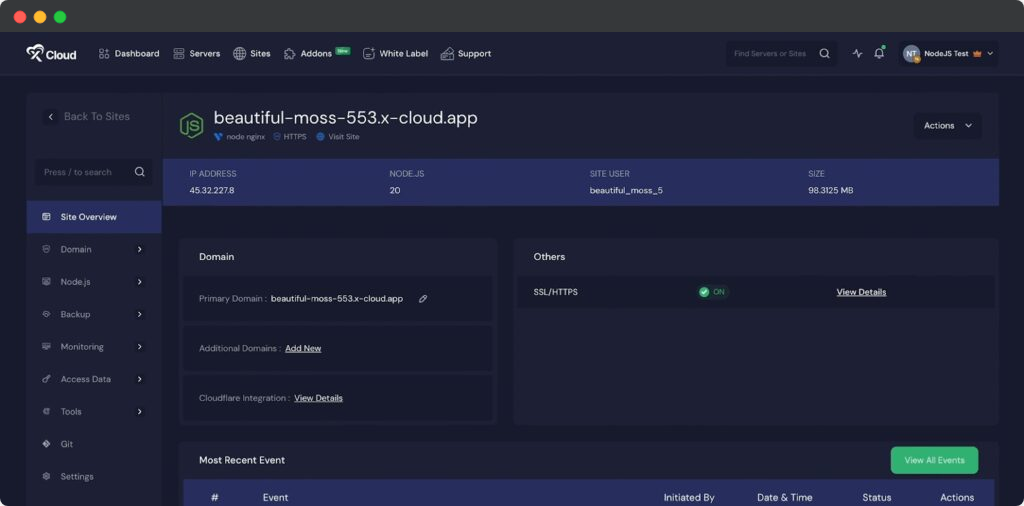
After deployment, a success message will appear. From there, access your site dashboard and visit your site to confirm your Node.js app is running on Vultr server with xCloud.
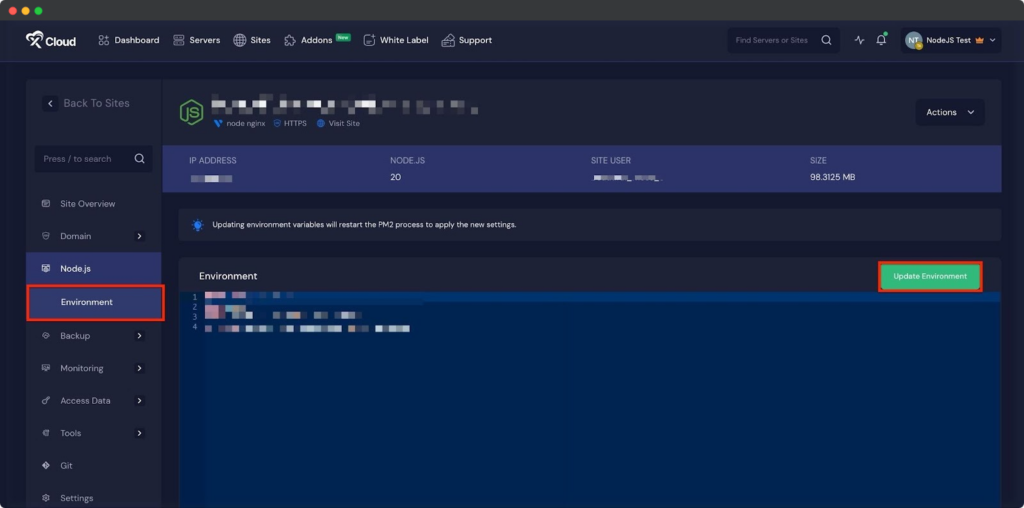
Environment Editor for Node.js Application #
The Environment section in xCloud allows you to customize configuration settings for your n8n instance. Just go to the ‘Environment’ option from the sidebar and adjust as you need then click on the ‘Save’ button.
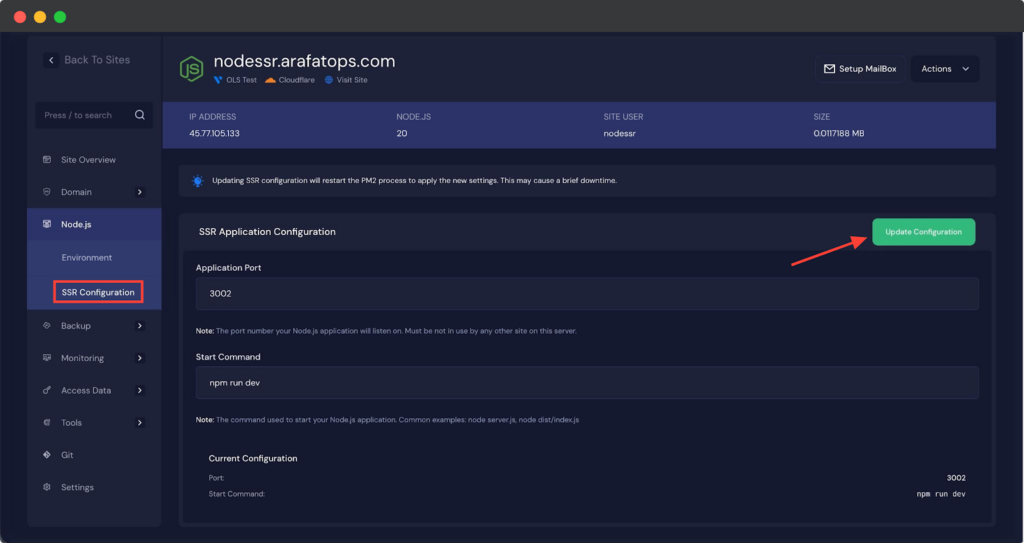
SSR Configuration for Node.js application #
If you are deploying an SSR application, you can update the ‘Application Port’, ‘Start Command’ later as well.
Just go to the ‘SSR Configuration’ from the ‘Node.js’ Menu under the site dashboard and click on the ‘Update Configuration’ button.
Setting up a Node.js application on a Vultr server with xCloud is simple and efficient. After setting up or deployment, you can manage your app, update settings and push changes directly from your Git repository.
Still stuck? Contact our support team for any of your queries.


