


Some users install Paperless-ngx on their server but cannot access the admin panel because no superuser account exists. Paperless-ngx requires an administrative user to log in and manage documents, users, and system settings. Normally, the platform creates this account through an interactive terminal command.
The issue appears when the user works from the xCloud dashboard. The Commands interface in xCloud runs commands in a non-interactive environment, which means the standard createsuperuser command cannot prompt for a username and password.
This guide explains how to solve that problem by creating a Paperless-ngx superuser directly from the xCloud Commands interface. The process uses Docker commands and environment variables to bypass the interactive prompt and create the admin account successfully.
The steps below will help you:
- Identify the correct Paperless-ngx Docker container
- Run the command required to generate a superuser
- Verify that the account was created successfully
Follow the steps to log in to the Paperless-ngx dashboard and manage your installation normally.
Step 1: Identify the Docker Container Name #
Since container names in xCloud are dynamically generated (e.g., containing unique strings like g27hx), you must first identify the exact name of your webserver container.
1. Log in to your xCloud Dashboard.
2. Navigate to Servers > Select your Server.
3. Go to Management > Commands.
4. Run the following command:
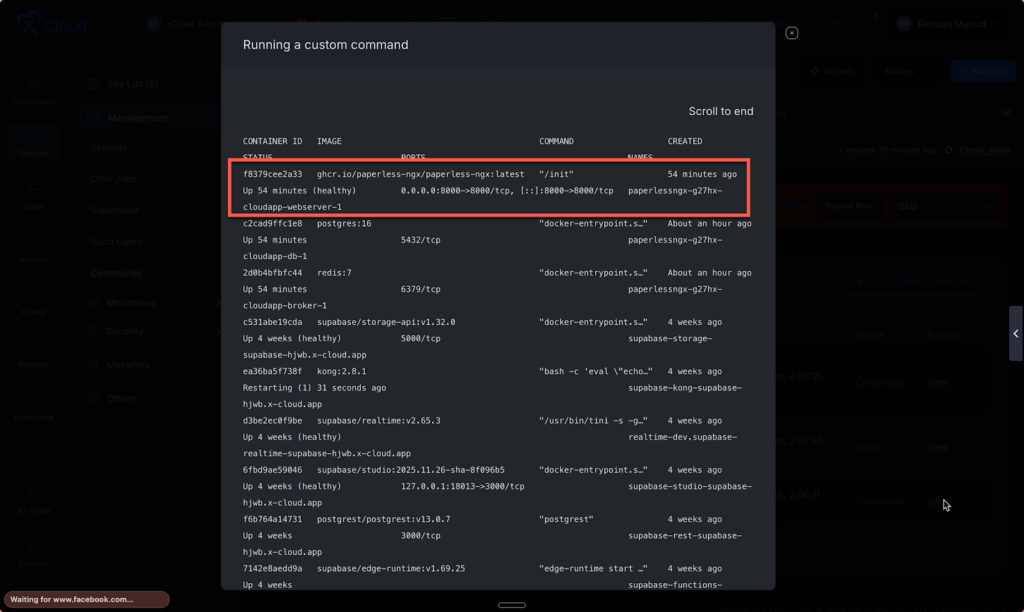
docker ps5. Look for the image associated with paperlessngx. You are looking for a name similar to:
paperlessngx-g27hx-cloudapp-web
6. server-1
Step 2: Execute the Superuser Creation Command #
Once you have the container name, you can trigger the creation of the superadmin account. Because the xCloud Command tool is non-interactive, we pass the password as an environment variable and use the –noinput flag.
- In the same Commands interface, clear the previous input.
- Paste the following command (replace [YOUR_CONTAINER_NAME] with the name found in Step 1):
docker exec -e DJANGO_SUPERUSER_PASSWORD='Pass@#123' [YOUR_CONTAINER_NAME] python3 manage.py createsuperuser --noinput --username superadmin --email superadmin@example.comSecurity Note: It is highly recommended to log in to the Paperless-ngx web interface immediately after this step to change the password from the default password.
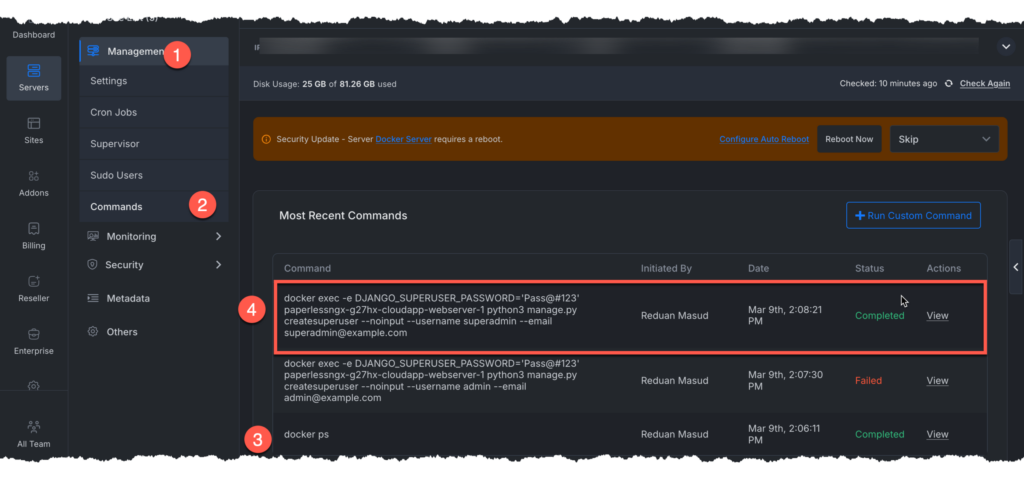
Step 3: Verification #
After running the command, the output log in xCloud should indicate:
Superuser created successfully.
You can now navigate to your Paperless-ngx URL and log in with:
- Username: superadmin
- Password: *******************
Alternative Method: SSH (Recommended) #
While the xCloud dashboard is convenient, using SSH is the most robust method for managing Docker containers. If you have SSH access configured:
1. Connect to your server via terminal: ssh user@your-server-ip.
Run the standard interactive command:
sudo docker exec -it [YOUR_CONTAINER_NAME] python3 manage.py createsuperuser
2. Follow the prompts to manually enter your desired credentials.
A missing superuser can prevent access to the Paperless-ngx admin panel. The method above solves the issue through the xCloud Commands interface by running the required Docker command with environment variables.
This process creates the admin account without an interactive terminal. Log in to the Paperless-ngx dashboard after the command finishes and change the default password immediately for security. SSH remains a good alternative if you prefer an interactive setup.
Still stuck? Feel free to contact our support team.


