


Moving your WordPress sites from Cloudways to xCloud is now seamless with xCloud’s Cloudways Full Server Migration provider. You can migrate all your WordPress sites in bulk — without root access, without manual database exports, and without touching each site individually.
xCloud handles site discovery, file transfer, database migration, and search-replace automatically. You only need your Cloudways Master Credentials to get started.
Why Migrate from Cloudways to xCloud? #
Cloudways is a managed platform — they control the server environment and limit what you can do. When you migrate to xCloud, you get:
- Full server control — root access, custom configurations, no platform lock-in
- Transparent pricing — pay for your VPS directly, not a markup on top of it
- Bring your own server — use Vultr, DigitalOcean, Hetzner, AWS, or any VPS provider
- No per-site fees — manage unlimited sites per server on one flat license
Prerequisites #
Before starting the migration, make sure the following are ready:
- A destination server provisioned in xCloud — To migrate your sites to xCloud, you need an already deployed server where your sites can be hosted. You can also create a new server to migrate your sites from Cloudways
- Cloudways Master Credentials — SSH username and password (not your Cloudways account login). You’ll find these in your Cloudways dashboard under Server → Master Credentials.
- Destination server storage — ensure at least 1 GB of free space more than the total size of your sites on Cloudways.
- Disable caching plugins — disable Object Cache Pro, Redis, or other caching on source sites before migration.
- Disable security plugins — temporarily disable Wordfence or similar security plugins on source sites.
- Clear all caches on source sites before starting.
⚠️ Note: Unlike regular Full Server Migration, you do not need root access to your Cloudways server. Cloudways manages SSH authentication through their own dashboard — xCloud handles this automatically when you select the Cloudways provider.
How to Get Your Cloudways Master Credentials #
Your Master Credentials are the SSH login details for your Cloudways server — not your Cloudways account email/password.
Log in to your Cloudways dashboard. Go to Servers and click on the server you want to migrate from.
Click the ‘Master Credentials‘ tab.
You’ll see:
- Username — your Cloudways SSH master username.
- Password — your master SSH password.
Keep these handy. You’ll enter them in xCloud in the next step.

Step 1: Start Full Server Migration & Select Cloudways #
Go to xCloud Dashboard, click on the ‘Add New Site’ → choose a server, the n click on the ‘Migrate Full Server’ under the WordPress tab.
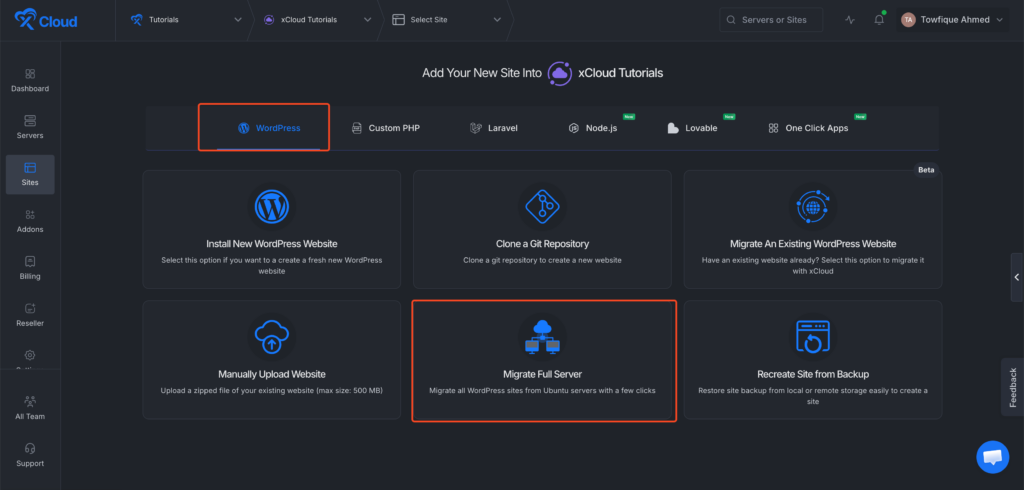
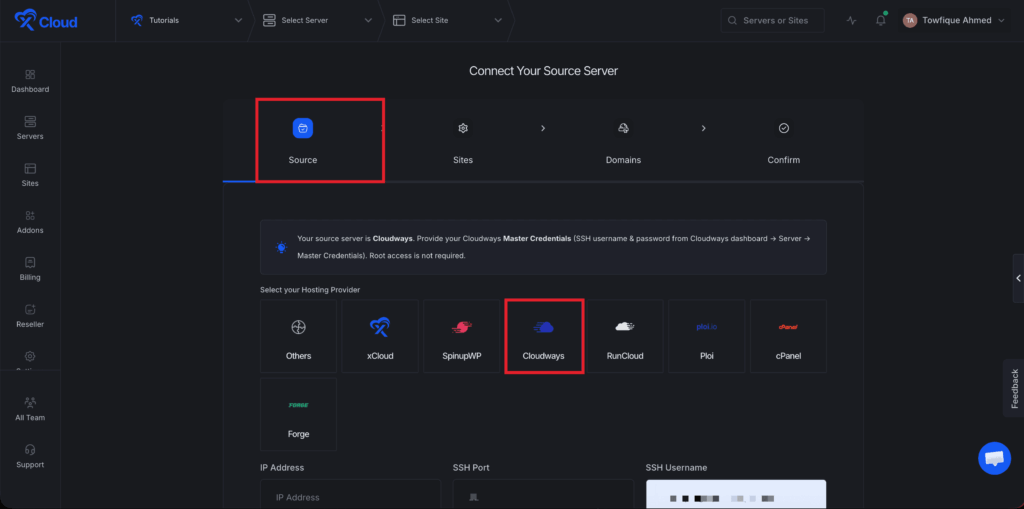
Next you will find differnet server providers options. Choose ‘Cloudways’ provider from the ‘Source’ page.
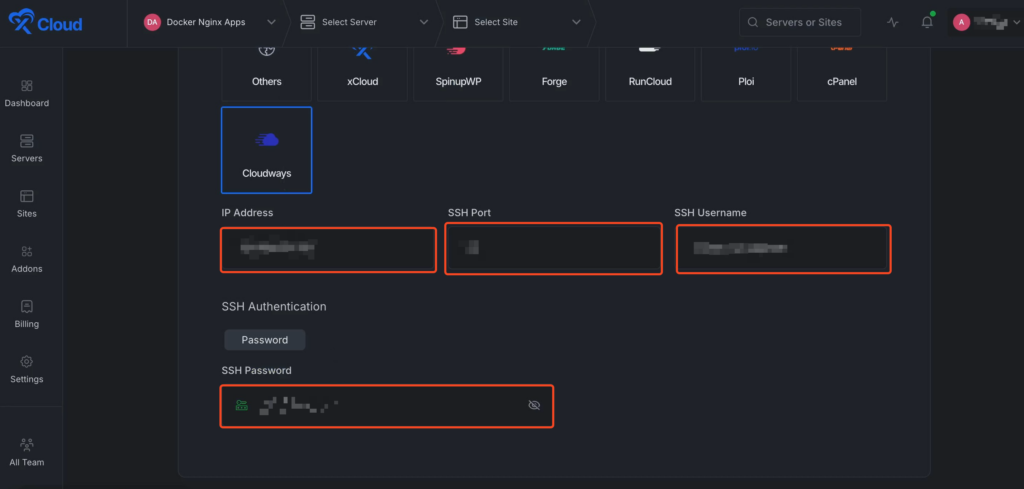
Step 2: Enter Your Cloudways Server Credentials #
Once you select Cloudways as the provider:
- IP Address — enter the public IP address of your Cloudways server (found in Cloudways dashboard → Servers)
- Port — leave as
22(default SSH port) - SSH Username — enter your Cloudways Master Credentials username (e.g.
master_abc123)
💡 Unlike regular Full Server Migration, where the username is locked to root, Cloudways requires your master username. The username field is editable when Cloudways is selected.
4. Authentication — automatically set to Password (public key option is hidden for Cloudways, since Cloudways manages SSH keys through their own dashboard)
5. Password — enter your Cloudways Master Credentials password
- Click Next to verify the connection and proceed to the next steps.
xCloud will connect to your Cloudways server and automatically discover all WordPress installations under your Cloudways applications directory.
Step 3: Select the Sites to Migrate #
After a successful connection, xCloud scans your Cloudways server and lists all WordPress sites.
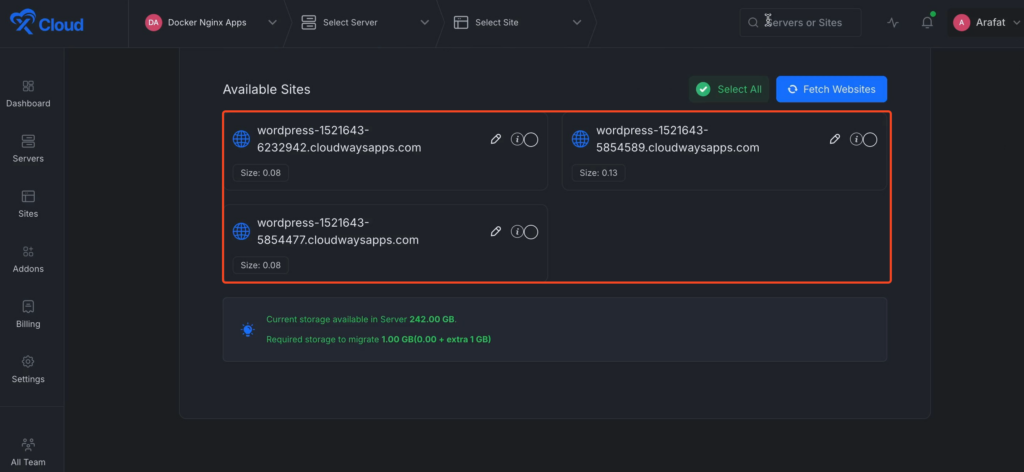
Select the sites you want to migrate — you can select all or choose specific ones. Click Next to proceed.
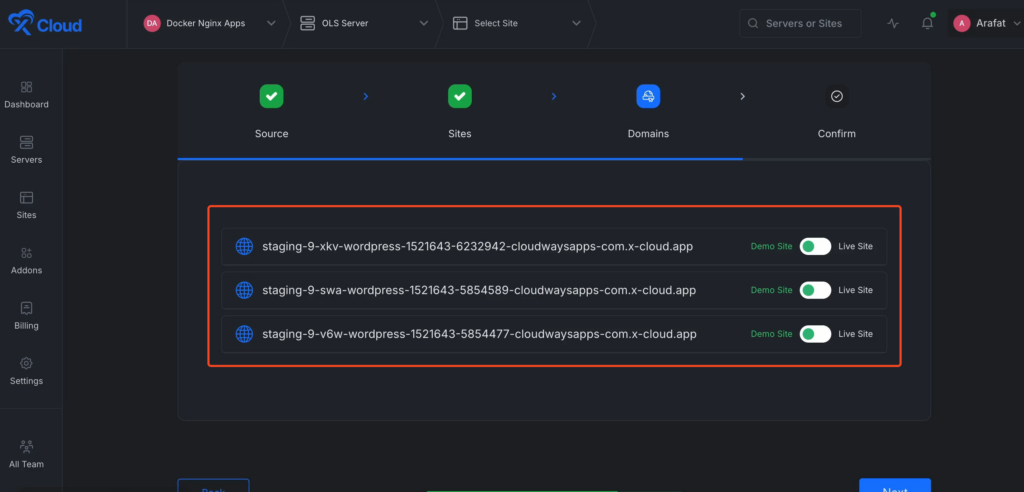
Step 4: Choose Migration Mode — Go Live or Demo #
For each site, choose how you want it to land on xCloud:
- Go Live– Migrates directly to the same domain, point your DNS to xCloud when ready
- Demo Site: Creates a site using an xCloud demo domain.
Toggle your preferred option for each site and click on Next button to start migration.
⚠️ Make sure your destination server has at least 1 GB free storage beyond your total site sizes. Check Server Overview → Disk Usage before starting.
Step 5: Wait for Migration to Complete #
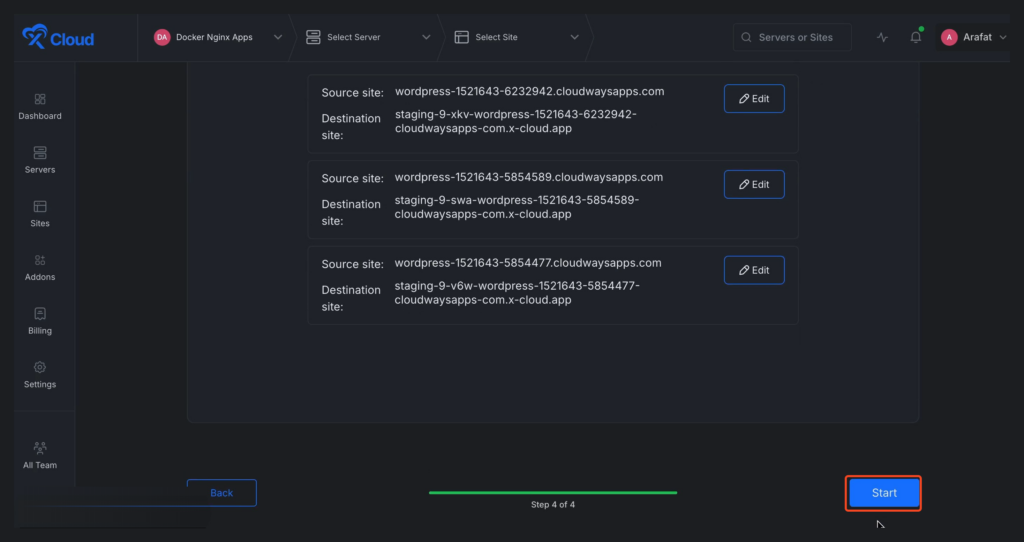
Next verify the informations and click on the the ‘Start’ button.xCloud handles the entire migration process automatically:
- File transfer — rsyncs all site files from Cloudways to xCloud
- Database export — dumps the database from Cloudways (
mysqldumpwith managed hosting compatibility) - Database import — imports into the new server’s MySQL/MariaDB
- Search & Replace — updates URLs in the database if domain or path changes
Migration time depends on the total size of your sites. You’ll see real-time progress in the xCloud dashboard.
Step 6: Verify & Go Live #
Once migration is complete:
- Test your sites using the Demo URL (if you chose Demo mode) or by editing your local
hostsfile - Verify content, images, plugins, and functionality look correct
- When ready, point your DNS to your new xCloud server’s IP address
- SSL certificates are automatically provisioned by xCloud after DNS propagates
And that’s it this is how easily, you can migrate your sites from Cloudways easily.
Still stuck? Feel free to reach to our support team.


