

How to Manage PHP Extensions With xCloud
Updated June 10, 2026 · 6 min read
xCloud’s PHP extensions add extra capabilities to PHP, such as image processing, caching, and database support. With xCloud, you can install or remove these extensions for a specific PHP version directly from your server dashboard without connecting through SSH or editing configuration files by hand.
The Manage PHP Extensions panel shows every extension that is already installed on the server, along with the extensions that are available to add. Some extensions are marked as Core because PHP requires them to run; these are protected and cannot be removed.
How PHP Versions And Extensions Work in xCloud
In xCloud, PHP extensions are tied to a specific PHP version, not to the server as a whole. Every PHP version ships with its own set of extensions, so the Installed Extensions and Available Extensions lists you see always depend on the version selected in the panel.
An extension that is offered for one PHP version may not exist for another, which is why the same server can show different extensions when you switch versions.
Which PHP versions you can choose from depends on the web server stack your server runs on. xCloud supports two web server stacks, and each one offers its own range of PHP versions:
| Web Server Stack | Supported PHP Versions |
|---|---|
| OpenLiteSpeed (OLS) | PHP 8.1, 8.2, 8.3, 8.4 and 8.5 |
| NGINX | PHP 5.6, PHP 8.0 – 8.5 and PHP 7.0 – 7.4 |
A small group of extensions in every version are labelled Core. These are the extensions PHP must load to serve a website on that version; without them, the sites running on that PHP version would not work at all. Because they are mandatory, Core extensions are protected: xCloud does not display a Remove button for them, and they stay installed for as long as that PHP version exists on the server.
Before You Begin
Before you open the panel, take a moment to confirm the following:
Before you begin, make sure you have access to the xCloud team where the server is hosted and know which PHP version your site is using, since extensions are managed separately for each PHP version installed on the server.
You should also identify the extension you want to install or remove. If you plan to remove an extension, first verify which extensions your websites actually depend on to avoid uninstalling one that a live site requires. Taking a moment to confirm this beforehand can prevent unexpected site issues and is far easier than troubleshooting and recovering a broken website later.
Note: Installing or removing an extension restarts the PHP service for that version so the change can take effect; PHP-FPM on NGINX servers or the LiteSpeed Web Server (lsws) on OpenLiteSpeed (OLS) servers.
Either way, every site running on that PHP version is briefly affected, so where possible, make changes during a low-traffic window.
Step 1: Open the Manage PHP Extensions Panel
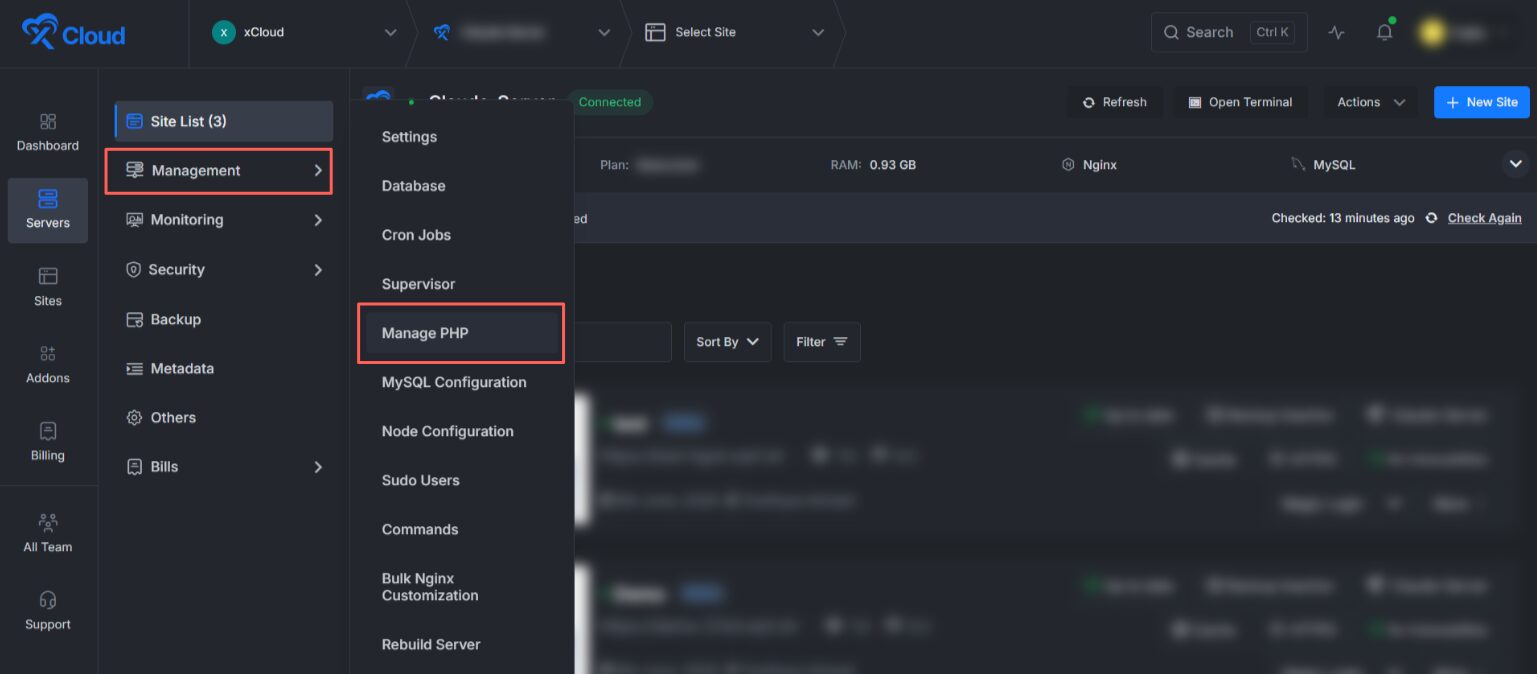
From your xCloud dashboard, go to ‘Servers’ and select the server you want to manage. Open the ‘Management’ menu, then click ‘Manage PHP’.
On the Manage PHP page, select the ‘Manage PHP Extensions’ tab. xCloud loads the list of extensions for the PHP version shown in the dropdown at the top-right corner.
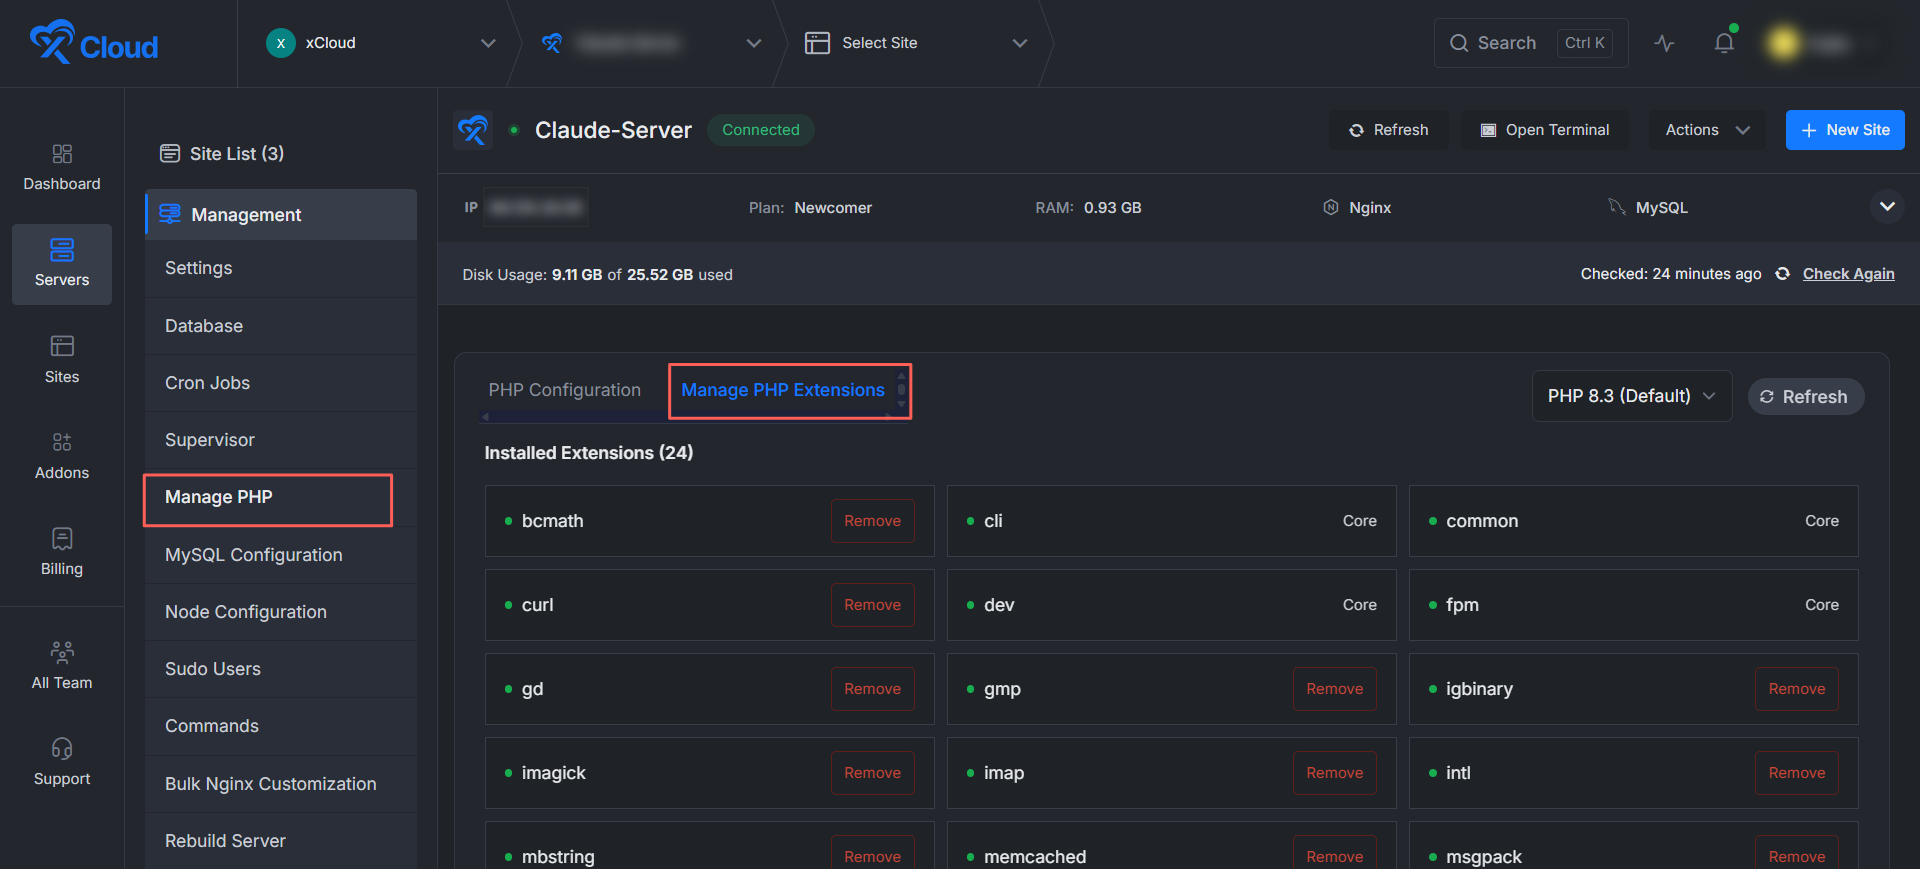
Inside the Manage PHP Extensions Panel
The Manage PHP Extensions panel is divided into two sections.
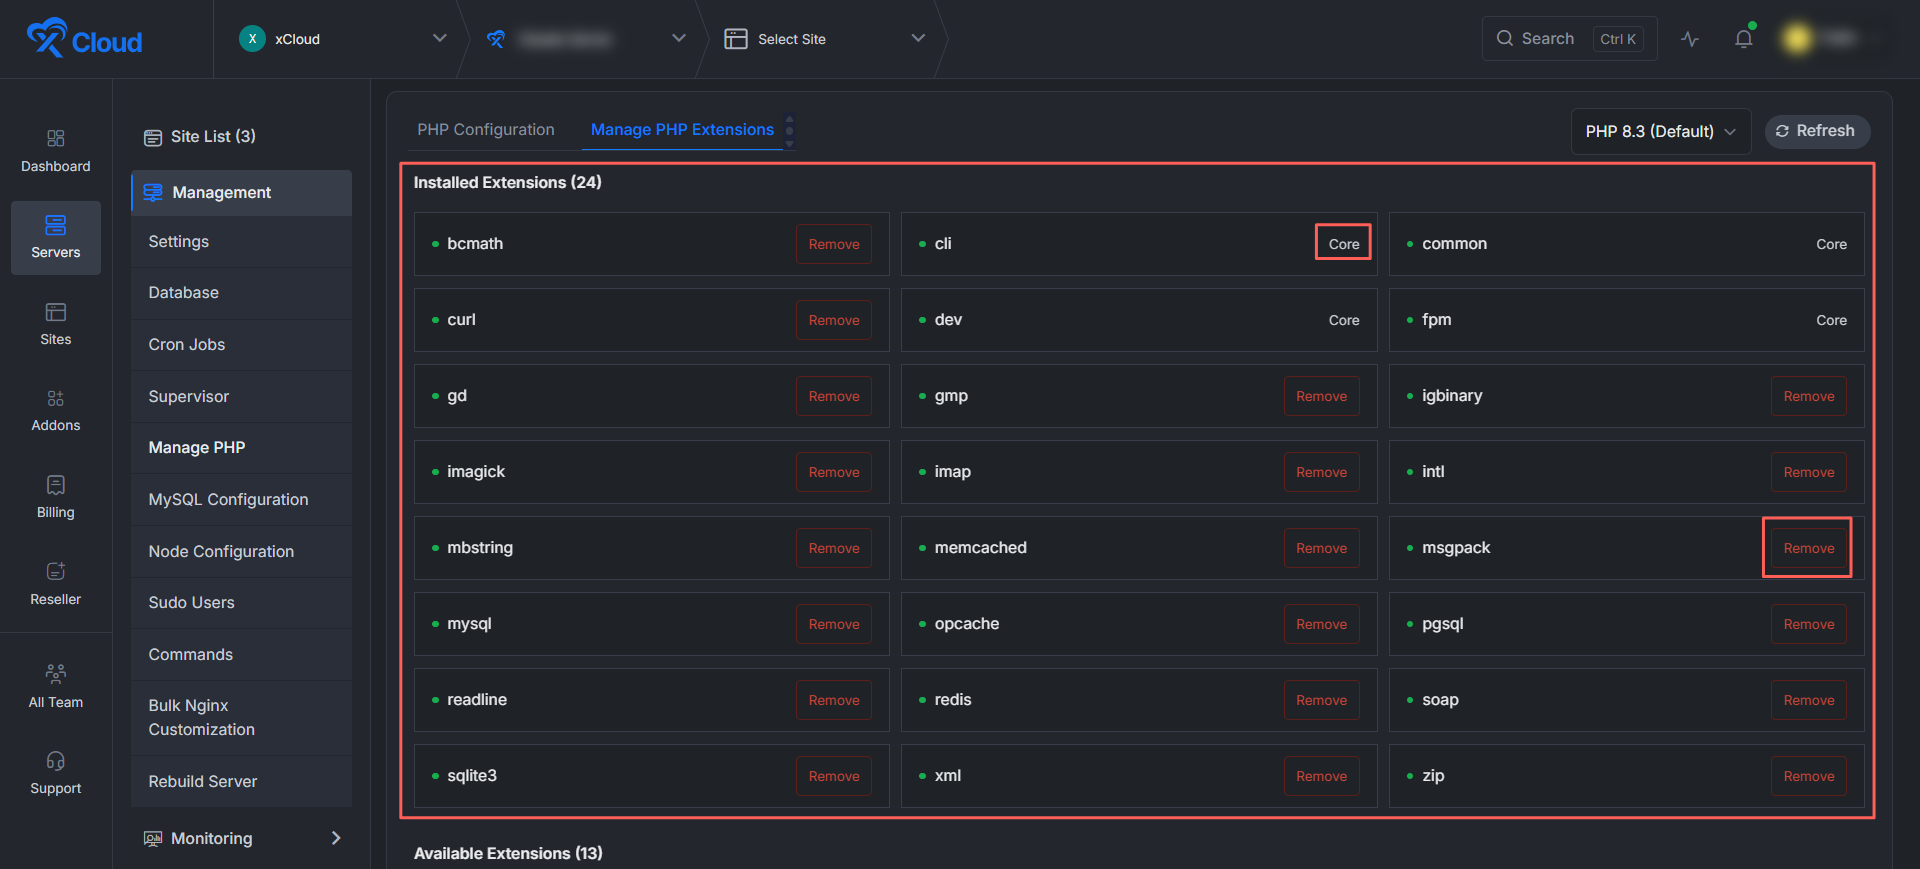
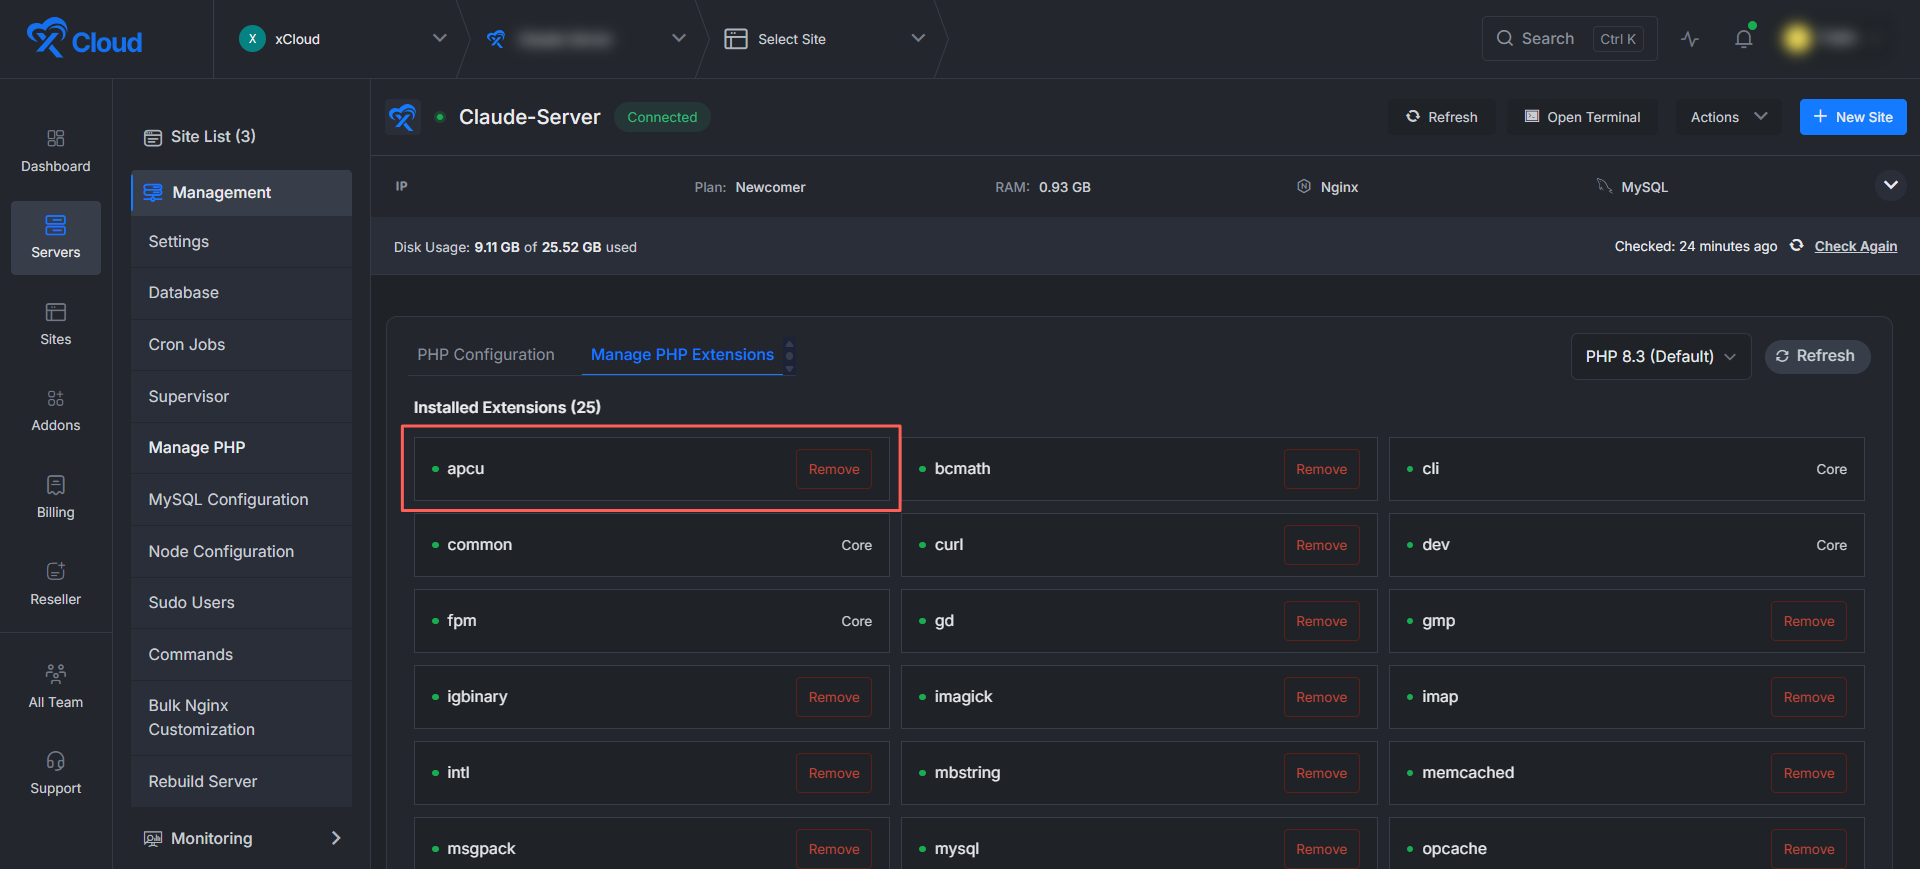
‘Installed Extensions’ lists every extension currently enabled for the selected PHP version, along with the total count shown in the heading.
Extensions you can remove display a ‘Remove’ button. Extensions marked Core are required by PHP and are protected.
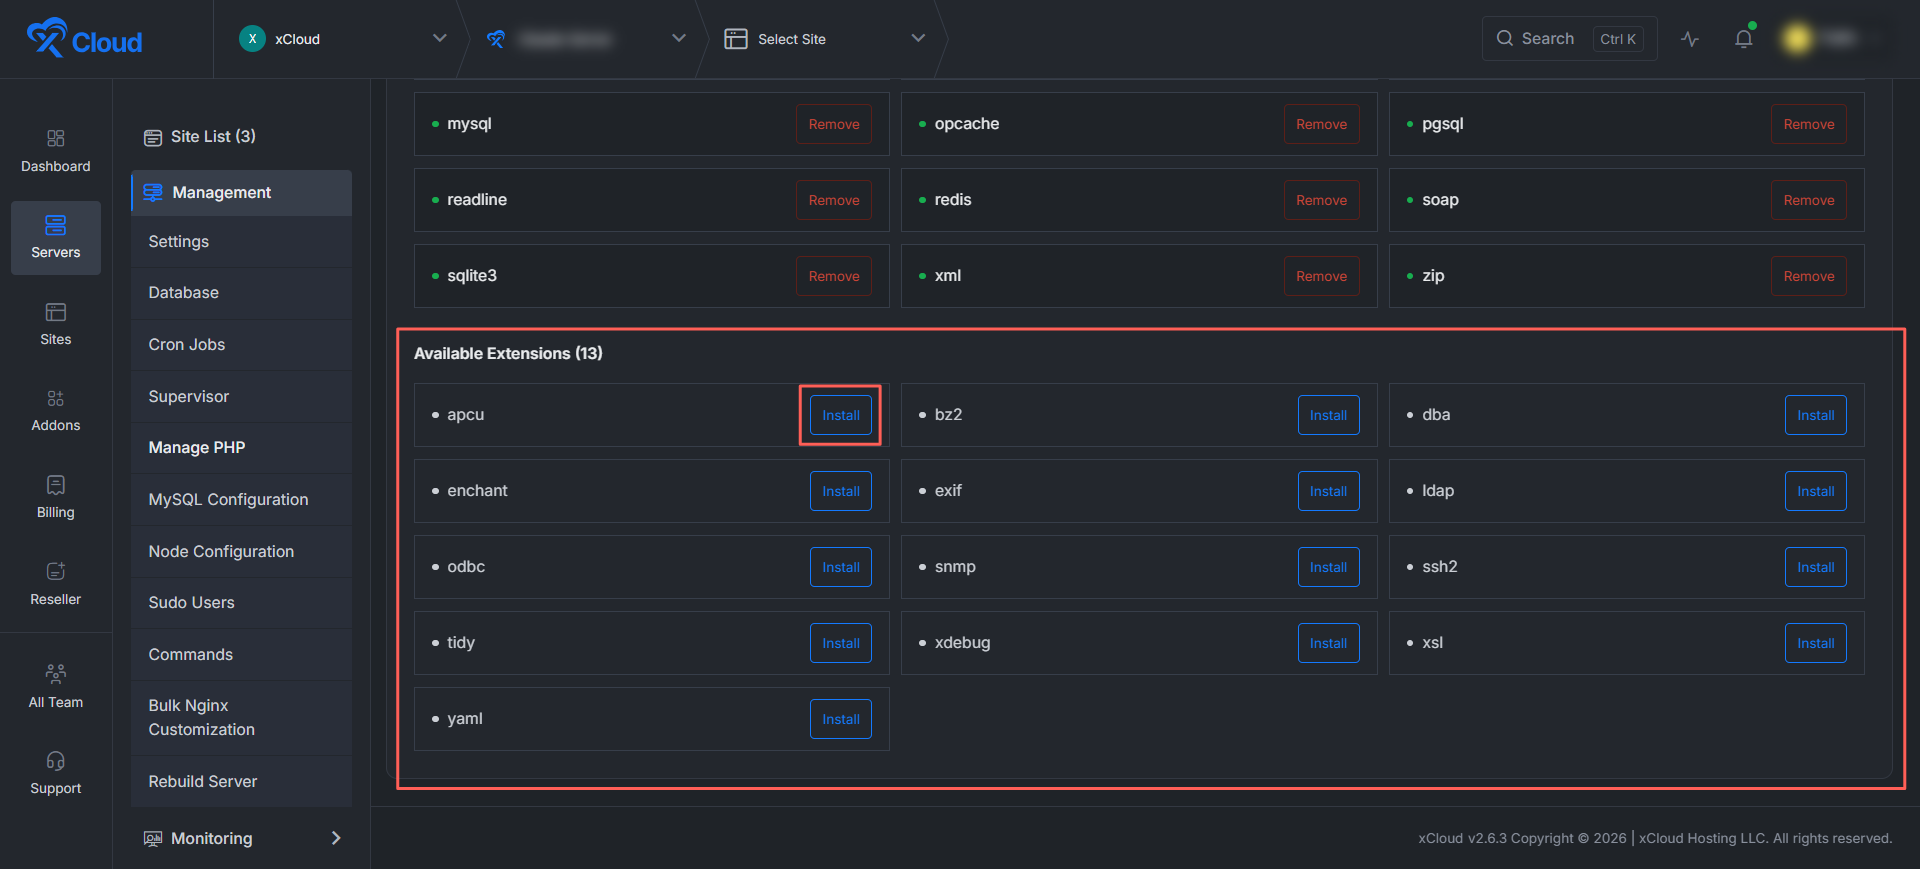
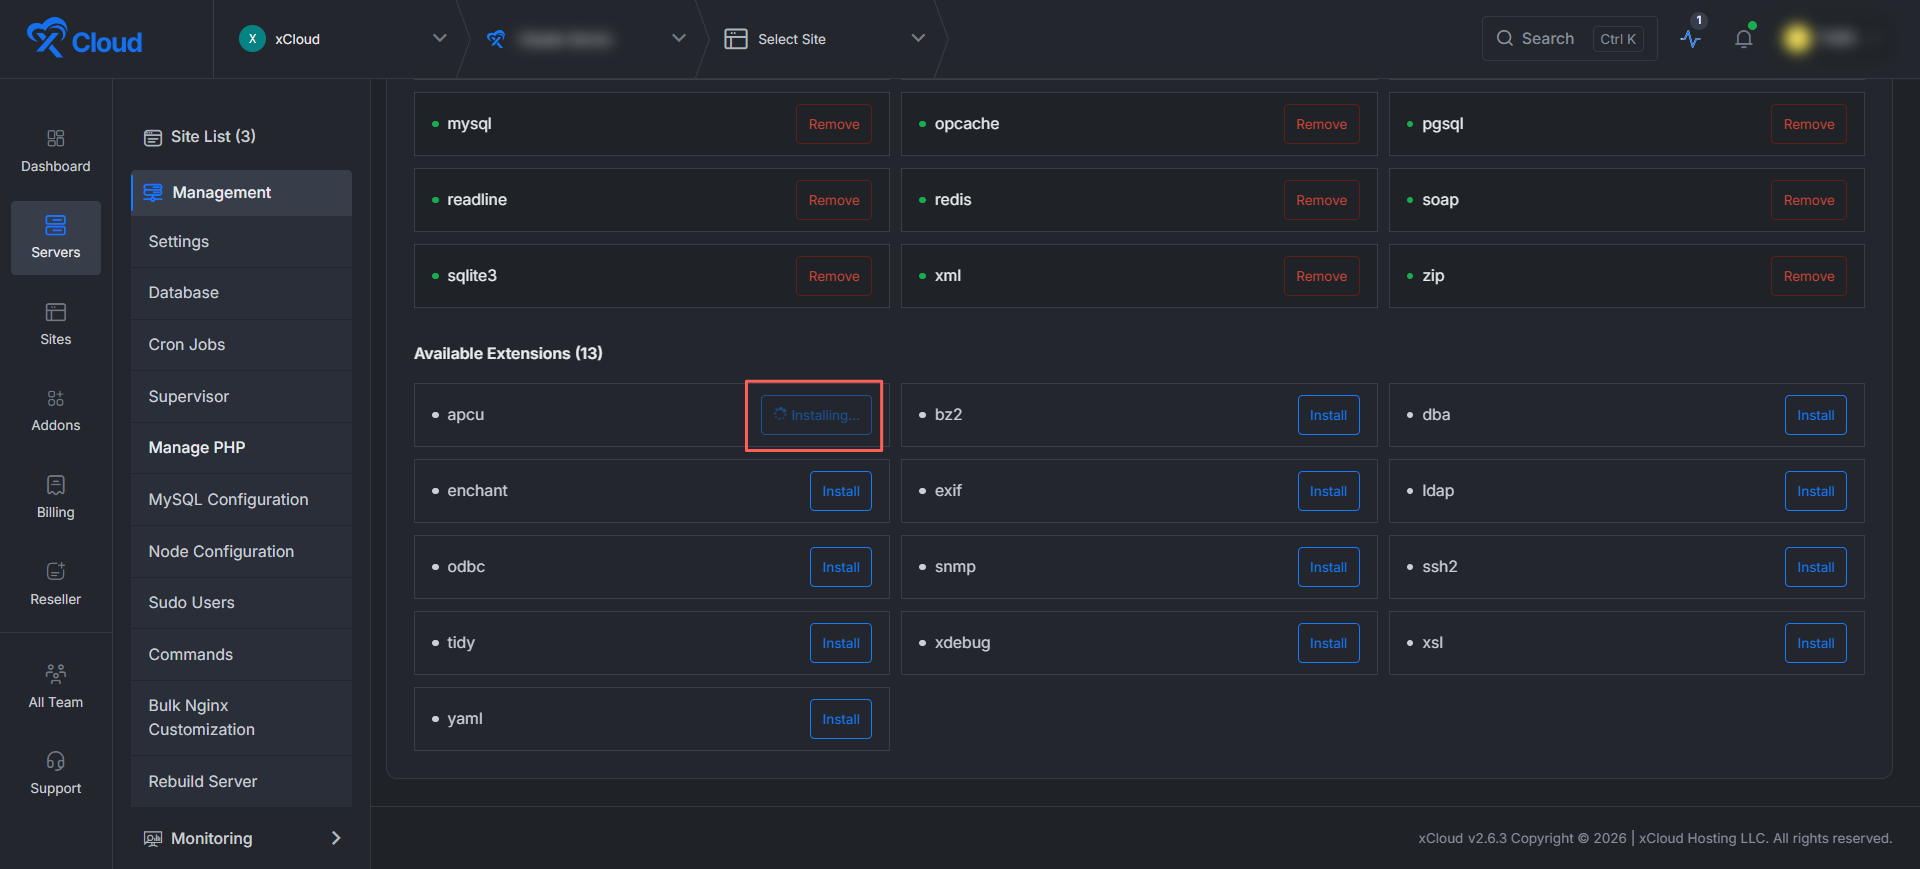
‘Available Extensions’ lists every extension that is supported but not yet installed for the selected PHP version. Each available extension displays an ‘Install’ button.
Step 2: Install a PHP Extension
In the ‘Available Extensions’ section, find the extension you want to add and click the ‘Install’ button. The button changes to ‘Installing…’ while xCloud adds the extension and restarts the PHP service for that version (PHP-FPM on NGINX, or lsws on OpenLiteSpeed).
Once the process completes, the extension moves to the ‘Installed Extensions’ section and the installed count increases. In the example below, apcu has been installed.
Step 3: Remove a PHP Extension
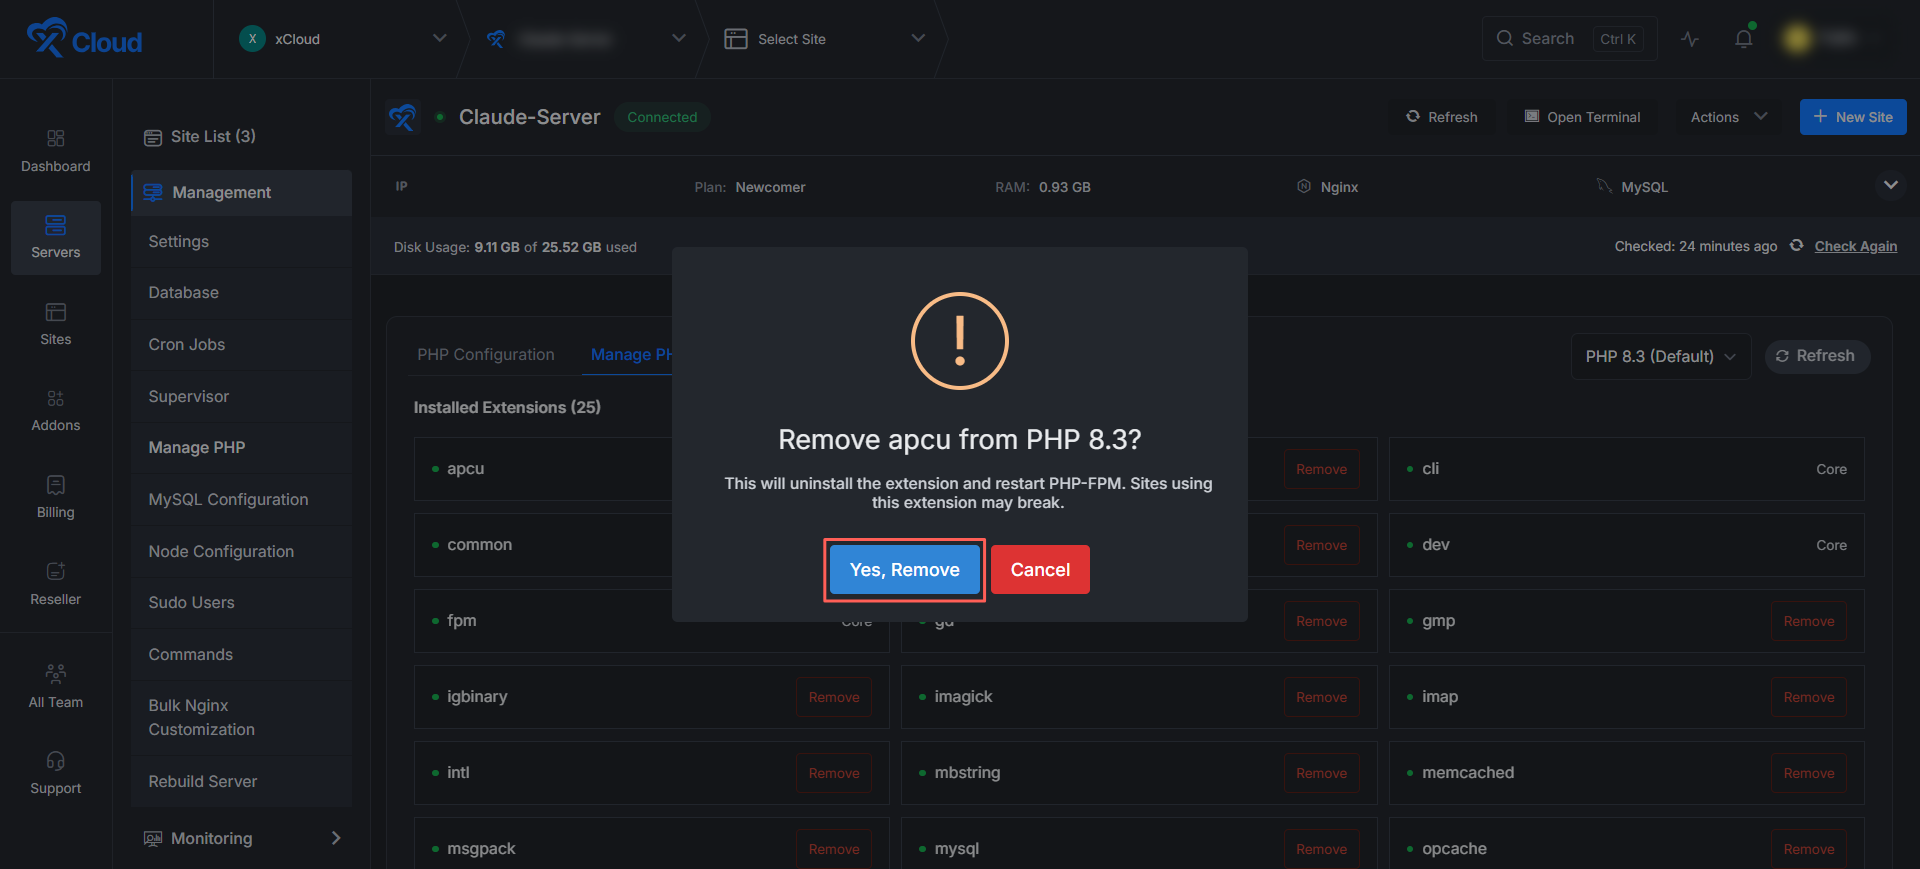
You can remove any extension that shows a ‘Remove’ button; Core extensions cannot be removed. In the ‘Installed Extensions’ section, click the ‘Remove’ button next to the extension you want to uninstall.
A confirmation dialog appears, warning that the extension will be uninstalled, that the PHP service for that version will restart (PHP-FPM on NGINX or the LiteSpeed Web Server on OpenLiteSpeed) and that sites using the extension may stop working. Click ‘Yes, Remove’ to continue or ‘Cancel’ to keep the extension.
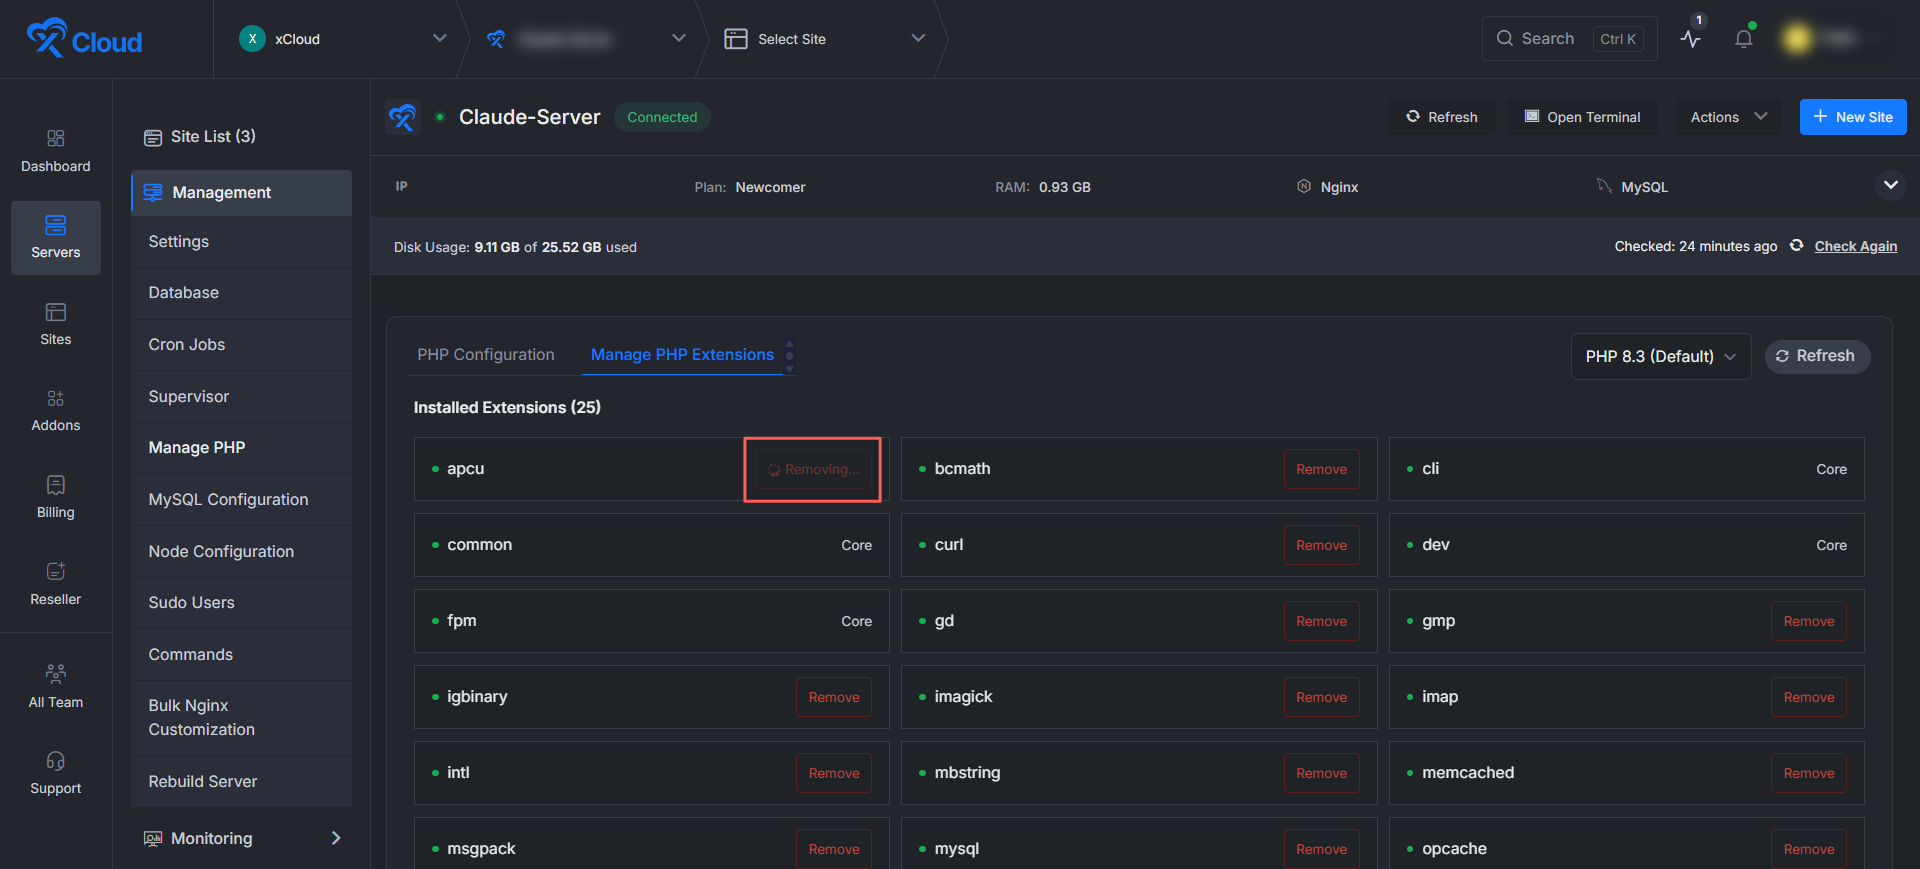
The button changes to ‘Removing…’ while xCloud uninstalls the extension and restarts that PHP service. Once the process completes, the extension returns to the ‘Available Extensions’ section and the installed count decreases.
Step 4: Switch PHP Version And Refresh the List
Because extensions are managed separately for each PHP version, you will switch versions whenever you want to view or change the extensions of a different version. Use the PHP version dropdown in the top-right corner to choose the version whose extensions you want to view or change.
After you select a version, the ‘Installed Extensions’ and ‘Available Extensions’ lists update to match it. If a change does not appear right away, click ‘Refresh’ to reload the list.
Troubleshooting
The Extension You Need Is Not in the Available List
If an extension does not appear in either the Installed or Available list, it may not be supported for the PHP version you have selected. Remember that each PHP version has its own set of extensions, so availability genuinely differs between versions.
Switch to a different PHP version using the dropdown, then click Refresh. If the extension is already installed, it will appear in the Installed Extensions section instead.
A Site Stopped Working After You Removed an Extension
Removing an extension uninstalls it for every site that uses the selected PHP version. If a site breaks, return to the Available Extensions section and click Install to add the extension back. The site should recover once the PHP service restarts (PHP-FPM on NGINX, or lsws on OpenLiteSpeed).
The Extension List Did Not Update
If the Installed or Available list does not reflect your most recent change, click the Refresh button in the top-right corner to reload the current state for the selected PHP version.
Still stuck? Contact our support team for any of your queries.