


xCloud helps you open a fully functional command-line web terminal for your servers and sites directly inside the dashboard, right from your web browser. Instead of configuring an SSH client, copying key files and connecting manually, you can launch a secure terminal session with a single click and start running commands straight away.
Why Use the Built-in Terminal? #
Traditionally, accessing a server through the command line means setting up an SSH connection, managing private keys, and remembering host details, a process that can be slow and error-prone, especially for teams. xCloud removes that friction by bringing the terminal into the dashboard itself.
With the built-in terminal you can:
- Connect Instantly: Open a live terminal in your browser without any local SSH setup or key management.
- Choose the Right Access Level: Open a Server terminal as the root user, as a specific Sudo user or scope a terminal to an individual Site.
- Control Access with Permissions: Decide exactly which team members can use each type of terminal through role-based permissions.
- Work Faster And Safer: Run scripts, check logs and troubleshoot in real time from anywhere, on any device.
Follow the guide below to enable the necessary permissions and access each type of terminal through a step-by-step process.
Step 01: Set the Required Role Permissions #
Before anyone can open a terminal, the correct permissions must be enabled for their role. From your xCloud dashboard, open the team member’s Role Permission page and make sure the relevant terminal permissions are switched on under the Server and Site sections.
From the left sidebar, click ‘All Team’. Navigate to the team member you want to manage, then click ‘Change Role’ to access the role permission settings and make the necessary changes. In the Server and Site sections, enable the permissions that match the access each user needs:
Navigate: Dashboard → All Team → Change Role → Role Permission
Enable the permissions that match the access each user needs:
- Server:terminal-root → Allows opening the Server terminal as the root user.
- Server:terminal-sudo → Allows opening the Server terminal as a Sudo user.
- Site:terminal → Allows opening a terminal scoped to a specific Site.
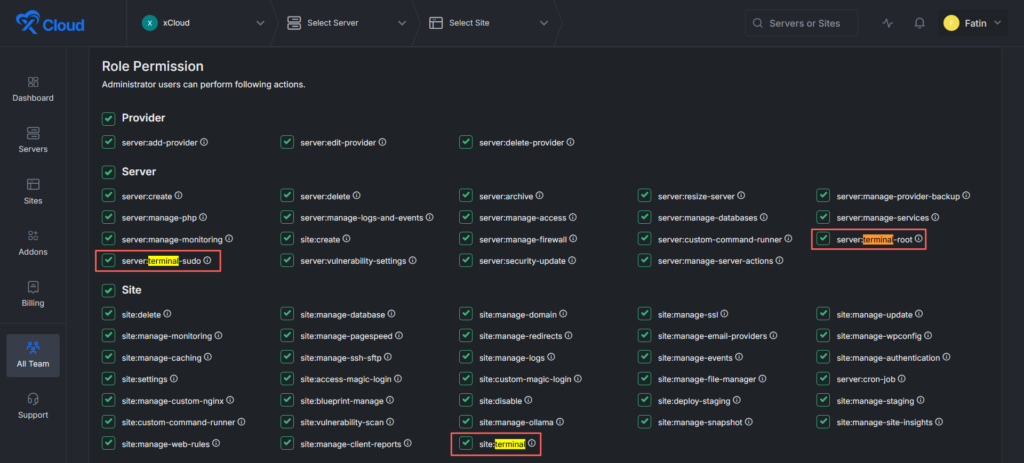
Note: If a user does not see the ‘Open Terminal’ option, it usually means the matching permission above has not been enabled for their role.
Step 02: Open the Web Terminal as Root #
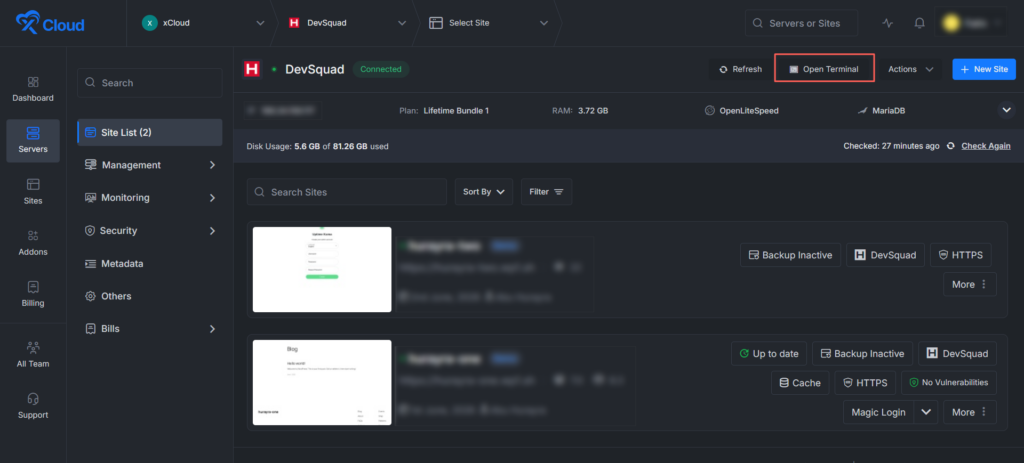
Root access gives you full administrative control over the entire server. From the left menu, go to Servers and select the server you want to manage. On the server overview screen, click the ‘Open Terminal’ button in the top-right corner.
From the left sidebar, click ‘Servers’. Select the server you want to manage to open its overview screen. In the top-right corner, click ‘Open Terminal’.
Navigate: Dashboard → Servers → Select Your Server → Open Terminal
A secure terminal session opens in your browser, connected to the server as the root user. Use this when you need to:
- Perform server-wide configuration or maintenance tasks.
- Install software or manage services that require root privileges.
- Inspect system-level logs and processes across the whole server.
Note: Because root has unrestricted access, reserve it for tasks that genuinely require it and rely on Sudo users for routine work.
Step 03: Open the Web Terminal as a Sudo User #
A Sudo user has elevated server access for administrative tasks while maintaining controlled permissions.
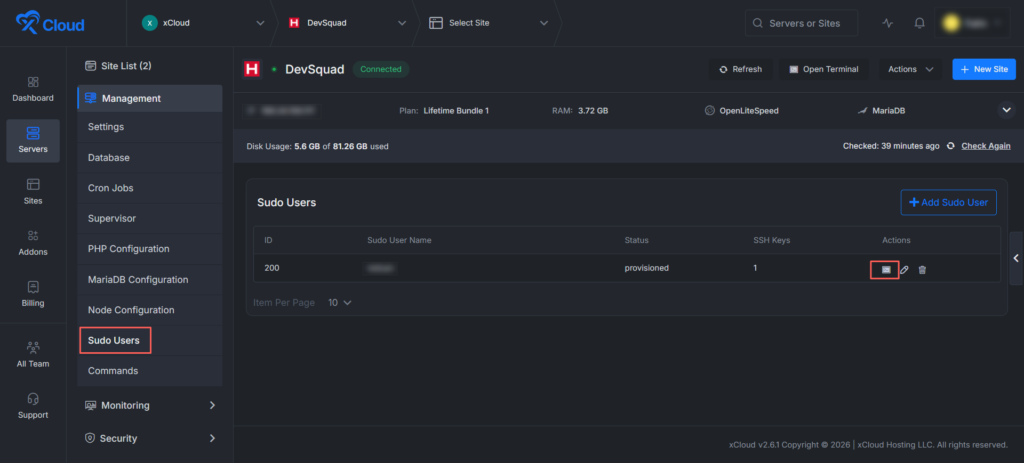
To view Sudo users, select your server, open ‘Management’ from the left menu and click ‘Sudo Users’. You will see a list of all Sudo users available on that server.
Navigate: Servers → Select Your Server → Management → Sudo Users → Terminal Icon
Find the user you want to use, then in the Actions column click the terminal icon to launch a session as that Sudo user.
- Each terminal runs with the permissions of the chosen Sudo user.
- Ideal for delegating server access to team members without sharing root.
- You can manage these accounts any time using ‘+ Add Sudo User’ on the same page.
Step 04: Open the Site Web Terminal #
A site web terminal is scoped to a single website, so you can work within that site’s environment without affecting the rest of the server.
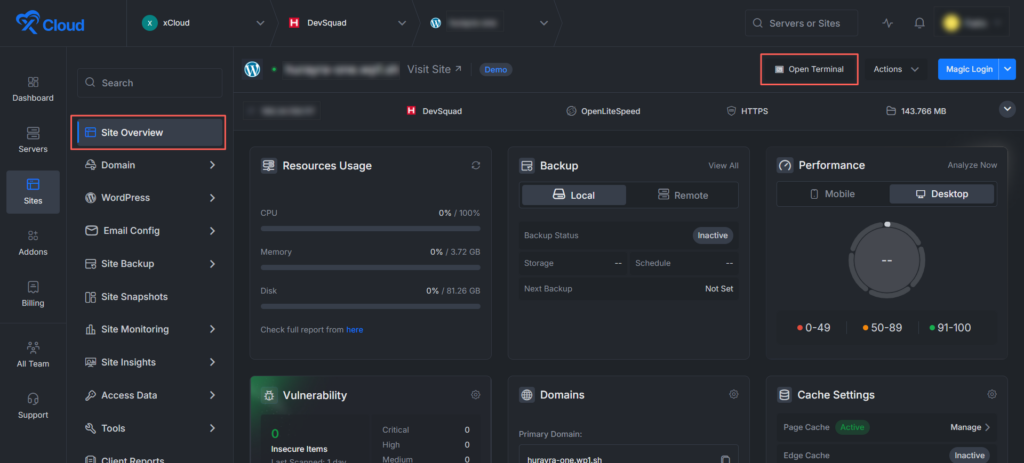
From the left menu, go to ‘Sites’ and select the site you want to manage. On the Site Overview screen, click the ‘Open Terminal’ button in the top-right corner.
Navigate: Dashboard → Sites → Select Your Site → Open Terminal
The terminal opens in the context of that specific site, which is perfect for:
- Running WP-CLI or site-specific commands.
- Managing files and folders inside the site directory.
- Debugging or maintaining one site without touching others on the server.
Step 5: Start Working in Your Terminal #
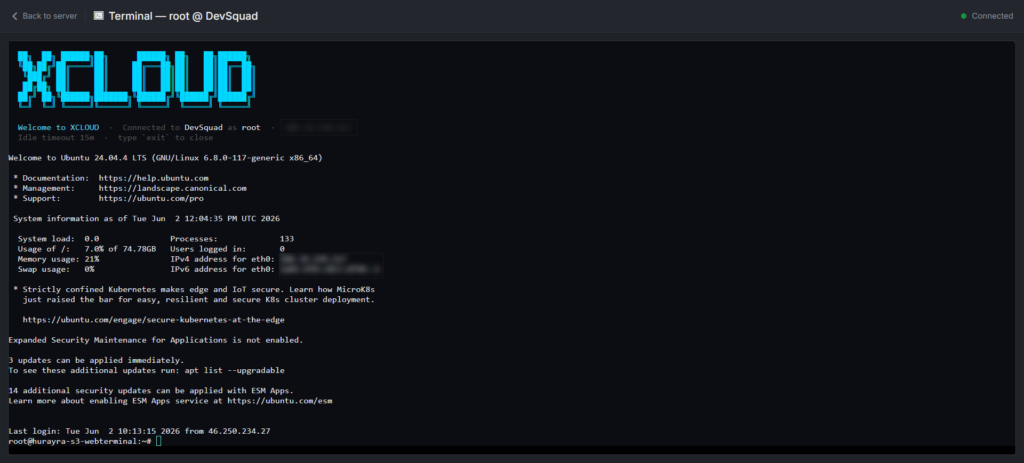
Whichever option you choose, xCloud opens a live, secure terminal session in your browser. A welcome banner confirms the connection for example, Terminal root @ DevSquad with a Connected status in the top-right and shows your server’s system information before handing you the command prompt.
From here you’re ready to work just as you would over SSH:
- Confirm the session details at the top, including the user you’re connected as (such as root) and the server name.
- Review the system summary, such as: operating system, system load, disk and memory usage, IP address, and pending updates to get a quick health check at a glance.
- Type your commands at the prompt to manage your server or site in real time.
- When you’re finished, type exit to close the session. Note the idle timeout (15 minutes) automatically ends inactive sessions to keep your server secure.
Note: You can copy the terminal’s URL and open the session in a separate browser tab. The terminal stays accessible from that link until you exit the session, handy for keeping a terminal open alongside the rest of your dashboard. Once you type exit, the link is closed and a new session must be opened from the dashboard.
That’s It! You can now open a terminal for your servers and sites directly from the xCloud dashboard as root, as a Sudo user or scoped to a single site without ever leaving your browser. Choose the access level that fits the task and you are ready to manage everything in real time.
Still need a hand? Our support team is always happy to help. If you have any questions, feel free to reach out to our Support Team or explore more guides in the xCloud Documentation.


