

How to Connect xCloud MCP to Your AI Agent
Updated October 9, 2026 · 5 min read
Managing servers usually means opening the dashboard, finding the right site, clicking through a few screens, and repeating that every time you need something. xCloud MCP removes that step.
MCP (Model Context Protocol) is an open standard that lets AI agents connect to external tools and act on your behalf. With xCloud MCP connected, you can ask your agent to check a server’s health, run a backup, update plugins, purge a cache, deploy a site, or pull the latest vulnerability scan — and it does it through your xCloud account. No dashboard, no tab switching.
Setup overview
The xCloud MCP server is built into xCloud and hosted at one endpoint. These four facts are all a client needs; the sections below show where each client takes them.
| MCP endpoint | https://app.xcloud.host/mcp |
| Transport | Streamable HTTP |
| Authentication | OAuth in the browser (recommended), or an API key with the mcp:invoke scope sent as Authorization: Bearer YOUR_TOKEN |
| Compact profile | https://app.xcloud.host/mcp?profile=compact, five tools instead of one per operation, for clients that cap the tool list |
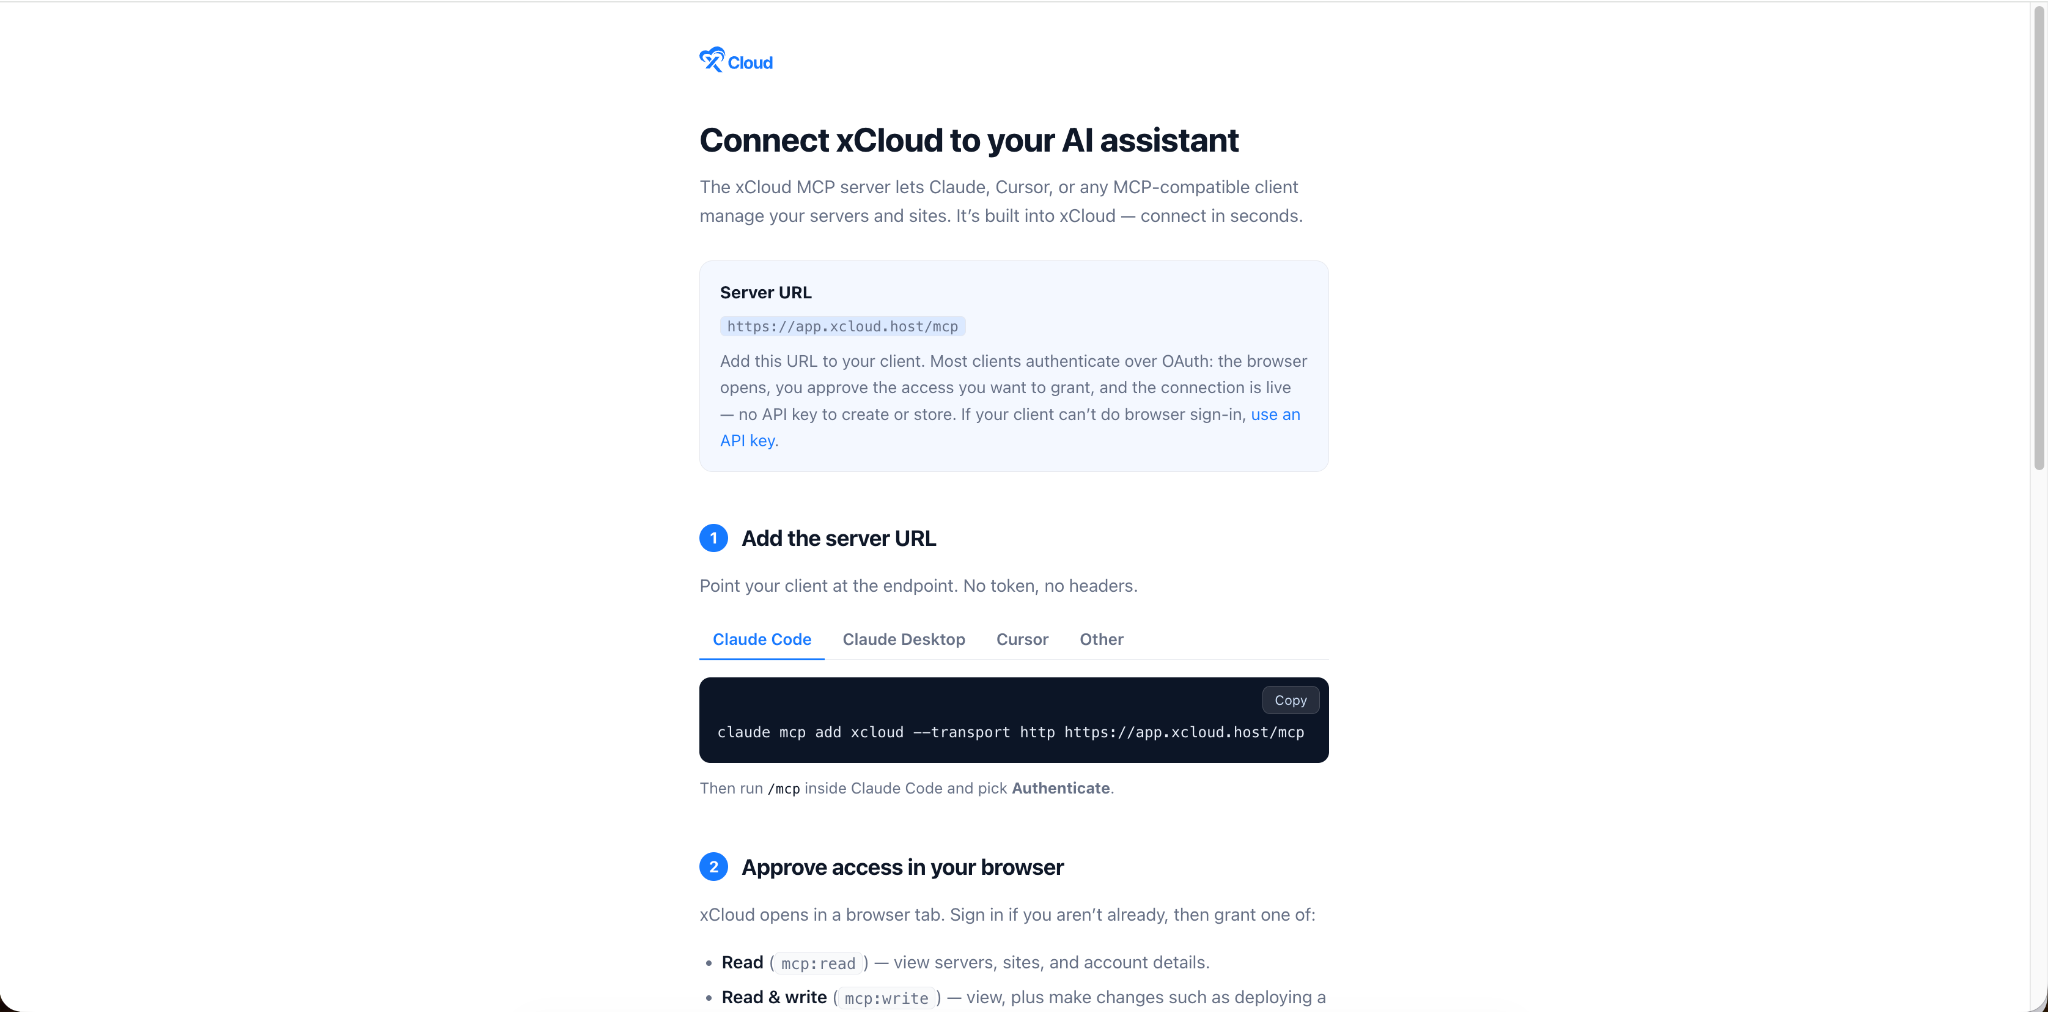
https://app.xcloud.host/mcpAdd this URL to your client. Most clients authenticate over OAuth: the browser opens, you approve the access you want to grant, and the connection is live — no API key to create or store. Every connection is listed with your API keys, so you can revoke it at any time. The same setup instructions also live in your dashboard under Settings → Developers → MCP.
Connect your client
Claude Code
Run one command, then authenticate:
claude mcp add xcloud --transport http https://app.xcloud.host/mcpThen run /mcp inside Claude Code and pick Authenticate.
Claude Desktop
Open Settings → Connectors → Add custom connector, name it xcloud, and paste the server URL.
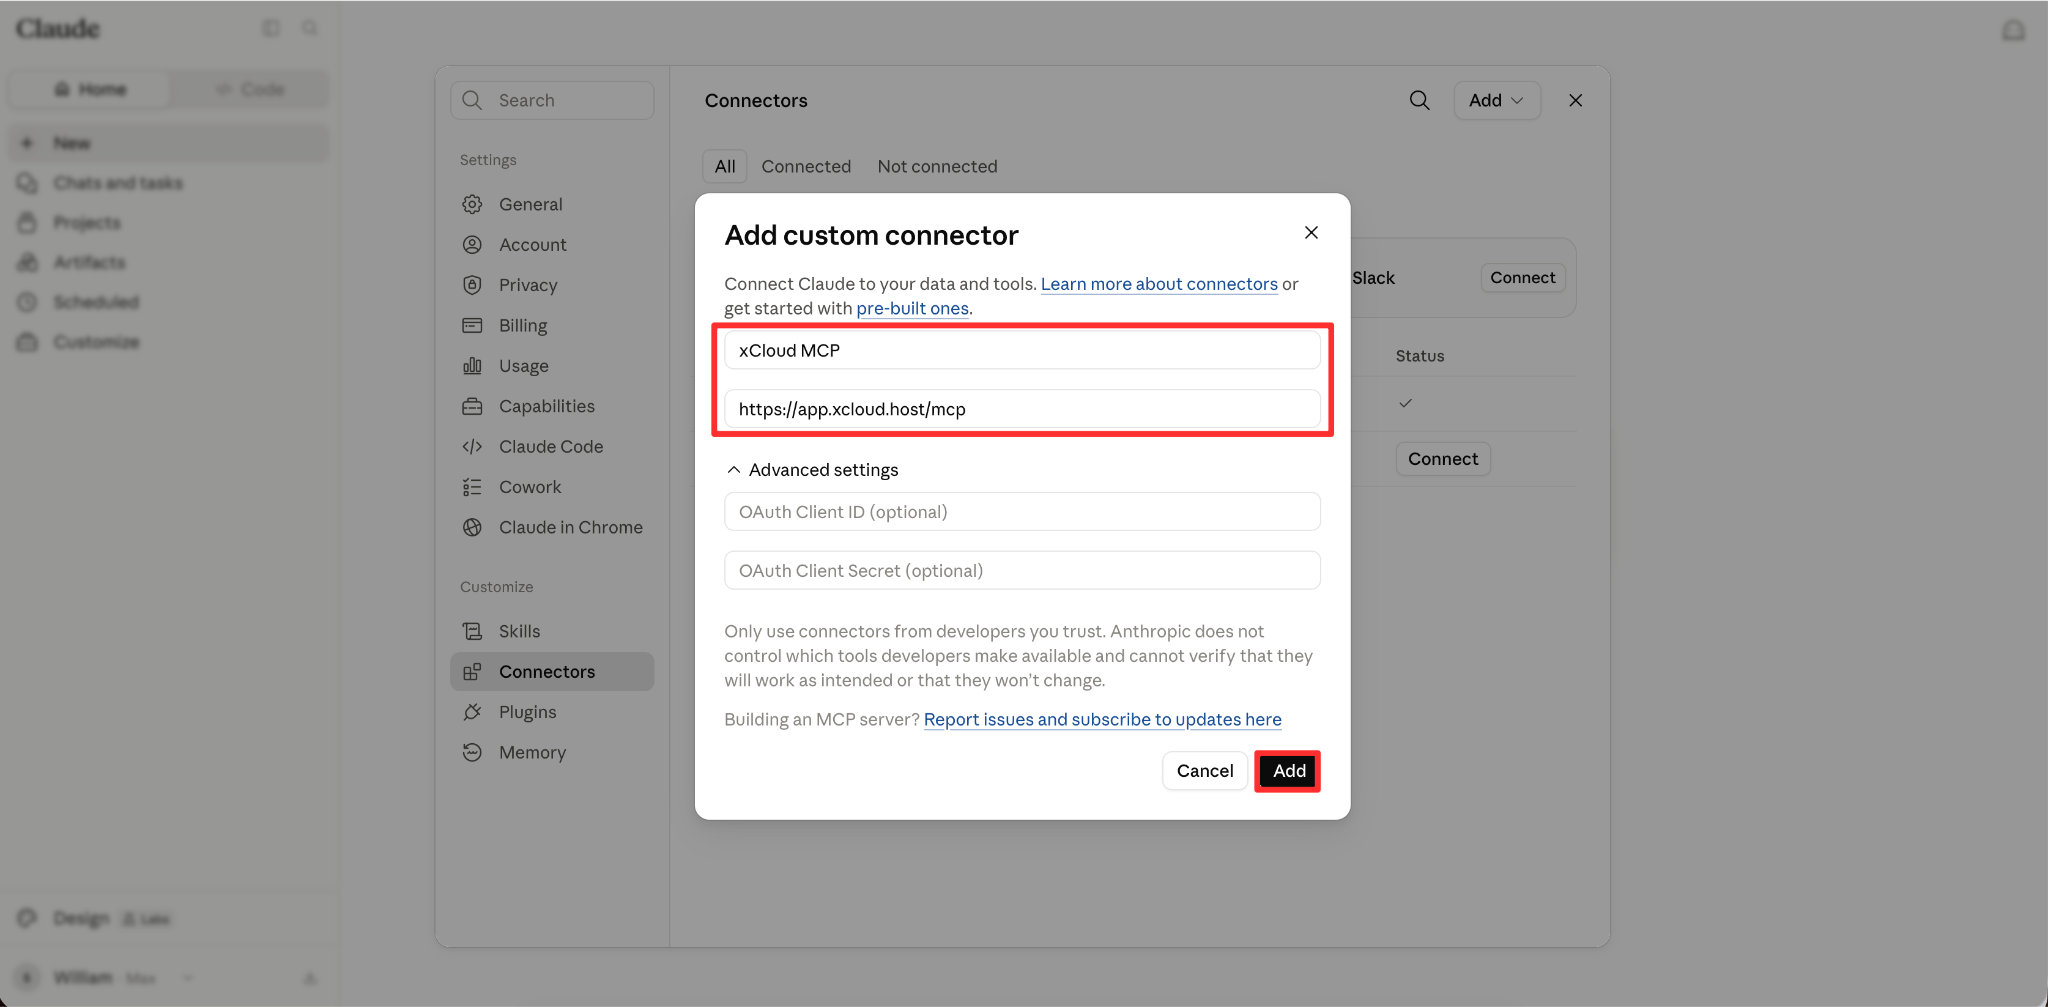
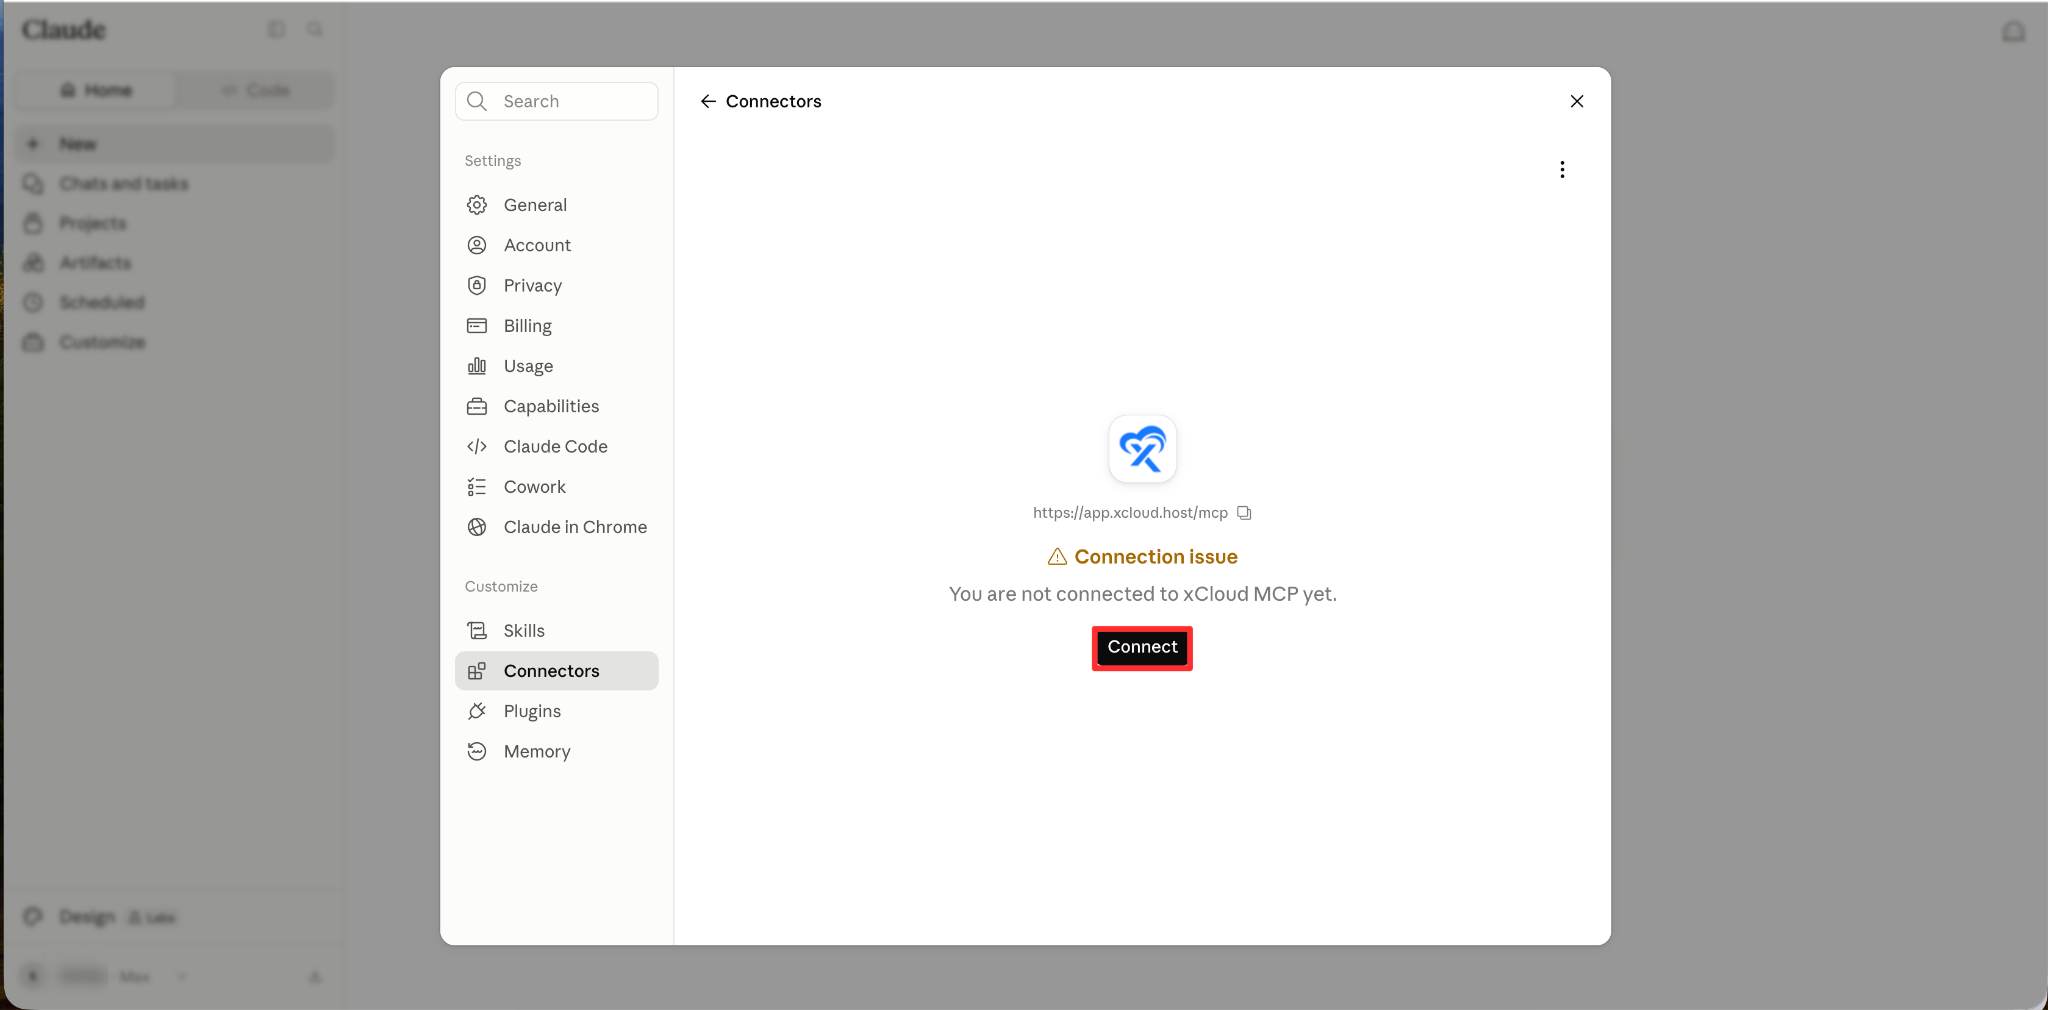
Claude Desktop opens the browser sign-in for you.
Cursor
Open Settings → MCP → Add new MCP server, or add this to ~/.cursor/mcp.json:
{
  "mcpServers": {
    "xcloud": {
      "url": "https://app.xcloud.host/mcp"
    }
  }
}
Cursor shows a Needs login prompt — click it to sign in. Cursor caps a server at 40 tools; if it refuses to load the list, use the compact profile URL from the overview above instead.
Codex
Run both commands in your terminal. The second opens the browser sign-in:
codex mcp add xcloud --url https://app.xcloud.host/mcp
codex mcp login xcloud
OpenCode
Run one command from the project that should use xCloud (add --global to make it available everywhere):
opencode mcp add xcloud --url https://app.xcloud.host/mcpIt writes this entry under mcp.servers in opencode.jsonc. OpenCode v2 no longer accepts server names directly under mcp, and OAuth is on by default, so the URL is all it needs:
"mcp": { "servers": { "xcloud": { "type": "remote", "url": "https://app.xcloud.host/mcp" } } }Then run opencode mcp auth xcloud to sign in, or open /mcps inside OpenCode, pick xcloud and sign in there.
Hermes Agent
Add this to ~/.hermes/config.yaml:
mcp_servers:
  xcloud:
    url: "https://app.xcloud.host/mcp"
    auth: oauth
On first connect Hermes prints the authorize link and opens your browser for the xCloud sign-in. Run hermes mcp login xcloud if you ever need to re-authorize. If Hermes itself runs on xCloud, see how to deploy Hermes Agent with xCloud.
Any other MCP client
GitHub Copilot, VS Code, Windsurf and any client that supports the MCP Streamable HTTP transport can connect: add the server URL to its MCP config and OAuth starts on first use. The key names differ by client. Copilot’s .vscode/mcp.json uses a top-level servers object with type: "http". Windsurf, now shipped as Devin Desktop, opens new tabs on the Devin Local agent, which you configure with devin mcp add xcloud https://app.xcloud.host/mcp (the entry it writes is url plus transport: "http"); only its legacy Cascade agent uses serverUrl under mcpServers. Each of these has its own short guide with the exact file and field names:
- Claude Cowork
- OpenClaw, skills and MCP
- Windsurf
- GitHub Copilot in VS Code
- Gemini CLI
- ChatGPT
- Grok
- Kiro
- Antigravity
- Zed
Every client, with one guide per hosting job, is listed under AI agents on xCloud.
"xcloud": { "url": "https://app.xcloud.host/mcp" }If your client only supports local (stdio) servers, bridge it with:
npx mcp-remote https://app.xcloud.host/mcpApprove access in your browser
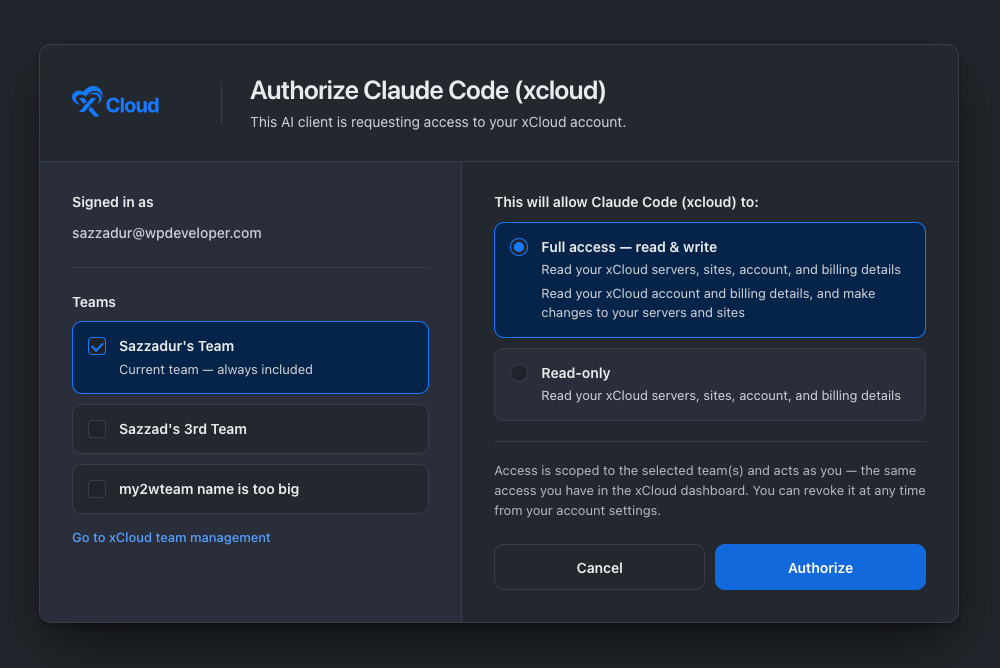
xCloud opens in a browser tab. Sign in if you aren’t already, then:
- Verify the account email shown under Signed in as.
- Under Teams, tick every team this connection may act on. Your current team is always included; any other team you belong to is optional. Since xCloud v2.8.8 one connection can be authorized for several teams, and you switch between them per request simply by naming the team — see Multi-Team Access with One API Token or MCP Connection.
- Grant Full access — read & write (
mcp:write) to also make changes such as deploying a site or restarting a service, or Read-only (mcp:read) to view servers, sites, account, and billing.
If you are only trying it out, Read-only is a safe place to start — you can reconnect with wider access later. A team you did not tick is refused, never silently swapped for the current one.
Read-only (mcp:read) |
Full access (mcp:write) |
|
|---|---|---|
| View servers, sites, account, billing | Yes | Yes |
| Deploy, update, restart, purge, create | No | Yes, and every such call still stops for your confirmation |
| Good for | Trying it out, reporting, monitoring | Day-to-day operations once you trust the setup |
Verify in 30 seconds. Ask your assistant these three things, in order:
Who am I on xCloud?List the teams this connection can access.List my servers.The first should return your name, email and team, the second the teams you ticked, the third the servers on your default team. If all three work, you are connected.
No browser sign-in? Use an API key
If your client cannot open a browser to authenticate, create an xCloud access token with the explicit mcp:invoke scope (full access alone does not enable MCP). Add read:servers and read:sites to let the assistant view things, or the write: scopes to let it make changes — see How to Access the xCloud API for token creation. Then pass the key as a header:
claude mcp add xcloud --transport http https://app.xcloud.host/mcp \
  --header 'Authorization: Bearer YOUR_TOKEN'
Or in a JSON-configured client:
{
  "mcpServers": {
    "xcloud": {
      "url": "https://app.xcloud.host/mcp",
      "headers": { "Authorization": "Bearer YOUR_TOKEN" }
    }
  }
}
Tip: xCloud tokens contain a | — keep the single quotes so your shell doesn’t read it as a pipe.
What the assistant is allowed to do
Two layers decide what a connected assistant can do, and they live in different places.
On the xCloud side, the access you granted at sign-in is the boundary: Read lets the assistant view servers, sites, account and billing; Read & write also lets it make changes. On the API-key path the token’s scopes play the same role. Every tool call goes through the real Public API route, so your team permissions apply exactly as they do in the dashboard.
On top of that, xCloud gates the operations that can cost money or break something: the server refuses them unless the call carries an explicit confirm: true, and the tool’s description tells the assistant to get your approval before setting it. Creating a billable site or server, deploying, updating plugins or themes, rebooting, changing a runtime, deleting, purchasing an addon — all stop and ask. Routine actions run straight away without that step: purging a cache, taking a backup, restarting or enabling a service, starting a PageSpeed or vulnerability scan, refreshing the WordPress inventory, marking an alert read. Reads never ask. Site-creation tools also accept dry_run: true, which runs every check and creates nothing, so the assistant can show you the resolved configuration before you approve the real call.
On the assistant’s side, most MCP clients let you set per-tool rules — run automatically, ask each time, or block. Claude Desktop and Cursor both offer this. These are client settings, not xCloud settings; see your client’s documentation for where they are. A good default there is to auto-allow read tools and ask for anything that writes.
Too many tools for your client?
Everything below is served from the same server with the same access — only the tool list the client sees differs.
| Profile | URL | Tools the client sees | Use when |
|---|---|---|---|
| Flat (default) | https://app.xcloud.host/mcp |
One tool per xCloud API operation (188), plus xcloud_agent_search for finding the right operation and xcloud_docs_search for answering questions from the docs |
Your client has no tool cap and you want the full picture |
| Compact | https://app.xcloud.host/mcp?profile=compact |
Five: the two searches plus three executors split by what a call does (read, write, irreversible) | Your client caps tools per server (Cursor stops at 40), or you would rather not load ~190 tool descriptions every session |
| Toolsets | https://app.xcloud.host/mcp?toolsets=sites,servers |
Only the areas you name, such as servers, sites, billing or wordpress-actions, plus both searches |
You want the agent focused on one part of xCloud. Not a fix for a tool cap on its own: servers alone is 61 tools, sites 60 |
The full toolset list is at app.xcloud.host/mcp/toolsets. Toolsets narrow what the agent is shown, not what your key may do — the permissions on the connection decide every call.
Try it out
Start with something simple to confirm it is working:
- “List all my xCloud servers.”
- “Which of my sites have pending WordPress updates?”
- “Take a backup of my staging site.”
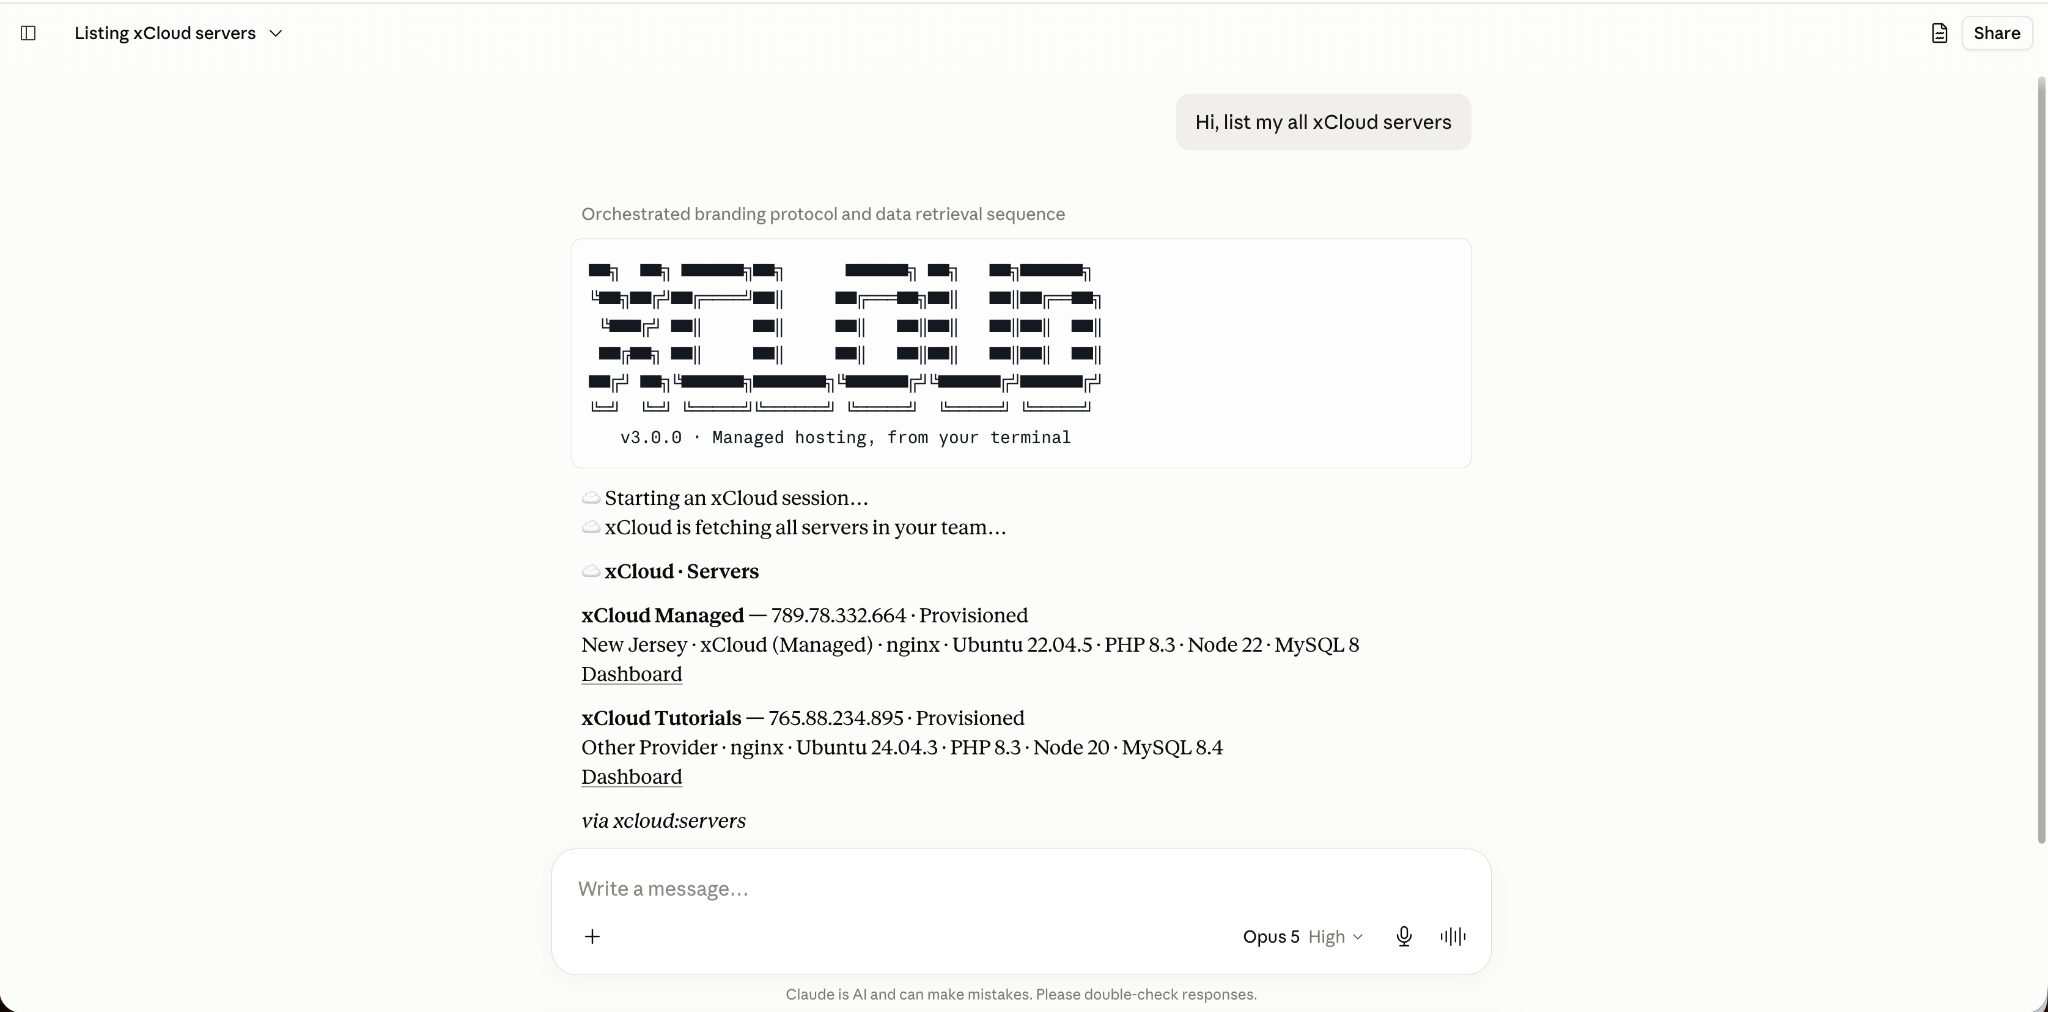
From here, connect the same MCP to other agents you use, adjust permissions as you get comfortable, and let your agent handle the routine infrastructure work. For 40+ prompts grouped by job, and how to write a good one, read What You Can Ask xCloud MCP to Do. To work across several teams from one connection, see Multi-Team Access with One API Token or MCP Connection.
Troubleshooting
| Symptom | Likely cause | Fix |
|---|---|---|
| Client asks for a token | It does not support browser sign-in | Use the API-key path above |
| 403 on connect | The approval was declined, or was granted read-only for a write action; on the API-key path the key lacks mcp:invoke |
Reconnect and approve full access, or add the mcp:invoke scope to the key |
| “Site not found” | The site belongs to a team this connection was not granted | Ask the assistant to list its granted teams (teams_index) and name the right one, or reconnect and tick that team. See multi-team access |
| 401 Unauthorized | The sign-in expired, or on the API-key path the key is invalid or the Authorization header was mangled by shell quoting |
Reconnect; keep the single quotes around a token that contains | |
| Client refuses to load all the tools | The client caps tools per server (Cursor at 40) | Connect with ?profile=compact (five tools). Toolsets alone rarely fit under a cap |
| A tool you expected isn’t listed | The connection is narrowed by toolsets, or the key is limited to some | Ask xcloud_agent_search for the operation, then widen the key or drop the parameter |
| 403 right after approving on claude.ai (web) | The connector was added before the 6 October 2026 fix, or an older connection for the same account is still registered | Remove the connector in claude.ai, revoke any Claude entries under Settings → Developers → API Tokens, add the connector again with https://app.xcloud.host/mcp and the default Sign in now / Register automatically options, and approve with your team ticked |
| “Connected apps” list looks empty on the API Tokens page | The list is hidden below the empty state when the account has no API tokens (fix pending) | Scroll down on Settings → Developers → API Tokens, or hard-refresh the page; the connections are there and can be revoked |
| Can’t find the MCP settings page | There is no separate permissions page; access is chosen on the approval screen | Settings → Developers → MCP shows the server URL and setup steps; review or revoke connections under API Tokens |
FAQs
Can I connect more than one team?
Yes. Since xCloud v2.8.8, a single MCP connection or API token can access multiple authorized teams — you select the teams during authorization and switch teams per request. You can also still add fully separate connectors by appending a query string to the URL, such as https://app.xcloud.host/mcp?1 and https://app.xcloud.host/mcp?2, since some clients do not allow the same URL twice.
Do I need an API key to use xCloud MCP?
Usually not. Most clients authenticate over OAuth: the browser opens, you approve the access you want to grant, and the connection is live. An API key is only needed for clients that cannot do browser sign-in — create one with the explicit mcp:invoke scope, because full access alone does not enable MCP.
What if my client refuses to load all the tools?
Some clients cap how many tools a server may advertise — Cursor stops at 40. Connect with the compact profile at https://app.xcloud.host/mcp?profile=compact, which serves five tools instead of one per API operation. Toolsets alone rarely get under a cap: the servers toolset is 61 tools and sites is 60.
Explore further: the xCloud Public API reference, xCloud API documentation, and xCloud AI agent skills. If you face any issues, please do not hesitate to contact our support team.