

How to Activate the Cloudflare Enterprise Addon on Your Domain
Updated October 19, 2026 · 10 min read
Cloudflare Enterprise in xCloud adds a managed CDN, web application firewall (WAF), DDoS protection, edge caching, image optimization, and traffic and security analytics to a site domain. This guide is for site owners and team members who can manage paid add-ons and DNS. It covers purchase, DNS ownership verification, activation, settings, analytics, security events, and team-level management in xCloud v2.9.3.
Prerequisites
Before you start, confirm that you have:
- A provisioned and enabled site in xCloud.
- A domain assigned to that site.
- Permission to manage the site and purchase paid add-ons for the team.
- Access to the domain’s authoritative DNS provider.
- A payment method or sufficient team balance for the displayed monthly charge.
- An agreed maintenance window for DNS changes on a production domain.
Cloudflare Enterprise is billed per domain. Always confirm the current amount shown in the purchase dialog before paying.
Activate Cloudflare Enterprise
1. Open the site’s Cloudflare Enterprise page
In xCloud, select Sites, open the site, and choose Cloudflare Enterprise from the site sidebar.
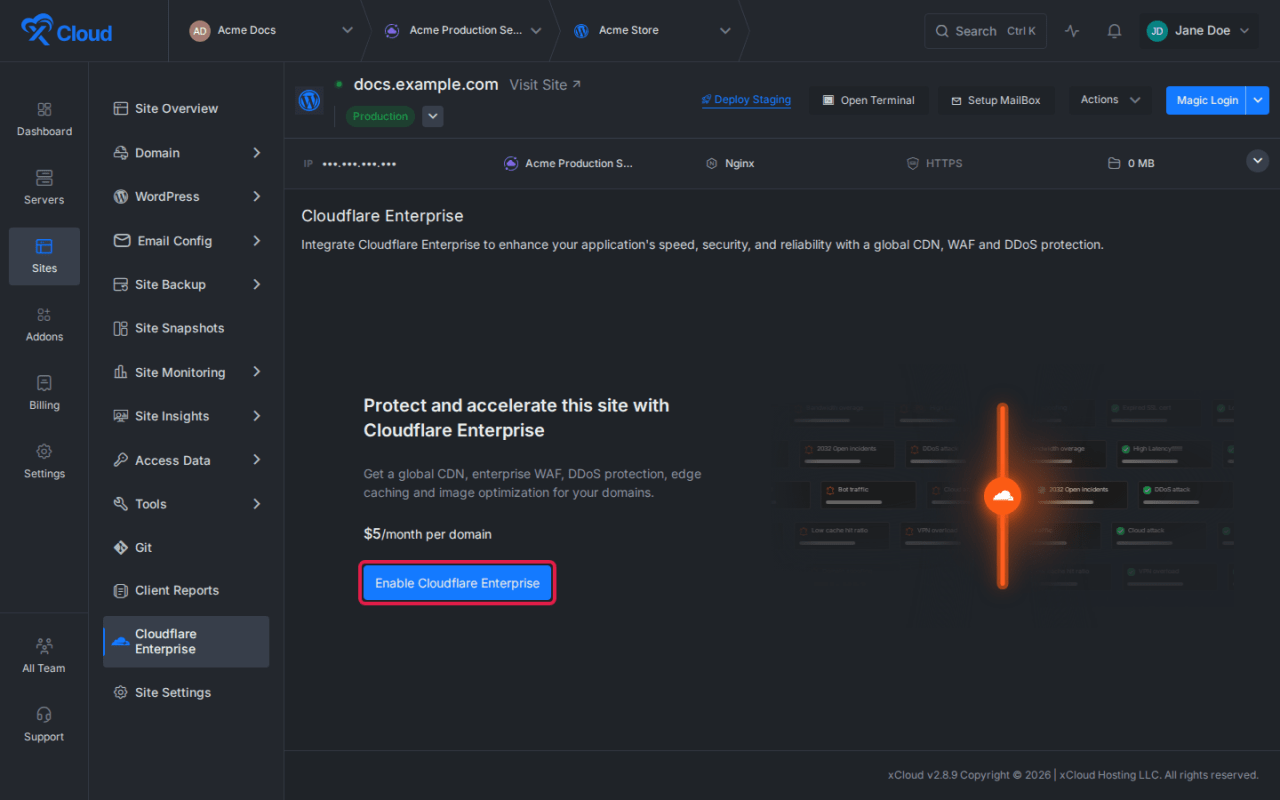
Expected result: The page explains the service and displays Enable Cloudflare Enterprise. A disabled site cannot start activation until it is enabled.
2. Review the purchase
Select Enable Cloudflare Enterprise. In the confirmation dialog, check the domain, monthly charge, and payment method, then select Pay now.
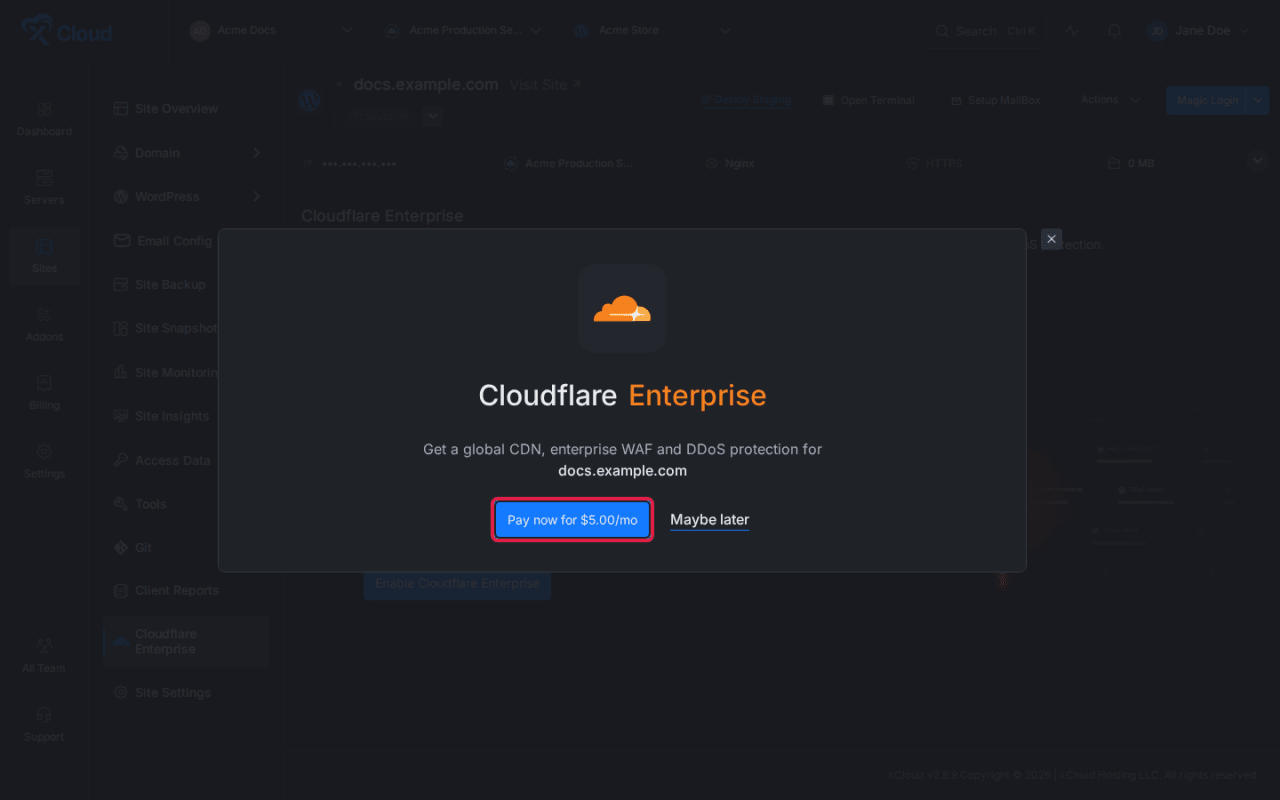
Expected result: xCloud starts the subscription and adds the domain to the Domains tab. Payment processing may redirect to a payment provider when additional confirmation is required.
3. Check the initial domain state
Return to Cloudflare Enterprise → Domains after payment. A new domain normally starts as Pending Verification while xCloud prepares ownership and certificate validation records.
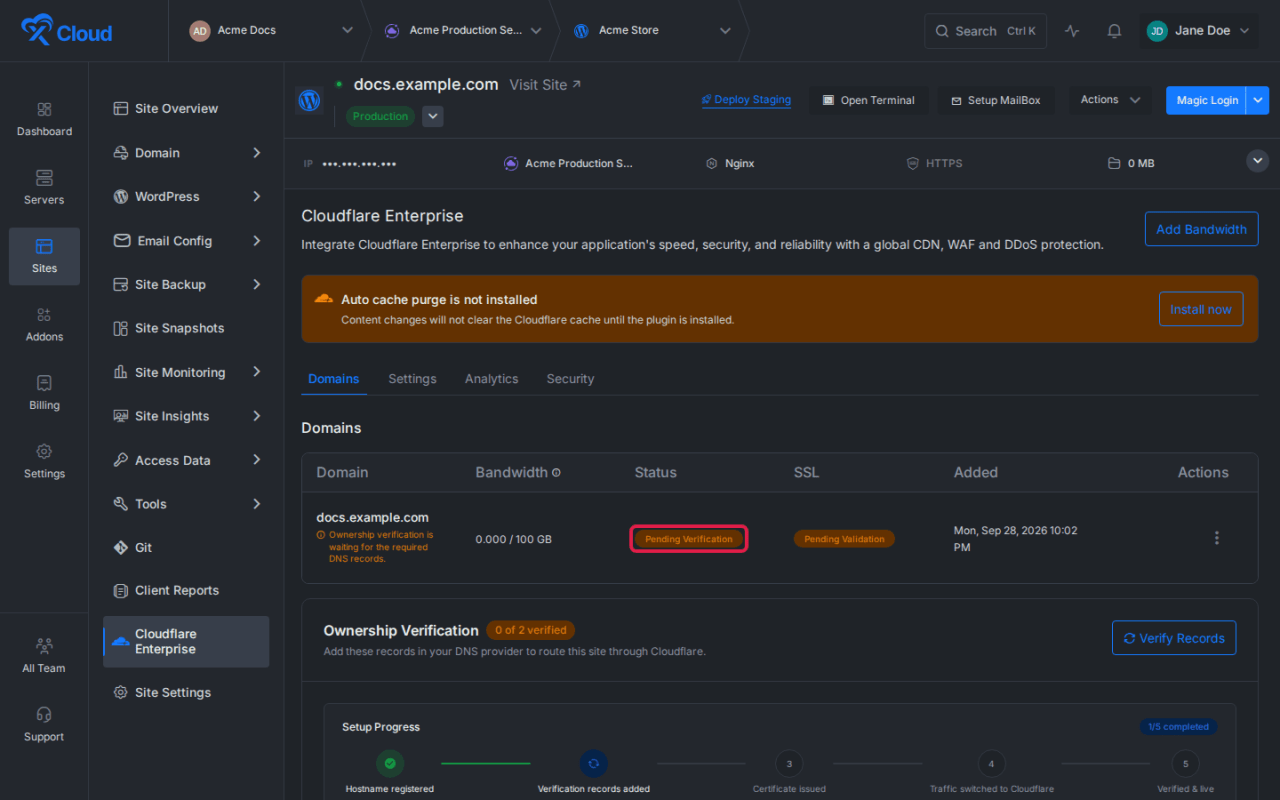
Expected result: The table shows the domain, included bandwidth, domain status, SSL status, creation time, and actions. The ownership panel reports how many required DNS records are verified.
4. Add the DNS records shown by xCloud
In Ownership Verification, copy each record exactly into the authoritative DNS provider. Use the record type, name, and target displayed for your domain. Do not copy values from this guide because xCloud generates them for each subscription.
The panel splits the records into two groups:
- Safe to add anytime: ownership and certificate records. They do not move traffic, so add them first.
- Live traffic cutover: the routing records. They replace whatever A, AAAA, or CNAME record answers for that name today and take over live traffic straight away. If the panel says to add them only after the domain shows Active, wait until it does.
For the root domain, use the record type the panel recommends for your DNS provider: a root CNAME, an ALIAS or ANAME record, or two A records. For step-by-step instructions, see the guides for Google Cloud DNS, AWS Route 53, Namecheap, and Cloudflare without an xCloud integration.
For a zone managed in Cloudflare DNS, keep the records DNS only unless the xCloud screen explicitly says otherwise. Do not create a second record with the same name if an existing record must be replaced.
Expected result: The DNS provider accepts the records without duplicate-name errors. DNS publication can take time, depending on the provider and record TTL.
5. Ask xCloud to verify the records
After the DNS records are publicly available, select Verify Records. If your team has a connected Cloudflare integration, the button is called Verify & Add Records and also adds any missing records for you. While xCloud is still adding records automatically, the button stays locked for a short time.
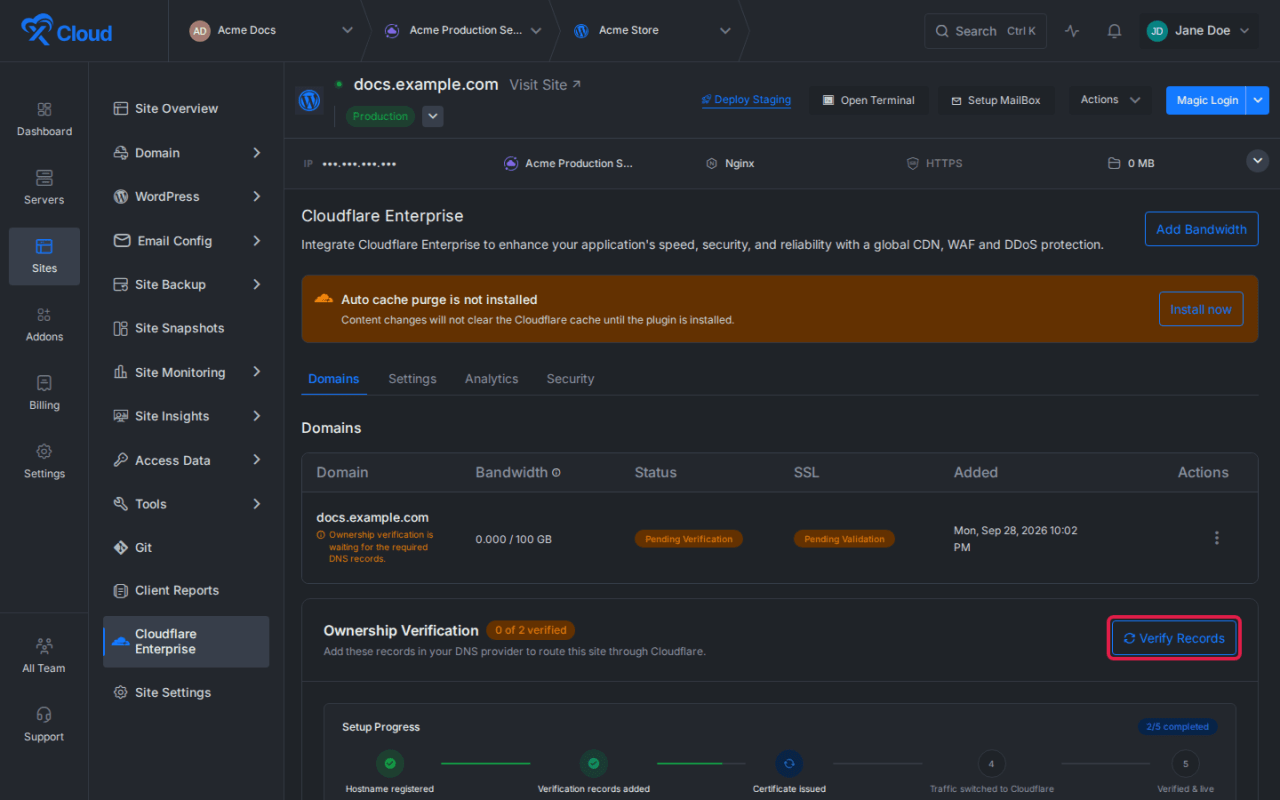
Expected result: xCloud checks ownership and traffic-routing records, updates the verification count, and continues certificate issuance. The setup progress indicator distinguishes records that are safe to add early from the later traffic cutover.
6. Wait for both the domain and SSL states to become Active
After DNS propagation, open the domain row’s actions menu and select Refresh status. Activation is complete only when the domain status and SSL status both show Active.
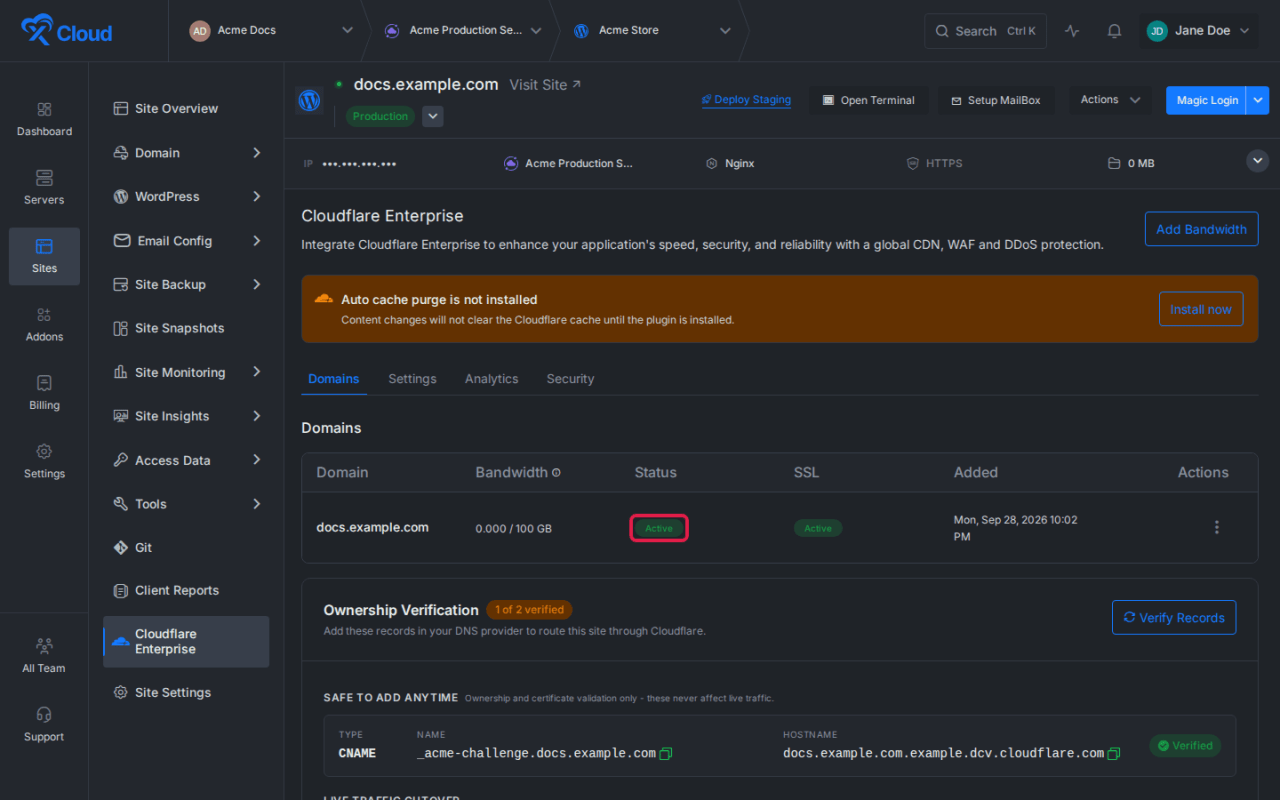
Expected result: Requests can be served through Cloudflare Enterprise, the domain row shows Active, and post-activation controls such as bandwidth purchase and cache purge become available.
Configure the active service
7. Review the included features and save settings
Open the Settings tab. Review the always-on included features, then select Save Changes after changing a configurable option.
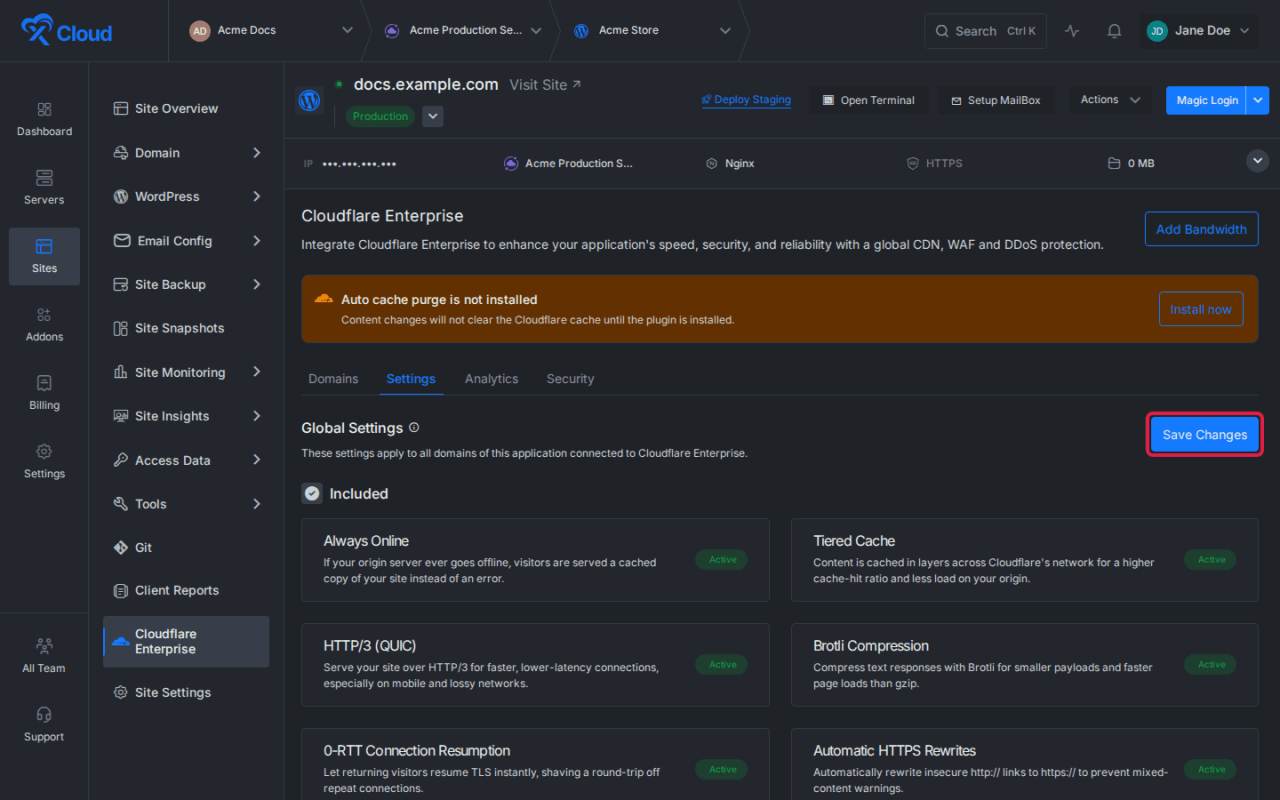
Expected result: xCloud saves the site-level Cloudflare Enterprise configuration. Cloudflare edge changes can take a short time to propagate.
8. Configure optimization and security options
In Settings, review Optimizations, Image Optimization, SSL Cipher, Security, and Caching. Choose settings that match the site’s compatibility and cache requirements.
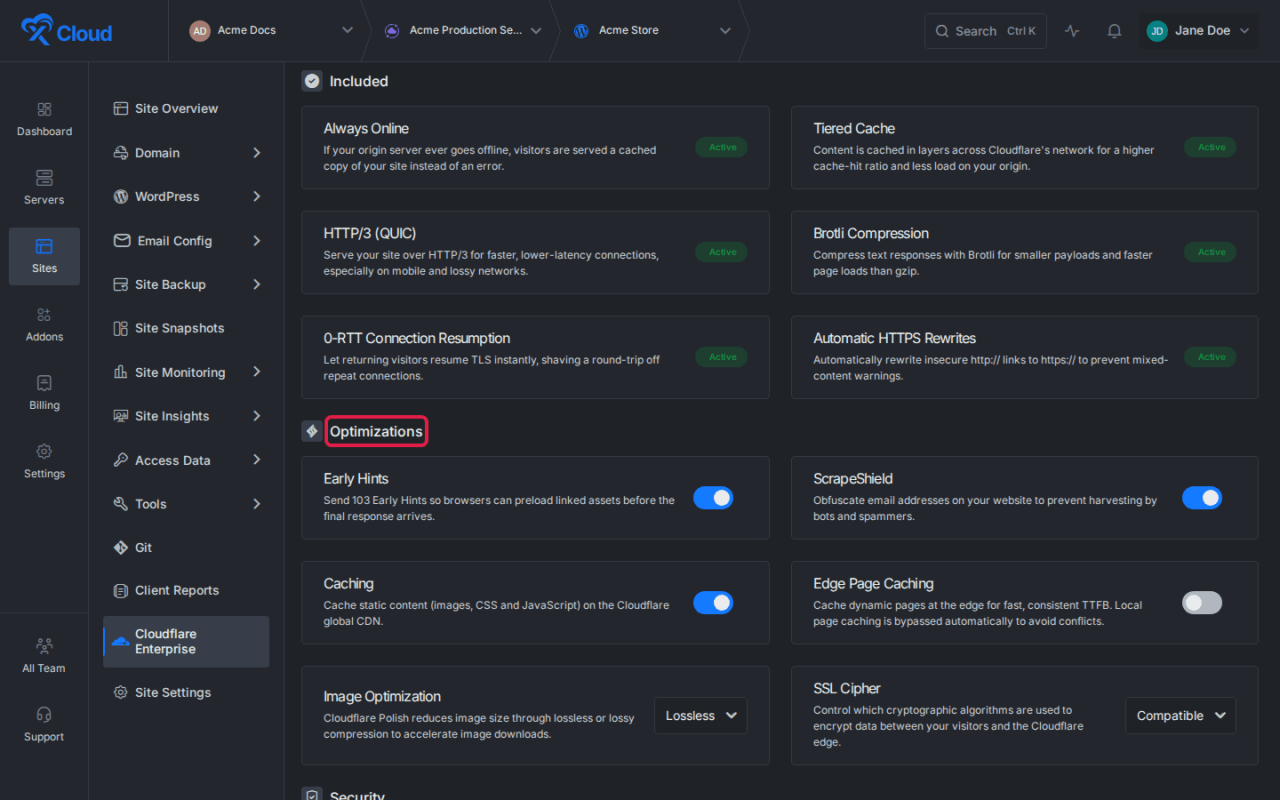
Expected result: The form reflects the selected values. Select Save Changes before leaving the tab.
Important interactions:
- Edge Page Caching caches dynamic pages at the edge and supersedes the basic Caching option while it is on. The edge follows the cache headers your server sends, so pages your server marks as not cacheable are not cached.
- While Edge Page Caching is on, Optimizations also shows Cache by Device Type, which keeps separate cached copies for mobile, tablet, and desktop visitors, and Cache Bypass Paths.
- Cache Bypass Paths (shown while Edge Page Caching is on) add site-specific exclusions. Standard exclusions for logged-in sessions, carts, checkout, WordPress administration, login, and account pages remain in place.
- Image Optimization supports Lossless, Lossy, and Off modes.
- SSL Cipher supports Compatible, Modern, and Legacy profiles. Choose a stricter profile only after confirming client compatibility.
- Purge Cache becomes available when at least one domain is Active. You can purge everything, specific URLs, or Cache-Tags. See How to Purge Cloudflare Enterprise Cache by URL or Cache-Tag.
9. Install automatic cache purge when xCloud prompts you
If the page shows Auto cache purge is not installed, select Install now. This installs or enables the integration that clears Cloudflare cache after supported WordPress content changes.
Expected result: The warning no longer appears after installation completes. If the integration is not installed, content changes do not automatically clear the Cloudflare cache, so use the manual purge control when needed.
Sites that are not WordPress do not get this prompt. Instead, they have an Auto Purge tab with a purge webhook for each domain. See How to Configure Cloudflare Enterprise Auto Purge Webhooks.
Monitor Cloudflare Enterprise
10. Review traffic and cache analytics
Open Analytics. Switch between Request Summary and Data Transfer Summary, choose a time range, and use refresh to request current results.
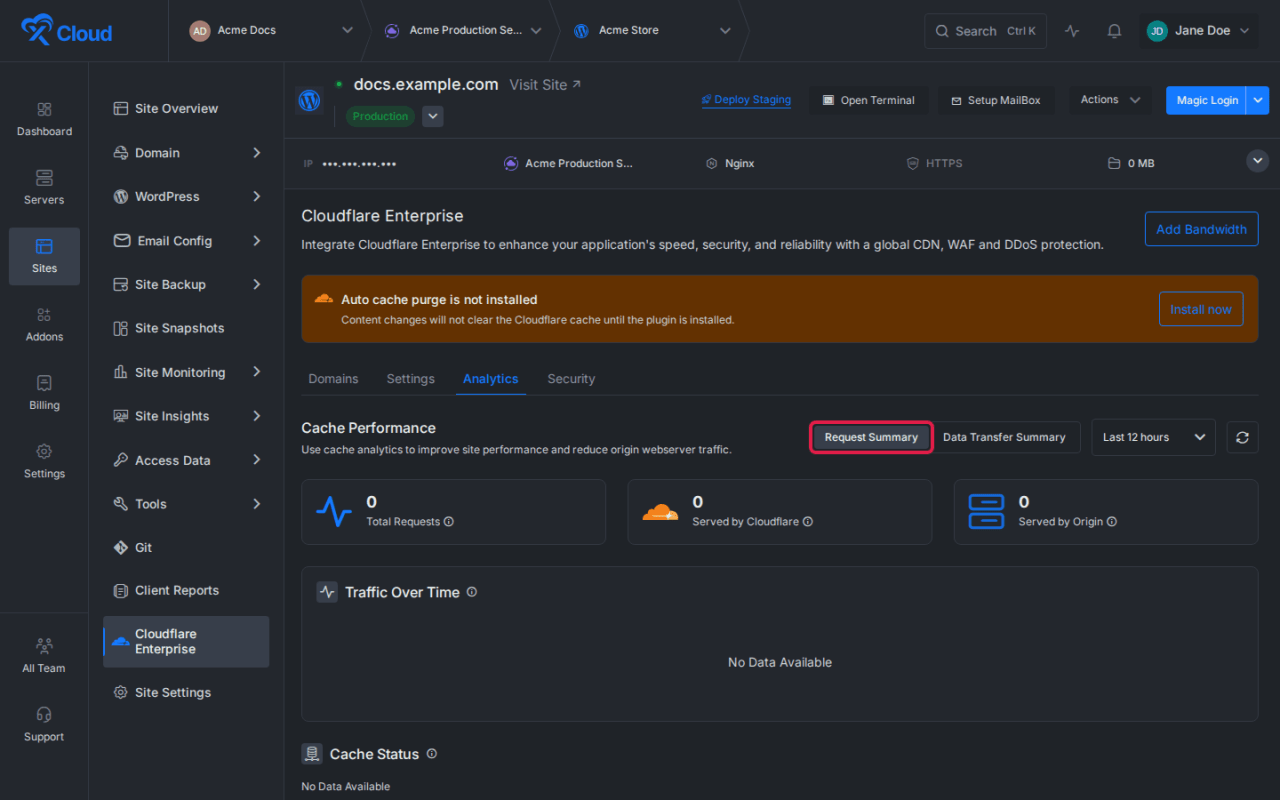
Expected result: The page shows total requests, requests served by Cloudflare, requests served by the origin, traffic over time, cache status, and available breakdowns. A new or quiet site can correctly show zero totals and No Data Available.
11. Review security events
Open Security, choose a time range, and refresh the event data when needed.
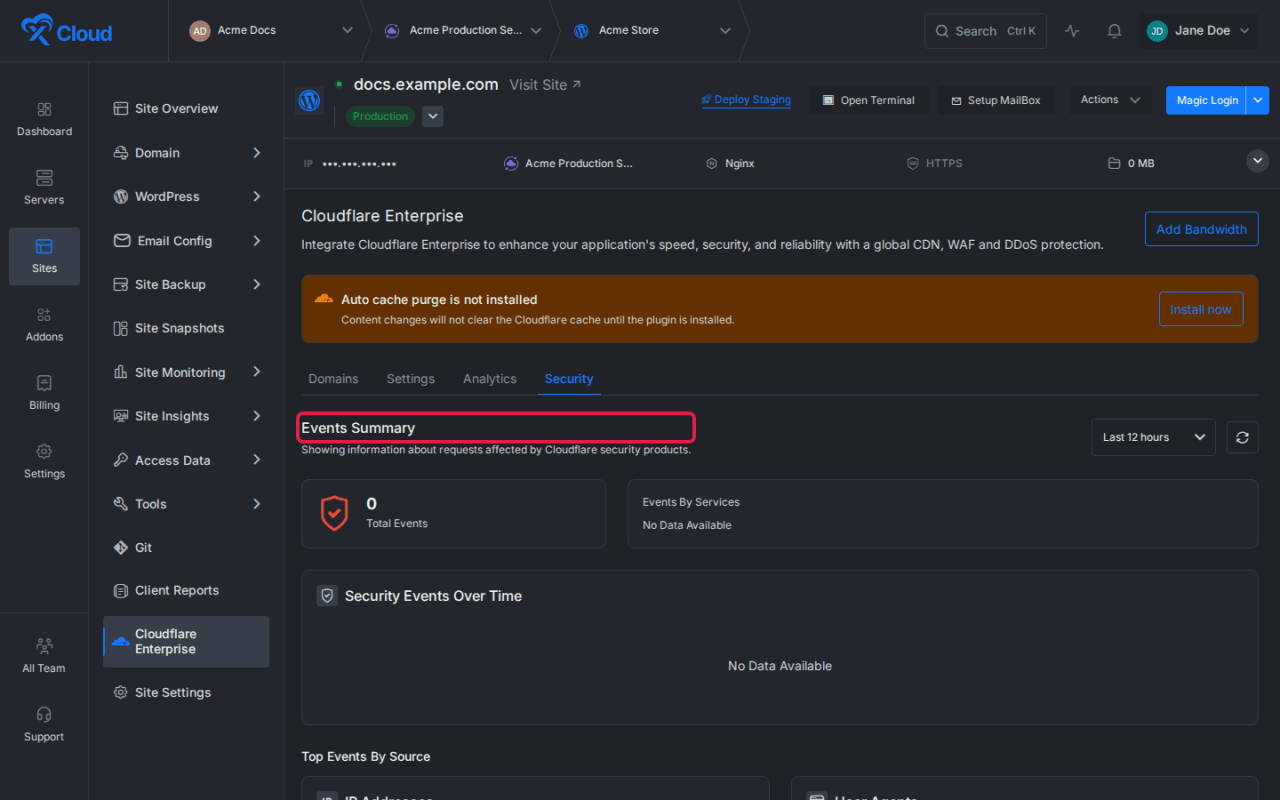
Expected result: The page shows total events and available breakdowns by Cloudflare security service and other request attributes. Zero events and No Data Available are valid when no matching security activity exists for the selected period.
12. Review all team subscriptions
Open Addons → Cloudflare Enterprise to view Cloudflare Enterprise domains across the current team.
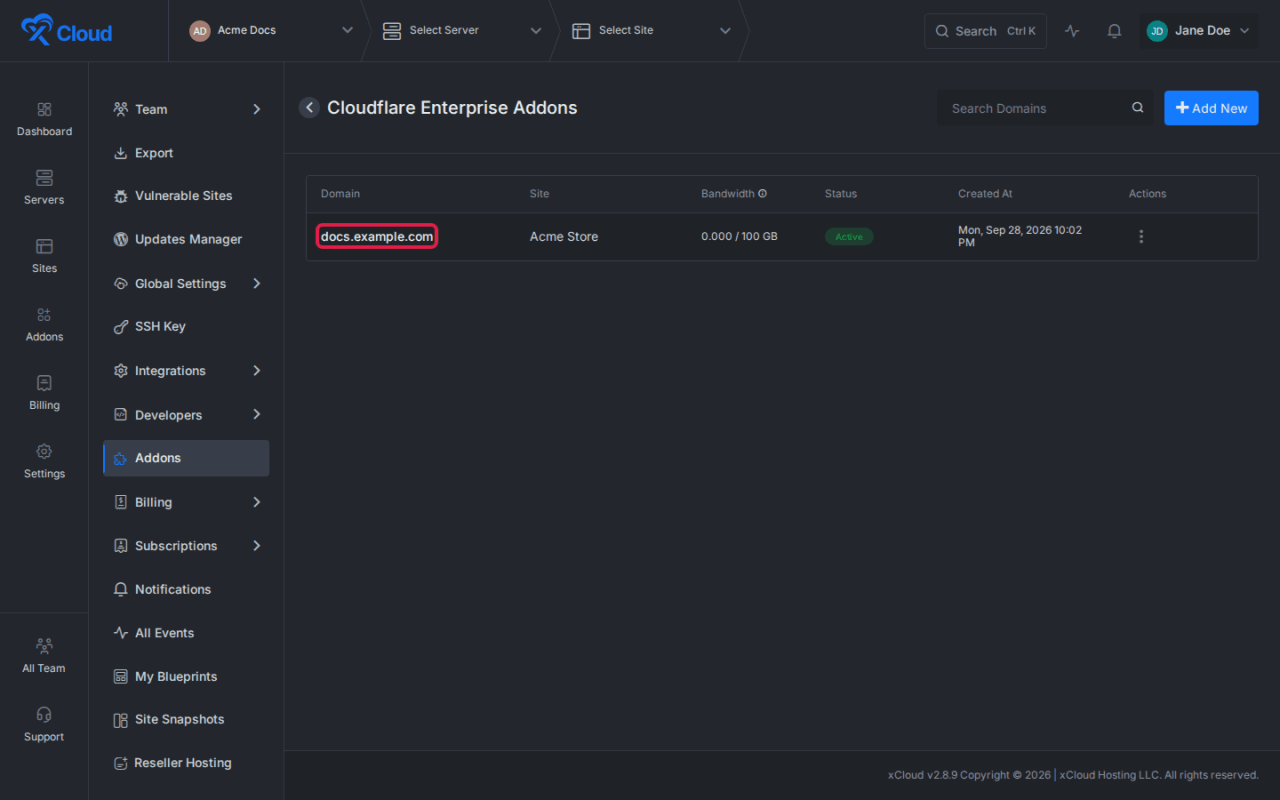
Expected result: The team-level table shows each domain, related site, included bandwidth usage, current status, creation time, and available actions. Use the site-level page for site settings and detailed verification.
Options and settings
| Area | Option or state | What it means |
|---|---|---|
| Purchase | Monthly domain charge | The recurring price displayed in the confirmation dialog for one domain. |
| Domains | Pending Verification | xCloud is waiting for one or more required DNS checks to pass. |
| Domains | Domain not Live | The custom hostname is registered, but traffic is not yet served through Cloudflare Enterprise. |
| Domains | Active | The domain is verified and serving through Cloudflare Enterprise. Confirm SSL is also Active. |
| Domains | Failed | Cloudflare reported a failed hostname. Use Retry in the row menu when it appears, or contact support. |
| Domains | Disabled | Cloudflare Enterprise is turned off for the domain. |
| SSL | Pending Validation | Cloudflare certificate validation is not complete. |
| Bandwidth | Included usage | The domain’s monthly usage against its allowance. Each domain includes 100 GB per month. |
| Included | Always Online, Tiered Cache, HTTP/3, Brotli, 0-RTT, Automatic HTTPS Rewrites | Platform-managed features displayed as active rather than editable switches. |
| Optimizations | Early Hints, ScrapeShield, Caching, Edge Page Caching | Configurable delivery and caching behavior. |
| Optimizations (with Edge Page Caching on) | Cache by Device Type, Cache Bypass Paths | Separate mobile, tablet, and desktop copies, and site-specific paths that are never cached at the edge. |
| Images | Lossless, Lossy, Off | Cloudflare image-compression mode. |
| TLS | Compatible, Modern, Legacy | Client compatibility profile for encryption between visitors and Cloudflare. |
| Security | WAF, rate limiting, browser integrity, Under Attack Mode, AI crawler controls | Configurable protections for the active site. |
| Caching | Purge Cache | Clears everything, specific URLs, or Cache-Tags so subsequent requests fetch fresh content from the origin. |
| Analytics | Request or data transfer summary | Traffic, cache, origin, and transfer measurements for the selected range. |
| Security events | Events Summary | Requests affected by Cloudflare security products during the selected range. |
Limits and edge cases
- Activation is per domain. Buying the root domain or
wwwcovers both, plus first-level subdomains. Other domains need their own purchase. - A disabled site cannot start the site-level activation flow.
- DNS ownership and SSL certificate validation are separate states. Treat the setup as incomplete until both are Active.
- DNS values are generated for the specific domain. Never reuse values from another site or screenshot.
- Existing DNS records with the same name can block the required record. Confirm whether the provider expects replacement rather than duplication.
- DNS propagation depends on the authoritative provider and TTL. xCloud cannot make an unpublished record visible sooner.
- Automatic cache purge is a separate post-activation integration. The domain can be Active while the page still warns that automatic purge is not installed.
- Analytics and security panels can show zero data immediately after activation. Zero data does not by itself mean activation failed.
- Each domain includes 100 GB of bandwidth per month. xCloud emails you at 80%. After it reaches 100%, once at least 24 hours have passed since the 80% email, Cloudflare Enterprise is turned off for it until you add bandwidth or the next month starts. See How to Add Cloudflare Enterprise Bandwidth.
- To switch the site’s SSL to xCloud SSL or a custom certificate, confirm the prompt on the SSL page. xCloud first turns off Cloudflare Enterprise for the site’s domains and keeps the subscription. If your DNS is managed at your own DNS provider, you must then point the domain back at your server with an A record yourself, or the site becomes unreachable. With a connected Cloudflare integration, xCloud does this for you.
- Disable and Enable in the domain row menu run in the background, so you can close the dialog while they finish.
Verification
Use this completion check after activation:
- Open Cloudflare Enterprise → Domains for the site.
- Confirm the domain status is Active.
- Confirm SSL status is Active.
- Confirm ownership verification shows all required records as verified.
- Load the public site over HTTPS from a separate browser session.
- Open Analytics later and confirm requests appear after the site receives traffic.
- Open Addons → Cloudflare Enterprise and confirm the domain appears under the correct team and site.
You know activation is complete when xCloud shows both domain and SSL as Active and the public HTTPS site loads through the configured domain.
Troubleshooting
| Symptom | Likely cause | Fix |
|---|---|---|
| Enable Cloudflare Enterprise is disabled | The site is disabled. | Enable the site first, then reopen the Cloudflare Enterprise page. |
| Payment does not complete | The payment method needs confirmation, failed, or the team has insufficient balance. | Follow the payment prompt, update the payment method, or add sufficient team balance, then retry from the site page. |
| Domain remains Pending Verification | One or more ownership or routing records are missing, incorrect, duplicated, or not yet propagated. | Compare every type, name, and target with the current xCloud panel. Correct the DNS record, wait for publication, then select Verify Records again. Follow the guide for your DNS provider if the root record is refused. |
| Verification record is present but not detected | The record is proxied, entered at the wrong DNS provider, or created with an incorrect host value. | Confirm the authoritative nameservers, set validation records to DNS only when using Cloudflare DNS, and check whether the provider automatically appends the zone name. |
| SSL remains Pending Validation | Ownership validation is incomplete or Cloudflare is still issuing the certificate. | Keep the validation records published, wait, select Refresh status, and verify again. Do not remove validation records after the first successful check. |
| The domain went offline after heavy traffic | The domain used up its monthly bandwidth and Cloudflare Enterprise was turned off. | Add bandwidth. The domain is turned back on automatically. |
| Site stops resolving after traffic cutover | The traffic record is missing, conflicts with an existing record, or points to the wrong target. | Restore the last known working DNS record if immediate rollback is required, then compare the traffic record with the value shown by xCloud before retrying. |
| Changes are visible in WordPress but not to visitors | Cached content was not purged and automatic cache purge is not installed. | Select Install now for automatic purge or use Settings → Purge Cache after confirming a domain is Active. |
| Analytics or security panels show no data | The selected period has no matching traffic or events, or data has not arrived yet. | Generate normal site traffic, choose a wider range, wait briefly, and use refresh. Do not use an empty panel as the only activation check. |
| Settings cannot be saved | The request failed or the service is not ready for the domain. | Confirm the domain is Active, reload the page, apply the change again, and contact xCloud Support if the save continues to fail. |
Common mistakes
- Activating the add-on before arranging access to authoritative DNS.
- Copying example DNS values from documentation instead of the values generated for the domain.
- Treating Pending Verification as an error immediately after publishing DNS.
- Proxying validation records when the panel requires DNS-only records.
- Assuming a verified ownership record means the traffic cutover and SSL certificate are also complete.
- Leaving the settings form without selecting Save Changes.
- Purging cache repeatedly while the domain is not Active.
- Interpreting zero analytics or zero security events as a failed installation.
FAQ
Is Cloudflare Enterprise activated for every team site at once?
No. The purchase and activation are domain-specific. Repeat the process for each additional domain that needs the service.
Can I activate the add-on without DNS access?
You can start the purchase, but activation cannot complete until the required records are published at the authoritative DNS provider.
Why are there separate domain and SSL statuses?
They report different checks. The domain status covers Cloudflare Enterprise routing and verification, while SSL status covers certificate validation and availability. Both should be Active before you consider the setup complete.
Should I remove the validation record after activation?
No. Keep the records xCloud marks as safe to add anytime unless xCloud Support or the product UI explicitly instructs you to remove them.
When should I use Purge Cache?
Use it after publishing content or configuration changes that are still being served from Cloudflare cache. Purge specific URLs or Cache-Tags when only part of the site changed. Install automatic cache purge for supported WordPress changes when the prompt is available.
Where can I see every Cloudflare Enterprise subscription for the team?
Open Addons → Cloudflare Enterprise. The team-level page lists managed domains, related sites, bandwidth, status, creation time, and actions.
Next steps and related guides
- Use Cloudflare Enterprise for an external domain
- Purge Cloudflare Enterprise cache by URL or Cache-Tag
- Add Cloudflare Enterprise bandwidth
- Fix Cloudflare Enterprise errors 525, 526, 1014, and the www hostname
- xCloud documentation
- Contact xCloud Support from the dashboard if payment succeeds but activation repeatedly fails after correct DNS records are publicly visible.