

How to Migrate from Cloudways to xCloud (Full Server Migration)?
Updated September 25, 2026 · 10 min read
Moving your WordPress sites from Cloudways to xCloud is now seamless with xCloud’s Cloudways Full Server Migration provider. You can migrate all your WordPress sites in bulk without root access, without manual database exports, and without touching each site individually.
xCloud handles site discovery, file transfer, database migration, and search-replace automatically. You only need your Cloudways Master Credentials to get started. This guide takes you from preparing the Cloudways server through the migration itself to validation, DNS cutover and rollback, so you can move a whole server with a known recovery path at every step.
Why Migrate from Cloudways to xCloud?
Cloudways is a managed platform, they control the server environment and limit what you can do. When you migrate to xCloud, you get:
- Full server control — root access, custom configurations, no platform lock-in
- Transparent pricing — pay for your VPS directly, not a markup on top of it
- Bring your own server — use Vultr, DigitalOcean, Hetzner, AWS, or any VPS provider
- No per-site fees — manage unlimited sites per server on one flat license
Is this the right migration path?
Use this workflow when the sites are WordPress installations on the same Cloudways Flexible server and you can access that server’s Master Credentials. Cloudways describes Master Credentials as server-level SSH/SFTP access across the applications on a server, and xCloud’s Cloudways source uses them to discover the WordPress sites.
Do not use this guide for Cloudways Autonomous or any Cloudways product that only provides application-level credentials. If you cannot see server-level Master Credentials, or you are moving a single site, follow How to Migrate a WordPress Website from Cloudways to xCloud instead, which uses the migration plugin and token. Do not substitute an application username for the master username.
Prerequisites
Before starting the migration, make sure the following are ready:
- A destination server provisioned in xCloud — To migrate your sites to xCloud, you need an already deployed server where your sites can be hosted. You can also create a new server to migrate your sites from Cloudways. Do not reuse a production server that already holds a copy of the same sites.
- Cloudways Master Credentials — SSH username and password (not your Cloudways account login). You’ll find these in your Cloudways dashboard under Server → Master Credentials. SSH port
22must be reachable. - Destination server storage — ensure at least 1 GB of free space more than the total size of your sites on Cloudways. Check Server Overview → Disk Usage.
- A current, verified Cloudways backup — plus a separate, portable copy of any business-critical data you cannot recreate.
- Disable caching plugins — disable Object Cache Pro, Redis, or other caching on source sites before migration.
- Disable security plugins — temporarily disable Wordfence or similar security plugins on source sites.
- Clear all caches on source sites before starting.
- Admin access to each WordPress site for functional checks, and access to the DNS zone for every production domain.
- A maintenance plan for stores, membership sites, forums and other sites that accept writes.
⚠️ Note: Unlike regular Full Server Migration, you do not need root access to your Cloudways server. Cloudways manages SSH authentication through their own dashboard — xCloud handles this automatically when you select the Cloudways provider.
Before you start: inventory, back up, prepare
A full server migration goes smoothly when you know exactly what is on the server before you start.
- Inventory the Cloudways server. List every WordPress application with its domain, disk usage and business owner. Note which sites accept orders, form submissions, account changes or content edits, and record each site’s PHP version, plugins, redirects, scheduled jobs, transactional email path and external integrations. Record the DNS provider and TTL for each domain, and lower production TTLs at least one TTL interval before the planned cutover.
- Create and verify a Cloudways backup. Use Cloudways’ backup controls to take an on-demand backup and confirm its timestamp is later than your last content or configuration change. For critical sites, also keep a files-and-database export outside the source server; a provider snapshot is useful for rollback but is not a portable copy you control.
- Prepare the source sites. Clear page, object and CDN caches, and temporarily disable the caching and security plugins listed above. Do not remove licensing, mail or payment settings just to migrate. Record every temporary change so you can restore it after validation.
Expected result: You have a complete site list with an owner for each validation decision, a recoverable source-side restore point, and source sites that will not block the migration connection.
How to Get Your Cloudways Master Credentials
Your Master Credentials are the SSH login details for your Cloudways server — not your Cloudways account email/password.
Log in to your Cloudways dashboard. Go to Servers and click on the server you want to migrate from.
Click the ‘Master Credentials’ tab.
You’ll see:
- Username — your Cloudways SSH master username.
- Password — your master SSH password.
- Public IP — the server address you will enter in xCloud.
Copy the values into a password manager for the migration window. Do not put them in notes, tickets, screenshots or support messages.
Step 1: Start Full Server Migration & Select Cloudways
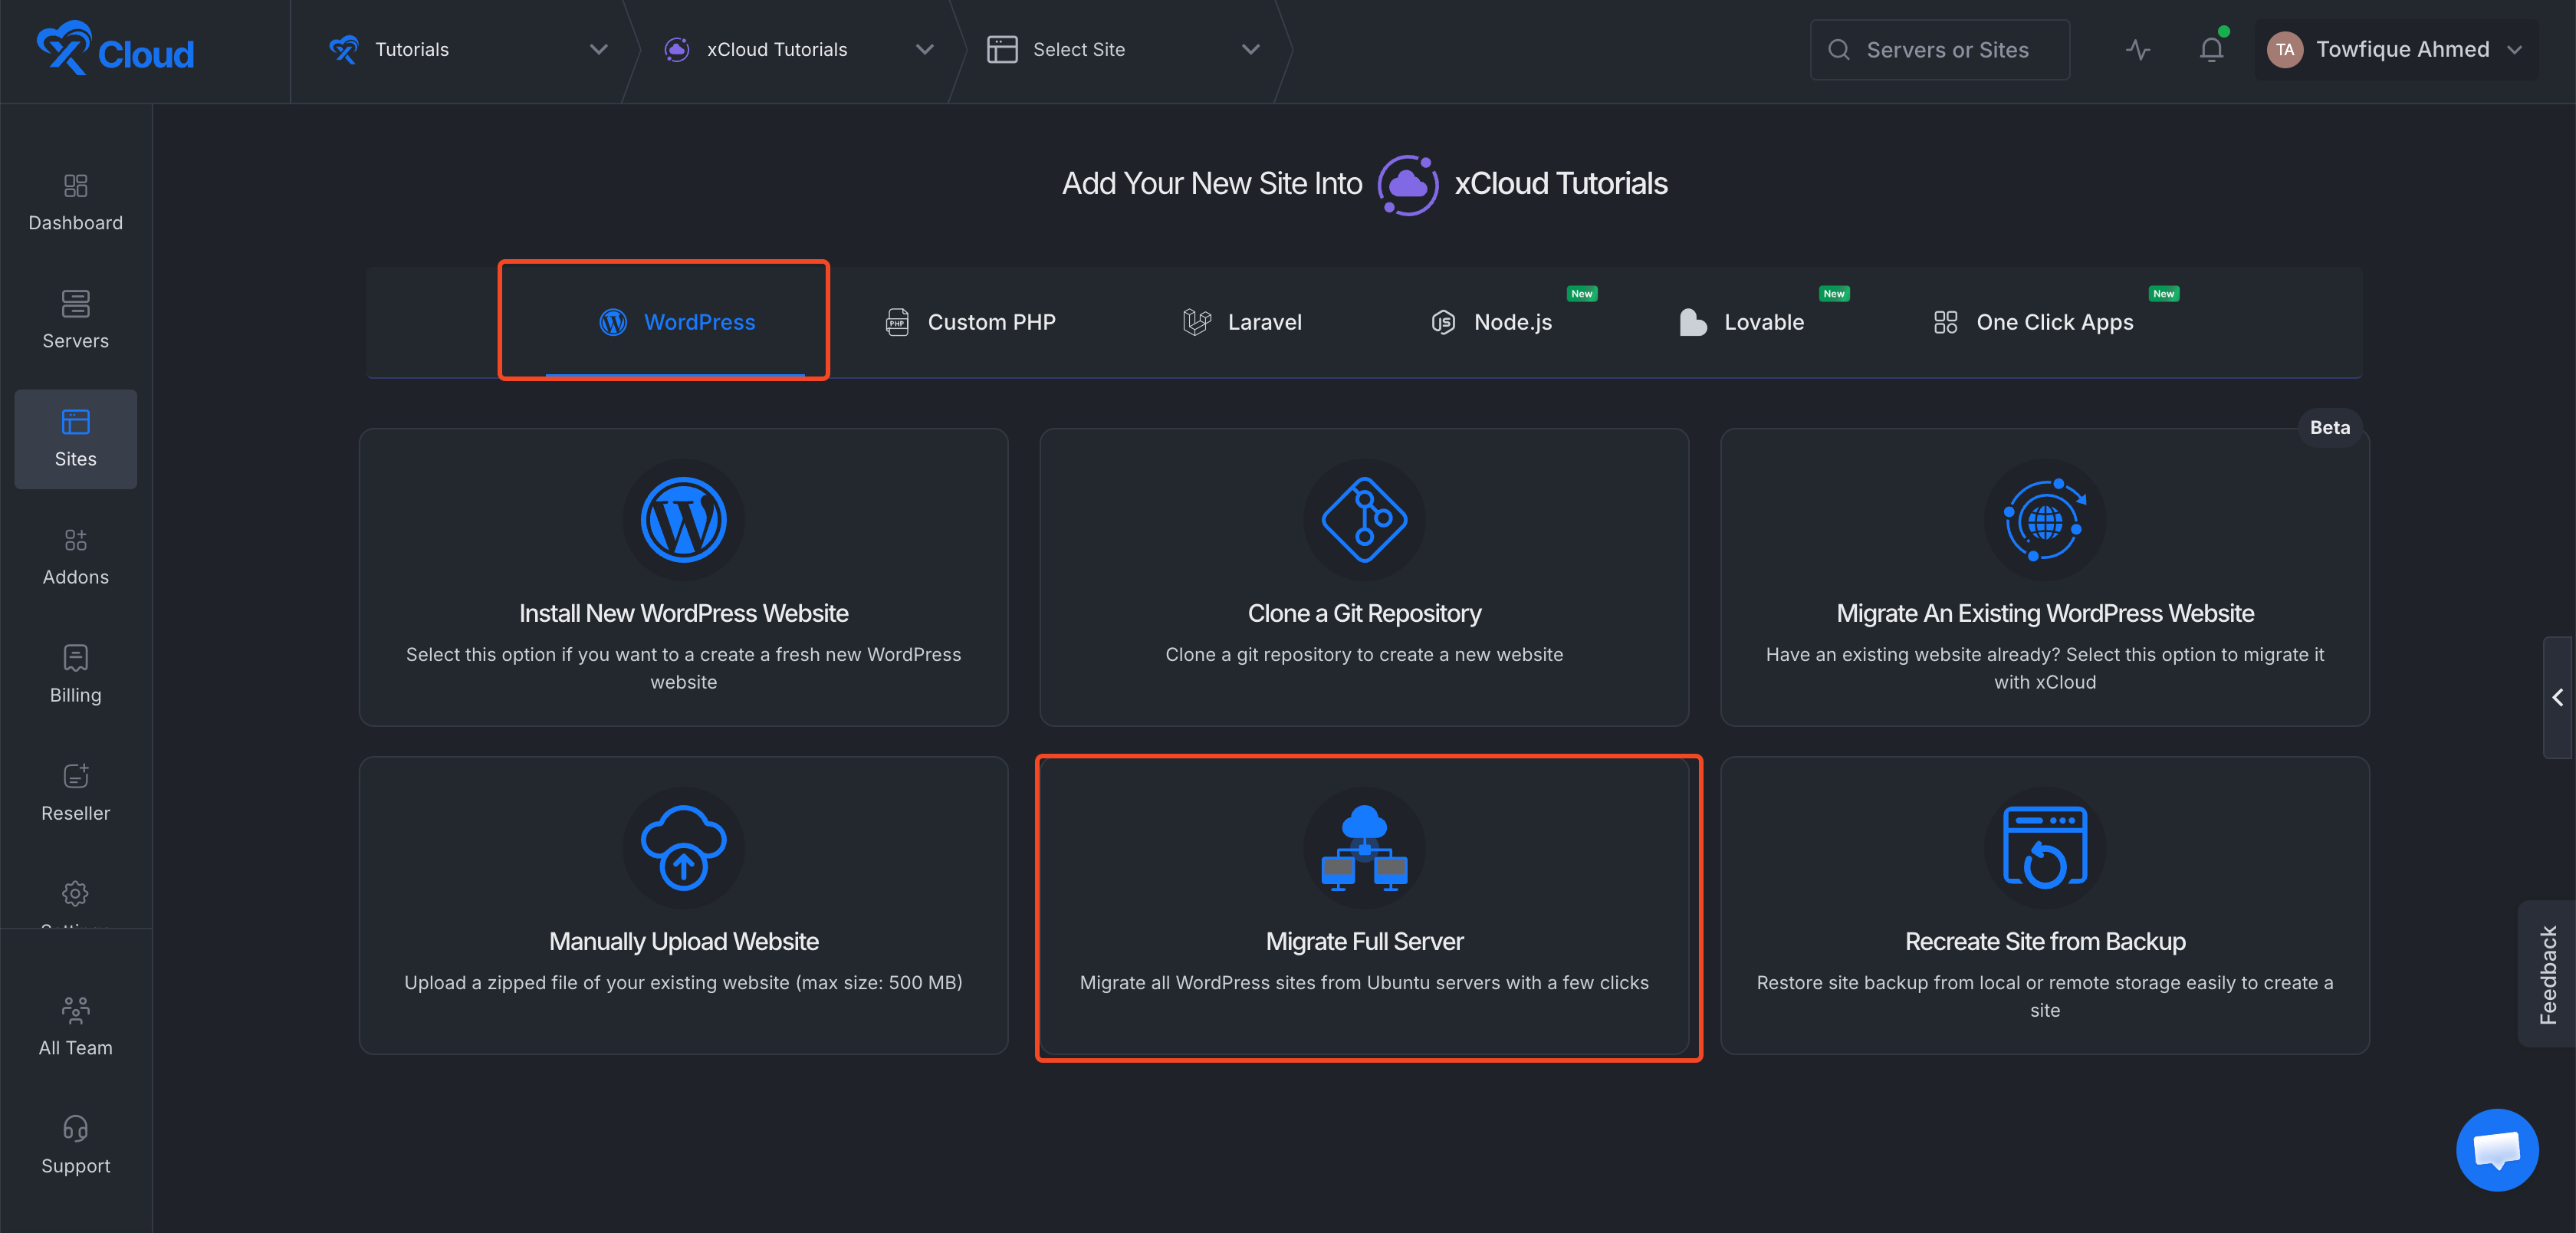
Go to the xCloud dashboard, click ‘Add New Site’, choose the destination server, then click ‘Migrate Full Server’ under the WordPress tab.
Next you will see the server provider options. Choose the ‘Cloudways’ provider on the ‘Source’ page.
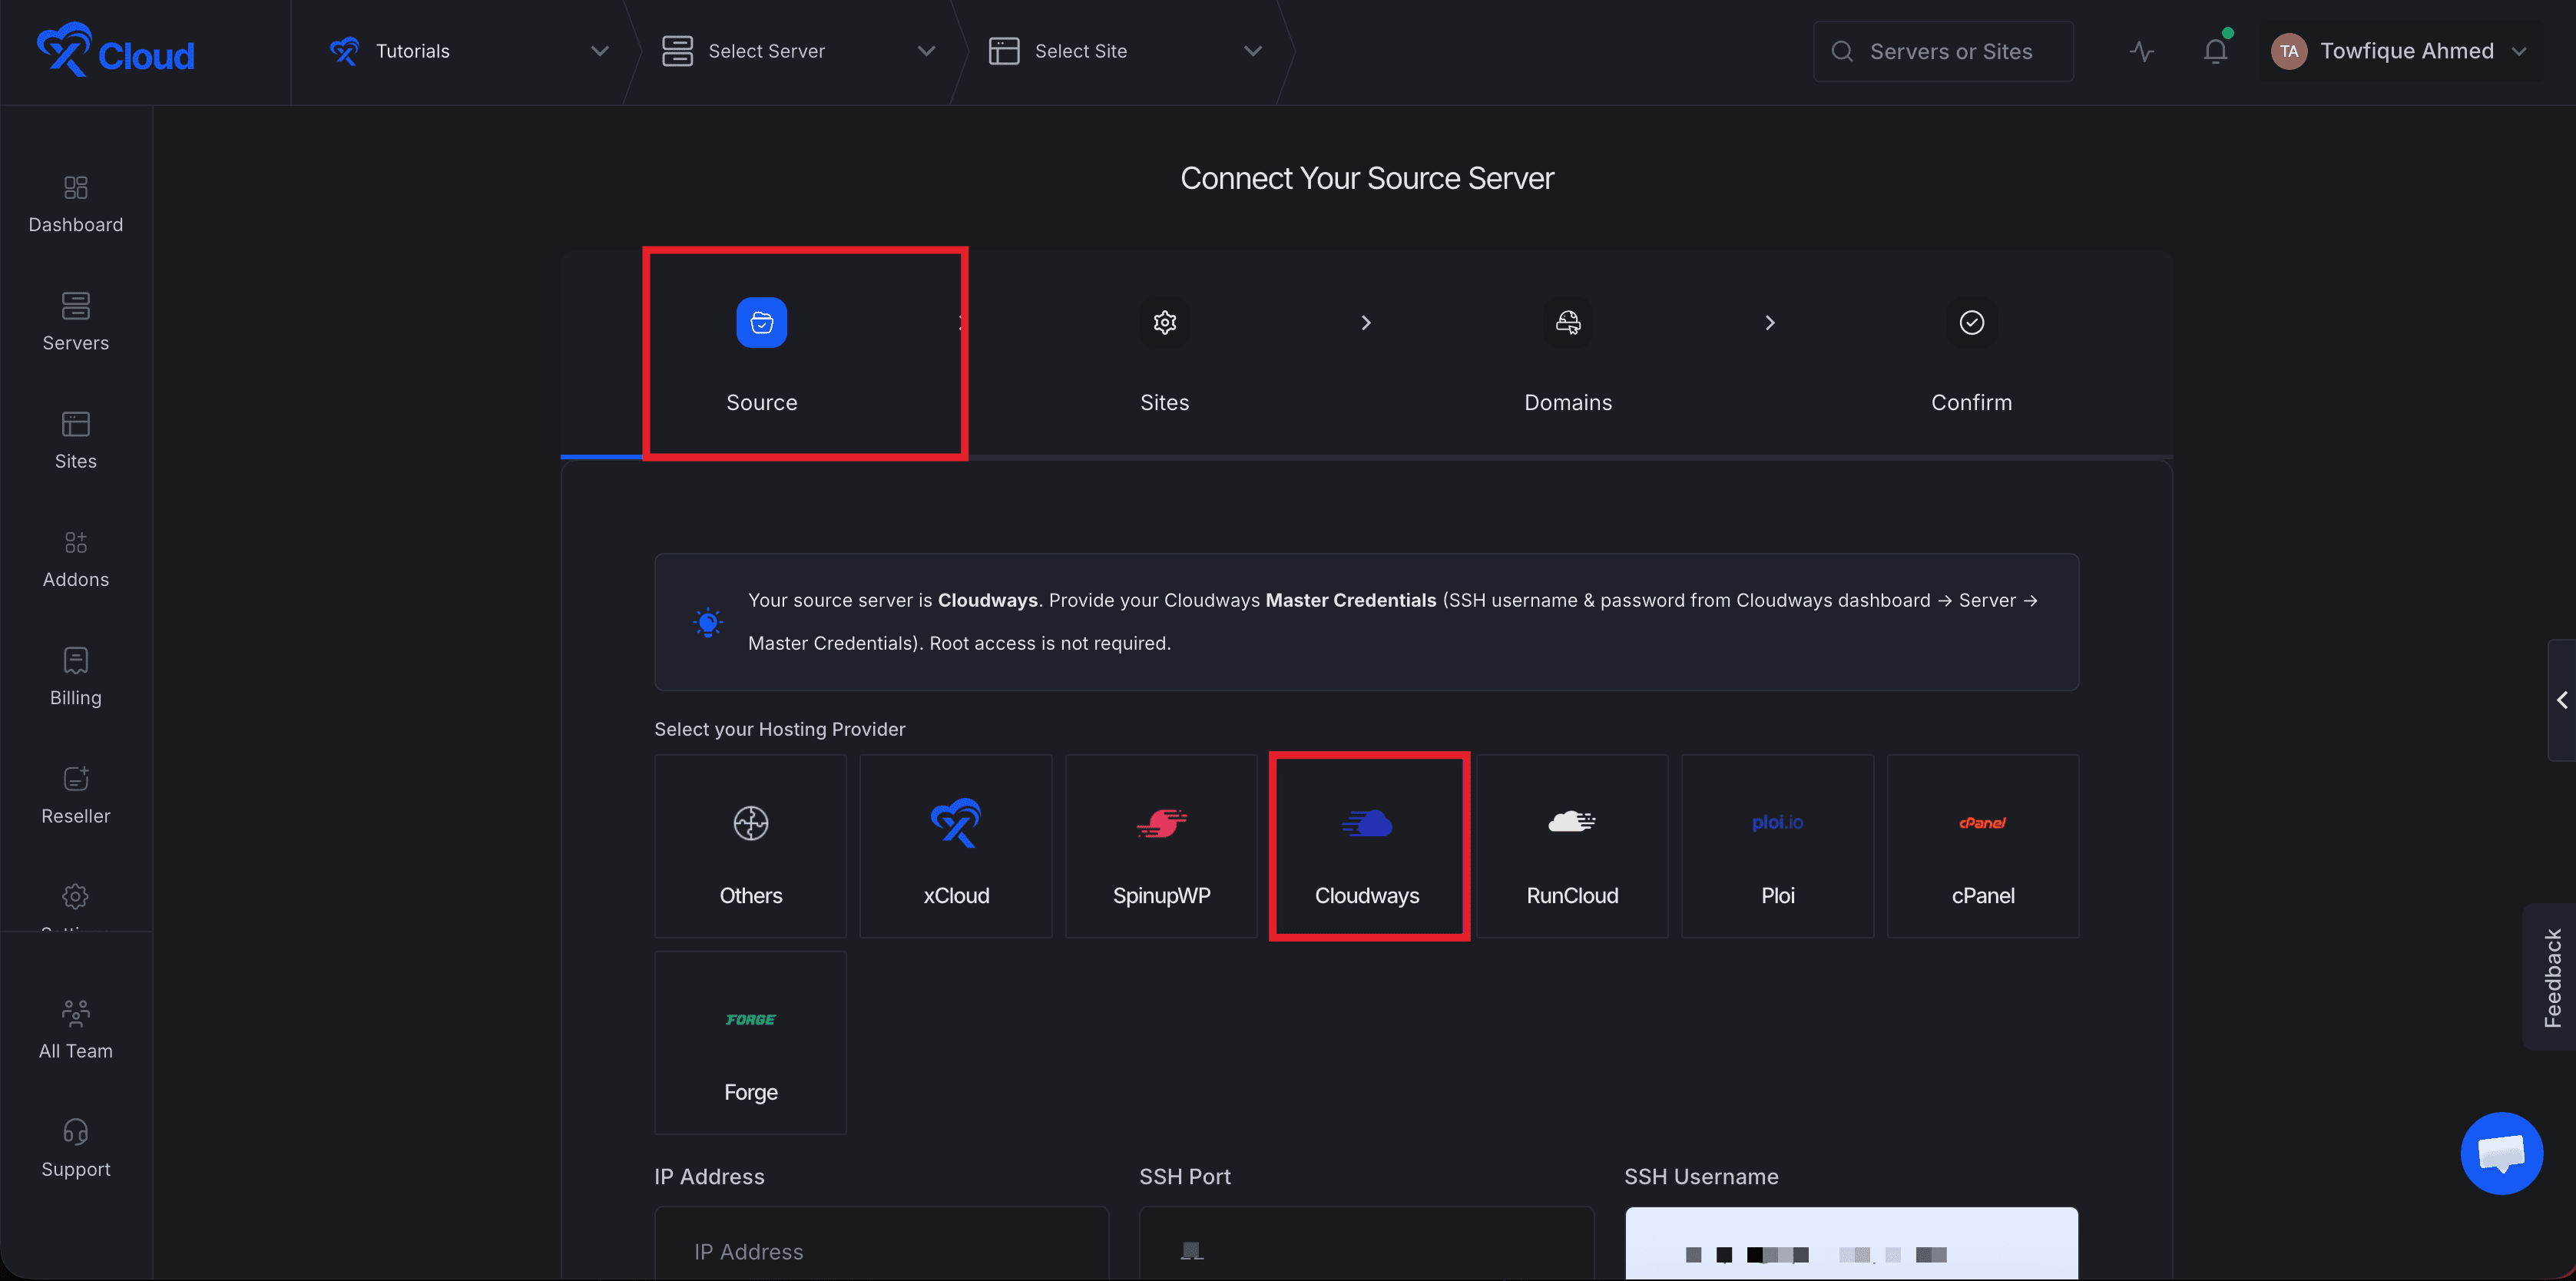
The Cloudways option matters: the generic full server source expects root access, while the Cloudways source accepts the provider’s master username.
Step 2: Enter Your Cloudways Server Credentials
Once you select Cloudways as the provider:
- IP Address — enter the public IP address of your Cloudways server (found in Cloudways dashboard → Servers)
- Port — leave as
22(default SSH port) - SSH Username — enter your Cloudways Master Credentials username (e.g.
master_abc123)
💡 Unlike regular Full Server Migration, where the username is locked to root, Cloudways requires your master username. The username field is editable when Cloudways is selected.
4. Authentication — automatically set to Password (public key option is hidden for Cloudways, since Cloudways manages SSH keys through their own dashboard)
5. Password — enter your Cloudways Master Credentials password
Click Next to verify the connection and proceed to the next steps.
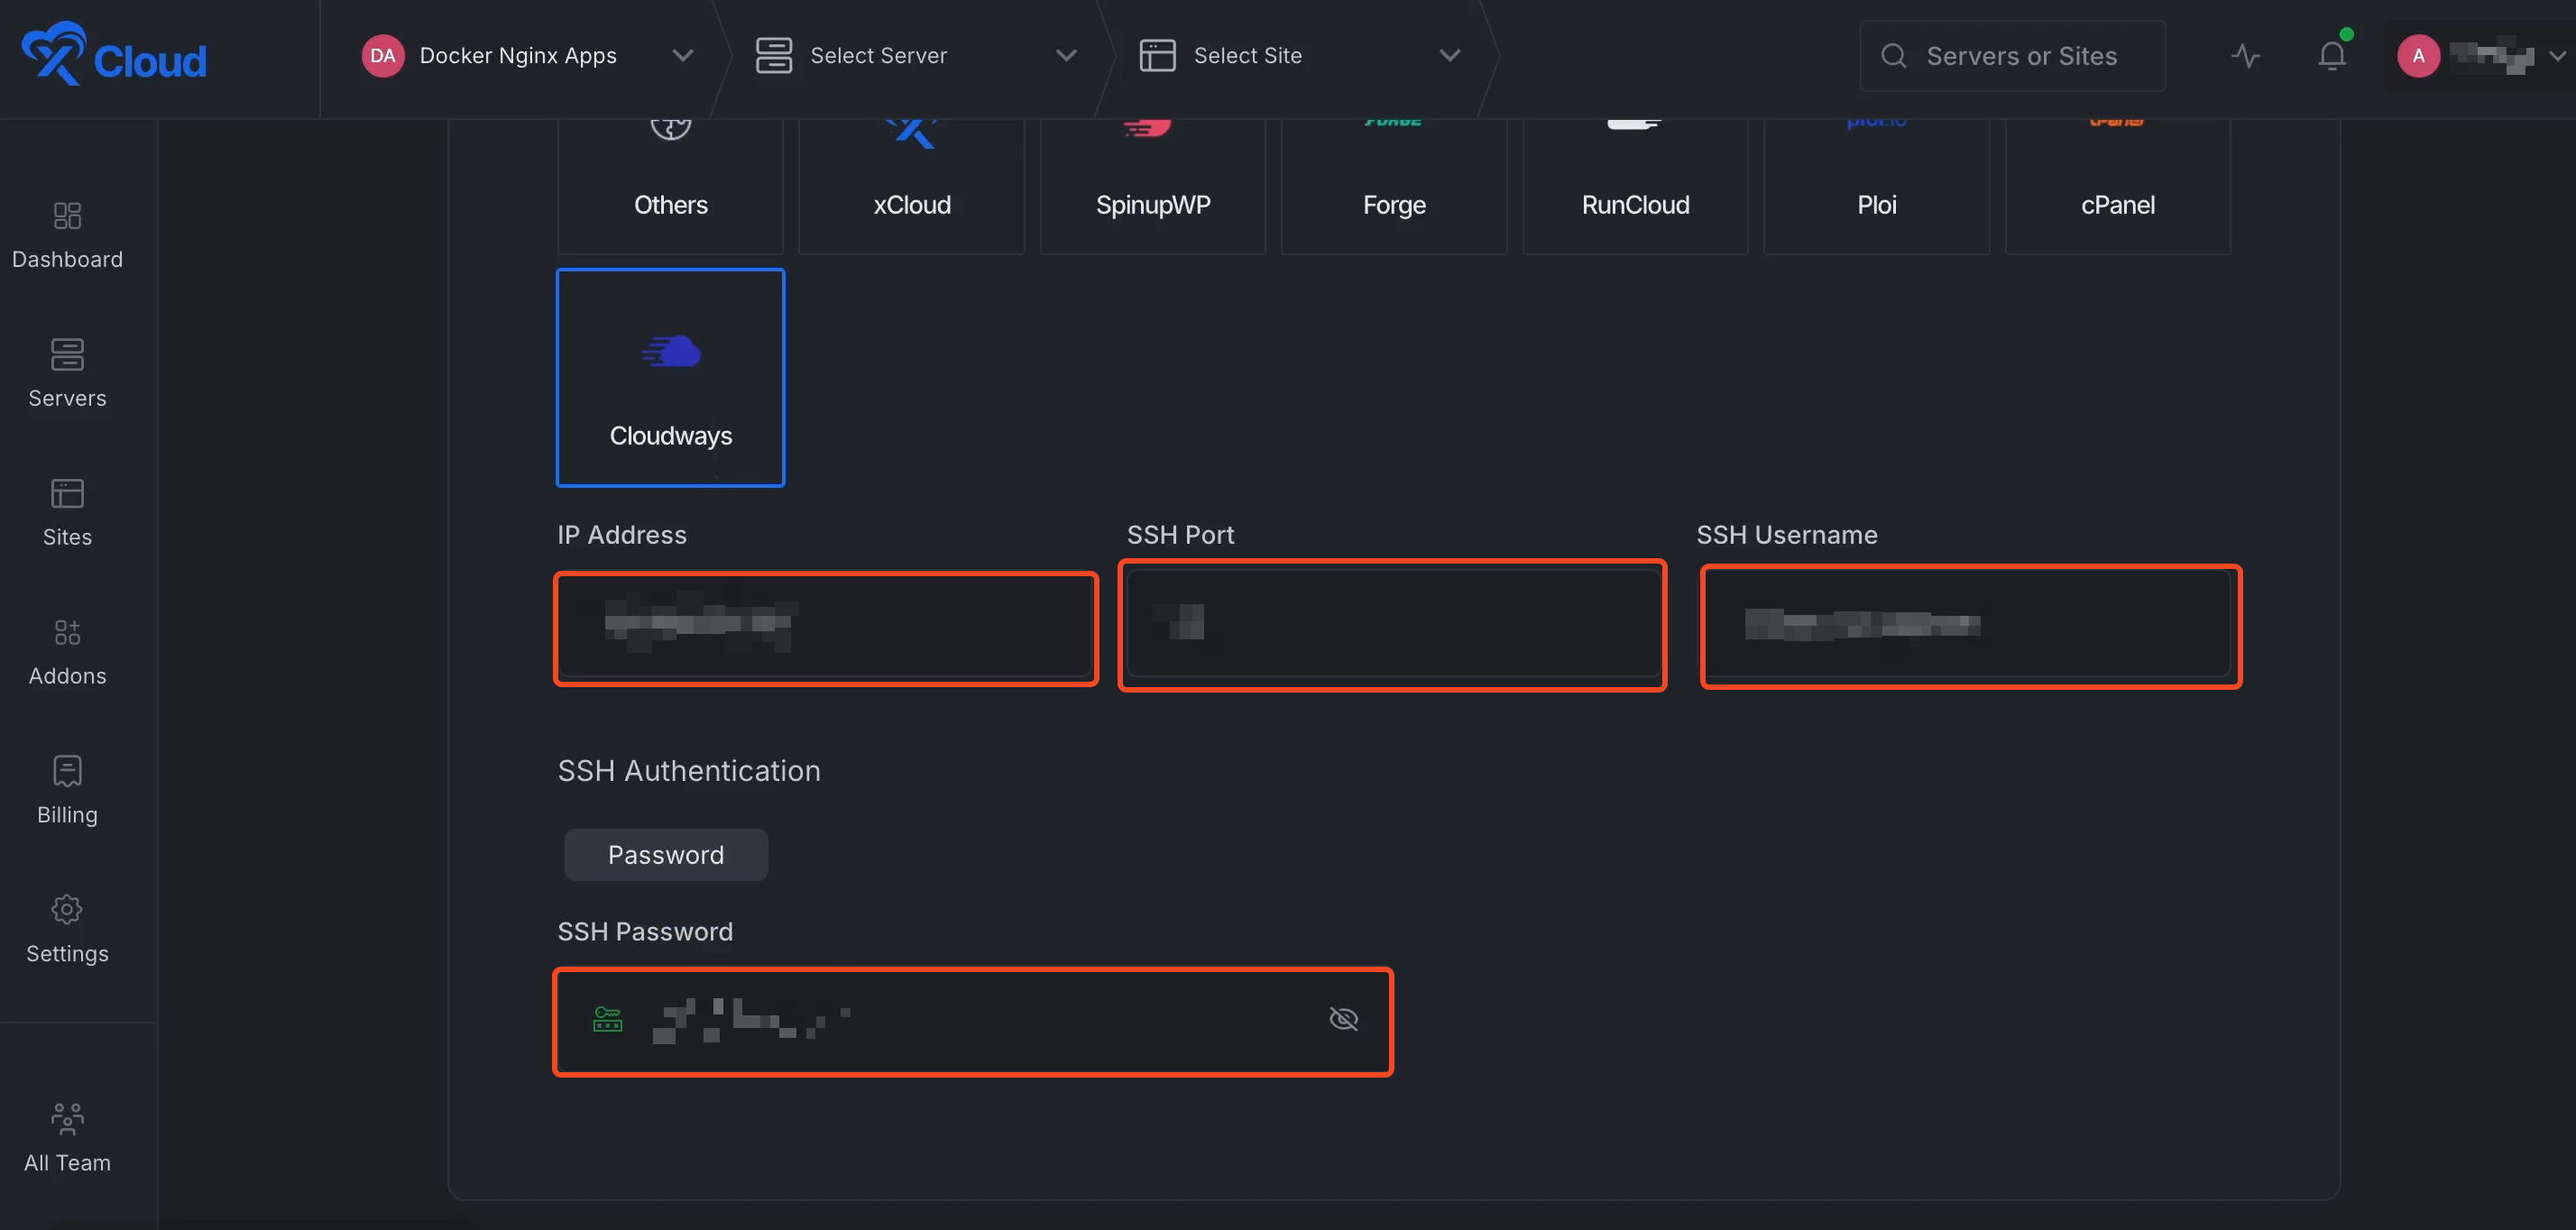
xCloud will connect to your Cloudways server and automatically discover all WordPress installations under your Cloudways applications directory.
Expected result: xCloud accepts the credentials and lists the WordPress sites found on the Cloudways server.
Step 3: Select the Sites to Migrate
After a successful connection, xCloud scans your Cloudways server and lists all WordPress sites.
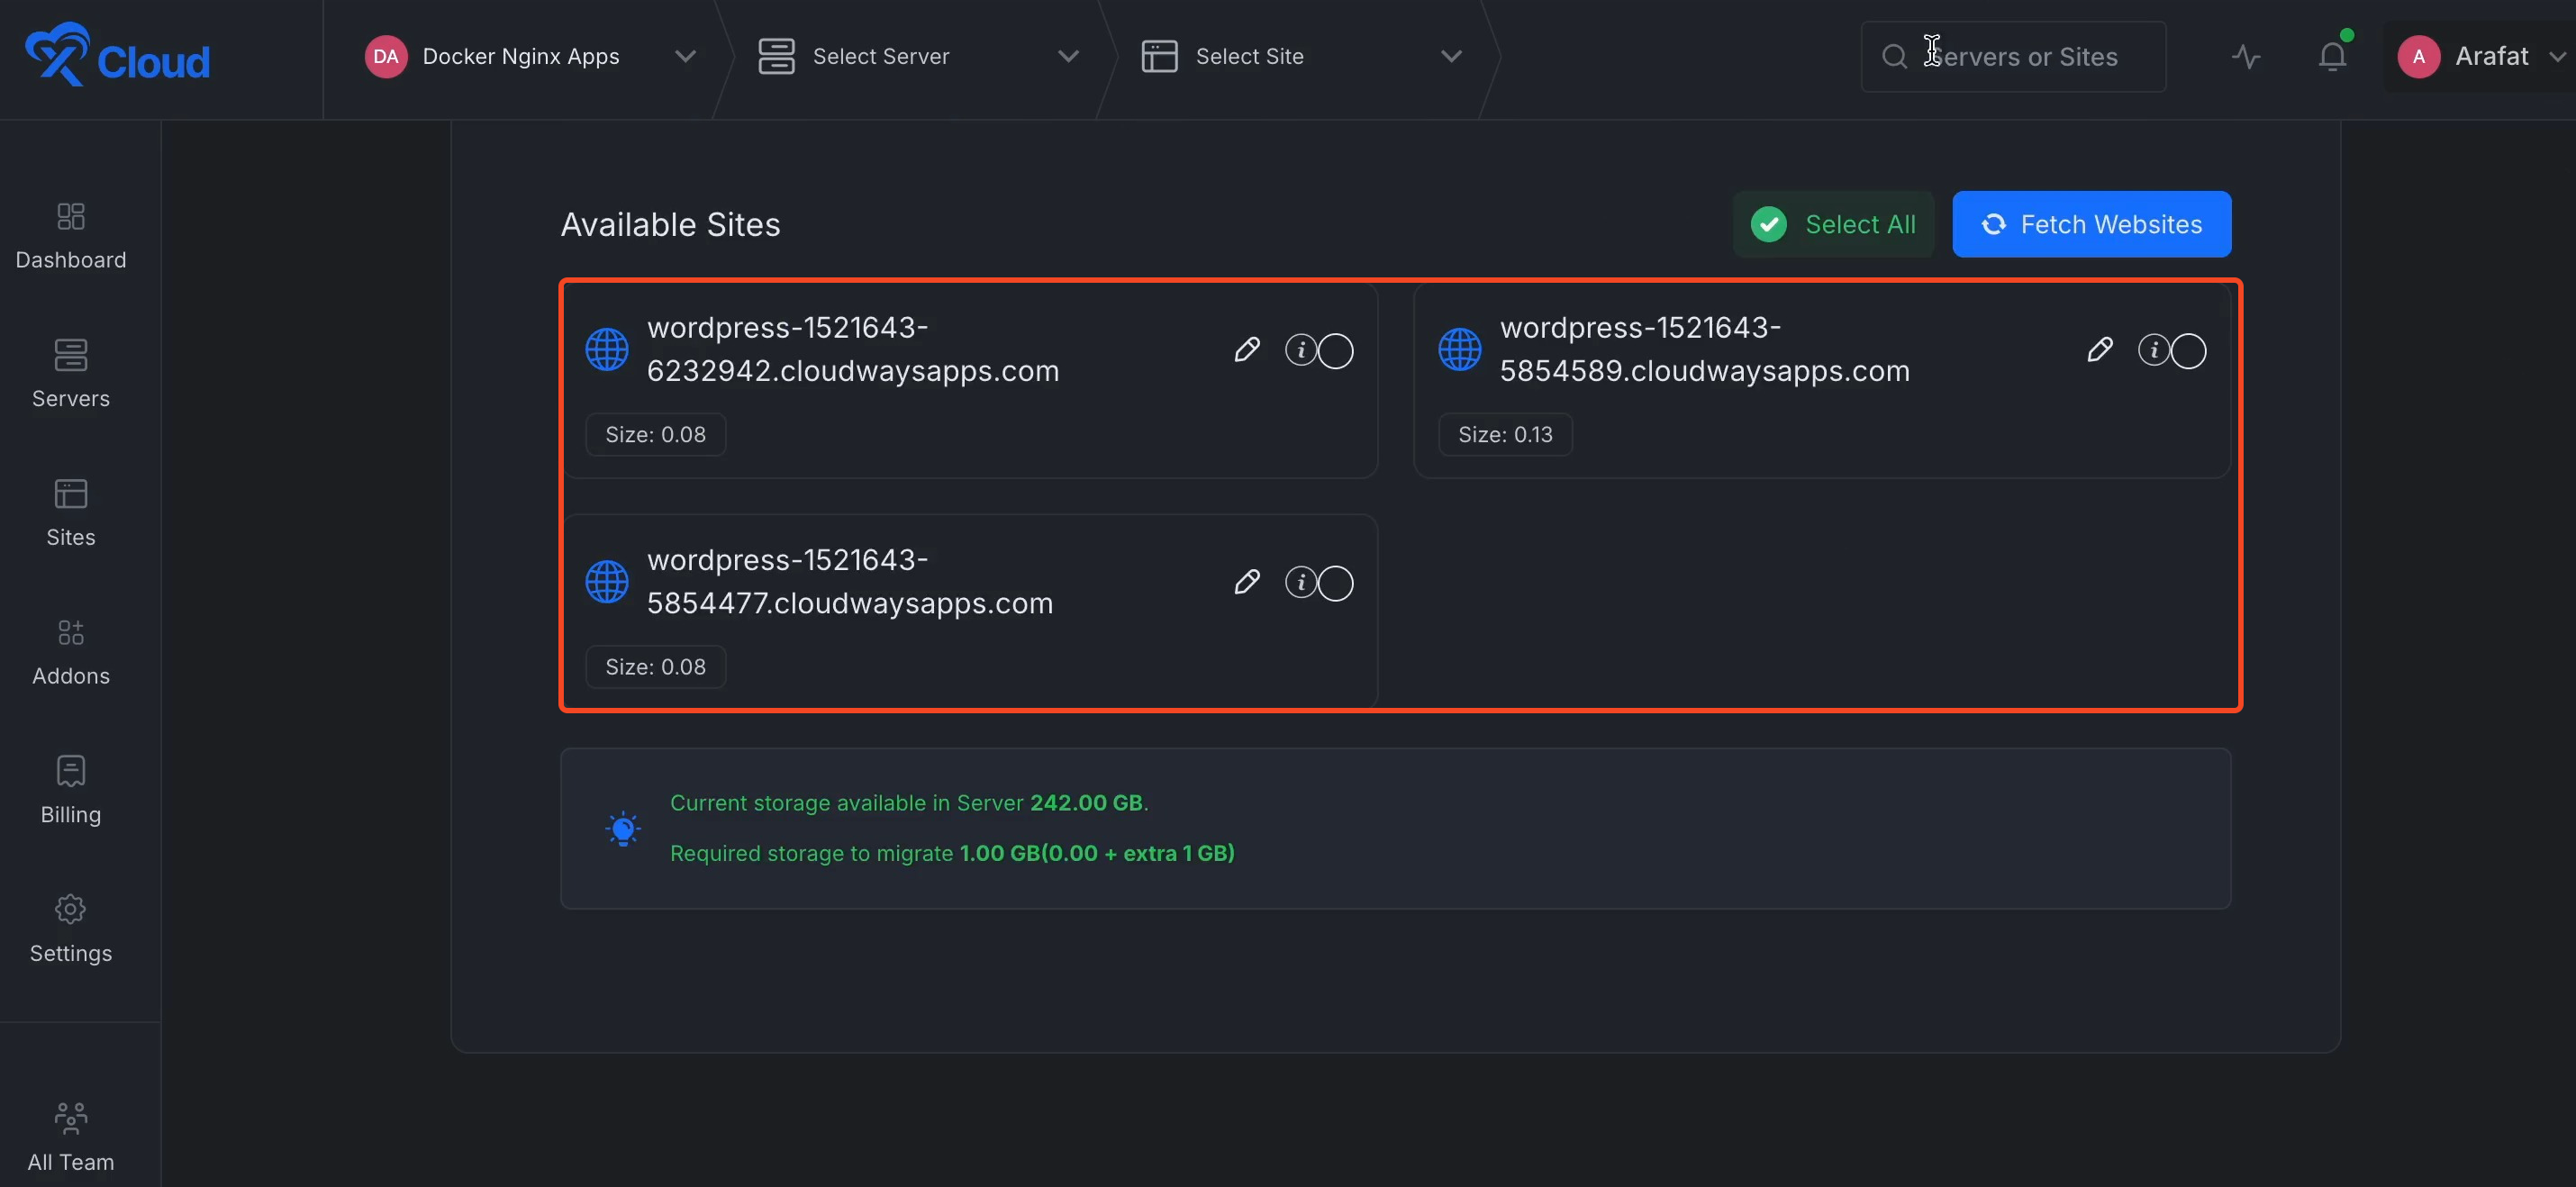
Select the sites you want to migrate — you can select all or choose specific ones. Compare the list with your inventory: if an expected site is missing, stop and check that it is a WordPress installation on this server before continuing, or route it to a site-level migration. Click Next to proceed.
Step 4: Choose Migration Mode — Go Live or Demo
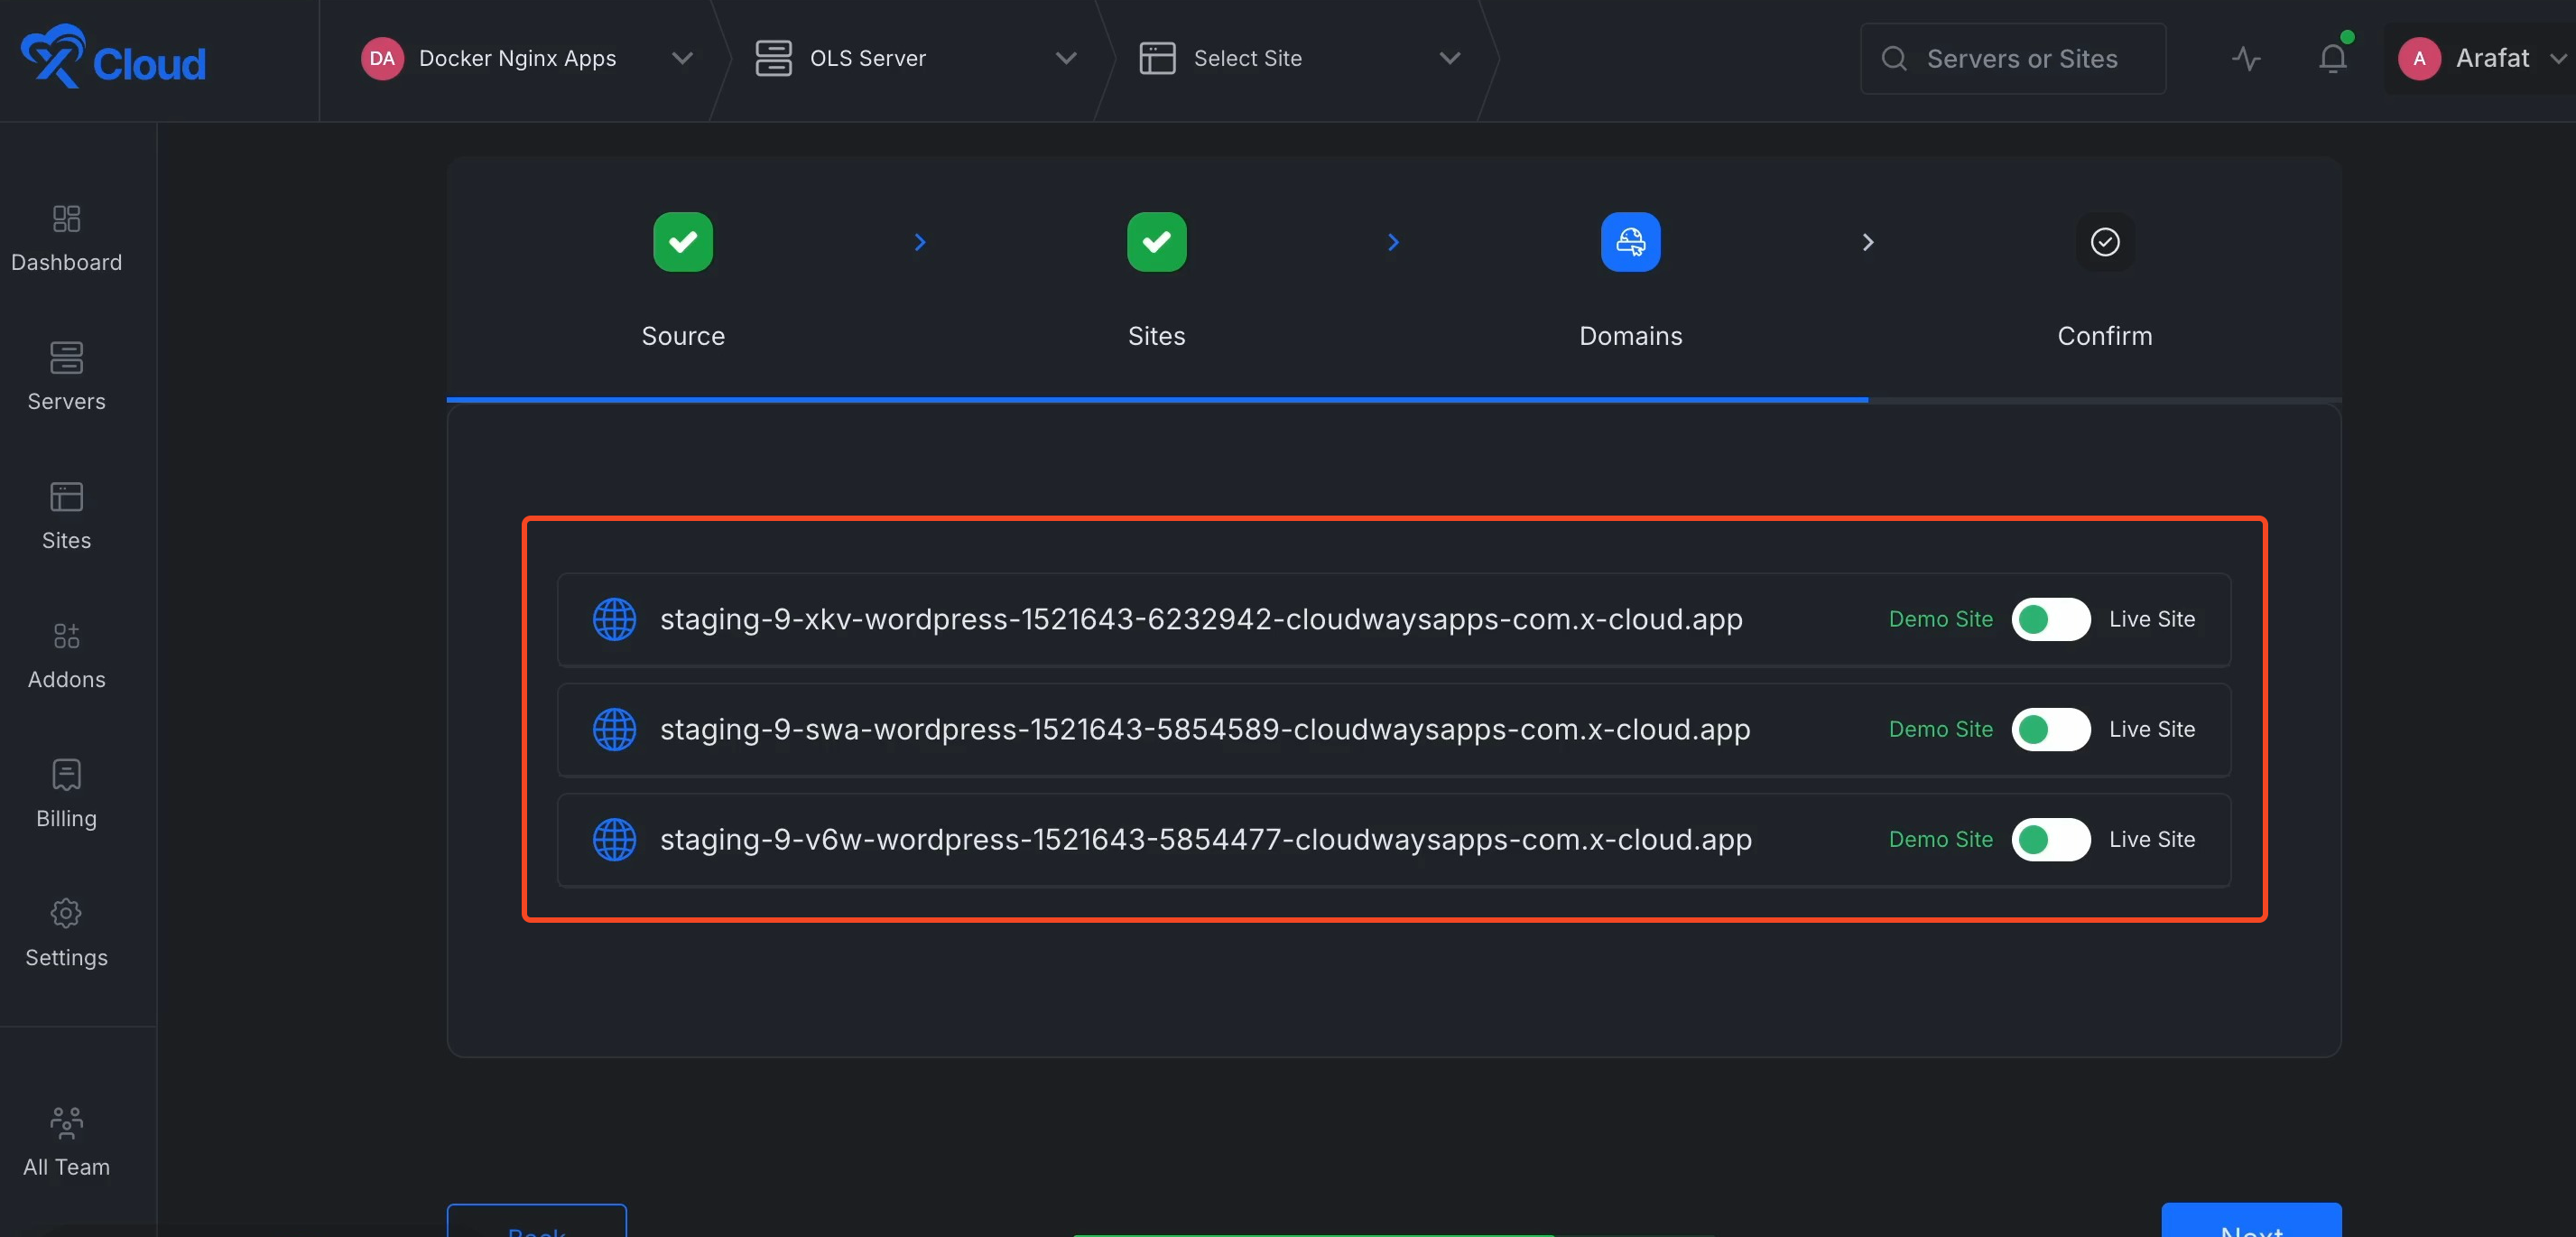
For each site, choose how you want it to land on xCloud:
- Go Live — Migrates directly to the same domain; point your DNS to xCloud when ready
- Demo Site — Creates a site using an xCloud demo domain
We recommend Demo Site for the first run. A demo copy lets you test every site on xCloud before the production domain moves, and a completed transfer alone does not prove that checkout, email, cron or integrations work. Toggle your preferred option for each site and click Next to start the migration.
⚠️ Make sure your destination server has at least 1 GB free storage beyond your total site sizes. Check Server Overview → Disk Usage before starting.
Step 5: Wait for Migration to Complete
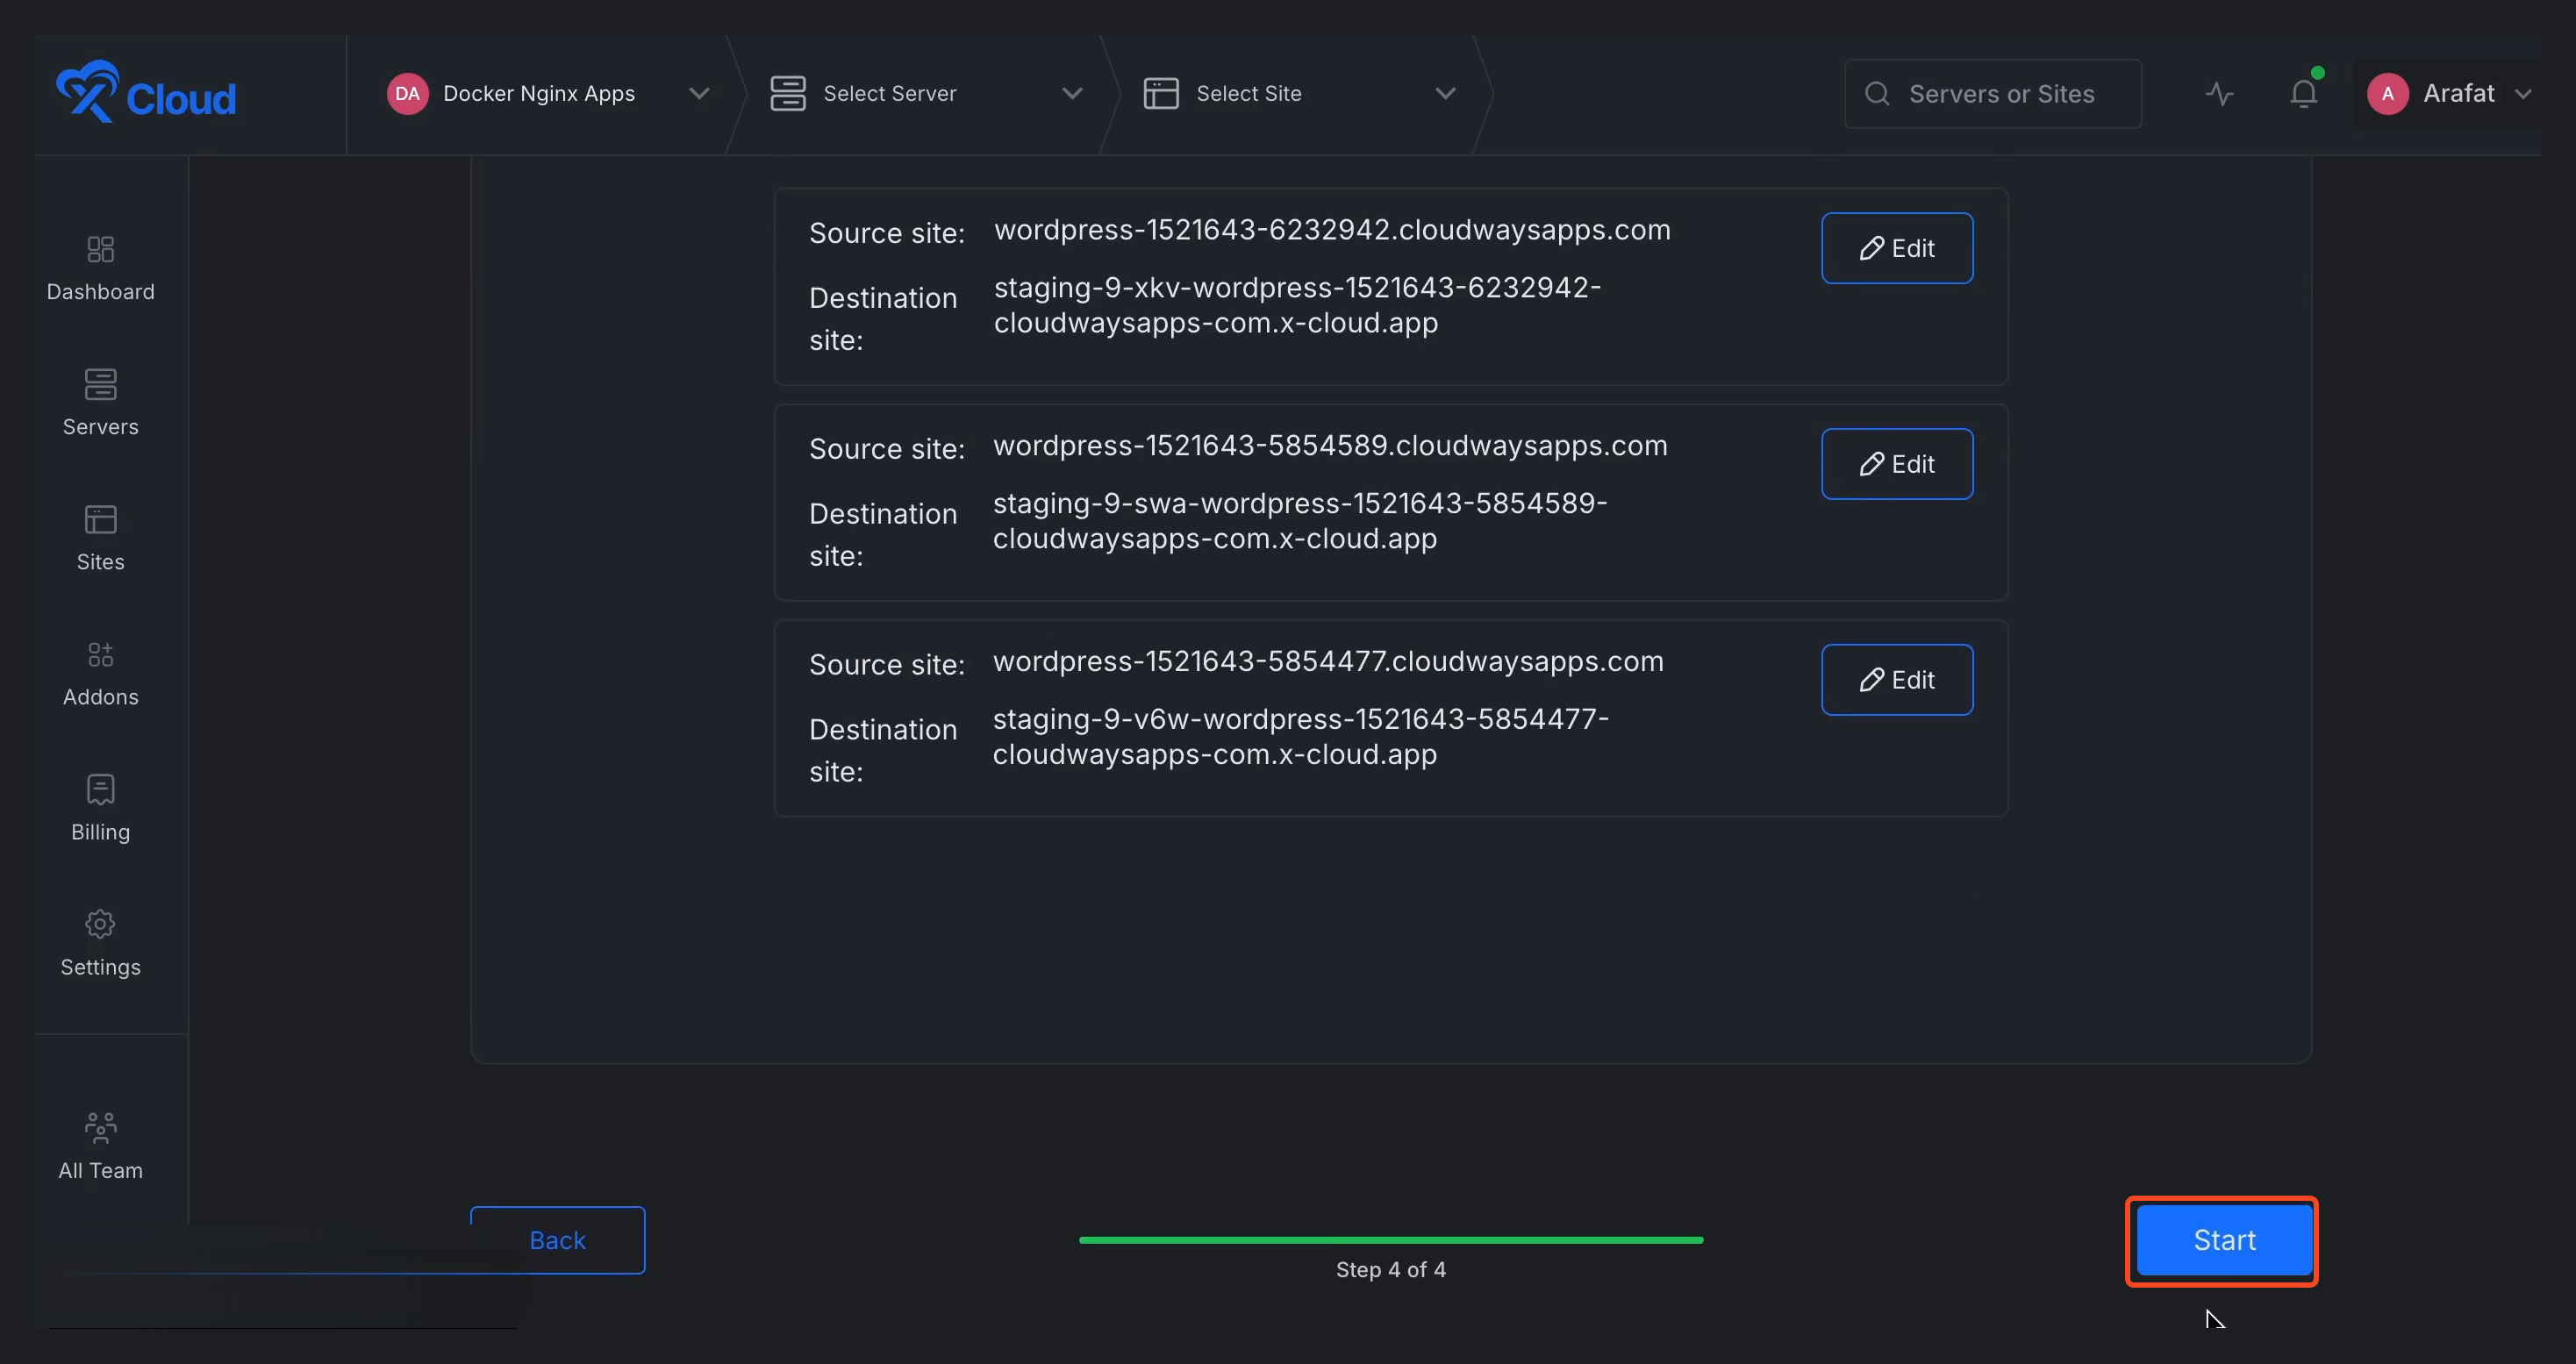
Verify the information and click ‘Start’. xCloud handles the entire migration process automatically:
- File transfer — rsyncs all site files from Cloudways to xCloud
- Database export — dumps the database from Cloudways (
mysqldumpwith managed hosting compatibility) - Database import — imports into the new server’s MySQL/MariaDB
- Search & Replace — updates URLs in the database if domain or path changes
Migration time depends on the total size of your sites. You’ll see real-time progress in the xCloud dashboard.
Step 6: Validate every migrated site
Test each demo site as a visitor and as an administrator (if you chose Go Live, test through your local hosts file). Compare it with the Cloudways source and check:
- homepage, posts, pages, images and downloadable files;
- WordPress admin login and role permissions;
- forms, search, checkout, account creation and password reset;
- plugin and theme behaviour;
- redirects, canonical URLs and permalink structure;
- scheduled jobs and any host-specific cron replacement;
- transactional email delivery through the intended provider;
- external storage, payment, analytics, webhook and API integrations;
- PHP compatibility, error logs and cache behaviour.
Do not treat a successful homepage load as complete validation. Get a sign-off from the owner of each business-critical site.
Expected result: Every site has a recorded pass for content, administration and business transactions, or a documented issue that blocks cutover.
Step 7: Freeze writes and take a destination backup
For stores, membership sites and anything else that accepts writes, schedule a short maintenance window. Pause new orders, registrations, comments, form submissions and editorial changes on the Cloudways source before the final copy.
If a demo copy has become stale since the migration, keep writes paused and run the migration again for that site, or confirm the recopy plan with xCloud support before changing DNS. Do not assume a second migration merges new writes automatically.
Once the final data is present and validation passes, create a backup on xCloud by following Site backups in xCloud. This restore point separates migration work from post-cutover changes.
Expected result: The source has a known final state, and a completed xCloud backup exists for every site at the pre-cutover state.
Step 8: Go Live: switch DNS and verify SSL
Point each production domain at the xCloud server: update the authoritative DNS record to the IP shown for the destination site in xCloud. Move one site or a small group at a time so you can verify each before the next. If you migrated as Demo Site, first change the site’s domain in xCloud; see how to change the primary domain of a site.
Wait for the authoritative answer to show the new IP, then confirm the domain loads the xCloud copy. xCloud provisions SSL automatically after DNS points to the destination. If a certificate is not issued, follow enable HTTPS and configure SSL certificates.
Re-enable destination cron jobs, transactional email and WordPress writes only after DNS and SSL checks pass. Keep the Cloudways source unchanged and read-only during the rollback window, and keep the lowered DNS TTL until that window closes.
Expected result: The production domain resolves to xCloud with a valid certificate, new writes happen only on xCloud, background tasks run once, and the source remains available for rollback.
Verification checklist
The migration is complete when all of the following are true:
- Every approved site appears on the xCloud destination.
- Frontend pages, media and downloads match the source.
- WordPress admin access and required roles work.
- Forms, checkout, login and password reset complete successfully where applicable.
- Scheduled jobs, email and third-party integrations work from xCloud.
- Authoritative DNS points to the destination.
- HTTPS is valid on every production hostname.
- A verified xCloud backup exists.
- The Cloudways source is retained, unchanged and non-authoritative during the rollback window.
Troubleshooting
| Symptom | Likely cause | Fix |
|---|---|---|
| xCloud rejects the SSH connection | Account or application credentials were entered instead of server-level Master Credentials | Return to Cloudways Servers, copy the Master Username and password, confirm port 22, and retry with the Cloudways source option. |
| A WordPress site is missing from discovery | The site is on another Cloudways server, is not a discoverable WordPress installation, or the master account cannot access it | Compare the discovery list with your inventory. Route the missing site to the site-level WordPress migration if it cannot be included. |
| Migration stops because of storage | The destination lacks room for files, database imports or temporary data | Increase destination capacity or reduce the set of sites. Keep at least 1 GB free after the copy. |
| Demo pages redirect to the production domain | WordPress URLs, a cache or a plugin-level redirect still point to Cloudways | Clear destination caches and inspect the WordPress URL and redirect settings. Revalidate before cutover. |
| The site works but forms, checkout or email fail | An external integration, cron task or mail path was not recreated | Compare the destination with your pre-migration inventory, correct the integration and repeat the transaction test. |
| HTTPS does not issue after DNS cutover | DNS has not reached the destination, or a proxy or CAA setting blocks validation | Verify the authoritative DNS answer first, then review the HTTPS and SSL guide. |
| Content is missing after cutover | Writes continued on Cloudways after the copy | Pause writes on both sides, decide which copy is authoritative and get a supported final-sync plan. Do not overwrite either side blindly. |
Common mistakes
- Using the generic full server path. Cloudways has a provider-specific source that uses Master Credentials rather than root.
- Using application credentials. They are scoped to one application and are not the server-level credentials required for bulk discovery.
- Skipping the demo copy. A completed transfer does not verify checkout, email, cron or integrations.
- Changing DNS before the final write decision. This can split new data between Cloudways and xCloud.
- Running cron or scheduled tasks on both servers. Duplicate processing can send repeated email or run maintenance twice.
- Deleting the Cloudways server immediately. Keep it unchanged through the agreed rollback window.
Rollback guidance
If a blocking issue appears after cutover, stop writes and background processing on xCloud and keep the Cloudways source read-only. Capture any new destination data before changing DNS so the site owner can reconcile orders, accounts or submissions.
Point the authoritative DNS records back to the original Cloudways values and wait until destination traffic drains. Resume Cloudways writes and scheduled processing only after you confirm users are reaching the source again. If no reverse synchronization was prepared, some destination-only writes may need manual reconciliation.
Do not delete the xCloud copy during rollback. Keep both environments and their backups until the owner confirms which dataset is authoritative.
Frequently asked questions
Does a Cloudways full server migration require root access?
No. The Cloudways source in xCloud uses the server’s Master Username and password, not root. xCloud’s generic full server migration is the one that normally requires root.
Can I use Cloudways application credentials?
No. Application credentials are limited to one application. Use the server-level Master Credentials for the Cloudways full server flow. If your Cloudways product exposes only application credentials, migrate each site with the site-level WordPress migration instead.
Can I migrate only some sites from the server?
Yes. The discovery screen lets you select all discovered sites or specific ones. Record any site you leave out so it is not mistaken for a failed migration.
Does this process guarantee zero downtime?
No. DNS changes, SSL issuance and a final write freeze can affect the cutover. Plan a short maintenance window for stores and other sites that accept writes, and keep a tested rollback route.
Related xCloud documentation
- Perform a full server migration with xCloud (the generic, root-based flow)
- Migrate an existing WordPress website in xCloud
- Site backups in xCloud
- Enable HTTPS and configure SSL certificates
- Request site migration support from xCloud
And that’s it, this is how easily you can migrate your sites from Cloudways to xCloud. Still stuck? Feel free to reach out to our support team.