

How to Host WordPress on Contabo with xCloud
Updated September 23, 2026 · 5 min read
You can host WordPress on Contabo with xCloud by creating a clean Ubuntu 24.04 LTS server at Contabo, connecting it through xCloud’s Other Providers option, and then creating a WordPress site on the provisioned server. This guide covers the complete path from the provider setup to a working WordPress installation.
Important: xCloud provisioning is designed for a fresh server. Do not connect a server that already hosts websites, a database, or another server-management stack.
Prerequisites
- An active Contabo VPS or cloud server
- Ubuntu 24.04 LTS x64 installed on a fresh server
- At least 1 GB of RAM
- The server’s public IPv4 address
- Root-level SSH access through a password or public key
- Inbound TCP ports 22, 80, and 443 open
- An xCloud account
- A domain you can point to the new site
Prepare a Contabo VPS or VDS
Install a fresh Ubuntu 24.04 LTS x64 image from the Contabo Customer Panel. Contabo lets you choose the operating system and set the server password during installation.
- Sign in at
new.contabo.com. - Open Servers & Hosting, then choose VPS or VDS.
- Open the server’s More menu and select Install or Reinstall.
- Choose Standard installation, select Ubuntu 24.04 LTS x64, and set a strong system password.
- Start the installation and wait for the server status to show that it is ready.
- Record the server IP address and username from the Your login data! email. Keep the password you set during installation; Contabo states that it does not store or email this password.
If you assign a Contabo Firewall to the server, create inbound TCP accept rules for ports 22, 80, and 443 first. An active Contabo Firewall blocks all incoming traffic by default unless an allow rule matches.
Connect the Contabo server to xCloud
Step 1: Select Other Providers
Sign in to xCloud, start the add-server flow, and select Other Providers. This option connects an existing fresh server that xCloud does not create through a native provider integration.
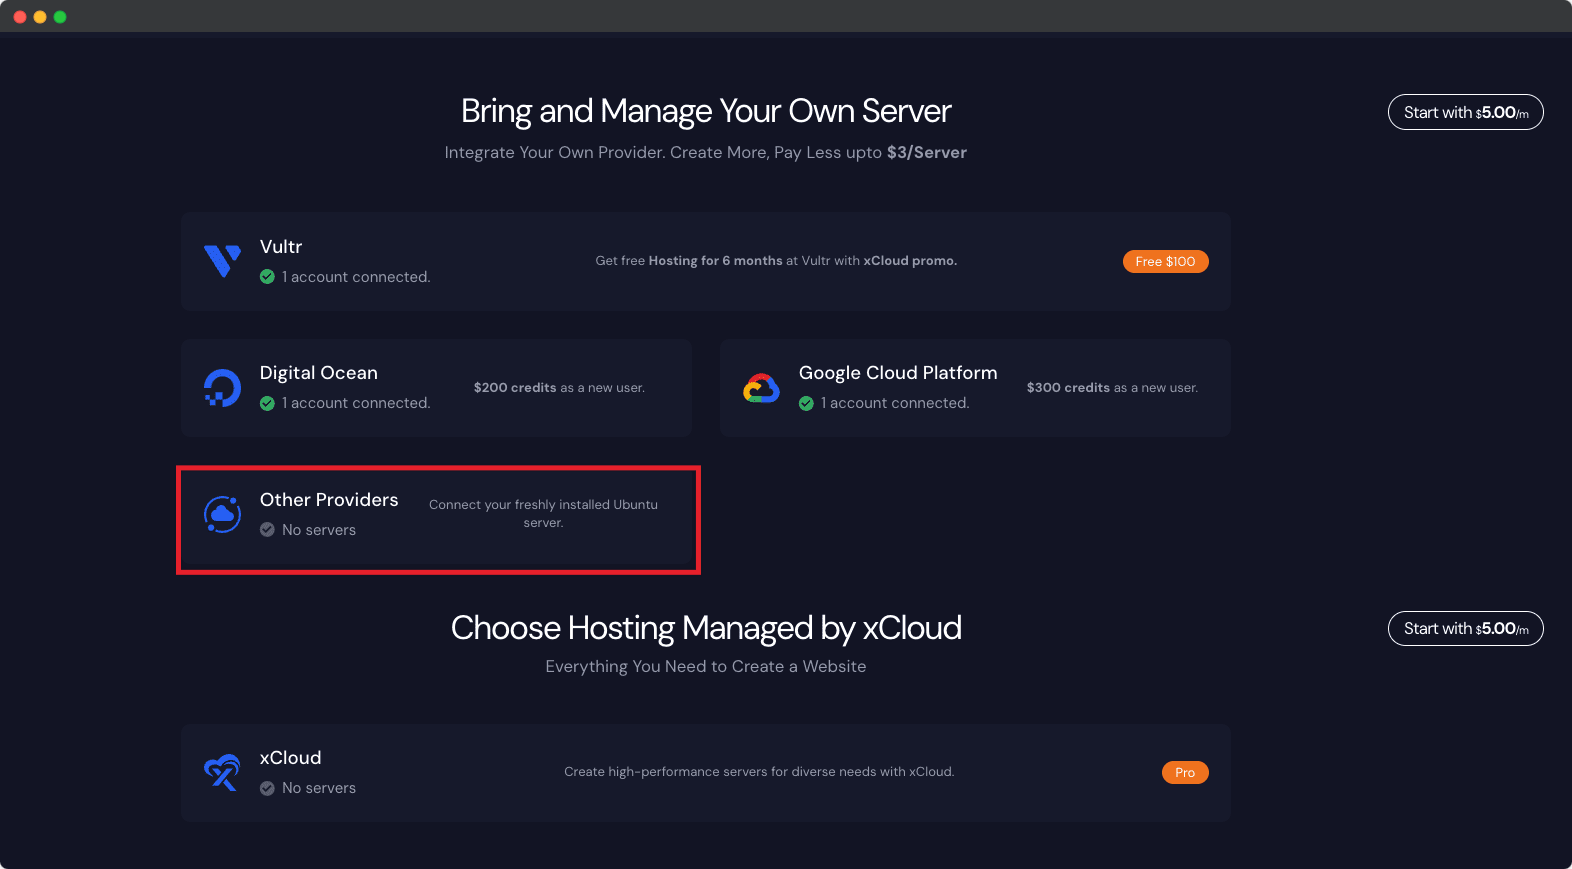
Expected result: xCloud opens the form for connecting an existing server.
Step 2: Enter the server details
Enter a clear server name, select the nearest location, and provide the public IPv4 address. Choose the web server stack you want to use, such as NGINX or OpenLiteSpeed.
Contabo does not email or retain the system password you choose during installation. Save it securely before starting the install.
Step 3: Choose an SSH authentication method
Use either the password or public key method. The account must give xCloud root-level access to install and configure the web stack.
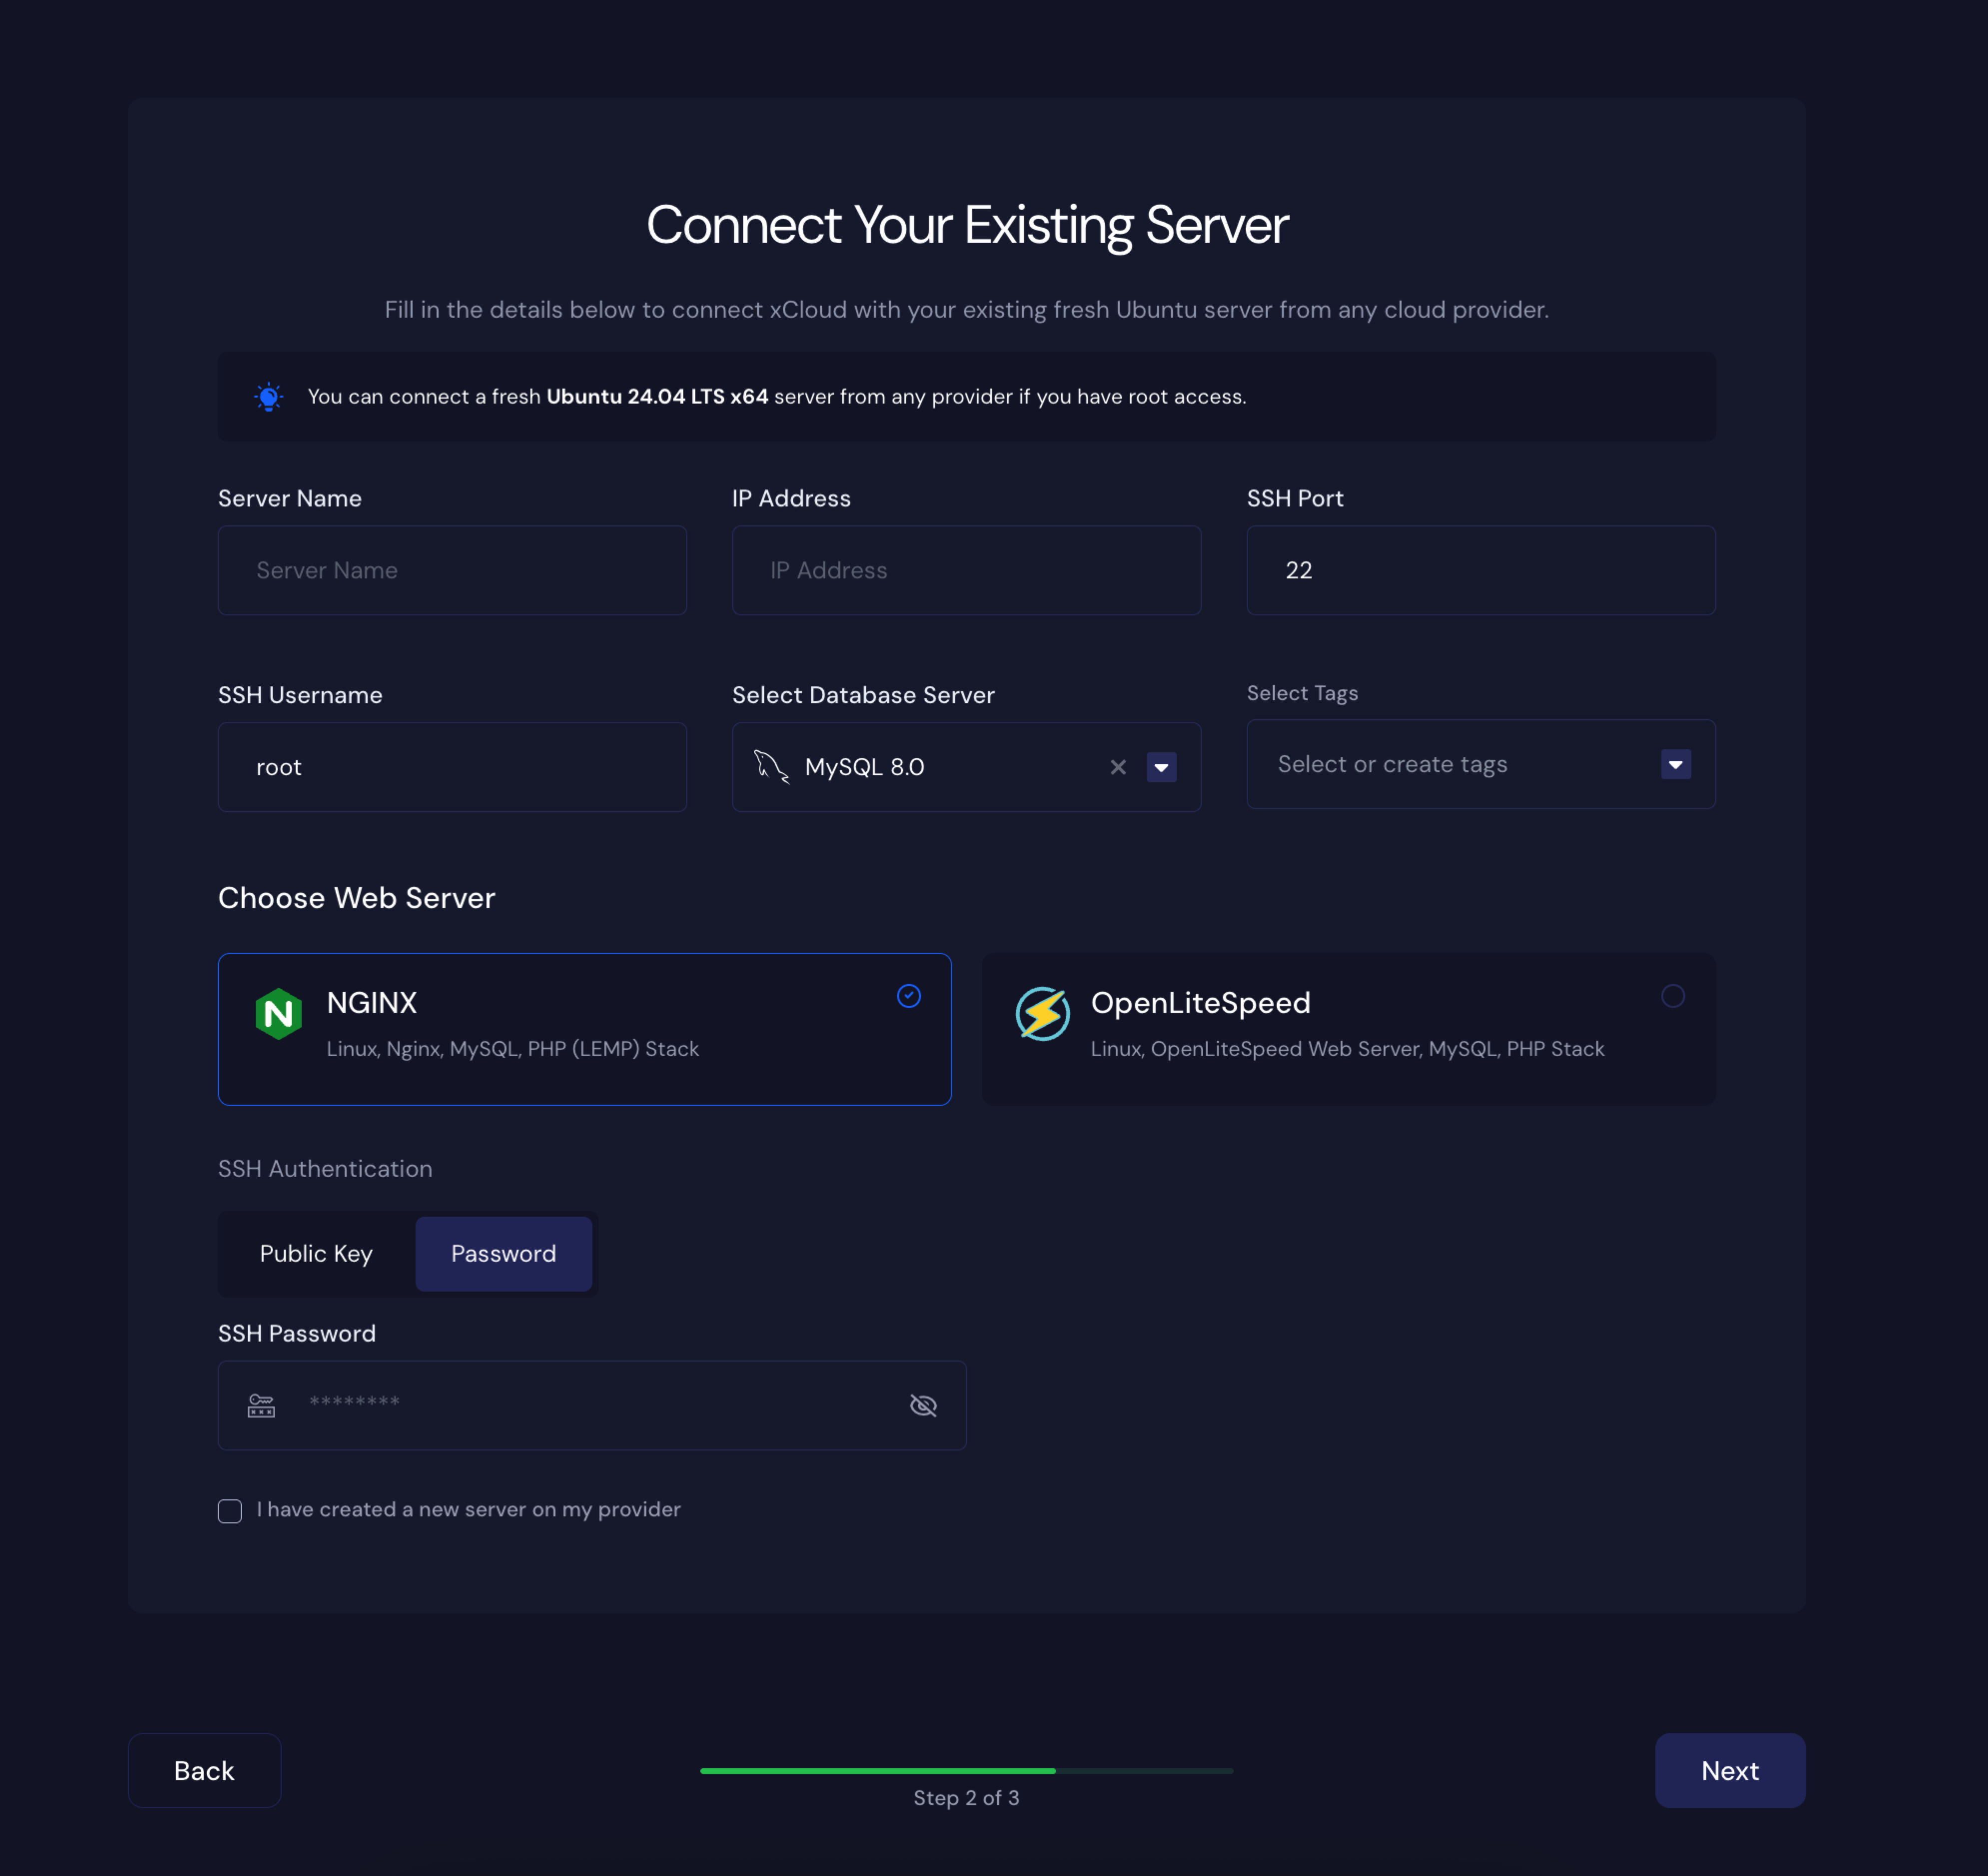
- Password method: Enter the root password for a server that permits root SSH login.
- Public-key method: Follow the key instructions in the xCloud form and authorize the supplied key for the root account.
Never paste a private SSH key into a form. A public key can be shared; a private key must remain on the system that created it.
Expected result: xCloud accepts the connection details and lets you begin provisioning.
Step 4: Start provisioning
Review the server IP, authentication method, database choice, and web server stack. Submit the form once the values are correct.
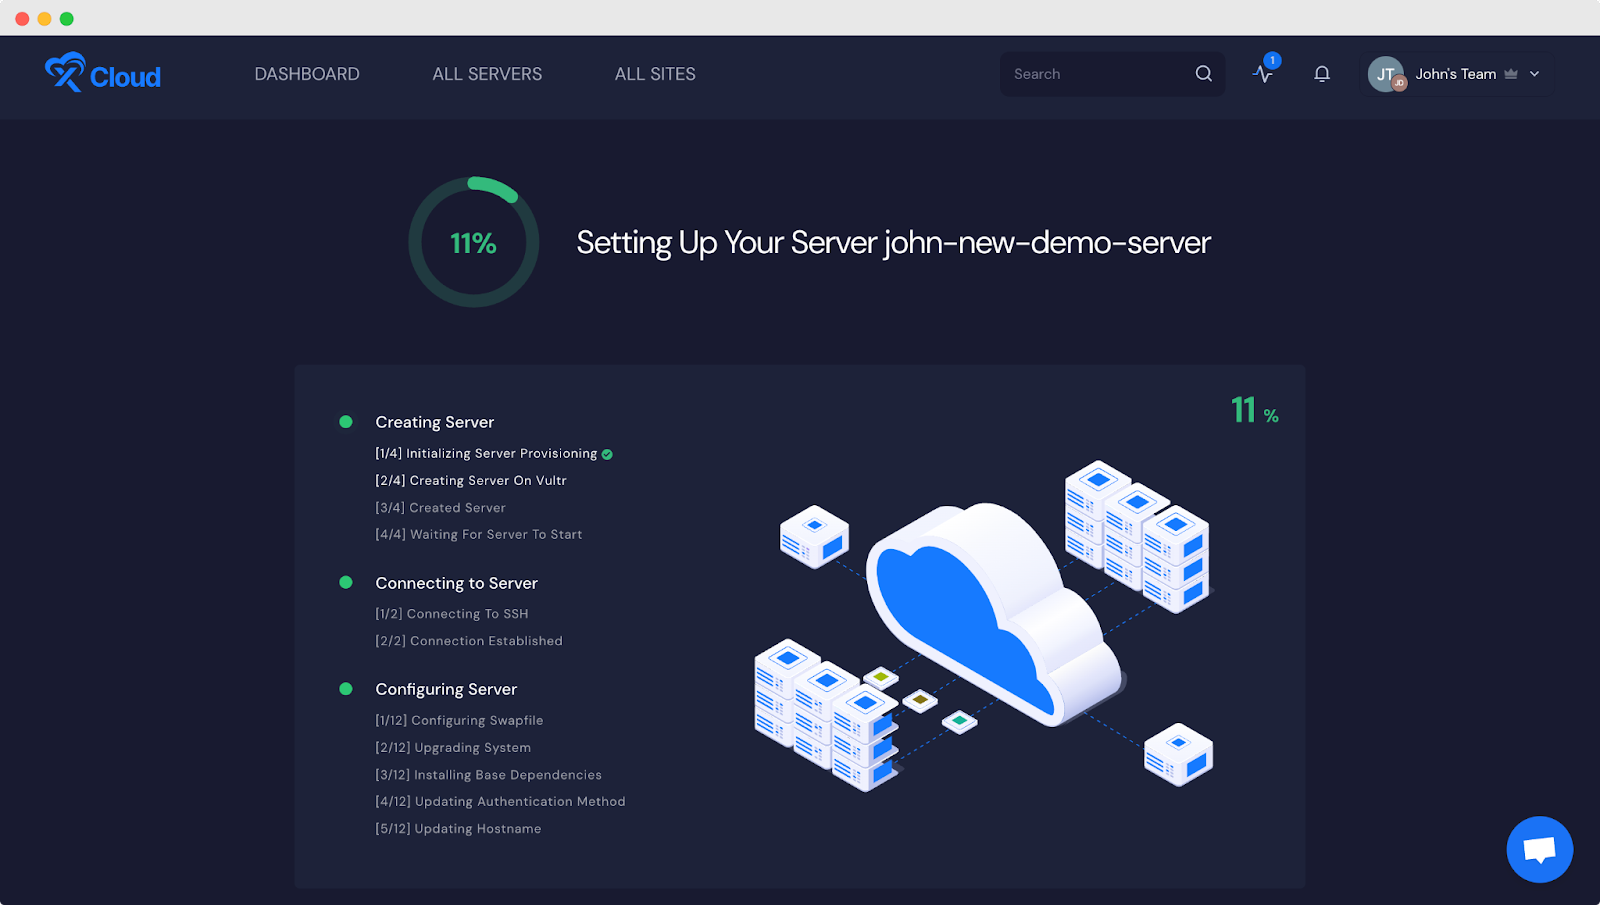
Provisioning commonly takes several minutes. Leave the server powered on and do not install packages or change firewall rules while xCloud is configuring it.
Expected result: The server status changes to ready in xCloud.
Create the WordPress site
Step 5: Choose a WordPress installation
Open the connected server in xCloud, select Add New Site, and choose Install New WordPress Website.
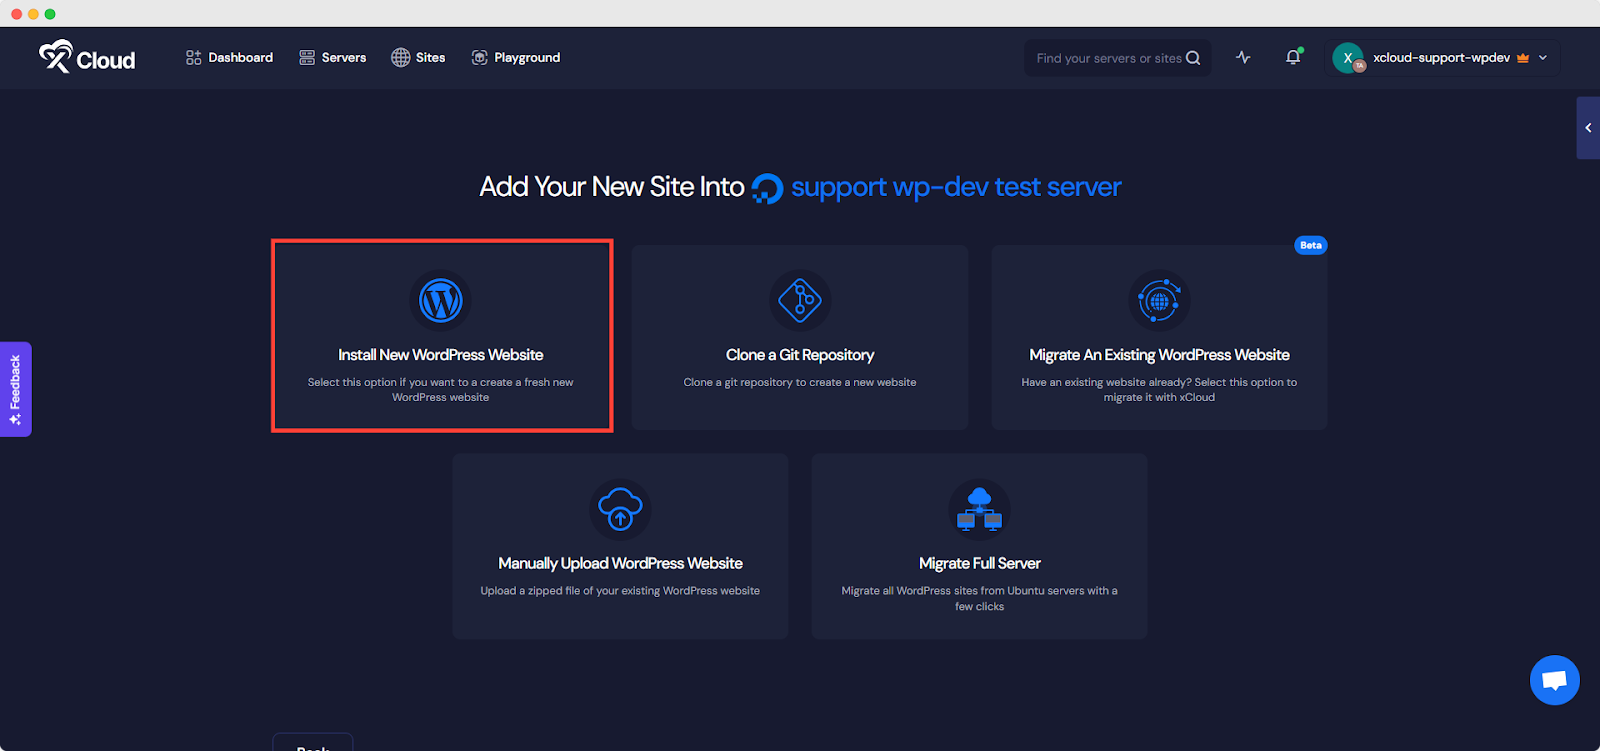
Expected result: xCloud opens the WordPress site-creation form for the Contabo server.
Step 6: Select a temporary or live domain
Choose Go Live when your domain is ready, or use a demo domain while you prepare the site. For a live domain, enter the domain name you will point to this server.
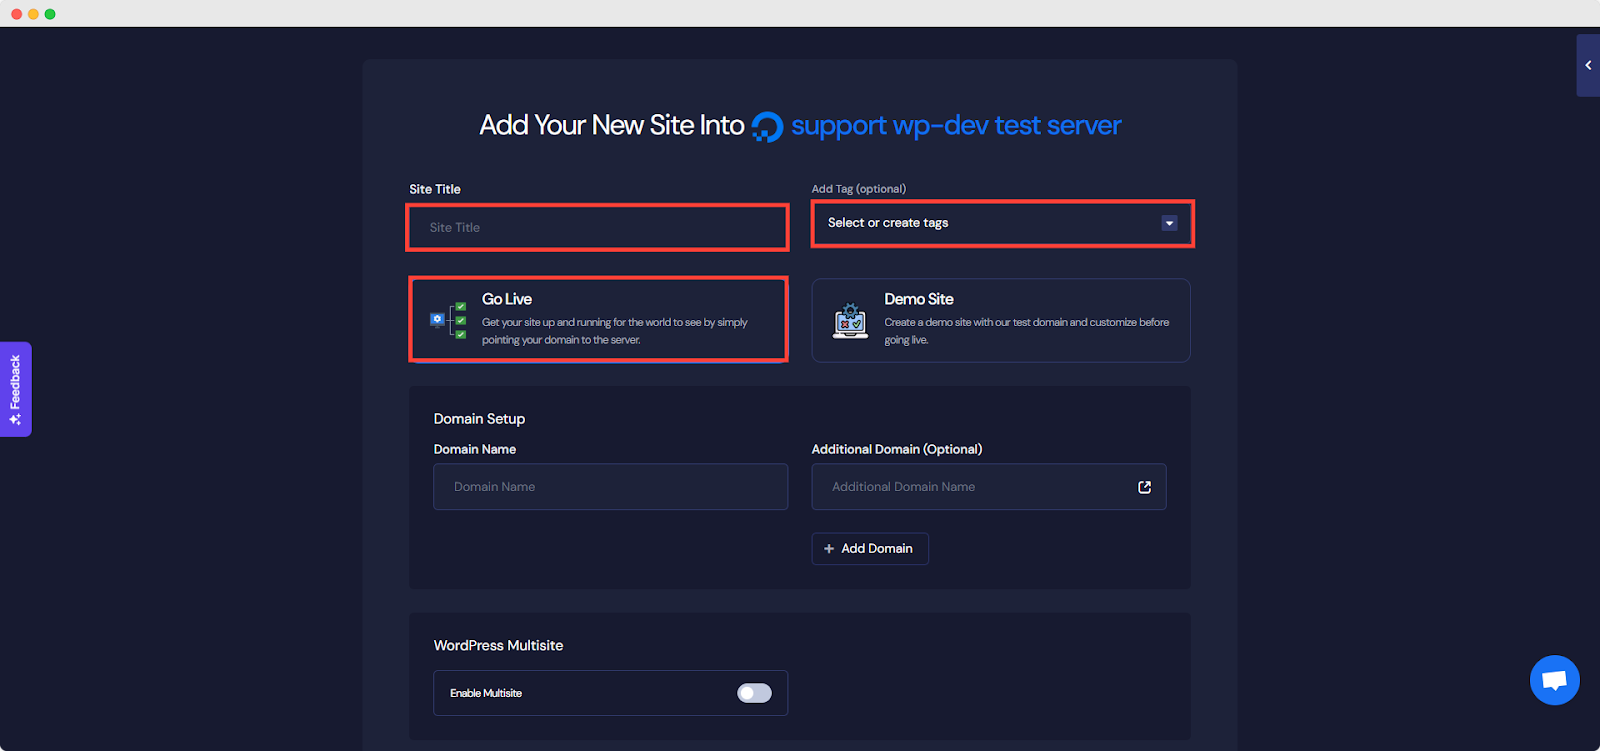
Expected result: The form displays the domain and WordPress configuration fields.
Step 7: Configure WordPress and create the site
Enter the site title and WordPress administrator details. Select the preferred PHP version and any available site options, then click Create Site.
xCloud now installs WordPress and configures the selected web stack.
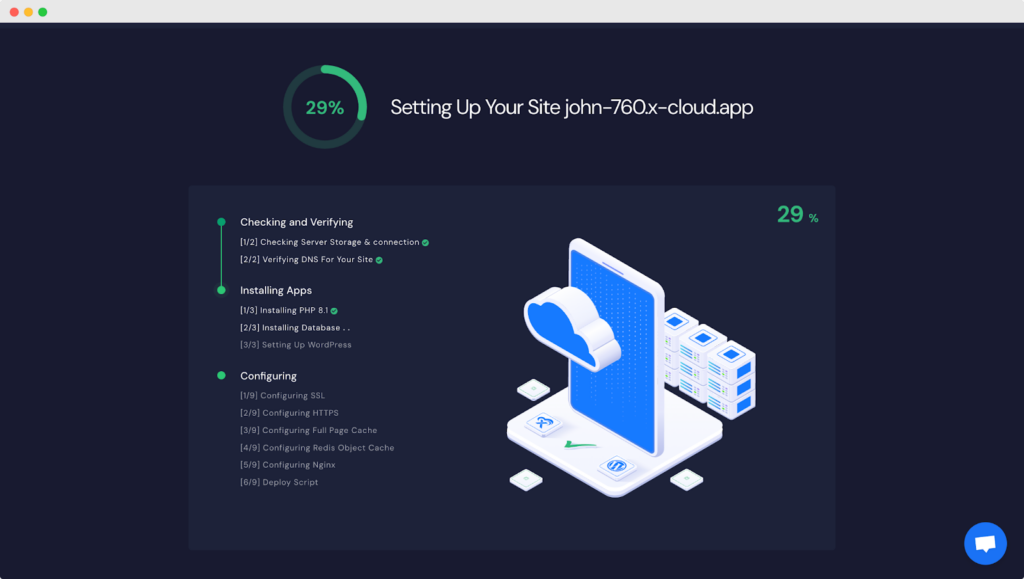
Expected result: xCloud marks the site as ready and provides access to the site dashboard.
Step 8: Point the domain to the server
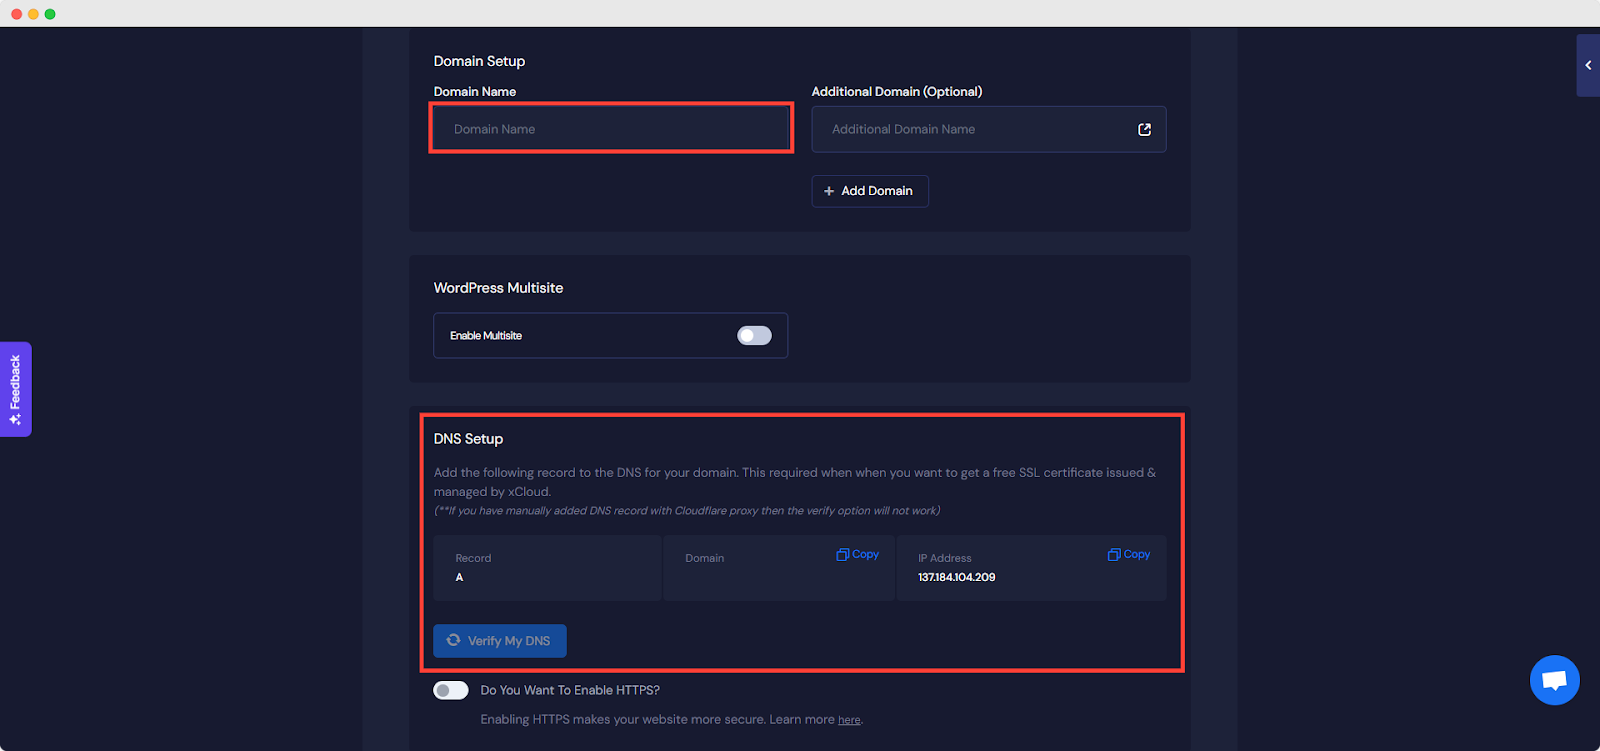
At your DNS provider, create or update the domain’s A record so it points to the Contabo server’s public IPv4 address. Remove conflicting A or AAAA records if they direct the hostname elsewhere.
DNS changes can take time to propagate. Once the domain resolves to the server, use xCloud to issue SSL and confirm that the site loads over HTTPS.
Verify the installation
You know the setup worked when:
- The Contabo server shows as ready in xCloud.
- The WordPress site shows as active.
- The domain resolves to the server IP.
- The site loads over HTTPS.
- You can sign in to WordPress admin with the account created in step 7.
Troubleshooting
| Symptom | Likely cause | Fix |
|---|---|---|
| xCloud cannot connect over SSH | Port 22 is blocked, the IP is wrong, or the account lacks root access | Recheck the provider firewall, server IP, and root authentication method |
| Provisioning stops before the web stack is ready | The server is not fresh or another control panel is installed | Reinstall Ubuntu 24.04 LTS x64 and reconnect the clean server |
| The domain does not open the new site | DNS still points elsewhere or has not propagated | Verify the A record and remove conflicting records |
| SSL cannot be issued | The domain does not resolve to this server, or port 80/443 is blocked | Correct DNS and allow inbound TCP 80 and 443 |
| The server was reachable before a firewall change | A deny-by-default policy was enabled without all required allow rules | Restore inbound access for TCP 22, 80, and 443 |
Common mistakes
- Connecting a VPS that already hosts production data
- Choosing Debian, Windows, or an application image instead of fresh Ubuntu 24.04 LTS x64
- Closing SSH port 22 before xCloud finishes provisioning
- Entering a private SSH key instead of authorizing a public key
- Updating DNS before recording the old values and planning rollback
Next steps
- Connect an Ubuntu server from any provider
- Set up your first server and site with xCloud
- Configure WordPress site email
Frequently asked questions
Does the server need to be brand new?
Yes. xCloud provisioning expects a fresh Ubuntu 24.04 LTS server. Reinstall the operating system at Contabo before connecting it, and never connect a server that already hosts websites, a database, or another control panel.
Which ports must be open?
Inbound TCP 22, 80 and 443. xCloud connects over SSH on port 22 to provision the server, and ports 80 and 443 are required for the site and for SSL issuance.
Do I paste my private SSH key into xCloud?
No. With the public-key method you authorize the public key xCloud shows you on the server’s root account. A private key must stay on the system that created it.
Sources
- Contabo: Reinstall a server
- Contabo: Connect for the first time
- Contabo: VPS/VDS firewall
- xCloud: Connect a fresh Ubuntu server from another provider
- xCloud: Set up your first server and site
If you run into any issues connecting your Contabo server, feel free to reach out to our support team for help.