

How to Deploy OpenClaw with xCloud (Self-Managed Server)
Updated October 15, 2026 · 7 min read
This guide shows you how to install OpenClaw on your own VPS with xCloud. You keep the server at your cloud provider, and xCloud does the OpenClaw installation, the Control UI, the SSL certificate and the updates. To install OpenClaw, you connect a server, choose the OpenClaw stack, add your AI provider key and click Create. An OpenClaw VPS needs a dedicated server with at least 4 GB RAM.
If you want xCloud to supply the server too, use How to Deploy OpenClaw with xCloud (Fully Managed Hosting). To run Hermes Agent on your own server instead, see How to Deploy Hermes Agent with xCloud (Self-Managed Server).
OpenClaw installation on your own server
You can install OpenClaw on two kinds of self-managed server:
- A connected cloud account. xCloud creates a new instance for you in your AWS (EC2 or Lightsail), Google Cloud, DigitalOcean, Vultr, Hetzner, Linode (Akamai) or Hostinger account. xCloud reads the regions and plans from your account and shows only plans with at least 4 GB RAM.
- A VPS from any provider. You create a fresh Ubuntu server at your provider, then connect it to xCloud over SSH.
No OpenClaw Docker setup is necessary. xCloud installs OpenClaw directly on Ubuntu and runs the gateway as a system service, so there are no Docker or compose files to write.
VPS for OpenClaw: system requirements
Before you start, make sure that you have:
- A dedicated server. OpenClaw uses the whole server. You cannot host other sites on it.
- At least 4 GB RAM. xCloud refuses a smaller server before it installs anything.
- A server running Ubuntu. New cloud instances use Ubuntu 24.04. For a VPS from any provider, use a fresh Ubuntu 24.04 LTS x64 server. The connection check also accepts Ubuntu 22.04. It refuses Ubuntu 26.04 for AI agent servers.
- Root SSH access to a VPS from any provider, and ports 22, 80 and 443 open.
- An AI provider key. For example, an Anthropic, OpenAI, Google Gemini, OpenRouter, Z.AI or Moonshot AI (Kimi) API key, an Anthropic Claude Code CLI token, or an OpenAI Codex (ChatGPT OAuth) token.
- A Telegram bot token (optional). You can also add it later.
Step 1: Choose where to install OpenClaw
Open OpenClaw on your own server in xCloud to connect a VPS directly, or choose a provider. The Bring and Manage Your Own Server page lists the providers you can use: DigitalOcean, AWS, Hetzner, Vultr, Google Cloud, Linode (Akamai), Hostinger and Any.
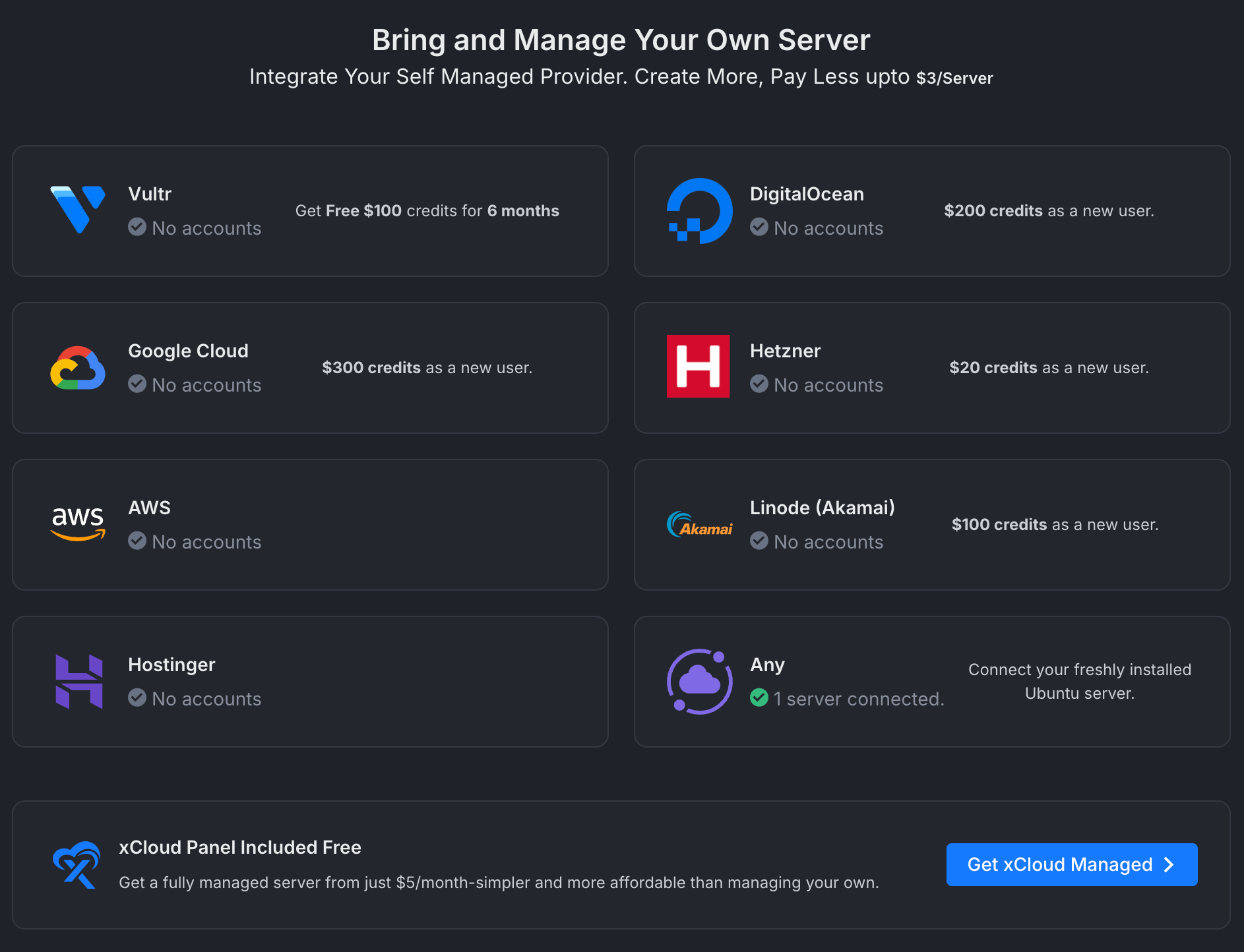
- DigitalOcean, AWS, Hetzner and the other cloud providers: click your provider to create a new OpenClaw instance in your account. If you did not connect the account yet, connect it first. For example, see the guides for DigitalOcean, AWS, Hetzner, Google Cloud, Linode and Hostinger.
- Any provider: click Any to use a VPS that you already created. The rest of this guide shows this path. For the general steps, see How to connect a fresh Ubuntu server from any provider.
Expected result: The server form opens with Agentic and OpenClaw already selected.
Step 2: Enter the server details
On the Connect Your Existing Server form:
- Enter a Server Name.
- Make sure that Agentic is selected under Choose Web Server and OpenClaw under Choose Agentic Stack.
- Enter the server’s public IP Address and the SSH Port (default
22). The SSH Username isroot. - Optional: add tags.
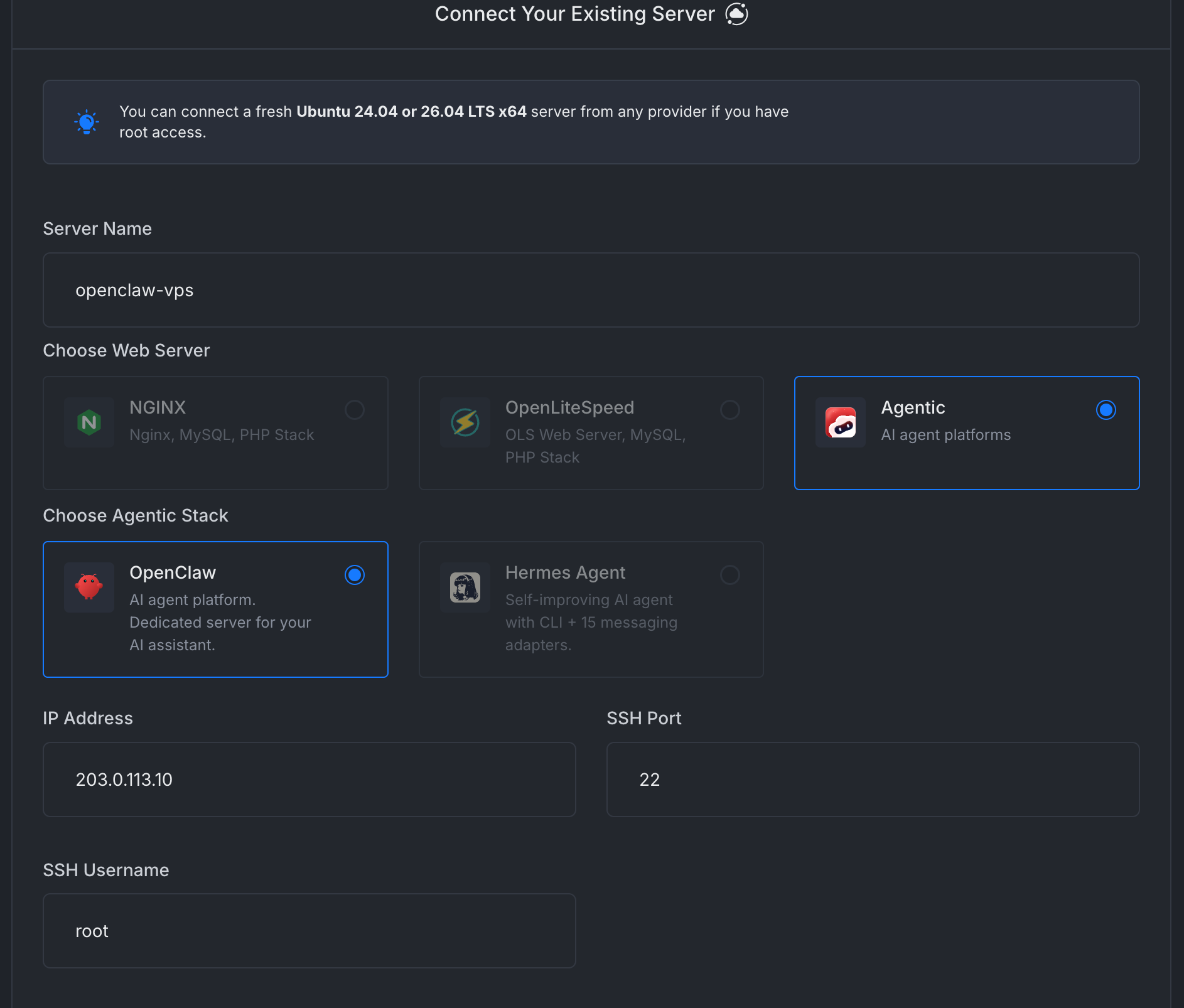
If you create the instance in a connected cloud account, select the account, region and a plan with at least 4 GB RAM instead of the IP address. xCloud uses Ubuntu 24.04 for the new instance.
Expected result: The form shows the OpenClaw security warning below the server fields.
Step 3: Complete the OpenClaw setup
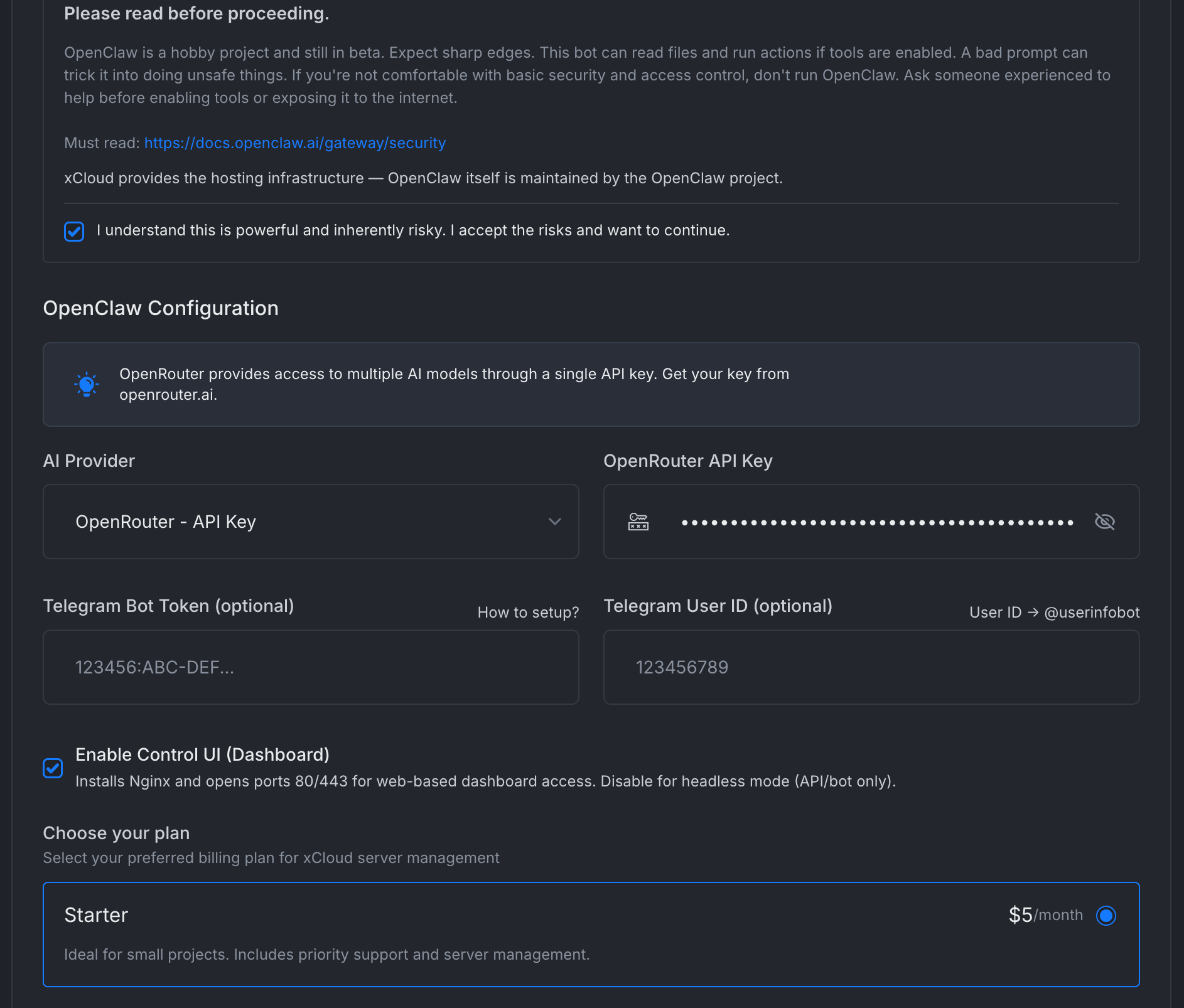
- Read the security warning. Select I understand this is powerful and inherently risky. I accept the risks and want to continue.
- Under OpenClaw Configuration, select your AI Provider.
- Paste your API key or token into the key field. The field name changes with the provider, for example OpenRouter API Key.
- Keep Enable Control UI (Dashboard) selected if you want the web dashboard. Clear it for headless mode, where you use OpenClaw only through the API or a chat app.
OpenClaw Telegram setup
To talk to OpenClaw from Telegram, enter the Telegram Bot Token and your Telegram User ID in the optional fields. To create the bot and find your user ID, see How to create a Telegram bot and connect it with OpenClaw. You can also add the bot later under OpenClaw > Channels.
Expected result: The key field shows dots, and the provider is selected.
Step 4: Choose the plan and add the xCloud SSH key
- Under Choose your plan, select the xCloud plan for this server. The first self-managed server can use the Free plan.
- Under SSH Authentication, select Public Key. Copy the command and run it on your server as root. The command adds the xCloud public key to
/root/.ssh/authorized_keys. If you prefer, select Password and enter the root password. - Select I have created a new server on my provider.
- Click Create.
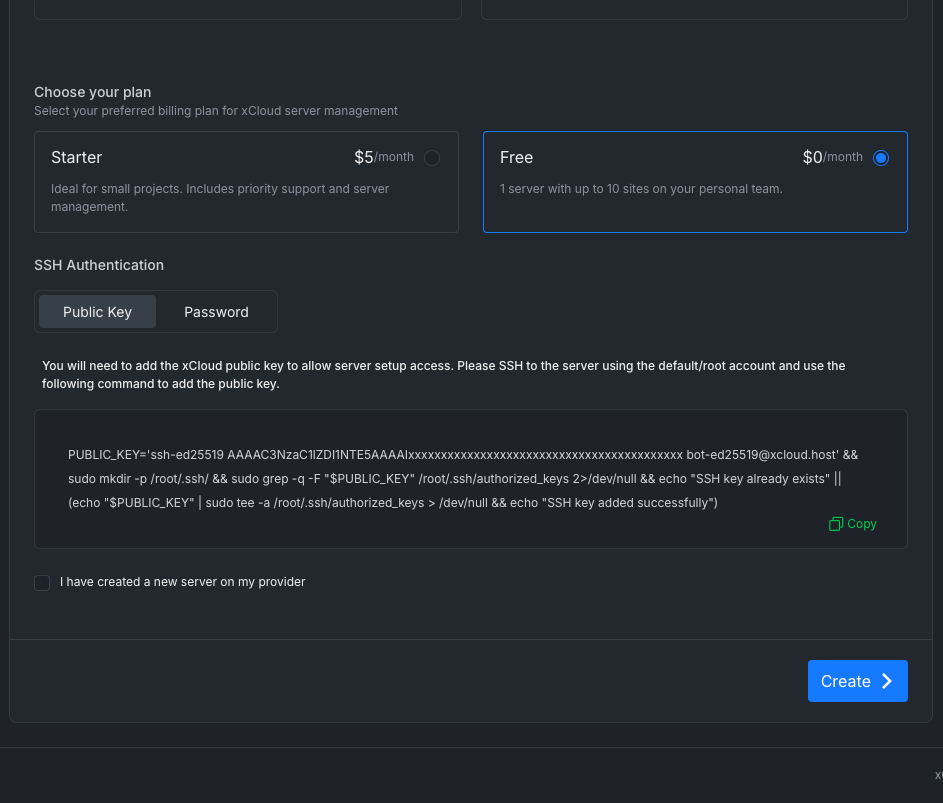
Before xCloud saves the server, it connects over SSH and checks the Ubuntu version and the RAM. If a check fails, the form shows the reason and nothing is created. See Troubleshooting.
Expected result: xCloud opens the Setting Up Your Server page and runs the installation steps, for example Installing OpenClaw Stack. In our test on a 4 GB VPS in October 2026, it finished in about 6 minutes. You can leave the page while it runs.
Step 5: Open the OpenClaw dashboard
When the setup finishes, open the server in xCloud. The OpenClaw menu has Status, Providers, Channels, Config, Environment, Updates, Reset and Logs.
Go to OpenClaw > Status. This page shows the gateway state, the OpenClaw version, the Control UI credentials and the Basic Auth credentials.
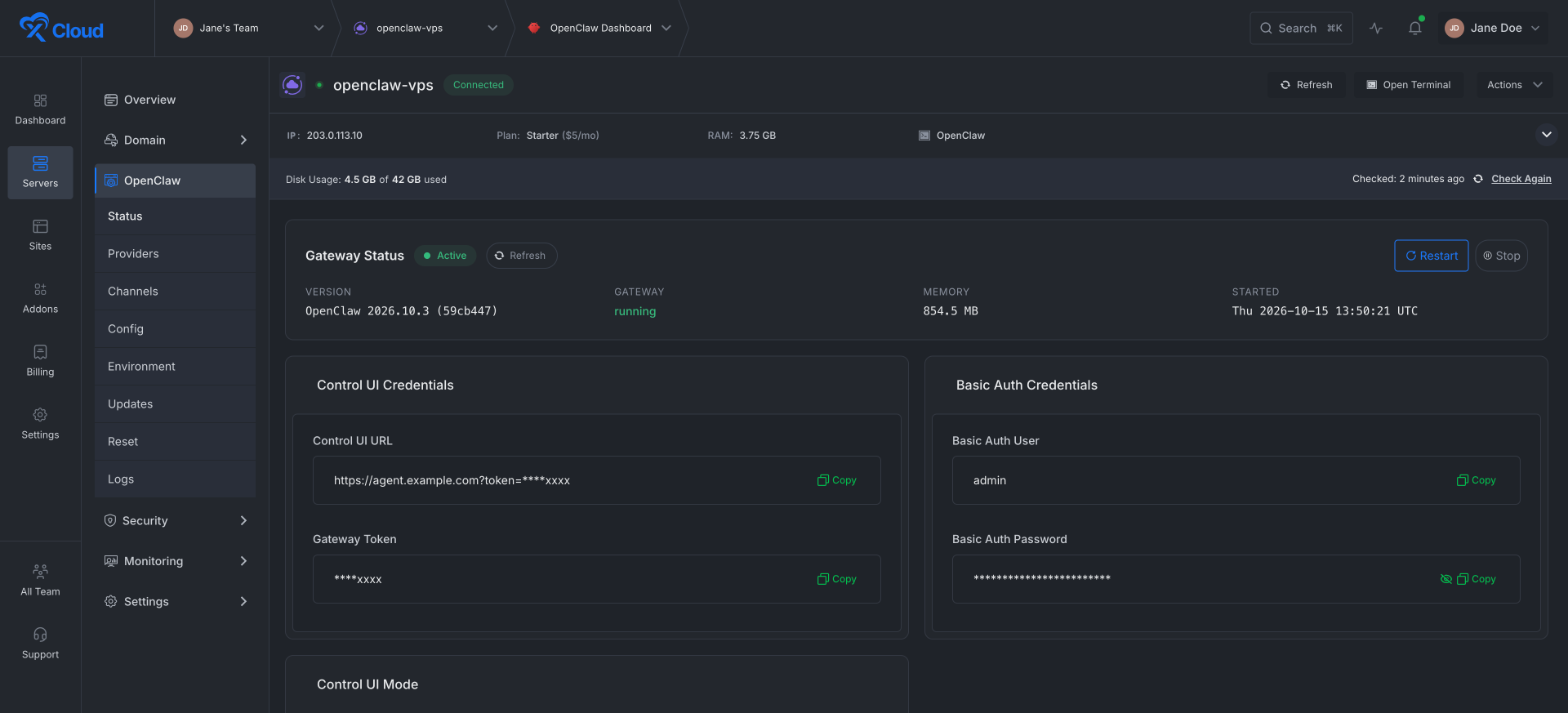
To open the OpenClaw Control UI:
- Copy the Control UI URL. It includes the gateway token.
- Copy the Basic Auth User and Basic Auth Password.
- Open the URL in your browser and sign in with these credentials.
The Status page also has Restart and Stop buttons for the gateway. To manage xCloud from OpenClaw chat, see How to Connect OpenClaw to xCloud.
Billing for a self-managed OpenClaw server
xCloud starts the self-managed billing for a new OpenClaw server only after the gateway and its dashboard respond. If the installation fails, you are not charged for the plan while you retry it. The free first server and Lifetime Deal rules do not change. For plan details, see Upgrade from free to paid self-managed hosting.
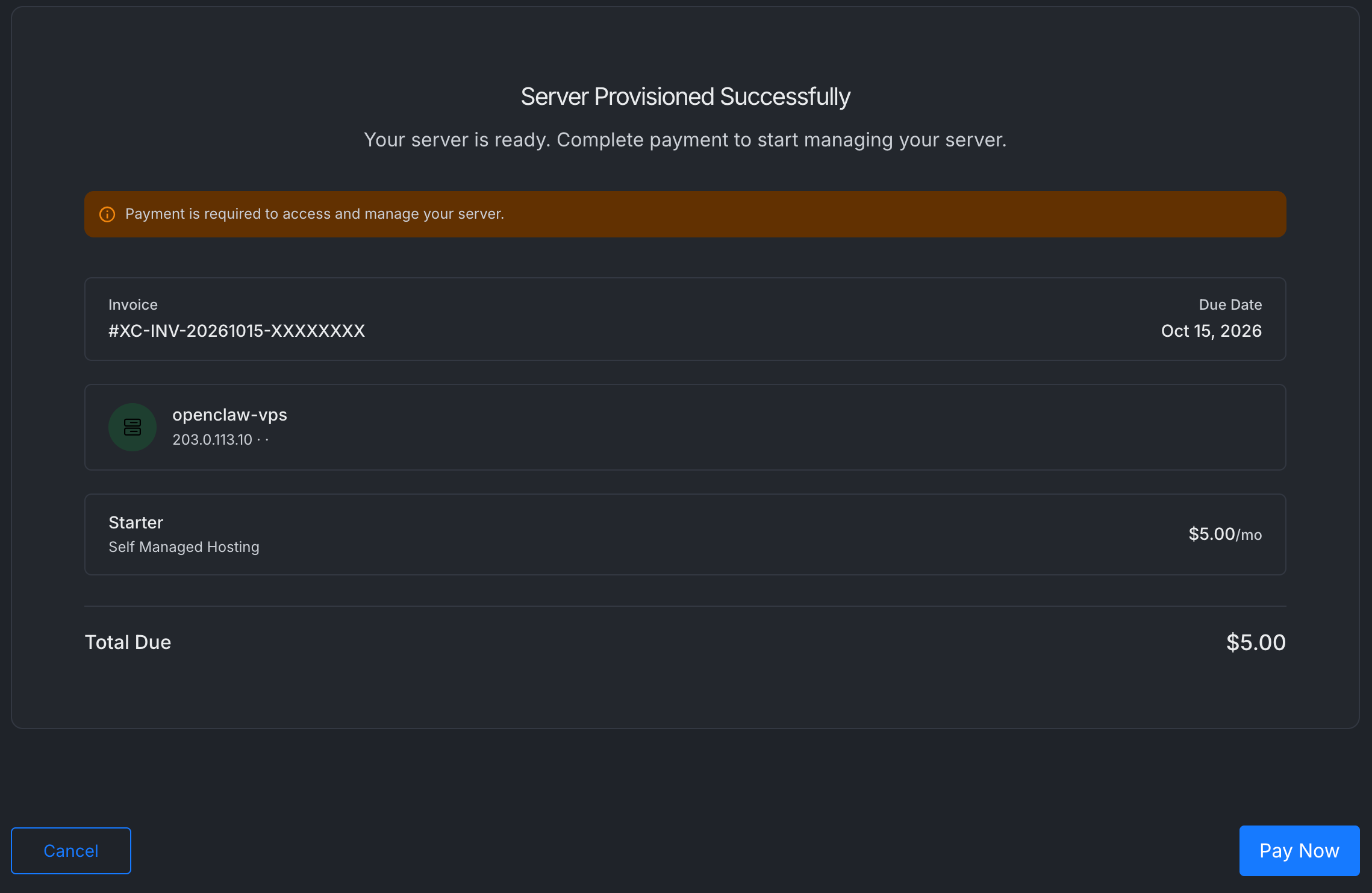
If xCloud cannot charge your saved payment method when the server is ready, the setup page shows Complete payment to start managing your server. Click Pay Now to pay the invoice.
Retry and rebuild
Retry a failed installation
If the setup stops, the Setting Up Your Server page shows the error and a Retry button with the number of retries left. Fix the cause, for example start the stopped gateway or free memory, then click Retry. If the server itself is ready but the OpenClaw dashboard did not respond, Retry starts the gateway and runs only the dashboard setup again. After three retries, contact support.
Rebuild the server
Rebuild reinstalls the operating system and OpenClaw. It erases everything on the disk. It is available for OpenClaw servers that xCloud created in a connected DigitalOcean, Hetzner, Linode, Hostinger, Vultr, AWS or Google Cloud account. It is not available for a VPS that you connected with Any, because xCloud cannot reinstall that server through a provider API.
- On DigitalOcean, Hetzner, Linode, Hostinger and Vultr, xCloud reinstalls the same instance. The public IP and billing stay the same.
- On AWS and Google Cloud, xCloud creates a replacement instance. The public IP can change. You must select I accept that the replacement can change the public IP and cause temporary provider charges for two instances. xCloud keeps the original instance until the replacement is ready.
For the full procedure, see How to Rebuild a Server Safely with xCloud. To fix a broken OpenClaw install without a rebuild, see How to repair OpenClaw with xCloud.
Troubleshooting
“Not yet available on Ubuntu 26.04”
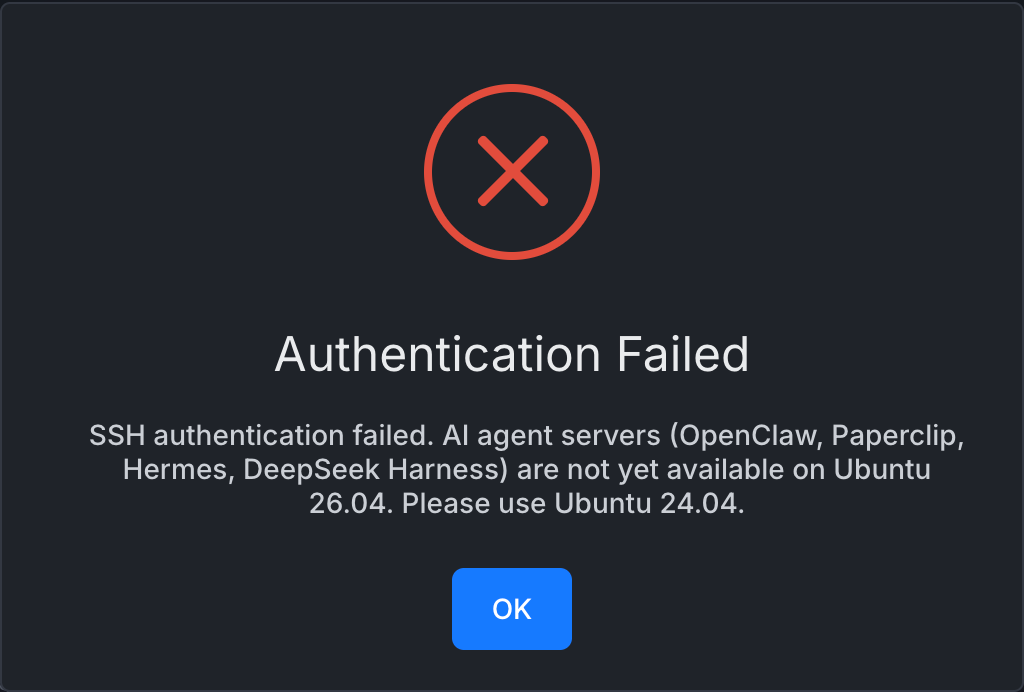
If the VPS runs Ubuntu 26.04, xCloud shows an Authentication Failed message that says AI agent servers (OpenClaw, Paperclip, Hermes, DeepSeek Harness) are not yet available on Ubuntu 26.04. Please use Ubuntu 24.04. Reinstall the VPS with Ubuntu 24.04 at your provider and try again.
“AI agent servers need at least 4 GB RAM”
xCloud checks the server memory before it creates anything. If the server has less than 4 GB RAM, the form shows AI agent servers need at least 4 GB RAM. Use a larger server or choose another stack. Resize the server at your provider, or use a plan with at least 4 GB RAM, and submit the form again.
The gateway or its dashboard is not ready
If the OpenClaw gateway or the dashboard does not respond at the end of the installation, the setup fails with The agent or its dashboard is not ready. Retry provisioning after the service starts. Open OpenClaw > Logs to see the gateway output, then click Retry on the setup page.
For other connection errors, see How to troubleshoot “Server Installation Failed” on a self-managed server.
Use the xCloud API
You can also do these steps with the xCloud Public API and the xCloud MCP server: list your cloud accounts, regions and plans, connect a server, and start or retry a rebuild. See xCloud API.
Frequently asked questions
Can I install OpenClaw on a VPS I already have?
Yes, if the VPS is fresh. Create a new Ubuntu 24.04 server at your provider, then connect it to xCloud with the Any provider option and choose the OpenClaw stack. Do not use a server that already hosts sites: OpenClaw uses the whole server.
Which server providers can I use for OpenClaw?
xCloud can create the OpenClaw server in a connected AWS (EC2 or Lightsail), Google Cloud, DigitalOcean, Vultr, Hetzner, Linode or Hostinger account. You can also connect a fresh Ubuntu VPS from any other provider over SSH.
What are the OpenClaw system requirements on a self-managed server?
A dedicated server with at least 4 GB RAM and root SSH access. New cloud instances use Ubuntu 24.04. For a VPS from any provider, use a fresh Ubuntu 24.04 LTS x64 server. The connection check also accepts Ubuntu 22.04 and refuses Ubuntu 26.04 for AI agent servers. You also need an API key or token from your AI provider.
Do I need Docker to self-host OpenClaw?
No. xCloud installs OpenClaw directly on Ubuntu and runs the OpenClaw gateway as a system service. You do not write Docker or compose files.
How do I connect Telegram to OpenClaw?
Enter your Telegram bot token and Telegram user ID in the optional fields of the OpenClaw configuration when you create the server. You can also add or change them later under OpenClaw > Channels.
Related guides
- How to Deploy OpenClaw with xCloud (Fully Managed Hosting)
- How to Deploy Hermes Agent with xCloud (Self-Managed Server)
- How to connect a fresh Ubuntu server from any provider
- How to create a Telegram bot and connect it with OpenClaw
- How to Rebuild a Server Safely with xCloud
If you run into any issues, feel free to reach out to our support team.