

How to Update MariaDB or MySQL on an xCloud Server via SSH
Updated October 12, 2026 · 7 min read
This guide updates MariaDB or MySQL on your xCloud server to the newest patch release of the same version, for example MariaDB 11.8.6 to 11.8.9. Patch releases fix bugs and security issues, and your data stays as it is.
Plan about 15 minutes. Your sites lose their database for a few seconds while it restarts (10 to 15 seconds in our tests), so pick a quiet time.
Prerequisites
This guide is for patch updates only. It does not move you to a new major version.
| Database on your server | Can you use this guide? |
|---|---|
| MariaDB 11.8 | Yes. It updates to the newest 11.8.x. |
| MySQL 8.4 LTS | Yes. It updates to the newest 8.4.x. |
| MariaDB 10.6 | No. Community support for MariaDB 10.6 ended on 6 July 2026. See Moving to a new major version. |
| MySQL 8.0 | No. MySQL 8.0 has reached end of life. See Moving to a new major version. |
You also need:
- Root access to the server. Step 1 shows two ways to get it.
- A quiet time for a short database restart.
- Recent backups of your sites, including their databases.
- Free disk space larger than your databases, for the safety copy in Step 3.
Step 1: Connect to your server
Use one of these two ways. Both give you root access.
Option A: the xCloud web terminal (easiest). Open your server in xCloud and click ‘Open Terminal’. A terminal opens in a new browser tab, logged in as root. See how to access the web terminal in xCloud.

Option B: SSH from your computer.
- In xCloud, open your server and go to ‘Management’ → ‘Sudo Users’ → ‘Add Sudo User’. See sudo users and site users in xCloud.
- Enter a ‘Sudo User Name’ and a ‘Sudo Password’, pick your SSH key, and click ‘Save’. No key in the list? See how to generate and add SSH keys in xCloud.
- Connect from your computer, then switch to root:
ssh YOUR_SUDO_USER@SERVER_IP
sudo -i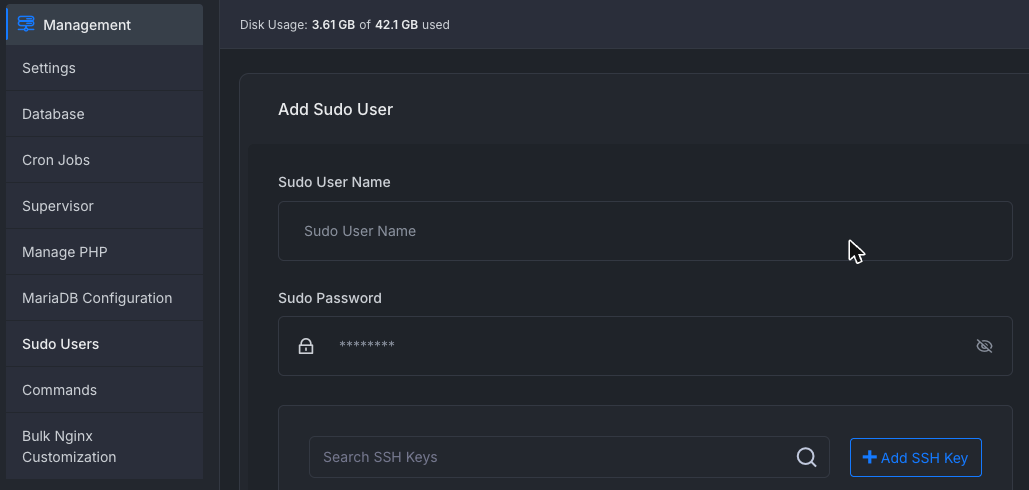
Expected result: a prompt that ends in #, for example root@demo-server-01:~#.
If the connection does not open and you limited SSH to certain IP addresses on your server, use the other option or contact support.
Step 2: Check your version and preview the update
These commands change nothing. They show what you have and what the update would install.
MariaDB:
mariadb --version
apt-get update
PKGS=$(dpkg -l | awk '/^ii/ && $2 ~ /^(mariadb|galera|libmariadb|mysql-common)/ {print $2}')
apt-get -s install --only-upgrade $PKGS | grep -E '^Inst|upgraded'
MySQL:
mysql --version
apt-get update
PKGS=$(dpkg -l | awk '/^ii/ && $2 ~ /^(mysql-|libmysqlclient)/ && $2 != "mysql-apt-config" {print $2}')
apt-get -s install --only-upgrade $PKGS | grep -E '^Inst|upgraded'
The -s flag means “simulate”: nothing is installed.
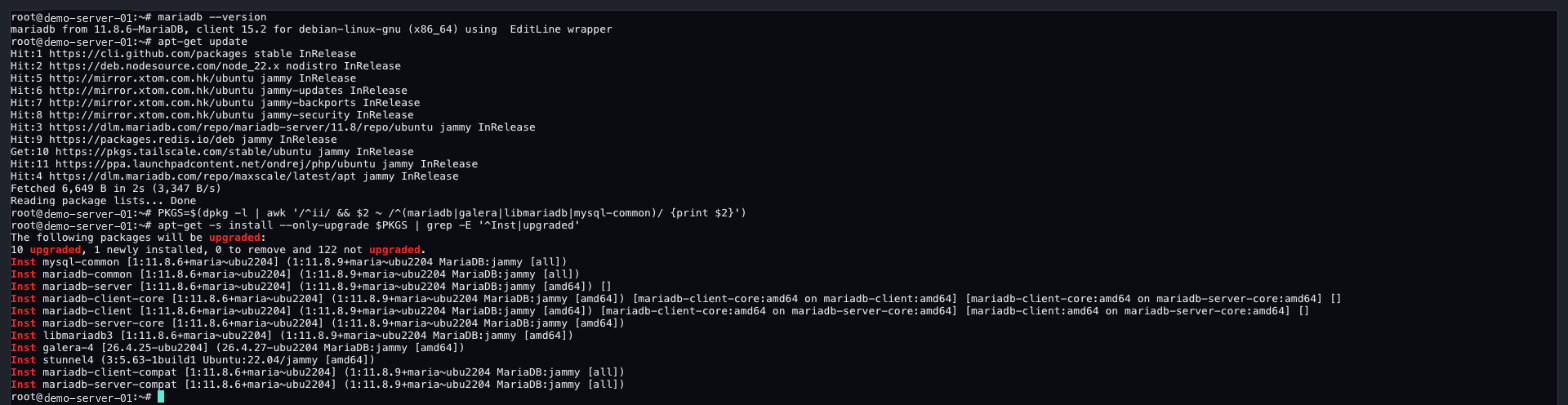
Expected result:
- Each
Instline shows a database package and its new version. The version number changes only after the last dot, for example 11.8.6 to 11.8.9. - One small new package that the database needs (such as
stunnel4) may appear. That is fine. - The summary line says 0 to remove. If it wants to remove anything, stop and contact support.
- The “not upgraded” number on that line counts other packages on your server. This guide leaves them alone on purpose, so any number there is fine.
- No
Instlines means you already have the newest patch. You are done.
Step 3: Back up before you update
Take two backups: one in xCloud and one on the server. The update rarely fails, but a backup makes any problem easy to undo.
- In xCloud: open each site, go to its backups, and click ‘Backup Now’. Wait until it finishes.
- Check free disk space. The first number is your database size. The free space (
Avail) must be larger.
du -sh /var/lib/mysql
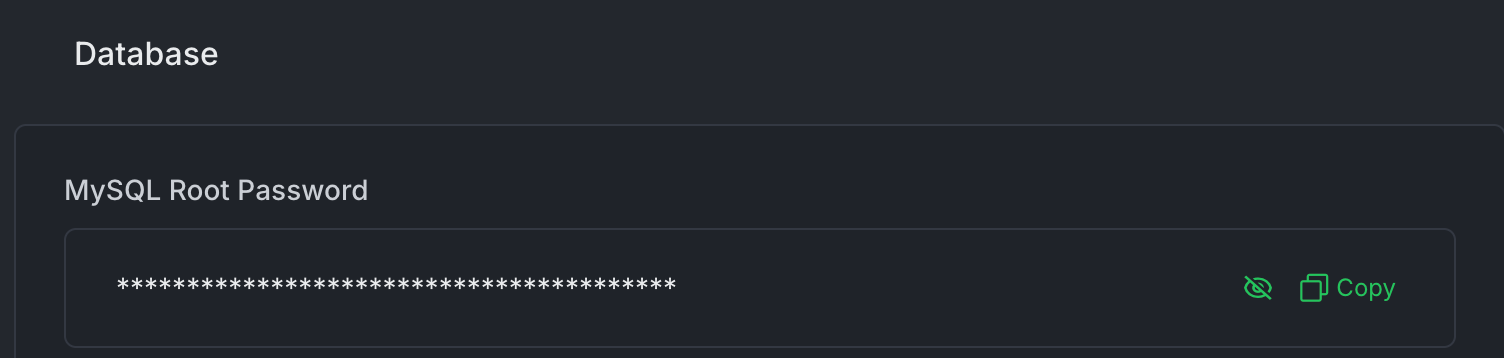
df -h /- Copy the database root password. In xCloud, open your server and go to ‘Others’ → ‘Database’ → ‘MySQL Root Password’, then click ‘Copy’. MariaDB servers use the same field. See how to find the MySQL root password in xCloud.
- Make a safety copy on the server. Paste the password when it asks. Nothing shows while you paste; that is normal.
MariaDB:
mariadb-dump -u root -p --all-databases --single-transaction --routines --events --triggers | gzip > /root/db-before-update-$(date +%F).sql.gzMySQL:
mysqldump -u root -p --all-databases --single-transaction --routines --events --triggers | gzip > /root/db-before-update-$(date +%F).sql.gz- Check that the copy is good:
gzip -t /root/db-before-update-*.sql.gz && ls -lh /root/db-before-update-*.sql.gzExpected result: no error, and a file bigger than a few KB. If you see an error, stop here and contact support.

Step 4: Update only the database
This updates the database packages and nothing else. The database restarts once by itself, and your sites wait a few seconds for it.
MariaDB:
PKGS=$(dpkg -l | awk '/^ii/ && $2 ~ /^(mariadb|galera|libmariadb|mysql-common)/ {print $2}')
DEBIAN_FRONTEND=noninteractive apt-get install --only-upgrade -y -o Dpkg::Options::=--force-confold $PKGS
MySQL:
PKGS=$(dpkg -l | awk '/^ii/ && $2 ~ /^(mysql-|libmysqlclient)/ && $2 != "mysql-apt-config" {print $2}')
DEBIAN_FRONTEND=noninteractive apt-get install --only-upgrade -y -o Dpkg::Options::=--force-confold $PKGS
What the options do:
--only-upgradeupdates packages you already have. It installs nothing new except what the database itself needs.--force-confoldkeeps your current settings files. xCloud tuned them for your server, so they must stay.
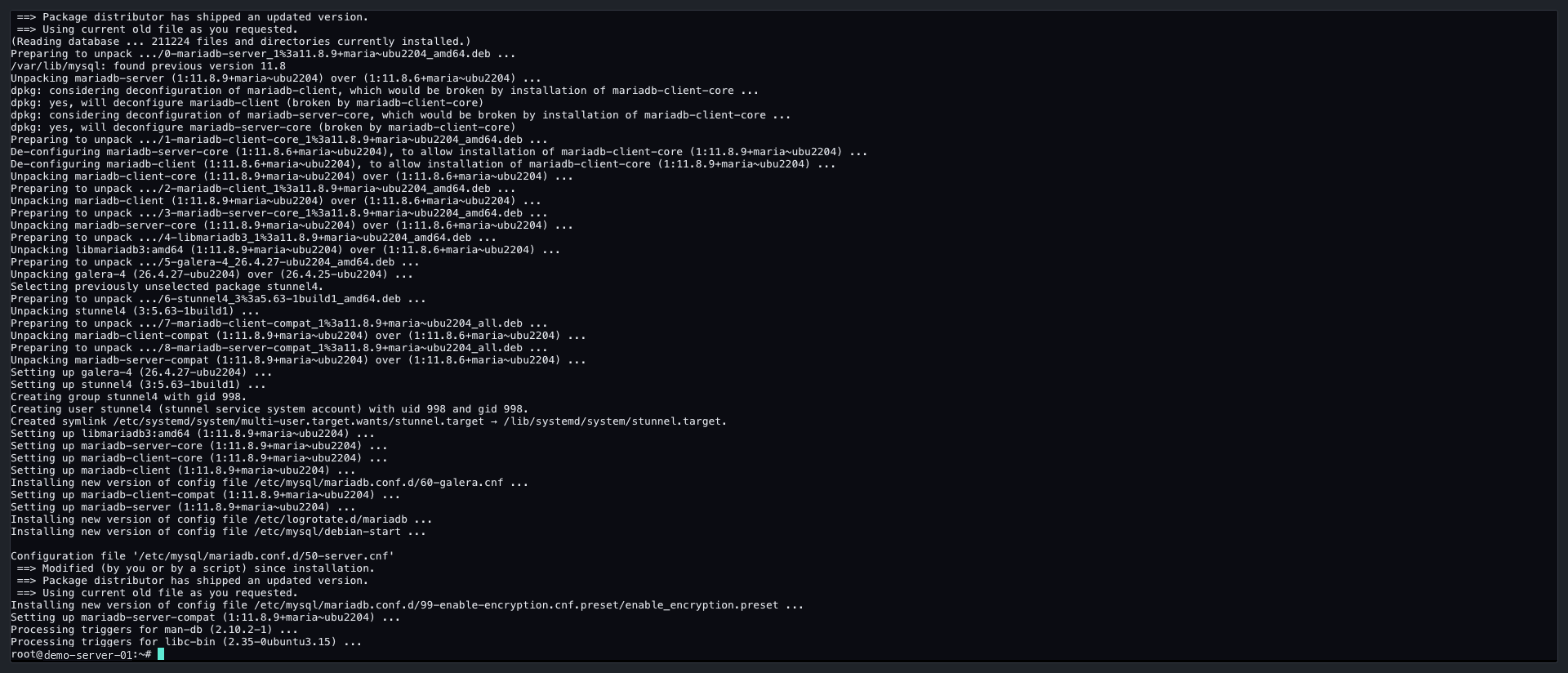
Expected result: the prompt comes back after about a minute. For files that xCloud changed, the output says Using current old file as you requested, which means your settings are kept.
Do not run apt upgrade or apt full-upgrade for this. Those update every package on the server and can need a reboot.
Step 5: Check that everything works
MariaDB:
mariadb --version
systemctl is-active mariadb
mariadb -u root -p -e "SELECT VERSION();"
MySQL:
mysql --version
systemctl is-active mysql
mysql -u root -p -e "SELECT VERSION();"
Expected result: the new version number and the word active.

Then open each of your sites in a browser and log in to its admin area (for example /wp-admin on WordPress). If pages load, the update is done.
Keep the safety copy for a few days. When you are sure all is well, delete it to free the space:
rm /root/db-before-update-*.sql.gzIf something goes wrong
| Symptom | Likely cause | What to do |
|---|---|---|
| The database does not start | Usually a full disk | Run journalctl -u mariadb -n 50 --no-pager (use mysql for MySQL) and df -h /. Free some space, then run systemctl restart mariadb. See database keeps stopping. |
| A site shows a database error | The database is still starting | Wait one minute and reload. If the error stays, check that the database is active (Step 5). |
| Data looks wrong or missing | Very rare with patch updates | Do not restore the safety copy on your own: it brings back every database at once, including database users. Contact support. Restoring one site from its xCloud backup is usually the safer fix. |
When you contact support, include the output of the journalctl command above and the versions from Step 2. Never share your database password.
Moving to a new major version
A major upgrade (MariaDB 10.6 to 11.8, or MySQL 8.0 to 8.4) changes how the database stores data. Do not do it in place on a live server. The safe way is a new server:
- Create a new server in xCloud and choose the newer database version.
- Copy your sites to it. See how to clone a full server with xCloud.
- Check the sites on the new server, then point your domains to it.
- Delete the old server when you no longer need it.
The new server has a new IP address, so plan the DNS change for a quiet time.
Frequently asked questions
Does this update restart my server or my sites? No server reboot is needed. Only the database restarts, once, and pages that need it show an error for a few seconds (10 to 15 seconds in our tests).
Don’t xCloud’s automatic security updates already update MariaDB or MySQL? Not yet. Automatic security updates install Ubuntu’s security fixes. MariaDB and MySQL come from their vendors’ own package sources, which those updates do not include.
Can I use this guide to move from MariaDB 10.6 to 11.8 or from MySQL 8.0 to 8.4? No. That is a major upgrade. Create a new server with the newer database and clone your sites to it instead.
Can xCloud update the database for me? Yes. Contact xCloud support with your server name and a time that suits you.
References
- xCloud: How Automated Security Updates and Auto Reboot Work in xCloud
- MariaDB: MariaDB 11.8.9 release notes
- MariaDB: Maintenance policy and end-of-life dates
If you run into any issues with this update, feel free to reach out to our support team for help.