

See what needs you across your sites and servers with the Security Center in xCloud
Updated November 2, 2026 · 7 min read
The xCloud Security Center shows what needs you across your sites and servers on one page. One vulnerable plugin on 40 sites is one line, and each line has one button that opens the page where you deal with it. It replaces the old Vulnerable Sites page, and old links to that page now open the Security Center.
The Security Center reads what xCloud has already stored: results from each server’s Vulnerability Scan, Site Security Pro findings, PHP and Node.js versions, and each server’s Security Updates and Security Patches. Opening it runs nothing on your servers.
Before you start
- You need a paid plan. On the free plan, opening the Security Center takes you to your billing page with the message “You need to upgrade your plan to access this feature.”
- WordPress vulnerabilities only appear for sites the server’s Vulnerability Scan covers. See Vulnerability Checker to turn it on.
- You see only the sites and servers your team role gives you. See Who sees what.
Step 1: Open the Security Center
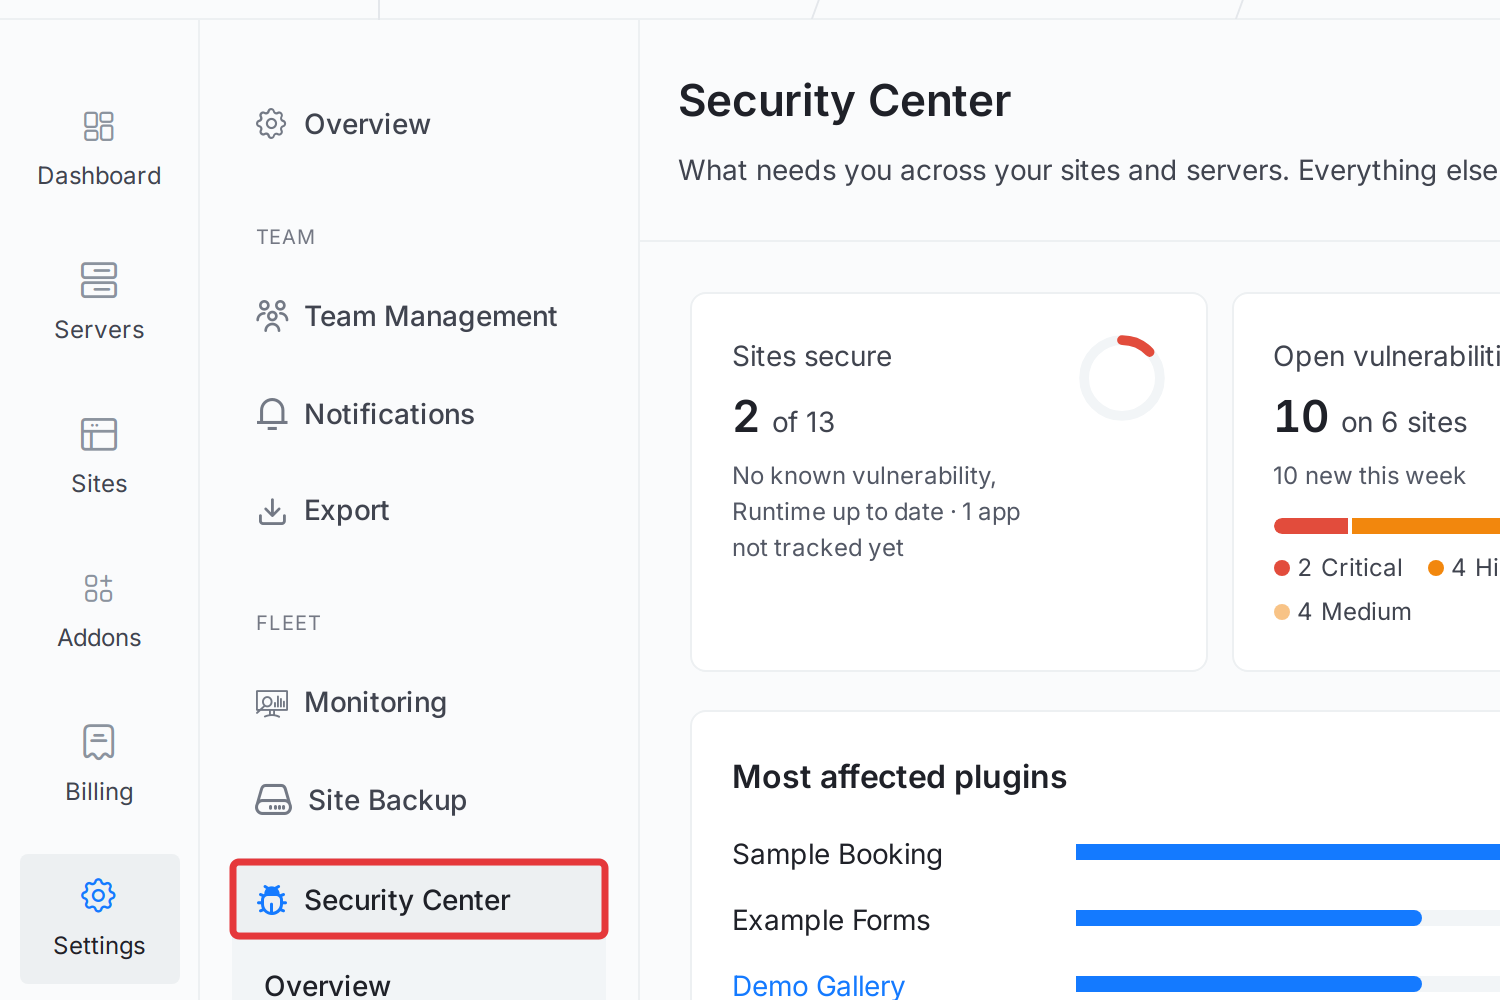
Click Settings in the main menu, then click Security Center. The group opens with three pages: Overview, Sites and Servers.
Step 2: Read the four cards on Overview
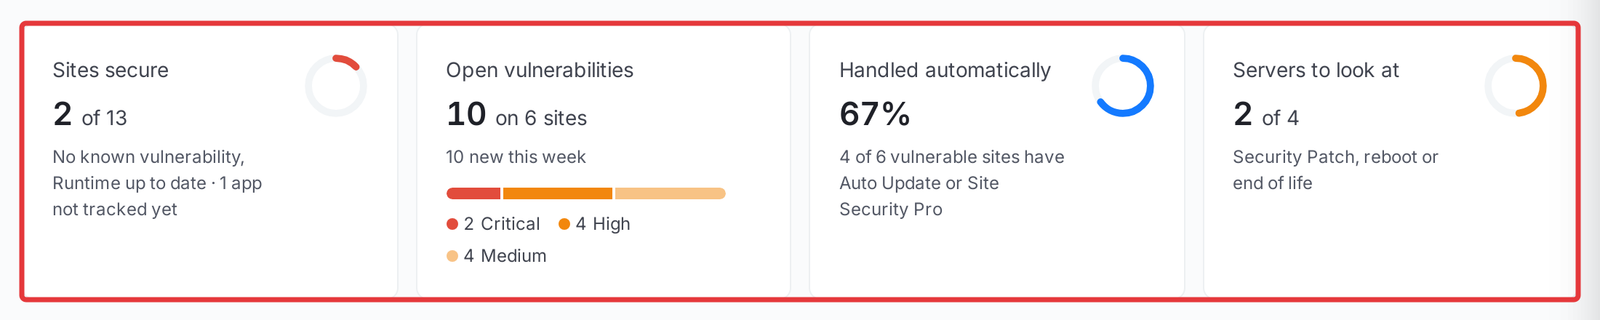
The four cards at the top of Overview give you the team’s position at a glance:
- Sites secure: sites with no known vulnerability, an up-to-date PHP or Node.js version and, for WordPress, a recent check.
- Open vulnerabilities: how many vulnerabilities are open, on how many sites, how many are new this week, and the split by severity.
- Handled automatically: the share of vulnerable sites that have Auto Update or Site Security Pro.
- Servers to look at: servers with a Security Patch waiting, a reboot needed or an end-of-life version. Members without access to server security don’t see this card.
Below the cards, Most affected plugins lists the plugins on the most sites. The Open vulnerabilities chart shows the last 30 days, with counts for Fixed by Auto Update, Security Patches applied and Update runs. You see the chart and these counts only if you can access every server in the team. It records one point a day, so a fix shows on the chart from the next day’s point.
Step 3: Work through What needs you
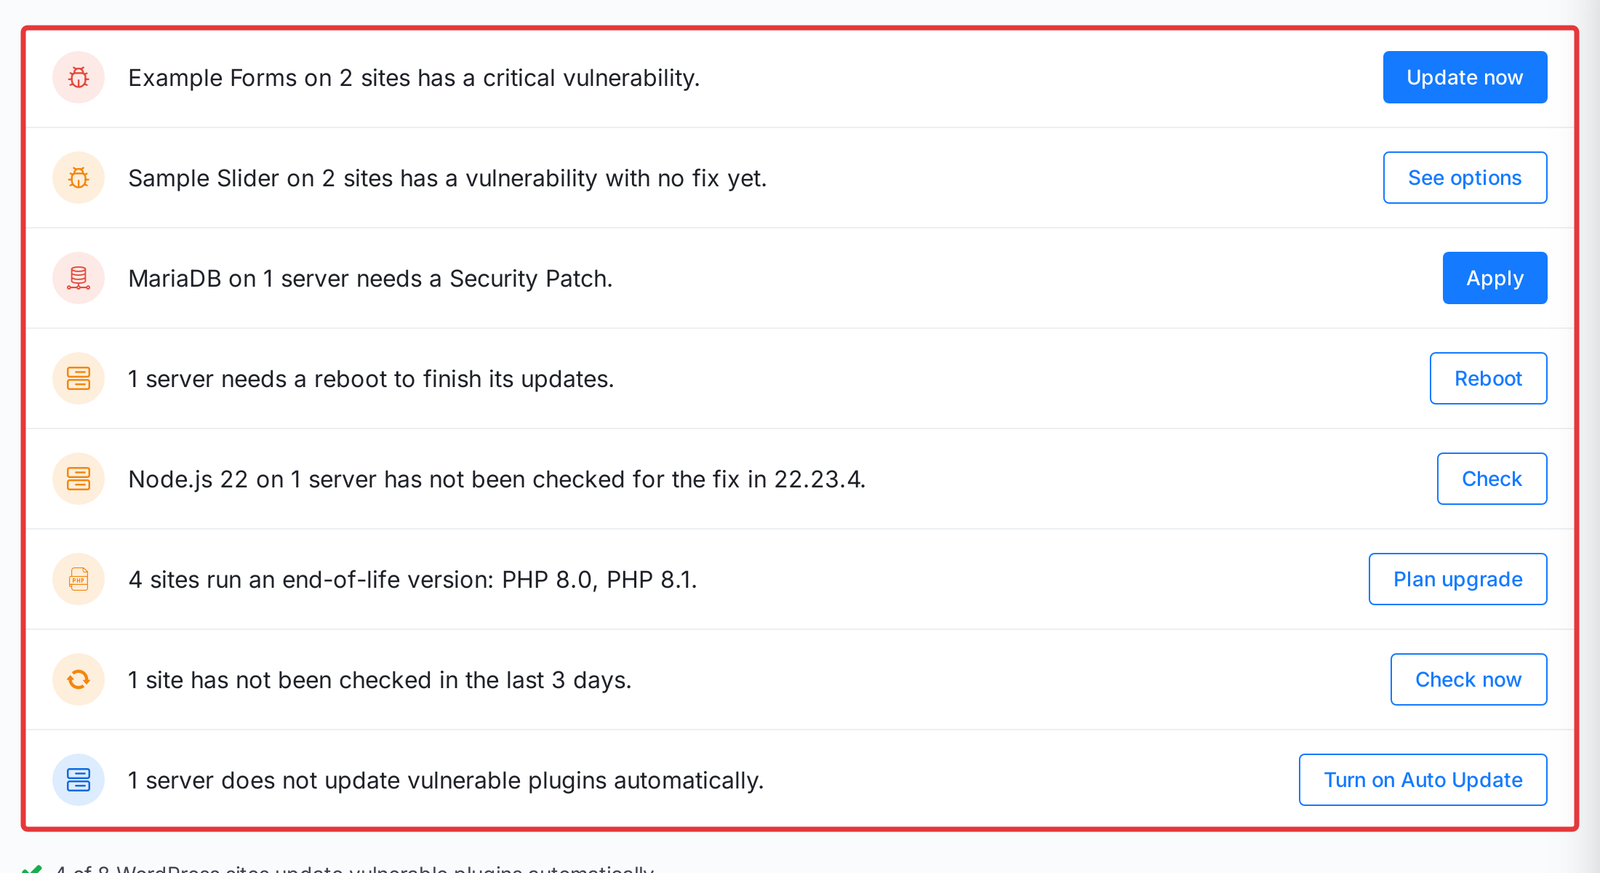
What needs you lists the work in plain sentences, the most urgent first. Each line has one button. When the list is empty, it says Nothing needs you right now.
| Line says | Button | What the button does |
|---|---|---|
| A plugin has a critical vulnerability, or one attackers are using | Update now | Opens the Updates Manager, filtered to that plugin. Without permission to update sites, the button is See sites. |
| More plugins have a critical vulnerability | Review | Lists them on Sites |
| A plugin has a vulnerability with no fix yet | See options | Opens that plugin on Sites, with the option to protect its sites |
| More plugins have no fix yet | Review | Lists them on Sites |
| A server needs a Security Patch | Apply | Lists the servers waiting for one on Servers |
| A server needs a reboot | Reboot | Lists those servers on Servers |
| Node.js is missing a security update | Update | Lists those servers on Servers |
| Node.js has not been checked for a fix | Check | Lists those servers on Servers |
| Sites run an end-of-life version | Plan upgrade | Lists those sites on Sites, with their fix buttons |
| Sites have not been checked in the last 3 days | Check now | Starts a vulnerability check of your sites |
| Servers don’t update vulnerable plugins automatically | Turn on Auto Update | Lists those servers on Servers |
Only Check now starts anything from this page. Every other button opens a page where you decide what to do.
Step 4: Fix one plugin on every site that runs it
Click Sites, then By plugin. Each vulnerable plugin, theme or WordPress core appears once, with its severity, the number of sites and one of three statuses:
- Update available: a fixed version exists. Update now opens the Updates Manager, which can back each site up first.
- No fix yet: no fixed version exists. Deactivate the plugin if you can, or protect the sites with Site Security Pro until a fix ships.
- Handled automatically: Auto Update is on for every affected site, so it updates within 24 hours.
A red Being exploited label means attackers are using this vulnerability. Click a row to see the advisory, the fixed version and every affected site with its server, installed version and protection.
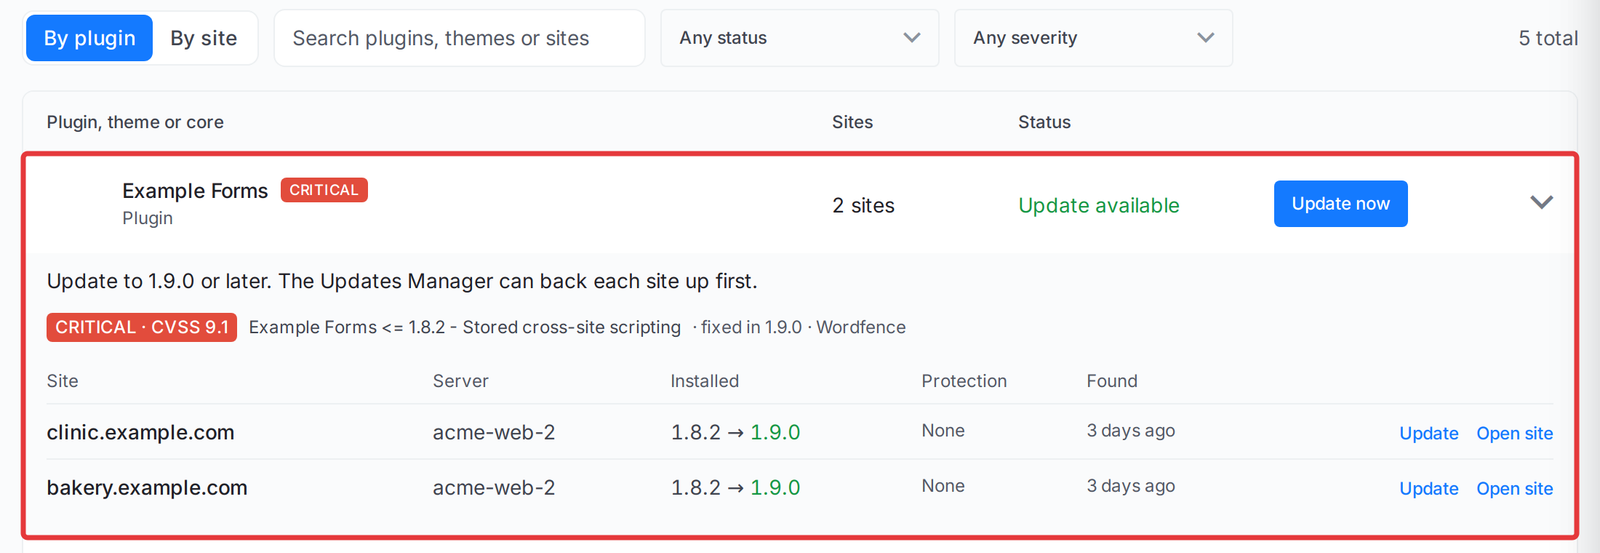
Search by plugin or site name, and filter by status or by severity (Critical or exploited, Lower risk).
Step 5: Check each site
Click By site to list every site, WordPress or not. Each row shows:
- Vulnerabilities: the count, with Install N updates when updates are ready. It opens that site’s updates page.
- Runtime: the PHP or Node.js version and its status: Security update available, End of life or Up to date. Update PHP or Update Node.js appears when the version needs work.
- Protection: Site Security Pro and Auto Update. Auto Update only shows as on for sites the server’s scan covers.
- Last checked: when the site was last checked. It can also say Never checked, Last check failed or Scan off.
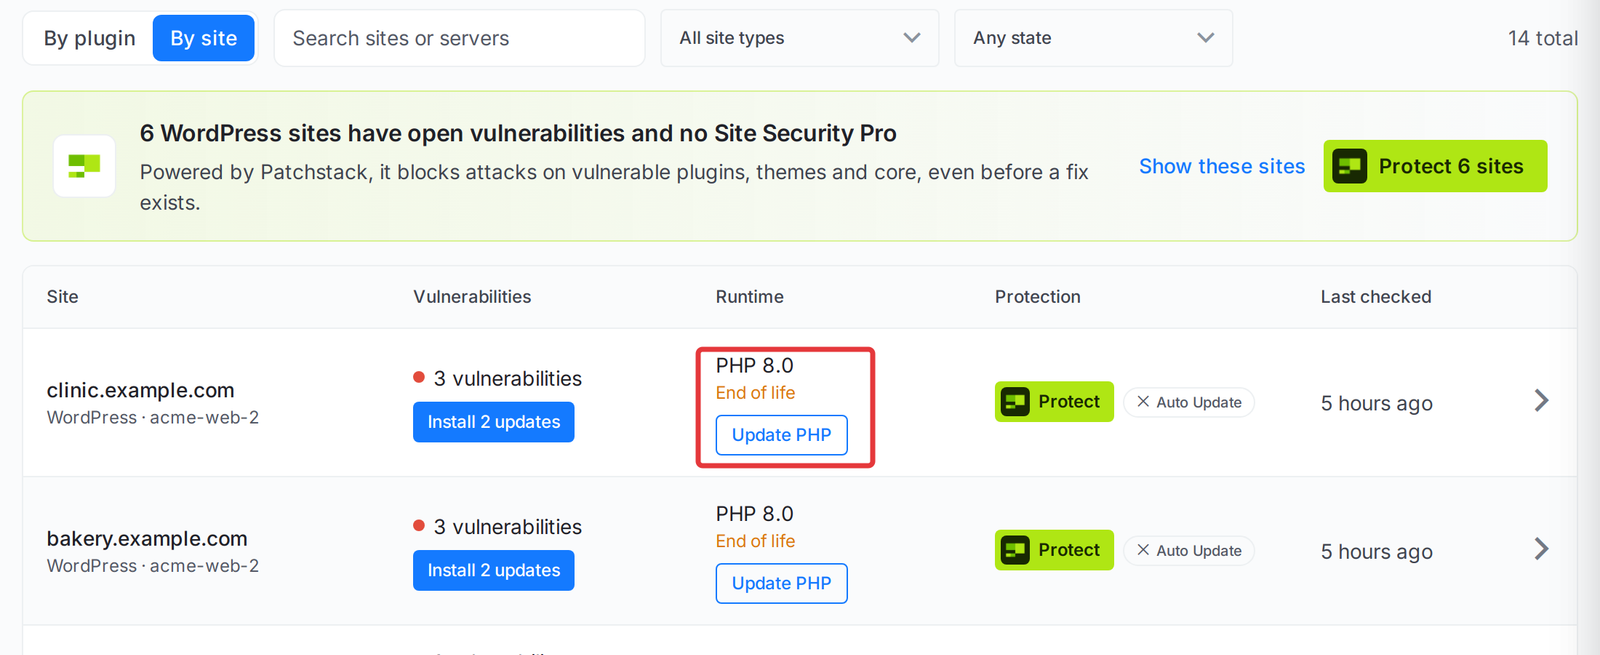
Filter by site type (PHP apps, Node.js apps, Docker apps) or by state: Needs attention, With vulnerabilities, Runtime needs an update, Not checked recently, Not tracked yet or No Site Security Pro. Docker apps show Not tracked yet, because xCloud has no security data for them.
When WordPress sites have no Site Security Pro, a banner offers it. See How to Set up Site Security PRO with xCloud.
Step 6: Check your servers
Click Servers, the third page in the Security Center group. Each server has one status: Security Patch waiting, Node.js security update, Node.js not checked, Reboot needed, End of life or Up to date. +N more means the server has other items too. Protection counts what is on, such as 2 of 4 on. The four are Auto Update, Auto Backup, PHP, database and Redis updates and Automatic reboot.
Click a server to see what needs attention, its protection and its versions.
- Open Security Update and Change Security Update open the server’s Security Update page.
- Change Auto Update opens the server’s Vulnerability Settings.
For an example of a waiting patch, see Apply the MariaDB Security Patch in xCloud.
Step 7: Change what the scan covers on a server
Open a server, then click Security → Vulnerability Settings. Turn on Vulnerability Scan, choose what Scan covers, then click Save Settings.

The full steps are in Vulnerability Checker.
Step 8: Move a site off an old PHP version
Update PHP opens the site’s settings at PHP Configurations. If the version no longer gets security fixes, a notice says so and names the version to move to. Click Choose PHP 8.3 (or the version it names), then Save Settings. Nothing changes until you save. If the site runs old plugins, try the new version on a staging site first.
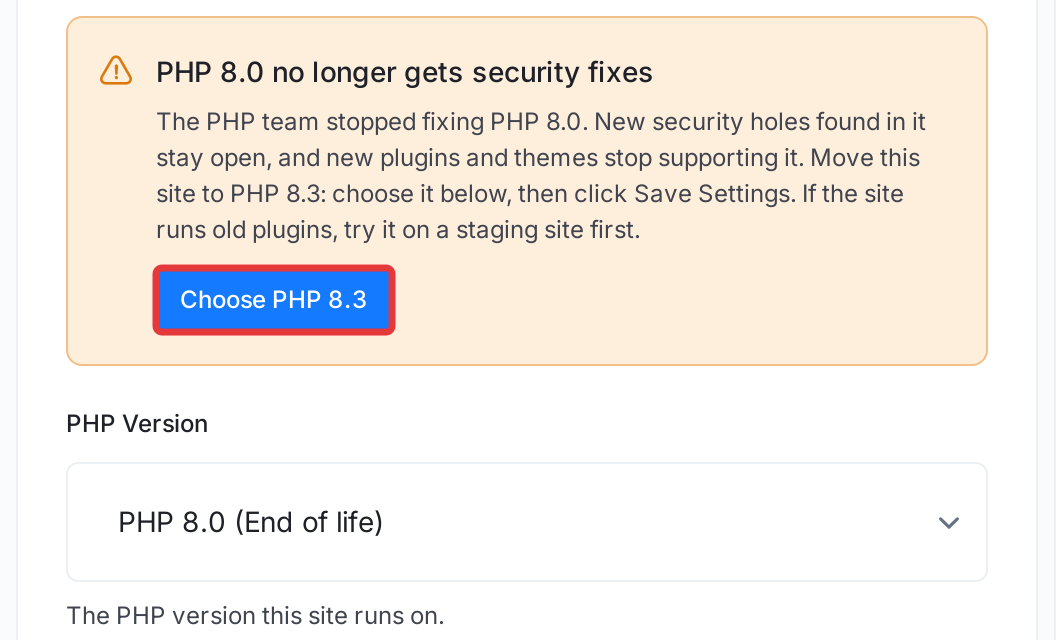
If the server cannot install a newer PHP version, the notice offers Clone this site to a newer server instead.
Step 9: Update Node.js on a server
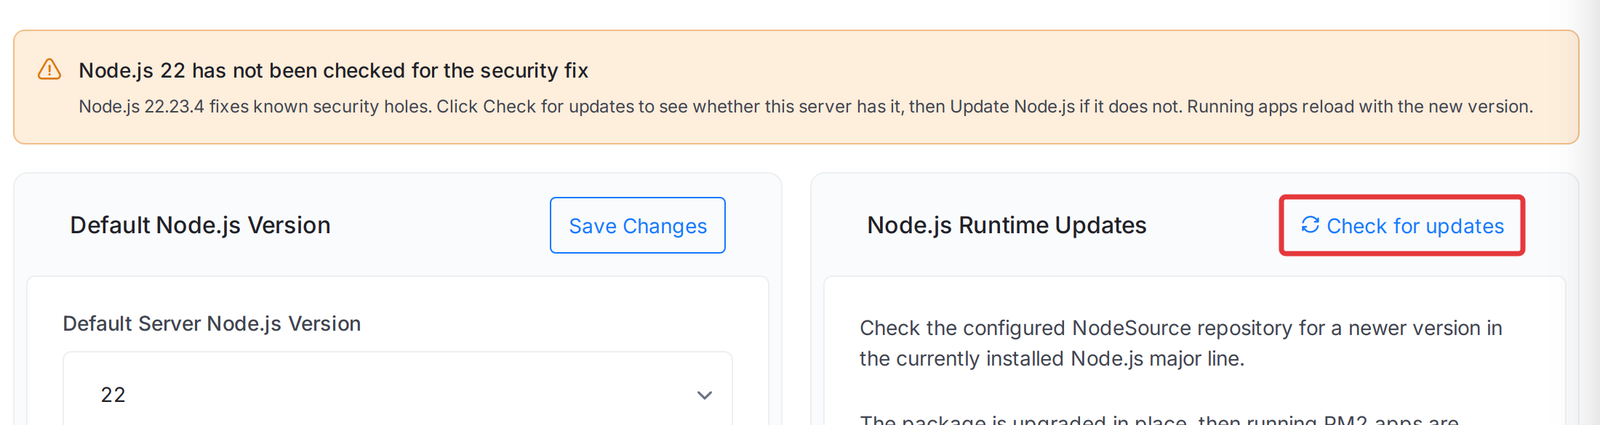
Update Node.js opens the server’s Node Configuration page. Click Check for updates to see whether the server has the fixed version. If it does not, click Update Node.js. Running apps reload with the new version.
Who sees what
| Team role | Overview and Sites | Servers |
|---|---|---|
| Team Admin | The sites their access covers | The servers their access covers |
| Server Admin | The sites their access covers | The servers their access covers |
| Site Admin | The sites their access covers | Not shown |
A member also needs the team’s vulnerability scan permission to open the Security Center, and a server security permission to see Servers. Fix buttons follow the permissions people already have. For example, Update PHP needs permission to change site settings. See Team Roles & Permissions in xCloud.
On a white-label account, the Site Security Pro offer doesn’t appear.
For developers: Public API and MCP
GET /api/v1/security/overviewreturns what needs you, vulnerabilities grouped by plugin, theme or core, and each site’s status. It needs a token with theread:sitesscope, and it names sites and servers by UUID.- Servers are included only for a token with the
read:serversscope, held by a Team Admin or Server Admin with a server security permission. - Optional filters are
status(all,update_available,no_fix,handled_automatically),urgent,type(all,core,plugin,theme) andkind(all,wordpress,php,node,app). - The xCloud MCP server offers the same read-only overview as the
security.overviewtool. See How to Connect xCloud MCP to an AI Agent.
Frequently asked questions
Does the Security Center scan my sites or change anything on my servers?
Opening it does not. It shows what xCloud has already stored: the results of each server’s Vulnerability Scan, Site Security Pro findings, the PHP and Node.js versions behind your sites, and each server’s patches and updates. Check now starts a vulnerability check of your sites. Every fix button only opens the page that makes the change.
Why does a WordPress site show Never checked or Scan off?
Scan off means the server’s Vulnerability Scan is off or does not cover that site. Never checked means the scan covers the site but no check has finished yet. A site that has not been checked is never counted as secure. Open the server’s Vulnerability Settings page to change what the scan covers.
Why does a Docker app say Not tracked yet?
xCloud has no security data for Docker apps yet. They are listed without a status instead of being counted as secure.
Can I use the Security Center on the free plan?
No. On the free plan, opening it takes you to your billing page with the message “You need to upgrade your plan to access this feature.”
If you run into any issues, feel free to reach out to our support team.