

My WordPress Site Was Hacked: What to Do on xCloud
Updated November 6, 2026 · 8 min read
If your WordPress site on xCloud was hacked, work in this order: keep the evidence, find what changed, remove the attacker’s way back in, then restore or clean the site. xCloud gives you the tools to see changed files, read your site’s logs and restore backups. The malware cleanup itself is your task or a security specialist’s, because it is not part of standard xCloud Support.
Signs of a hacked site include spam pages or posts you didn’t write, redirects to other sites, admin users you don’t know, a Google “This site may be hacked” warning, or an abuse report from your host or Cloudflare. If xCloud has already suspended the site after an abuse report, read why xCloud suspends a site or server first: the steps below are also how you get it back.
What xCloud support can and can’t do
xCloud Support helps you use the hosting tools. It does not remove malware. This follows the xCloud support scope.
| Support can help with | Outside standard support |
|---|---|
| Checking that your server and site are online in xCloud | Removing malware or backdoors |
| Reviewing the logs and events xCloud shows | Forensic cleanup or finding exactly how the attacker got in |
| Pointing out suspicious signs from a hosting point of view | A guarantee that the site is fully clean |
| Guidance on restoring a clean backup | Repairing search rankings or blocklist reputation |
| Guidance on changing passwords, SSH/SFTP users and database passwords | Fixing plugin or theme code |
| Guidance on updates, the firewall and vulnerability scans |
When the cleanup is more than you can do yourself, hire a WordPress security specialist or a malware-removal service. Give them the evidence from Step 1.
Step 1: Keep the evidence before you change anything
Don’t delete strange files or wipe the site yet. Deleting first destroys the clues that show how the attacker got in, and without them the same hole stays open.
- Write down when you first noticed the problem and every change you make from now on.
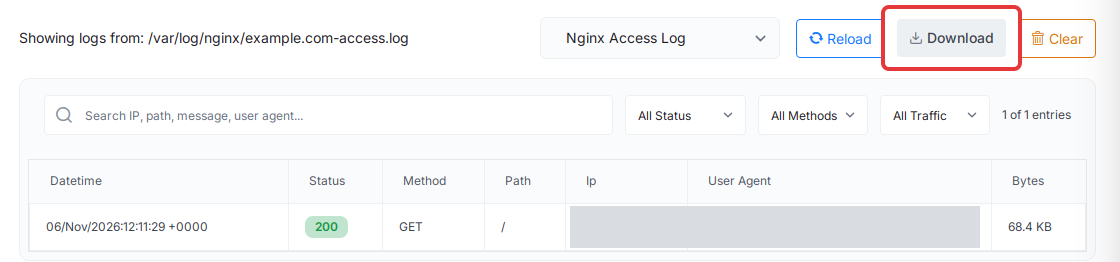
- Open the site and go to Site Monitoring → Logs. In Select log type, choose the access log (Nginx Access Log or OpenLiteSpeed Access Log, depending on your server), then the error log, and click Download for each. In the Download Site Log window, click Download again. The log file downloads to your computer. Logs rotate, so older lines disappear over time.
- Check Site Monitoring → Events for recent actions on the site, such as restores, updates or setting changes.
- On a paid plan, take a copy with Site Backup → Previous Backups → Backup Now. On the Free plan, download the files over SFTP instead, because Site Backup is locked. Keep this copy apart from your clean backups and never restore it: it contains the malware.
Step 2: Find what changed with Integrity Monitor
Integrity Monitor shows WordPress core and plugin files that differ from the official WordPress.org copies. Open the site and go to Security → Integrity Monitor, then click Scan Now. When the scan finishes, expand WordPress Core and Plugins to see each flagged file.
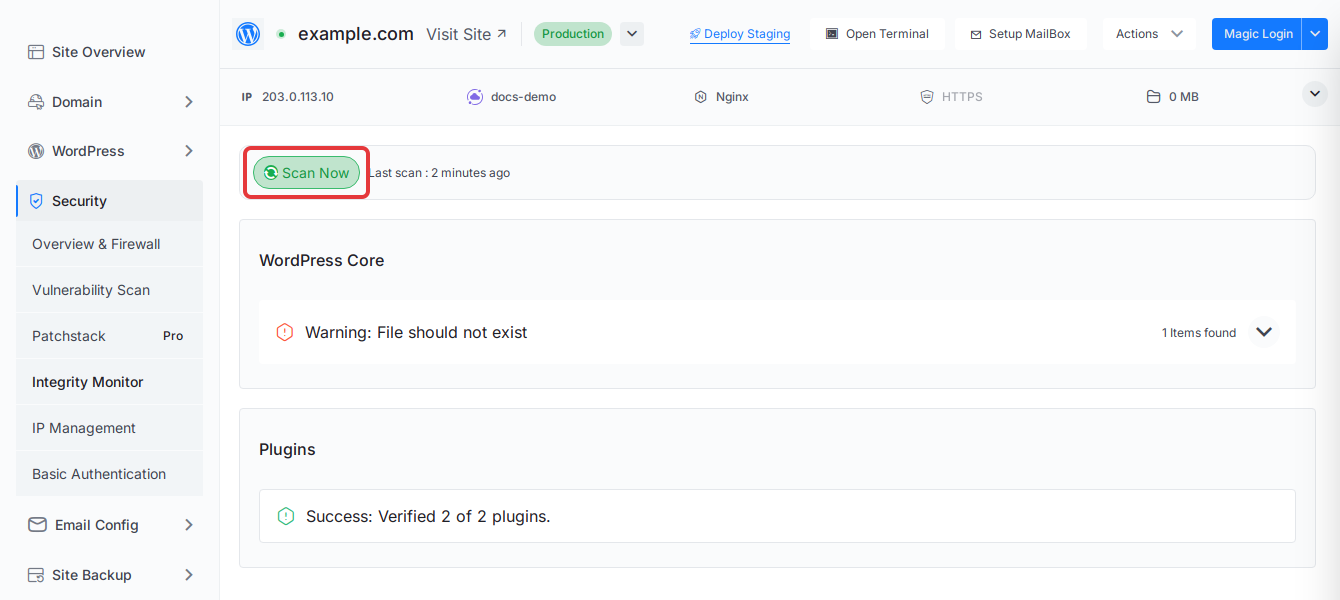
Read the results as clues, not as a verdict:
- A core file that is modified or should not exist is a strong sign. Attackers often hide files in
wp-adminandwp-includes. - A flagged plugin may have been changed by the attacker, or you may have edited it yourself.
- What it can’t see: premium or custom plugins (they have no WordPress.org checksums), themes, the
uploadsfolder and the database. A clean result here does not mean the site is clean.
For more on reading the results, see how to verify WordPress checksums.
Step 3: Close the way back in
Do this before you clean or restore. Otherwise the attacker can return through the same door.
- Remove unknown administrators. In WordPress, go to Users and delete any admin account you didn’t create. Then change the passwords of every remaining admin.
- Change the site’s server passwords. In xCloud, open Access Data → SSH/sFTP and set a new Password for the site user, then click Save.
- Change the database password. An attacker who could read
wp-config.phpalso has this password. Note the Database User shown in the site’s Access Data → Database. Then open the server’s Database page, click Edit next to that user under Database Users, enter a new Password, keep the site’s database ticked under Can Access, and click Update. xCloud writes the new password intowp-config.phpfor you, so you don’t need to edit the file. - Change other passwords and keys the site uses: email (SMTP) passwords, payment and API keys in plugins, and the security keys in
wp-config.php(generate new ones at https://api.wordpress.org/secret-key/1.1/salt/). This signs everyone out. - Turn on two-factor sign-in for your xCloud account with two-factor authentication.
- Find the vulnerable plugin or theme. Open Security → Vulnerability Scan and update or remove anything it flags. See the vulnerability checker guide.
If you run WP-CLI checks over SSH on a hacked site, add --skip-plugins --skip-themes. WP-CLI loads your site’s plugins and themes by default, so without those flags it can run the attacker’s code:
wp user list --role=administrator --skip-plugins --skip-themes
wp core verify-checksums --skip-plugins --skip-themes
find wp-content/uploads -name "*.php"
A PHP file in uploads is a common sign of a backdoor: that folder should only hold images and documents. See how to run commands on your site and server for SSH access.
Step 4: Restore a clean backup, or clean the site
Restore when you have a backup you trust; clean the site when you don’t.
When a restore is right
Restoring needs a paid plan: on the Free plan, the Site Backup menu is locked. Restore only from a backup taken before the attack started. A backup is not safe just because it is older than the first symptom you saw: attackers often wait days or weeks before anything shows. Compare the backup dates with the earliest suspicious lines in your logs and the dates of the flagged files.
Go to Site Backup → Previous Backups and find a backup from before the attack. Click the three-dot (⋯) actions button in its Action column.
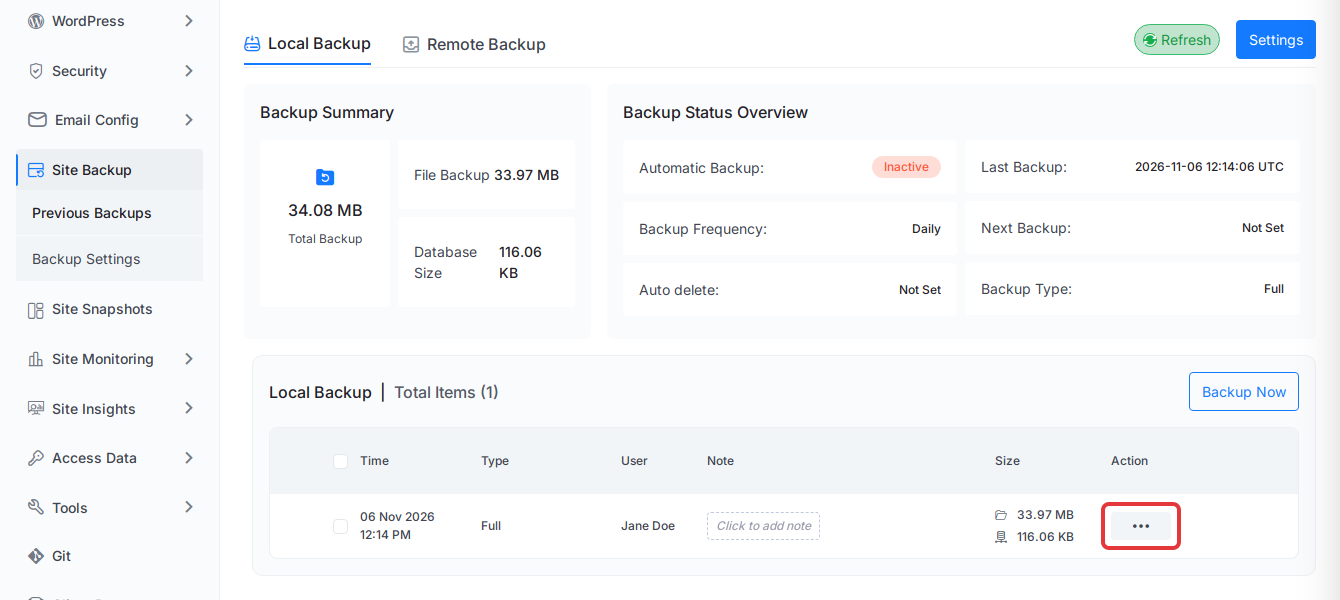
Choose Restore Backup and confirm. See site backups in xCloud for local and remote backups, and recreate a WordPress site from backups if you want to restore into a new site instead.
After a restore, finish Step 3 again on the restored site. The restored copy still has the old vulnerable plugin and old passwords, so update both straight away.
When you need to clean the site
If every backup may be infected, clean the current site rather than restoring an infected copy. xCloud has no malware cleaner, so use a malware-removal tool or service:
- Replace WordPress core with a fresh copy of the same version, keeping
wp-contentandwp-config.php. - Reinstall each plugin and theme from its official source, and delete the ones you don’t use.
- Remove PHP files from
uploadsand code you don’t recognise inwp-config.phpand.htaccess. - Check the site’s cron jobs: open the site and go to Tools → Cron Jobs. Delete any job you didn’t add.
- Search the database for injected scripts and spam posts.
Once the files are clean, reset file and folder permissions and repair the site user:
- Open the site and go to Site Settings.
- On the Rescue Site card, turn on Repair Site User and Update Directory Permissions.
- Click Run Now, then click Yes, Run Now to confirm.
You see the message “Site rescue job has been initiated.” xCloud then repairs the site on the server. Rescue Site does not scan or clean files. See reset file and folder permissions with Rescue Site.
Step 5: Check the result and protect the site
- Click Scan Now in Security → Integrity Monitor again. WordPress core should now pass.
- Run Security → Vulnerability Scan again and update anything it still flags.
- Watch Site Monitoring → Logs for a few days for the same requests you saw in Step 1.
- If the site was suspended, reply to the support ticket with what you found and fixed. A person from our team reviews it and lifts the suspension once the site is clean.
For ongoing protection, follow the WordPress security checklist. To get earlier alerts and block attacks on known plugin and theme flaws before you can update them, you can add Site Security Pro, powered by Patchstack. It blocks known attacks, but it doesn’t remove malware that is already on the site.
Frequently asked questions
Will xCloud support clean the malware from my site?
No. Malware removal and forensic cleanup are not part of standard xCloud Support. Support can check your server and site in xCloud, review the logs and events xCloud shows, and guide you on restoring a clean backup, changing passwords and updating WordPress. For the cleanup itself, use a WordPress security specialist or a malware-removal service.
Does a clean Integrity Monitor or Vulnerability Scan result mean my site is clean?
No. Integrity Monitor compares WordPress core and WordPress.org plugin files with their official copies, so it cannot see malware in uploads, themes, premium plugins or the database. The Vulnerability Scan and Site Security Pro report known vulnerabilities in your plugins, themes and core. Neither one removes malware or proves that it is gone.
Should I restore a backup or clean the site?
Restore a backup only when you are sure it was taken before the attack started. A backup is not safe just because it is older than the first symptom you saw. If every backup may be infected, clean the current site instead of restoring an infected copy.
Can malware on one site spread to my other sites on the same server?
Each site on an xCloud server usually runs under its own user, so its files are kept apart from your other sites. One infected site does not by itself mean the others are infected. Still check every site whose files, admin accounts or passwords overlap with the hacked one.
If you run into any issues while recovering your site, feel free to reach out to our support team.