

How to Deploy Jellyfin With xCloud One Click Apps
Updated November 7, 2026 · 8 min read
Deploy Jellyfin from Sites → Add New Site → One-Click Apps → Jellyfin, pick a server, choose Demo Site or Go Live, then select Next. xCloud installs Jellyfin in Docker behind Nginx with HTTPS, so you don’t write a docker-compose.yml or set up a reverse proxy yourself. This guide is for anyone who wants a private media server for movies, TV, music and photos on a server they control.
New to Jellyfin? Read what Jellyfin is and what it’s used for first, or see the Jellyfin hosting page for what xCloud includes.
What the Jellyfin template ships
xCloud’s Jellyfin template runs Jellyfin in Docker. You can see the exact Jellyfin version and volume names on the site’s Compose page. You don’t fill in any app settings during setup.
| Item | What you get |
|---|---|
| Jellyfin version | A fixed version from the official Jellyfin release, which stays the same until you update it |
| Stack | Nginx server with Docker. xCloud installs Docker during deployment if the server doesn’t have it yet. |
| Recommended size | 4 GB RAM, 2 vCPU, 20 GB disk, as shown in the catalog. An existing server needs at least 2 GB RAM. |
| Web access | Your site’s HTTPS domain |
| Storage | Docker volumes for your settings and media, listed under volumes on the site’s Compose page |
| Login | No default credentials. The first account you create is the administrator. |
This size is enough to set up Jellyfin and stream videos that your device can play as they are. If Jellyfin has to convert videos for a device while they play (transcoding), it needs much more CPU. Media files also need their own disk space on top of the 20 GB. Size the server for the number of people streaming at once and the size of your library.
Before you start
- An xCloud account that can create sites, and an Nginx server, or room to create a new one. OpenLiteSpeed servers can’t run Docker apps.
- For Go Live: a domain or subdomain you can point at the server. For a quick test, use Demo Site and go live later.
- A sudo user on the server if you plan to upload media files.
Step 1: Find Jellyfin in the catalog
Go to Sites → Add New Site. On What would you like to host today?, type Jellyfin in Search apps…, then select the Jellyfin card. Several Jellyfin add-on apps appear in the same search, so pick the card titled Jellyfin, the media server itself.
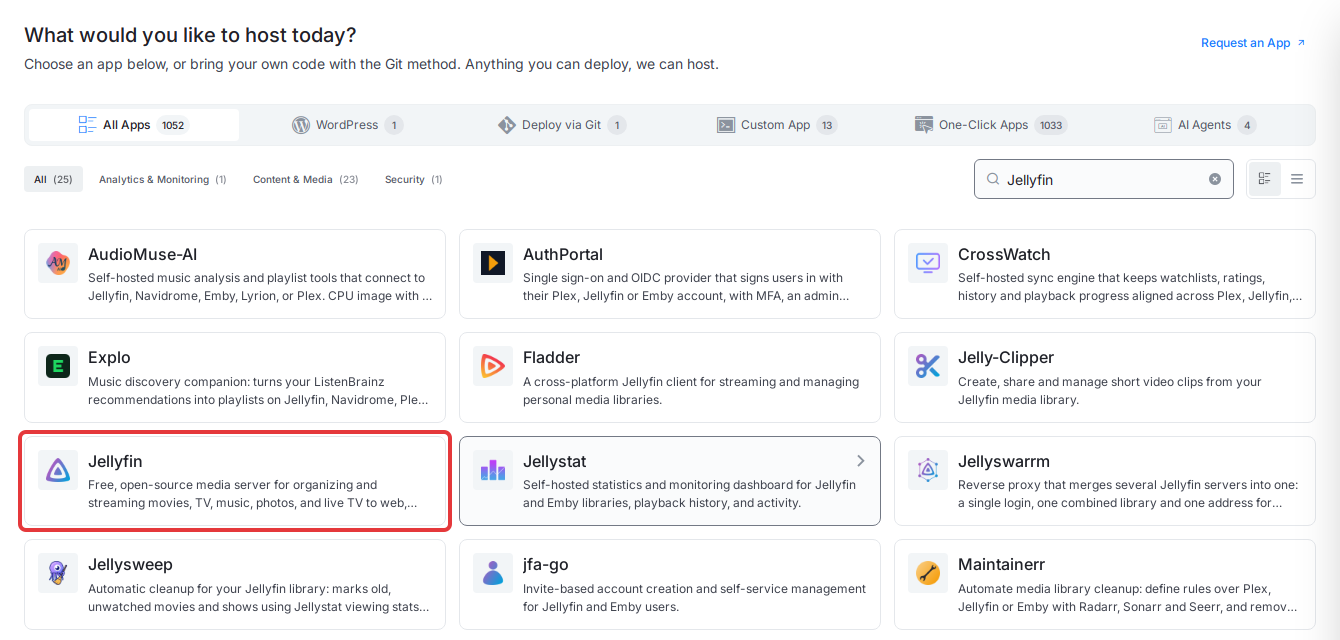
Expected result: The Jellyfin page opens with Runs on Nginx, Docker and Recommended: 4 GB RAM · 2 vCPU · 20 GB disk.
Step 2: Choose where it runs
Under Where should it run?, select an existing Nginx server, or select Deploy on a new server to create one for Jellyfin. Each server card shows its stack, RAM, vCPU, free disk and site count. Then select Continue.
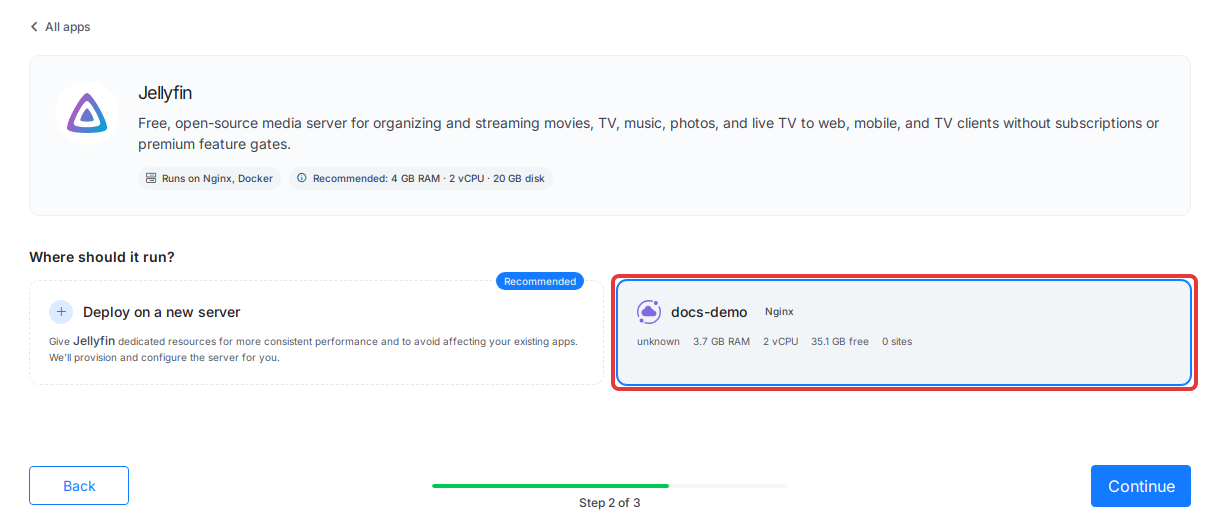
Expected result: The Install Jellyfin Into page opens for the server you chose.
If a server you expected isn’t in the list, open servers cannot run this app below the list to see why, or choose Deploy on a new server.
Step 3: Name the site and pick a domain
Enter a Site Title, for example Jellyfin Media. Add tags under Add Tag (optional) only if your team uses them. Under Domain Setup, choose:
- Demo Site to get an xCloud test domain right away. Select Regenerate if you want a different name.
- Go Live to use your own domain. Point the domain at your server first, so xCloud can set up HTTPS.
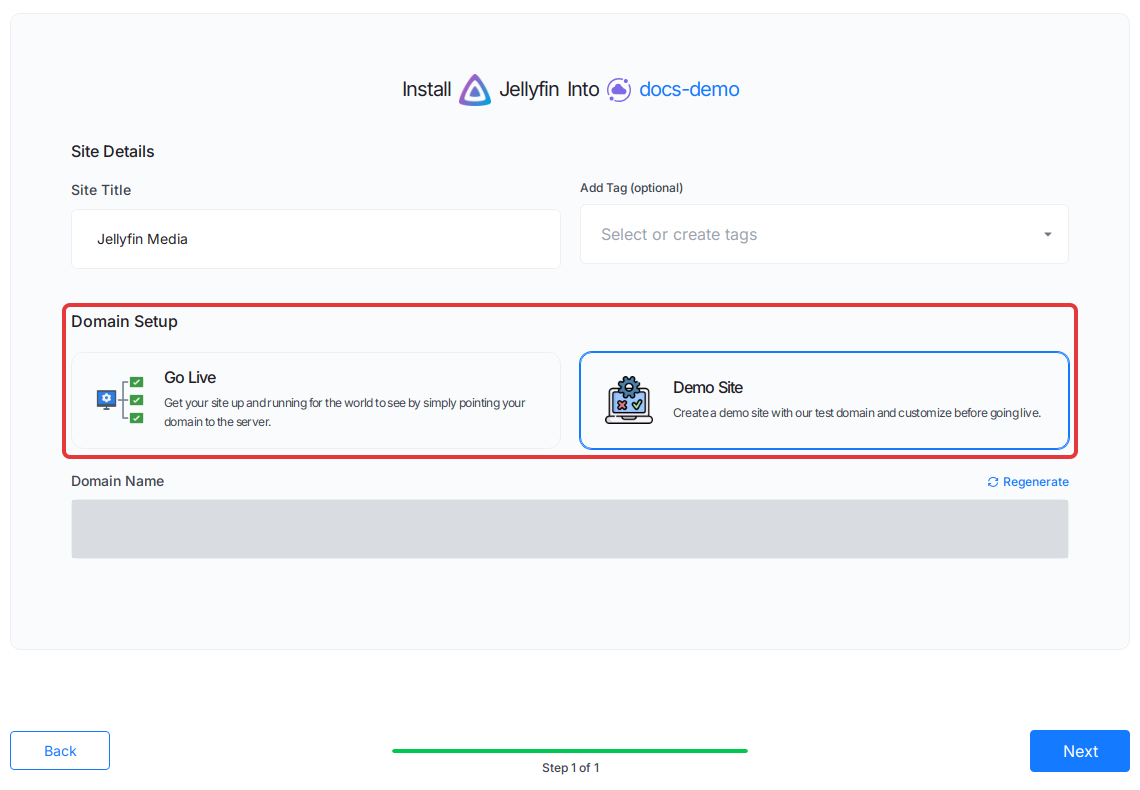
Select Next to start the installation.
Expected result: xCloud opens the setup progress screen.
Step 4: Wait for the installation to finish
xCloud checks the server, installs Docker if needed, sets up the Jellyfin app, configures SSL and HTTPS and the Nginx routing, then installs monitoring. You can leave the page while it runs.
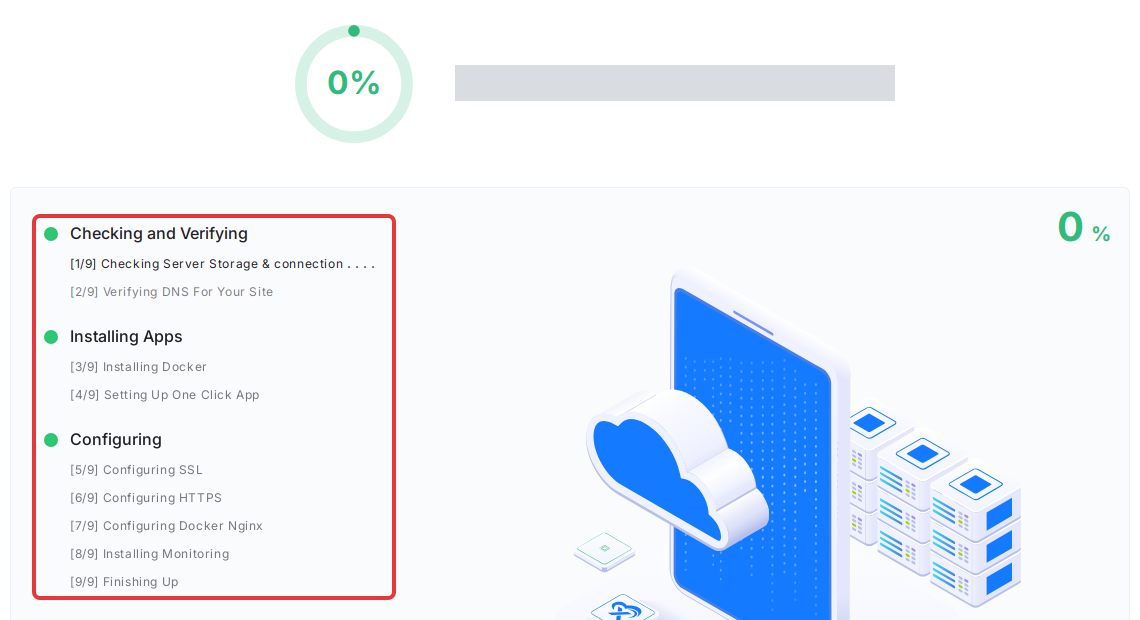
Expected result: When it finishes, the site’s Site Overview opens and the Jellyfin Credentials panel shows the site URL.
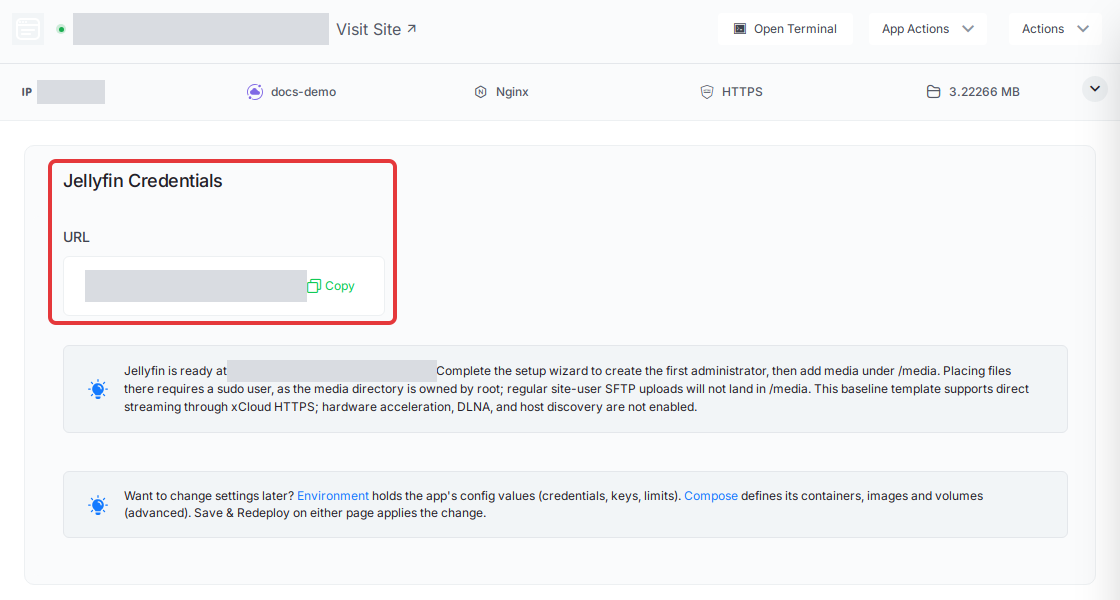
If the installation fails, open the site’s Events page and select the failed event to read its output (view logs and events shows how). Fix what it reports (for example, low disk space or a domain that doesn’t point at the server yet), and try again.
Step 5: Name your Jellyfin server
Select Visit Site, or copy the URL from Jellyfin Credentials. Jellyfin opens its setup wizard on Welcome to Jellyfin!. Enter a Server name, choose a Preferred display language, then select Next.
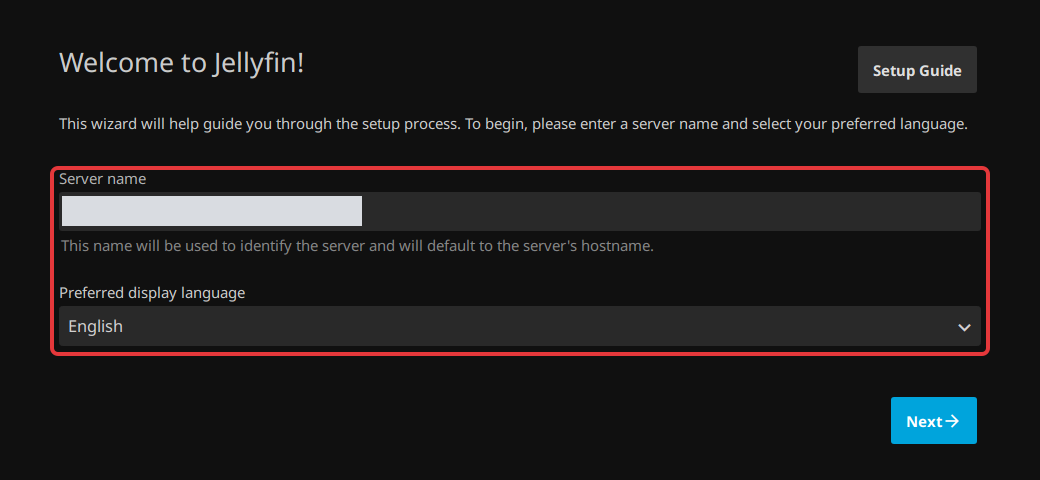
Do this step right after deployment. Until the wizard is finished, anyone who opens the URL could create the admin account.
Step 6: Create the administrator account
On Tell us about yourself, replace the suggested Username with your own, enter a strong Password, repeat it in Password (confirm), then select Next. This first account is the Jellyfin administrator. You can add more users later from the Jellyfin dashboard.
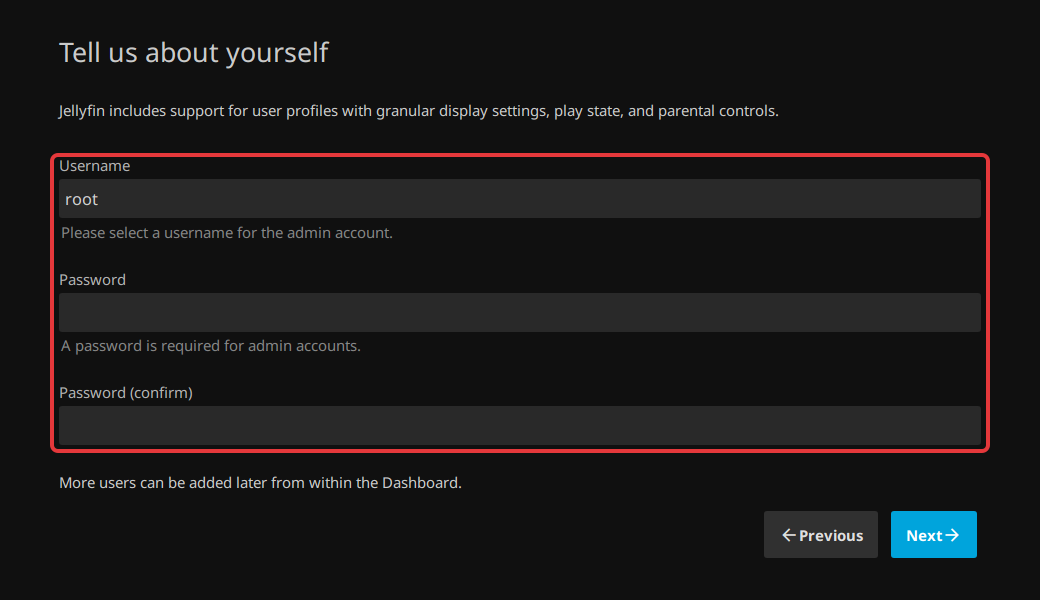
Expected result: The wizard moves on to its next screen.
Step 7: Add media and finish the wizard
Jellyfin reads media from /media inside its container. You can add a library for each folder there, for example a Movies library at /media/movies, or skip libraries for now and add them later in Jellyfin’s settings. Then follow the remaining wizard screens to finish setup.
A regular site user’s SFTP uploads don’t land in /media. To add files, use a sudo user:
-
Upload your files to the server as the sudo user, for example into a
moviesfolder in its home folder, then sign in to the server over SSH as that user. -
Find the Jellyfin container’s name:
sudo docker psCopy the name in the NAMES column for the Jellyfin container.
-
Copy the files into the container, replacing
CONTAINERwith that name:sudo docker cp ./movies/. CONTAINER:/media/movies -
Check that the files are there:
sudo docker exec CONTAINER ls /media/movies -
In Jellyfin, scan your libraries again so it picks up the new files.
Expected result: The ls command lists the files you copied. After the scan, the movies appear in your Movies library.
Connect apps and other devices
Use the full HTTPS URL of your site when you add the server in an official Jellyfin app on a phone, TV or desktop.
Back up and update Jellyfin
Back up every volume listed under volumes on the site’s Compose page. Together they hold your Jellyfin settings, users and libraries, and the files you placed in /media. Keep a copy of irreplaceable media off the server too. See backing up and restoring Docker apps for the xCloud side.
Your site stays on the Jellyfin version shown on its Compose page until you change it. Before you move to a newer release, take a backup and read the Jellyfin release notes. Then follow update a One-Click App and edit its Docker Compose. Keep the same volume names when you edit the Compose file, so your library and settings carry over.
Frequently asked questions
Does Jellyfin on xCloud come with a default username or password?
No. The template has no default credentials. The first account you create in the Jellyfin setup wizard becomes the administrator, so open the site and finish the wizard right after deployment.
How much server do I need for Jellyfin?
The xCloud catalog recommends 4 GB RAM, 2 vCPU and 20 GB disk. An existing server with at least 2 GB RAM can still run it. If Jellyfin has to convert videos for a device while they play (transcoding), it needs much more CPU. Your media library also needs its own disk space on top of the 20 GB.
Why don’t files I upload over SFTP show up in Jellyfin?
Jellyfin reads media from the /media folder inside its container, and a regular site user’s SFTP uploads do not land there. Sign in to the server as a sudo user, copy the files into the container with sudo docker cp, then scan the library in Jellyfin.
Related resources
- How to use One-Click App templates for App Actions, the Environment and Compose pages and events
- Manage One-Click App domains and public endpoints
- Jellyfin hosting on xCloud and the full One-Click Apps catalog
- Jellyfin’s own guides: hardware selection and backup and restore
If you run into any issues while deploying Jellyfin, feel free to reach out to our support team.