

How to Deploy a Shopify App on Your Own Server with xCloud
Updated November 10, 2026 · 9 min read
To deploy a Shopify app on your own server with xCloud, push the app to a Git repository, create a Node.js site with Deploy via Git, set Database engine to PostgreSQL, add the Shopify environment variables, and point the app URLs in shopify.app.toml at your domain. xCloud builds the app, runs it with PM2 and adds DATABASE_URL for you.
This guide uses Shopify’s official React Router app template, the starting point that Shopify CLI creates for new apps. Apps built on the older Remix template follow the same steps.
Before you start
You need:
- A Shopify Partner account (or Dev Dashboard access) and an app created with Shopify CLI. You need its Client ID and Client secret.
- The app code in a GitHub, GitLab or Bitbucket repository. See How to Integrate a Git Provider with xCloud for private repositories.
- An Nginx server in xCloud with managed PostgreSQL Ready. See How to Install Managed PostgreSQL and pgAdmin in xCloud.
- A domain or subdomain for the app, such as
app.example.com, that you can point at the server.
Step 1: Switch Prisma from SQLite to PostgreSQL
The template stores Shopify sessions with Prisma in a SQLite file (dev.sqlite). On a server, use PostgreSQL instead. Each Git deployment resets the code folder, and a separate worker process cannot safely share a SQLite file with the web process.
Open prisma/schema.prisma and change the datasource block:
datasource db {
  provider = "postgresql"
  url      = env("DATABASE_URL")
}
The template’s existing migrations were written for SQLite, so Prisma will not apply them to PostgreSQL. Delete the prisma/migrations folder, point DATABASE_URL at a local PostgreSQL database, and create a fresh first migration:
rm -rf prisma/migrations
npx prisma migrate dev --name init
Commit the new prisma/migrations folder and push it to your repository.
Step 2: Start a Deploy via Git site
Open your server in xCloud, select Add New Site, and choose Deploy via Git. Paste your repository URL. xCloud reads the repository and suggests how to run it.
The template ships a Dockerfile, so xCloud may offer Docker container. Select Native app, then select Node.js as the App Type.
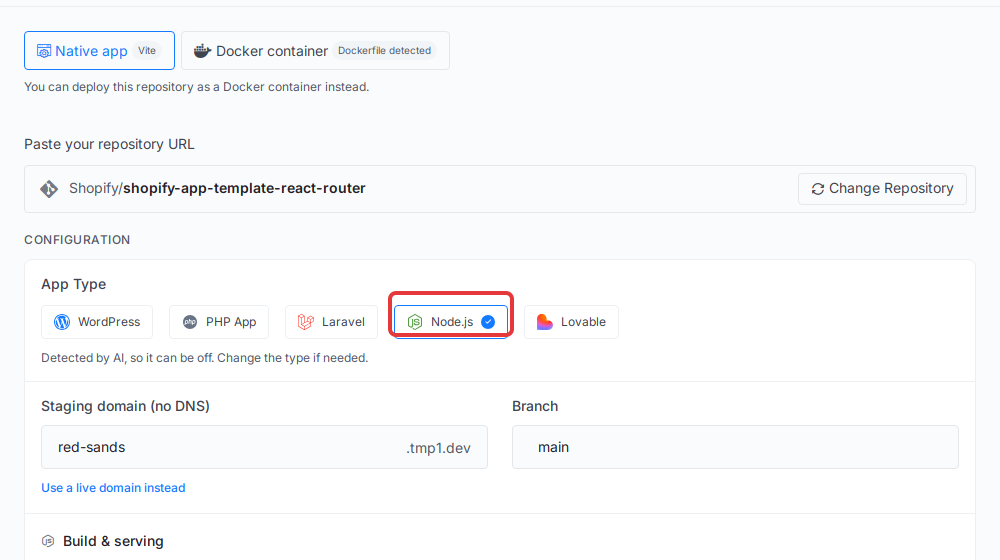
Select the Branch to deploy. To use your own domain from the start, select Use a live domain instead and enter it, for example app.example.com. You can also start on the Staging domain (no DNS) and go live later.
Step 3: Set the serving mode, start command and port
In Build & serving, set Serving mode to SSR (Node process). Enter npm run start as the Start command and 3000 as the Port.
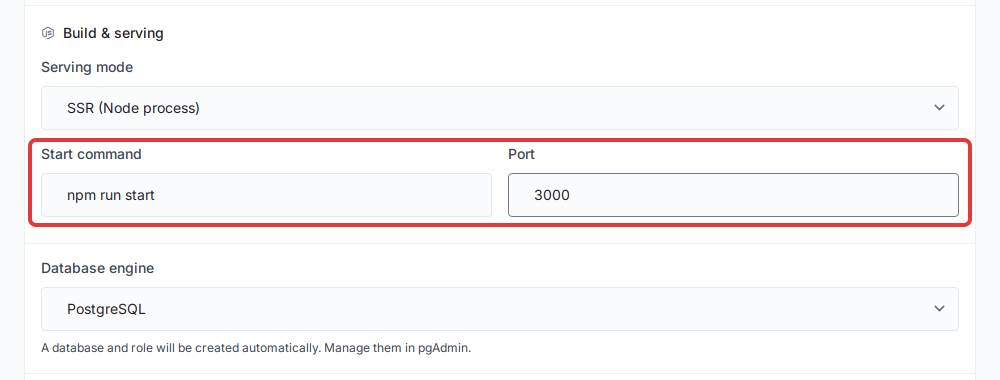
The template’s start script runs react-router-serve ./build/server/index.js, which reads the port from the PORT environment variable.
Step 4: Choose PostgreSQL as the database engine
Set Database engine to PostgreSQL. The form confirms: “A database and role will be created automatically. Manage them in pgAdmin.”
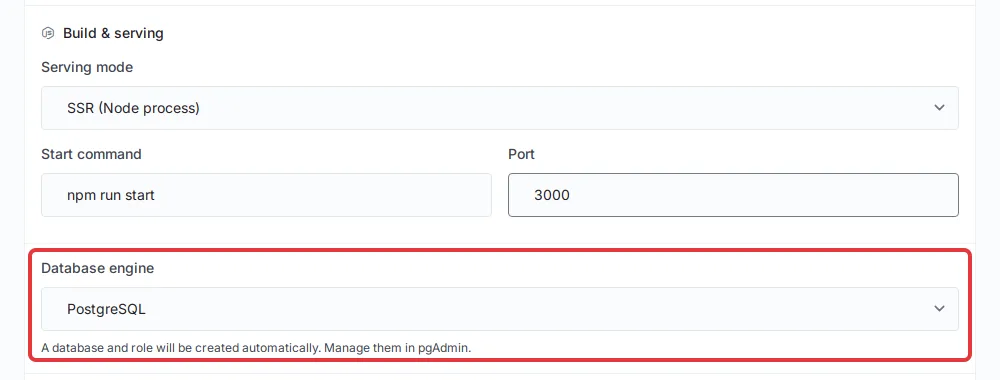
xCloud creates a database and role for the site and adds DATABASE_URL and the DB_* settings to the site’s environment. You don’t enter a database password yourself.
If Database engine does not appear, PostgreSQL is not Ready on the server yet, or the app type is not Node.js.
Step 5: Add the Shopify environment variables
Expand Advance. Check that Node.js Version is 22 or newer: the template’s package.json requires Node.js 22.12 or later.
In Environment file (.env), add one KEY=value pair per line:
NODE_ENV=production
PORT=3000
SHOPIFY_API_KEY=your_client_id
SHOPIFY_API_SECRET=your_client_secret
SCOPES=write_products
SHOPIFY_APP_URL=https://app.example.com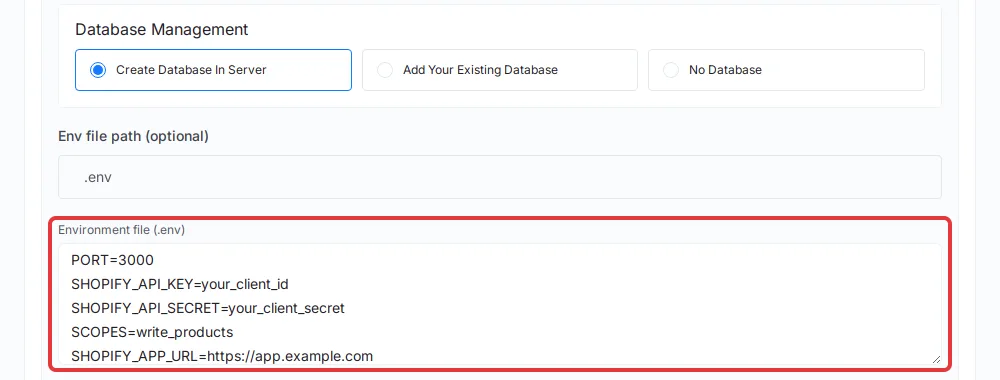
SHOPIFY_API_KEYandSHOPIFY_API_SECRETare the app’s Client ID and Client secret. Runshopify app env showin the project to print them.SCOPESmust matchscopesinshopify.app.toml, comma separated.SHOPIFY_APP_URLis the HTTPS address of the site, with no trailing slash.- Leave out
DATABASE_URL. xCloud adds it.
Keep these values out of Git. For how a deployment treats .env, see Environment Variables (.env) and Git Deployments.
Step 6: Set the build and deploy script
In Build & deploy script, replace the generated commands with the template’s install, build and database steps:
$XCLOUD_NPM install
$XCLOUD_NPM run build
$XCLOUD_NPM run setup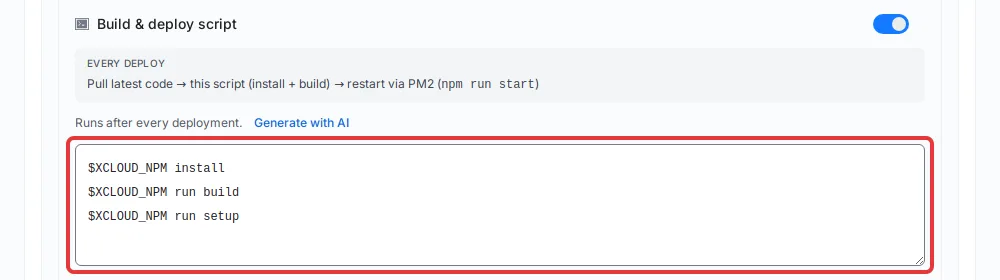
The template’s setup script runs prisma generate && prisma migrate deploy, so every deployment applies new migrations before PM2 restarts the app. If your app’s package.json uses other script names, use those.
Review the summary and select Deploy. Wait for the deployment to finish.
Step 7: Add SSL to your domain
Point your domain’s DNS at the server and make sure the site has an SSL certificate. Shopify only loads apps over HTTPS. See How to Enable HTTPS in xCloud. If you started on the staging domain, follow How to Go Live from a Staging Domain first, then update SHOPIFY_APP_URL on the site’s Environment page, then redeploy the site.
Step 8: Point the Shopify app at your domain
Shopify needs to know where your app lives. In shopify.app.toml, set application_url to your domain and change the host of each entry in redirect_urls under [auth] to the same domain. Keep the paths as they are:
application_url = "https://app.example.com"

[auth]
redirect_urls = [ "https://app.example.com/auth/callback" ]
Then release the configuration to Shopify from your computer:
shopify app deployShopify CLI uploads the URLs, scopes and webhook subscriptions in shopify.app.toml to your app. See Shopify’s app configuration reference for every option.
Step 9: Add a worker for background jobs (optional)
If your app processes webhooks or other jobs in the background, run the worker as a Supervisor process so it restarts when it stops. The template has no worker; use your own worker’s command.
Open the server, go to Management → Supervisor, and select Add Supervisor Process. Enter the worker Command, set Directory to the site’s folder (/var/www/<your domain>), and set User to the site user shown when you created the site.
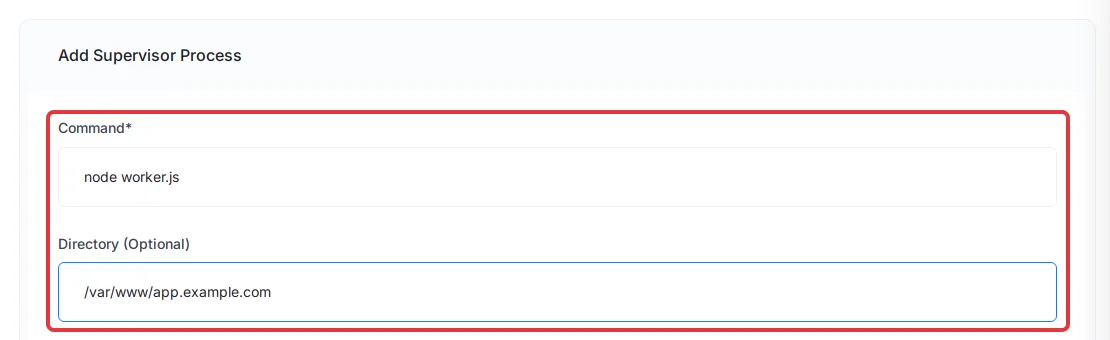
See Supervisor for Process Management for every field and how to check the process status.
Step 10: Test the app
- In the Partner Dashboard or Dev Dashboard, install the app on a development store.
- Open the app in the store admin. It should load inside Shopify without errors.
- Trigger a webhook, for example by uninstalling and reinstalling the app, or with
shopify app webhook trigger. - In xCloud, open the site, go to Monitoring → Logs, and select PM2 Log. The template logs a line such as
Received app/uninstalled webhook for <shop>for each webhook it handles.
Handling webhook bursts
Shopify can send many webhooks at once, for example during a flash sale or Black Friday Cyber Monday. Shopify expects a quick success response, so keep each webhook request short:
- Answer fast. Verify the webhook, save what you need, and return
200. Don’t call slow APIs inside the request. - Queue the work. Store the job in the database or a queue and process it in the worker from Step 9.
- Make handlers idempotent. Shopify can deliver the same webhook more than once. Use the webhook ID to skip one you already processed.
- Size the server for peak days. Watch CPU and memory on the server’s monitoring page during busy days and resize before a big sale.
Troubleshooting
| Symptom | What to check |
|---|---|
| The app is blank or shows an error inside Shopify admin | SHOPIFY_APP_URL and application_url must be the same HTTPS address. Check the PM2 Log for a startup error. |
| OAuth fails with a redirect URL mismatch | Each redirect_urls entry must use your domain. Run shopify app deploy again after changing it. |
| Webhooks return 401 | The webhook signature check failed. SHOPIFY_API_SECRET must be the app’s current Client secret. Update it on the site’s Environment page, then redeploy the site so the app picks up the new value. |
| Prisma can’t reach the database | provider in schema.prisma must be postgresql and the site must have been created with Database engine set to PostgreSQL. Check that DATABASE_URL is in the site’s environment. |
| Prisma refuses to run the migrations | The old SQLite migrations are still in the repository. Delete prisma/migrations, create a fresh migration for PostgreSQL (Step 1), commit and redeploy. |
| 502 Bad Gateway | The app is not listening at 127.0.0.1 on the Port you set, or it crashed on start. See Fix a 502 Bad Gateway after deployment. |
For deployments that fail or don’t start, see Troubleshooting Git Deployments.
Frequently asked questions
Can I host a Shopify app on my own VPS?
Yes. A Shopify app is a web app that Shopify calls over HTTPS. Connect your own server to xCloud, deploy the app’s Git repository as a Node.js site, give it a domain with SSL, and point the app URLs in shopify.app.toml at that domain.
Do I need PostgreSQL?
Not strictly, but it is the safer choice for a live app. The template stores sessions in a SQLite file by default. A database server keeps that data outside the code folder that each deployment resets, and a worker process can share it. On a server with managed PostgreSQL Ready, xCloud creates the database and fills DATABASE_URL for you.
Does this work for Remix-based Shopify apps?
Yes. Older Shopify apps built on the Remix template deploy the same way: a Node.js site with a build script, a start command and a port. Check the app’s package.json for its real build and start scripts and use those.
Can I move an app from Gadget?
Yes, but it takes code changes. Export the code with Gadget’s ggt pull command, replace the Gadget-specific parts (its database, actions and hosting) with your own code, then deploy the result with the steps in this guide.
For more on Node.js sites, see How to Deploy a Node.js Application with xCloud and Connect Your App to PostgreSQL in xCloud.
If you run into any issues while deploying your Shopify app, feel free to reach out to our support team.