

How to Migrate a Shopify App from Gadget to xCloud
Updated November 10, 2026 · 12 min read
Gadget shuts down on March 31, 2027. To move a Shopify app from Gadget to xCloud, export the code with ggt, rebuild the Gadget-specific parts on Shopify’s React Router app template, rebuild your data from Shopify, deploy the app as a Node.js site with PostgreSQL, then point the Shopify app at the new URL. This guide walks through each step in that order.
It is for developers and agencies who own a Gadget app and can edit its code, its Shopify app configuration and its domain’s DNS. For the background and the reasons behind each choice, read Gadget Is Shutting Down: How to Move Your Shopify App to Your Own Server first.
xCloud has no import tool for Gadget apps. A Gadget app runs on Gadget’s own framework, so the move is a code rebuild, not a file copy. Hosting the rebuilt app is the short part.
Why move your Shopify app to xCloud
- Own your data. Your records live in a PostgreSQL database on your server and your code in your own Git repository, so you can move them any time without a rewrite. You won’t have to migrate the same app twice.
- Your server or ours. Connect a server from your own cloud account (Self-managed), or use one we supply (xCloud Managed). The panel is the same.
- Predictable billing. You pay per server per month, not per request, webhook or CPU second. xCloud Managed plans start at $5 a month per server; on your own server, the free tier covers one server with up to 10 sites. See pricing.
- Root access and full control. You get root through the dashboard terminal, sudo users and key-based SSH, so you can install anything your app needs. See Do You Provide Root Access To My Servers?.
- Security on by default. SSH lockdown, isolated system users per site, Fail2Ban and automated security updates are set up with the server.
- An easy panel. Git deploys, the
.enveditor, PostgreSQL, Supervisor workers, cron, SSL and monitoring are all in one dashboard. - Host anything. The same server can also run your other Node.js apps, Laravel or PHP, WordPress, Docker apps from Git and one-click apps.
Shopify apps already run in production on xCloud. If you want help moving yours, contact our team.
Before you start
Check the dates first, then gather the accounts you need. Gadget announced the wind-down on November 9, 2026:
| Date | What happens at Gadget |
|---|---|
| November 9, 2026 | Gadget announces the shutdown. New applications can no longer be started. |
| End of November 2026 | Last chance for a first-time deploy to production |
| End of 2026 | Gadget support stays available until the end of the year. After that, Gadget says it will focus on keeping the platform running and fixing critical issues. |
| March 31, 2027 | The platform shuts down |
Gadget says it will publish guides and tools for moving apps to other platforms and email its users when they are ready. Check your email before you start, in case something new is out.
You need:
- Access to your Gadget app and its environments.
- A Shopify Partner account or Dev Dashboard access for the app, with its Client ID and Client secret.
- A Git repository on GitHub, GitLab or Bitbucket for the rebuilt app. See How to Integrate a Git Provider with xCloud for private repositories.
- An Nginx server in xCloud with managed PostgreSQL Ready. See How to Install Managed PostgreSQL and pgAdmin in xCloud.
- A domain or subdomain for the app, such as
app.example.com. - A Shopify development store for testing.
Step 1: Inventory your Gadget app
Write down everything Gadget runs for your app before you change any code. Each row below becomes code, a setting or a process in the new app.
| Item | What to record |
|---|---|
| Models | Each model, its fields, and whether it holds Shopify data or app-only data |
| Actions on each model | What each action does and what triggers it |
| Global actions | Inputs, outputs and who calls them |
| Shopify webhooks | Every webhook topic the app handles, from your Shopify connection settings |
| Actions that run on a schedule | The schedule and what each run does |
| Environment variables | Every key (store the values somewhere safe, never in Git) |
| Access scopes | The full scope list from your Shopify connection |
| Frontend | Its pages, and every place that calls the Gadget API client |
Expected result: you have a list that accounts for every model, action, webhook topic, schedule, variable and scope in the app.
Step 2: Export the code with ggt
Use Gadget’s CLI, ggt, to copy the app’s files to your computer, then commit them to Git. Gadget’s source control guide covers it:
npx ggt@latest dev ./my-app --app=my-app   # first time: starts a two-way sync into ./my-app
npx ggt@latest pull                         # later: pull the latest files
Replace my-app with your app’s name. Stop the dev sync once the files are local, then commit the folder to a new repository branch, for example gadget-export.
ggt copies files only. Your app keeps running on Gadget, and the records in its database stay there. Export the records separately through your app’s GraphQL API in Step 4.
Expected result: the full Gadget source is in Git, and you can read every action and model file locally.
Step 3: Map Gadget features to standard code
Start a new app from Shopify’s React Router app template, then move your logic into it one piece at a time. Shopify CLI creates this template for new apps, and it already handles OAuth, sessions and App Bridge.
| What Gadget did | What replaces it in the new app | Where it runs on xCloud |
|---|---|---|
| OAuth and sessions | The template’s @shopify/shopify-app-react-router package with Prisma session storage |
The Node.js site, sessions in the site’s PostgreSQL database |
| A copy of Shopify data | Your own Prisma models, filled by webhooks and Shopify bulk operations (Step 4) | The site’s PostgreSQL database |
| Webhook registration | App-specific subscriptions in shopify.app.toml, released with shopify app deploy |
Your computer or CI, pointing at the site’s domain |
| Retries and duplicates | Handlers that save the job, return 200 fast and skip an X-Shopify-Webhook-Id they already processed |
A jobs table in PostgreSQL |
| Daily sync of recent data, which recovers missed webhooks | A scheduled job that asks the Admin API for records updated since its last run | A cron job on the server |
| Actions and global actions | Routes, webhook handlers and job functions | The Node.js site |
| Background actions | A worker process that reads the jobs table | A Supervisor process on the server |
gadget-server, the generated API client, @gadgetinc/react, @gadgetinc/react-shopify-app-bridge |
Prisma queries on the server; the template’s loaders, actions and App Bridge on the frontend | The Node.js site |
| Gelly queries and computed fields | Prisma queries or SQL views | The Node.js site and PostgreSQL |
Shopify expects a webhook response within five seconds and may deliver the same webhook more than once. Keep each webhook request short and make every handler safe to run twice. Shopify’s webhook troubleshooting guide and delivery headers cover both.
Check how the app stores its access tokens while you rebuild it. Shopify says public apps that still use non-expiring offline access tokens are blocked from new installs on January 1, 2027, and their API requests are rejected from April 1, 2027 (access tokens).
Expected result: the new app installs on your development store and loads in the Shopify admin on your computer, with each action from Step 1 moved to a route, handler or job.
Step 4: Rebuild your data
Store the app’s data in PostgreSQL with Prisma, fill Shopify data from Shopify, and export app-only data yourself.
- Switch Prisma from SQLite to PostgreSQL in
prisma/schema.prisma(provider = "postgresql",url = env("DATABASE_URL")), and create a fresh first migration. The exact commands are in Step 1 of How to Deploy a Shopify App on Your Own Server with xCloud. - Add a Prisma model for each Gadget model you recorded in Step 1.
- For Shopify data (products, orders, customers and so on), fill your tables after the app is installed with Shopify bulk operations. Then let webhooks and the daily sync job keep them current.
- For app-only data that exists only in Gadget (settings, records your app created), read it out of your Gadget app’s GraphQL API with an API key before the shutdown, then import it into PostgreSQL. Gadget’s open-source gadget-data-extraction tool (MIT) pages through every model’s records this way. It’s built for Fivetran, but its paging code works as a starting point for a one-time export.
Expected result: every model has a home in PostgreSQL, and you know which records come from Shopify and which you must export from Gadget.
Step 5: Deploy on xCloud
Deploy the rebuilt app as a Node.js site from Git, with PostgreSQL as its database engine. Every click and field is in How to Deploy a Shopify App on Your Own Server with xCloud. In short:
- Open the server, select Add New Site and choose Deploy via Git. Select Native app and the Node.js App Type.
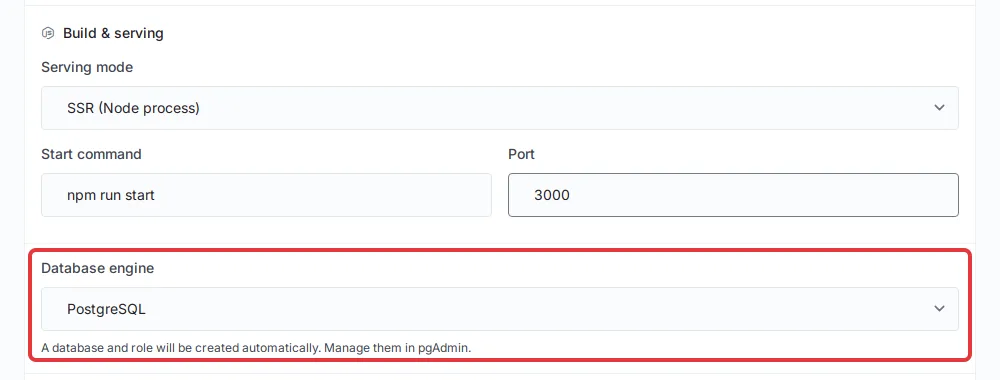
- In Build & serving, set Serving mode to SSR (Node process), the Start command and the Port.
- Set Database engine to PostgreSQL. xCloud creates the database and adds
DATABASE_URLto the site’s environment.
- In Environment file (.env), add the Shopify keys and the variables you recorded in Step 1. Leave out
DATABASE_URL. - Set the Build & deploy script, deploy, and add SSL to your domain.
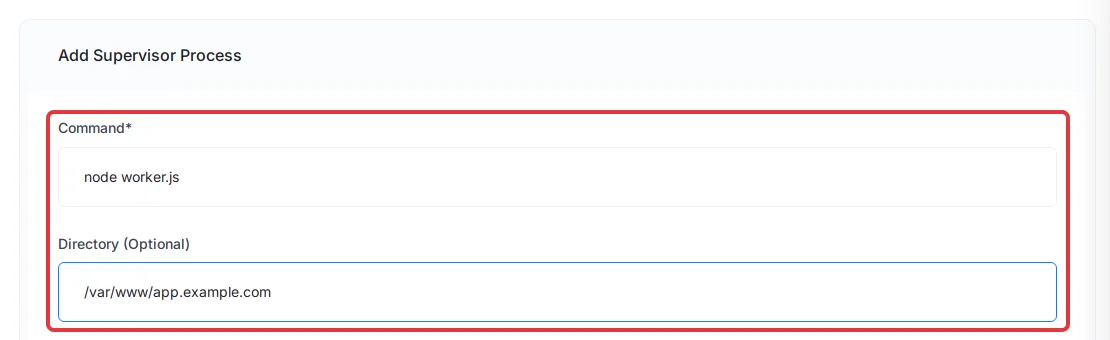
- Add the worker under Management → Supervisor → Add Supervisor Process, and the daily sync as a cron job. See Supervisor for Process Management and How to Add a Custom Cron Job in xCloud.
Expected result: the site is live on your domain over HTTPS, and the worker process shows as running.
Step 6: Switch the Shopify app over
Test the new URL with a development store first, then point the live app at xCloud. You keep the same Shopify app, so you keep its Client ID.
-
Install a separate development copy of the app (its own
shopify.app.tomlconfiguration) on a development store, pointed at the xCloud site, and test install, admin load and webhooks. -
In the live app’s
shopify.app.toml, setapplication_urlto your xCloud domain and change the host of eachredirect_urlsentry under[auth]to the same domain:application_url = "https://app.example.com" [auth] redirect_urls = [ "https://app.example.com/auth/callback" ] -
Check that every webhook subscription you need is declared in the same file, then release the configuration:
shopify app deploy
Shopify applies configuration you release with deploy to all stores in production, so admin loads, OAuth redirects and webhook deliveries move to the xCloud site. See Shopify’s app configuration reference for every option.
Expected result: opening the live app in a store admin loads it from your xCloud domain.
Step 7: Check and cut over
Watch the new app under real traffic before you stop anything on Gadget.
- Open the site in xCloud, go to Monitoring → Logs and select PM2 Log. Look for incoming webhooks and no repeated errors.
- Confirm the worker processes jobs and the cron job runs on schedule.
- Compare a sample of records in PostgreSQL with Shopify and with your Gadget app.
- Once the new app has handled a full day of webhooks and its data matches, stop the Gadget app’s scheduled actions so two copies don’t write the same data. Keep the Gadget app until you no longer need it for rollback or data checks, and before March 31, 2027.
Expected result: all traffic and webhooks reach xCloud, data matches, and the Gadget app no longer does any work.
Moving many apps
Move one small app first, write down what broke, then repeat the same checklist for the rest. For each app, track: code exported, Gadget-only code mapped, data plan written, rebuilt and tested on a development store, deployed, and switched. Put small apps together on one server, and give a busy app its own server so one merchant’s sale can’t slow the others.
Troubleshooting
| Symptom | Likely cause | Fix |
|---|---|---|
The rebuilt app fails on gadget-server or @gadgetinc/* imports |
Gadget-only code is still in the new app | Search the repository for those imports and replace each one (Step 3). |
| The app is blank inside the Shopify admin | SHOPIFY_APP_URL and application_url don’t match |
Set both to the same HTTPS address, update the site’s Environment page, redeploy, then run shopify app deploy. |
| OAuth fails with a redirect URL error | A redirect_urls entry still points at Gadget |
Change each entry to your xCloud domain and run shopify app deploy again. |
| No webhooks arrive | Subscriptions were registered by Gadget, not declared in shopify.app.toml |
Declare each topic in shopify.app.toml and run shopify app deploy. |
| Webhooks return 401 | The signature check uses the wrong secret | Set SHOPIFY_API_SECRET to the app’s current Client secret and redeploy the site. |
| The same order is processed twice | Gadget’s scheduled actions and the new cron job both run, or a handler doesn’t skip repeat deliveries | Stop the Gadget scheduled actions after cutover and skip webhook IDs you already handled. |
| Records are missing after the move | Shopify data was not backfilled, or app-only data was not exported | Run a bulk operation for the missing Shopify data, and export the app-only records from Gadget again. |
For deployments that fail or don’t start, see Troubleshooting Git Deployments.
Frequently asked questions
Can xCloud migrate my Gadget app for me?
No. xCloud has no import tool for Gadget apps, because a Gadget app has to be rebuilt as a standard Shopify app before it can run anywhere else. You do the code work in Steps 1 to 4. Our support team can help with the xCloud side: the server, the Node.js site, PostgreSQL, Supervisor and cron jobs.
Do I lose my data when Gadget shuts down?
Not if you export it first. ggt copies files only. Rebuild Shopify data from Shopify’s API, and export app-only records through your Gadget app’s GraphQL API before March 31, 2027 (Gadget’s open-source gadget-data-extraction tool shows how).
Is there a free plan?
Yes. xCloud’s free tier connects one server that you own and runs up to 10 sites. See the pricing page for what each plan includes.
Related xCloud documentation
- How to Deploy a Shopify App on Your Own Server with xCloud
- How to Deploy a Node.js Application with xCloud
- Connect Your App to PostgreSQL in xCloud
- Environment Variables (.env) and Git Deployments
- Supervisor for Process Management
- How to Migrate an Application from Railway to xCloud
- Pricing
Gadget and Shopify references
- Gadget: wind-down announcement
- Gadget: source control with ggt
- Gadget: reading data with the API
- Shopify: React Router app template
- Shopify: app configuration
- Shopify: webhook troubleshooting
- Shopify: webhook delivery headers
- Shopify: access tokens
- Shopify: bulk operations
If you run into any issues migrating from Gadget, feel free to reach out to our support team for help.