

How to check email logs in xCloud Mail Delivery
Updated November 15, 2026 · 5 min read
Email Logs shows what happened to every email your WordPress sites and apps sent through xCloud Mail Delivery: delivered, bounced or deferred, with the reason when it failed. You find it under Settings → My Purchases → Email Logs. Use it when a customer says an email never arrived, or when your email credits run down faster than you expect.
The page answers three questions:
- Did this email arrive? Search for the recipient and read the status.
- Why did it fail? Each bounced or deferred email shows the reason the recipient’s mail server gave.
- Is something sending too much? The daily chart shows a sudden rise, for example a contact form that a bot keeps submitting.
Before you start
- Your team uses xCloud Mail Delivery. The log covers only emails sent through it, not emails sent through another SMTP provider.
- You are the team owner, or a team admin with the permission to view email logs. The team owner has it automatically. Other admins get it in Team Management.
- Email Logs does not appear on a white label dashboard.
Step 1: Open Email Logs
Click Settings in the left menu. In the settings menu, scroll to Plans & billing and click My Purchases → Email Logs.
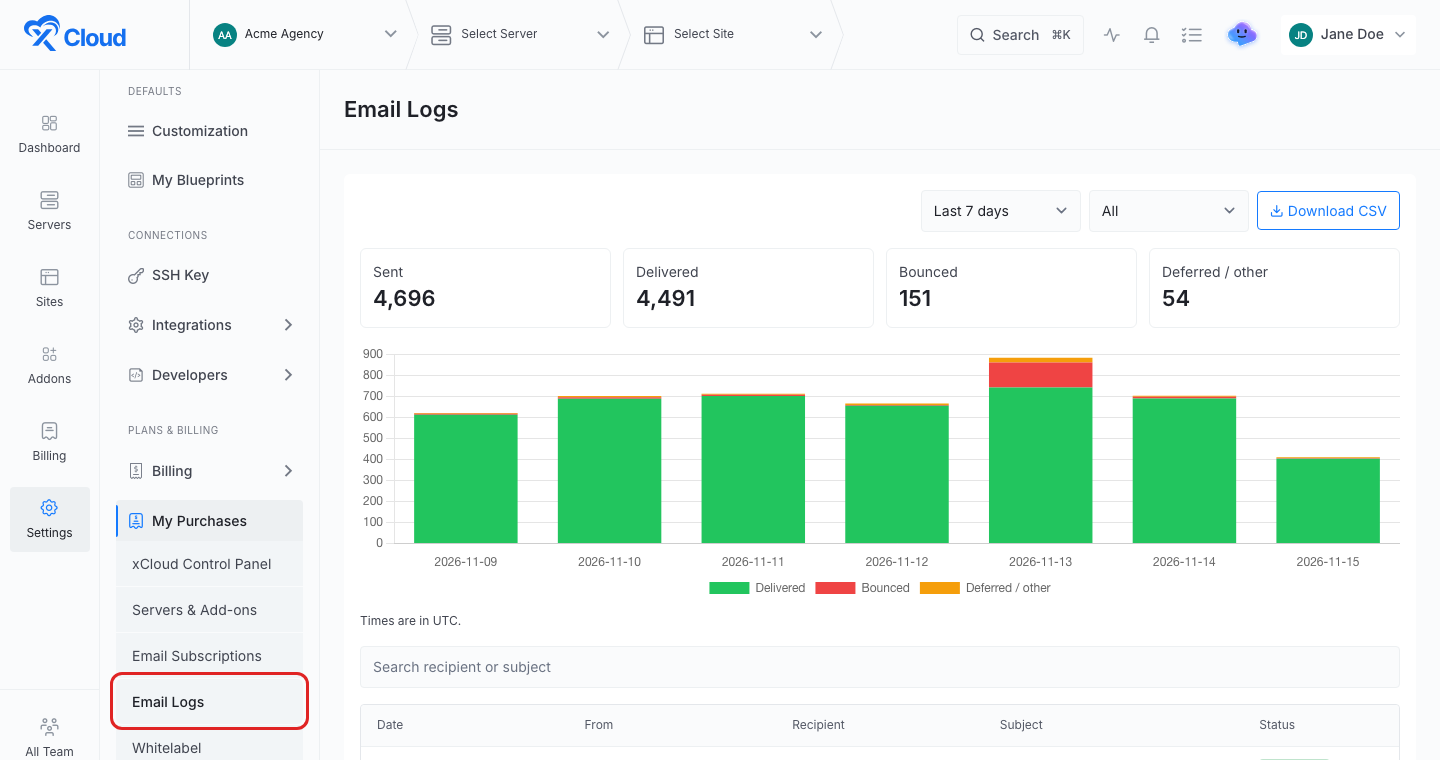
You can also open it from My Purchases → Email Subscriptions: under your email totals, a line such as Last 7 days: 4,696 sent · 151 bounced sits above the View email logs button.
Expected result: The Email Logs page opens with the last 7 days of email.
Step 2: Read the totals and the daily chart
Pick a period in the first dropdown: Today, Last 7 days or Last 30 days. The page then shows four totals for that period:
| Total | What it counts |
|---|---|
| Sent | Every email your team sent through Mail Delivery |
| Delivered | Emails the recipient’s mail server accepted |
| Bounced | Emails the recipient’s mail server rejected |
| Deferred / other | Emails that were delayed or failed for another reason |
The chart below the totals has one bar per day, split into Delivered, Bounced and Deferred / other. Hover over a bar to see the count for that day.
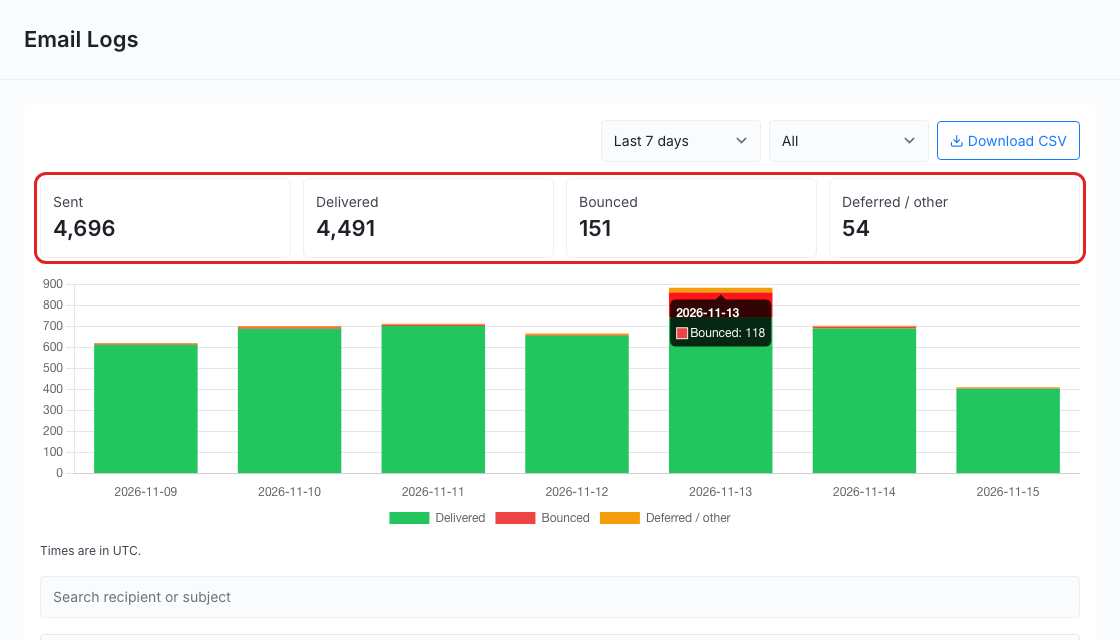
Expected result: You know how many emails went out in the period and on which days. A bar that is much taller than the others, or has a large red part, points to the day to look at.
All dates and times on the page are in UTC.
Step 3: Filter by status to see why emails failed
Open the second dropdown and pick Bounced or Deferred / other. The table now lists only those emails, newest first, with Date, From, Recipient, Subject and Status. The reason from the recipient’s mail server appears under the subject.
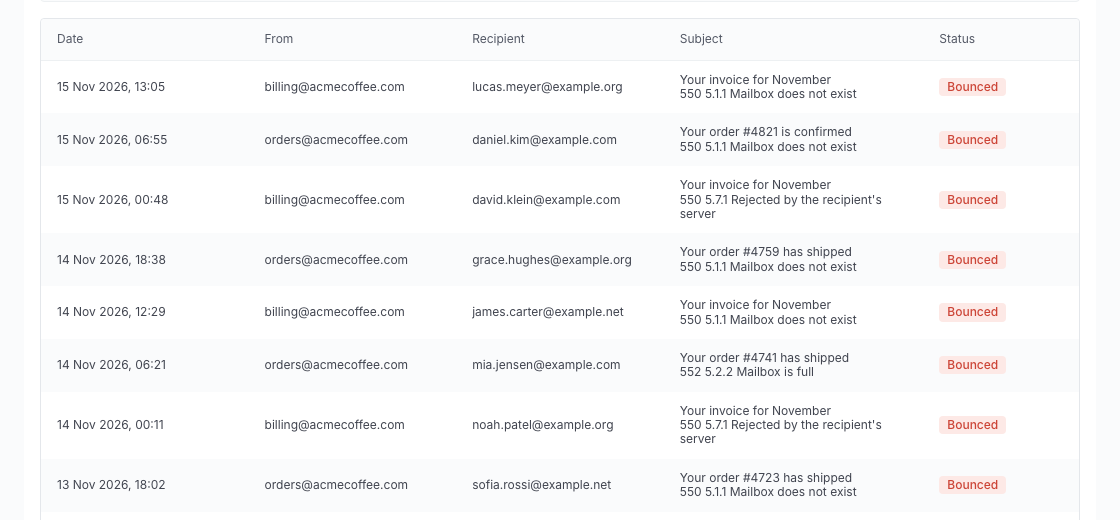
Expected result: Each failed email shows why it failed. The wording comes from the recipient’s mail server, so it varies. Common cases:
| The reason says | What it means | What to do |
|---|---|---|
| The mailbox does not exist | The address is wrong or was deleted | Ask the customer for the right address |
| The mailbox is full | The recipient has no space left | Ask the recipient to free up space, then send again |
| The server rejected the email | Their mail server refused it | Check your domain’s SPF, DKIM and DMARC records on the site’s Email Config → Mail Delivery page |
The table shows 50 emails per page. Use Next and Previous to move between pages.
Step 4: Search for one email
Type an email address, part of an address or a word from the subject in Search recipient or subject. The table updates as you type. The search works together with the period and the status you picked.

Expected result: You see the emails that match, each with its status and reason. If nothing matches, the page says No emails match your search. Pick a longer period or set the status back to All, then search again.
Step 5: Download the log as a CSV
Click Download CSV. xCloud prepares the file for the period, status and search you have selected, and the button changes to Preparing your CSV…. When the file is ready, click Download.

Expected result: You get a CSV file with these columns: Date, From, To, Subject, Status, Reason and TransactionID.
A CSV holds up to 200,000 rows. If your period has more, the page says the CSV holds only the most recent events. Choose a shorter period to get the rest. If the page says another CSV is still being prepared, wait for it to finish and try again.
If something looks wrong
| What you see | Why | What to do |
|---|---|---|
| Email logs appear here once this team has Mail Delivery. | Your team has no xCloud Mail Delivery plan yet | Set up Mail Delivery first |
| No emails in this period. | Nothing was sent through Mail Delivery in the period | Pick a longer period, or check that the site uses Mail Delivery under Email Config → Mail Delivery |
| Showing the most recent emails only. Download the CSV for the full period. | The period has more emails than the page reads at once | Download the CSV, or pick a shorter period |
| We couldn’t load your email logs right now. Please try again in a few minutes. | The log could not be read at that moment | Wait a few minutes and reload the page |
| A message that your current API key no longer works | The team’s Mail Delivery key was replaced or switched off | Contact our support team |
| Email Logs is not in the settings menu | You don’t have the permission, or you are on a white label dashboard | Ask your team owner for the permission in Team Management |
Sites that send through another provider are not in this log. To check them, use Check FluentSMTP on the site, as described in setting up site emails for WordPress.
For developers: API and MCP
The same log is available through the xCloud API and to AI agents connected through xCloud MCP.
- Permission: the API token needs
read:email-logs. Full Access includes it and no other permission does. Signing in an MCP client with your xCloud account does not grant it, so the agent needs an API token withread:email-logsandmcp:invoke. See how to access the xCloud API. - List emails:
GET /email-logswithfromandto(dates in UTC, at most 35 days apart), and optionalstatus(delivered,bounced,other),searchandpage. - Totals and daily counts:
GET /email-logs/summary. - CSV:
POST /email-logs/exportsstarts a file,GET /email-logs/exports/{exportUuid}shows its progress, andGET /email-logs/exports/{exportUuid}/downloadreturns it.
curl -H "Authorization: Bearer YOUR_API_TOKEN" -H "Accept: application/json" \
  "https://app.xcloud.host/api/v1/email-logs?from=2026-11-09&to=2026-11-15&status=bounced&[email protected]"
With an agent connected, you can ask in plain words, for example “Did the order email to [email protected] arrive?” The agent reads the log and answers with the status and the reason. The AI Assistant inside the xCloud dashboard does not read email logs.
Frequently asked questions
How do I check if an email from my WordPress site was delivered?
Open Settings → My Purchases → Email Logs, type the recipient’s address in Search recipient or subject and read the Status column. Delivered means the recipient’s mail server accepted the email. Bounced and Deferred / other show the reason under the subject.
Why is Email Logs missing from my settings menu?
Email Logs appears for the team owner and for team admins who have the permission to view email logs. It does not appear on a white label dashboard. Ask your team owner to give you the permission in Team Management.
Do the email logs include emails sent through my own SMTP provider?
No. Email Logs lists only the emails your team sends through xCloud Mail Delivery. For a site that uses another provider, such as toSend or Mailgun, check that provider’s own log or the FluentSMTP email log on the site.
Can I see which site sent an email?
The log covers your whole team and has no site column, because one sender address can serve many sites. Use the From address and the subject to tell which site sent an email.
If you run into any issues with Email Logs, feel free to reach out to our support team.