

How to Deploy Gitea With xCloud One Click Apps
Updated November 9, 2026 · 5 min read
Gitea is a self-hosted Git server with repositories, pull requests, issues, a wiki and a package registry. On xCloud you install it from One Click Apps and it runs in Docker on an Nginx server, with its own HTTPS address. The install form creates your first admin account, so you can sign in as soon as the site is ready. For server sizes and prices, see Gitea hosting on xCloud.
What you get
The One Click App installs Gitea 1.27.3 as a single Docker container.
| Part | What it does |
|---|---|
| Gitea web app | The web interface and Git over HTTPS, on your site’s domain |
| SQLite database | Stores users, issues and settings, with no separate database server |
gitea_data volume |
Keeps the database, repositories, packages and settings when the app restarts or updates |
Keep these limits in mind before you start:
- HTTPS only. Cloning and pushing over SSH is turned off.
- No sign-up page. Only the admin account exists at first. You add other users from Site Administration in Gitea.
- No Actions runner. Actions workflows need a runner you connect separately.
The install page recommends 4 GB RAM, 1 vCPU and 4 GB disk. That is the minimum for a managed server you buy from xCloud. A server from your own provider, or one you already have, can run Gitea with 1 GB RAM and 1 vCPU, as long as it has at least 4 GB of free disk space.
Step 1: Choose Gitea
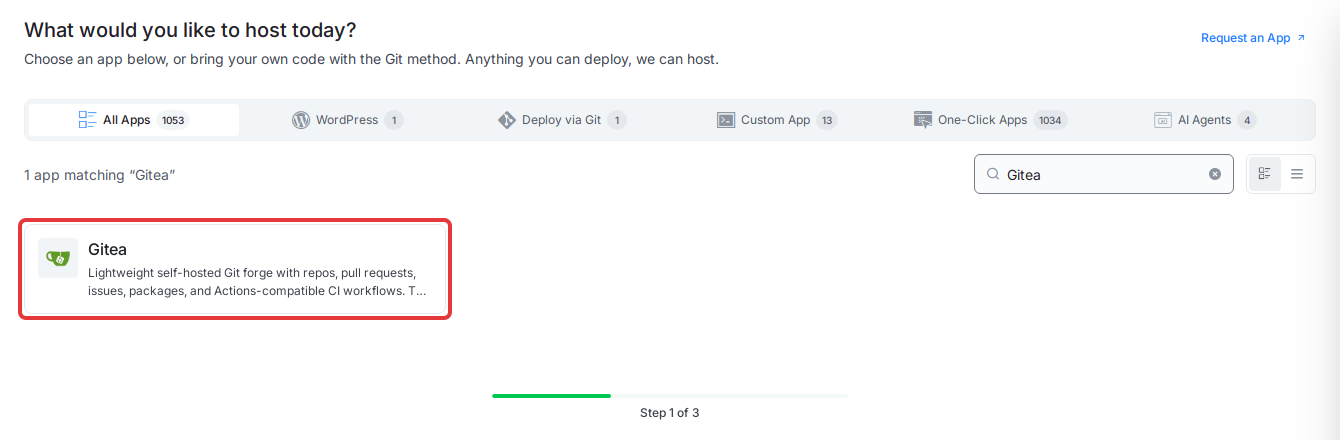
In your xCloud dashboard, click New Site. Type Gitea in the search box and click the Gitea card.
Step 2: Pick a server
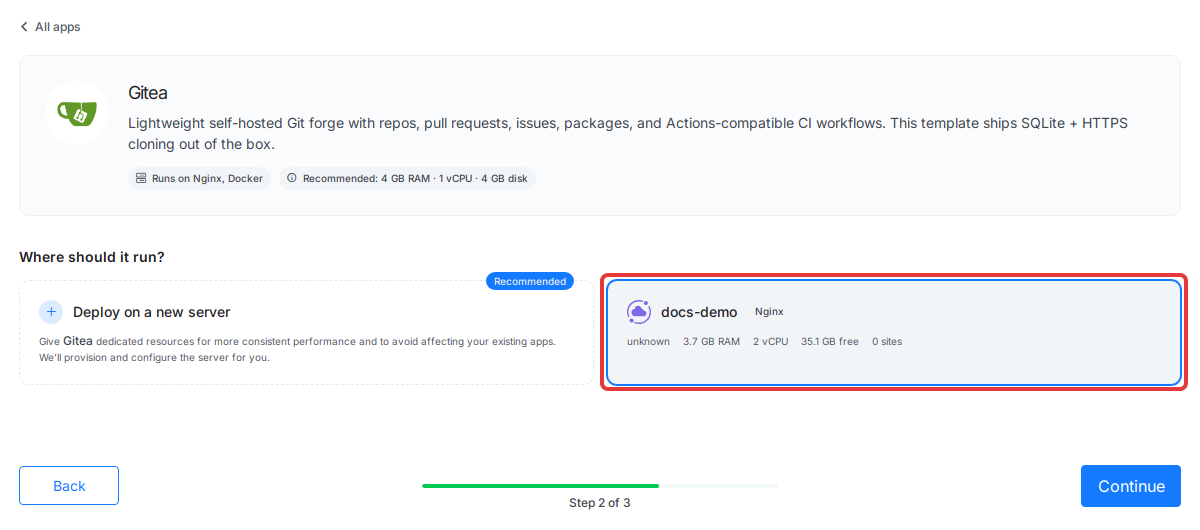
Under Where should it run?, choose one of these:
- An existing server: select one of your Nginx servers and click Continue.
- A new server: click Deploy on a new server (or Create Managed Server) and follow the server form.
- A server from your own provider: if none of your servers can run Gitea yet, click Connect a Provider and create the server. When it is ready, click Continue on the Finish installing Gitea message on the server page, then pick the server here.
Step 3: Add the site details and domain
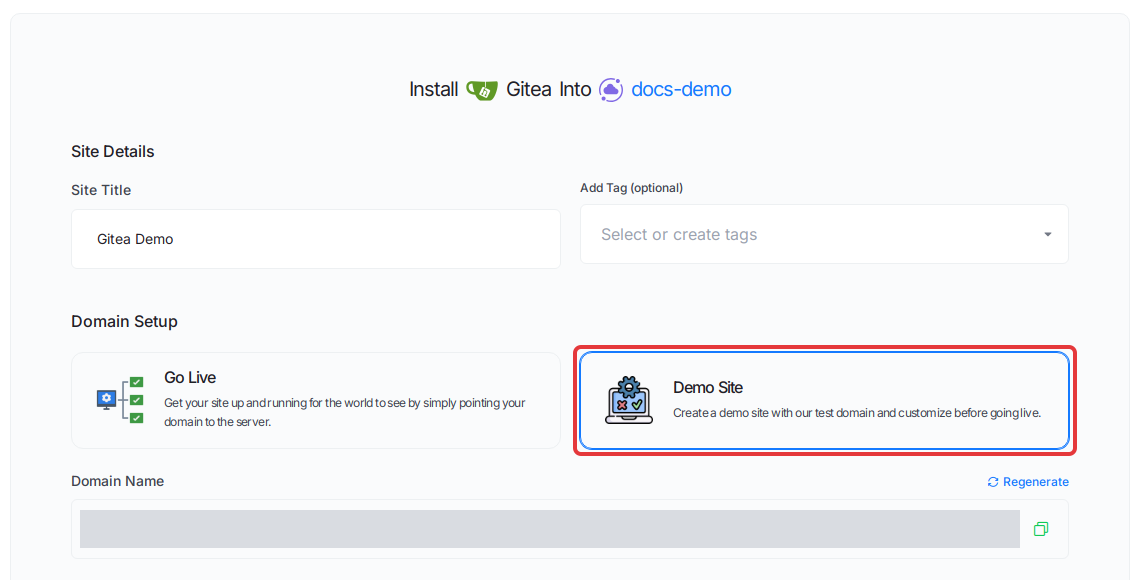
Enter a Site Title and, if you like, add a tag. Under Domain Setup, choose one of these:
- Go Live: use your own domain. Point it to your server first.
- Demo Site: use a test domain from xCloud, and move to your own domain later.
Step 4: Set the admin account and install
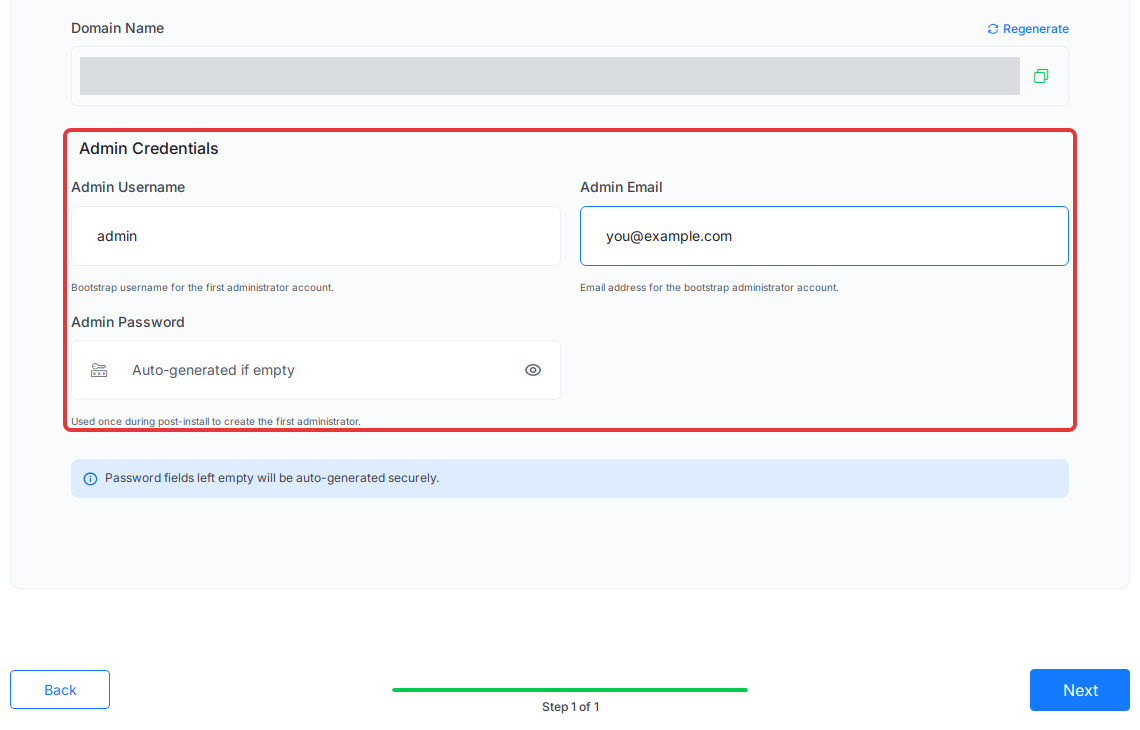
Under Admin Credentials, fill in the account you’ll sign in with:
- Admin Username: starts as
admin. Change it if you like. - Admin Email: the email for the admin account.
- Admin Password: leave it empty and xCloud creates a strong password for you.
Click Next. xCloud shows the setup progress while it installs Docker if needed, starts Gitea and adds the SSL certificate.
Expected result: The site’s Site Overview page shows Gitea Credentials and a message that Gitea is ready at your site’s address.
Step 5: Sign in to Gitea
Steps 5 and 6 follow the Gitea template’s first-run notes and the credentials panel in xCloud. We have not run them on a live install yet, so they have no screenshots.
Open the site in xCloud. Site Overview shows Gitea Credentials with these fields:
- URL: your Gitea address.
- Username: your admin username.
- Email: your admin email.
- Password: your admin password. It stays hidden until you click the eye icon beside it. You can also click the copy button without showing it.
Open the URL and sign in with those details. Then create your first organization or repository from the Gitea dashboard.
Expected result: Gitea opens your dashboard, signed in as the admin. There is no setup wizard, because xCloud has already finished the install.
Step 6: Clone your first repository
Clone over HTTPS with the address Gitea shows on the repository page:
git clone https://example.com/your-user/your-repo.gitWhen Git asks for a password, use your Gitea password or a personal access token.
To create a token in Gitea, go to Settings → Applications and use Generate New Token. Give it read and write access to repositories if you plan to push. Gitea shows the token only once, so copy it straight away.
Expected result: Git copies the repository into a new folder named after it. If the repository is new and empty, Git warns that you cloned an empty repository, which is normal.
Change the admin password later
The admin details in the install form are used once. Changing them later in the site’s Environment page does not change your login.
To set a new password, use the command in the warning at the top of the Environment page. It already has your site name in it. To run it, open the server’s web terminal: click Open Terminal on the server’s overview page. It runs in your browser and needs no SSH setup. If you already use SSH, you can connect as a sudo user instead. The site’s own user can’t run Docker commands, so use a server terminal, not the site one. Put in your admin username and new password, and run it with sudo:
sudo docker exec gitea-YOUR_SITE_NAME su git -c 'gitea --config /data/gitea/conf/app.ini admin user change-password --username "YOUR_ADMIN_USERNAME" --password "YOUR_NEW_PASSWORD"'Expected result: Your new password signs you in to Gitea, and the old one no longer works.
Update and back up Gitea
xCloud doesn’t update Gitea on its own. Your install stays on Gitea 1.27.3, and App Actions → Update pulls that same version again.
To move to a newer version:
-
Pick a version on Gitea’s releases page and read its release notes for breaking changes. As of November 2026, Gitea has dropped the
1.from its version numbers, so check the 28.0.0 release notes too when you move from 1.27.3. -
Back up the app. Gitea says you can’t run an older version on an upgraded database, so this backup is your way back.
-
Open the site’s Compose page and copy the current file somewhere safe.
-
Replace the full
image:line, including the@sha256part, with the new version. Write the number with novin front, such as28.3.0:image: gitea/gitea:NEW_VERSIONThe
@sha256part locks your app to one exact version. If you leave it in, you keep the old version even after you change the number. -
Click Save & Redeploy and confirm.
Expected result: xCloud shows Saved — redeploy in progress and recreates the container. When it finishes, the footer of any Gitea page shows the new version number. xCloud doesn’t check that the app still works after this edit, so sign in and open a repository to confirm.
The Compose page needs its own team permission. The team owner has it, and other members need a team admin to grant it. For details and how to undo a bad edit, see update a One Click App and edit its Docker Compose.
Everything Gitea stores lives in the gitea_data volume: the database, repositories, packages and settings. Back it up as described in back up and restore Docker apps.
Frequently asked questions
Can I clone and push over SSH?
No. The Gitea One Click App works over HTTPS only. Clone and push with your Gitea username and password, or with a personal access token.
Can people sign up on my Gitea site?
No. Public sign-up is turned off, so the only account at the start is the admin you set in the install form. To add other people, sign in as the admin and create their accounts from Site Administration in Gitea.
Does the install include a runner for Gitea Actions?
No. No runner is installed, so Actions workflows don’t run until you connect a runner of your own.
Does changing the admin details in Environment change my login?
No. The admin username, email and password are used once, when the site is created. To set a new password, run the command shown on the site’s Environment page.
Related guides
- Use One Click App templates in xCloud
- Manage One Click App domains
- How to self-host Gitea
- All One Click Apps
If you run into any issues while deploying Gitea, feel free to reach out to our support team.